It's well documented that if you want to build a successful e-commerce business, then a recurring revenue model is the way forward. Selling WooCommerce subscription products can be much more profitable than charging for each purchase as a one-off.
After all, your marketing costs are the same whether the customer makes a one-off purchase or a regular subscription. But with an ongoing subscription, that same customer is paying you every week, month or year (depending on your billing schedule and business model) on top of sign-up fees – for no extra customer acquisition or marketing costs.
WooCommerce Subscriptions is the official extension for taking recurring payments in your WooCommerce store. It provides an easy way to create subscription products and sell them on a daily, weekly, monthly or annual basis. It comes with all the subscription management features you'll ever need, such as the option to add a free trial period and one-off sign-up fees on top of the regular subscription payment and subscription renewals. Your customers will be billed automatically for their regular subscription fees using your chosen payment method - whether this is PayPal, Stripe, or another payment gateway. This means you can enable automatic payments.
WooCommerce Subscriptions integrates nicely with our top selling WooCommerce Product Table and Quick View Pro WordPress plugins. Used together, your subscriptions are listed in a searchable, sortable table view with filters and quick view lightboxes
I'm going to tell you more about the benefits of using WooCommerce Product Table and Quick View to list subscription products. I'll also explain exactly how the two plugins work together and where to get them.
The downside of WooCommerce Subscriptions
I think that WooCommerce Subscriptions is a fantastic WP plugin. We've used it on lots of our clients' websites and helped them to build recurring revenue for their business. However, it does have one major problem.
The problem: You can only buy subscriptions on the single product page
The Subscriptions recurring payments plugin just lists subscription products or downloadable product in the same layout as any other WC product. The only difference is that the 'Add to Cart' button is replaced with some other text. Customers have to click through to the single product page to see information such as the product description and other useful data. That's fine for some types of subscription, but others will sell better with a different type of layout.
For example, what if you want subscribers to be able to view your subscription products alongside one another and make comparisons? Well, that's not possible with the default layouts because you have to click through to the single product page for full details.
What if you want customers to subscribe without having to visit a separate page for each product?
Solution 1: List WooCommerce subscription products with the WooCommerce Product Table plugin
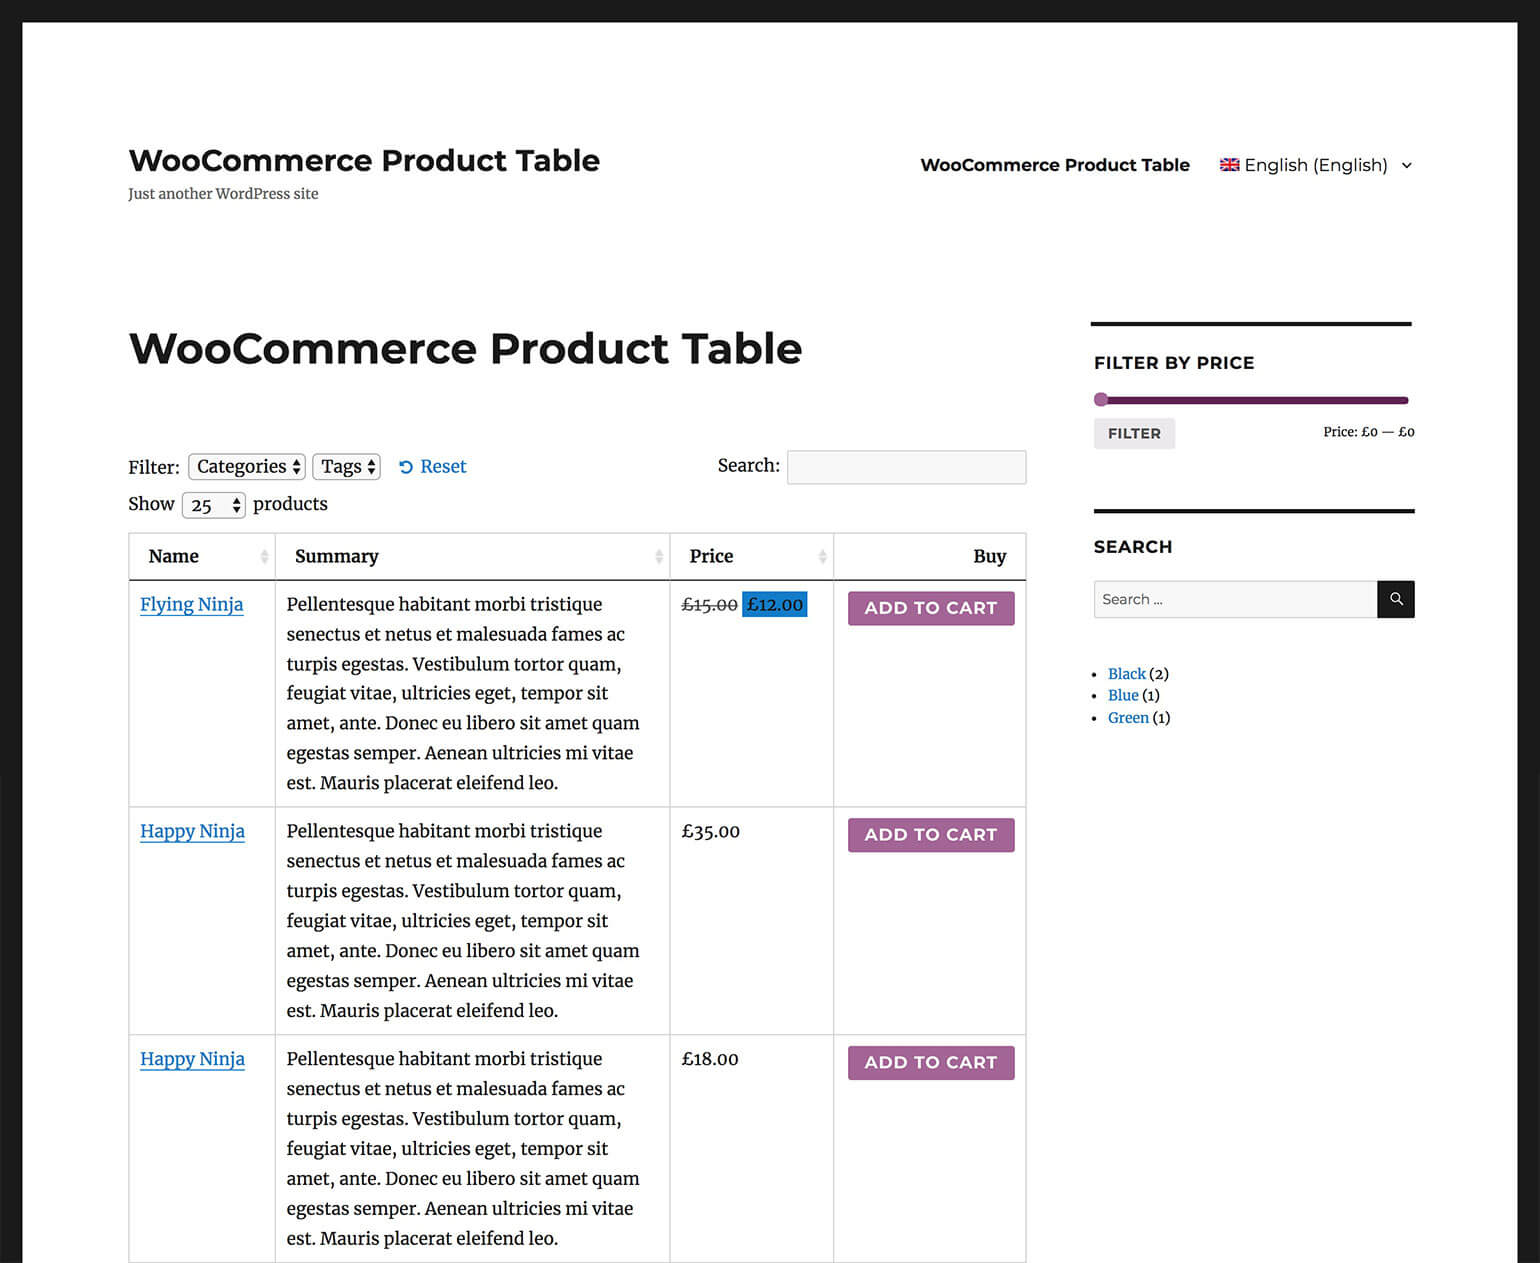
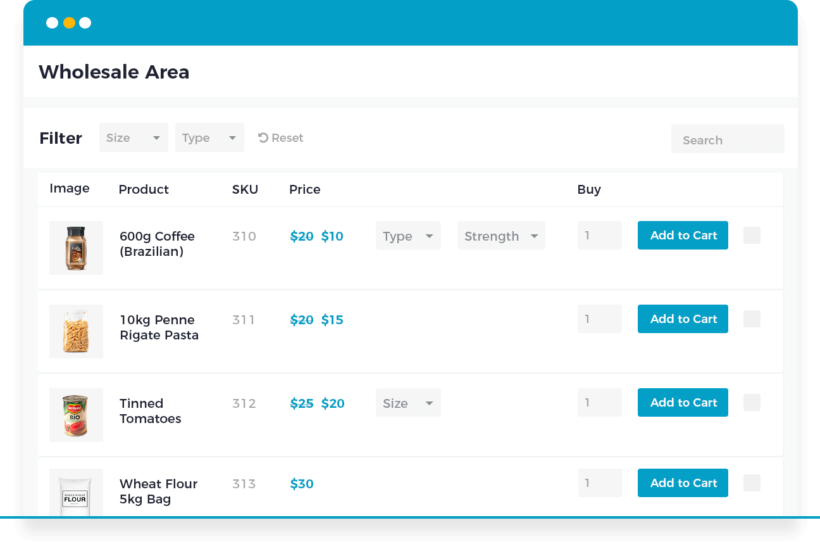
WooCommerce Product Table lists each subscription product on a separate row in the table layout. Subscribers can easily view the subscription pricing, make comparisons, and add to the cart without having to click elsewhere. Every time you add a new subscription or new product, it'll automatically appear in the product table.
It's an ideal way to increase the recurring revenue from your online store.
WooCommerce Product Table has over 50 options for choosing how to list your subscription products. Here are some of the most important ones to use with WooCommerce Subscriptions:
Display add to cart buttons directly in the subscription product list. Customers can choose a quantity and buy directly from the product table view.
You can choose your columns to show extra data about each subscription directly in the table. This means that customers can choose a subscription without having to click elsewhere.
Add filter dropdown lists above the table or filter widgets in the sidebar. This lets customers quickly find a subscription product based on category, tag, attribute, and other data.
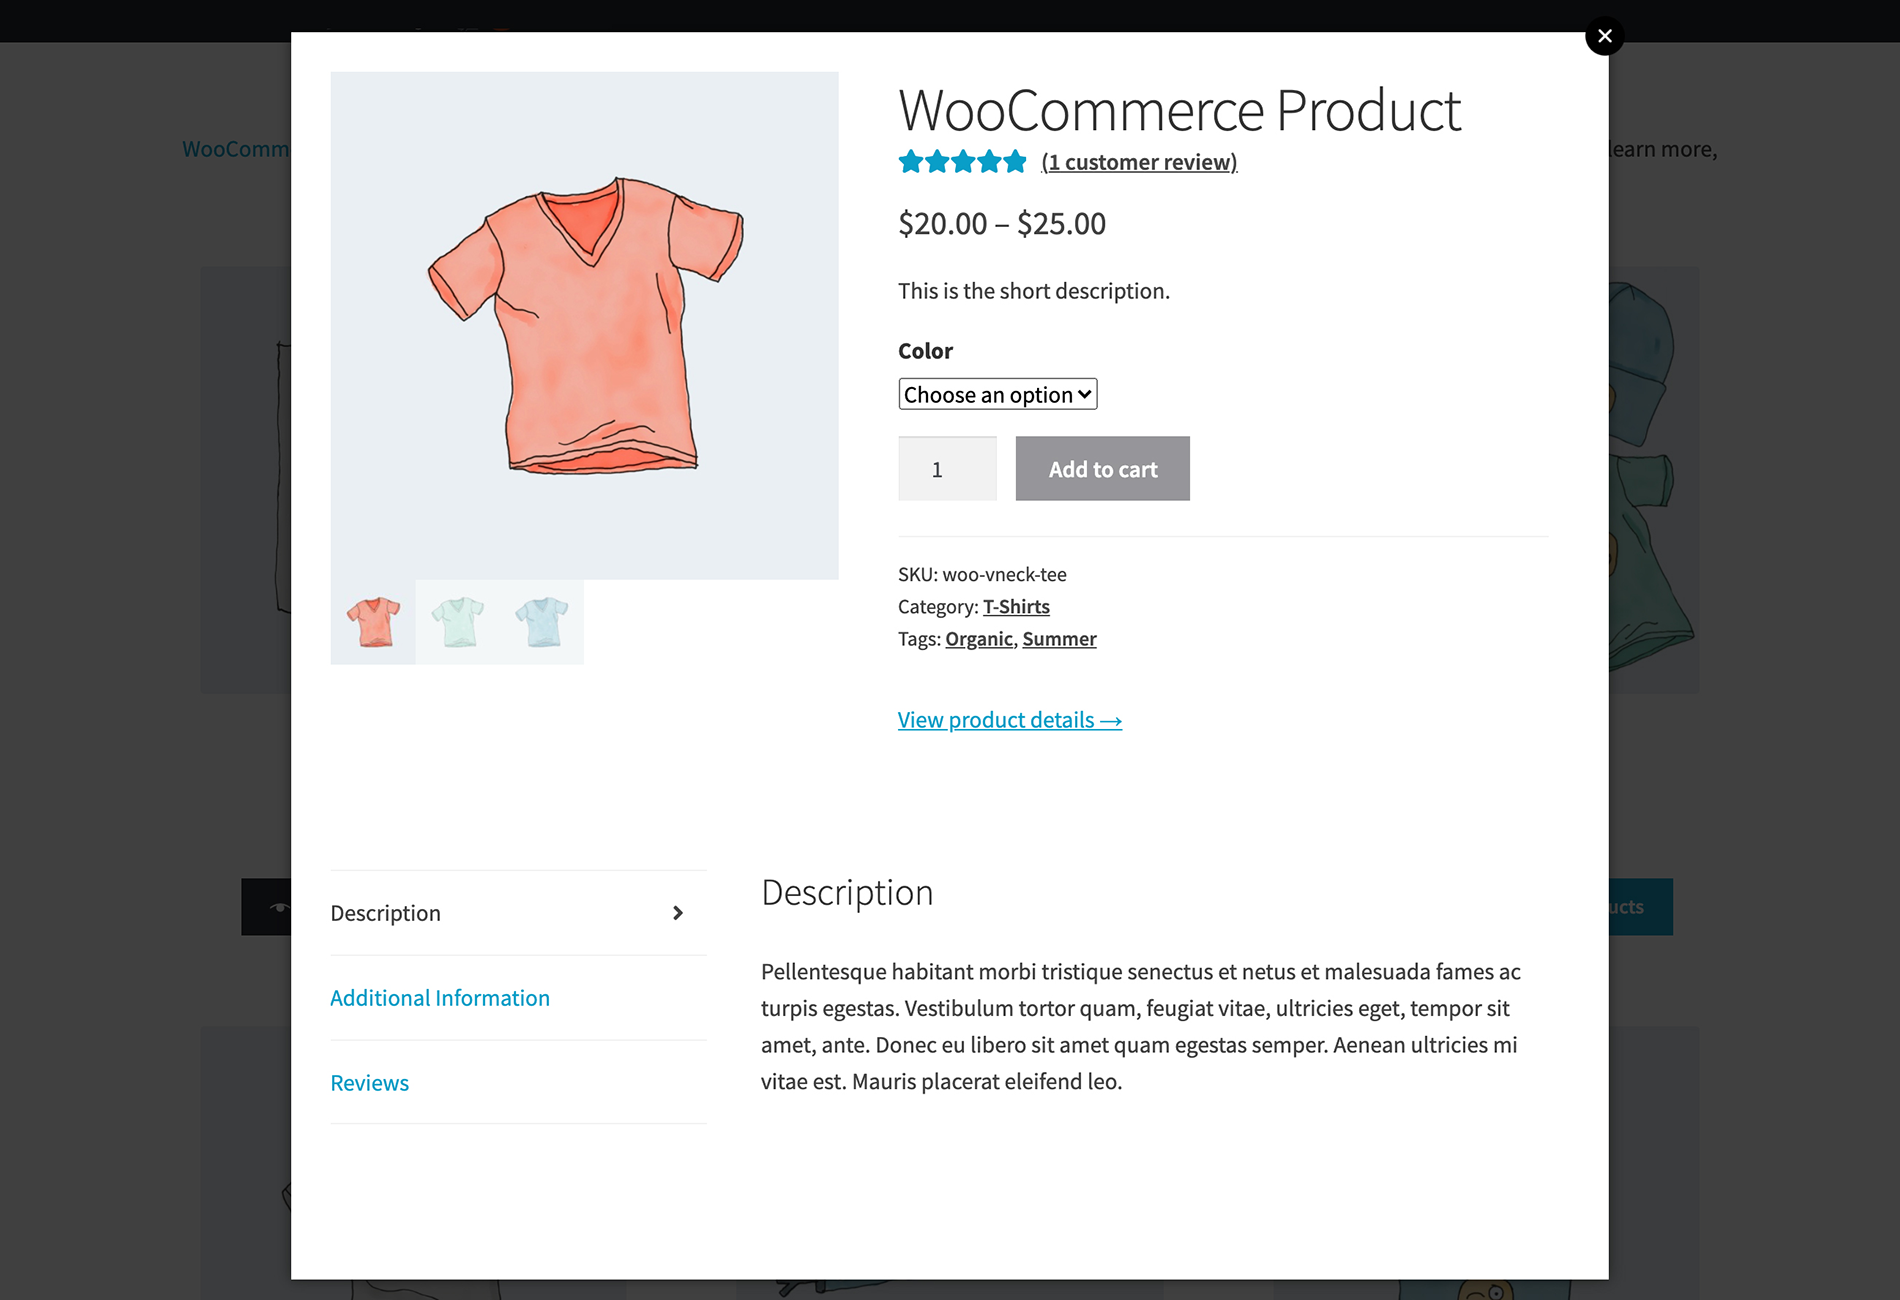
Solution 2: Sell subscriptions in a WooCommerce Quick View lightbox
Alternatively, you can sell subscriptions outside of the single product page by adding the WooCommerce Quick View Pro plugin. This adds quick view buttons for each product. Customers can use these to view extra information in a lightbox window. They use the lightbox to choose variations and add subscriptions to the cart, without having to visit a separate page.
Can I use solutions 1 and 2 together?
Absolutely!
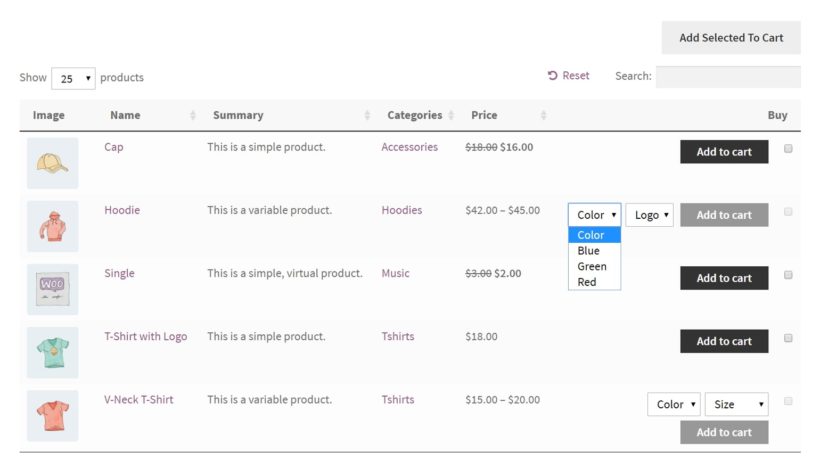
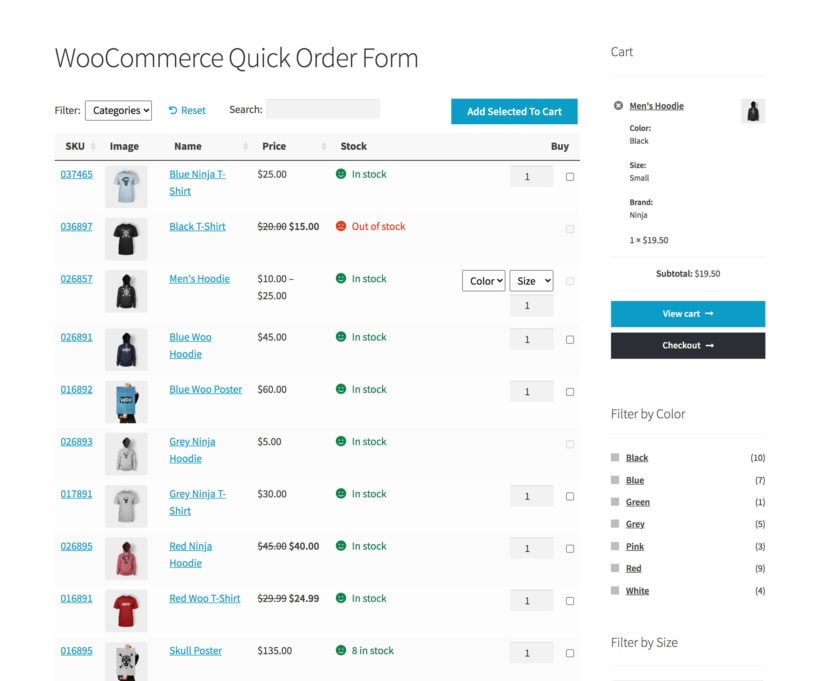
You can use WooCommerce Product Table and Quick View Pro together. Your subscription products will be listed in a table layout, with or without add to cart buttons. The tables can also contain quick view buttons or links so that customers can also purchase subscriptions from the lightbox. It'll look just like this on the front-end:
How to list WooCommerce subscriptions in a product table
WooCommerce Subscriptions and WooCommerce Product Table work together automatically. You don't have to do any extra setup to use them together.
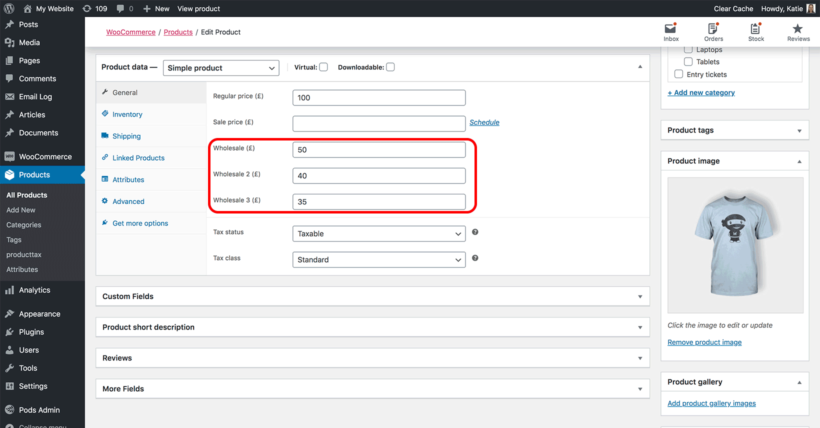
Simply install the WooCommerce Subscriptions plugin and set up your subscription products. This is really easy - just choose 'Simple subscription' from the dropdown in the 'Product data' section when you create a product. You can then choose your subscription amount, frequency and add a free trial period and setup free if required.
Once you've done that, install WooCommerce Product Table and go to Products → Product Table to create your first product table. Make sure you include a 'Price' and 'Buy' column. This is where the subscription product information and pricing will appear.
Now view the product table page. You'll see the subscription information listed in the 'Price' column. The plugin has replaced the text in the add to cart button with the wording that you can configure on the WooCommerce Subscription plugin settings page. When a customer adds a subscription product to the cart, the recurring payment (made through PayPal, Stripe, credit card, or a different payment gateway) will be correctly passed through. The subscription information will appear in the cart, checkout and in order confirmation email notifications. Perfect!
How to use WooCommerce Subscriptions with Quick View Pro
WooCommerce Subscriptions is fully compatible with WooCommerce Quick View Pro. As a result, you can use the two plugins together and let customers buy subscriptions from the quick view lightbox.
The plugins work together with no special configuration. This means that you simply set them both up in the usual way, and the subscription options will automatically appear in the lightbox. Just make sure you enable the Add to Cart buttons on the quick view plugin settings page.
Both of these WordPress memberships plugins let you restrict access to an exclusive members-only area on your website. They work in slightly different ways, so check out this comparison to help you choose. In a nutshell, both plugins work by creating a WooCommerce product for each type of membership or subscription plan that you wish to sell. For example, if you want to sell access to 3 different areas on your website, then you would create a membership product for each one and list them individually using WooCommerce Product Table. Customers can choose the membership options they require and add them all to the cart, directly from the product table view.
Used without WooCommerce Subscriptions, WooCommerce memberships lets you take one-off payment for access to hidden content on your website. You can use it with the Subscriptions plugin to get ongoing revenue from your membership site, e.g. to take recurring annual subscription payments. This is obviously a better business model than one-off access!
Variable subscriptions
WooCommerce Product Table works perfectly with standard subscription products. It does not integrate with variable subscription products.
If you'd like to offer different options for your WooCommerce subscription products, then there are two simple workarounds:
Workaround #1 - Use WooCommerce Quick View Pro
If you're selling variable subscriptions, then you can list these successfully in a product table without an add to cart column. Instead, install the WooCommerce Quick View Pro plugin and add a quick_view column to the product table.
Customers can click on the button to select variations and buy variable subscriptions from the quick view lightbox. This makes the subscribing process incredibly easy.
Workaround #2 - Use All Products for WooCommerce Subscriptions
Alternatively, you can use the All Products for WooCommerce Subscriptions plugin to sell variations for your simple subscriptions. This allows you to sell variations directly in the add to cart column of the product table, without the problems that you get with variable subscriptions:
Set up the product as a 'Variable product', NOT a 'Variable subscription'. Add your attributes and variations in the usual way.
Install the All Products for WooCommerce Subscriptions add-on for WooCommerce Subscriptions. This handy plugin lets you add subscriptions options to normal variable products, instead of having to use the 'Variable subscriptions' product type.
Click the 'Subscriptions' tab near the bottom of the Product Data section. Set up your subscription options as required.
Your variable simple subscription product will appear in the product table. If you just offer one subscription option then this will automatically be passed to the cart when the customer selects a variation. If you offer a choice of subscription options (e.g. weekly and monthly subscriptions) then these will appear as radio buttons when the customer chooses a variation:
Where to get the subscription plugins
As you can see, WooCommerce Product Table is the perfect way to display your subscription products. Customers can quickly look through the list of subscription options and add their subscriptions straight to the cart. No need to visit the single product page!
You can get the plugins by clicking on these links:
Customers love their favorite brands. That's why you need the best WooCommerce brand plugins to display product by brand, allow them to filter by brand, and more.
In the world of e-commerce, product branding is a critical element in building a strong online presence. For businesses using WooCommerce, showcasing your product brands effectively can make a significant difference in attracting and retaining customers.
WooCommerce comes with a built-in 'Brands' taxonomy which lets you display the brand of each product in your store. In this article, I'll tell you about 2 awesome plugins which will help your customers to find and view customers by brand more easily:
WooCommerce Product Table - Display products in a quick order form complete with information about their brand. Customers can view products by brand, sort by brand, and more.
Product Filters - Allow customers to filter products by their favorite brand.
By the end, you will have a solid understanding of how to use these tools to showcase your product brands effectively and improve your online store's performance.
How to use the built-in WooCommerce Brands taxonomy
This is how to add brands to your WooCommerce products:
Go to Products → Brands.
Set up your brands.
Find the 'Brands' section on the right hand side of the Add/Edit Product screen. Select a brand for each product as needed.
As you can see, working with WooCommerce brands is really easy.
Limitation of WooCommerce Brands
While the built-in WooCommerce brands are everything you need to tag each product with brand information, it's not ideal for displaying products by brand. For example, it can't:
Keep reading to discover two plugins that work alongside WooCommerce brands to fill these gaps.
List and sort products by brand
WooCommerce Product Table is our flagship plugin here at Barn2. It works by listing your WooCommerce products in an interactive table or one-page order form. It comes with extra features such as customizable columns, search box, product variations support and more. The table plugin also provides more sophisticated ways to allow WooCommerce users to filter by brand.
Product table views are a popular way to increase conversion rates. They can boost your sales because it makes the buying process quicker and easier. Customer can quickly view all your products on a single page. They can see all the information they need (including brand, if you're using the WooCommerce Brands plugin). This lets them add to the cart without having to click elsewhere.
One of WooCommerce Product Table's biggest selling points is its ability to show extra data directly on the product listing page. It supports all the standard WooCommerce product data such as name, price, add to cart, description, short description, attributes, variations - the list goes on. However, the WooCommerce core doesn't come with a brands field. That's why you need to use it with the WooCommerce Brands plugin to display product brands in a table.
Once you have created a product table with a brand column, customers can click on the column header to instantly sort products by brand.
How to Use WooCommerce Brands with WooCommerce Product Table
Tag your products with their brand, as described earlier in this WooCommerce brands tutorial.
Next, use the plugin documentation to create brands and assign them to your products. This is really easy - just look for the 'Brands' section on the right of the Add/Edit Product screen.
The table builder will open when you activate the plugin, or you can create a table later via Products → Product Tables.
Use the table builder to choose set up your product table. Specifically:
On the first page, choose whether you want to list products on a page manually or use the table layout on your main shop page templates.
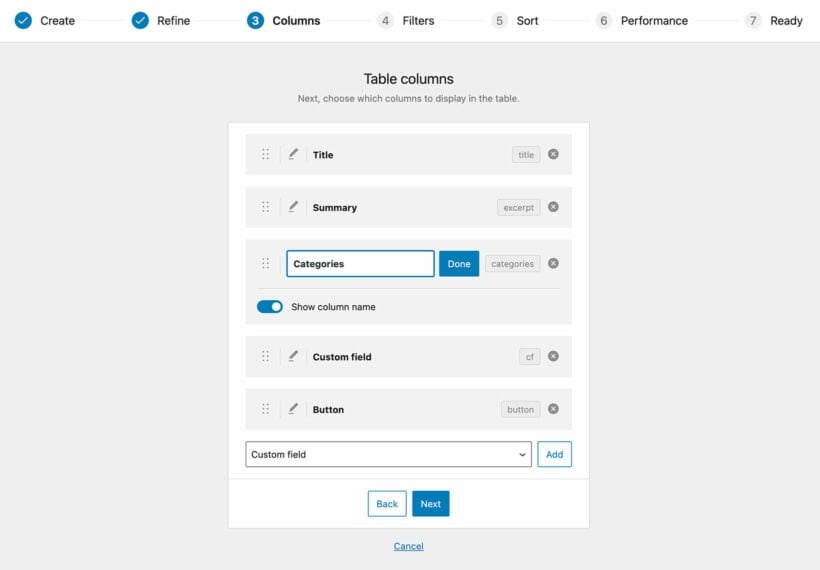
On the 'Columns page', select the 'Brand' column. If you have already installed a brand plugin then this will appear automatically in the list of columns.
On the search page, click to add filters and add a 'Brand' filter. This will allow customers to filter by brand.
If you selected to add the table manually then the final page of the table builder will give you a shortcode which you can use to do this. Either use this or the 'Product Table' Gutenberg block to insert the table onto any page.
When you view your product table with WooCommerce brands, you will see a list of products with your chosen settings. You'll also see a 'Brands' column in the table. Clicking on a brand in the WooCommerce table will filter the list of products by that brand. A 'Brand' filter dropdown will also appear above the table. However, I'll show you how to add more user-friendly brand filters in a minute.
How to list products with a specific brand
You can also use WooCommerce Product Table to list products by brand. To do this:
Go to edit your table at Products → Product Tables.
In the 'Select products' section, select 'Brand' and then enter the slug of the brand you wish to display. You can get this from the page where you added all the brands.
Insert the table onto a page, and it will only list products with the selected brand.
Let customers filter by brand
While the WooCommerce Product Table plugin includes simple filter dropdowns, you probably want more visual ways to let customers filter by brand. After all, customers love buying products by their favorite brand and want a quick way to find and view them.
The best way to do add sophisticated and eye-catching brand filters to WooCommerce is to install the Product Filters plugin. This comes with a wide range of styles which you can use to filter by brand, including:
There are several ways to choose where the filters will appear on the page. You can use either of these options separately, or combine them to add filters to multiple locations:
To display filters above the list of products on all your shop pages, select the name of the relevant filter group in the plugin setup wizard. You can also do this on the plugin settings page at Products → Filters → Settings.
Go to Appearance → Widgets and add a 'Product Filters' widget. This will display it in the sidebar area on the pages where you list products.
You can also display filters in other locations such as via shortcodes and Gutenberg blocks, or in your page builder plugin such as Elementor. Learn how in the plugin documentation.
Go to Products → Filters and add or edit a filter group.
Add a filter in your chosen style (e.g. image buttons).
Select 'Custom Taxonomy' as the source of the data to be used in the filter. Select 'Brand' as the taxonomy name.
Take your WooCommerce brands to the next level
Enhancing the display of product brands on your WooCommerce store can improve the best branding plugins for WooCommerce, you can effectively showcase your product brands and make it easy for customers to find and filter products based on their preferences.
With the WooCommerce Product Table plugin, you can display your products in a streamlined order form that includes brand information, and enable customers to view products by brand, sort by brand, and more.
The WooCommerce Product Filters plugin empowers customers to filter products by their favorite brands, making it easier for them to find and purchase the products they desire.
With the tips and strategies outlined in this article, you can take your product branding to the next level and create a strong online presence for your business. So, don't hesitate to start implementing these plugins on your WooCommerce store and see the positive impact it has on your sales and customer engagement.
We're pleased to announce that our WooCommerce Product Table plugin works with a WooCommerce geolocation plugin. You can use this to show different content in your product tables depending on the customer's country.
GeoTargeting Lite – WordPress Geolocation shows or hides completely different product tables depending on the customer's country. Each product table can show products from a different category or tag. Use this plugin to show different products to different countries, listed in an interactive product table layout. GeoTargetingWP has joined the official WooCommerce Product Table compatibility scheme.
How to use GeoTargeting Lite with WooCommerce Product Table
Next, I'll tell you how to create different product tables which appear depending on the user's country.
How the WooCommerce geolocation plugin works
The free WooCommerce geolocation plugin comes with 2 shortcodes:
[geot country="US"] USA only content [/geot]
[geot exclude_country="US"] Everyone except USA will see this [/geot]
You can use these to show or hide specific content anywhere on your website depending on the user's country. The geolocation plugin looks at their IP address to decide which country they're in.
How to create country-specific WooCommerce product tables
Use the WooCommere geolocation shortcodes to create country-specific product tables. I'm assuming that you have already set up WooCommerce and added your products.
First, you need to label your products based on the countries they should be visible to. You can use categories or tags for this. Or if you're already using categories and tags for something else, then create a WooCommerce taxonomy and use this instead. If you want a single product to appear for multiple countries, then it's ok to put them in more than one category/tag/taxonomy.
Go to Products → Product Table and create a new table.
In the product selection section, choose the category/tag/taxonomy for one of the locations you tagged in step 1. For example, you might select the 'Germany' category.
Go through each step of the table builder to choose your product table columns, filters etc.
Repeat steps 2-5 to create a different product table for each location.
Now create a new page where you will be adding the country-specific product tables.
Next, you need to use the geolocation shortcodes to create product tables that are only visible depending on the user's country. Put the [product_table id="1"] shortcode inside the geolocation shortcodes (replace the id parameter with the actual ID of your table). This will show or hide a product table to the correct country only, depending on which geolocation shortcode you're using.
Add multiple WooCommerce geolocation shortcodes to the page, each showing or hiding product tables from one or more countries. Use the examples below as guidance on how to do this.
Tip: If you want a specific product table to be visible or hidden from more than one country, then you can add multiple country codes within a single shortcode, Just separate them with commas.
Geolocation example 1
The following combination of shortcodes will create a page containing 2 product tables: 1 showing products from a category called 'france-germany' to customers in France and Germany only, and 1 showing products from the 'UK' category to customers in the UK only:
As you can see, I have added two product tables to the page. However, each customer will only ever see one product table depending on their location.
Geolocation example 2
This time, we'll use the exclude option to create a product table that will not appear for customers in the US. This assumes that you have tagged these products 'US':
In this final example, we'll use the include and exclude options together. This will create a product table that is visible to all countries except for Australia. It assumes that I have created a category called 'Australia' for the Australia-only products. It's a useful method if sell different products to a specific country in WooCommerce, e.g. for legal reasons.
All customers will see 1 product table on the page. Customers in Australia will see the products from the Australia category, and everyone else will see all your other products.
How to show and hide the country-specific products elsewhere on your site
The above instructions will only show or hide the products in your WooCommerce product tables.
You will need to use the geolocation plugin's other features to restrict the visibility of products elsewhere in your store, for example on the main shop pages, widgets and single product pages. To help with this, you can use the above shortcodes anywhere on your site and in template files.
If you want to restrict access to any of the default WooCommerce pages and direct people to your geolocation product table page, then the free Redirection plugin is perfect for this. Simply add a redirect from any unwanted pages such as the main Shop page, and users will be taken to your product tables page instead.
Do any other geolocation plugins work with WooCommerce Product Table?
Right now, this is the only WooCommerce geolocation plugins that we know works correctly in the product table view.
We also tested with Product Country Restrictions and found that it works with WooCommerce Product Table. However, that plugin is no longer actively updated or supported, so we wouldn't recommend it.
There are some geolocation plugins that definitely don't work with it, and we have included these on our list of incompatible plugins.
There are other geolocation plugins that we haven't tested with. Please let us know if you discover any more that work with WooCommerce Product Table, and we'd be happy to include them on this page.
We're delighted to announce that WPML, the market leading WordPress multilingual system, have formally tested our WooCommerce Product Table plugin and confirmed that it is fully WPML compatible.
We have always tested our WordPress and WooCommerce plugins with WPML. However, this is the first time that we have submitted a plugin to them for formal testing and review. They were happy that WooCommerce Product Table works perfectly with WPML and have issued a certificate of compliance.
Note: Since publishing this article, WPML have discontinued their compatibility program. However, you can still use it with WooCommerce Quick View Pro.
Product Table with WPML - English
Product Table with WPML - French
What about Barn2 Media's other plugins?
Next, we plan to submit our other WordPress plugins to WPML for formal testing and certification.
In the meantime, we have already tested all our plugins with WPML so you can safely use them together for your multilingual websites.
Lots of people ask how to use our Product Table plugin with a WooCommerce multi vendor marketplace plugin. A multi vendor plugin lets multiple sellers upload and sell products in your WooCommerce store.
Product table layouts are the perfect way to list vendors' products, as you can show more products per page and choose which information to display about each product. A table view also makes it easier to find products, as you can add features such as keyword search and product filters.
What is a WooCommerce multi vendor plugin?
A product vendors plugin transforms any WooCommerce store into an online marketplace with multiple product vendors or sellers.
All multi vendor plugins work in similar ways, so read about them all and choose your favorite one that works with WooCommerce Product Table.
Sellers can register as a product vendor on your WordPress website, or you can add vendors manually. Each vendor can upload products to sell on your WooCommerce store. All the vendors' products are sold together in an online marketplace, similar to popular websites such as Etsy or Not on the High Street. Each vendor will have their own store page within your WooCommerce store, and you can also list products centrally.
You can choose how to pay your vendors. Most multi vendor marketplace plugins have built-in options for giving them commission and sharing profits.
Which WooCommerce multi vendor plugin should I use?
It's from a reputable company and integrates fully with WooCommerce Product Table. This means that you can build a fully functional multi-vendor marketplace, with the vendors' products listed in a user-friendly order form layout. As well as having a separate shop page for each vendor, you can create a central page listing all the products in the marketplace. Customers can easily filter by data such as vendor or product attributes to find what they're looking for.
As a result, I will mostly focus on YITH's in this tutorial. At the end I'll show you how to use other WooCommerce multi vendor plugins with WooCommerce Product Table - but there are some compromises involved.
If you're using a different WooCommerce multi vendor plugin, don't worry. I'll provide tips on how to use it with product tables later. But for the fullest integration with WooCommerce Product Table, use YITH WooCommerce Multi Vendor.
Keep reading to find out how!
What is WooCommerce Product Table?
WooCommerce Product Table is a WordPress plugin by ourselves at Barn2. It lets you list any type of WooCommerce product in a flexible table layout with search box, filters and any product data that you want to display. It's popular for creating a one-page order form layout for a WooCommerce multi vendor marketplace.
The plugin comes with over 50 options, so there are literally dozens of ways you can customize your product tables. For example, you can create tables listing all the products in the marketplace, or products from a specific vendor only. I'll talk about the most popular options to use with a WooCommerce multi vendor plugin later.
Here's a video to explain how WooCommerce Product Table works:
How to use YITH WooCommerce Multi Vendor with Product Table
Create an order form listing all products in the marketplace, or separate shops for each vendor
The multi-vendor plugin allows you to create multiple vendors and give them the ability to add products and manage their orders. The product table plugin creates better layouts for your multivendor store. This combination will get more sales for your sellers, and more commission for you - everyone wins!
Set them up now using the documentation for your chosen plugin. Add some products and vendors to get you started.
Navigate to Products → Product Tables and set up your multi vendor product table. In particular, you should:
Enable the option to display product tables on the Shop page, Vendor taxonomy, and anywhere else you want to use them.
Choose which columns of data you want to include about your marketplace products. For example, you might add columns for image, name, the 'YITH Shop Vendor' taxonomy (which you can rename to something else), price, and buy.
For the 'Add to cart buttons' option, select either 'Checkbox' or 'Button and checkbox'. This helps to increase conversions by allowing customers to add multiple products to the cart at once.
In the variations option, select 'Dropdown'. That way, vendors can select variations from directly in the product table.
Enable the 'Lazy load' option if the marketplace is likely to have a lot of products.
Use the 'Filters' option to add a 'YITH Shop Vendor' filter (which you can rename by clicking the pencil icon) if you're creating a central page for the whole marketplace. This will let customers filter to find products from a specific vendor. If each vendor will have their own shop page, then add other filters like categories and tags. This will add filter dropdowns above the table for the product categories and tags.
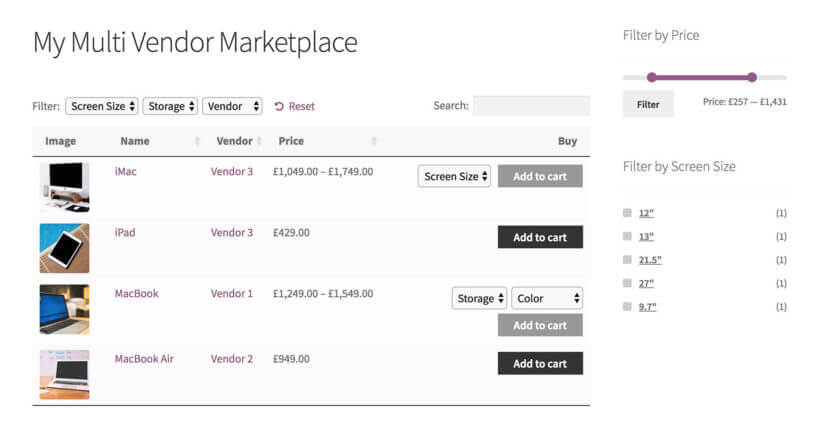
Viewing all products in the central marketplace
Now go to the 'Pages' section of the WordPress admin and find the page that is labelled 'Shop'. View the page, and you'll see a product table listing all the products in the multi vendor marketplace.
The table will have whichever columns you choose on the WooCommerce Product Table plugin settings page. If you enabled other features such as filters then these will show too. For example, you might have a filter dropdown above the table where customers can choose a specific vendor. Customers can also click on any vendor in the Vendors column to view products from that seller.
If any of your vendors sell variable products, then the variation options will appear as dropdowns in the add to cart column.
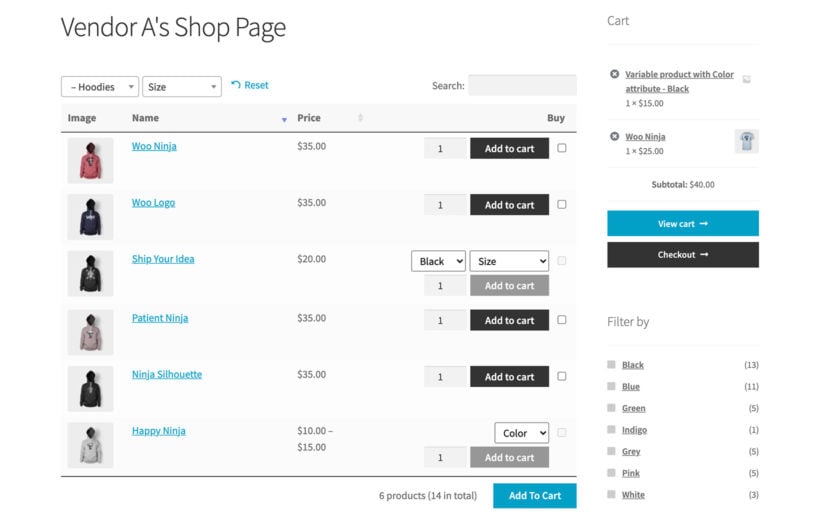
Individual vendor shop pages
The best thing about using WooCommerce Product Table with YITH WooCommerce Multi Vendor/Marketplace is that you can also have a separate shop page for each vendor. That simply isn't possible with any other WooCommerce multi vendor plugins on the market.
The reason it's possible is because the YITH plugin creates a 'custom taxonomy' for each vendor. WooCommerce Product Table works perfectly with custom taxonomy archives. As a result, the taxonomy pages created using the multi vendor plugin will work with the product table layout.
I already showed you how to enable this in the previous section, when you enabled the table layout for the vendors taxonomy. Once you've done that, find the 'Vendors' section in the WordPress admin, and view the list of vendors. Click 'View' for one of them, and this will take you to their vendor shop page. You will see the vendor's products listed in a WooCommerce table.
Listing vendors' products manually
So far, you've learned how to automatically enable the order form layout on the central Shop page and individual vendor store pages. For even more flexibility, you can use a shortcode to list specific products on any page or post in your site. For example:
You can create pages listing products from specific categories.
To draw attention to specific marketplace products (e.g. Christmas products), you can publish blog posts. As well as writing in general about how perfect your marketplace is for a particular type of product, you can use WooCommerce Product Table to list relevant products.
To do this, create a table at Products → Product Tables. On the first page, choose the option to add the table to a page manually. On the next page, select the product vendors taxonomy and select which vendor you wish to display the products for.
How to use product tables with other WooCommerce multi vendor plugins
I mentioned earlier that YITH WooCommerce Multi Vendor works best with WooCommerce Product Table. That's because it creates a taxonomy for each vendor and display the vendors' shop pages as a taxonomy archive - both of which work with WooCommerce Product Table.
However, it is possible to use other multi vendor WooCommerce plugins with WooCommerce Product Table. It's just slightly trickier to set up, and there are some compromises involved.
Product Vendors
The official Product Vendors extension does create a vendors taxonomy which you can display in the product table. It's just not our top recommendations because YITH's plugin is more feature-rich overall.
To use Product Vendors with WooCommerce Product Table, follow the instructions which I have provided above for the YITH plugin. The only change is that you should select the Product Vendor plugin's 'Vendor' taxonomy instead of YITH's. This will appear in the list of columns, filters etc. for you to choose from.
MultiVendorX
The next best option is MultiVendorX. With this multi vendor plugin, you can easily create a table of all your vendors, complete with a 'Vendor' column and 'Vendor' filter dropdown above the table. You can also use it to create a separate table of products for each vendor and manually add it to a page as needed.
The only downside with MultiVendorX is that there's no automated way to enable the product table layout on the individual vendor store pages. Instead, you have to create these pages manually and list the products using the 'Product Table' block or shortcode.
MultiVendorX does create a taxonomy for each vendor. That's why you can display and filter vendors in the product table. However, it uses a custom template to create the page for each vendor, which doesn't work with WooCommerce Product Table. Your developer could customize the template to allow this (post a job on Codeable if you don't have a developer). I've also provided instructions below on how to manually list products for a specific MultiVendorX vendor.
How to use MultiVendorX with WooCommerce Product Table
Go to Products → Product Tables and set up your product tables, as described earlier in this tutorial. In particular, choose the option to insert the table manually and select the vendor whose products you wish to display.
Create a page for each vendor and insert the table onto it.
Finally, you need to redirect the default vendor pages that MultiVendorX has created, so that customers are taken to the product table page for each vendor instead. To do this, install the free Redirection plugin and set up the redirects.
Repeat the above process for the other vendors as needed.
Dokan, WC Vendors, WCFM Marketplace and other multi-vendor plugins
Now we've got to the plugins that are a bit more difficult to use with WooCommerce Product Table. However, it's still possible and I'll show you how.
All of these plugins store the vendors in ways that WooCommerce Product Table can't work directly with. For example:
Dokan Multivendor Marketplace stores each vendor as a user and has its own custom called template store.php. One of our customers has also reported that WooCommerce Product Table is incompatible with the front end product submission in Dokan (although there is another method you could use).
WCMP/WCFM has its own custom template called wcfmmp-view-store-products.php.
WC Vendors uses the post author/WordPress user rather than storing the vendor information directly on the 'products' post type.
To enable these plugins to work with WooCommerce Product Table, you need to create your own custom taxonomy for 'Vendors'. Use this to manually tag each vendor's products. Once you've done that, then you can use the two plugins together with no limitations.
If you don't create a vendors taxonomy, then you can still use WooCommerce Product Table to list the products from your entire marketplace. It just won't be possible to add a vendor column, filter by vendor, or list products from specific vendors only.
How to create a vendors taxonomy
Use our tutorial to create a WooCommerce custom taxonomy. Manually add the vendor name as a taxonomy term for each product. This is similar to adding tags in WordPress. You'll find the taxonomy on the right hand side of the 'Add/Edit Product' screen.
Once you've created your Vendors taxonomy, you can:
Use WooCommerce Product Table to list the products from each vendor separately.
Improve your vendors' sales with WooCommerce quick view
As you have seen, a product table layout is ideal for listing multiple sellers' products in a WooCommerce multivendor marketplace. You can make it even more effective by combining it with the WooCommerce Quick View Pro plugin.
This adds quick view links or buttons to the product table view. Customers use these to see extra images, read more information, choose options and add to the cart from a quick view lightbox. It's a great way to keep customers on the product table page, as there's no need to direct them to a separate page to learn about each product.
After adding a product to the cart, the quick view lightbox closes. This brings the customer straight back to their current place on the list of products, where they can continue browsing. As a result, they're likely to buy multiple products and spend more in your marketplace store.
Create a multi seller marketplace with product tables
WooCommerce multi vendor plugins are a fantastic way to transform your store into a complete marketplace with multiple sellers.
By adding WooCommerce Product Table to your multi vendor store, you can create improved layouts and increase sales. This benefits you and your product vendors, so get started today!
Use WooCommerce Product Table alongside YITH Multi Vendor Marketplace and list products from different vendors - the easy way.
There are lots of plugins to organize or sell events on a WordPress website, but it's less obvious how to create WordPress password protected events.
Today, I'm going to tell you how to use Password Protected Categories to protect events. This is an easy-to-use plugin that lets you password protect events based on their category. It works with any WordPress events plugin, whether you're using Events Calendar Pro, Event Espresso, WP Events Manager, or something else.
Let's get started!
What is Password Protected Categories?
Password Protected Categories is a WordPress plugin developed by ourselves at Barn2 Media. It provides an easy way to hide and password protect any type of category in WordPress.
The plugin works with any WordPress custom post type, including Events. This means that you can use it as a WordPress password protected events plugin.
There are lots of ways that you can use Password Protected Categories to hide or protect your upcoming events:
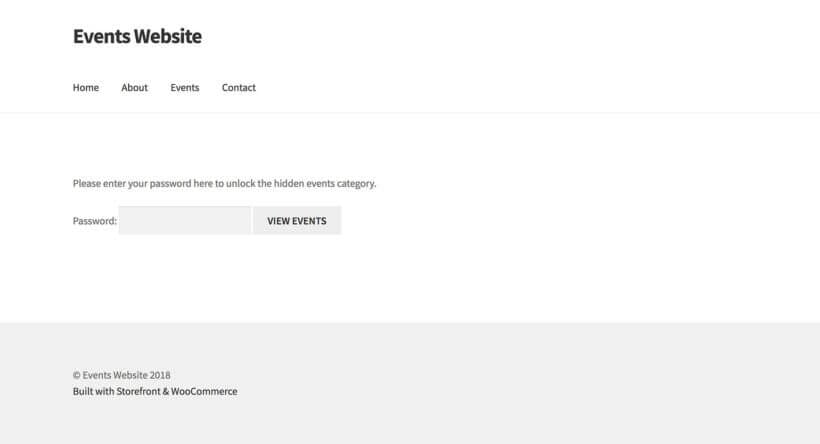
You can list events in the public areas of your website, but require a password before users can view the event detail page or make a booking.
Another option is to list public courses or events in the public parts of your website, and create 1 or more private event categories that only people with the password can view. These will be hidden from public view - people in the public parts of your site will never know that your private event listings exist.
Alternatively, you can put all your events within 1 or more hidden event categories. This hides the entire events section of your website, while your normal web pages (Home, About, Contact, Blog, etc.) remain public.
Finally, you can create hidden event categories which only certain logged in users or roles can see.
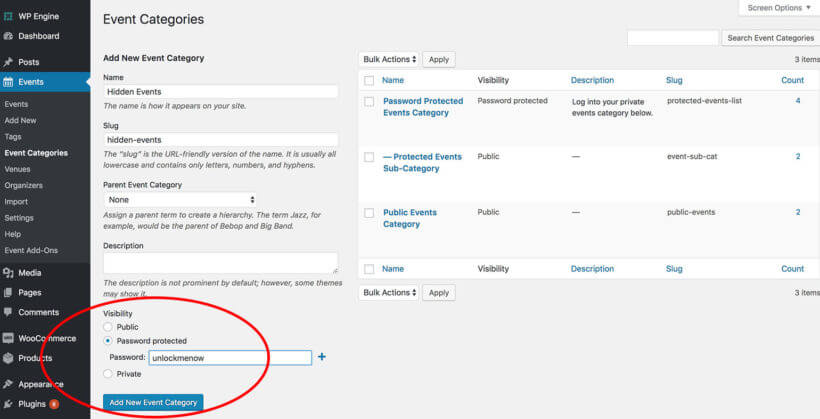
Create a private or password protected events category in WordPress. It will instantly hide and protect all the events in the category and its sub-categories with the same password. This is much easier than password protecting individual events. It's more user-friendly because people only have to enter one password to unlock the entire category and all its events.
Some people use a WordPress events booking website to promote events which are available for everyone to view and book. Others create a private events website to advertise events that only pre-approved people can access.
Here are some examples of why you might want to sell private events in WordPress:
A company or organization might want to create a hidden events area on their website to list staff-only events or workshops.
Training companies might offer training course dates to employees of a specific organization. They can list these events within a hidden password protected events category. Employees can enter the password to view the dates that are available to them, and make a booking without the public knowing that these events exist.
A members-only events site (e.g. a membership club or speed dating site) can use password protected events categories to take bookings for their events. Only people with access to each type of event can view them and make a booking.
Some websites list all their events publicly, but only pre-approved people can actually place a booking. When you click on an event, you are prompted to enter a password. This is a good way to recruit people into a club or membership organization, as they must join in order to book an event.
And of course, you can password protect events in WordPress even if you don't take bookings via your website. The important thing is that the event pages are private. It doesn't matter whether or not you accept bookings or if people can just turn up on the day.
Which WordPress events plugins does Password Protected Categories work with?
WordPress Password Protected Categories works with the vast majority of WordPress events plugins. Here's how to tell if it will work with your chosen events plugin:
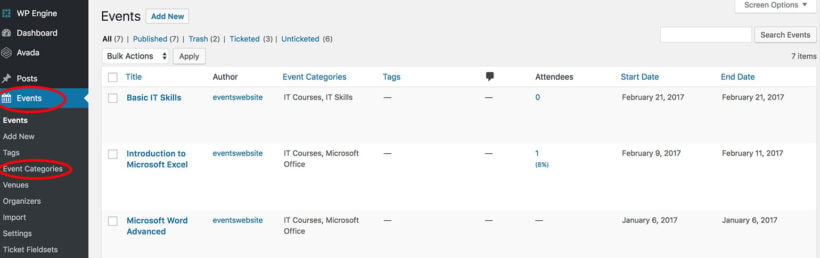
The plugin must have a custom post type which is used to store events. This applies to nearly all WordPress events plugins. If your events plugin has created a section called 'Courses', 'Events' or similar in the left hand side of the WordPress admin, then this means that there's a custom post type for events.
The events custom post type must come with categories (also known as hierarchical taxonomies in WordPress). You can check this by looking under the 'Events' link in the left hand side of the WordPress admin. If there's a 'Categories' link, then this will work with the Password Protected Categories plugin.
If your events plugin creates an 'Events' section (or equivalent) and comes with categories, then it will work with Password Protected Categories
This list is not exhaustive and it will actually work with most events plugins. If you're not sure, add a comment below and I'll check, or you can test it with Password Protected Categories and use our 30-day money back guarantee if there are any problems.
How to password protect events in WordPress
To start password protecting events, either watch the video or follow the instructions below:
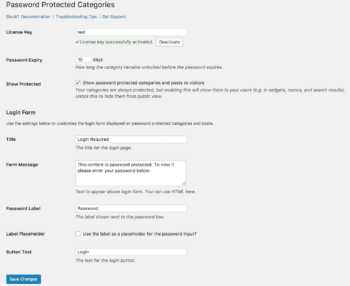
Go to Settings > Protected Categories and enter your license key.
Choose your settings, such as the text for the password entry form. You can also choose the number of days before each user must re-enter the password to continue accessing the password protected events categories.
Tick the 'Show Protected' box to display your password protected events in the public parts of your site. (This means that people can see your protected events, and will be prompted for a password when they try to view the single event page.) Leave it unticked if you want your protected events to be completely hidden from public view.
Next, hover over the events section on the left of the WordPress admin, and click the Categories link. Add or edit the events category that you want to password protect. Find the 'Visibility' section and choose one of these options:
Password protected - Enter 1 or more passwords to hide the category page and its events behind a password protection screen. You can add a shared password for everyone, or add a different password for each person. (More info here.)
User or role protected - Choose this if you want to hide the category and its events from public view, so that only logged in users with a specific user role can see this.
Add the shortcode [category_login] anywhere on your site to create a category login form. When someone enters a password on this page, the plugin will automatically direct them to the correct events category.
Can I protect multiple event categories with the same password?
Yes, you can create more complex event category structures, all protected by a single password. To do this, you need to create a single password protected 'Parent' category and password protect it. Next, add as many sub-categories as you like. Leave them set to 'Public'.
The plugin will automatically protect the password protected sub-categories and their events with the same password as the parent events category. Users can enter the password once and the entire section will be unlocked for them. Once they're in, they can navigate between multiple events as needed.
How to create a WordPress events website
I've written this tutorial for people who already have a WordPress events plugin set up on their site. If you haven't got this far, don't worry.
I recommend The Events Calendar plugin as the best way to create events in WordPress. You can use the free plugin to list events for information, or combine it with the Pro plugins from the same company to take bookings online with WooCommerce.
If you don't know how to do this, I've created an online course about how to create a WordPress events website using these plugins. It covers everything you need to know.
Does the plugin change my event layouts?
Password Protected Categories is a simple plugin to protect and hide any or all of your WordPress event categories. If you want to change the way your events are displayed, then I recommend our Posts Table Pro plugin.
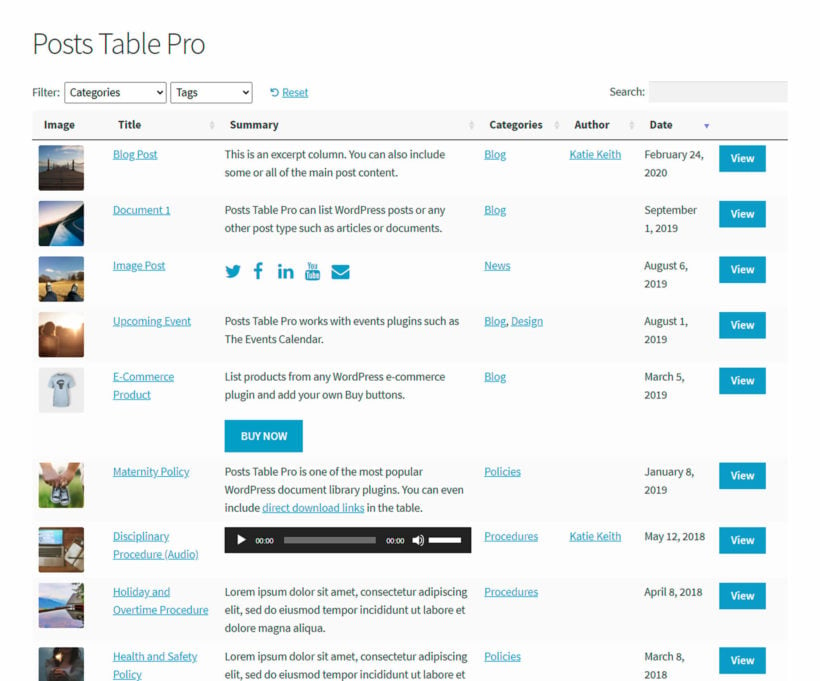
Posts Table Pro is a WordPress table plugin. Unlike most table plugins, it takes any type of WordPress content and lists it in an interactive table view with filters. It's ideal for listing events in a table because the table layout is perfect for displaying events. The table plugin lists each event date on a separate row of the table. You can show whichever columns of data you'd like, such as event image, name, description, date etc.
So, now you know how to hide and password protect event categories - regardless of which WordPress events plugin you're using. Next, it's time to put it into practice.
Download Password Protected Categories and use it with your chosen WordPress events plugin. It just takes a few minutes to set up and will instantly hide all the courses or events in your protected categories.
Password Protected Categories comes with an in-depth knowledge base and full support from us at Barn2 Media. It comes with everything you need to get your password protected events up and running, so try it today.
Over 100,000 WordPress sites run the free Pods plugin. It's a fantastic way to create custom post types, custom fields, and taxonomies - everything you need to store extra data. Keep reading to discover an easy way to install Pods and list the data in a searchable, sortable table.
At Barn2, we love the WordPress Pods plugin because it makes it so easy to add extra content types to any WordPress website and has a list of premium addons. Instead of messing up your site by adding everything as pages and posts, you can create WordPress custom post types or CPT and create custom settings pages. Your new custom post types appear as separate sections on the left of the WordPress admin menu. They're perfect for storing articles, events, publications, members, directory listings, or something completely different. However, there is a problem.
While Pods is a wonderful and versatile plugin for creating custom post types, fields, and taxonomies in WordPress, it does have a limitation regarding displaying the custom data in the back end, which is great for storing and organizing information for internal use. However, it does not include any functionality to display the custom data on the front end, meaning that you will need to use additional tools or code to display the information on your website.
The solution is to use WordPress Pods plugins with the Posts Table Pro plugin. Posts Table Pro is a WordPress table plugin that displays your custom post types, fields, and taxonomies in a searchable, filterable table. It's the perfect way to show custom content.
Using Posts Table Pro to display custom data creating using Pods
This Pods WordPress plugin tutorial is the complete guide on how to use Pods to create WordPress custom post types, custom fields, and taxonomies. I'll show you how to create each of these extra content types. You'll also learn how to display them on your website using Posts Table Pro.
Either read the whole article or click straight to the section you need. Alternatively, you can watch us create and display a custom post type in this video:
What are Pods?
Pods is a powerful and feature-rich plugin for WordPress. Whether you're looking to add custom post types, custom taxonomies, or custom fields that are meta boxes added to your posts to input additional information, this plugin provides you with all the tools you need to do so. Pods - Custom Content Types and Fields make it easy to create custom content types and fields, even for those without technical expertise, thanks to its user-friendly function.
One of the standout features of Pods is the level of support that it receives from a team of well-known WordPress.org experts. This ensures that the plugin is always up-to-date and in line with the latest development in WordPress.
I've obviously had my head in the sand for the last 4 years because according to the plugin changelog, Pods was released back in 2014 - and it has been updated every few months since then. For some reason, I only heard of it recently when customers started asking if our plugins work with Pods.
I did some investigation and discovered that lo and behold, Pods is a fantastic way for creating the extra data that people need to display using our WooCommerce and WordPress table plugins.
There are various other plugins for creating WordPress custom post types, fields, and taxonomies. These include:
Advanced Custom Fields - Excellent for creating custom fields. There's a free and a Pro version. If you just need to create custom fields, then ACF is ideal for WooCommerce. ACF is compatible with Elementor, Gutenberg, WooCommerce, and WPML Multilingual plugin. But if you want custom post types and/or taxonomies too, then Pods is a better all-round plugin.
Toolset - This plugin is well-supported and from On the Go Systems, the company behind WPML. You can use it to create custom post types, fields, and taxonomies. I recommend Pods in this article because it's just as good as Toolset and completely free, but Toolset is a valid option too.
Custom Post Type UI - A free plugin for creating WordPress custom post types and taxonomies. I've used this a lot and it's a good option, but use Pods if you need custom fields too.
If you're using Posts Table Pro to list custom post types on your WordPress site, then you can equally create the data using any of the above plugins. However, we like Pods because you can use it to create custom post types, fields, and taxonomies. That way, you just need one WordPress plugin (Pods) to create and store the data, and another (Posts Table Pro) to display it on the front end.
How to create a WordPress custom post type with Pods
First, I'll show you how to use Pods to create a WordPress custom post type. I'm assuming that you have already installed the free Pods WordPress plugin. If you haven't done that yet, do it now.
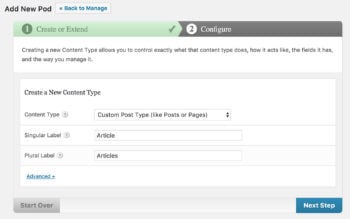
Navigate to Pods Admin → Add New → Create New.
On the 'Add New Pod' screen, choose 'Custom Post Type' from the 'Content Type (like Posts or Pages)' dropdown.
Add a Singular and Plural label. This is how your WordPress custom post type will appear in the admin. For example, if you're creating a 'Documents' custom post type for a WordPress document library, then the Singular Label would be 'Document' and the Plural 'Documents'.
Click 'Next Step'.
The next screen lets you add custom fields to your custom post type. We'll look at this in the next section. For now, click on the 'Advanced' tab and scroll down to the 'Supports' and 'Built-in Taxonomies' sections. Tick any extra fields that you want to be available for your custom post type.
Click 'Save Pod' and you can start adding custom posts straight away!
Adding posts to your WordPress custom post type
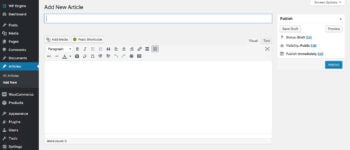
'Add New' custom post screen with default fields
If you look to the left of the WordPress admin, you'll see a new link with the Plural Name you just added. To add a post to the custom post type you just created, go to [custom post type Plural Name] > AddNew in the WordPress admin (e.g. Articles > Add New if your custom post type is called 'Articles').
The 'Add New' screen for your custom post type will look like my screenshot, plus any extra fields that you ticked in Step 5, above. Add all the data for your custom post and click 'Publish'.
Keep reading to learn how to create custom fields and taxonomies for storing extra data in WordPress. Or if you want to get started with displaying your custom post types on your website without any extra fields, skip ahead now.
Creating WordPress custom fields with Pods
In this section, we'll explore how to use Pods to create custom fields for any post type in WordPress, including post types created with Pods, standard blog posts, pages, WooCommerce products, events, portfolios, and more.
Before diving into the process of creating custom fields with Pods, it's important to understand the various field types available. Pods offer a wide range of custom field types, including text, date, file uploads, checkboxes, and more. In this section, I'll provide a comprehensive list of all the custom field types you can create with Pods, to help you make informed decisions about which fields to use for your specific needs.
Pods custom field types
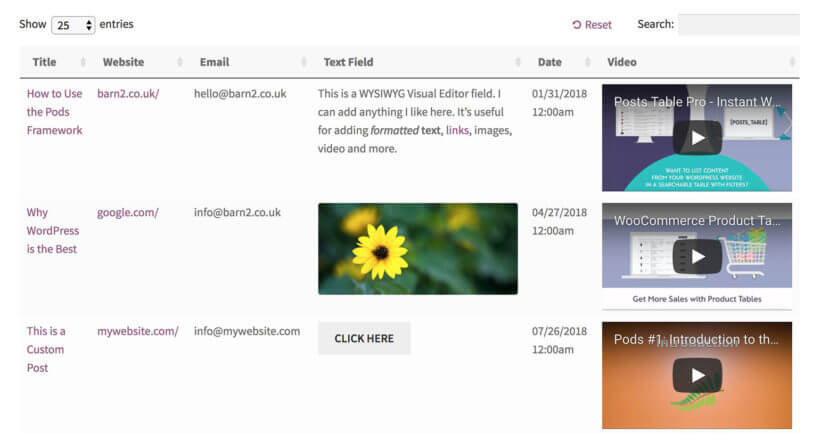
Posts Table Pro lets you display these Pods custom field types:
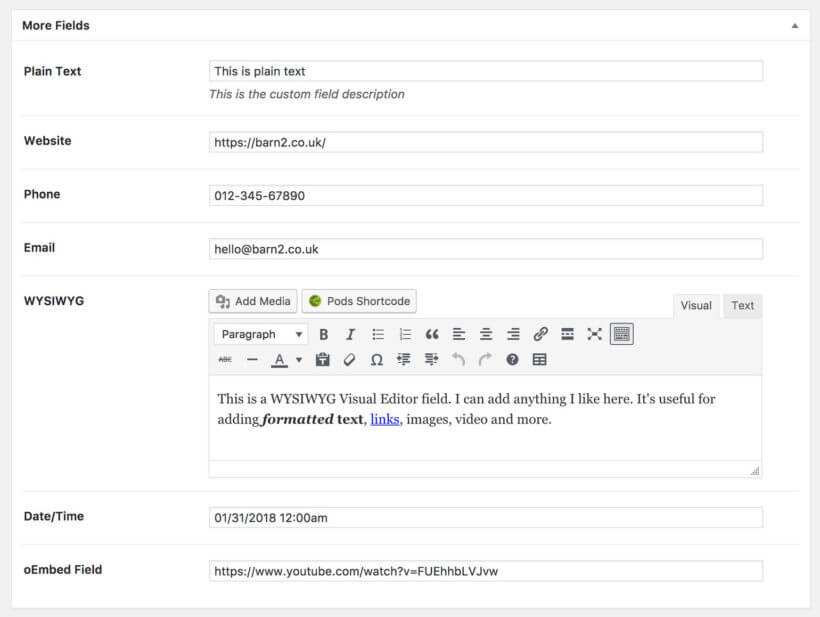
Plain Text - Unformatted text.
Website - A clickable link to any website or URL. Good for website links or downloads (e.g. in a WordPress document library).
Phone - Displays phone numbers. Use the 'Advanced' tab to select a format, and Pods will automatically add any dashes.
Email - A non-clickable email address. If you want to make it clickable, then I suggest adding it to a WYSIWYG field instead. That way, you can highlight the email address and add the link.
Plain Paragraph Text - Paragraphs of text with line breaks but no formatting.
WYSIWYG (Visual Editor) - Probably the most useful field type, this adds a full WordPress visual editor to your custom field. You can add any type of content and format it using the WordPress toolbar. You can even add images, videos, audio files, galleries, etc.
Date/Time, Date & Time - These 3 fields display dates and/or times. Use the 'Additional Field Options' tab to choose the format. Pods will show a date/time picker when you add data to this custom field. It will then show it on your website in the correct format.
Plain Number - Use this to store any number with no special symbols or extra formatting.
Currency - This field lets you display a currency or price. Use the 'Additional Field Options' to choose the currency symbol etc.
oEmbed - Displays any of the oEmbeds supported by WordPress. For example, if you paste a YouTube video URL then WordPress will automatically display it as an embedded video player using Posts Table Pro. (Note: You can also insert oEmbeds into the WYSIWYG field type.)
I added data to various custom field types on a custom post
Posts Table Pro displays the same custom fields like this
Pods custom fields that work but are less relevant/useful
Color Picker - With this field type, Pods will display a color picker when you add a custom post. Posts Table Pro will then show the hexadecimal value of the color. Not sure why you'd ever want to do this, but it's there if you need it!
Yes/No - In theory this field does work with our plugins. However, if you select 'Yes' then it will just display as '1', which isn't very user-friendly! I'd recommend a different field type for displaying this sort of information.
Code - Useful for displaying shortcodes or source code on your website.
Custom field types that can't be displayed using our plugins
Password field - You can use this to add an encrypted password in the back end, but the password column will appear blank if you try to display it using Posts Table Pro. This is for security reasons.
File / Image / Video - If you need to add files, images, or videos, then you can easily add these to one of the other field types. For example, you can add images using the 'Add Media' button of a WYSIWYG Visual Editor field, add videos by pasting a YouTube link to a WYSIWYG Visual Editor field or use the oEmbed field type.
How to create WordPress custom fields
Alright, now that you're familiar with the various custom field types that are available to you, it's time for me to guide you through the process of creating custom fields. Whether you want to add custom fields to a post type created using Pods or an existing post type, such as blog posts, pages, WooCommerce products, events, and others, the instructions will vary. However, don't worry, I'll walk you through the process step-by-step to make sure you end up with the custom fields you want.
Adding custom fields to Pods custom post types
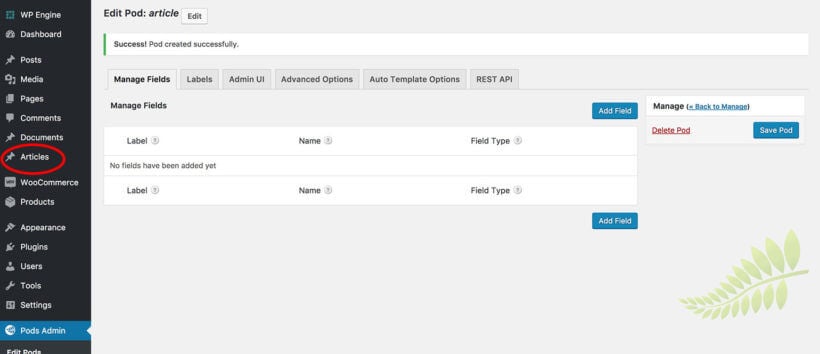
Go to Pods Admin > Edit Pods and click on the WordPress custom post type that you're creating custom fields for. This will take you to the 'Manage Fields' tab on the 'Edit Pod' screen.
Click 'Add Field' and enter the data for your custom field:
Label - This will appear above the custom field on the add/edit custom post screen.
Name - (Generated automatically when you add the Label.)
Description (Optional.)
Field Type - Choose a supported type of custom field from the list above.
Options - Choose whether this field is mandatory when you create and save a custom post, or whether you can leave it blank.
Click 'Save Field'.
Repeat steps 2 and 3 to create as many WordPress custom fields as you need.
Adding custom fields to other WordPress post types
To add extra fields to other post types such as posts, pages, products, or events, the instructions are the same as above. However, instead of Pods Admin > Edit Pods, you need to go to Pods Admin > Add New and click the 'Extend Existing' option. From there, you can add custom fields to any post type - not just those created in Pods.
Entering data for your Pods custom fields
As you move forward with creating or editing a post in your WordPress custom post type, you'll notice a section named 'More Fields' that displays all of your custom fields. This section is located just below the main content editor for the post.
Enter all the relevant information for your custom fields and proceed to publish or update the post. With Pods, you don't have to worry about formatting errors as it provides helpful warnings if you attempt to enter any information in an incorrect format.
Now that you know to add custom fields to your posts, I'll explain how you can create custom taxonomies using Pods. On the other hand, if you're eager to start showcasing the custom post types and fields directly on your website, feel free to move ahead.
How to create WordPress custom taxonomies
So far, you've learned how to create a custom post type using the Pods framework. You've also learned how to create custom fields for your custom post type. Next, I'll teach you how to create taxonomies for your post types.
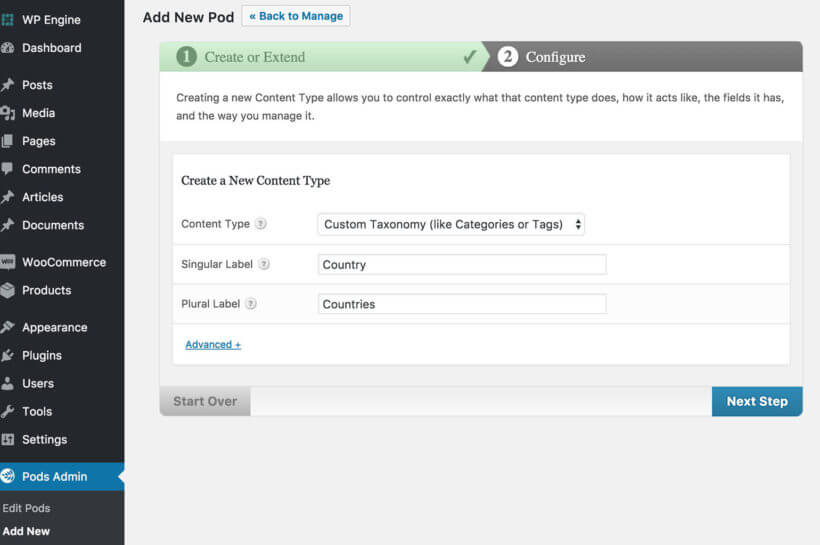
Go to Pods Admin > Add New and click the 'Create New' option.
On the 'Add New Pod' screen, select 'Custom Taxonomy (like Categories and Tags)' from the Content Type dropdown.
Add a Singular Label and a Plural Label. For example, if you need the custom taxonomy to store country data then the singular should be 'Country' and the plural should be 'Countries'.
Click 'Next Step'.
Most people reading this article won't bother adding fields to their taxonomies because (a) this is a niche case, and (b) they're not supported by our plugins. So go straight to the 'Advanced Options' tab and scroll down to 'Associated Post Types'. This is really important, as it's where you link WordPress taxonomy with the post type that you need to use it on. Choose a post type from the list. This could be normal WordPress pages or posts, or a custom post type.
Click 'Save Pod'.
How to add custom taxonomy terms in Pods
Now you've created a WordPress custom taxonomy for your post type, it's time to add data to it.
You can add categories and tags to your custom post type, allowing them to be displayed in multiple taxonomy archive pages and appearing on your home page or blog page. To do so, go to the "Add or Edit" page for the post type you want to apply the taxonomy to. Just like WordPress categories, you'll see the taxonomy option on the right side of the page.
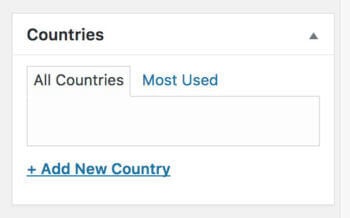
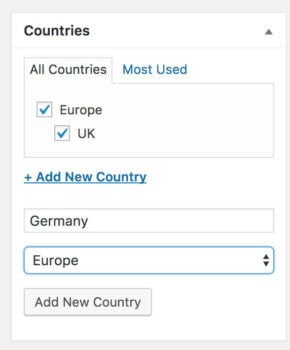
At first, it will look something like this screenshot, as you haven't added any data yet. Click 'Add New Country' (or whatever you called your taxonomy) and add 1 or more terms. These will appear as checkboxes. You can make terms parents of each other to create hierarchical taxonomies in a nested structure:
Tip: You can also add, edit, delete and restructure your custom taxonomies centrally. Find the post type on the left of the WordPress admin, and hover over it to find the link for the taxonomy. This page will be just like the main 'Categories' page in WordPress, and you can use it to manage the taxonomy terms.
Displaying Pods content in the front end of your WordPress website
Pods is an excellent tool for creating custom post types, fields, and taxonomies that can store additional data in the backend of your WordPress website. However, displaying custom post types metadata on the front end can be challenging, especially for non-technical users who do not have the time or expertise to add custom code to their template files.
For those who want an easier solution, Posts Table Pro is a WordPress table plugin that can help display the Pods fields on the front end of your website without the need for complex coding. This plugin makes it easy for you to showcase the custom data stored in Pods in a dynamic and organized manner on your public-facing pages. So, whether you're a developer or a non-technical user, Posts Table Pro provides an accessible way to bring your Pods fields to life on your website.
What is Post Table Pro?
Posts Table Pro is a powerful WordPress plugin that provides an easy solution to display all types of WordPress content management system, including custom post types, custom fields, and custom taxonomies, in a table format. The Table is fully searchable and sortable, which makes it easier for visitors to find the information they're looking for.
Additionally, Post Table Pro offers a range of filter options, so you can choose to display only specific columns or items, making it a highly flexible solution for displaying data on your website. With it, you can create tables of custom post types and fields that are easy to navigate, making it the ideal choice for anyone who wants to display their Pods fields on the front end of their website.
You can also use the plugin to display WordPress custom post types, with each custom post appearing as a separate row in the table. It can also display custom fields as columns in the table. You can list custom taxonomies as columns in the table, and also as filter dropdowns above the table. With WordPress Pods, you can even create tables that list posts with a specific value for a custom field or a term for a custom taxonomy. You can then add custom taxonomy filters. Additionally, using the WordPress Pods get field value function, you can retrieve the value of a specific field for a post.
I'll show you how to do all this next.
How to list custom post types Plugin on a WordPress website
Set up Posts Table Pro using the instructions in the 'Getting Started' email.
Go to Pages > Add New and create a page that you'll use to list the custom post type.
Add the following shortcode: [posts_table post_type="your_post_type"]
Replace your_post_type with the label for the post type you want to display. If you created the post type using Pods then this will be the Singular Label you added earlier. If you added the Label as multiple words, then you need to add an underscore (not a hyphen) between each word, as I did in my example.
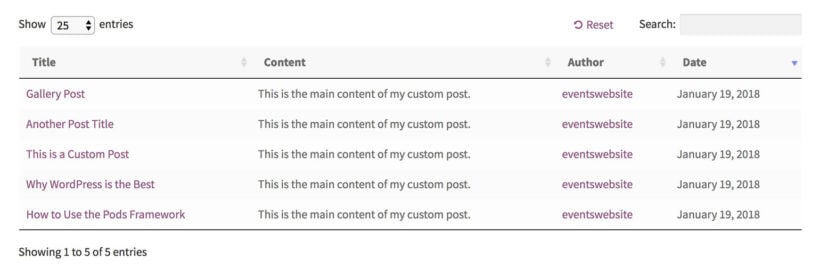
Now view your page, and you will see all the posts for that custom post type listed in a neat table layout.
At this point, your list of custom posts will look something like this:
You can use the Posts Table Pro knowledge base to show different columns, rename the columns, and much more.
How to list custom fields in the front end
Next, I'll show you how to list your Pods custom fields as separate columns in the table. Again, you'll need Posts Table Pro for this:
Create a table using Posts Table Pro, as per the instructions in the previous section. Extend your shortcode to something like this: [posts_table post_type="your_post_type" columns="title,cf:your_custom_field_1,cf:your_custom_field_2"]. Replace the blue text with the Singular Label of the custom fields you want to display. If the Singular Label consists of more than one word, then you need to add an underscore between each word. In my example shortcode, I have shown you how to add 2 custom field columns. You can add as many as you like - separated by commas, with cf: before each one.
If you want to display formatted content (e.g. links, text formatting, HTML, shortcodes or video), then you should also add shortcodes="true" to the shortcode. For example: [posts_table post_type="your_post_type" columns="title,cf:your_custom_field_1,cf:your_custom_field_2" shortcodes="true"]
Now, your table will look something like this:
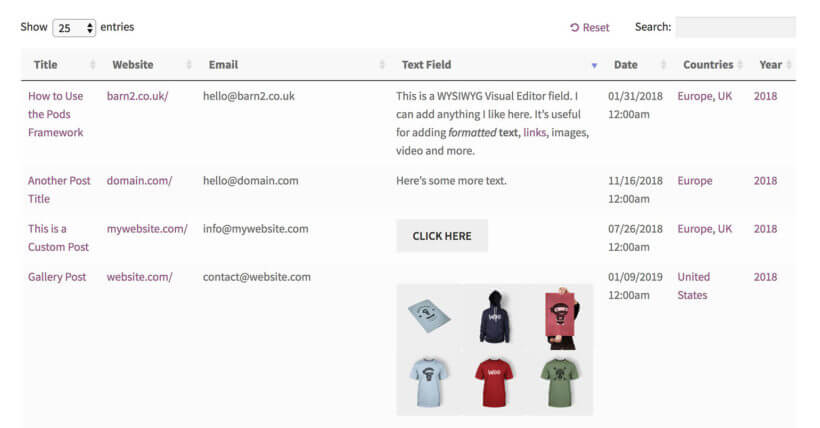
How to show custom taxonomies in the front end
By now, you've learned how to display WordPress custom fields in a table with extra columns for custom fields and other data. You should see new fields appear in the sidebar of your dashboard or the label you designated. Now, let's extend it by showing a custom taxonomy:
Use Posts Table Pro to create a table, as per the instructions in the previous two sections.
Extend your shortcode by adding tax: followed by the Pods custom taxonomy. For example: [posts_table post_type="your_post_type" columns="title,cf:your_custom_field_1,cf:your_custom_field_2,tax:country" shortcodes="true"]. This time, replace the text in green with the actual Singular Label (separated by underscores if it's multiple words) for your WordPress taxonomy. If you want to show multiple taxonomies, then just separate them with commas and make sure you add tax: before each one.
Save the page and view the table.
Your table will now contain the custom post title, custom fields, and custom taxonomies:
Nice!
People can click on any custom taxonomy in the table to filter by that term. Read on to discover how to add taxonomy filter dropdowns above the table too.
Now you know how to create WordPress custom post types, fields, and taxonomies, and to list them on your website. Let me show you how to create tables that display only those posts that have a specific custom field value or taxonomy. Additionally, I'll explain how to add custom taxonomy filters to help users easily find your posts. This can be done by using WordPress Pods get field value that provides access and display the custom fields and taxonomies of your posts. With this plugin, you can easily filter and sort posts based on their custom field value or taxonomy term.
How to list posts based on a custom field value
You can use Posts Table Pro to show posts with a specific custom field value. For example, if you have a custom field called 'Vegetarian' then you can create a table listing all posts with a custom field value of 'Yes'.
To do this, you need to add cf="<field name>:<field value>" to the posts table shortcode. To use my example with Posts Table Pro, this would be:
[posts_table cf="vegetarian:yes"]
How to list posts with a specific custom taxonomy term
It's also possible to use our plugins to show posts that are labelled with a specific custom taxonomy term. For example, if you have a custom taxonomy called 'Country' then you can create a table listing all posts with the term 'France'.
You can do this by adding term="<taxonomy_label>:<term slug or ID>" to the posts table shortcode. To use my example with Posts Table Pro, this would be:
[posts_table term="country:france"]
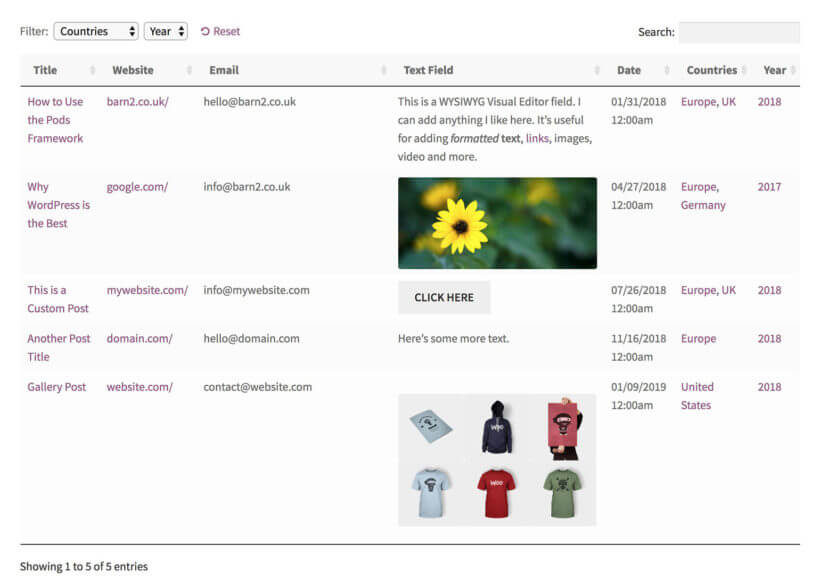
How to let your users filter by custom taxonomy
Finally, I'll tell you how to add custom taxonomy filters above the list of posts. The filter will appear as a dropdown list - 1 for each custom taxonomy. Users can refine the list of posts by clicking on the taxonomy terms in the dropdowns.
To do this, add filters="tax:<taxonomy_label" to your posts table shortcode. For example, this shortcode will list posts with filters for the country and year taxonomies:
[posts_table filters="tax:country,tax:year"]
How to password protect custom post types
Before we close, I'll quickly tell you how to hide your WordPress custom post types from public view. There are lots of reasons you might want to protect some or all of a custom post type. For example, you might be creating a private document library that only specific people can access. If you're a designer then you might need a private portfolio that is hidden from public visitors to your website.
There are 2 ways to do this:
Password protect categories within your custom post type
Create private custom post-type categories that are only visible to logged-in users based on their role
In conclusion, Pods is a top-notch plugin that offers a comprehensive solution for creating Pods - custom content types and fields, and taxonomies within the WordPress platform. You can also create custom content types and fields by writing code, but it requires a good understanding of the functions.php file and custom CSS codes. With its user-friendly interface, versatility, and support from a team of WordPress experts, Pods provides an efficient and effective way to enhance the functionality of your website.
Used alone, you need some technical know-how to display Pods custom fields on the front end of your WordPress website. However, that's not a problem because you can use Posts Table Pro to list your Pods data, without needing any technical expertise.
What do you think of Pods compared to other plugins for creating custom data in WordPress? Did you find this Pods WordPress plugin tutorial helpful? Please let me know in the comments.
Discover the best WordPress podcast hosting options to build your listener base, and how to set them up.
Podcasts have never been more popular, and for good reason: they're highly engaging, and a great way to draw attention to your business, sell your products, and earn money through advertising – but they also take a good deal of work to create. You need microphones, audio editing, and podcast hosting. It's easy to focus on the first two on this list, but quality WordPress podcast hosting is going to let you take your podcast to the next level.
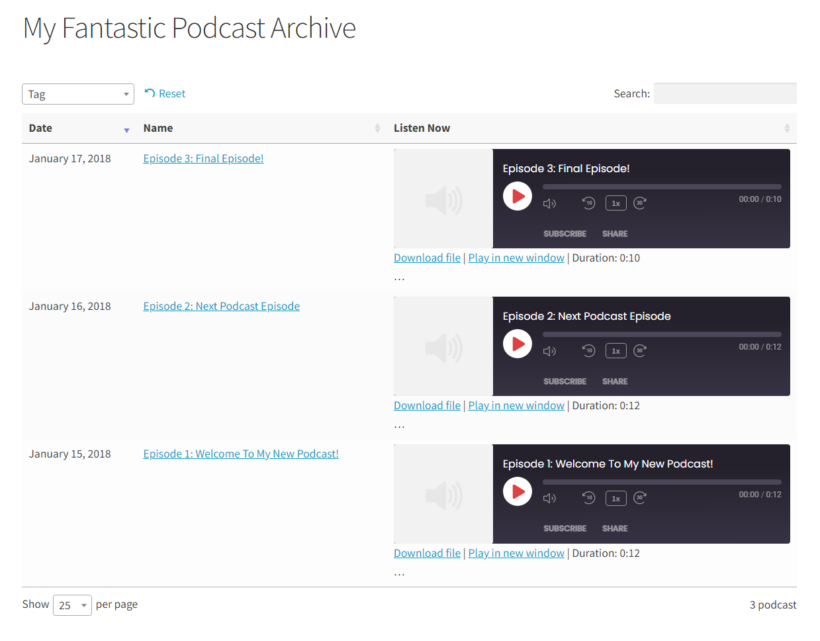
In this article, I’m going to tell you why it’s important to choose the best WordPress podcast hosting option which will give you maximum exposure. We’ll talk about why it can be a great idea to host podcasts on your WordPress website. I’ll also show you how to display them more effectively in a way that keeps your podcast episodes evergreen so that people can continue to find and enjoy them long after they’re published. We’ll do this using the Posts Table Pro WordPress plugin, which is perfect for displaying podcast episodes and playlists in a searchable, filterable table.
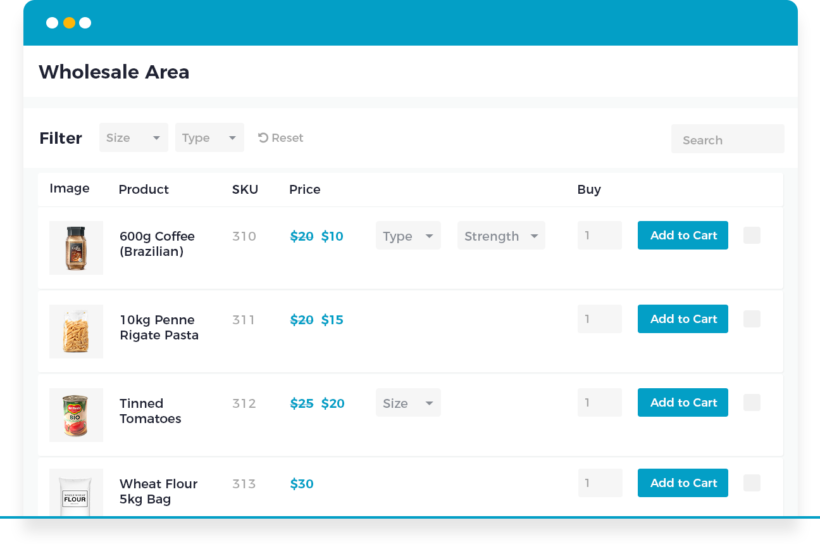
Use the Posts Table Pro plugin to create a searchable table of podcast episodes
Why does podcast hosting matter?
Choosing the right podcast hosting platform can make all the difference in the success of your podcast. While microphones and audio editing software are important, podcast hosting is equally crucial. A quality podcast hosting platform will enable you to upload and share your podcast episodes easily and ensure that your listeners can access them quickly and without interruption.
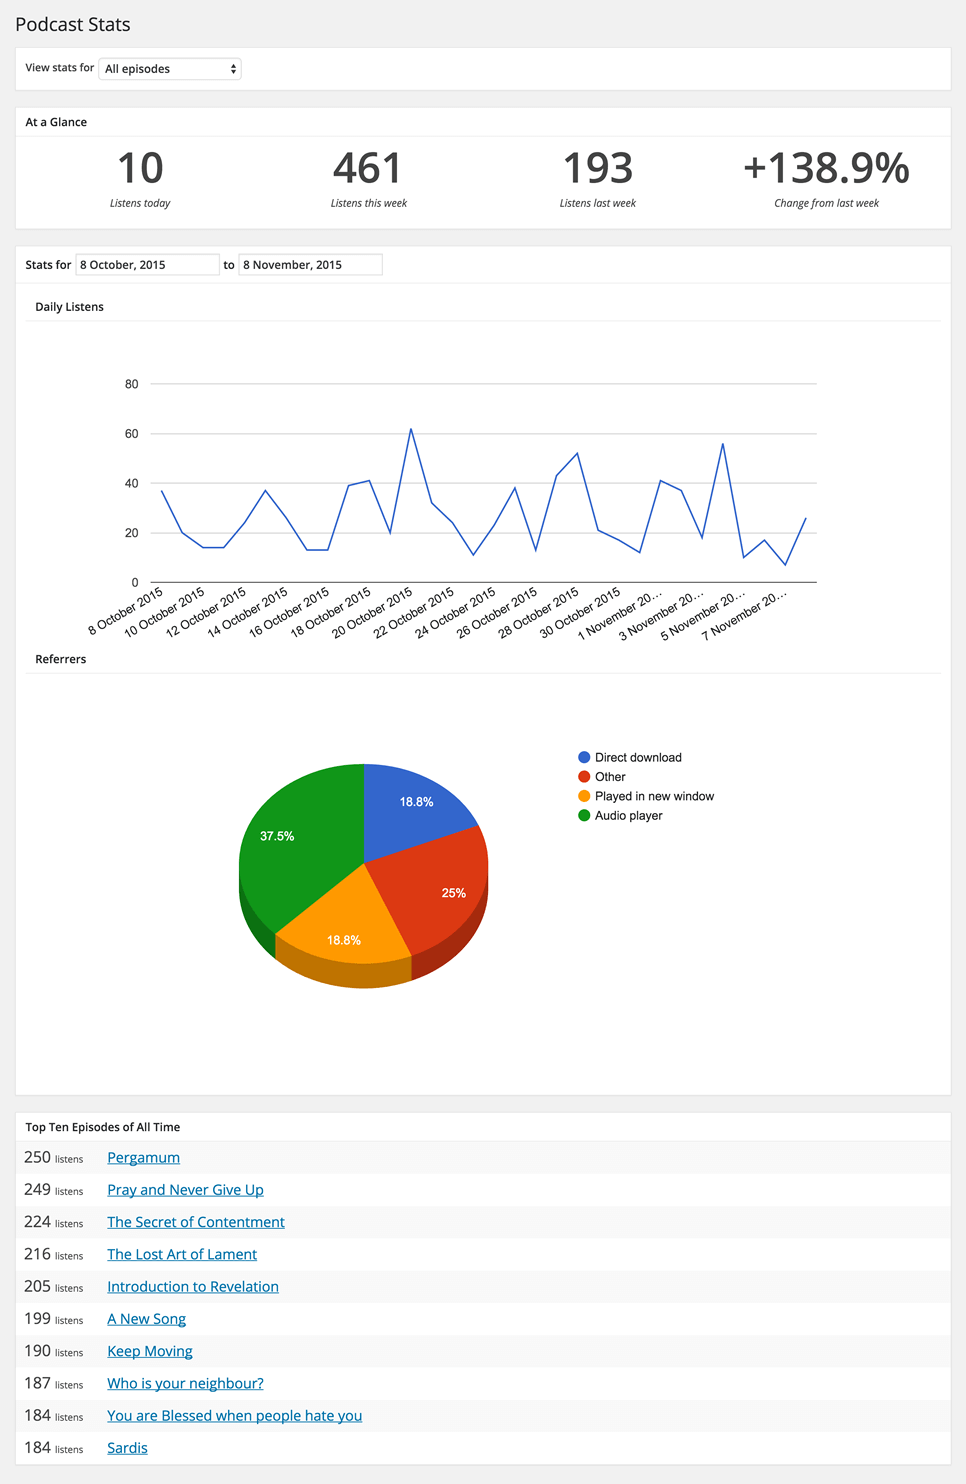
The right podcast hosting platform can also provide advanced features and tools to help you grow your audience, such as analytics to track listener behavior and preferences, as well as built-in marketing and promotion tools. It can also give you full control and ownership over your podcast content, allowing you to decide how and where it is distributed.
Therefore, it's important to invest in a reliable podcast hosting platform that can offer fast and secure hosting services for your listeners and help you grow your audience and monetize your content. Without a good podcast hosting platform, your podcast may not be able to reach its full potential, and you may miss out on valuable opportunities to engage with your listeners and grow your brand.
Self hosted WordPress podcast hosting vs managed hosting
When it comes to podcast hosting, there are two primary options available: self-hosted WordPress podcast hosting and managed hosting. Both options have their own pros and cons, and understanding the differences between them is crucial for choosing the best hosting solution for your podcast.
Self-hosted WordPress hosting means that you are responsible for hosting and maintaining your own website and podcast. This means that you will need to purchase your own web hosting plan and install WordPress on your own server. You will also need to install and configure podcasting WordPress plugins, such as Seriously Simple Podcasting or PowerPress, to manage your podcast content. This option gives you complete control over your website and podcast, but it also requires technical knowledge and can be time-consuming to set up and maintain.
Managed hosting, on the other hand, is a hosting service where the hosting provider takes care of all technical aspects of hosting and maintaining your website, including security, backups, updates, and optimization. Managed hosting services often include a range of additional features and services, such as automatic updates, and advanced caching. This option is ideal for podcasters who want a hassle-free hosting experience and do not have the technical knowledge or time to manage their own hosting.
Why is self hosted WordPress podcast hosting better?
Self hosted WordPress podcast hosting can be a better option for several reasons. First, it gives you full control over your podcast and website. You have the freedom to customize your site as you wish and can choose which plugins and tools to use to manage your podcast content. This flexibility is particularly useful if you have specific design or functionality requirements.
Another advantage of self hosted WordPress podcast hosting is that you have complete ownership and control over your data. You are not reliant on a third-party hosting service to store and manage your content, which means you can back up and restore your data at any time.
A self hosted podcast also offers greater scalability, as you are not limited by the storage or bandwidth restrictions of a managed hosting service. This means you can upload and share as much content as you need, without worrying about running out of space or exceeding your monthly bandwidth allowance.
Getting started with WordPress as a podcast hosting platform
If you are looking to create a successful podcast, one of the most important decisions you will make is choosing the right hosting platform. While there are many hosting options available, WordPress stands out as a great choice for podcasters.
WordPress for podcast hosting is that it is highly customizable. With WordPress, you can choose from a wide range of themes and plugins to create a unique and professional-looking podcast website. You can also customize your site's design and functionality to meet the specific needs of your podcast and your audience.
In this post, we will provide you with a comprehensive guide on how to use WordPress as your podcast hosting platform. You will learn how to create a filterable and sortable database for your podcast episodes, as well as easily navigable archives, analytics, and email signup forms on your self hosted WordPress website. Additionally, we will cover how to keep your listeners engaged by automatically sending them new episodes via email.
Our step-by-step guide covers all you need to know about getting your podcast working, including:
Getting a WordPress website online.
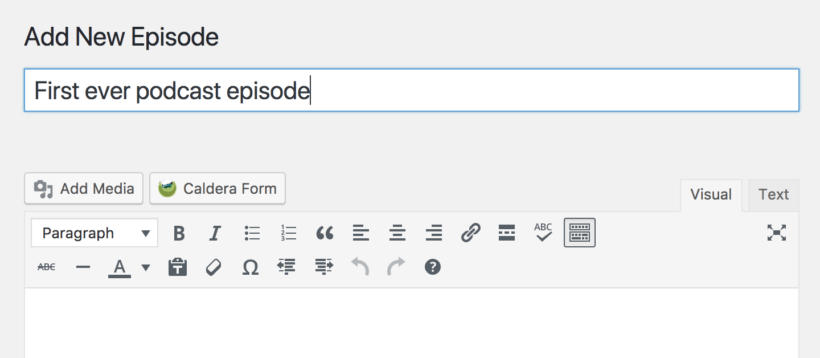
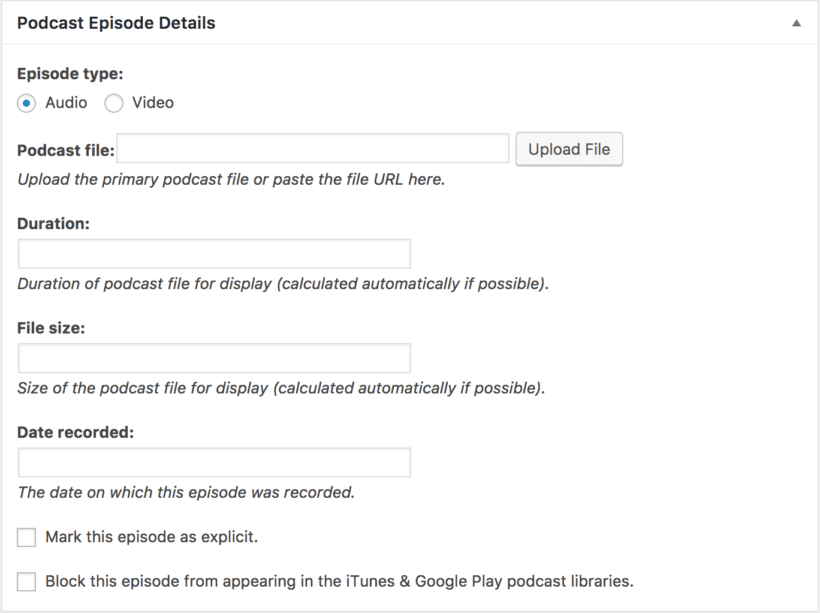
Adding podcast episodes to your site using the Seriously Simple Podcasting WordPress plugin.
How to list podcast episodes in an archive using the Posts Table Pro plugin.
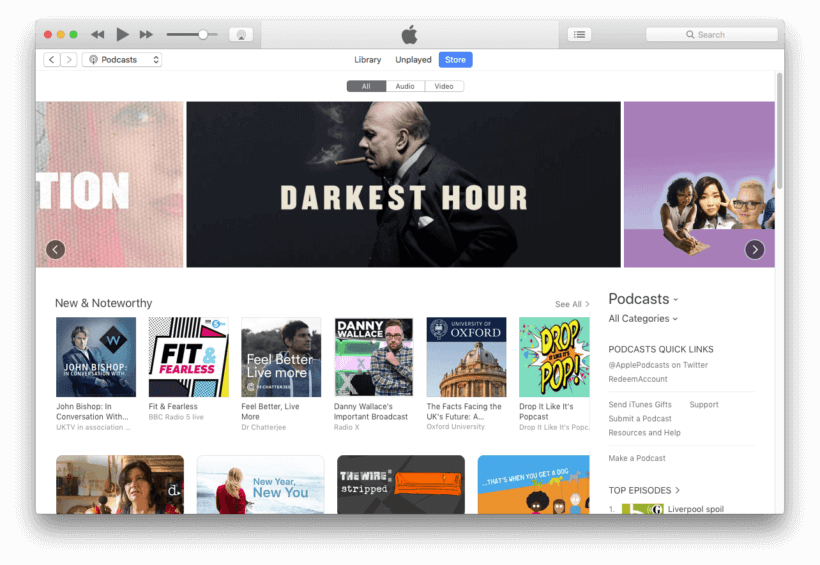
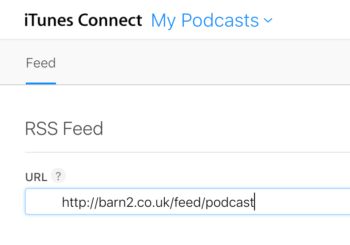
Submitting your podcast to iTunes, measuring its success with analytics, and turning listeners into subscribers with an email newsletter signup + auto sending of new episodes.
We'll keep costs to a minimum here: you'll need to pay for WordPress hosting (and a domain name, if you need one) and the Posts Table Pro plugin for podcast archives, but that'll be it. You can get a head start by getting Posts Table Pro right away.
Back when it was hard to get high-quality hosting at reasonable prices, hosting companies would get a bit huffy about the large amounts of data transferred by podcasters' audio files. Because of this, it might have made more sense to subscribe to an all-in-one podcast hosting service. Compared to a website with just text and a few images, podcasts do use more data.
Thankfully, we now have ready access to super fast, reliable hosting, so the data transfer issue is becoming increasingly irrelevant. For most, going the self hosted podcast route is now by far the most beneficial.
By choosing the open source software, WordPress, rather than a traditional podcast hosting service, you'll maintain complete ownership over your podcast content. You'll also be able to maintain a core focus for your podcast marketing, with a central point to direct social media and search engine traffic to, a place to analyze listener numbers and engagement, and the option to hook listeners or advertise in whichever way fits your business model.
Overall, it's just much more flexible.
To get started, all you need is:
A domain name
A WordPress hosting plan
A WordPress theme
If you already have a WordPress website up and running, skip ahead in one section, to add your podcast episodes to WordPress.
If you don't already have a website ready to go, read on. Here are the three steps you need:
1. Domain name
Firstly, you'll need a domain name so people can find your website and podcast easily. If you have a domain name already, you'll simply need to direct it to your WordPress hosting. If not, you can pick one up for a few dollars through a domain name provider, such as NameCheap. You should pick a domain name that matches either your brand or your podcast name (Domain Wheel is great for generating ideas).
2. WordPress hosting plan
We've previously discussed in detail how to choose a host for your WordPress website. For the purposes of hosting your podcast, we recommend getting started with some robust managed hosting, such as that offered by WP Engine.
WP Engine specializes in WordPress hosting, offers exceptional support, and has useful tools you can access directly from your WordPress dashboard.
The other benefit of using a WordPress hosting specialist like WP Engine is that all the work of installing WordPress is done for you. That means you'll be able to get on with the important business of designing your website and getting your podcast online.
3. WordPress theme
There are thousands of free and premium themes available in the WordPress theme directory – you can search and install these from your WordPress Dashboard by going to Appearance → Themes → Add New. One of the recent (free) themes which are included in all WordPress installations (the Twenty Something series) would be a convenient starting point. You can always change your theme later.
Make your own podcast hosting: Add podcast episodes to WordPress
Now you have your WordPress website ready, the next step is to upload and organize your podcast files.
There are a couple of ways you can go about uploading your podcast. The less desirable option is to add your media files directly to a post or page on your WordPress site. This will work fine in that people will be able to access your podcast on your website. However, it makes it tricky to measure your podcast's success, and even trickier to get the formatting correct for submitting to iTunes.
To solve these issues you can create a specific custom post type to make sure all the information is in the right place. Instead of reinventing the wheel, we recommend taking the quicker, easier (and free) alternative, which is to use a plugin that does exactly what you need it to.
Creates a custom post type automatically, so it's easy to upload, assign metadata and manage your podcast files in one place from your WordPress website
Supports both audio and video podcasts
Pairs with extensions, including one that lets you analyze podcast usage stats
Formats your podcasts ready for submission to iTunes
First up, you'll need to add this plugin to your WordPress site. Go to Plugins → Add New and search 'Seriously Simple Podcasting'. Click Install Now then click Activate.
Starting to use Seriously Simple Podcasting
Once installed, the Podcast menu item is added to the sidebar in your WordPress Dashboard, and a new custom post type podcast is created:
If you're going to group your podcast episodes by series, you'll need to create a series category.
To do this, go to Podcast → Series. Fill out the fields to give your first series a name (e.g. Series one) and, optionally, a description. Click Add New Series.
Go ahead and create another series (or multiple other series) if you have more podcast series ready to upload.
Add podcast episodes to your WordPress podcast hosting
Next up, you'll want to start adding your podcast episodes to the site.
Head over to Podcast → Add New. Just like you would do with a new blog post, you'll need to give your podcast episode a title. I've called this example 'First ever podcast episode':
If you like, you can include a full description or transcript of your podcast episode in the content box just under the title in the editor. And, if relevant, you can select which series the podcast belongs to on the righthand side of the editor. You can also add any relevant tags to each episode. We'll show you listeners can filter your podcast episodes by these taxonomies later on.
If you then scroll down, you'll find the Podcast Episode Details box. Here is where you'll upload your first podcast episode.
Checklist of steps for adding each podcast episode
These are the steps you need to run through for each episode:
Select whether you're uploading an Audio or Video file, click Upload File, upload your first podcast file, then click Select.
You can manually add the duration and file size, or leave these fields blank to auto-calculate.
Add in the date recorded so listeners will know how old or new your podcast is.
If necessary, there's also the option to mark specific episodes as explicit or choose to block them from appearing in any external podcast libraries to you submit your podcast.
It's a good idea to add a summary of the episode in the Excerpt box as we can display this later in our searchable podcast library.
Add your podcast's series and any relevant tags. Users will be able to use these to quickly filter the episodes they want.
Hit Publish and your first podcast is ready to go!
Add in any remaining podcast episodes, by going to Podcast → Add New again and repeating the steps above.
Once you've added all your episodes, it's time to display them nicely on your website. Next, we'll cover how to enhance your self hosted WordPress podcast hosting, by creating a sortable podcast archive that can display your latest episodes in a convenient format.
How to list podcast episodes in an archive: quickly find episodes
Your website needs to be an easy place for visitors to listen to your podcast. Visitors should be able to find episodes they're interested in, easily listen to them, and sort through your archives. This section will show you how to list podcast episodes on your WordPress site.
Seriously Simple Podcasting lets you display your most recent podcasts, but just displaying a long list of podcasts in the order of newest to oldest isn't always the most helpful – especially if you're trying to engage new listeners or those who have missed a few episodes.
A better solution is to create a library of your podcasts by displaying them in a sortable and searchable table. This will let your listeners quickly sort through episodes, conveniently listen to them, and makes everything extremely simple for you.
The Posts Table Pro plugin can pull in all the information you've already added using Super Simple Podcasting. It uses this information to autogenerate your podcast library, in a sortable, filterable, and searchable list. This is the perfect format for podcast archives.
Plus, each time you add a new episode to your website, Posts Table Pro will update your library automatically :)
WordPress podcast hosting is superior :)
The animated screenshot above shows this in action. Note how listeners can even conveniently filter by podcast series!
In addition to the benefits mentioned already – listeners can search all your podcast episodes in one place, easily find the episode(s) they're looking for by sorting the table or filtering by series or tags, and listen to episodes directly from your podcast library – you can even add newsletter signups to this page in order to keep listeners hooked, which we'll cover after this section.
Your purchase will include instructions on installation and setup. Once installed, decide whereabouts on your website you'd like to display your podcast library. This might be on your home page, or on a separate podcasts page. In this example, we'll be putting our podcast on a homepage.
How to create your sortable table
When you've chosen where to display your podcasts, generating your podcast library is simple. Upon installing the plugin, an automatic setup wizard will initiate and provide a comprehensive guide to creating your first table.
The instructions below will describe each step involved in creating a table.
Choose a name for the library and select the post type you want to display. Here we're displaying the custom post type podcast.
Select the posts or podcast episodes to include in your library.
Customize the columns you want to display in your table by selecting which columns to add and in what order. You can also rename or hide column names and remove columns as needed. I suggest adding a column for episode date, title and listen now.
Add filters. will set your table to be filterable by the podcast series, as shown in the example below. You can also add filters like tags and categories.
Customize the sorting options for your table, including the default sorting option and the sort direction
Display your podcast library
Once you have completed creating your table with the Post Table Pro plugin, the setup wizard will confirm that you are finished and provide instructions for inserting the table onto your website. By choosing one of these two options, you can easily add your table to your website and make it accessible to your visitors.
Use the "Post Table" block in the Gutenberg editor.
Copy the shortcode from the table builder and paste it anywhere on your site. This option gives you the flexibility to place the table on any page, regardless of its content.
Ready to publish your podcast
When you're done making your library look great, click Publish and the page will publicly display the table with your podcasts. Nice work! Visitors can now easily find your entire archive of podcasts, and you've made a fantastic self hosted podcast solution.
Now your WordPress podcast hosting is all setup and your podcasts are beautifully displayed on your website, you're ready to get promoted and grow your podcast further.
This section will show you three advanced next steps you can take, two of which you can only do because you've chosen to self host your WordPress podcast hosting. We'll show you how to submit your podcast to iTunes, how to set up podcast analytics, and how to add an email signup box in order to convert listeners into long-time subscribers.
Submit podcast episodes directly to iTunes from WordPress
To increase your audience reach, you need to submit your podcast to iTunes.
Yet another useful feature of the Seriously Simple Podcasting WordPress plugin, is that it organizes your podcast episodes in an iTunes-friendly format. Once you've uploaded your episodes to your WordPress website, you're almost ready to submit them all in one go to iTunes.
Before you do, you'll just need to go to Podcast →Settings → Feed details and upload a Cover Image for your podcast.
Once you've done that, to submit your podcast to iTunes, simply go to Apple's podcast submission page and sign in using your Apple ID (or create one if you don't have one already).
The Seriously Simple Podcasting plugin will autogenerate a URL for your podcast. You can find this in your WordPress Dashboard by going to Podcast → Settings →Publishing.
The URL you need is the Complete feed and will be something similar to https://yourwebsite.com/feed/podcast
Copy and paste your Complete feed URL into the box on the iTunes submission website and click Validate:
You'll then see a preview of how your podcast will appear on iTunes.
Once iTunes is happy your podcast meets the requirements, and you're happy with how everything looks, click Submit.
Podcasts can take up to 10 days to make their way through the iTunes approval process but are often processed much faster than that. Once complete, you'll be able to see your podcast in iTunes – alongside the best podcasts in the world.
While you're waiting for your podcast to be approved on iTunes, it's worth getting your analytics set up too. We'll look at these next.
Podcast analytics
If you want to successfully grow your podcast audience, it's important to keep track of how many listeners you have, and how they're consuming your podcasts.
There is a multitude of analytics tools out there, but seeing as we've already installed Seriously Simple Podcasting, let's go ahead and use their add-on plugin, Seriously Simple Stats.
Just like the name suggests, this plugin is seriously easy to use and ideally suited to measuring the success of your podcast.
Among other things, it can measure where people are listening to your podcast (e.g. iTunes, your website, or via a download), how many listeners you have, and what your most popular episodes are.
This is all vital information you can use to optimize future podcasts, source sponsorship, and boost advertising revenue.
You can download Seriously Simple Stats free from the WordPress plugin directory. Go to Plugins → Add New then search "Seriously Simple Stats". Click Install Now then click Activate.
You can access Seriously Simple Stats right from your WordPress dashboard, head to Podcast → Stats. Your stats will start showing up here over the coming days.
The industry secret is podcast stats are horribly unreliable: keep in mind that a download to your podcast isn't necessarily a listen to your podcast. My podcast app, for example, downloads the latest episode of my favorite podcasts every week. I don't necessarily listen to them, and if I do listen, I don't necessarily listen all the way through.
Don't be disheartened by this; given podcasts are downloaded and listened to separately, there's no prospect of fixing this in the short term. What you can do, however, is keep your listeners hooked by connecting with them in your email inboxand your podcast app. We'll cover how to handle this next.
Collect email subscribers for your podcast using MailChimp
Don’t miss out on turning one-off listeners into long-term subscribers! Getting inside your listeners' email and their podcast app is a great way of ensuring listeners know about the latest episodes, and what you're doing, and are excited about the podcast in the long term.
We'll let you collect email subscribers by adding an email subscription box to your podcast page using MailChimp and the MailChimp for WordPress plugin. This is a major benefit of handling your WordPress podcast hosting yourself.
First, sign up for a free MailChimp account if you don’t already have one. The free account lets you have up to 2,000 subscribers, which is plenty to be started with.
Next, add the MailChimp for WordPress plugin to your site:in your WordPress Dashboard, go to Plugins → Add New, then search "MailChimp for WordPress plugin". Click Install Now then click Activate.
You’ll need to pair this plugin with MailChimp. From the Dashboard, head to MailChimp for WP→ MailChimp, and click Get your API key here. Copy your API key from MailChimp and go back to MailChimp for WP→ MailChimp. Paste the key into the API Key box and click Save Changes.
Once connected, you’ll also need to create a new list in MailChimp to start collecting email subscribers. From MailChimp, go to Lists→ Create List→ Create List, and fill out the details.
Add your email signup form to WordPress
Next, create the signup form for your website. From your WordPress Dashboard, go to MailChimp for WP→ Form, give your form a title, select the MailChimp list you want subscribers to be added to then click Add new form.
The plugin will generate a shortcode for your form. Click Get shortcode, copy the shortcode, and paste it on your podcast library page so listeners can easily subscribe to future episodes:
You'll be collecting podcast subscribers in no time! Hooray! You know, however, need to be emailing new episodes out to your subscribers. You can automate this by connecting your podcast RSS feed to Mailchimp. Our popular tutorial on how tocreate an RSS-Driven Campaign in MailChimp shows you how to do this, and take a step out of your podcast email setup.
Best practices for podcast SEO on WordPress
Search Engine Optimization (SEO) is crucial for any website or content to gain visibility on search engines such as Google. It involves optimizing your website's content to make it easier for search engines to crawl and index, and ultimately rank it higher in search results. Similarly, optimizing your podcast for SEO can help it reach a wider audience and increase its visibility.
Tips for optimizing your podcast for search engines
Use descriptive titles and descriptions: Make sure to use descriptive titles and descriptions that accurately reflect the content of your podcast episodes. This will help search engines understand what your podcast is about and display it in relevant search results.
Include relevant keywords: Identify relevant keywords and incorporate them naturally into your titles, descriptions, and episode summaries. However, avoid keyword stuffing, which can negatively impact your SEO.
Use transcripts: Transcripts of your podcast episodes can be helpful for SEO as they provide search engines with text to crawl and index. They also make your content more accessible to those who may prefer to read or skim content rather than listen to an entire episode.
Optimize your website's metadata: Ensure that your website's metadata, such as titles and descriptions, are optimized for SEO. This can help your website rank higher in search results, which can indirectly help your podcast gain more visibility.
Use internal linking: Internal linking, or linking to other relevant content within your website, can help improve your website's overall SEO. By linking to other relevant content, you can also help search engines understand the context and relevance of your podcast.
Troubleshooting common WordPress podcast hosting issues
Even with the best WordPress podcast hosting, issues can sometimes arise. Here are some common issues you may encounter and how to troubleshoot them:
Slow website performance
Slow website performance can lead to a poor user experience and may cause visitors to leave your site. This issue can be caused by a number of factors, such as poorly optimized images, an outdated WordPress version, or a plugin conflict.
To troubleshoot slow website performance, you can use tools like Google PageSpeed Insights or GTmetrix to analyze your website's speed and identify areas for improvement. You can also try optimizing your images by compressing them and resizing them to the appropriate dimensions. Updating WordPress and plugins to their latest versions can also improve website performance.
Audio file playback issues
Audio file playback issues can be frustrating for listeners and may cause them to stop listening to your podcast. These issues can be caused by incorrect file formatting or encoding, insufficient bandwidth, or compatibility issues with the podcast player.
To troubleshoot audio file playback issues, make sure that your audio files are in the correct format (usually MP3) and encoded at the appropriate bitrate. Check your web hosting plan to ensure that you have sufficient bandwidth to handle podcast downloads and playback. You can also test your podcast on different podcast players to ensure compatibility.
RSS feed issues
RSS feed issues can prevent your podcast from being distributed to popular podcast platforms like Apple Podcasts and Spotify. These issues can be caused by incorrect RSS feed formatting, missing or incorrect tags, or a plugin conflict.
To troubleshoot RSS feed issues, use a tool like Cast Feed Validator to analyze your RSS feed and identify any formatting errors. Ensure that your RSS feed includes all the necessary tags, such as title, description, and artwork. If you are using a podcast plugin, try disabling it to see if it is causing the issue.
Self podcast hosting is easy! Now you're ready to go
Choosing to manage WordPress podcast hosting yourself is remarkably easy, and this tutorial has shown you everything you need to know. We've shown you how to set up WordPress, add the podcast, and then make use of features you can only get if you self host your podcast, including a sortable archives page, and effective email signups.
Just to recap, here are the main steps needed to host your own podcast using WordPress:
Set up a WordPress website – with managed hosting and a simple theme.
Customize your searchable podcast library using the table builder.
Power up your podcast by submitting it to iTunes right from your website, and monitoring your analytics using Seriously Simple Stats.
Automatically email your podcast subscribers with new episodes.
Now you have the equipment to make your podcast and your website can delight listeners.
Please let us know how your self-hosted podcast library is working for you. We can't wait to see the clever things you do with it!
Whether you are a small business owner looking to expand your product offerings or a large retailer looking to tap into the wholesale market, this free guide is for you. Discover everything you need to know about how to create a WooCommerce wholesale website.
WooCommerce is great for creating an e-commerce site, but it doesn't distinguish between retail and wholesale customers. That's no good because B2B buyers have different needs from other customers. As well as needing wholesale pricing and discounts, they're already familiar with your products and want a quicker, easier way to buy.
The problem is: How can a company like yours create a wholesale website without affecting the experience for normal public customers?
Luckily, there's an easy solution - which we'll cover in this complete step-by-step guide on how to create a WooCommerce wholesale website. Keep reading if:
You're looking to start a wholesale business or expand your existing business and tap into the wholesale market.
You currently sell wholesale products through manual orders and want to automate this with a wholesale ecommerce store.
There's already a wholesale ordering plugin on your website, but it doesn't fully meet your needs.
This tutorial will take you through the process of creating a wholesale website from scratch. You will learn how to:
Add a WooCommerce wholesale area to your existing online store (without changing anything for retail customers).
Create a 100% private wholesale-only online WooCommerce store.
Add a wide range of B2B features - including wholesale registration forms, pricing, custom user roles, and choosing which products to show in the WooCommerce wholesale and/or retail areas.
Grow your wholesale revenue by adding quick one-page order forms, designed specifically for wholesale.
Add a range of bonus features to make the wholesale buying experience even better.
By the end, you will have a fully functional WooCommerce wholesale website.
And the best part? You can set it up in 15 minutes, then sit back and let it do all the work for you. It’s way faster and way cheaper so you can start selling your wholesale products today!
Your complete guide to creating a WooCommerce wholesale ordering store
This step-by-step guide will show you how to use the WooCommerce Wholesale Pro WordPress plugin to create a wholesale website. We'll cover all the essential features:
How to create a private wholesale areaDiscover the easy way to restrict access to your WooCommerce wholesale ordering store. You can either create a completely hidden B2B store; or a public retail WooCommerce store with private wholesale area. It comes with everything you need including unlimited wholesale user roles and user registration (with or without moderation). You can also choose which products to show in the public and/or wholesale stores.
Set wholesale pricing and discountsNearly all WooCommerce wholesale websites need to charge different retail prices and wholesale prices. What's more, many also need to charge different wholesale pricing to different groups of wholesale users. I'll show you how to add 3 different types of wholesale dynamic pricing.
Create user-friendly wholesale layouts and order formsFinally, you'll learn how to list products in an easy-to-use WooCommerce wholesale ordering form. B2B customers don't want to browse through multiple pages or look at big images, so a wholesale quick re-order list is a must.
At the end of this tutorial, you will know how to create a WooCommerce wholesale website with all these amazing features. It's easier to set up than other WooCommerce wholesale plugins or WordPress membership plugins. You'll have everything you need to create a wholesale website today.
This guide is also beginner friendly, which is perfect for anyone learning how to start a wholesale business or sell wholesale products for the first time.
1. Set up your basic WooCommerce store
If you haven't already done so, then you need to create a WordPress website with a domain name. You should also install the WooCommerce plugin on it. (If you don't know how, check out this guide on How do I set up a WooCommerce shop?) Add some products to get started. At this stage, all your products will be publicly available and presented in the default layout.
Keep reading to learn how to add a hidden WooCommerce wholesale area.
2. Create a private WooCommerce wholesale ordering area
Firstly, you need to create a wholesale WooCommerce store which is hidden from public view so that only approved wholesale customers can access it. You might choose to set up a standard online retail WooCommerce store with a separate private wholesale area. Or you can even have a 100% hidden WooCommerce wholesale ordering store that no one else knows exists!
You can do all of this with WooCommerce Wholesale Pro. You'll learn how to use this fantastic WooCommerce wholesale plugin to add:
User roles - create additional wholesale custom user roles.
Wholesale products - you can either use the same products in the public and wholesale areas (with special pricing and order forms for wholesale users, of course); or you can have completely different products for retail and wholesale.
Menu links - Set up the wholesale website navigation.
All these steps are optional, so you can stick with the default options to set up the WooCommerce wholesale app even more quickly.
2a. Install the WooCommerce wholesale plugin
To get started, buy the WooCommerce Wholesale Pro plugin. Install and activate the plugin, then add your license key using the instructions in the confirmation email.
As soon as you do this, the plugin will automatically create a wholesale user role, a Wholesale Store page, and a Wholesale Login page.
Your WooCommerce wholesale website is now 90% set up, and you haven't even done anything yet!
2b. Set up wholesale registration (optional)
Secondly, log into the WordPress Dashboard and go to WooCommerce → Settings → Wholesale → General. Choose whether or not to allow new users to register for the wholesale store:
If you enable wholesale registration, then:
The Wholesale Login page will also include a registration form.
You can choose whether new wholesalers can access the wholesale area immediately, or whether their customer account will be held for moderation by an administrator first.
If you disable wholesale registration, then you can still add wholesalers manually via the WordPress admin.
2c. Edit your wholesale registration emails (optional)
The WooCommerce wholesale plugin comes with a range of emails for each stage of the wholesale registration process:
When you install the wholesale plugin, these emails will be pre-populated with suitable wording. You can easily edit the emails at WooCommerce → Settings → Wholesale → Roles if required.
Once registered, wholesale users will receive the same emails as your normal customers. These are provided by WooCommerce rather than the wholesale plugin.
2d. Add extra wholesale user roles (optional)
The WooCommerce wholesale plugin automatically creates one wholesale user role. If you want to charge different wholesale prices to different wholesale users, then you need to create a separate user role for each group.
You can easily do this at WooCommerce → Settings → Wholesale → Roles:
If you enabled wholesale registration, then new wholesalers will be added to the default wholesale user role. You can then change their user role manually (for example, when you approve their account).
If you add new wholesale users manually via Users → Add New in the WordPress admin, then you can select the appropriate wholesale user role from the 'Roles' dropdown.
2e. Control the visibility of your WooCommerce wholesale products (optional)
By default, all the products in your WooCommerce wholesale store are available to everyone. Public users and normal customers see the standard price for each product, while wholesale users see the correct price for their role.
If you prefer, then you can choose whether each category of products is visible to public users or wholesalers only. You can easily do this under Products → Categories:
This lets you sell different products or SKU's to retail and wholesale buyers.
Tip: If you need more advanced visibility options - for example, to restrict products to individual users or specific wholesale user roles - then you can do this by using WooCommerce Wholesale Pro with our other plugin, WooCommerce Protected Categories.
2f. Set up the wholesale website navigation
Finally, you need to structure your wholesale website so that people can easily find their way around. This only takes a minute:
Link to the wholesale login pageSome WooCommerce wholesale websites add a wholesale login link to their public website, while others keep this private. You can add a link to the 'Wholesale Login' page to your menu or anywhere else on your site (e.g. the footer). Or if you want to hide the fact that you have a wholesale store, then you can send a link to the Wholesale Login page to your distributors (e.g. in the email to new wholesale users). As a result, retail customers will never know there's a hidden wholesale area.
Edit your navigation menuThe WooCommerce Wholesale Pro plugin cleverly shows and hides your menu links so that each user only sees pages they have access to. Make sure the main menu on your site contains all the required links for both the public and wholesale users. Each one will only see the correct links for them. For example, public visitors or normal customers will see the link to the Wholesale Login page. But they won't see any other links to wholesale-only content. If they login as a wholesale user, then the menu changes to hide any public-only links and display the wholesale-only content. Neat!
Case study: Wholesale navigation for Best Remy Hair Extensions
NRD Web Design used WooCommerce Wholesale Pro to create a wholesale website for their client Best Remy Hair Extensions.
To ensure that wholesalers can find the hidden products and pricing, they added clear 'Wholesale Login' and 'Wholesale Registration' links to the website header. This creates an intuitive user experience for wholesale buyers, without affecting the navigation for normal customers.
Richard Davenport from NRD Web Design was delighted with his client's WooCommerce wholesale website (and his experience with Barn2 in general). He said:
Barn2 are really leading the way in customer service, and quality of product and communication. Their newsletters are one of the very few I am happy to receive, and am always actively interested to read about the new features (or plugins) that they are working on or have released. I point my people in their direction quite regularly.
3. Set up wholesale pricing and discounts
The next step is to add the correct pricing and discounts for your wholesale users. You can set different pricing for each wholesale role - perfect if you have tiered wholesale discounts for different groups.
When you create a wholesale website with WooCommerce Wholesale Pro, there are 3 easy ways to set prices:
Global percentage discountOn WooCommerce → Settings → Wholesale →Roles, set a % discount for each wholesale role. This will be deducted from the wholesale price of all products for users with that role, except for any products that have a category or product-specific discount.
Category percentage discountFor greater control, you can set category-level % discounts which will affect all products in that category and its sub-categories (except for any products where you have entered individual wholesale pricing).
Product-specific wholesale pricingFor even more fine-grained control, you can set specific wholesale variable prices for each product or variation. (Note: This option only appears for roles where you have enabled product-specific pricing on WooCommerce → Settings → Wholesale →Roles.)
An example of setting product-specific wholesale pricing for a variable product
Logged-in wholesale users will see the correct product pricing for their user role. The main price will appear crossed out, and the wholesale price will appear alongside.
If the product is also visible to guest users and non-wholesale user roles, then they will see the standard price as usual. Your WooCommerce wholesale pricing will remain secure and only wholesale users will ever be able to see it.
You can combine the different types of wholesale pricing as required, and the plugin will always show the correct price. For example, if you set a global, category-level AND individual product discount then wholesalers will just see the individual product discount. If there is no product-specific wholesale price then wholesalers will see the category discount, and so on.
How to set wholesale prices on your WooCommerce store
3a. Add a global wholesale price
Go to WooCommerce → Settings → Wholesale → Roles.
Click to edit each wholesale role.
Add a whole number in the global discount field. This percentage will be deducted from all products, unless it is overridden by a category or product-specific wholesale price.
3b. Add category wholesale pricing
Go to Products → Categories.
Either add a new category or edit an existing one.
Add a whole number for each wholesale role. This will be deducted as a percentage discount off all the product pages (except for products where you set an exact wholesale price).
On this screen, you can also hide the category from public or wholesale users if required.
3c. Add exact wholesale product prices
Go to the main Products list in the WordPress admin and click on the product you want to add an exact wholesale price for.
On the 'Edit Product' screen, scroll down to the 'Product Data' section. For simple products, go to the 'General' tab and add an exact price (not a percentage discount) for each wholesale user role. For variable products, go to the 'Variations' tab and enter an exact wholesale price per variation.
4. Create user-friendly wholesale layouts & order forms
So far we've covered the best ways to protect your wholesale area from public users and to set wholesale pricing. But that's only half the journey to creating a WooCommerce wholesale website.
The other half is the layout of your wholesale area. This is more to do with user experience and growing your wholesale sales rather than functionality.
There's little point having a private wholesalers section if it's clunky and difficult to use, or if it looks identical to your retail shop. You need to ensure that you're offering a visually different experience that's better catered to the needs of wholesalers.
Public ecommerce shops tend to use a standard layout with large product images and basic information. This retail-style layout isn't suitable for most WooCommerce wholesale stores. But strangely, nearly all WooCommerce wholesale plugins neglect this important fact, and leave the wholesale ecommerce area looking the same as the public shop.
To fix the problem, WooCommerce Wholesale Pro is designed to work alongside its sister plugin - WooCommerce Product Table.
WooCommerce Product Table offers a wholesale-friendly order form layout
Products are listed in a responsive space-saving grid or tabular layout with extra product data and instant purchase options.
A product table wholesale layout provides an easy way for B2B customers to re-order their regular products. Customers see all the information at a glance, select quantities and variations, and can quickly re-order their list from a single page.
I used another plugin suite to set up the wholesale area and it worked great except the Wholesale Order Form wasn't flexible enough for my client's needs. Wholesale Product Table to the rescue. It was much more flexible and customizable and support answered my questions quickly and was great to work with.
On the first page, select the 'Shop pages' option, then on the following page select the 'Wholesale Store' page template to display the product table.
On the remaining pages, choose the default settings for your wholesale order forms. You can customize every detail of your tables, from the styling to the table columns, filters and sort order.
Now when wholesale users access your site, they will see the products displayed in the order form layout. Your normal customers will continue seeing your default store layout, unless you create product tables for those page templates too (e.g. the main shop page).
4b. Getting more sales from your wholesale product tables
Choose what to display in your wholesale order form
ColumnsThe table can contain various columns. It supports all the main WooCommerce data fields (title, description, categories, product attributes, tags, stock, etc.). You can also add extra product data through custom fields and taxonomies.
"Add to cart" buttonsBy including add to cart buttons, wholesale customers order online directly from the product table view. Choose whether to include a quantity selector and product variations. You can also create further options using the Product Options plugin. This way, you can create a wholesale order form for easy bulk ordering and quick re-ordering.
Wholesale enquiry formsYou can replace the add to cart column with wholesale enquiry buttons. By adding buttons or links to the wholesale table, users can click through to a separate page with an enquiry form (created using a WordPress contact form plugin). Alternatively, use WooCommerce Product Table with a Request a Quote plugin.
Downloadable documentsLots of Woo wholesale websites provide downloadable files with technical product information. This is useful for downloadable promotional materials, specification documents, etc. You can add a column with an icon, button or text for each product linking to a downloadable PDF or similar.
Search, sort & filtersUse filters to help wholesale buyers to find products quickly and easily.
4c. Use quick view to speed up wholesale ordering
Add quick view buttons or links to the wholesale order form.
Use product tables with our WooCommerce Quick View Pro plugin
By now, you know how to create a WooCommerce wholesale website order form. But what if you want to show even more information or purchase options, without taking wholesale users to a separate page for each product?
You can do this by adding the WooCommerce Quick View Pro plugin. This wholesale quick view plugin lets you add quick view links or buttons to the order form. Trade customers can view extra product information, choose variations and add to the cart from a quick view lightbox.
Once they have made their selections, they immediately return to the wholesale order form where they can add more products to their order. As a result, it's much quicker than buying from a separate page.
There are lots of ways to tailor the quick view lightbox to your WooCommerce wholesale website. For example:
Choose whether or not to include images in the quick view popup. Many wholesale websites sell non-visual products, so there's no need to distract buyers with big images.
Decide whether to include quick view buttons, or just let customers open the lightbox by clicking the product name or image.
Change the wording of the Quick View button (e.g. to 'Configure Options', 'Read More' or 'Customize Product').
Choose which information to display in the wholesale lightbox.
5. Test your WooCommerce wholesale website
Now you've set up the WooCommerce wholesale plugin. It's also important to test the experience for both public and wholesale specific users.
Log out and visit the shop as a guest. Can you see the correct products and pricing?
Now login as a wholesale user. Again, can you see the correct products and pricing? Are the menu links intuitive, and can you see the wholesale order form layout (if you're using WooCommerce Product Table)?
Go back to the plugin settings and continue tweaking your wholesale website until it's perfect.
6. Add wholesale users to your WooCommerce store
Once you've finished testing the WooCommerce wholesale plugin, it's time to start adding wholesale users.
If you have enabled wholesale registration, then people can register for an account on the Wholesale Login page. You might also want to add wholesale users yourself. There are a few ways to do this:
Add wholesale users manuallyCreate a user account (Users → Add New) in the WordPress Dashboard for each wholesale user. Assign them to one of your wholesale roles.
Convert existing customers to wholesaleIf you want to convert an existing customer to wholesale, then you can easily do this by editing their account and choosing a wholesale user role from the 'Roles' dropdown.
Bulk import themIf you're migrating from another B2B plugin or ecommerce system and have a lot of wholesale users to import, then we have provided instructions on how to do this.
Whichever method you use to add them, your B2B e-commerce users can log into their account and access the private WooCommerce wholesale area. Guests and other user roles will never know it exists!
Bonus tips
Create a 100% private wholesale store
Some wholesale websites don't have a public ecommerce area at all. You can set up the WooCommerce wholesale plugin without a retail-facing store.
To do this, make sure all your product categories are marked as 'Wholesale Only'. This will hide them from public view and from search engines.
If you want to hide other parts of WooCommerce too - for example, the links to your cart and checkout pages - then we recommend using WooCommerce Wholesale Pro with our other WooCommerce B2B plugin, WooCommerce Private Store. Use WooCommerce Wholesale Pro for your wholesale registration, login, and to set different wholesale prices for each wholesale role - and use WooCommerce Private Store to ensure that those extra parts of your store are hidden from public view. (Note: Your non-WooCommerce pages - such as the homepage and blog - remain public.)
WooCommerce Private Store is designed specifically for stores that don't sell to the public. Just read what this happy customer said about it:
Building a wholesale store, with a plugin, where only my accepted dealers can obtain access, was exactly what I was looking for - and Barn2Media provided exactly that plugin....
After watching the YouTube videos and communicating with Barn2Media, I had no doubts, that this was the right plugin for me - and it works just perfect....
Hide prices from non-wholesale users
Perhaps you have a wholesale-only store where you want the public to be able to browse the products, but not see the wholesale pricing. You can do this by enabling the 'Hide Prices Until Login' feature in WooCommerce Wholesale Pro.
This will hide the prices and add to cart buttons from logged out users. When non-wholesalers visit your store, they can browse products as usual, but the prices and purchase options will remain hidden.
Create wholesale-only products and pricing
Some WooCommerce wholesale websites provide specific products and/or pricing for each customer. For example:
You might sell custom products (e.g. branded items) that are specific to each wholesale user.
Alternatively, you might sell the same products to all your wholesalers, but need to charge user-specific pricing.
Luckily, the WooCommerce wholesale plugin comes with built-in product visibility options. You can choose whether each product category in your online store is available to retail customers, wholesale users, or both.
This is how to create wholesale-only products which are hidden from your retail store:
First, set up WooCommerce Wholesale Pro, as described above.
Next, go to Products → Categories in the WordPress Dashboard.
Add or edit a product category. Either way, find the 'Visibility' settings which are added by the WooCommerce wholesale plugin. The default is 'Public and Wholesale', so change this to 'Wholesale Only'.
Create retail-only products
Of course, you also might want to create products which are available to public retail customers but not wholesale users. You can do that with WooCommerce Wholesale Pro too.
Simply follow the instructions in the previous section. The only difference is that you need to set the category to 'Public Only', and this will hide it from the WooCommerce wholesale area.
Add wholesale-only payment methods
As we discussed earlier, wholesale buyers often have fundamentally different needs from normal retail customers. After all, wholesalers are regular customers who are buying in bulk, rather than browsing for their own personal use.
As a result, many WooCommerce wholesale websites need to offer different payment methods for each type of user. For example:
Imagine that you want to offer PayPal to retail customers but not wholesale buyers due to the high PayPal fees.
Maybe you want wholesale customers to pay by invoice or bank transfer/BACS, while requiring instant online payment from regular customers.
The solution is to use the role-based payments feature in WooCommerce Wholesale Pro:
Go to WooCommerce → Settings → Payments.
First, make sure you have added all the payment methods that you will be offering, such as PayPal, credit card, invoice, etc.
Next, find the 'Payment Roles' page.
For each payment method on your store, select which user role(s) it will be available to.
One you've done that, guests and normal customers will only see the payment gateways which are available to their role. Similarly, wholesale buyers will only see the payment methods for their role.
Create wholesale-only shipping methods
Shipping products to wholesale customers can be very different to shipping retail orders. That's because wholesale orders tend to be in bulk and involve much larger quantities. As a result, you may want to offer different shipping methods and costs to each type of customer.
For example:
Lots of online shops offer flat rate shipping costs or free shipping to retail customers. In contrast, they're more likely to cover their costs by offering weight-based shipping to wholesale buyers using a plugin like YITH Product Shipping.
In addition, some WooCommerce wholesale websites offer free shipping to their highest tier of wholesale users. This might be buyers with the highest historical sales, as offering free shipping is a way to reward them for their loyalty.
In the WordPress Dashboard, go to WooCommerce → Settings → Shipping.
Add all the different shipping methods and costs that you require for each shipping zone.
Now go to the 'Shipping Roles' tab within the same section.
Use the options on the page to choose which shipping methods will be available to each user role. Select different shipping methods for retail and wholesale customers.
Or if you don't want to worry about shipping to wholesale users, consider a dropshipping arrangement where the order fulfilment is handled by a third party.
Ready to create a wholesale website in less than 15 minutes?
If you've been wondering "How long does it take to create a wholesale website?" then I hope this tutorial has given you the answer.
WooCommerce Wholesale Pro is a plug-and-play solution to help store owners and developers to create a professional wholesale area in minutes. It's the best WooCommerce B2B plugin for online store owners that want to sell to different types of customers.
No technical knowledge is needed. Just follow the instructions in this tutorial, and you'll be up and running in no time.
WooCommerce wholesale plugin with quick plug-and-play setup.
In-depth documentation and video tutorials showing you ever step and every click (absolutely no way to get it wrong!).
Technical support is available if you need any help.
Zero-risk 30 day money back guarantee. Love it or get a full refund!
Get the WooCommerce B2B plugin here, and start taking wholesale orders TODAY 🚀
FAQ
1. What is a wholesale website?
A wholesale website is an online shop in which part or all of the ecommerce area is restricted to B2B (business-to-business) buyers. These buyers are typically resellers of your products. They need to buy the products at discounted trade prices so that they can mark them up when selling them to their own customers.
A wholesale ecommerce website may also have a public shop for retail customers. These public customers cannot see wholesale prices.
2. Why create a wholesale website?
You should create a wholesale website if you want resellers to be able to purchase at trade prices. Of course, you can avoid this by taking wholesale orders manually over the phone. However, it's far more efficient to let them do it themselves on your website.
This will help to grow the wholesale side of your business because it is more convenient for buyers, as well as freeing you up for more important tasks. A wholesale website can be tailored specifically to the needs of wholesale buyers, without affecting the public-facing shop. This helps to build loyalty to your brand and ensure that they continue selling your products for many years.
A dedicated wholesale order form provides a much faster buying experience
3. What is the best website builder for wholesale?
The best website builders for creating a wholesale website include WooCommerce, Shopify and Squarespace. They all make it easy to create a wholesale website without any technical expertise.
You probably use it alreadyAs the marketing leading website builder, it's likely that you already use WordPress for your main company website. You might even already use it with WooCommerce for your public ecommerce shop. As a result, the easiest option is simply to add a wholesale area to your existing site.
Excellent choice of professional-grade wholesale pluginsThere are some fantastic WooCommerce wholesale plugins available. These are perfect for adding all the features you need. This includes WooCommerce wholesale pricing, user registration, bulk order forms, minimum order requirements, and tiered pricing.
Infinitely customizableA WordPress wholesale website is completely flexible and you get full control over it. You can choose from a wide range of themes and plugins to create a unique wholesale website that represents your brand and offers a great user experience for wholesale buyers.
You own your dataUnlikely proprietary website platforms, you own your data.
100% free, and you keep the profits!WordPress and WooCommerce are both completely free to use. You'll pay a bit for a domain name, web hosting and your WooCommerce wholesale plugin. However, this works out far cheaper than using an enterprise solution where you pay a share of the profits on every sale.
An example of a WordPress WooCommerce wholesale ordering page
If you are looking to create a wholesale website, WooCommerce is a great platform to use. Next, I'll tell you how to set it up for this purpose.
4. Do you need a plugin to create a wholesale website?
If you're creating a 100% wholesale website with no retail area then you might be able to do it without a plugin. Instead of using a WooCommerce wholesale plugin, you would need to ask your hosting company to password protect the entire site. You can then give the password to your wholesale buyers so that they can login and purchase.
I believe this is a bad way to create a wholesale website because:
The entire website will be private. This means that you can't have any public pages. No homepage, no About page, no wholesale registration page. The website will be completely hidden from search engines and you will have no public online presence 🙁
Without a plugin, you must charge the same prices to all wholesale users. Plugins are essential to create multiple wholesale pricing tiers.
Passwords are easily shared and are less secure than having unique logins for each wholesale buyer.
5. What is the difference between a WooCommerce wholesale website and a standard online store?
The main difference between a wholesale store and a regular WooCommerce store is the target audience and the pricing structure:
A regular WooCommerce store is typically geared towards individual customers who purchase products at retail prices. These customers are usually looking to purchase products for personal use or in small quantities. The pricing structure for a regular WooCommerce store is usually set at retail prices, which are higher than wholesale prices.
On the other hand, a wholesale website is geared towards bulk buyers who purchase products at wholesale prices. Wholesale buyers are usually looking to purchase products in large quantities for resale purposes. The pricing structure for a wholesale store is set at wholesale prices, which are lower than retail prices.
However, a wholesale website may have other differences too. For example, a wholesale area might use an order-form style layout designed to select products more quickly, whereas a retail site is designed for browsing. A wholesale area might have different payment and shipping options from a retail store.
6. Can I showcase my offerings to both wholesale and retail customers?
Absolutely. When you use WooCommerce Wholesale Pro to create a wholesale website, you can sell the same products to different customers at different prices. Each customer sees the correct pricing for their role, so there's no duplication.
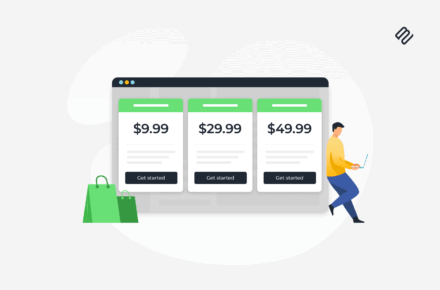
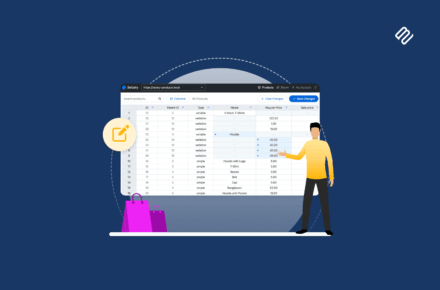
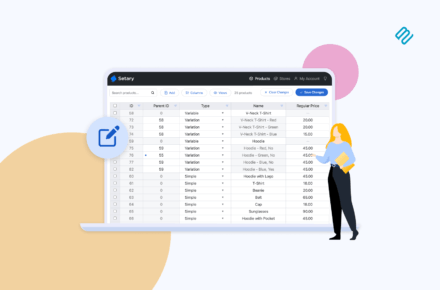


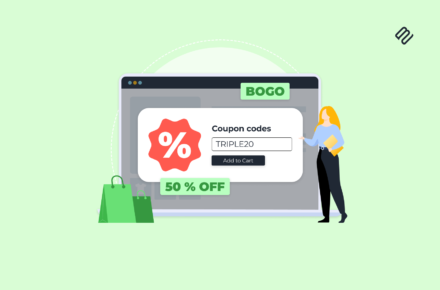
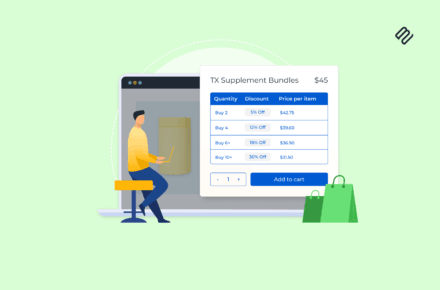

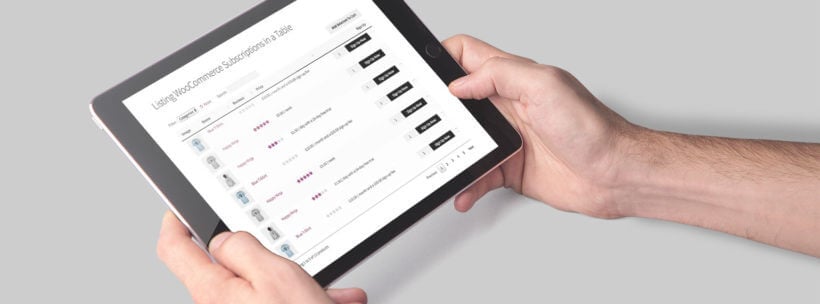
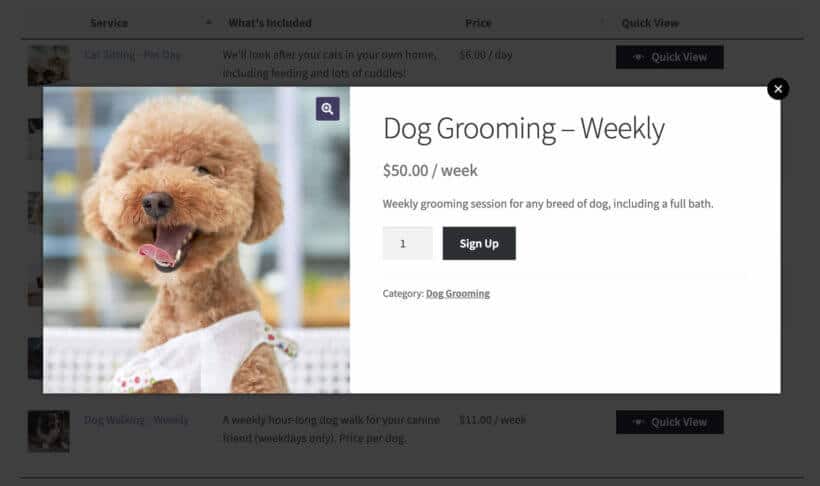
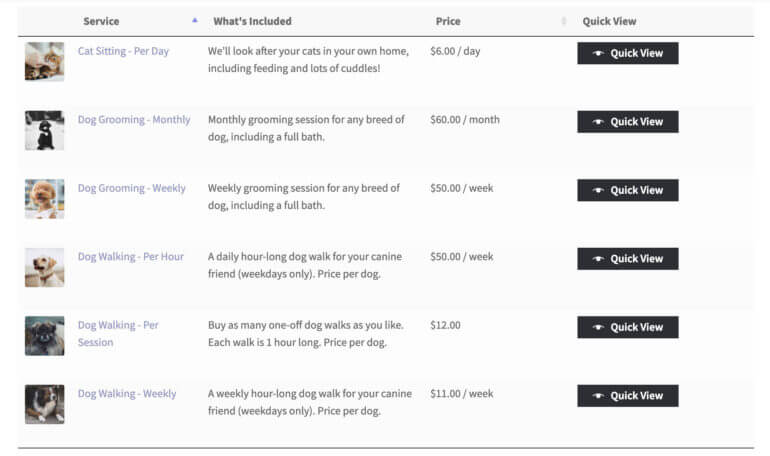
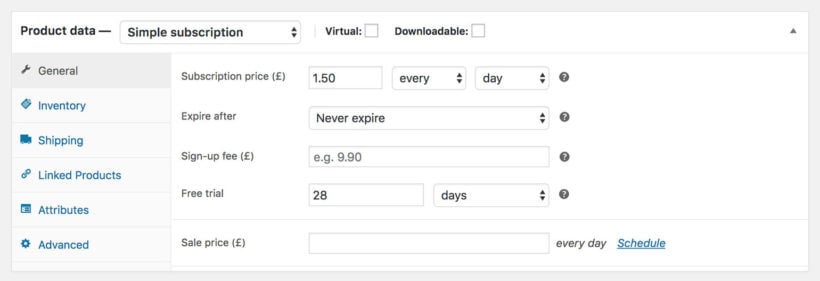
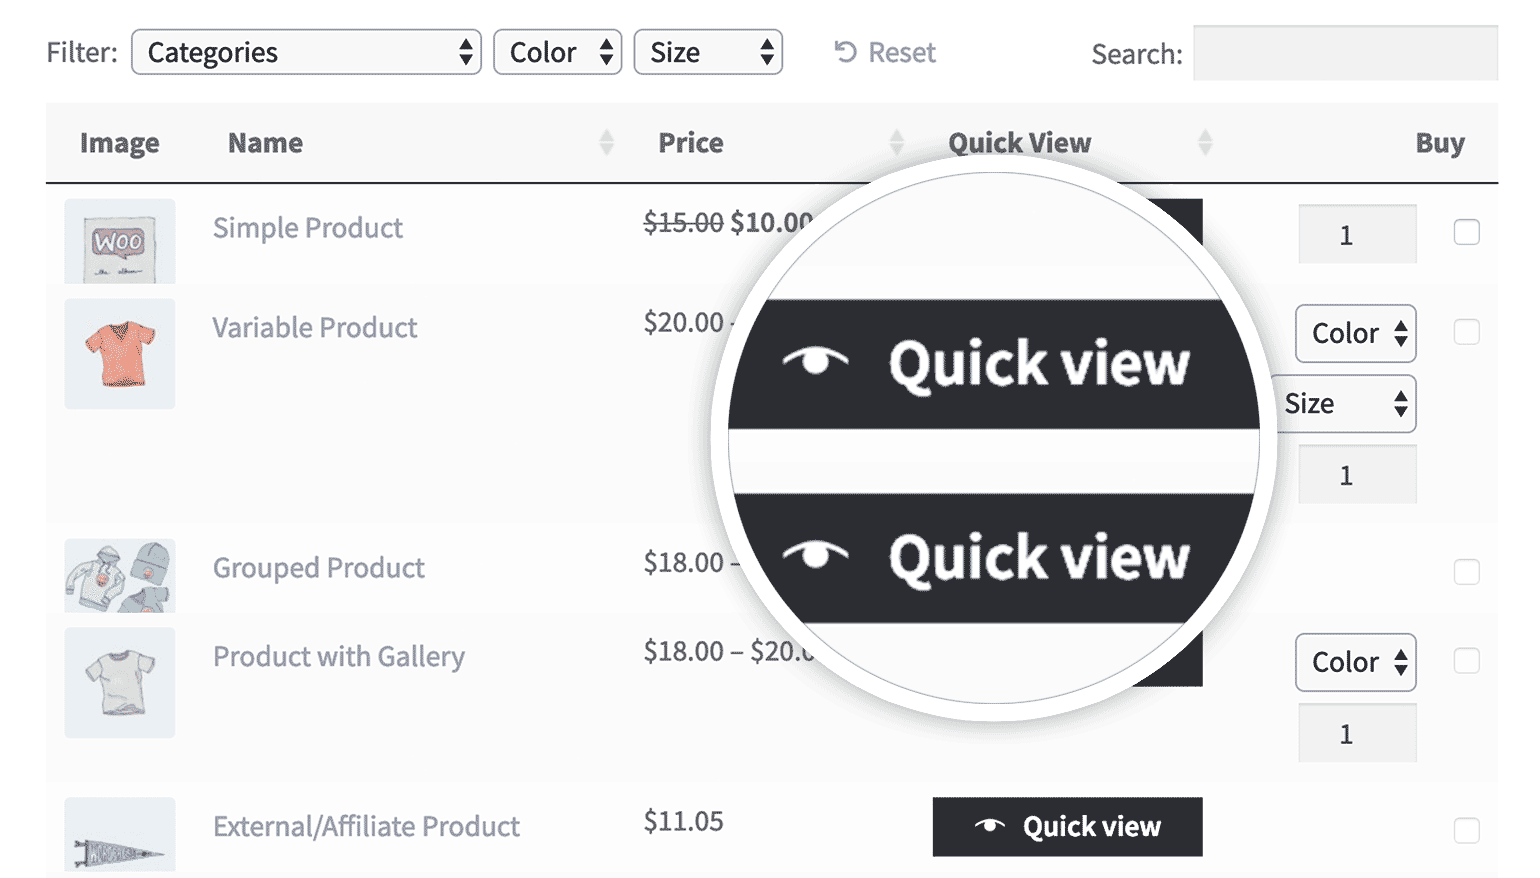
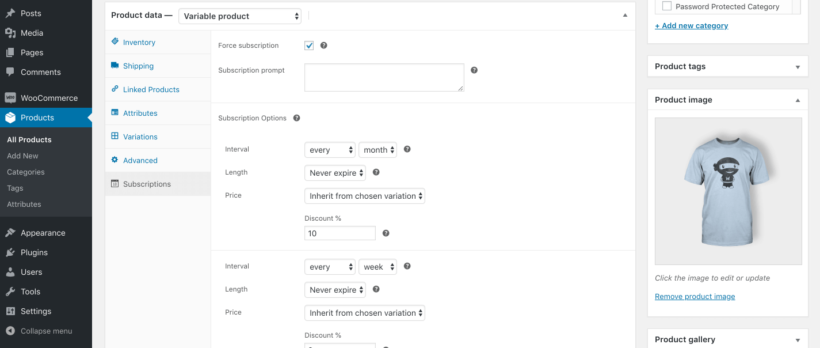
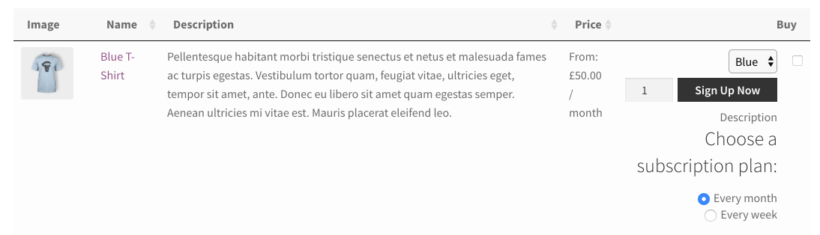
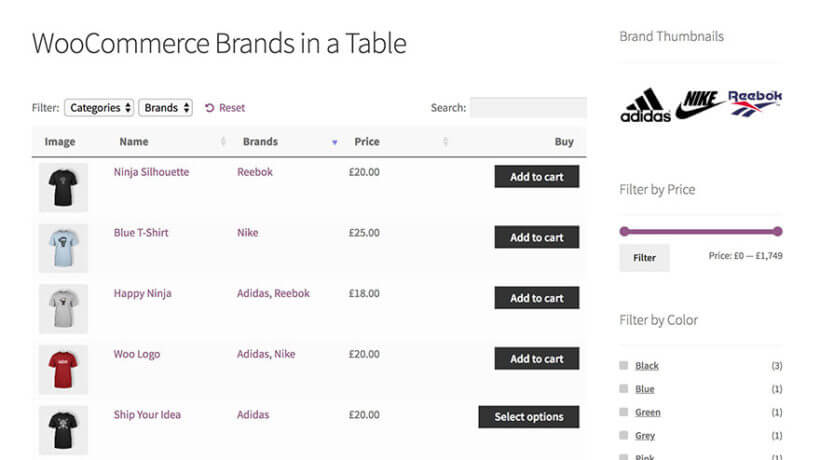


 We're delighted to announce that WPML, the market leading WordPress multilingual system, have formally tested our