2. Creating tables with Posts Table Pro
Once you’ve installed the Posts Table Pro plugin, it’s time to start creating tables. There are 2 ways to do this:
- Use the table builder *recommended*
- Build tables using a shortcode
Method 1: Table generator
Creating tables
When you first install the plugin, a setup wizard will open automatically. This guides you through a step-by-step process to create your first table.
You can also create new tables at any time by going to Post Tables → Add New.
Either way, the following instructions explain each stage of the process for creating a table.
Step 1 - Name your table
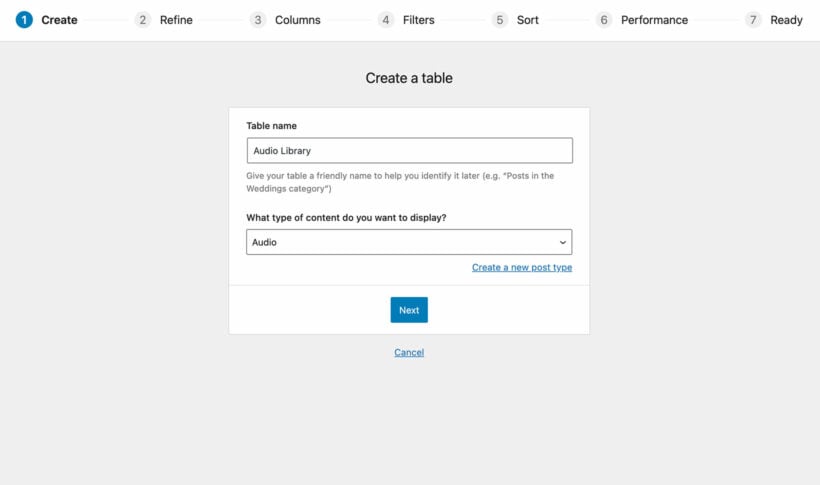
Choose a name for the table you're creating. This is just for internal use and only appears on the list of tables in the WordPress admin.
You'll also need to select the post type you want to display. If you don't have a content type yet, you can easily create one using our free Easy Post Types and Fields plugin. Just click on the 'Create a new post type' link to get started.
Step 2 - Choose your posts
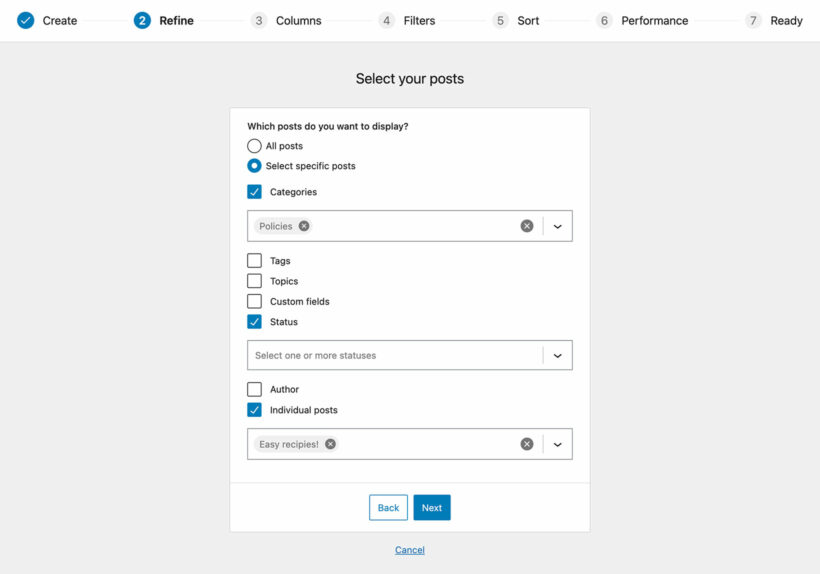
Select which posts or pages to add to your table. The options on this page will depend on which post type you selected on the previous page. For example, if the post type has any custom taxonomies then these will be listed.
Need more options? There are additional options which you can add directly to the shortcode, such as excluding specific posts or categories.
Step 3 - Customize your table columns
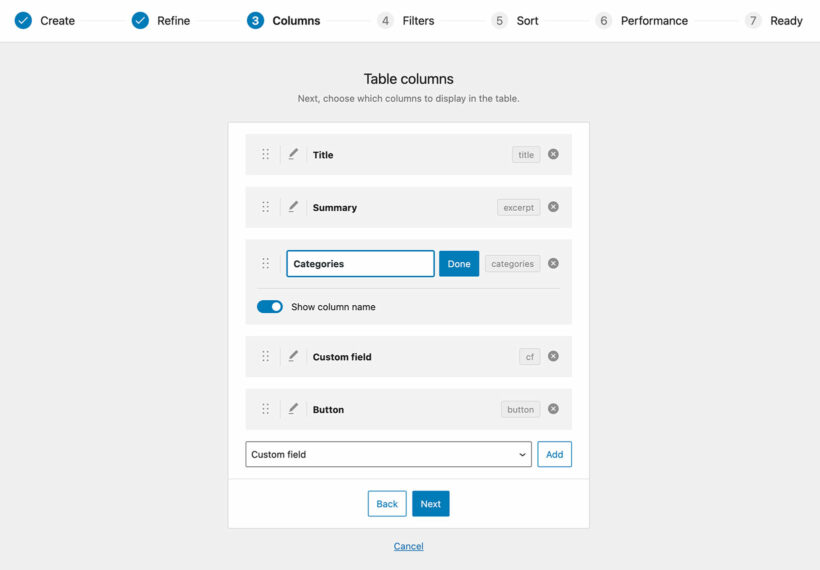
Select and modify the columns you want displayed in your table:
- To add a column, select the type of column from the dropdown and click 'Add'. It then appears in the list of columns above.
- Re-order the table columns by dragging and dropping the sort icon on the left or the column title. The columns listed first appear towards the left of the table.
- Click the pencil icon to change the name of the table, and then click 'Done'. Alternatively, use the toggle hide the column name completely.
- Use the X icon to remove a column.
Learn more about the available table columns and how to use each one.
Advanced column options
Enable the 'Advanced' toggle to view additional options for each column. These vary depending on the column and include:
Show column heading
Enable or disable this toggle depending on whether you want to display a label in the column heading.
Column type
This allows you to choose the type of column for custom field or taxonomy columns:
- Text - This is the default and means that the column will be sorted alphabetically.
- Date - Use this if you are displaying dates in the table, for example within a custom field. This means that the column will be sorted by date.
- Number - Select this if you will be displaying numbers in the column and wish to sort the column numerically instead of alphabetically.
Width
Posts Table Pro automatically sizes the columns for the best fit. You can override this behavior and control the column widths manually by entering one of the following values for each column as needed:
- % - Enter the percentage of the table width that the column should take up. If you enter this for all columns then the total must be 100.
- px - Enter the number of pixels wide that the column should be. If you enter this for all columns then the total must be the same or less than the total available space. Generally, we recommend using the percentage option because it gives more reliable results on different screen sizes.
Responsive visibility
Select from the dropdown to control which devices the column will be visible on.
Responsive priority
Setting a priority level for each column is useful when displaying the table on smaller screen sizes (mobiles, tablets, etc.) or when you have too many columns to fit. When the screen size gets too small, the plugin will collapse certain columns down so they are no longer visible, and a "+" icon will appear at the left of each row. This allows the user to expand the row to show its full contents.
Enter priorities to control the order in which columns are "collapsed" on smaller screens. The lower the number, the higher priority that column has. For example, a column with a priority of "1" would have the highest priority and be collapsed last.
Step 4 - Add filters
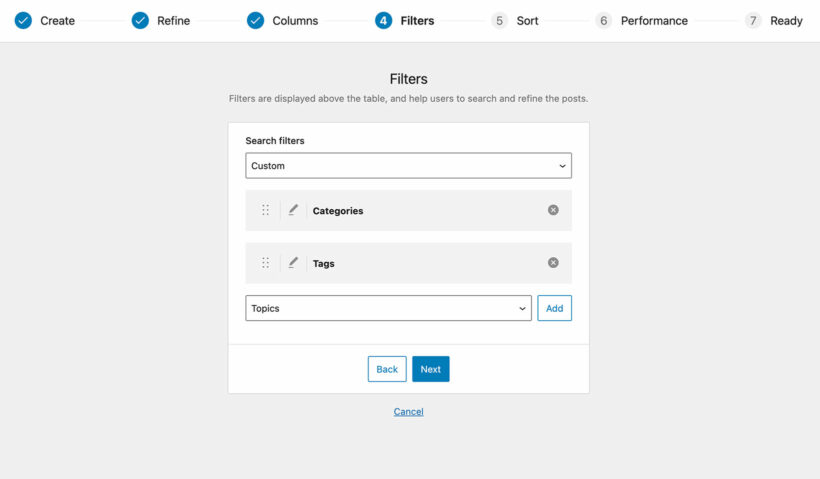
Add filters to your table to help users narrow down their selections. The filters appear as dropdowns above the table and you can add as many as you like.
The options on this page will change depending on which post type you selected on the first page. For example, normal blog posts can have filters for categories, tags, plus any custom taxonomies you have added. Other post types don't have built-in categories and tags, so they will just list any custom taxonomies that you have added to them (e.g. using the Easy Post Types plugin).
Learn more about the available filters and how to use them.
Step 5 - Speed up the table
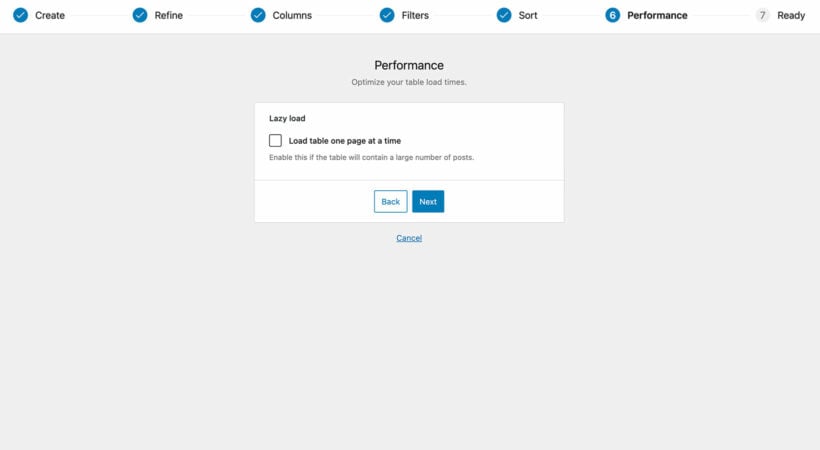
Enable lazy loading to ensure performance remains optimal even with hundreds or thousands of items in the table. However, there are some other implications of using lazy load, so make sure you read about how it works first.
Step 6 - Choose how to sort the table

Customize the sorting options for your table. The available sort options will change depending on whether or not you enabled lazy load on the previous page.
Step 7 - Finished!
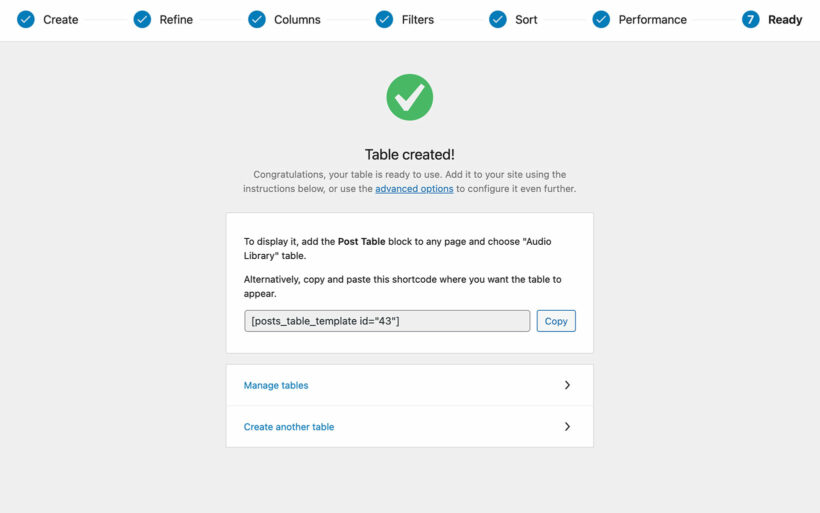
The final page confirms that you have finished creating the table and provides instructions on how to insert it onto your site.
Need more options? The table builder only includes the most popular options, and there are many more which you can either configure on the plugin settings page or directly in the shortcode.
Inserting tables
There are two easy ways to add the finished table to your site:
- Either use the Gutenberg editor to insert a 'Post Table' block...
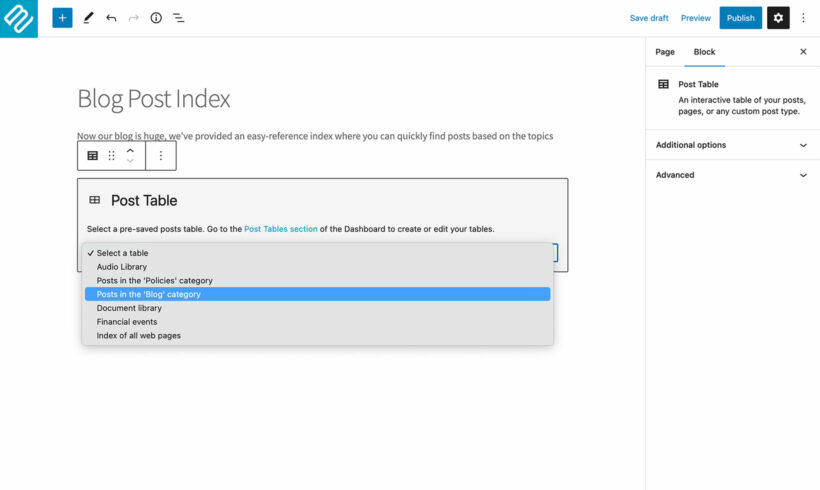
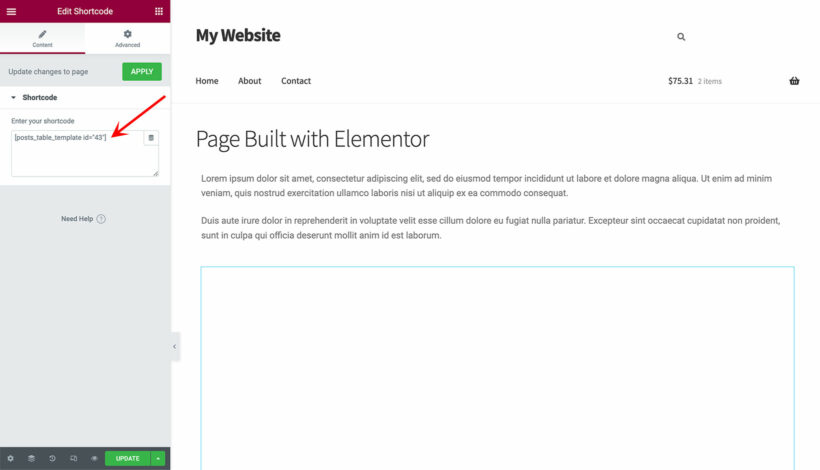
- Alternatively, if you're not using the block editor, then copy the shortcode from the final page of the WordPress table builder. You can then paste it anywhere on your site. Use this option if you're using Classic Editor or a page builder plugin like Elementor. The shortcode for each table also appears on the main list of tables in Post Tables → Tables, so you can easily access it at any time.
Method 2: Build tables using a shortcode
Posts Table Pro also comes with a [posts_table] shortcode which you can use to create tables manually. This is more technical than using the table builder, but it can be a useful option if you are comfortable working with shortcodes.
Unlike the table builder method, this method generates tables directly on the page where you add the [posts_table] shortcode. The tables are not stored in a central location - you simply add the shortcode directly to the page where you want to create the table and add the options there.
The following video explains how to use the shortcode method in Posts Table Pro:
Using the basic shortcode
The basic [posts_table] shortcode will create a table listing all your posts, using whichever post type is selected on the plugin settings page. All the other options in the table - such as the columns and sort order - will be inherited from the defaults on the plugin settings page.
To add the [posts_table] shortcode to a page, simply insert it to any page, post, widget or other location on your site. For example, you can add it to a text block, code block or shortcode block in your chosen page builder.
![[posts_table] shortcode added to a 'Shortcode' Gutenberg block](https://barn2.com/wp-content/uploads/2018/12/Posts-table-Gutenberg-back-end-770x459.png)
Creating more complex tables
There are dozens of shortcode options which you can use to create more advanced tables. For example, you might want to add shortcode options in order to control which items to include in the table; or to override some of the default options from the plugin settings page. This allows you to create as many tables as you like, each one different.
Can I create multiple tables?
Yes, you can create as many tables as you like using either method. You can either add each table to a different page, or you can add multiple tables to the same page.
How to add posts tables to your main blog page, category pages, search results & more
If you want the posts table layout to be used automatically on other parts of your site, then you can do this by editing the archive template in your theme. This is more technical and we've provided basic guidance on how to use the Posts Table Pro layout on category archives and search results pages.
How to add data into the table
Posts Table Pro is a dynamic WordPress table plugin. This means that it creates tables automatically, containing information already stored in your WordPress database. This might be pages, posts, or any custom post type such as documents, events or members. No manual data entry is needed.
If you haven't loaded the information that you plan to display with Posts Table Pro yet, then you need to do this first. You can either add the information as WordPress posts or pages in the normal way, or create a custom post type for storing the data using a free plugin such as Easy Post Types and Fields. With this plugin, you can also create custom fields and taxonomies for storing any extra data that you wish to display.
If you have too much information to add manually, please see our article Can I import data to display in Posts Table Pro?.