Creating product tables
Once you've installed the WooCommerce Product Table plugin and activate it for the first time, a setup wizard will open automatically. As well as prompting you to activate your license key, this guides you through the process for setting up your first table.
Either watch this quick video tutorial, or read the written instructions below.
You can launch the table builder at any time to create additional tables. Do this at Products → Product Tables → Add New.
The table builder lets you create as many tables as you like and then insert them anywhere on your site using a Gutenberg block or shortcode. This is the most user-friendly option but if you prefer, then you can create tables directly in a shortcode.
The table builder takes you through the following steps:
Create a table
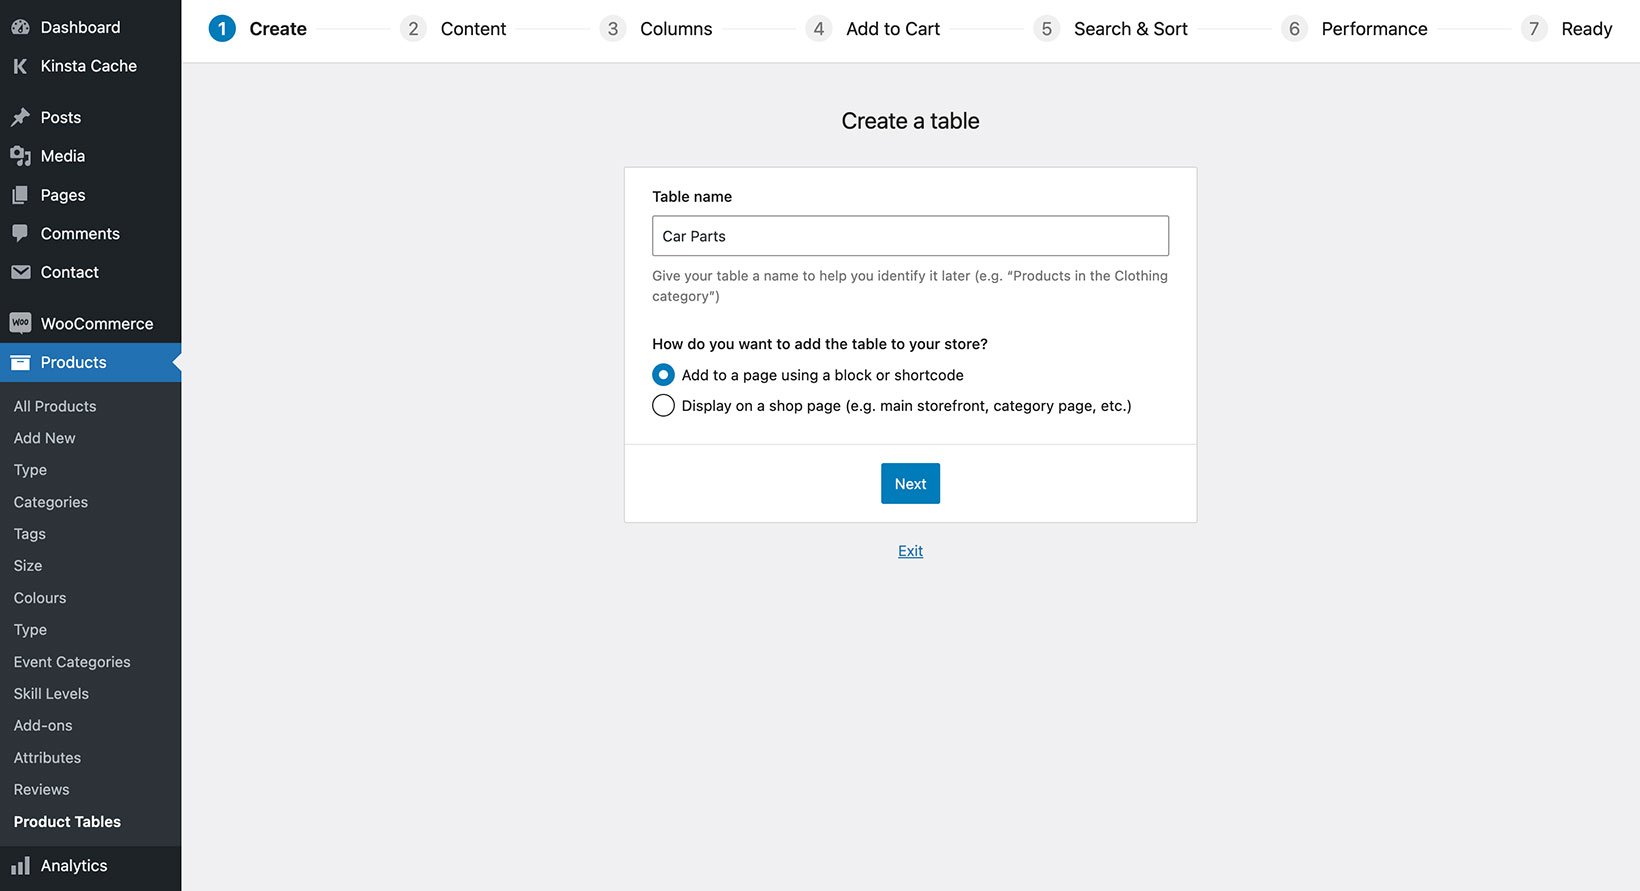
Table name - Choose a name for the table. This will only be used in the WordPress admin and not displayed on your site.
How do you want to add the table to your store?
- Add to a page using a block or shortcode - Choose this option if you want to manually add the product table to a normal page or post, a widget, or use a shortcode to insert it elsewhere on your site.
- Display on a shop page (e.g. main storefront, category page, etc.) - Choose this option if you want the table to replace the default layout in any or all of your store template pages. For example, do this if you want to replace the existing layout on your main shop page (which is created by WooCommerce itself) with a product table.
Content
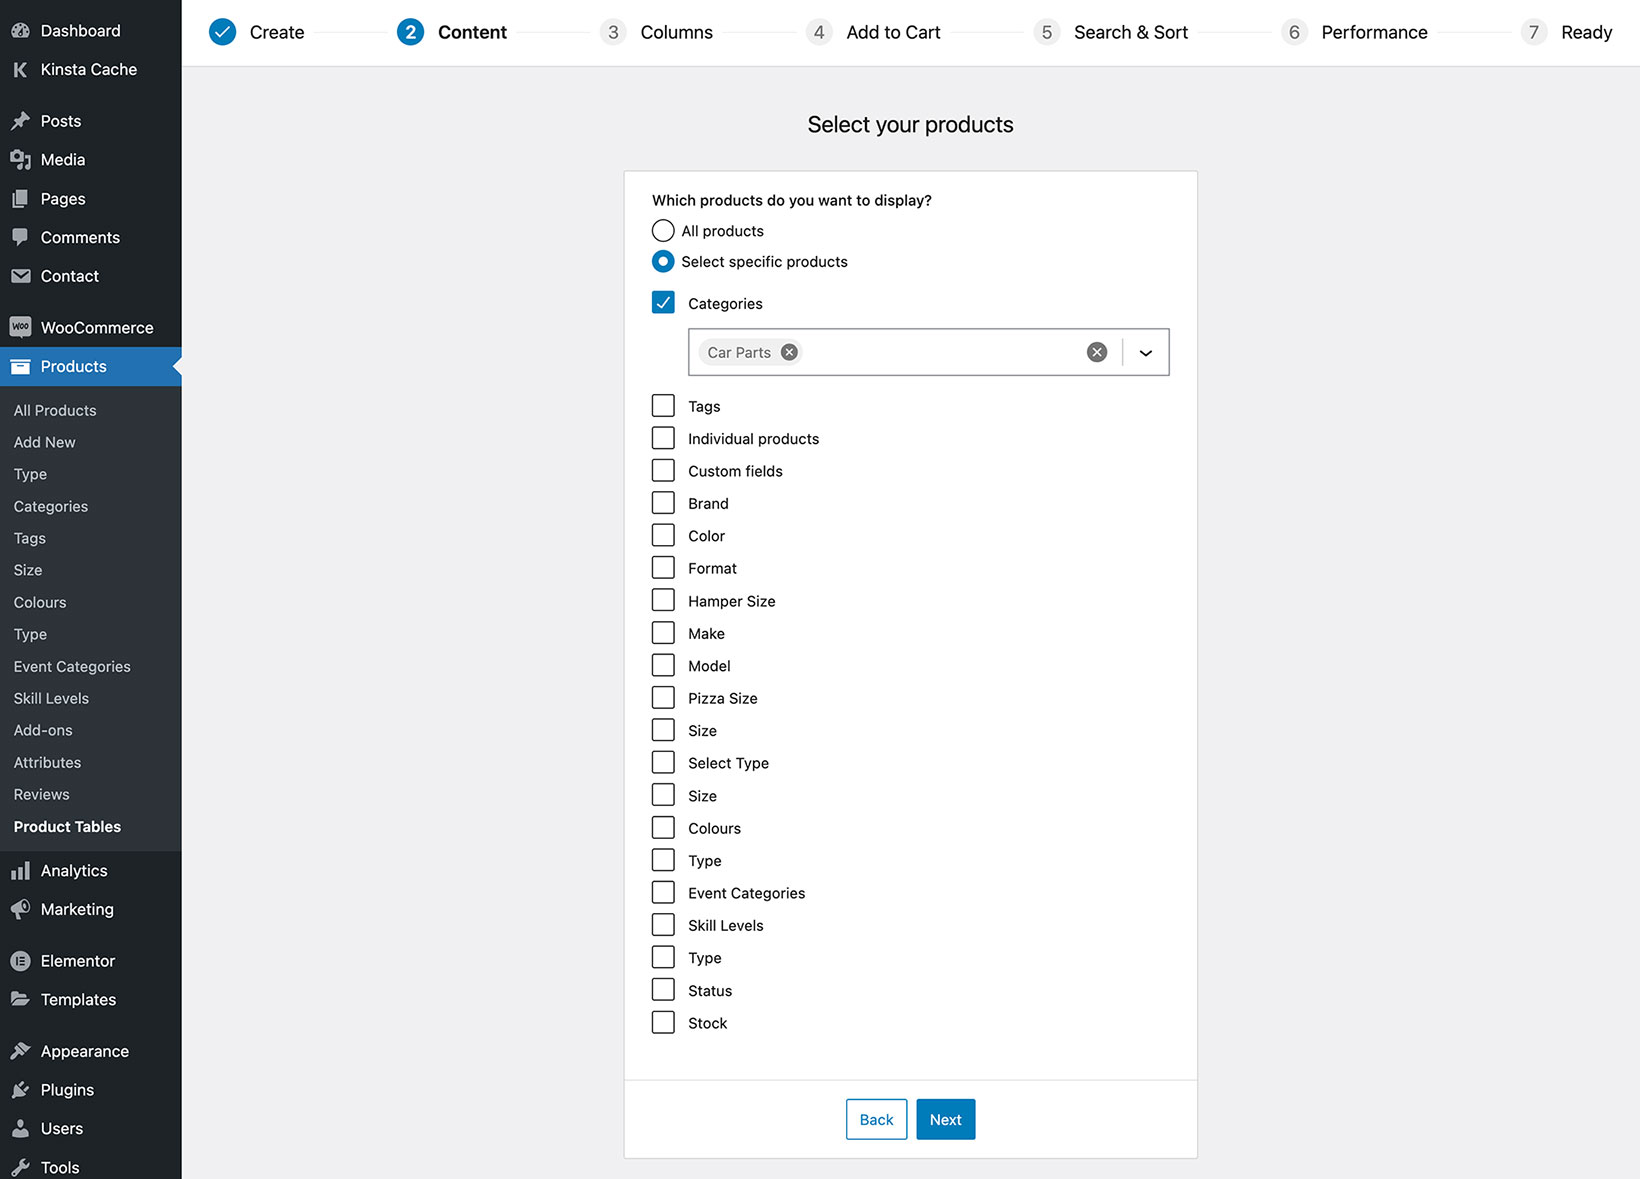
This page only appears if you selected "Add to a page using a block or shortcode" on the previous page. Use it to choose which products to include in the table.
By default, "All products" is selected and will list all the products in your store in the table. To show specific products only, select "Show specific products" and choose from the options which appear below:
- Categories - Select one or more product categories. If you select a parent category then the products from its sub-categories will also be included.
- Tags - Select one or more product tags.
- Individual products - Select one or more specific products.
- Custom fields - Display products with a specific custom field value. For example if you have created a "Reference number" custom field then you can select products with a specific reference number. Enter the following information for each custom field that you wish to include:
- Name - The name of the custom field, e.g. "Reference_number".
- Value - The value of the custom field, e.g. "Ref-123".
- Attributes and custom taxonomies - All the product attributes and taxonomies in your store will be listed here. For each one you select, you can then select the terms that you want to display the products for. For example, you might have a "Color" taxonomy and wish to display all "Blue" products.
- Product type - Select which product types you wish to display, e.g. Simple or Variable products.
- Status - Select which statuses you wish to display, e.g. Published, Draft or Private.
- Stock - Select which stock statuses you wish to display products for, e.g. "In stock" or "On backorder".
Location
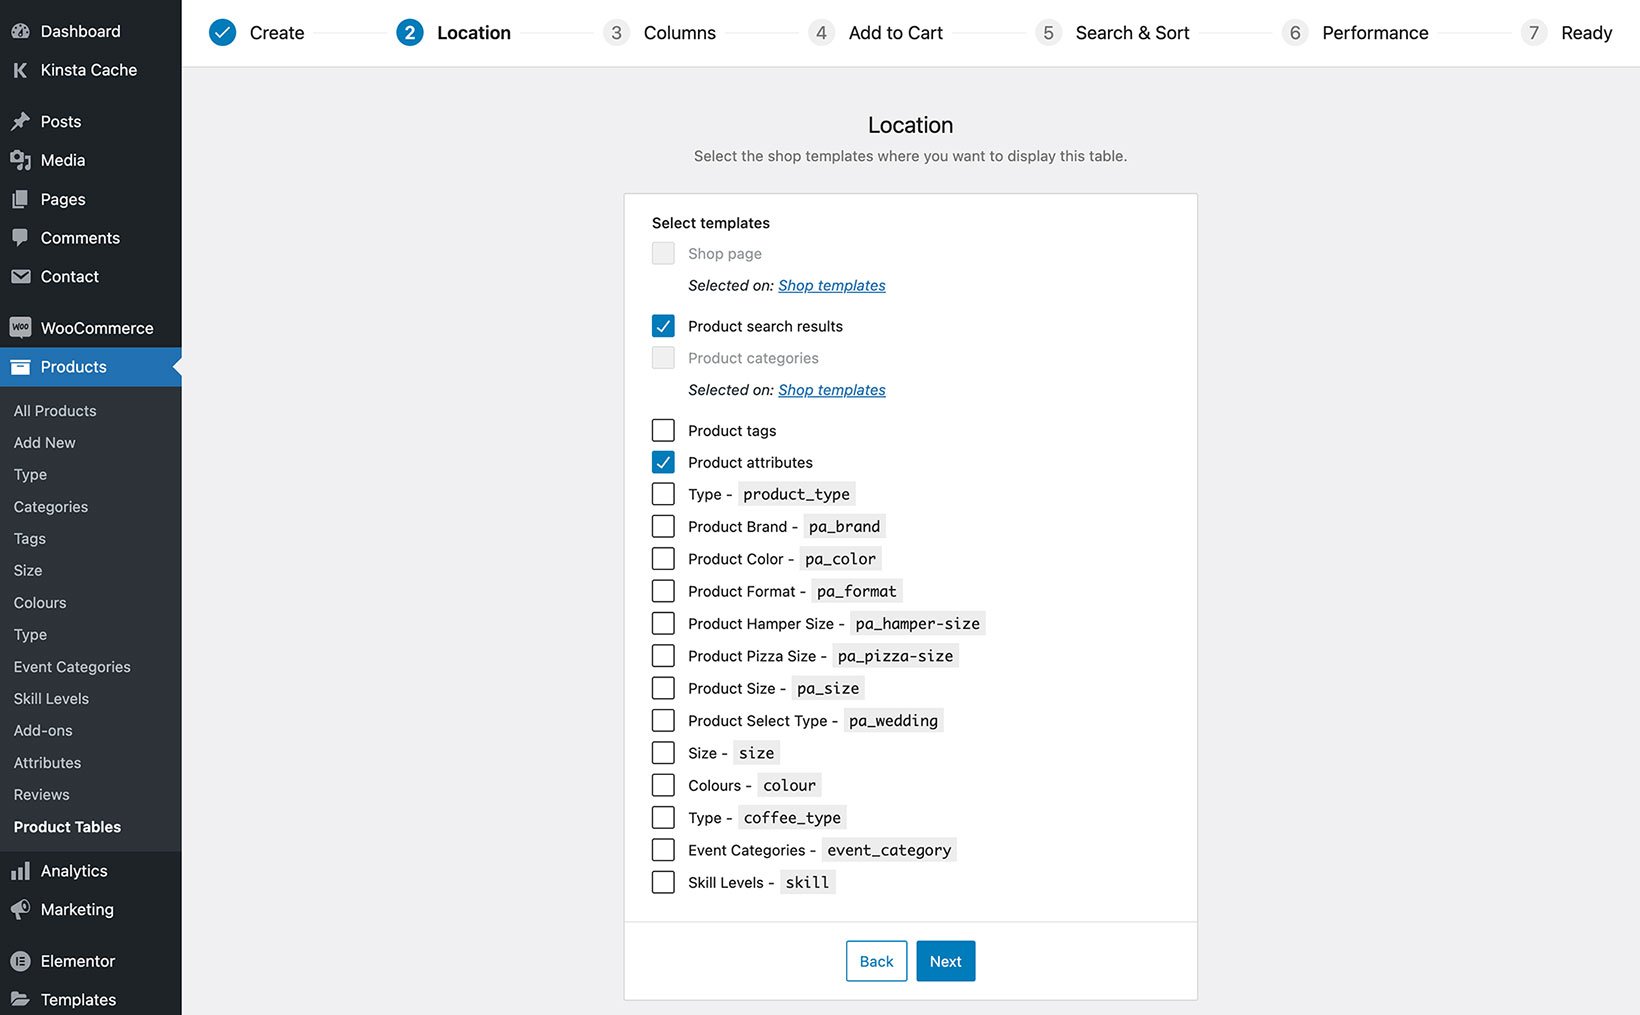
This page only appears if you selected "Display on a shop page (e.g. main storefront, category page, etc.)" on the previous page. Use it to choose which template-generated pages you want to use the table on.
The templates listed on this page will depend on which templates are available in your store. As a result, the list will differ from the screenshot above.
If you have already created other tables and selected templates then these tables will be greyed out, as you can see in the screenshot above. This prevents you from accidentally selecting the same table for multiple templates.
Columns
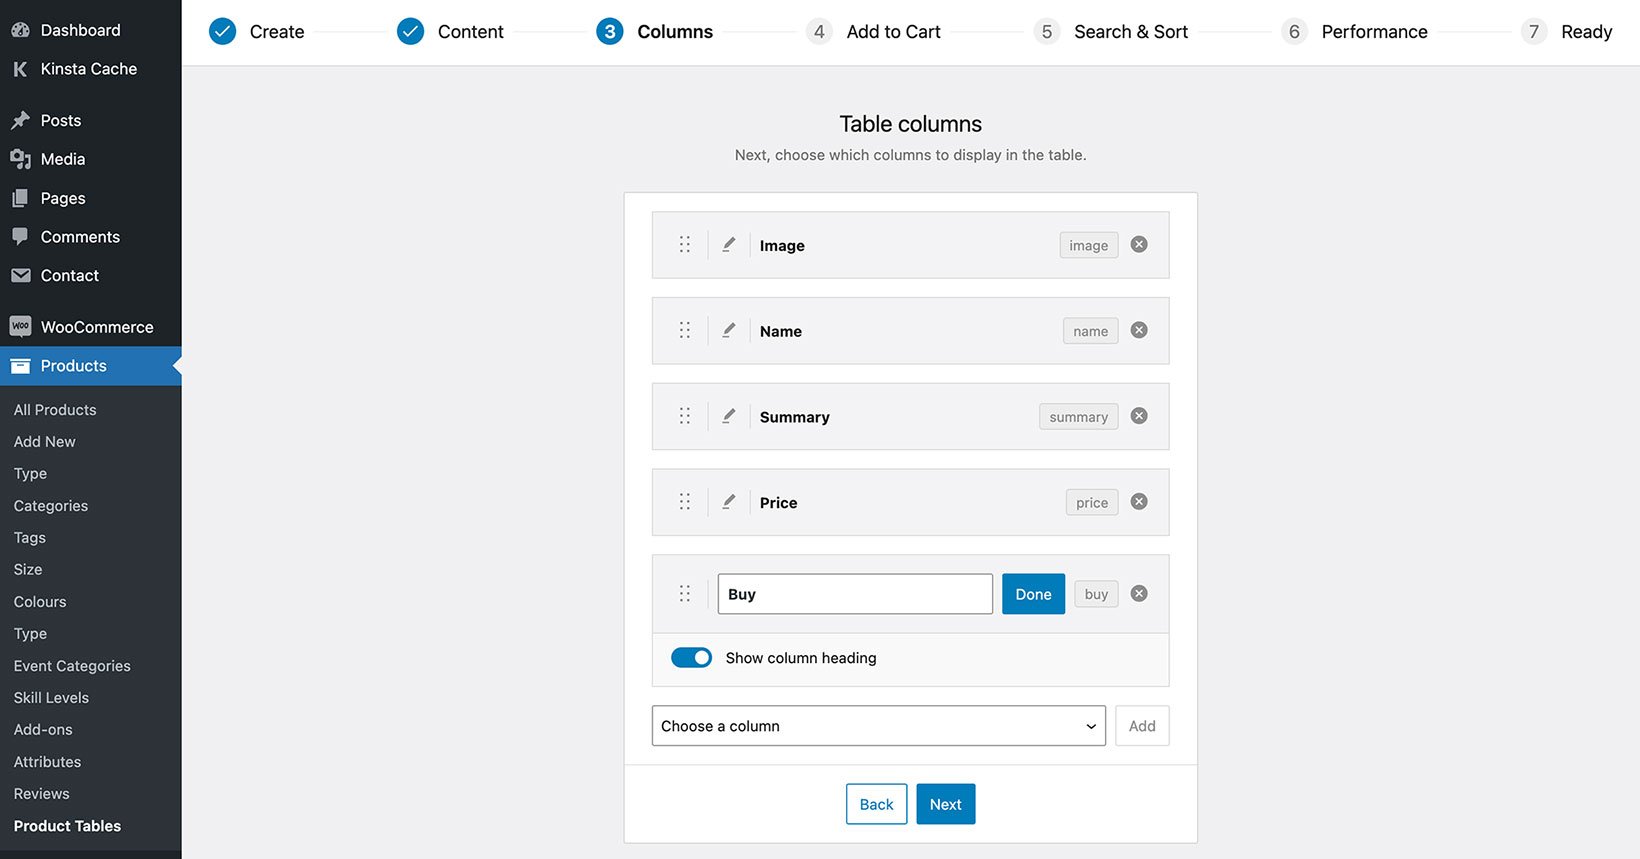
Next, select which columns you wish to appear in the table. Remove any of the default columns that you don't require, and use the "Choose a column" button at the bottom to add new ones.
Use the dots on the left of each column to change the order. The columns listed at the top will appear to the left of the table, and you can re-order them as required.
For each column, you can click the pencil icon to reveal additional options for changing the column name or hiding the column heading completely. For certain columns, you can also choose whether or not the column will be clickable, and where it will link to.
Link to the product page
You can optionally enable links for the following columns: sku, name, categories, tags, attributes, any custom taxonomy, and image. By default, all of these columns are clickable and you can disable the links for each column as needed.
Link behavior:
- The SKU, ID, and name columns link to the single product page.
- By default, clicking on the 'Image' column will open that image in a lightbox. You can change this to link it to the single product page instead.
- Clicking on the categories, attributes, tags or taxonomy columns will filter the table by that value. You can change this behavior to link them to the relevant archive page instead.
Advanced
Enable the 'Advanced' toggle to view additional options for each column. These vary depending on the column and include:
Show column heading
Enable or disable this toggle depending on whether you want to display a label in the column heading.
Column type
This allows you to choose the type of column for custom field or taxonomy or attribute columns:
- Text - This is the default and means that the column will be sorted alphabetically.
- Date - Use this if you are displaying dates in the table, for example within a custom field. This means that the column will be sorted by date.
- Number - Select this if you will be displaying numbers in the column and wish to sort the column numerically instead of alphabetically.
Width
WooCommerce Product Table automatically sizes the columns for the best fit. You can override this behavior and control the column widths manually by entering one of the following values for each column as needed:
- % - Enter the percentage of the table width that the column should take up. If you enter this for all columns then the total must be 100.
- px - Enter the number of pixels wide that the column should be. If you enter this for all columns then the total must be the same or less than the total available space. Generally, we recommend using the percentage option because it gives more reliable results on different screen sizes.
Responsive visibility
Select from the dropdown to control which devices the column will be visible on.
Responsive priority
Setting a priority level for each column is useful when displaying the table on smaller screen sizes (mobiles, tablets, etc.) or when you have too many columns to fit. When the screen size gets too small, the plugin will collapse certain columns down so they are no longer visible, and a "+" icon will appear at the left of each row. This allows the user to expand the row to show its full contents.
Enter priorities to control the order in which columns are "collapsed" on smaller screens. The lower the number, the higher priority that column has. For example, a column with a priority of "1" would have the highest priority and be collapsed last.
Discover the full list of columns.
Add to cart
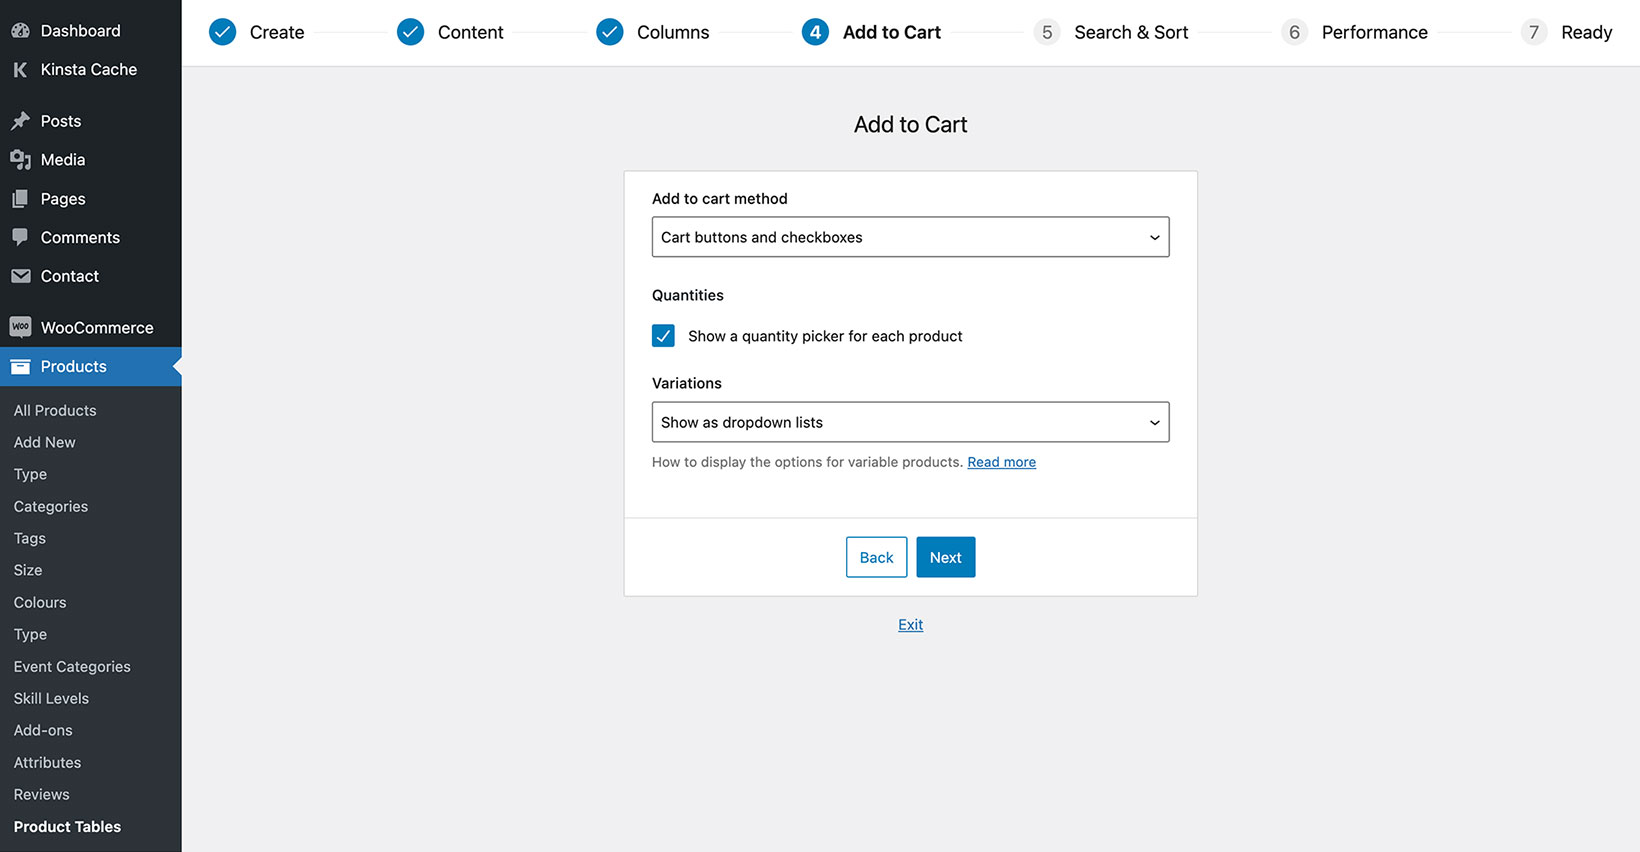
These options affect the 'Buy' column in the product table. If you haven't included this column then they will be ignored.
Add to cart method
- Cart buttons – The default option. Displays the standard add to cart button for each product, or if the product cannot be purchased (out of stock, grouped product, etc), then a Read More or View Products link is displayed.
- Checkboxes – Displays a checkbox next to each button instead of an add to cart button. Customers can select multiple products at once and then click an 'Add Selected to Cart' button above or below the table.
- Cart buttons and checkboxes – Displays both the add to cart button and checkbox.
Note: You can customize the add to cart button text on the plugin settings page.
Quantities
Choose whether or not to include a quantity picker in the buy column.
Variations
Decide how product variations will be displayed in the table:
- Show as dropdown lists - Each variable product will take up one row of the table, with one or more dropdowns allowing customers to select the variations.
- Show one variation per row - Each individual variation will appear on a separate row of the table with its own add to cart button. For example, if a product has 4 variations then this will take up 4 rows of the table.
- Read more button linking to the product page - Instead of showing variations in the table, variable products will have a "Read more" button linking to the single product page.
Variation name format
This only appears when "Show one variation per row" is selected. By default, the 'Name' column will display the product name followed by a hyphen and a list of the attributes used for each variation (e.g. "Ninja Hoodie - White, Large"). You can change this using the dropdown:
- Name + attributes
- Name only
- Attributes only
For more information about each option, read our article about product variations.
Search & sort
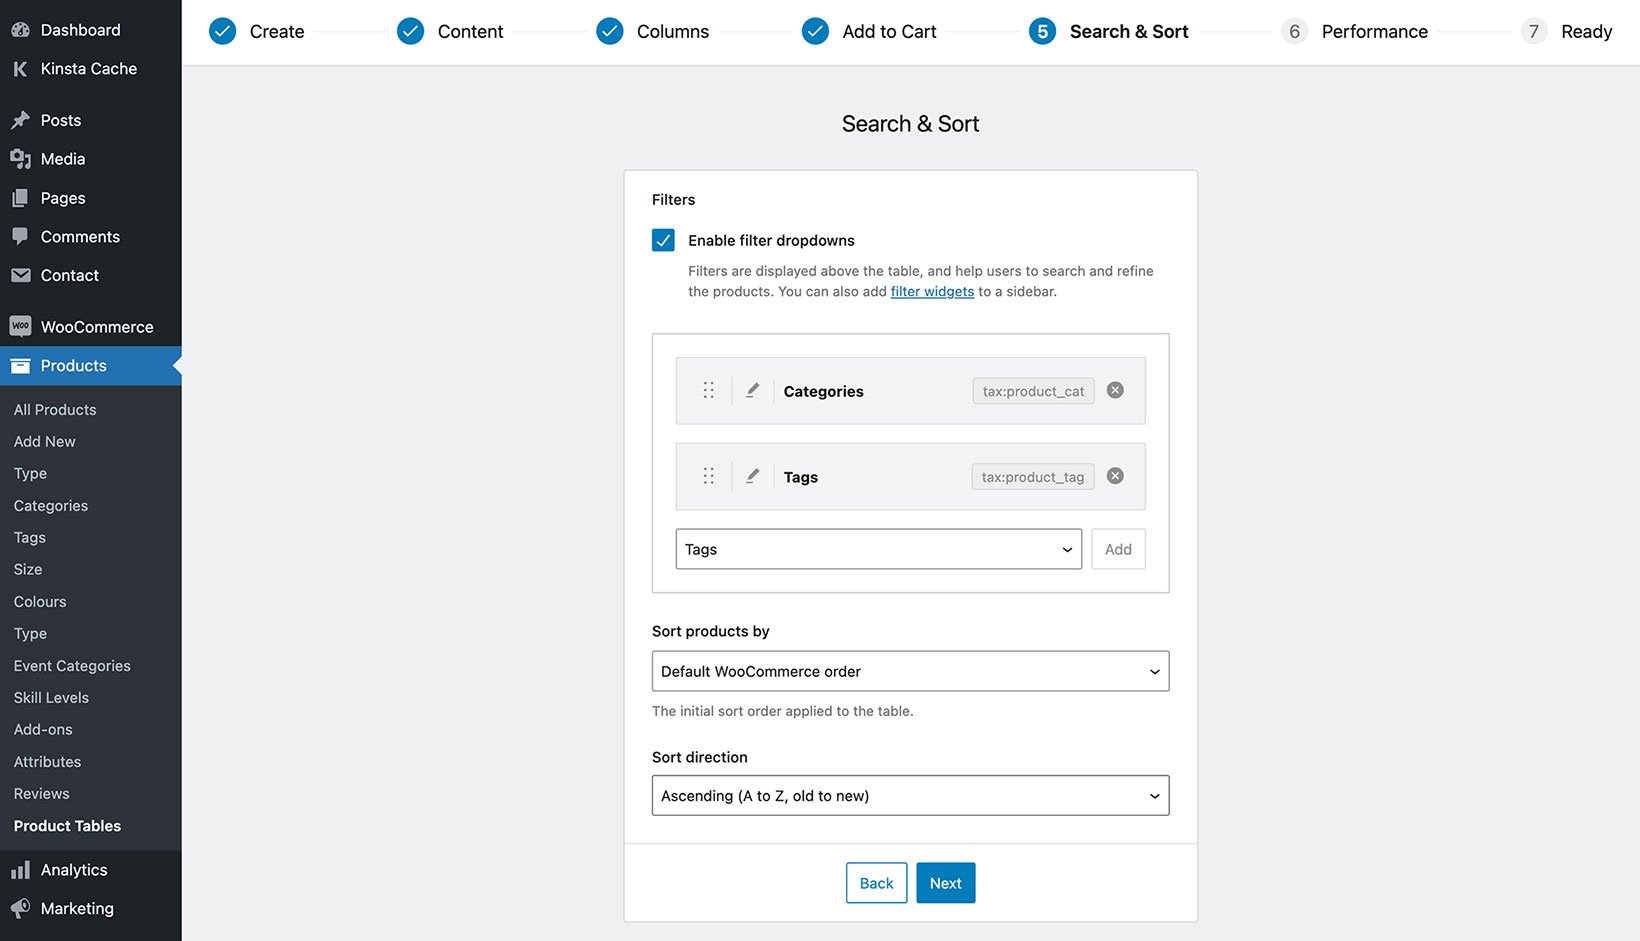
Use this page to make it easier for customers to find products.
Filters
Tick 'Enable filter dropdowns' to reveal options for selecting which filters to display above the product table. This is similar to adding columns, with a pencil icon for renaming each filter.
Note: WooCommerce Product Table also comes with filter widgets which can appear in your page sidebar. Or for more advanced visual filters, you can use it with our WooCommerce Product Filters plugin.
Sort products by
Select from the dropdown to choose how the products will be sorted when the table first loads. Customers can then click on a column heading to re-order the table.
You can learn more about the sort options in our article about sorting the table. We also have an article about how to sort by date.
Sort direction
Choose which direction the products will be sorted in when the table first loads.
Additional table controls
In addition to the options on this page, a search box will automatically appear above the table along with other controls such as the total number of products. You can show, hide or reposition these on the plugin settings page.
Performance
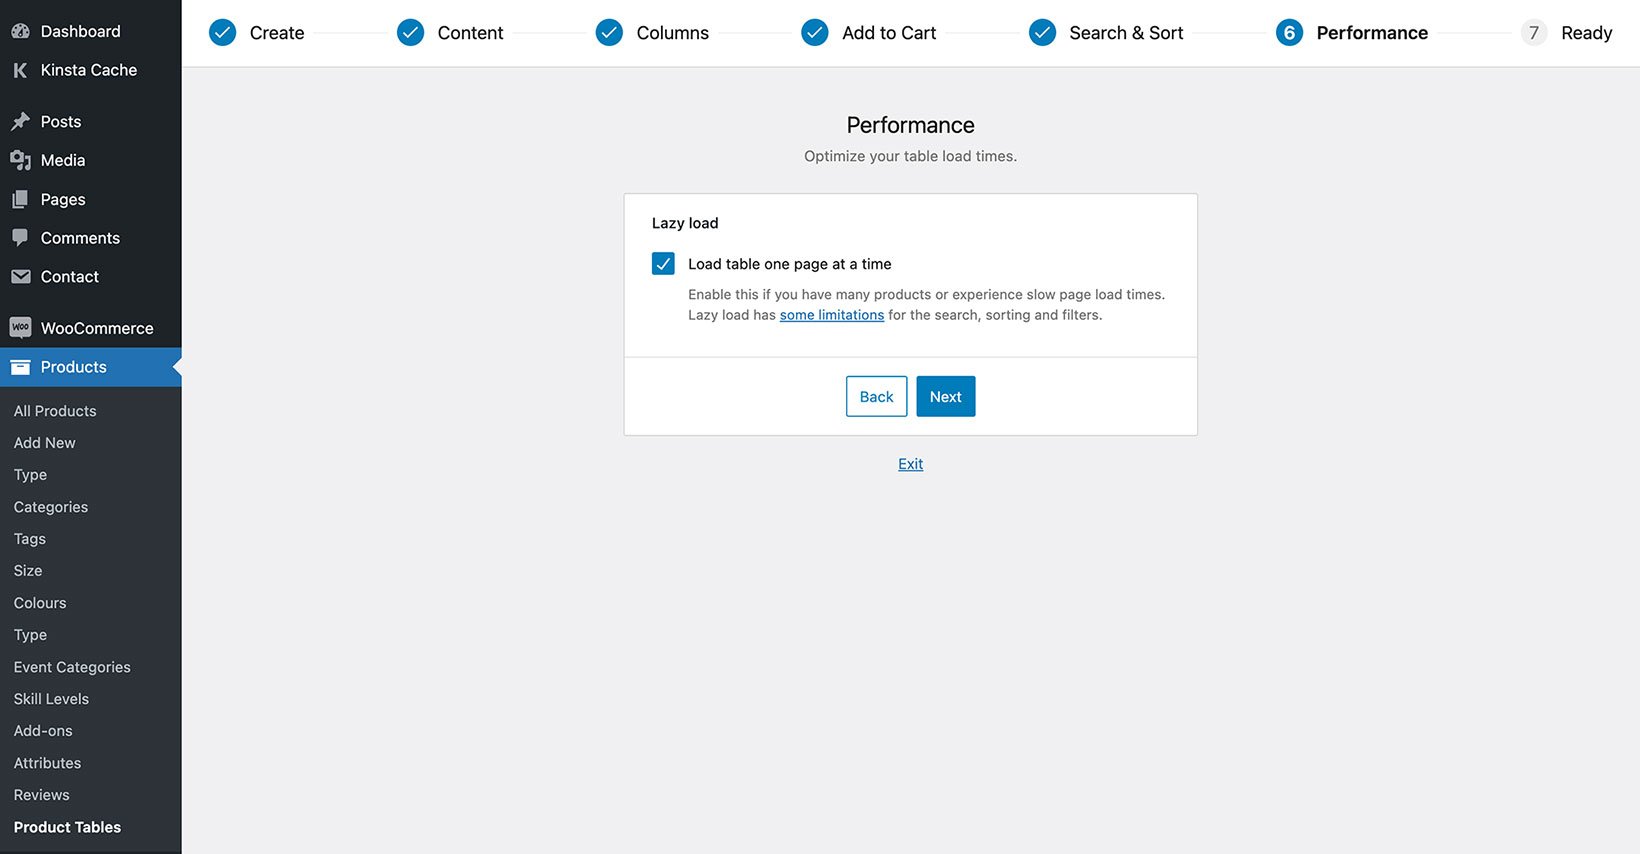
Enable lazy load to improve performance by loading the overall page before the product table, and loading 1 page of products at a time. We only recommend enabling lazy load if you have a lot of products in the table or are experiencing slow load times. That's because due to the way it works, it necessarily limits or changes some of the table behavior. You can learn more about this in our article about lazy load.
There is also a caching option which you can enable on the plugin settings page for even faster performance.
Product limit
This option only appears when 'Lazy load' is disabled.
Enter a whole number to specify the maximum number of products that can appear in the table. The default is 500 products.
Warning: Setting a product limit is useful for displaying a limited number of products - for example, if you order products by popularity and set the product limit to 5 then the table will list your 5 most popular products. You can also use the product limit to increase the maximum number of products in the table beyond 500, but this could cause performance issues depending on the speed of your service. As an alternative, we recommend activating lazy load so that only one page of products are loaded at a time - this allows you to include as many products you like on each page of the table without having to worry about performance.
Table created!
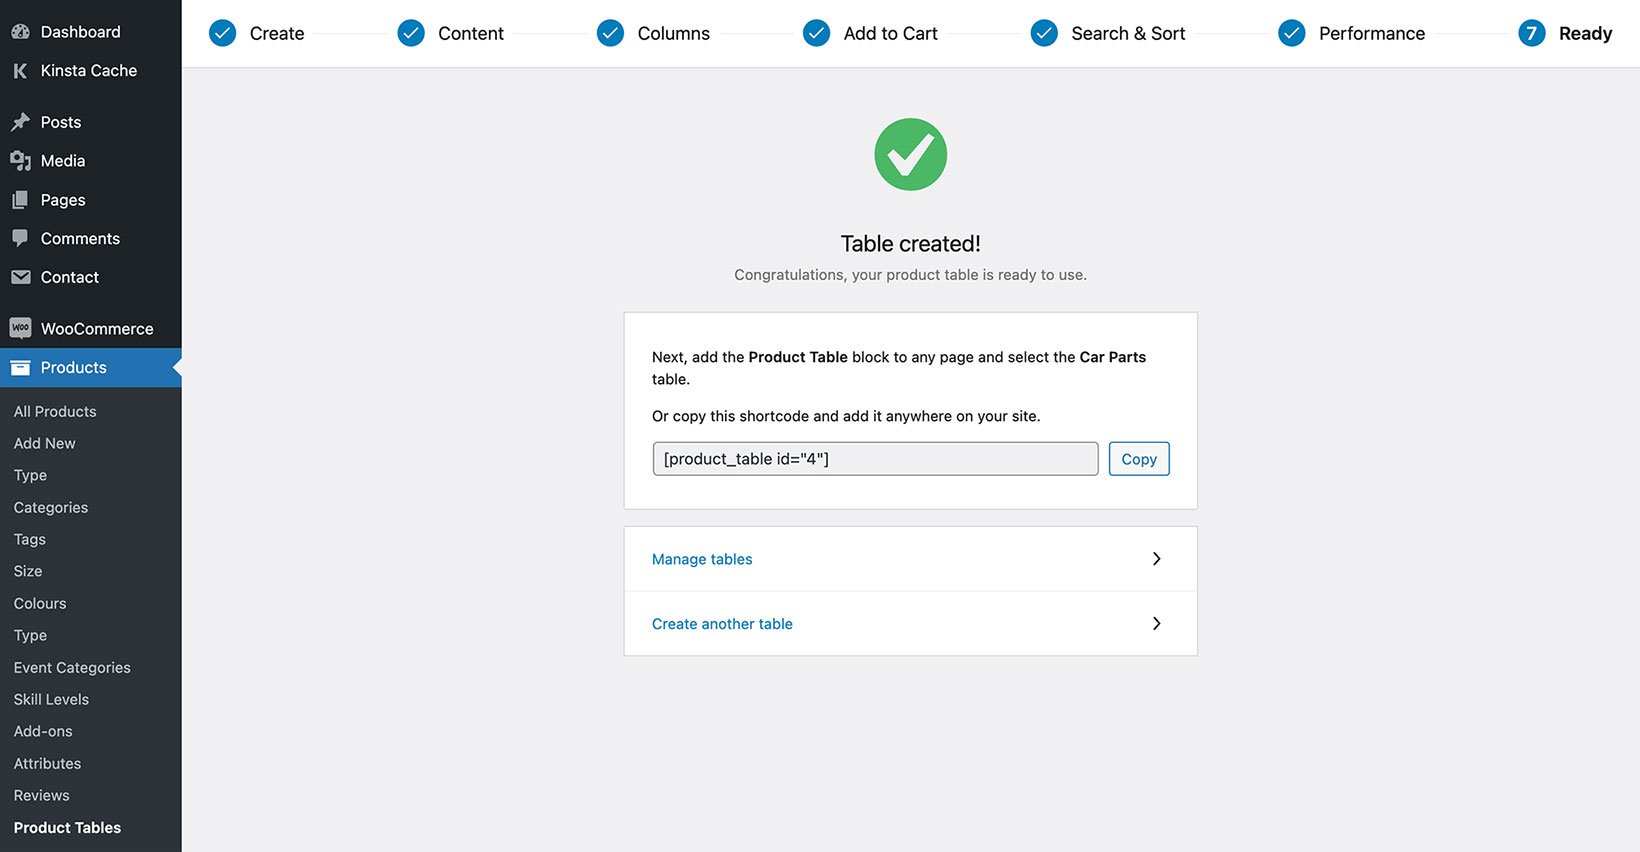
The final page of the table builder will explain how to add the table to your site. If you selected for it to appear on certain Shop Templates on the 'Create' step, then you don't need to do anything further. Alternatively, you can add the table anywhere on your site by either inserting the 'Product Table' Gutenberg block and selecting the table you just created; or by copying and pasting the shortcode which is displayed on this page.
Where to find additional options
By design, the table builder includes the most commonly used options for creating a product table. You can find additional settings in the following locations:
- The 'Edit Table' screen (Products → Product Tables → Edit) also contains an 'Image size' option for changing the size of the image in the 'Image' column of the table.
- The plugin settings page (Products → Product Tables → Settings) contains the following additional options:
- Options for customizing the 'Add selected to cart' button.
- Description length.
- Show hidden products in the table.
- Enable sticky table header.
- Hide table header.
- Show table footer.
- Show or hide the search box.
- Show, hide or reposition the total number of products found.
- Show or hide the reset button.
- Control the number of products shown per page of the table.
- Show, hide or reposition the option to allow customers to choose how many products to show per page.
- Show, hide, reposition or change the style of the pagination buttons for tables with multiple pages.
- Control how extra data is displayed when there are too many columns to fit in the table.
- Customize the table design and styling.
- Use AJAX when adding to the cart.
- Show shortcodes, HTML and other formatting in the table.
- Cache table contents to improve load times.
- Change the way that dates are formatted in the table.
- Customize the wording of the messages that appear when no products are found in the table.
- Add a scroll offset to ensure the table displays correctly with the sticky header in your theme.
- Clear the cache.