Creating a WooCommerce audio store doesn't have to be complicated. With the right plugins, you can have a music store up and running in under an hour - without hiring a programmer to help you out.
So if you're looking to sell audiobooks, samples of music, audio language learning materials, or even karaoke music, you're in the right place.
In this post, I will guide beginners through the step-by-step process of creating their own WooCommerce audio library. By following the instructions provided, you can easily build a user-friendly audio library for your online store, without the need for advanced technical skills.
In this post, I take you step-by-step through the process of building your very own WooCommerce audio library. The end result will be a fully operational WooCommerce audio store.
Here's the kind of final effect that we're going for:
What you need to get started building your WooCommerce audio store
Before we start, I'm going to assume that you already have the following:
Any WordPress theme (with or without a page builder such as Elementor)
There's also the third element - our WooCommerce Product Table plugin. Let me show you how to get your hands on it, install it, and use it to build your WooCommerce audio store.
But before that...
Okay, I should probably address one small thing before I discuss how to use the plugin.
That thing is, "Why do you even need a WooCommerce music store?"
The short answer is that it's going to make selling audio files more effective for you, and more convenient for user experience. We've previously published a tutorial about how to create a WordPress audio library with embedded audio players. That focuses on how to display audio and music for everyone to view in the front end, but it doesn't let you sell them. That's what I'm going to tell you about today.
A WooCommerce audio store is powered by an e-commerce plugin. As well as embedded WooCommerce audio previews, it has purchasable download files.
What will my WooCommerce music store look like?
You can use WooCommerce on its own to sell audio files. However, it displays them in a really unhelpful way. You can sell audio files online more effectively by showcasing your catalog of audio tracks in a list or table. That's why you need the WooCommerce Product Table audio plugin store too.
Your finished WooCommerce music store might look something like this:
With this type of WooCommerce music store, the reader/buyer can listen to a number of audio files one after the other without having to navigate to separate product pages - each for one audio file. This might be the full audio file so that people can listen without being able to download it (as they have to buy the product to actually download it!). Or it might be a short sample or snippet to convince them to buy the full version.
The buyer can click the "add to cart" buttons directly next to the tracks that they like. This lets them purchase and download items from the music store WordPress. Again, no need to navigate anywhere else.
Keep reading to see examples of WooCommerce music stores in action, and then learn how to set it up on your own site!
Examples of music you can sell online with WooCommerce
WooCommerce Product Table lets you create a WooCommerce music store selling literally any type of music online. Here are some examples:
Any audio file format MP3, WAV, and much more. Choose the most appropriate format for your music products, and sell them online with WooCommerce.
Any audio or music genre You can sell original audio (audiobooks, foreign language lessons, singles, albums, podcasts, recorded lectures) or stock footage (corporate or relaxing background music, karaoke backing tracks, royalty-free music, samples, sound effects).
Before I show you how to set up your WooCommerce audio store, let's look at some case studies. You can also see our demo of an audio store in action.
Case study #1 - A WooCommerce audio store for Nico Backing Tracks
Nico composes and sells background music tracks through his Woo audio store – Nico Backing Tracks. Nico's customers need to be able to listen to snippets of tracks before purchasing so he needed audio players embedded into the product list.
That's why Nico lists his backing tracks in a WooCommerce music store powered by our WooCommerce Product Table plugin.
Customers can sort the audio store by price, reviews, or track name. There's no clicking from one page to another to listen to tracks and add them to the cart. Everything's on one page. Once the customer knows what they want, they just have to add the track to their shopping cart before clicking view cart to choose the payment gateway.
Case study #2 - Music Drop's WooCommerce audio store
Music Drop is a music platform with a WooCommerce audio store. Set up by Louis Colaiannia, the site's mission is to be a platform where artists can sell their music to music lovers across the world.
Each artist has their own profile with tabs for information, an image gallery, and audio. The purchase tab features a product table listing all the audio tracks by that artist. Customers can sort the WooCommerce music store by price, track name, and genre. Plus, the embedded audio players mean users can listen to the tracks before they add any item to the shopping cart.
Case study #3 - Boom Bap Labs' audio sounds shop
Boom Bap Labs sell individual sounds with WooCommerce audio previews through their sister site called Paypersample.
The audio store is powered by WooCommerce Product Table, making the tracks quick and easy to find.
Each track has a sample track embedded into the table so customers can listen before they buy. To do this they installed the WordPress HTML5 Audio Player.
There are hundreds of tracks to look through, that's why customers benefit from the filter dropdowns and sort options. In a couple of seconds, the customer can filter the table by category, tag, beats per minute, and key.
Read on to find out how to create your own WooCommerce audio store.
How to create a WooCommerce audio store: step-by-step
The great thing about WooCommerce Product Table is that it can be used for all sorts of different types of WooCommerce products, not only audio files. Whether you want to sell physical CDs or digital products, this audio plugin store can do it.
To learn how to set up a WooCommerce music store, either watch the video or read the step-by-step instructions below.
1. Get the WooCommerce audio plugin and install it on your WordPress site
The interactive table builder will open, or you can access it later from Products → Product Tables.
Follow the step-by-step process to set up your WooCommerce audio store.
2. Configure your audio store
Pay particular attention to the following options:
Music store columns
WooCommerce Product Table comes with a long list of columns that you can add to the table. You can add and rename columns in the table builder. I recommend these columns for selling audio and music:
Description - We're using the main description field of the product to display a live audio embed. This allows the buyer to listen to the track before buying it. Click on the pencil icon for the Description column and rename it to "Listen Now" or similar.
Name - The name of the audio track.
Categories - It's a good idea to categorize your audio products based on the genre. Use the product category for that, and change the column name to "Genre".
Price - The price of each audio product.
Buy - The "Add to Cart" button.
Of course, the above settings are just a suggestion. You are free to experiment and pick other columns when building your WooCommerce audio library.
Disable links to the product page
By default, columns like the product name will link to the individual page for each product. I like to disable these for a WooCommerce audio store because customers already have all the information they need to buy. Keeping them on the main audio store page helps to prevent distractions.
You can do this in the advanced settings for each column when you edit an existing table at Products → Product Tables:
Product filters
The table builder also lets you add filter dropdowns above the audio store. WooCommerce music store, it makes sense to enable filtering based on genre.
Add a category filter and click the pencil icon to change the name to 'Genre':
Plugin settings
To create the ultimate WooCommerce audio store, you also need to go to Products → Product Tables → Settings and enable the 'Shortcodes' option. This ensures that the embedded audio players in the table will work.
Add filter sidebar widgets to the music store
Some WooCommerce audio stores like to allow their users to filter by multiple tags, for example, to find all songs that are 'romantic' and 'classical'. The filter dropdowns above the table only let you select one option at a time (although you can have as many different dropdown lists as you like, for example, so that users can choose a genre, a composer, and so on).
If you'd like people to be able to select multiple items from the same category (e.g. multiple composers) then you can do this using filter widgets. These appear in the page sidebar. Add the options as product attributes, and users can tick as many as they like.
Add advanced filters
For even more advanced filters, you can also use WooCommerce Product Table with the WooCommerce Product Filters plugin. This has a huge range of filter options that you can tailor to your music store's exact needs.
You can add these advanced filters to your default store layout, your WooCommerce Product Table-powered audio store pages, or anywhere else where you sell products.
3. Add products to your WooCommerce audio store
WordPress and WooCommerce make this part very simple. Here's what you do:
Start by going to your Products panel normally, from the WordPress dashboard.
Click on Add New.
Give your audio product a representative name. Keep it brief, though.
Assign the product to a category. As I mentioned earlier, it's a good idea to use categories for genres.
Decide where you want to add the embedded audio player. Most people add it to the main product description or short description. Alternatively, you can add it to a WYSIWYG custom field. Either way, click the Add Media button above the toolbar (or insert a Gutenberg block) and upload or select an audio file from the media library. (Alternatively, insert the file from an external URL if you're web hosting your audio elsewhere.) Where it says, Embed or Link, pick Embed Media Player. Like so:
Mark the product as Downloadable, enter its price, and pick the file that the buyer will get access to after completing their purchase. (This will most likely be the exact same audio file you've embedded above.)
Repeat this step for each of your WooCommerce audio store's products.
Tip: If you don't like how the default WordPress audio player shortcode looks, don't worry. Keep reading to learn about other audio player plugins you can use in your WooCommerce audio library.
4. Add your WooCommerce audio store library to any page or post
So far you've configured the WooCommerce plugin and added audio tracks to the product catalog. Next, you just need to show this WooCommerce audio store module to your buyers.
This is very simple to do. Just edit any page or post, and use one of these methods to insert the audio store:
Insert the 'Product Table' Gutenberg block and select your table.
Add the table's shortcode. You can find this at Products → Product Tables.
When you publish the page or post, this shortcode will be converted into a live WooCommerce audio store table containing all your products with embedded audio tracks.
Depending on the options you chose on the audio table plugin settings page, your buyers can navigate the table easily, listen to any of the tracks or sort it by any column. They can also add audio tracks to the cart, and filter the entire table to only display tracks of a given genre.
The WooCommerce music store plugin in action
Bonus tip #1 - Show audio previews in a quick view lightbox
So far, you've learned how to list your WooCommerce audio store products in a table layout with a column containing embedded WooCommerce music players. If you prefer, you can provide the audio samples in a quick view lightbox instead of directly in the product list.
You can achieve this by installing the WooCommerce Quick View Pro plugin. This adds 'Quick View' links or buttons to your product tables, or to the default store layout if you prefer. Customers can open the quick view for a product and listen to the WooCommerce music player from a lightbox popup.
To set it up, simply install the plugin and add the embedded audio players or playlists to the product's short description. This will appear as a music player for WooCommerce in the quick view popup.
Bonus tip #2 - Boost conversions with faster checkout mechanism
For any ecommerce store, cart abandonment is a big issue. One of the primary reasons for cart abandonment is the long and complex checkout process. For this, having a simplified and quick checkout set up on your store can greatly increase conversions and bring down the cart abandonment rate.
The WooCommerce Fast Cart plugin is specifically designed for this purpose. The plugin features an intuitive one-page checkout mechanism that lets customers complete the checkout process without leaving the page at all. They can review their orders, add their mailing details, and complete the payment on the same page.
To set it up, simply install and activate the WooCommerce Fast Cart plugin on your WordPress website. Configure plugin settings for your store, and that's it. The plugin will begin working independently and help customers easily place orders on your WooCommerce store.
Enhance your WooCommerce audio library with other audio plugins
In the instructions above, I explained how to add music players for WooCommerce audio store using the basic audio shortcode that comes with WordPress. If you don't like how this looks, then you can embed your audio files using third-party audio plugins instead.
There are lots of audio plugins available. We particularly love:
The free or premium version of Presto Player, which adds easy-to-use yet attractive video players that look fantastic in WooCommerce Product Table:
The free
Compact WP Audio Player plugin because it's so incredibly simple. It lets you add a circular play icon that customers can click on to listen to tracks directly in the WooCommerce audio library. This takes up less space than the default WordPress audio player and looks really neat.
The plugin author has packed a lot into this small audio plugin, as it has the main controls you need. While you're playing an embedded audio track, the icon turns to a pause button so that you can stop and resume as needed.
To add a compact WooCommerce music player to any of the fields in your WooCommerce audio store, simply install the plugin. The only other step is to add the shortcode [sc_embed_player fileurl="URL OF THE MP3 FILE"] to the field where you want to display the customizable audio player for each product. This will display correctly in WooCommerce Product Table.
Create a WooCommerce audio store with free downloads
So far, we've talked about how to create an audio library with add-to-cart buttons. This is ideal if you want to sell your audio products. But what if that's not what you want?
Fortunately, you can also use this WooCommerce audio plugin to provide free downloads. There are several ways to do this:
Option 1 - Create free audio products
Create a download product and set the price to 0. Users can add the free download to the cart in the usual way, and complete the WooCommerce checkout without having to pay. WooCommerce will then send them a secure link to the free download via email.
Option 2 - Add direct download links to the audio library
Alternatively, you can add a direct link to the download to the short description, long description, or a custom field. You can style this as a button if you like, or leave it as plain link text. Call it something like 'DOWNLOAD NOW'.
People can click to download the file to their computer immediately, bypassing the cart and checkout. For instructions on how to add a link or button to the audio library table, please see the knowledge base.
Can I create a WooCommerce audio store without free audio snippets?
Absolutely. You don't have to include audio players with the full track or a short sample snippet.
Instead, you can just list the other columns without an embedded audio player. Or alternatively, add an image (watermarked if required) as the main product image and add an 'image' column to your product table. This will show the image instead of an audio player. The customer will receive an email with the actual audio file after purchasing.
Can I sell non-downloadable audio tracks?
So far, I've assumed that you want people to receive a link to download the full audio file after purchasing. If you don't want people to be able to download the audio - for example for copyright reasons - then that's fine too.
Here's a nice simple way for you to sell audio products, without making them available for download. Customers can only listen to them on a hidden page on your online store.
This is how to set it up:
Create a new page and use the 'Add Media' button to upload the audio file. WordPress will automatically convert this into an embedded audio player that you can listen to on the page, but which can't be downloaded.
Password protects the page where you've added the audio player. This is easy to do - just click 'Edit' next to the 'Visibility' option in the 'Public' section of the Add/Edit Page screen.
Add the audio track as a 'Virtual' WooCommerce product.
Now, install Woo's official Follow Ups plugin. Use it to create an email that will be sent to customers after they purchase this specific product. The email should contain a link to the password-protected page where you have embedded the non-downloadable audio track. It should also contain the password so that they can unlock the hidden page.
Repeat this process for each audio product.
Go the extra mile and sell entire audio playlists
With the following setup, you can not only sell individual audio tracks but also entire playlists.
To do that, you first need to create some new products. The process starts normally by going to Products → Add New and naming your new audio playlist product accordingly.
Next, click on the Add Media button, but this time instead of adding an individual audio file, click on Create Audio Playlist and pick the tracks that should go into the playlist. When you're done, click on Insert audio playlist.
Lastly, mark the product as Downloadable, and assign all the files that the buyer should be able to download once they complete the purchase.
This is what the playlist looks like for the buyer:
Your turn!
Now you know how to create a fully functional WooCommerce audio store with the WooCommerce Product Table plugin! The best thing is that the whole process can be carried out in less than an hour (reading this tutorial included). If you have lots of products then you might need longer to add them all, but an hour should be realistic to set up the basic WooCommerce audio store.
Get this WooCommerce audio plugin today and begin your adventure with it:
This is the ultimate guide to WooCommerce for photographers. WooCommerce offers some fantastic opportunities to sell photos online, whether this is to the general public or specific clients. I'll walk you through the best WooCommerce photography plugins and WooCommerce gallery plugins , as well as provide tips on how to sell more photos on your WordPress website.
Not all photographers want to sell their images to the general public. If you provide bespoke photography services, you'll want to sell photos in secure areas of your website that only certain clients can access. Fortunately, WooCommerce for photographers is straightforward. And if you're not a photographer, don't worry! These solutions are suitable for anyone wanting to create client-specific products or categories in WooCommerce.
By the end of this article, you'll know how to choose the best WooCommerce for photographers plugins and set them up:
Skip straight to the section you're interested in for detailed written instructions. To bring it all together, we've also created this video tutorial on how to create a complete WooCommerce photography website. It covers all the features you need, including quick bulk upload, photo order form pages with variations, plus a password protected category for each client:
WooCommerce & WordPress for Photographers: how useful is it?
Does just what I needed. I list the set of photos based on each client.
Good adjustment and easy to use.
There a huge number of WooCommerce gallery plugins, WooCommerce gallery plugins and other miscellaneous plugins for photographers. A huge number already have WordPress websites. It's hardly surprising given that WordPress powers over 1/4 of all websites. A huge number of WordPress photography themes and plugins are available. This makes WP for photographers easy: you can create professional websites using flexible, off-the-shelf solutions.
WooCommerce is the world's biggest e-commerce platform. As well as powering a huge 94.3% of all WordPress e-commerce websites, it's used by over 41% of all e-commerce sites worldwide. Wow.
While popularity isn't everything, WooCommerce is obviously here to stay. It's well supported with a huge ecosystem of Woo experts behind it. With so many plugins and add-ons available, there are plenty of options for selling client-specific products in WooCommerce. Not to mention all the other great plugins and features for displaying photos in WooCommerce.
Types of photography you can sell with WooCommerce
You can use WooCommerce to sell absolutely any tip of photography product - digital or printed. For example:
Type of photography Artistic photography, aerial or drone images, client photography (e.g. family, couple or wedding photos), editorial images, event photos, portraits, stock photos.
Image genres Animals, architecture, beaches, holidays and travel, business, celebrities, cities, fashion, food and cookery, home and lifestyle, natural photography, panoramas, seasonal photography, sports and fitness, technology.
Delivery mechanism Digital photos, printed photos, or images printed onto other media such as stationery and promotional materials.
Whatever type of photos you need to sell, you can do it with WooCommerce. Keep reading to find out how.
WooCommerce for Photographers case study – Photo Studio TNK WooCommerce photography website
Photo Studio TNK is a WooCommerce for photographers website run by Thierry in Paris, France. His clients book him for photoshoots, he then sells the prints to them on his WooCommerce website. Selling prints is a big part of his business, so Thierry's clients each need access to a private space where they can view and purchase their photos. That’s why Thierry’s WooCommerce website is powered by our WooCommerce Protected Categories and WooCommerce Product Table plugins.
This is how it works. After a photoshoot, Thierry uploads the images into the client’s hidden WC category. The client is sent a password. They log on to their hidden area to view the images. Each image is displayed in one table than can be filtered. Clients can view images, select variations and add multiple photos to the cart, all from this one table.
It works well for customers as they can view the images on their mobile or laptop and they don't need to leave the page to purchase their chosen images.
You can read more about Thierry’s WooCommerce photography website here. Or read on to find out more about how to make WooCommerce gallery plugins work for your photography business.
Why sell client-specific products in WooCommerce?
There are lots of reasons why a photographer might want a WooCommerce photography plugin to sell client-specific products. Woo for photographers is highly flexible. Let's take a look:
Event or wedding photography
Wedding photographers take photos of a specific event such as a wedding. Afterwards, they need to upload the photos of the event for the couple to view.
A wedding photographer will typically charge a fixed fee for the event itself, with perhaps a photo album included in the price. They may earn extra revenue from the wedding by selling extra options to the couple and their guests. For example, the photos can be bought individually (either as photo prints with different framing options, or as digital prints for download) via the photographer's website. The photographer might also sell packages via their website, such as additional albums or photo montages.
The images must be uploaded to a secure area of the WooCommerce photography website that only the couple - and possibly their guests - can access. People with access to the photos should be able to buy them online.
Family photographer
A family photographer is similar to a wedding or event photographer in that they're commissioned to do a photoshoot of a specific family. They might do the photoshoot for free, with the family just paying for the photos they actually want.
After the photoshoot, the photos need uploading to a private area on their website. The family can login, choose their photos and buy online.
School photography
School photographers take individual and class photos of school children. After visiting the school (which they typically won't charge for), they earn money by selling the photos to parents. The same often happens in nurseries, pre-schools and kindergardens.
Traditionally, school photographers would print a preview of each photo which the school would distribute to parents. This still happens, but parents are typically directed to the school photographer's website where they can view all the images of the class and buy online. The website often sells many options such as different packs and framing choices, and even other objects printed with the photo (e.g. mugs or mouse mats).
Given the confidentiality around photos of children, it's important that school photography is uploaded to a secure area. Only the individual parents - or perhaps the parents for the whole class - can access the photos.
How photographers can sell client-specific products in WooCommerce
There's an excellent plugin to sell client-specific products to photography clients. It involves creating hidden areas of your WordPress WooCommerce website that only the appropriate client can access. It does this by password protecting a category so that only people with the correct password can view and buy the hidden photos.
Password protected categories are better than creating a separate login for each user and giving them access to specific photos in WC. This is because:
You don't have to spend time creating a separate user login for each client.
You can easily give multiple clients access to a hidden category of photos. For example, wedding photographers can give a shared password to the bride and groom, and all their wedding guests. Everyone can access the protected category and buy the photos, resulting in more sales for you! (Tip: You can create multiple passwords for each customer, if you want to. This is still easier to manage than creating a full WordPress user login for each person who accesses your protected photos.)
Create a password protected category for each client
To use the plugin, photographers can create a separate product category for each client in WooCommerce. You can then upload all the photos for that client to the relevant category. For regular clients, you can create sub-categories - one for each event or photoshoot.
How to create client-specific WooCommerce password protected categories
In Pages > Add New, create a page called 'Client Login' (or similar). Leave this blank and Publish the page.
Go to WooCommerce > Settings > Products > Password Protected Categories. De-select the options to show protected categories and products in the public areas of the site. This will hide your client-specific products so no one else will know they exist. Change any other settings as needed, for example to customise the text on the WooCommerce category login form.
Go to Products > Categories and create a category (plus any sub-categories) for each photography client. In the 'Visibility' section, choose 'Password protected' and enter 1 or more passwords. (Tip: Don't password protect any sub-categories - they will automatically inherit the same password as the parent category.)
Upload the photos that you want to sell to each client by creating products in WooCommerce and assigning them to the correct category. (If you've already added your photos products for the client, go to the main Products list in WP. Use Quick Edit to categorise them quickly.)
Finally, go to Appearance Menus and add your Client Login page to the menu. Or if you prefer, link to this page from the header, footer or anywhere else on your site. (Or just keep it hidden from your public website and send the link to your clients.) You can also add a login form to a text widget using the shortcode: [category_login].
And that's it!
That's all you need to do to sell client-specific products and categories for a WooCommerce photography website. When a client visits your website, they can click on the 'Client login' link to view the login page. On entering the correct password, they will be automatically directed to their own category. They won't be able to see your other clients' categories - just their own.
The plugin is simple but secure. Visitors will be prompted for a password whether they try to access the login page, the category page, a sub-category or a specific product page. Once they've unlocked their client-specific category, they can navigate anywhere within that category without having to re-enter the password.
It's the perfect way for any photographer to securely sell customer-specific products in WooCommerce.
Bonus! Tips on using WooCommerce for a photography website
So far, you've discovered an easy way for photographers to use WooCommerce to sell photos to specific clients. Then some tips on how photographers can use WooCommerce more effectively.
Sell physical photo prints, downloadable digital photos & other types of product
One of the best things about WooCommerce for photographers is that you can sell multiple product types. The ones most suited to a WooCommerce photography website are:
Standard products This is a traditional 'physical' product which you will ship to the customer. With this product type, you can add postage costs.
Downloadable products You can also use WooCommerce to sell downloadable products. These don't have a shipping cost. When you create a downloadable product, you can upload the digital image file of the photo. Once a client has purchased the digital version of a photo, they will be given access to a secure link where they can download it.
By combining simple and downloadable products, you can design a WooCommerce photography website where you can sell photo prints and digital versions. If you only want to sell one of these product types (e.g. some photographers refuse to sell digital versions of their photos), that's fine too!
Use WooCommerce Product Table to list more photos per page
Most themes have a fairly typical WooCommerce category layout, which may or may not be suitable for selling client-specific photography products. This tends to have big images with the product name, price and add to cart button.
The usual layout is pretty good on most WooCommerce for photographers websites due to the big images. However, it's less appropriate for selling photography products that aren't so visual. For example, a product category for framing options and photo bundles may not need big images. Instead, you might prefer to list as many products per possible, with extra information to make it easy to compare products such as size and colour.
If that applies to any of your products then WooCommerce Product Table offers a better photo gallery layout. It lists products in a searchable, sortable table or grid with filters.
You can make the product images as big or as small as you like (or hide them completely). This is better for less visual products such as frames or bundles, where you just want to list the options on a single page.
How to use WooCommerce Product Table to sell photos with password protected categories for each client
WooCommerce Product Table is fully compatible with the Password Protected Categories plugin that I told you about earlier. To use the two plugins together, you just need to follow these instructions to automatically add the product table layout to your category archive template file.
When your photography clients log into their hidden password protected category, they will see their photos presented in a product table layout.
What if my client has already paid for their photos?
Some photographers upload photos so that clients can buy them individually, whereas others take payment as a package beforehand. You can let clients order photos without having to pay for each one. The exact method depends on whether you're selling physical or digital downloadable photos.
Photo prints and physical products
Add your photos as WooCommerce products using the method that I described above. Instead of requiring payment online, choose an offline payment gateway such as 'Invoice'. You can rename this to anything you like, so the word 'invoice' won't appear anywhere.
When the customer adds photos to the cart and the checkout, they can use this pseudo payment method to complete their order without having to pay.
If you still want to take payment for other types of product, then that's fine too. Simply use the Conditional Shipping and Payments plugin to show the pseudo payment method for specific categories only.
Downloadable digital photos
Your customers can also download their pre-paid photos from their private portal, without having to pay online. To do this, I recommend using the following plugins alongside WooCommerce Protected Categories and WooCommerce Product Table:
Free Downloads WooCommerce - Add each photo as a downloadable WooCommerce product, and use this free plugin to allow customers to download them without having to check out or pay online.
WooCommerce Quantity Manager - If a client has pre-paid to download a specific number of photos, then use this plugin to restrict the number of products they can download. For example, if they have purchased a package of 20 photos then you should set a maximum quantity of 20. You can set limits on the client's whole category, or individual products/photos.
Use quickview to show multiple photos and image zoom
WooCommerce Product Table is ideal for listing photography products. However, the size constraints of the image column mean that it can only show one static image of each product.
You can show extra images by adding the WooCommerce Quick View Pro plugin. This handy plugin displays the full image gallery for each product, and customers can scroll between images by clicking on the thumbnails or using navigation bullets.
You can hover over an image to zoom in on it, showcasing your photos in full high definition that will inspire people to buy them.
The quick view plugin is very flexible and you can choose which style of photo gallery to show, and whether to include images only or whether to add extra product data and purchase options. It's the perfect way to provide further information and show off your photography more effectively without taking people to a separate page for each product.
Use product variations or add-ons to provide multiple options
WooCommerce photography websites often need to sell products with several options. For example, you might sell a photo print in multiple sizes. You might offer a choice of framing options. You could offer different file formats for your photos.
Give customers a choice with product variations
Use variable products in WooCommerce to add extra options. Customers can select the combination of variations they need and see the updated price before adding photos to the cart.
Sell optional extras and customizations with Product Add-Ons
If you need extra flexibility (e.g. multi-select checkboxes or space for the customer to add a personal message), then you can use the WooCommerce Product Options plugin.
This WooCommerce extension adds extra add-on fields to the product page where clients can add text, upload a file, or choose additional options.
The add-on options will appear in the add to cart column of your product table. Customers can select them before adding to the cart.
Add a watermark to protect your images
Many photographers who sell photos in WooCommerce wish to protect their images and prevent people from downloading them without making a purchase. After all, the product featured image is available for people to see before they buy. Anyone with basic computer knowledge knows how to right click on a photo to download it, or how to take a screenshot of it.
There are several easy ways to protect your photos:
When you add the product featured image, make sure it's low resolution. That way, if anyone downloads it then it won't be print quality. They must pay for the high resolution downloadable product in order to get the full quality version. (Of course, they can still share the low res photo on social media, so you may want more protection.)
You can also use the YITH WooCommerce Watermark plugin to automatically add a watermark to your featured images. This is a neat compromise because while it doesn't prevent people from downloading the image, the watermark will prevent them from using it. They must buy the photo in order to receive the un-watermarked version.
Bulk import photo products: WooCommerce import and WooCommerce Gallery plugins
Since publishing this tutorial, lots of you have asked how to bulk import photos to sell in WooCommerce for photographers. For example, a photographer might want to upload an entire photoshoot to their website and sell each image as a separate product. It would take too long to do this manually, so you need a WooCommerce gallery import plugin that can import simple, variable and downloadable products.
You can do this using the official Product CSV Import Suite plugin. I'll tell you how to import your photos using this plugin now:
Use FTP to upload all the photos to the /wp-content/uploads/ folder on your website. To keep your photos organized, add them under the current month. This is easy, as the uploads folder is already structured by month. (If you haven't used FTP before, learn how here.)
If you want to create a lower resolution version of each photo to use as the main product image, upload these too.
Next, prepare a CSV file containing the product data that you wish to import. The easiest way to create a CSV file is to use spreadsheet software such as Microsoft Excel or Numbers. When you've finished, use the Save As or Export option to save the file as CSV.
Add all the product data using the column headers in the import plugin documentation. If you want each product or variation to have the same data (e.g. price) then you can copy and paste rows of the spreadsheet to quickly add them - just make sure each row has a unique URL for the actual image.
If you're selling photos as downloadable products, use this section of the documentation to add the downloadable product data to the CSV file. This includes downloadable file URL (this will be the URL of the photo that you uploaded via FTP), download limit and expiry.
When the CSV file is complete, upload it using the Product CSV Import Suite plugin. This will automatically import your photos as WooCommerce products, so you can start selling them.
Preparing your CSV file sounds a bit daunting. Stick with it, as the documentation is excellent and covers everything you need to know. WooCommerce.com also provide excellent live chat support to help with any problems. Once you've created your first CSV file, it will be much easier next time.
WooCommerce for photographers – time to create your website!
I hope this guide has helped you to choose the best WooCommerce photography plugins or WooCommerce gallery plugin for your WordPress website. I'd love to hear how you get on.
Which are the best plugins on WordPress and WooCommerce for photographers in your opinion – are there any I've missed? Please add your comments below.
This tutorial will show you how to create a WordPress audio library or MP3 player using the Document Library Pro plugin. Your visitors will be able to find and play audio tracks directly in a searchable and sortable table. They can play individual audio tracks or even complete audio playlists.
Audio galleries are a popular feature of many websites. There are lots of reasons for wanting to know how to create a filterable music library or audio track directory. You may be a band, artist, composer or musician and want to display your music or sound effects on a single directory page with embedded audio. Maybe you're a CD and want to include a track listing with samples.
You might need to provide samples as part of an audio or music catalogue or directory. Perhaps you're a voiceover artist and want to create an audio track library with examples of your work. Alternatively, your site might feature audio learning materials such as recorded tutorials or lectures, foreign language classes, or podcasts.
Whatever your reason for creating a WordPress audio library, this tutorial will show you how to do it using the Document Library Pro plugin.
The perfect WordPress audio library plugin
The Document Library Pro plugin has everything you need to create a WordPress audio library. While it has 'Document' in the name, it's perfect for listing any type of resource - including audio.
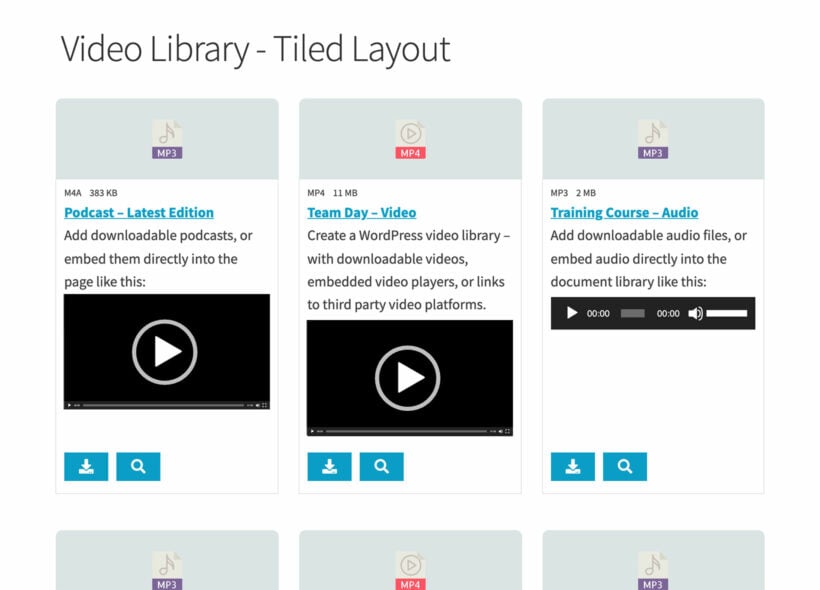
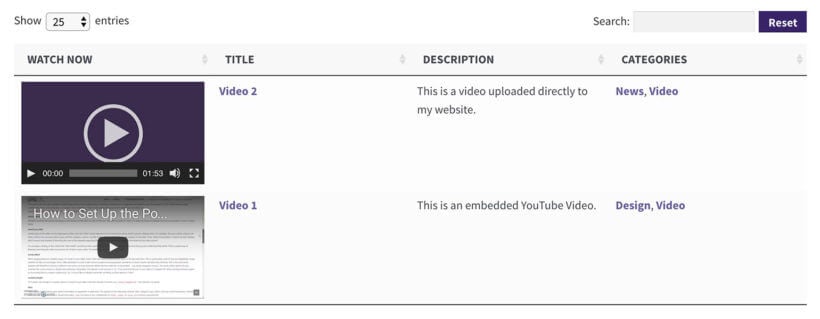
You add your audio files to the WordPress media library (or host it elsewhere, e.g. on Spotify), and the plugin displays them in a searchable table or grid. It contains embedded music tracks or MP3 players which you can listen to directly from the audio library page:
An audio library with a grid layout and embedded media players
It's a really neat way of displaying audio tracks. People can listen to them, play, pause and fast forward directly within the table.
Document Library Pro also works as a WordPress audio playlist plugin. It creates a container for playlists by listing them in a table-like directory structure. You can listen to playlists and navigate between the tracks from the table. People don't have to click through to a separate page to listen to them - it's all on one page.
You can use Document Library Pro to display audio players and playlists created using the audio shortcodes that come with WordPress itself. I'll also share some third party WordPress audio plugins that can be used to display more fancy audio players.
Read on to learn how to create a searchable, filterable WordPress audio library.
Beautiful product! I did a nice filtering and dynamic search for my music library without any strong skills in web development.
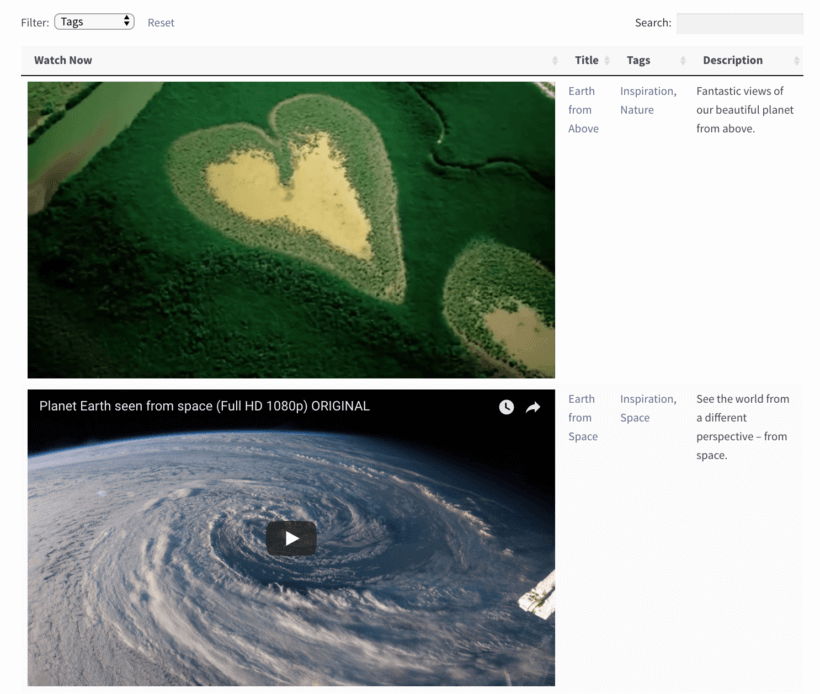
What type of audio can you include in a WordPress audio library?
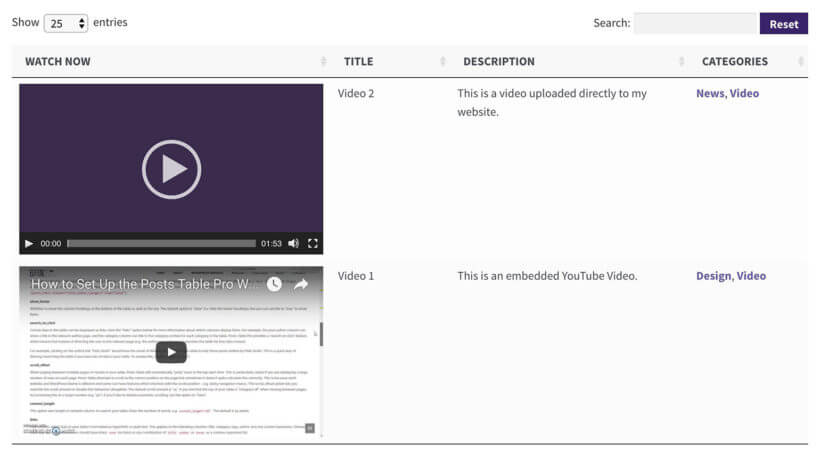
A WordPress audio library with a playlist and 2 individual music players
These days, people use audio files for a huge variety of purposes. The good news is that you can publish any of these in a WP audio library. This includes:
Multiple audio file formatsMP3, WAV, MPEG and more.
Types of audio recordingAudiobooks, bands, choir music, foreign language lessons, karaoke backing tracks, orchestra music, relaxing background music, samples, singles and albums, podcasts, stock music (e.g. corporate background music, royalty free music, sound effects, etc.).
Audio from third party websitesIf you host your audio files externally, that's fine. The WordPress audio library also supports embeds from other platforms such as Mixcloud, ReverbNation, SoundCloud and Spotify.
Whether your site features audio learning materials such as recorded tutorials or lectures, foreign language classes, or podcasts, you can also integrate text to speech technology to offer additional accessibility features. This allows users to listen to written content in audio format, thereby catering to diverse learning preferences and enhancing the overall user experience.
How to set up your digital WordPress audio library
Now, we get to the tutorial part of this article. Keep reading to learn how to set up a WordPress audio library.
1. Add the audio files to WordPress
To get started, you need a WordPress website with the Document Library Pro plugin installed.
First, you need to add each audio item to WordPress as a 'Document' post. Each 'Document' will appear individually in your front end audio library. You need to do this even if your actual audio files are hosted outside of WordPress.
There are several ways to do this:
Option 1: Add document manuallyGo to Documents → Add New in the WordPress admin and add all the information you want to display about each document. Don't worry about uploading the actual audio file yet - we'll do this in Step 2.
Option 2: Use drag and drop file uploadGo to Documents → Import and drag and drop the audio files into WordPress. Then, go to Documents and manually edit each one as needed. For example, the name will be the same as the filename, and you can change this to make it more user-friendly.
Option 3: Upload from CSVYou can also go to Documents → Import and upload a CSV file. This should contain all the information that you want to display for each audio track, as well as the URL where the audio file is hosted (e.g. in the WordPress Media Library or on another website).
2. Add embedded audio players
The next step is to add an embedded audio player to each of the audio items (i.e. 'Documents') that you added in Step 1. For each one, you can add either a standalone audio track or a full audio playlist.
Initially, we'll use the native WordPress audio and playlist shortcodes. Later, I'll show you how to create even more impressive-looking audio embeds using other plugins which work with the WordPress audio library.
Go to the Documents section of the WordPress admin and click on one of the documents.
Add an audio player to the main content area using one of these methods:
If you plan to store the audio files in the WordPress Media Library, then you should click the 'Add Media' button and upload the file. When you insert it into the document content, WordPress will automatically convert it into a full functional audio player. It must be a valid audio file type such as MP3, AAC, WAV or FLAC.
To embed audio files hosted on Mixcloud, ReverbNation, SoundCloud or Spotify, simply paste the URL into the content area. Again, WordPress will display this as an embedded audio player.
If your audio files are hosted on another third party platform then you need to get an embed code. To add it, go to the 'Text' tab and paste the embed code there.
Click 'Update' to save the document post.
Adding audio to the WordPress Media Library
Adding audio playlists
You can also add complete playlists to the WordPress audio library. If you're planning to treat the entire table as a playlist then you should add each embedded audio track as a separate 'Document' as described above. This would look like this:
An audio playlist with 1 track per row
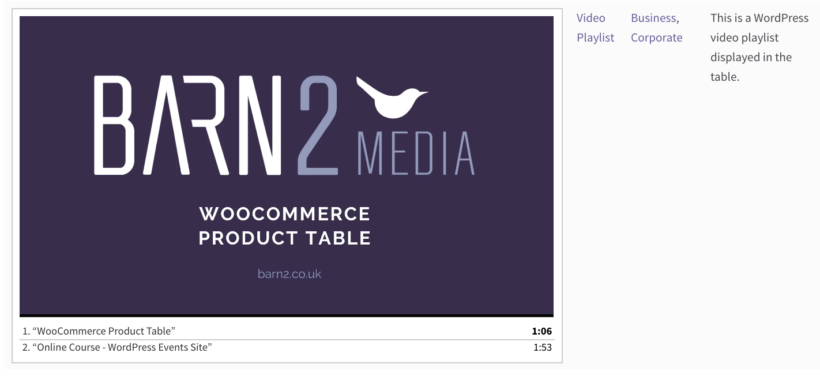
Alternatively, it's also possible to add actual playlists which appear in a single row of the table like this:
An audio library with an entire playlist in the first row of the table
To add a playlist to one of your 'Documents' - like in the second screenshot above:
Edit the document.
Click 'Add Media'. Instead of adding an individual MP3 file or similar, click 'Create Audio Playlist'. If you can't see this link, it's because you haven't uploaded any audio tracks to your WordPress media library yet. Once you have uploaded some audio tracks, this link will appear.
Select all the audio or music tracks that you want to include in the playlist and click 'Create a New Playlist'.
On the next page, you can add the track name underneath. This will appear on your playlist so make it as descriptive as possible - e.g. the song name. There are also some settings on the right, for example whether to display the artist name.
Finally, click 'Insert Audio Playlist'. WordPress will automatically create and embed your playlist.
Click 'Update'.
Adding an audio playlist using the Classic WordPress editor
3. Create a front end WordPress audio library
Now it's time to list the audio files on the front end of your website so that everyone can see (and hear!) them.
Document Library Pro has already created a main audio library page for you. To find it, go to the Pages section in the WordPress admin and find the page called 'Document Library'. Rename this to something more relevant such as 'Audio Library' (remember to change the permalink too).
View the page and you'll see your audio files listed in a table or grid view with one on each row. However, it may not have the information that you want to display yet.
To customize it to your requirements, go to Documents → Settings. Read through the page and change the settings as needed.
Recommended settings for an audio library
Document Library Pro has over 50 options and you can set it up however you like. In particular, I recommend that you use the following options:
Layout -Choose between a table layout with 1 audio track per row; or a grid layout with a tile for each document (like Netflix).
Content - There are lots of available content types to choose from. For a WordPress audio library, add something like: title, content, excerpt. This will display the title, the content field (which contains your embedded audio player or playlist), and an excerpt (which is useful for showing a brief overview of the audio file). You can rename the columns by adding a colon after each one like this: title: Song, content:Listen Now, excerpt:Description.
Shortcodes - Enable this option. This tells Document Library Pro to display the embedded music players in the main audio library, instead of the unrendered shortcode which WordPress has created behind the scenes.
Links - By default, people can click on the title column to access a separate page for each audio item. The separate page will have the name at the top with the embedded audio player underneath, and any other data you've entered on the right (e.g. the file size). If you don't need these pages then add none to the Links option.
Filters - If you have added categories or tags to your audio items, then add some filter dropdowns so that people can find then more easily.
Lazy load - Enable this if you will be listing lots of audio files. This tells the plugin to load one page of the audio library at a time, speeding up the load times.
4. View the audio library
Your finished audio directory will look something like this:
This has created a professional-looking WordPress audio library listing all your music tracks. You can add as many as you like.
If you have lots or music tracks or audio playlists then the plugin will add pagination buttons at the bottom.
Restyling the audio player
So far, I've shown you how to display the built-in audio and playlist shortcodes in a searchable WordPress audio library.
If you don't like how the basic players look or function, then you can enhance them by adding the free Compact WP Audio Player plugin. This works nicely with Document Library Pro.
Use it to create a very simple audio player, which appears as a small play button in a circle. When you click on the circle, the audio track plays and a pause icon appears within the button instead. If space is at a premium in your WordPress audio library, then this is an ideal plugin to add small audio players.
To display a compact audio player in the audio library, just install the plugin. Next, add the shortcode [sc_embed_player fileurl="URL OF THE MP3 FILE"] to the content field for each document.
Need to add download links?
Some WordPress audio libraries simply embed the audio files on the page, like the examples above. This is very secure because visitors can listen online but can't download the files.
If you want people to be able to download the audio files, then that's fine too. You can add download links, buttons or file type icons. Visitors click on these to download the audio file to their computer.
Go to Documents and click to edit a document.
Find the 'Document Link' option in the top right hand corner. Use it to either select the audio file from the WordPress Media Library, or add the URL where it is hosted on another website.
Go to Documents → Settings and add a 'link' column to your list of columns.
Use the other link-related settings on the page to choose a style for the download links.
This will add a download column to the WordPress audio library.
Need to sell audio online?
If you want to sell audio files in your WordPress audio library then you need an e-commerce plugin. You can sell audio files using either WooCommerce or Easy Digital Downloads.
Either way, you can use our other plugins to list the audio products in a searchable table. Your audio store will look like the other screenshots in this article, but will also have 'Buy' buttons so that people can make purchases.
Selling audio with WooCommerce
The free WooCommerce plugin lets you sell absolutely anything online. Use it with our other plugin, WooCommerce Product Table, to create a searchable audio library.
For example, Dosado used WooCommerce Product Table to sell audio files with embedded music players in the table.
If you only sell digital audio files then you can also sell them using the Easy Digital Downloads (EDD) plugin.
EDD is a bit simpler than WooCommerce because it doesn't have any options you don't need, such as Shipping.
For example, Fascinated Sound use EDD with our Posts Table Pro plugin to sell royalty-free sound effects and music tracks. They list over 600 downloadable audio products in their WordPress audio library.
Each audio download is listed in a table with columns for audio player, title, description, category and add to cart button. You can click on a category in the table to filter by that category. There's also a category filter dropdown above the WordPress audio library.
Customers can listen to each track by clicking on the embedded play buttons. The play buttons were created using the free Compact WP Audio Player plugin, which works perfectly in the audio library.
We love Fascinated Sound's WordPress audio library because it's such a user-friendly way to list and sell music and other audio products.
So now you know how to create an audio library in WordPress. Now it's your turn. Follow the steps in this tutorial to create your own WordPress audio library or music directory. To get started, download Document Library Pro today - it's one of the best WordPress audio plugins around.
Supports all types of audio file.
Aimed at beginners or developers.
Full support and documentation.
Money back guarantee.
Discover the easy way to embed, stream and sell videos on your WooCommerce store. We'll do it with the best WooCommerce video gallery plugins.
Are you looking for a way to showcase or sell videos on your WooCommerce store? There are several ways that you can use videos on your store:
Creating a WooCommerce video gallery - Display preview or promo videos on your main shop pages to grab visitors' attention. This is a great way to boost sales of any type of product, whether you're selling videos or something else such as clothing.
Selling videos with WooCommerce - You can also use WooCommerce to sell actual video products, which customers can then download or watch online.
An example of a WooCommerce video gallery
Keep reading to learn how to use WooCommerce video gallery plugin to display videos on your shop pages, as well as how to sell videos in WooCommerce. Customers will be able to watch a video preview for each product without leaving the page, and add the product to their cart right from the same gallery.
I'll also provide some tips on other ways to display video in WooCommerce, such as in a "Quick view" product lightbox, or in a dedicated "Video" tab on the product page.
How to create a WooCommerce video gallery
Why WooCommerce Product Table makes a great video gallery plugin
WooCommerce Product Table lets you display allor someof your WooCommerce products as a flexible grid/table. You can control exactly what information displays in your table including add to cart buttons and - you guessed it - product videos.
The advantage of a table view is that your customers can watch videos for multiple products on one page - there's no need for them to keep going to the individual product page. You can do this by adding embedded video players directly to the product table on the shop page. This is ideal for WooCommerce video streaming, as customers can view the video directly on. your website.
Similarly, your shoppers will also be able to select variations and add products to their carts right from the video gallery - again, no multiple tabs or page reloads required. Whether you're selling videos with WooCommerce or just want to use video to promote other types of product, it's a more convenient approach for visitors.
Below, we'll show you how to set up this WooCommerce videos plugin. After that, I'll show you some extra ways to display video in WooCommerce, and also how to sell video products.
Step 1: Add video to WooCommerce products
To get started, you need to add an embedded preview video to the individual products that you want to display with WooCommerce Product Table. This is how customers will stream the video online.
The process is the same whether you're selling videos with WooCommerce or just adding video to a regular product. You do have some choices for where and how you add the video, though.
First off - how. There are lots of ways to easily add video to WooCommerce products:
The easiest way is to just embed a video player from YouTube or Vimeo. Simply paste the video URL into the product and WordPress will embed it as a proper video player.
If you don't want YouTube branding, you can pay for one of Vimeo's unbranded plans, or a service like Swarmify. This can seamlessly import and serve YouTube video but with an unbranded player.
Now, the where.
If you're not already using the Product short description field, that's the easiest spot to add your video. In fact, that's what we'll do for this example. All you need to do is embed your video in the text editor using normal WordPress oEmbed functionality. This is incredibly easy - simply paste the URL of your video from YouTube, Vimeo or similar.
But if you're already using the short description field for something else, you can also create a custom field to embed your videos using a free plugin such as Advanced Custom Fields.
Finally, add videos to all the products you want to display with the WooCommerce video gallery plugin.
Step 2: Create a product table for your WooCommerce video gallery
Install the plugin and then go to Products → Product Tables. While you should set up each step to see what interests you, if you want to create a WooCommerce video gallery, I recommend that you configure these settings as a minimum:
Columns - Make sure to include the short description or the custom field that you added to hold your video. And if you're planning to add quick view to your video gallery, then you should also add a 'Quick view' column.
Add to cart column - Configure how you want your add to cart button to function, including variations.
Lazy load - If you have lots of products with WooCommerce videos, you might want to enable lazy loading for performance reasons.
Once you've created the video table, go to Products → Product Tables → Settings and enable the 'Shortcodes' option. This ensures that your embedded WooCommerce video players load properly in the table.
Step 3: Add the video gallery to WooCommerce
Now, you just need to choose where in your store the WooCommerce video gallery will appear. There are two ways to approach this:
Tick the relevant boxes on the plugin settings page to show the product table layout on your main shop and category pages. You can do this via the first page of the table builder.
Use a 'Product Table' block or a shortcode to add WooCommerce video streaming galleries to other pages. You can find the shortcode for your table at Products → Product Tables.
Once you have set up the video gallery in WooCommerce, it will look something like this:
Can I embed video playlists?
If you want to show more than one video per product, then you can embed entire video playlists into the WooCommerce video gallery. You can easily do this using the video playlist shortcode that comes with WordPress itself.
WooCommerce audio and video gallery containing an audio file, a single video, an audio playlist, and a video playlist
Use the following instructions to add a video playlist to any of the fields you're displaying in the product table:
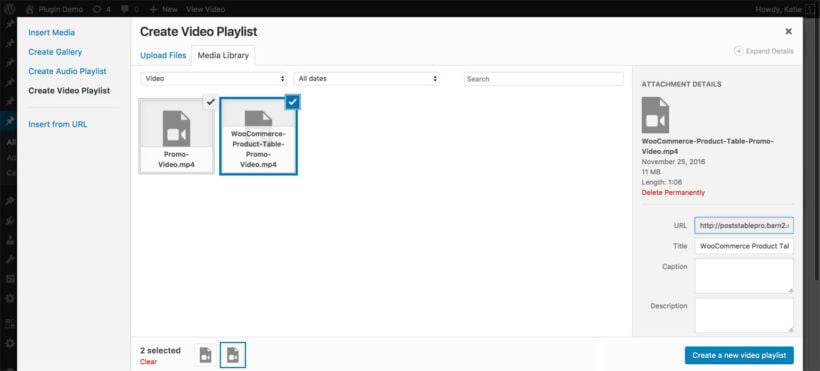
Click the 'Add Media' button.
Choose the 'Create Video Playlist' button on the left.
Upload and select the videos you wish to include in the playlist.
Click the 'Create a new video playlist' button on the bottom right.
On the next screen, add any captions for each video and change the settings as required.
Creating video playlists in Gutenberg
At the time of writing, the above instructions only work if you're using the classic WordPress editor and not Gutenberg. Hopefully Gutenberg will add a video playlist button in future. In the meantime, you can create video playlists by adding the following shortcode to a Gutenberg 'Shortcode' block:
Replace the ID's with the actual ID of each video you wish to include in the playlist. You can find these by going to the 'Media' section of the WordPress admin, clicking on a video, and looking at the URL at the top of your browser tab. For example, if the URL ends /wp-admin/upload.php?item=12345 then you need to add the ID 12345 to the shortcode.
Add WooCommerce videos to a quick view lightbox
So far, you've learned how to create a WooCommerce video gallery with embedded video players in the main product list. You can use the widths option in WooCommerce Product Table to choose how much space the video player column takes up. However, videos inevitably require a fair amount of vertical space. If you want to list products in a more compact way, then it might be better to show the videos in a quick view lightbox for each product:
Using WooCommerce quick view is better than just adding video players to the single product page. That's because you don't want to take customers to a separate page for each product - that slows things down and takes them away from the main product list. By watching sample WooCommerce videos and adding to the cart from a quick view lightbox, the customer remains on the same page. This stops them from getting lost and encourages them to add multiple products to the cart.
Go to WooCommerce → Settings → Products → Quick view, enter your license key and choose your quick view settings. Make sure you enable the short description, as this is where you've added the video players. You can choose whether or not to show other sections such as the product images or add to cart buttons.
Add 'Quick view' quick_view to the list of columns in the Product Table (Products → Product Tables).
And that's it!
Add a video tab to the product page
And finally, let's think about where else you can display video on the WooCommerce product page. One way to do this is to add a dedicated 'Videos' tab, which allows you to display video without cluttering up the page layout. You can do this with the WooCommerce Product Tabs plugin, which lets you add extra tabs to the product page.
How to stream videos on WooCommerce
We have already touched on WooCommerce video streaming, but I want to make sure it's totally clear before we move on.
Steaming videos involves allowing people to actually watch the video on your website. They don't download it - they watch it in an embedded video player embedded on the website.
This means that you can use several of the methods that we already discussed to enable video streaming:
When you embed videos directly in a product table, then visitors can stream them from your main shop pages.
Whichever method(s) you choose, it's very straightforward to add video streaming to WooCommerce. Just host the videos on any streaming service such as Vimeo or YouTube, and paste the URL wherever you want them to appear on your WordPress site.
How to sell videos on WooCommerce
Above, you learned how to create a customizable WooCommerce video gallery. However, what if you're specifically looking to sell videos on WooCommerce?
In that case, the same basic steps apply for creating the video gallery, but you'll want to go about creating your WooCommerce products a little differently.
That is, in the example above you learned how to display videos in a gallery as a way to showcase a product. Now, you're going to learn how to make the video the product itself.
Can you sell videos on WooCommerce?
Most people think of WooCommerce in terms of selling physical products that are shipped to the user. However, it's equally well-suited for selling virtual or downloadable products.
This means that you can sell videos on WooCommerce whether you're selling physical videos to post, or virtual videos to stream online or download.
Types of video you can sell with WooCommerce
You can use WooCommerce to sell absolutely any type of video. This includes:
All video genres - fiction, nonfiction, films, movies, educational video.
Any type of video - animations, commentary, drone footage, behind-the-scenes event coverage, how-to video tutorials, interviews, presentations, promotional product videos, stock footage, motion graphics and presets, After Effects project files, Apple Motion or Cinema 4D templates, Flash elements files, video overlays and textured, Premiere Pro templates, social media video templates, video effects and transitions.
All video file types - MP4, WEBM, AVI, QuickTime, WAV, and many more.
Whatever sort of video you want to sell online, keep reading to discover the best way to do it.
Setup instructions
The basic steps to sell video in WooCommerce are as follows. I'll be focussing on selling videos for streaming online or downloading, but you can also sell physical videos to post to the customer:
Upload the video file somewhere accessible.
Mark products as Virtual and Downloadable.
Add video file to WooCommerce product.
Let's go through them in detail…
Step 1. Upload video file somewhere accessible
To get started, you'll need to upload the video file itself to a place where visitors will be able to download it.
For a small file, you can just upload it straight to your server via your WordPress Media Library.
However, if you have larger files, or if you're planning to have a ton of downloads, a better option is to use a dedicated storage service like Amazon S3 or DigitalOcean Spaces. These services are affordable, reliable, and lower the burden on your site's server.
Step 2: Create a virtual, downloadable product
Next, create a new WooCommerce video product:
Go to Products → Add New.
Add the product title - this will usually be the WooCommerce video name.
Type a main description of the video. This will help with the SEO of the video product page by being crawled by search engines.
Choose any categories or tags for the video. Customers will be able to filter by these to find specific videos.
In the 'Product data' section, make sure to check the boxes for Virtual and Downloadable:
Step 3: Add download or streaming link
After you tick the 'Downloadable' box in Step 5 (above), you should see a new Downloadable files section appear in the General tab of your WooCommerce video product.
If you want customers to download the video they bought, then fill this in as follows:
Click the Add File button and insert the download link for where the video is saved. As we discussed in Step 1, this might be in the WordPress Media Library or it might be on a third party video host like Vimeo.
Add a download limit and expiry date if required.
Alternatively, you can allow people to stream the video online instead of downloading it. To do that, simply enter the URL of wherever they can stream the video. This might be a hidden page on your WooCommerce site containing the embedded video. It might also be a link to a third party video hosting site such as Vimeo.
Once you're finished, Publish the video product as you normally would.
Step 4: Add custom fields to WooCommerce video products (optional)
When you're selling video online, there might be extra fields of product data that you need to display about each video. For example, perhaps your WooCommerce video gallery needs fields for resolution, video length etc.
You can easily add custom fields using a free plugin like Advanced Custom Fields or Easy Post Types and Fields. Simply use your chosen plugin to add as many fields as you like to the 'Products' post type. You can then use WooCommerce Product Table to display them as extra columns in the video gallery.
What happens when customers purchase a video product?
When someone purchases the video from your WooCommerce store, they receive an email containing a unique link to download the video file.
For best results, combine this method for selling videos with the earlier section of this tutorial on how to create a WooCommerce video product gallery. That way, customers can watch the embedded video preview directly on your shop pages, and then purchase the full video.
What about piracy?
With the example above, even people who didn't purchase a video would still technically be able to download it if someone shared the link with them.
Now, digital piracy is something you're never going to stop, so a lot of store owners will just live with that and focus on finding more paying customers.
But if you are concerned and want to at least make it harder for people to share the download links, you can use the Download limit and Download expiry options to limit access:
Just be aware that these restrictions might frustrate some legitimate customers who want to download a file multiple times or in the future.
Go build your WooCommerce video gallery!
And that's it - you just added a user-friendly WooCommerce video gallery to your store. You also learned how to sell video online in WooCommerce, either for download or streaming.
Not only can visitors browse videos for multiple products without leaving the page they're on. They can also add products right to their carts for a smooth, friction-free checkout process.
The WooCommerce Product Table plugin makes it easy to add video to your shop pages. Get it today and start promoting your products with video:
Have any other questions about how to use a WooCommerce video gallery plugin? Leave us a comment!
We've been working hard adding exciting new features to Posts Table Pro, and I'm pleased to tell you that version 2.0 is now available for you to install.
The new version contains a huge number of changes, new features and improvements. We've made it easier to use than ever before, with a full settings page for people who aren't confident working with shortcodes. There's an image lightbox which opens a bigger version of the featured image in a popup or modal window. You can pre-filter for a specific search term, and add nested hierarchical filters above the table.
Here's more information about the new features and improvements.
Quite a few of our customers have asked for an easier way to configure your tables, instead of having to do everything in the shortcode. As a result, we've added a full settings to the plugin where you can select default options that will affect all the tables on your site. You can find this at Post Tables → Settings.
As before, you can continue configuring your tables directly in the Posts Table Pro shortcode if desired. This allows you to override the default settings for individual tables - for example if you want to add multiple tables to your site, each one listing different information.
New! Image lightbox
Another popular feature request - version 2.0 includes an image lightbox for all your post images, courtesy of the Photoswipe library. You can enable this from the plugin settings page:
This applies to all featured images within the 'image' column. Once enabled, the image will open in a lightbox when clicked or tapped.
One of the most popular items on our feature request list relates to the category or custom taxonomy filter dropdown above the table. Previously, all categories and sub-categories were listed alphabetically in a single list, regardless of their level. Lots of you have asked for this list to be hierarchical, so we have reworked the filter to achieve this.
The new categories/taxonomies filter is also better at only showing categories that relate to the products in the current table when you're not using the lazy load option.
Lots of you have also asked for an option to filter the products in the table when it first loads. To do this, add the search_term option to your shortcode. For example, the following shortcode will pre-filter the table for posts containing the word 'summer'.
[posts_table search_term="summer"]
New toolbar button
Previously, you created a table by adding the shortcode [posts_table]. We've added an 'Insert posts table' toolbar button to make this easier for you.
Use this button to add a table containing all the options you chose on the settings page.
Caching added for faster load times
We've added a new caching option to improve performance. By default, the cache will clear itself every 6 hours. You can enable this on the plugin settings page.
And there's more!
We've also made various other tweaks, bug fixes and improvements. You can see the full changelog here.
How to get the new improved table plugin
If you're already using Posts Table Pro then you can update to the latest version via Dashboard → Updates in the WordPress admin. If you get any errors, please see our knowledge base article on problems updating the plugin.
If you haven't got the plugin yet, get it now and start creating instant tables of your posts, pages, custom post types and more!
Looking for a way to create a front-end WordPress media library that your visitors can browse? You've come to the right place!
What you need to know:
The WordPress Media Library is the default place to upload and store files on the back end (dashboard) of your website.
The Document Library Pro plugin can display the files from your Media Library on the front end of your website.
You can choose what information to display in the front end Media Library, and which file types to display.
Full setup tutorial below.
Managing and displaying media files on the front end of your website can be a challenging task, as the WordPress Media Library normally only appears in the WP admin.
In this guide, we'll explore an unusual use case for the Document Library Pro plugin - how to use it to display files from the WordPress Media Library. This powerful plugin that revolutionizes the way you handle documents and other file types in WordPress. From organizing and categorizing files to customizing the front-end display, we'll provide you with step-by-step instructions and practical tips to make the most out of your front end Media Library.
A front end Media Library created with the Document Library Pro plugin
Whether you're a business, an educational institution, or a content-driven website, this guide will equip you with the knowledge and strategies to efficiently manage and showcase your Media Files to the public. This makes them easily accessible to your audience.
What is a media library?
The Media Library that comes with WordPress core is the default place to upload and store files and photos on your website. When you're just getting started it does a solid job of organizing files in your dashboard. However, it quickly becomes cluttered and impossible to navigate without the help of a plugin. Furthermore, you might want your files to be directly accessible to website visitors as well.
This is where a front end WordPress Media Library can come in handy for displaying:
Large numbers of files (especially images)For example, you might need to display more images than the WordPress media gallery can handle. In this case, a front end media library with search, filter, and sort options will be more user-friendly.
Non-image filesIf you need to display files like PDFs or audio files, a frontend media library provides an easy way to make those files accessible. You can even use it to create a document library.
Benefits of a front end media library
If you want to display files and multimedia content on your website, then a lot of people immediately look for a gallery plugin. However, this brings several disadvantages to compared to displaying the media library files directly on the front end:
It adds an extra step to the process. With a gallery plugin, you have to manually create a gallery. The files displayed are stored in the media gallery of WordPress, but you have the extra step of creating the gallery and bulk selecting the files.
It only supports certain file types. The WordPress Media Library stores any file type, whereas a gallery is all about image files. What about displaying other types of Media Library file, such as documents and PDF uploads?
It's harder to update. With no built-in version control, it's easy to lose track of which version of each file you're displaying.
Some Examples
There are lots of websites that can benefit from displaying some or all of the WordPress Media Library on the front end. Here are some examples:
Photography/videography websites: For photographers and videographers, their work is their product. Displaying high-quality images and videos directly on the front end allows potential customers to easily browse and appreciate their work.
Document database: If you need to share resources with your users, then displaying PDF's and other documents from the WordPress Media Library can be really helpful.
E-commerce sites: Product images, user reviews with photos, tutorial videos - all these can be organized in the media library and displayed on the front end for potential customers to see.
Educational sites: These may need to display media files like lecture videos, images, diagrams, and infographics on the front end for easy access to students.
Why Document Library Pro is the best front end WordPress media library plugin
The Document Library Pro plugin is the ideal solution for creating a front end Media Library. While its name focusses on documents, you can use it to display any type of media file in a searchable database on the front end of your website. This might be images, presentations, videos, PDFs, audio files, etc.
Unlike media gallery WordPress plugins, Document Library Pro displays Media Library files directly on your website. You don't have to manually create a gallery first or use FTP.
It works like this:
First, you bulk select all the WordPress Media Library files which you want to display on the front end.
Next, you select the option to convert them to documents. At this point, Document Library Pro creates a 'Document' post for each file, which you can use to add any extra information that you want to display about each media file. The document posts link to files in the WordPress Media Library so that you can display them in the front end.
Finally, you use a simple shortcode to insert any or all of your 'Documents' (i.e. Media Library files) onto the front end of your website.
When you've finished, you'll have set up a professional-looking library with optional features like instant AJAX search, lazy loading, and sort/filtering. You can display media library without having to learn coding languages such as CSS, JavaScript, and HTML. Users can click on a link, button, or file type icon to instantly view or download the media file.
Key features of Document Library Pro
With its intuitive interface and powerful functionalities, this WordPress Media Library plugin offers a seamless solution for organizing, managing, and showcasing your documents on your website. Here are some key features:
Instant search, sorting, and filtering: Document Library Pro provides robust search capabilities, allowing users to quickly find specific files based on keywords, categories, or tags. Sorting and filtering options further enhance the browsing experience, enabling users to navigate through your front end Media Library effortlessly.
Flexible layout options: Choose between table or grid layouts to display your documents. These flexible layout options ensure that your library looks visually appealing and well-organized, providing an optimal user experience.
Support for various file types and 3rd party URLs: Document Library Pro supports a wide range of file types, including documents, images, videos, and more. Additionally, it enables you to include 3rd party URLs, such as embedded audio and video players, expanding the possibilities for media file display and interaction.
Integration with password protected categories: Take advantage of the enhanced security features offered by Document Library Pro. By using it with its sister plugin Password Protected Categories, you can create private Media Libraries, granting exclusive access to authorized users. Protect sensitive information and ensure confidentiality with this powerful integration.
How set up a media library in WordPress
Next, I'll tell how you to use the Document Library Pro plugin to directly display files from your WordPress Media Library on the front end of your site.
You'll learn how to create a table which lists any (or all) of the following information in the front end:
File name - with or without a link to view the file on a separate web page.
Title - the filename.
Image - a featured thumbnails image to represent the media file with different image formats like gif, jpeg, and webp images.
Caption - this is a useful way to show a description or summary of each file.
File size and file type - these are both generated automatically.
Dates - e.g. the date the media file was added to the library, and the date it was last modified.
Any additional categories, custom fields, metadata or taxonomies that you choose to add. You can use these to store information such as the file size, and file type, add any extra descriptive text, and even add extra links, images, icons, or download buttons.
Download link - A link, button, or file type icon to download the media file or open it in the browser.
You'll also learn how to organize WordPress Media Library in a more simple grid layout, with each file displayed in its own tile.
Follow the below steps to add a searchable media library to WordPress
Purchase and install Document Library Pro and follow the on-screen instructions to activate your license key.
Complete the setup wizard and navigate to your Media Library.
We're now going to convert the media library WordPress folders and files into 'Documents' so that you can display them on the front end. Don't worry about the word 'documents' - you can do this with literally any type of file! This might be images (e.g. jpg or png), spreadsheets (e.g. csv or xls), or even audio or video (e.g. mp3 or mp4)!
Step 2: Add media files to your library
Make sure you're on the list view and not the grid view. (You can toggle the two views using the blue icons on the top left of the WordPress media library.)
Tick all the media library files that you want to display on the front end.
Click the 'Bulk actions' dropdown and select 'Add to document library'.
Next, go to the Documents section of the WordPress admin. You'll see that each media library WordPress folders file has been added as a 'document'. Make any changes as needed. For example, if you're planning to display the filename in the front-end media library then you might want to edit the title of each document to make it more readable.
Drag and drop new files
Alternatively, if the files aren't already in the WordPress Media Library then you can drag and drop them straight into Document Library Pro. This converts them to 'Document' posts straight away, also saving them to the main Media Library.
Go to the Documents → Import section of the WordPress admin.
Drag and drop the files directly onto the page, or click to browse and select them.
This will add the file to the Media Library, and will also add each one as a document that you can display in the front end - complete with links to download the files. Again, make any changes to the data that you're planning to display about each one.
Step 3: Display media files on the front-end library view
First, I'll tell you how to create a front-end WordPress Media Library that uses the information that WordPress itself stores about each file. Afterward, I'll tell you how to store extra information about your files and display it in the media library.
In the WordPress admin, go to the plugin settings page at Documents → Settings.
Go through the settings and choose how you want the front-end media library to look and behave.
Key settings to optimize your front-end media library display
There are lots of settings, and here's a summary of the ones that are most important for listing media files on the front end:
Columns - Choose which columns to display the media files. Make sure you include a 'link' column so that people can download the media file. If you have added a featured image for each media file then include the 'image' column too. You can also include columns like image size and file type.
Folders - Enable this option if you want to structure the WordPress media files into folders, based on their categories. This helps people to find files by category.
Link options - There are several options for choosing how the download links work in the front-end WordPress media library. If you're displaying different file types then it's a good idea to enable the 'Icon' option. This displays file type icons so that people know what type of file they're about to download. You can also choose whether or not to open links to media library files in a new tab.
Filters - If you've added media library categories and tabs (under Documents → Categories and Documents → Tags), then add doc_categories,doc_tags. This will add category and tag filter dropdowns above the front-end media library.
Lazy load - Enable this if you have more than a couple dozen media files to display.
WordPress frontend media library that looks something like this:
This screenshot includes an image column displaying the featured image, which we have renamed 'Content'. If you are only displaying the WordPress image library and don't want to have to add a featured image for each document, then you might prefer to use this method which uses the Posts Table Pro plugin.
You can also display non-image files (e.g. PDF, XLS or DOCX), for example like this:
Step 4: Set up media category and tag filters
The plugin lets you categorize your media library files (i.e. documents) and add tags. These allow you to keep things organized in the back end, while allowing visitors to filter by media category and tag.
To set up your Media Library categories and tags, go to Documents → Categories and Documents → Tags. Add your categories and tags as needed, and then apply them to each document as needed. If you're using the bulk import feature then you can also include a categories and tags column to do this automatically.
Step 5: Add extra fields to your WordPress Media Library
I recommend adding more information to the document, starting with the fields that come built into Document Library Pro. To do this:
Go to the 'Documents' section of the WordPress admin and click Edit on any document.
Fill in the fields which are available, such as the name, description and excerpt.
There are also options to categorize and tag the files.
If that's not enough, then you can also use the free version of the Easy Post Types and Fields plugin to add extra fields. You can add:
Custom fieldsUse these to list unique information about each file. For example, if you wanted to add an extra summary or descriptive text about each file, or to store a reference number, then you'd need a custom field.
Custom taxonomiesUse these for information that you want to be able to filter by and use to group your files. For example, if you wanted to store the year for each file and add a Year filter dropdown above the front-end media library, then you'd need a taxonomy for this.
How to add custom fields and taxonomies to WordPress media files
Go to the 'Post Types' section which appears on the left of the WordPress Dashboard.
Go to the 'Other Post Types' tab and find the 'Documents' post type. Click on either 'Custom Fields' or 'Custom Taxonomies'.
Add the required information to add as many custom fields and taxonomies as you like.
Now go to the 'Documents' section and you will see the new fields on the 'Add/Edit Document' screen. Add the data for each media file.
Now go back to Documents → Settings and edit the 'Content' section to tell Document Library Pro to include your new custom fields and taxonomies as columns:
To add a custom field column, add cf: followed by the custom field name (e.g. cf:reference)
To add a custom taxonomy column, add tax: followed by the custom taxonomy slug (e.g. tax:document_year)
For example, your list of columns might be: title:Name,excerpt,cf:reference,tax:document_year
Set up your WordPress media library today!
The WordPress Media Library is fantastic, and it's a shame that it's normally only available in the back end.
By using the Document Library Pro plugin, you can take your existing files and display them on the WordPress frontend media library of your WooCommerce website for everyone to see. Use the advice and tips in this tutorial, and you'll find huge flexibility in controlling how your frontend WordPress media library functions.
Have any other questions about using Document Library Pro to create a front end media library in WordPress? Leave a comment and we'll try to help out!
FAQ
1. Why use a WordPress media library plugin?
A media library plugin helps you manage your files better by offering features like folders, bulk editing, and advanced search options. It makes handling lots of images, videos, or documents quicker and more organized.
2. Can I edit media files in my WordPress library?
Yes, you can! WordPress allows basic edits like cropping, resizing, or rotating images directly in the media library. For more advanced edits, you’d need an external tool or a plugin.
3. How can I manage my media library effectively?
To keep things tidy, name your files descriptively, use a plugin which can add folders, and regularly delete unused media. Keeping your library organized saves time and helps your site load faster.
4. Should I add metadata to my media files?
Absolutely. Adding metadata like alt text, titles, and descriptions improves SEO and makes your site more accessible. It also helps you keep track of your files and find them easily.
5. How do I organize my media library?
You can organize your media library by creating folders using a plugin, tagging files with keywords, or naming them consistently. Regularly reviewing and cleaning up unused media ensures everything stays easy to find. Watch this video we made to learn more!
Andrew from Next Level Web has been hunting for the best WordPress audio plugin. He has kindly provided this article comparing the best four, with advice on how to choose the best audio plugin for your own website.
Are you looking to add a bit of pizzazz to your website? Do you feel your website needs something to keep visitors a bit more entertained but not sure what? Well, we have an idea for you - how about adding a WordPress audio plugin that allows you to play music on your website?
If you have a WordPress website then you are probably aware that it offers numerous plugins for different purposes. You can easily embed an audio file with a WordPress audio player plugin, allowing users to listen to music as they browse your website.
Now, when it comes to plugins, there are a variety of different plugins that offer you the functionality you need. The case for a WordPress audio plugin is no different, so how do you know which one to opt for? We have tested the most popular WordPress audio player plugins and selected the top four. During our testing, we made sure they were easy to use for site visitors, provided you with customization options, and were easy to setup.
Whether you are a band or would like to add music to your website, you want a WordPress audio player plugin that gives you freedom and allows you to embed audio easily. Document Library Pro does that and more. It is both easy to set up for you and user-friendly for your visitor. This will enhance their overall experience on your website.
This audio plugin works by creating a searchable, filterable table of your audio tracks. Each one appears on its own row in the table, with an embedded audio player plus any other information you want to include. For example, you might want to display data such as song title, album, category, tags, file size, length, artist, etc.
You can either use Document Library Pro on its own with the built-in WordPress audio embeds. Alternatively, you can use it with other WordPress audio player plugins to display more flashy audio players within the table layout.
How to set it up
At your end, you can either use standard WordPress posts or the Documents post type (comes pre-packaged with Document Library Pro) for this purpose. You can create a new post for each audio track that you want to display using the WordPress audio plugin, along with any extra data you wish to display.
You can then easily embed audio files using the standard WordPress functions. The "Add Media" button allows you to upload audio to your audio library. You can easily remove and add songs in your media library.
If you want to add playlists, you have the option of creating playlists for your users to listen to. Once you've done that, Document Library Pro gives you a ton of options to display the music on your website with little to no effort.
At your user’s end, Document Library Pro creates a table containing music players and other information about each track. The user can select songs or playlists to listen to.
Document Library Pro is definitely one of the more user-friendly WordPress audio plugins. It is a popular audio plugin for not only musicians and composers, but also those looking to sell any time of audio online. You can use it with e-commerce plugins such as Easy Digital Downloads (EDD tutorial here). There's even a WooCommerce version of Document Library Pro called WooCommerce Product Table, which is perfect for creating a WooCommerce audio store.
If you plan to sell audio files from your website using WooCommerce, displaying them in structured tables with all relevant details will make this a cakewalk.
For this, you can use the WooCommerce Product Table plugin and start selling audio files from an easy-to-navigate table. Your customers will be able to listen to audio files and add them to their cart from the same page. This way, they do not have to visit each product page to listen to each audio on your store.
If you want to learn how you can integrate WooCommerce with the WooCommerce Product Table plugin and start selling audio files, check out this complete guide on setting up an WooCommerce audio store.
3. WavePlayer audio player
WavePlayer is a robust audio player that is perfect if you want to enhance the default WordPress audio player on your website. It comes with full compatibility with most WordPress plugins, such as Elementor, WooCommerce, and even Document Library Pro, for displaying audio files in tables.
The plugin comes with multiple customization options, such as the option to change the color palette, dark mode, skins, and even the controls. You get access to detailed documentation with this plugin, and you can get started with the plugin in no time.
Compact WP Audio Player is an HTML5 + Flash hybrid based player. You can use this plugin to easily embed mp3 and other audio files on your website and display it on major web browsers.
This WordPress audio plugin works nicely with the Document Library Pro plugin listed above. By using them together, you can show more audio files in the table, each with an embedded compact audio player.
It is easy to manage and a great option for those that want to host podcasts that are updated regularly. It doesn’t really have much of a playlist option. This means it isn't the best option if you want to have albums or a wide variety of media. However, if you like this plugin then you can use Document Library Pro to list multiple tracks, each with their own compact audio player button.
5. Audio Album
If you are looking for a simple WordPress audio player, with no need for additional functionalities, then Audio Album is a good choice. The player won’t “wow” you in terms of design or anything. However, it is so simple that it easily fits into any website. You can add songs and albums and have different ones on each page if you like this plugin.
Audio Album lets you add the title along with song information to display as the song plays. It supports numerous audio file types from mp3 to wav. You can also link to the audio files to display lyrics or any other information in a popup window. You need to create these popups and can customize the width and height. This means that it doesn’t take away much from your website.
The player itself is easy to use at the user’s end. It displays all the songs available for them to listen to, and they can easily go through them. You do have the option of changing the color of the player, so it easily goes with the theme of your website.
6. MP3 Audio Player by Sonaar
MP3 Audio Player is an enhanced version of the default WordPress audio shortcode player. It comes with a more intuitive interface for the mp3 player and lets you also display multiple audio files easily in playlists, albums, and podcasts.
The plugin also features an intuitive waveform bar under the audio player powered by WaveSurfer.js. You also get multiple options for displaying the audio player on the website too. You can choose to display the audio files using Elementor, Gutenberg, shortcode, or Javascript API. Moreover, you can also bulk-import audio files to your website and create multiple posts for your mp3 files with just a single click.
Be it audio creators or podcasters, the plugin is suitable for all use cases. You can get the lite version from the WordPress.org repository for free. If you want to learn more about the pro version, you can check here.
7. AudioIgniter Music Player
AudioIgniter is another popular WordPress audio player plugin that comes with full compatibility to add and showcase audio files on your website. The plugin also allows you to create beautiful playlists and display them in minutes.
It supports more than a dozen audio services, such as Amazon S3, Radiojar, Anchor, and Shoutcast. With its settings and options, you can create and control unlimited playlists and tracks seamlessly and display them in an intuitive, responsive layout. You can also allow your audio listeners to download or purchase tracks from the audio page.
The plugin also has a Pro version that lets you upload audio files in bulk and perform multiple advanced actions related to managing audio tracks and playlists. If you wish to learn more about the Pro version, you can check it out here.
Picking the right WordPress audio plugin
Picking the right WordPress audio plugin isn’t rocket science. You just need to make sure that the plugin is easy to use and will get the most from the audio you display. Any of the four WordPress audio player plugins we've suggested will do just that.
Use all of them with Document Library Pro to list your audio files in a table layout, complete with embedded music players.
Need a WordPress audio playlist plugin to make it easy for your visitors to listen to audio content? In this post, we'll show you how to use the Document Library Pro plugin to create three different styles of audio playlists on your WordPress site.
A WordPress audio playlist plugin is a great solution for:
Podcasts - you can display all your latest episodes in one easy-to-navigate playlist.
Music - visitors can choose between different tracks. Or, you can include multiple playlists on a single page.
An audio library - visitors can search, sort, and filter to find specific audio content.
Portfolios - if you work with audio in any way, you can use the plugin to display your work in a portfolio.
Any other type of audio that you need to display!
Keep reading to find out how to set it up.
Document Library Pro - the best WordPress audio playlist plugin
If you think about it, an audio playlist is really just a table that includes information like:
Track name
Track length
Play/pause button
Etc.
Since Document Library Pro lets you display any resource from your WordPress site in a flexible table, it's perfectly suited to creating an audio playlist on your site. It fully supports music players and audio playlists so that people can listen directly on the main playlist page.
And because Document Library Pro focuses on customization and flexibility, you'll also gain more granular control over your playlist than other WordPress audio playlist plugins. You'll be able to:
Allow users to search, sort, and filter your playlist (if desired).
Control exactly what information displays on your playlist. For example, you can even include a short text description to go along with each audio file.
Display each track as a separate listing to create a single playlist or display multiple separate playlists on a single page.
3 ways to create a music playlist
Before we start, let's talk about what an audio playlist actually looks like. There are 3 options, depending on your requirements:
1. List audio tracks in a table with 1 song per row
Audio playlist - 1 track per row
In the screenshot above, we have a playlist where each track is listed in a separate row of the table. There's a search box above so that people can search for individual tracks within the playlist. They can then listen to each one individually.
2. List playlists in a table with 1 playlist per row
Audio playlist - 1 playlist per row
In the screenshot above, we have a table containing 1 row. This row has an entire playlist in it. You can add as many rows to the table as you like, each one containing a different playlist.
Customers can use the search box above the table to look for specific playlists. They can then listen to the playlist with a single click, and it will play the entire list in sequence.
3. Create a tiled audio playlist
Finally, you can create an audio playlist where each track appears as a separate tile. This option doesn't have auto-play as each track is displayed individually within the grid. However, it's worth considering if you want a more visual display for the playlist.
You can use the follow instructions to create either type of audio playlist.
How to create a WordPress audio playlist
The general process for using Document Library Pro as a WordPress audio playlist plugin goes like this:
Install the plugin.
Add individual audio files or playlists to WordPress.
Display audio playlists anywhere on your site.
Step 1: Install the plugin
We're going to create an audio playlist of audio files which are stored in the WordPress Media Library. As well as being in the Media Library, they will be in the 'Documents' action of the WordPress admin. This makes it easy for you to find and manage them, as well as adding extra information about each one.
Go to the plugin settings page: Documents → Settings. Activate your license key and then go to the 'Document Libraries' tab.
Decide whether to use the table or grid/tiled layout (see the screenshots above to help you decide).
Choose what information you will display your playlist. There are lots of options to choose from. You should probably include the following:
Title - this will show the title of the playlist
Content - this is where you will embed the audio players.
Enable the 'Shortcodes' option. This tells Document Library Pro to display fully functional embedded audio players in the table.
Step 2: Add the audio files that you want to include in your playlist
Now that you've created a custom post type to house your audio tracks, you're ready to actually add the audio tracks that you want to use in your playlist.
As we saw earlier, you can do this in two different ways:
Add a single track to each document post - this will display each audio track as a separate item in your table or grid. This is what you'll want to do most of the time.
Use the core WordPress playlist functionality - this essentially lets you create a "playlist of playlists". For example, you could use this to list multiple albums or multiple podcast series on a single page.
How to add a single track to each post
To add a single track to each post, you can either:
Upload your audio files directly to the WordPress Media Library if you want to self-host your audio files.
Embed an audio file from a third-party platform (e.g. SoundCloud) using the built-in WordPress embed functionality (Add Media → Insert From URL)
Either way, you should add it like this:
Go to Documents → Add New.
Add all the information that you want to display about the playlist. For example, this might include the title, a description, and so on.
In the main content field, click 'Add Media' and upload or link to the audio file. WordPress will then embed this as a proper audio player.
If you also want people to be able to download the audio track, then find the 'Document Link' section, upload the audio file (e.g. an MP3) or add the URL of where it is hosted. (Leave this blank if you don't want to add download links.)
Click 'Publish' and repeat the process for each audio file.
If you're using this method to add multiple playlists, then create a separate category for each one. Later, I'll show you how to create a playlist listing songs from a specific category.
How to create a "playlist of playlists"
You can also embed multiple playlists in a single table or grid. Each cell or tile contains an entire playlist. Here's a reminder of what it would look like with the table layout:
This option uses the native WordPress playlist feature.
Go to Documents → Add New.
Add all the information that you will be displaying about the playlist, such as the title.
Add a playlist to the main content area for the document:
Click the Add Media button.
Click the Create Audio Playlist link on the left-hand side.
This will embed your audio playlist in the main content for the document.
Repeat the above steps so that you have a separate 'document' for each playlist.
Step 3: Display your playlist
Once you've added your audio files and playlists using one of the methods above, you're ready to actually display your playlist on the frontend of your site.
The Document Library Pro plugin has added a page called 'Document Library' to your site. Find this now. (You can rename it to something else like 'Playlists' if you like.)
By default, the page contains the shortcode [doc_library]. It lists all the 'documents' (i.e. audio files or playlists) that you added in Step 2.
The audio playlist will use the options that you choose in Step 1. Go back to the plugin settings page and tweak these as needed.
You can add the shortcode multiple times - either to the same page, or to different pages on your WordPress site. Add options to each shortcode so that each table or grid contains different items. For example, you might create a different audio playlist for each category.
If you don't like how the core WordPress audio player looks or functions, Document Library Pro is compatible with many other audio player plugins to allow you to customize how your audio playlist functions.
Some good options are:
mb.miniAudioPlayer - more minimalist than the core player. It only expands when a user hits the play button.
Start using this WordPress audio playlist plugin today!
By using Document Library Pro as a WordPress audio playlist plugin, you gain the ability to control exactly what information displays in your playlist, as well as how your visitors can interact with your playlist in terms of searching, filtering, pagination, and more. Visit the audio playlist plugin knowledge base to see all the options and how to use them.
Whether you're creating a playlist of individual audio tracks or a "playlist of playlists", Document Library Pro is the perfect tool for the job.
Have any other questions about how to use this WordPress audio playlist plugin? Leave a comment and we'll do our best to help you out!
It's so easy to embed video in WordPress these days, but it's not so easy to create a video gallery listing all your videos in a grid – unless you use the right plugin. This article will teach you how to create a responsive WordPress video gallery - the easy way.
Keep reading to learn how to use the Document Library Pro plugin to create a searchable WordPress video gallery. While it isn't just for videos, it is one of the best WordPress video plugins around. It makes it easy to add a video grid or video portfolio to your website.
You'll learn how to add videos to your gallery using 3 different methods:
Embedding a video that is hosted elsewhere into WordPress, for example, YouTube videos or Vimeo videos.
Directly uploading video to your WordPress website.
Creating a video playlist.
We'll also look at the many different options and functionality for setting up your WordPress video gallery. You can choose what information to display about your videos, how to size them, how many WordPress tutorial videos to display on each page of the gallery, and more.
Your WordPress video gallery will be fully responsive and will resize to fit different screen sizes and mobile devices.
At the end of this step-by-step tutorial, you'll know how to create a professional-looking video gallery for your WordPress site. Your visitors will be able to watch videos directly within the WordPress video gallery, as well as search and filter to easily find their ideal videos.
Why Document Library Pro is the best WordPress video gallery plugin
Document Library Pro creates a WordPress video gallery in a choice of gallery layouts. The table layout lists each video on its own row of a searchable, filterable table. The grid layout displays each video within a tile, similar to Netflix.
You can use this WordPress video gallery plugin to embed any type of video into your WordPress site. This includes:
Any video hosting service YouTube, Vimeo, Dailymotion, Animoto, Blip, Cloudup, CollectHumor, Facebook videos, Flickr videos, TED talks, VideoPress, etc.
Types of video Long videos, short video snippets, promotional video, product demonstrations/reviews/unboxings, stock footage, educational videos, event coverage, how-to video tutorials, interviews, presentations, video commentary, vlogs, webinars.
All video genres Animations, behind-the-scenes footage, drone footage, movies, and films, non-fiction videos.
The videos in the gallery will autoplay in an online video player, directly on the video gallery page. You can also display videos on a separate WordPress page for each video, or allow users to click through to watch on video platforms like YouTube or Vimeo.
This WordPress video gallery plugin also lets users search, sort, and filter the gallery from the front end. As a result, visitors can quickly find the video(s) they’re looking for.
You can list all your videos in a single gallery, or you can list different videos on different pages on your WordPress site. It's super flexible and with over 50 options, it's the perfect WordPress video gallery plugin. The all-in-one plugin also provides a user-friendly player interface that lets you add SEO-optimized video galleries quickly.
Create your responsive WordPress video gallery
1. Install the video gallery plugin
The first step to creating your WordPress video gallery is to install the Document Library Pro plugin. You need this in order to add WordPress tutorial videos and display them in a video gallery online. It will work on any WordPress website and any theme.
After installing the plugin, go to the settings page and enter the license key from your 'Getting Started' email. Next, go to the 'Document Libraries' tab and choose how you want your video galleries to look. Pay particular attention to these options:
Columns - There are lots of available columns. As a minimum, I recommend these for a WordPress video gallery: title, content:Watch Online. The title column will display the video name, and the content column will show the embedded video player. You can see that I added :Watch Online after the name of the content column. This will appear as the column header, so change this to anything you like. If you want people to be able to download videos - or click through to watch them like a YouTube video gallery - then add a link column too.
Clickable columns - If you want people to be able to click on the name of a video to watch it on a separate page, then leave this as it is. Add none to disable these links and keep people on the main WordPress video gallery page.
Shortcodes - Enable this option. This is essential in order for the main WordPress video gallery page to display embedded video players.
Filters - Choose 'Custom' and add doc_categories and/or doc_tags, depending on how you're planning to structure the video gallery. This will add a categories filter dropdown and/or a tags filter dropdown above the video gallery. It's a quick way for people to find specific types of video, for example by genre or year.
Lazy load - Enable this if you're listing lots of videos in the gallery. It loads each page of videos one at a time, which improves page load times.
2. Add videos to the gallery
Now the overall structure of your WordPress video gallery is in place, it's time to start adding videos and/or video playlists.
If you want individual videos to appear in their own row of your WordPress gallery as below, then you'll need to add each one as a separate 'Document' post. You can do this in the 'Documents' section of the WordPress admin.
A WordPress video gallery with 1 video per row
If, however, you're planning to create video playlists then you'll need a separate Document post for each playlist, but not each video:
A video playlist in a WordPress video gallery
Note that you'll be able to include a combination of individual videos and playlists in your WordPress video gallery. For each 'Document', add either one or more videos. I'll tell you how to do this next.
Adding your videos
Use these steps to add each video or playlist to the gallery:
Go to Documents→ Add New in the WordPress admin.
Add a title for the video, plus any other information such as categories, tags, or an excerpt (which is useful for adding a short video description or summary).
Next, embed your video in the main content area using one of the following 3 methods:
Method 1 - Embed a video from YouTube or Vimeo
The most reliable way to add a video to your WordPress video gallery is to first host it on a third-party video platform. YouTube and Vimeo are the most popular, but you can embed from any of the video services in this list. (It's fine to use other video platforms too or use self-hosted videos, but instead of just pasting the URL, you need to get the embed code and paste it into the 'Text' view on the Add/Edit Document screen.)
Using a specialist video host is a great choice because:
It will save space on your web hosting account.
Dedicated video hosts automatically create multiple versions of your videos behind the scenes. This means that your videos will play for more people, whatever technology or device they're using to access your website. You don't have to worry about writing any fancy code to check the user's device or serve alternate versions of your videos - it all happens automatically.
You get lots of extra features from specialist video hosts such as view counters, social sharing, annotations, mobile-friendly cards, monetization through advertising, etc.
If you use a public video website such as YouTube then people can also find your videos directly via the host. This will help to increase your traffic. If you'd rather your WordPress video gallery not be publicly available on the hosting site, then I'd recommend Vimeo. Vimeo has more privacy settings and you can protect Vimeo videos so they can only be viewed on your domain.
If you're embedding WordPress tutorial videos from one of the files in this list, you just need to embed the URL of your video directly into the post. To do this, view your video on YouTube, Vimeo, social media platform, or whichever site you're using, and copy the URL from the address bar at the top of your browser. To help you find the video URL, I've circled it in the screenshot below:
Then, simply paste the URL into the content area of your WordPress post. WordPress will instantly convert it into an embedded video player.
Alternatively, you can use the free or premium versions of Presto Player to upgrade the default WordPress video player:
The Presto Player plugin adds eye-catching videos to the Document Library Pro video gallery
Method 2 - Upload the video directly to the media library
If you prefer, you can host videos directly on your WordPress website and embed the media files:
Click the Add Media button above the WordPress toolbar and upload your video file (e.g. MP4 or MOV).
Select the video in the WordPress media library.
Make sure the Attachment Display Settings section is set to Embedded Media Player and click Insert into post.
Again, WordPress will automatically embed a watchable video into your post.
Method 3 - Create a video playlist
Finally, you can add entire video playlists to your WordPress gallery. These have to be hosted in the WordPress media library.
Click Add Media above the WordPress toolbar.
Click the Create Video Playlist option on the left. Note, this option will only appear if you already have video files in your media library. Upload some videos to WordPress if not.
Tick all the videos you want to include in the WordPress video gallery playlist.
Click the Create a new video playlist on the right.
On the next screen, add the caption that should appear for each video. Tick the boxes to indicate whether to show the video list and images in the playlist. Then click Insert video playlist.
WordPress will embed the playlist directly into your page or post.
Where will the video players appear on my website?
Whichever method you use to add your videos and playlists, they will appear in 2 locations in your WordPress video gallery:
On the main video gallery page, within the 'content' section. (As we saw above, you can rename this column to anything you like.)
If you haven't disabled the clickable columns, then people can also click the video name to access a separate page for each video or playlist. The embedded video player will appear on this page. https://barn2.com/kb/dlp-column-widths/
3. Display your WordPress video gallery
Now all your videos are ready to go, you're ready to display your WordPress video gallery! The good news is that most of this has already been done for you. All you need to do is check it, make any tweaks, and add a link to your website menu so that people can find the video gallery page.
You can also create additional video galleries if you need more than one.
Viewing the video gallery page
Click on the 'Pages' link on the left of the WordPress admin, and you'll see all your pages listed. One of these is called 'Document Library' and contains your WordPress video gallery. Rename this to something specific to videos, such as 'Video Library'.
Now view the page. You will see all your videos listed in a searchable table or grid with whichever settings you chose in Step 1.
Go back to the settings page and make any changes to tailor the video gallery to your requirements. You may also want to edit the WordPress video gallery page directly and add some options to the shortcode which has been added to the page. For example, there's a shortcode option that lets you change the column widths. I'll provide more information on customization options for the video sizes next.
Changing the size of each video
If you are using the table view then the best way to customize the size of your embedded video players is to adjust the column widths. The videos will automatically adjust to fit the available space.
By default, the Document Library Pro WordPress video gallery plugin sets the column widths automatically based on the content of each column. But for a WordPress video gallery, you might want to make the video player column wider so that people can see your videos more easily.
To customize the column widths in the video grid, you need to add width="" to the gallery shortcode. Between the quotation marks, you can add a number for each column to represent the percentage of the table each column will occupy. Note the numbers must add up to 100% and be separated by commas. In the example below, the 4 columns will take up 40%, 15%, 30%, and 15% of the table, respectively:
(Note: In this shortcode, I have set the columns option to show you that the number of columns matches the number of widths. However, it's easier to set the columns on the WordPress gallery plugin settings page.)
The first column (content) gets 40% of the table width – the biggest width to give more space for the embedded video player. The second column (title) gets 15% as the video titles don't need much space. The third column (excerpt) is slightly wider to allow for more text. The final column (category) is also quite narrow.
Play around with the widths in your own video gallery to get the column sizes working as you want them.
Creating multiple video galleries
By default, all your videos are listed in one new gallery. If you prefer, then you can list different videos like WordPress training videos on different parts of your site.
You can add a video gallery to any post or page on your WordPress website, or even within a text widget.
Go to the page/post/widget where you want to add the gallery. In the main content area, add the following shortcode:
[doc_library doc_category="music"]
This will list all videos from the 'music' category. Edit the shortcode to include whichever category of videos you want to list in the gallery like WordPress training videos. You can then add as many shortcodes as you want, wherever you want.
Other uses for Document Library Pro
The great thing about using Document Library Pro as your WordPress video gallery plugin is that it's not just for videos. You can get even better value for money by using it for other purposes elsewhere on your site. For example:
To use it for multiple purposes, go to Documents → Categories and create categories for each use case. For example, you might have a 'Video' category with various sub-categories for your video genres, and a 'Documents' category with sub-categories for your document types. You can then use the [doc_library category="videos"] shortcode lists different types of resources in different places on your site.
Once you've installed this WordPress video gallery plugin, you can use it as many times as you like. Be creative and get more for your money by using Document Library Pro in different ways!
Create a WooCommerce video gallery
A WooCommerce video store powered by the WooCommerce Product Table plugin
It is also possible to create a WooCommerce video gallery for an ecommerce site. Each video would be a 'product' and would be listed in a table with a preview of the video. People can watch the preview and then click a 'Buy' button to purchase the video - either as a digital download or a physical DVD.
To do this, you need to use our other plugin - WooCommerce Product Table. It has similar features to Document Library Pro but works with the free WooCommerce plugin so that you can actually sell your WordPress training videos online.
Create your WordPress video gallery today
Now that you know how to create a fully featured, fully responsive WordPress video gallery, it's time to get creative. To get started, download the Document Library Pro plugin.
100% flexible.
List any type of video.
Quick 10-minute setup.
Expert support and documentation.
Free 14-day trial - love it or you pay nothing!
Follow the steps in this tutorial to set up your WordPress video gallery in no time at all. Don't forget it's simple to make the exact video gallery you want, so have a play around and check out the knowledge base for even more ideas.
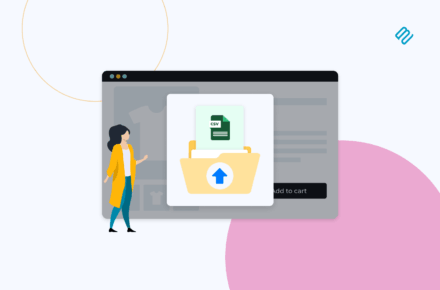

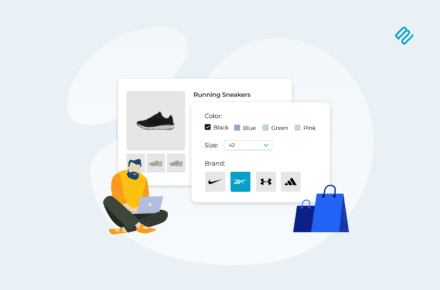


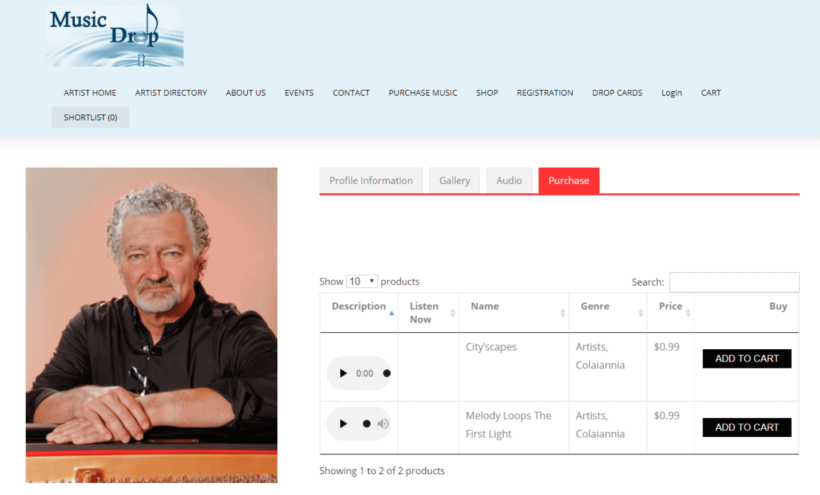
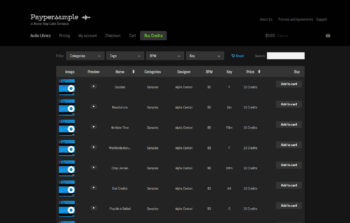


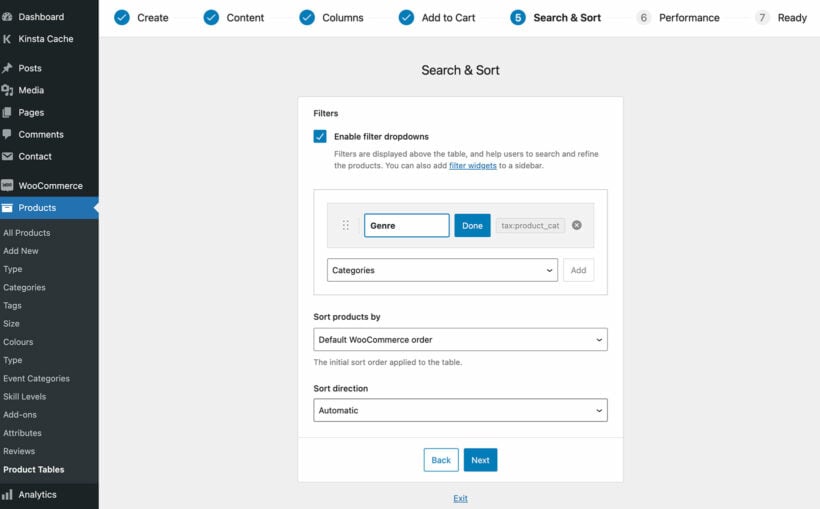
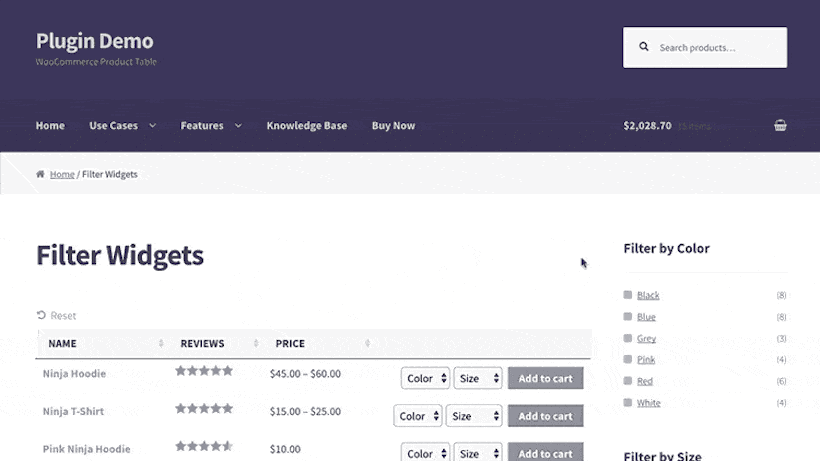
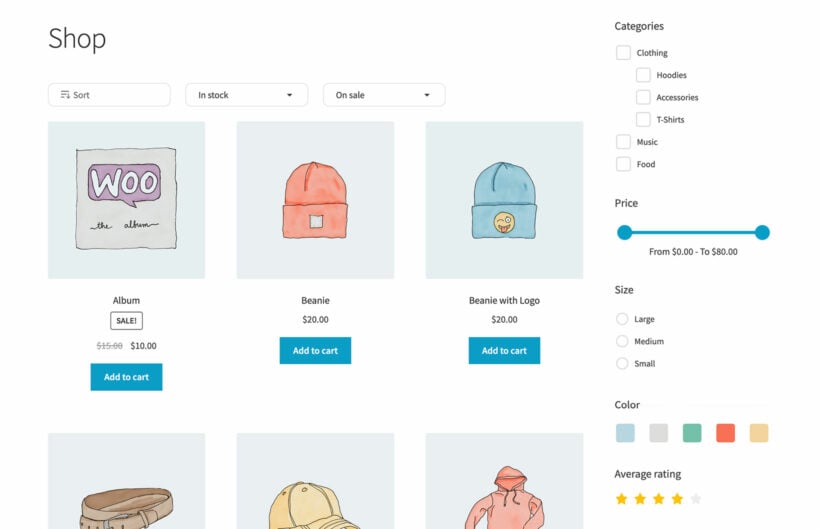
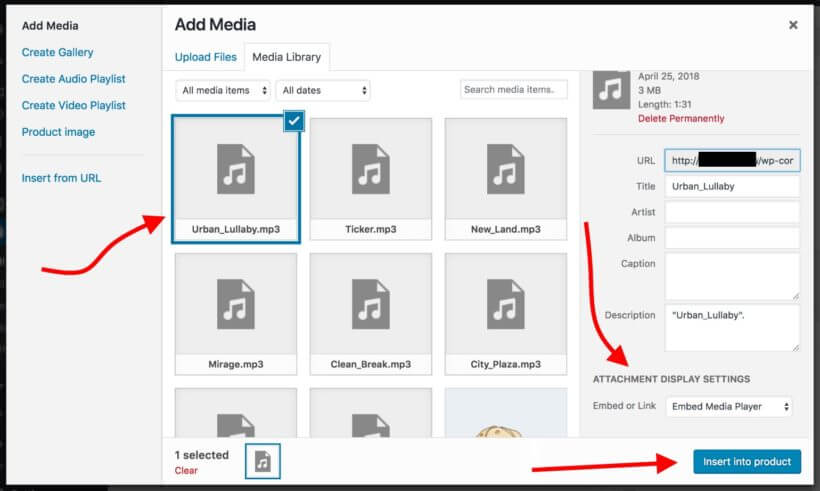
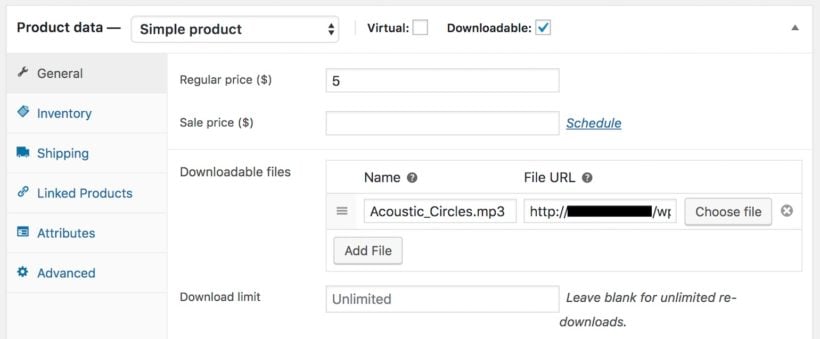
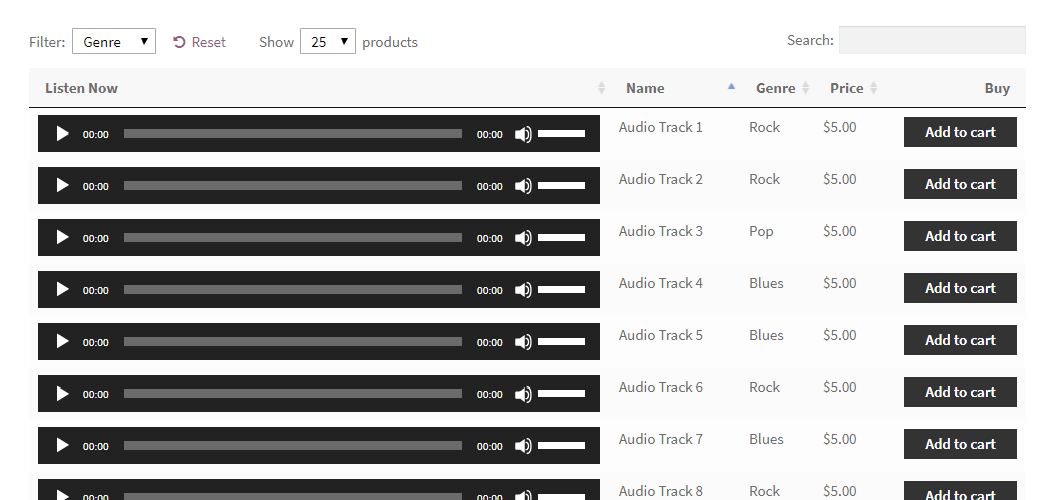
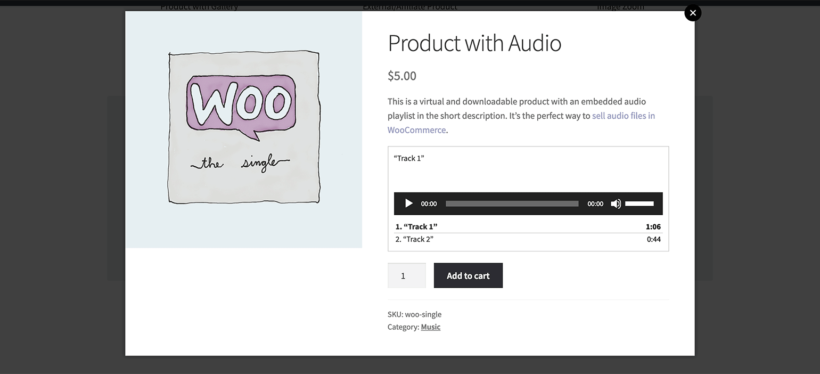
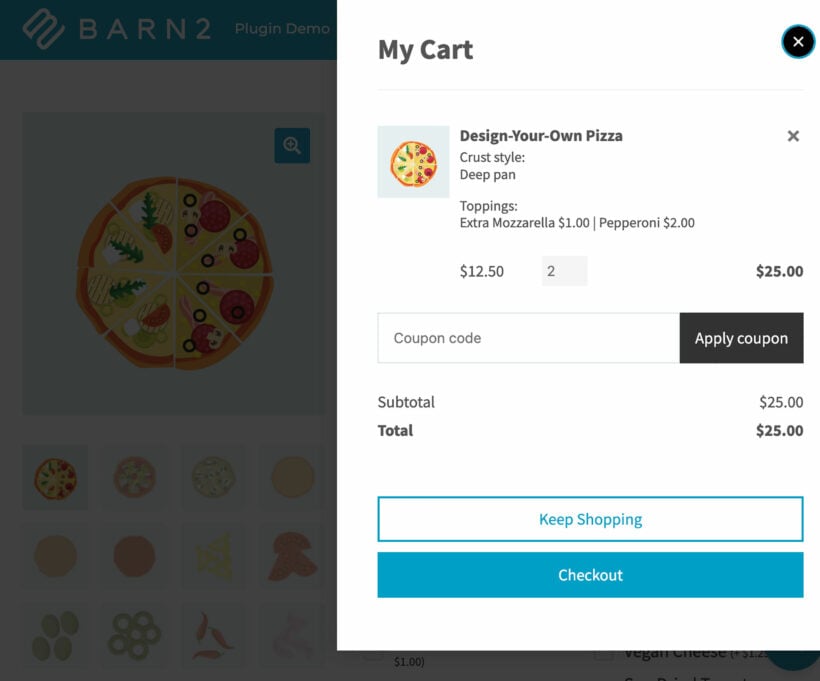

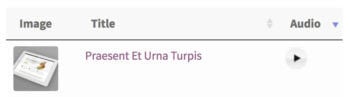

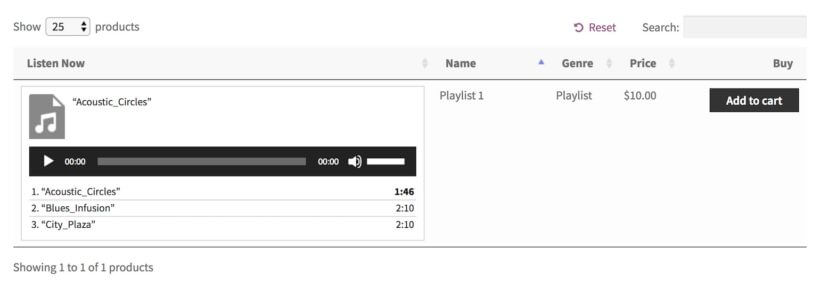

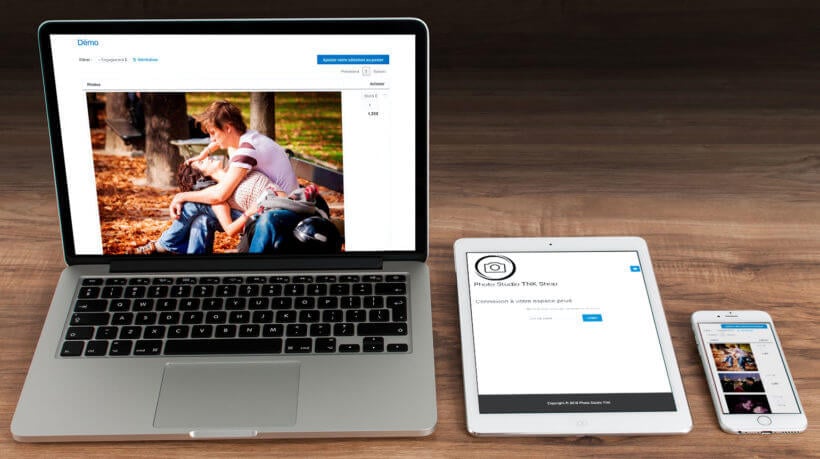


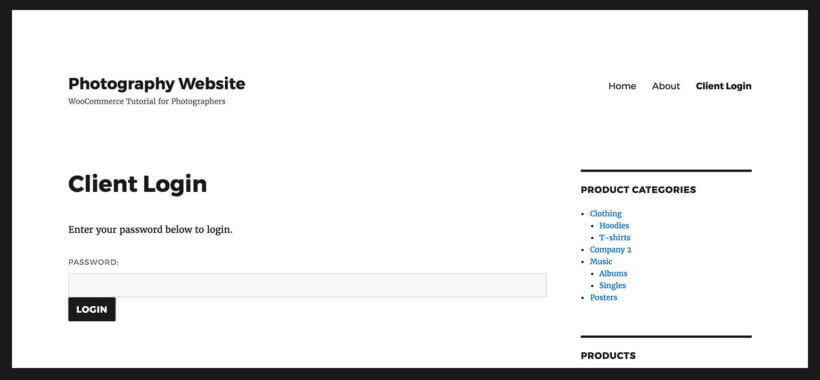
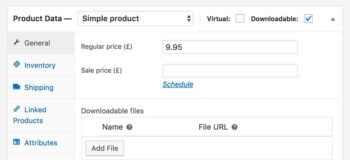
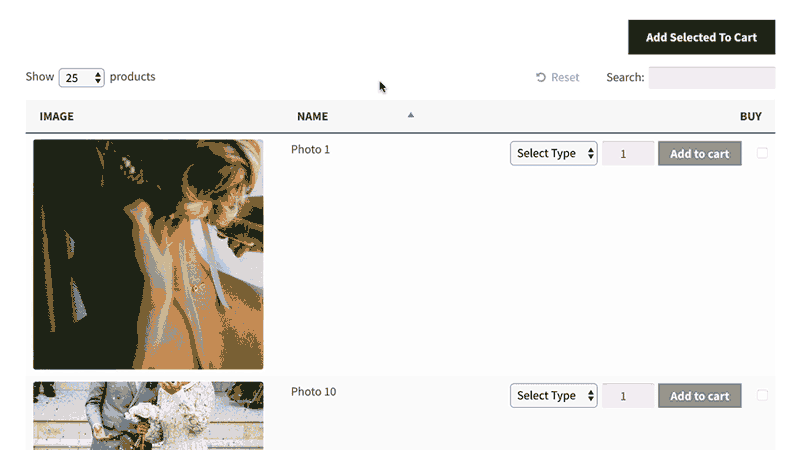
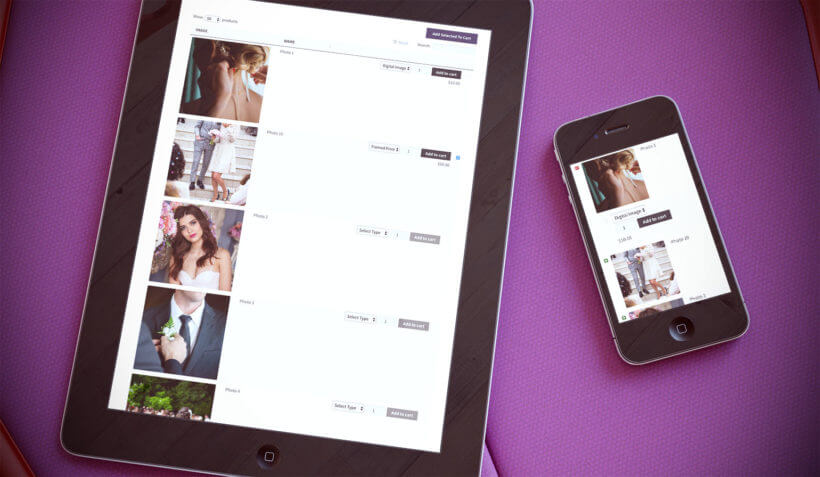
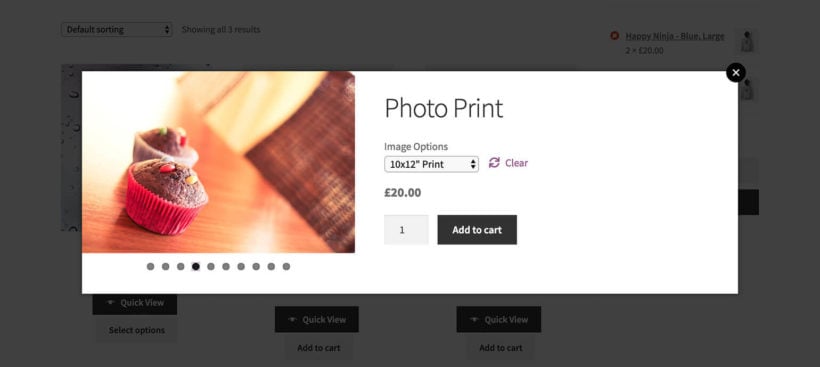

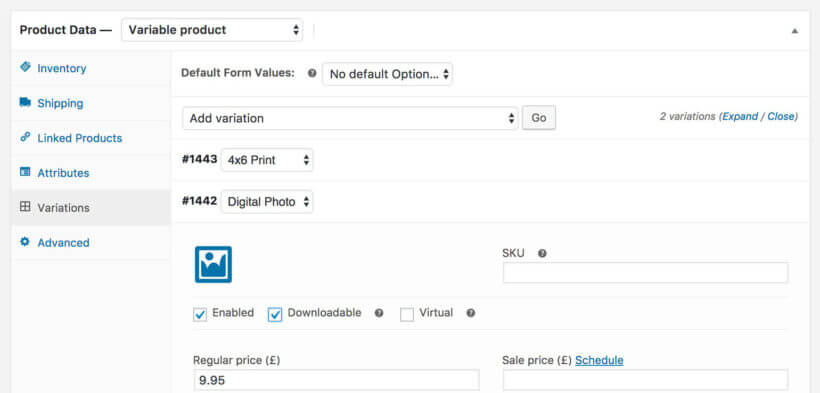
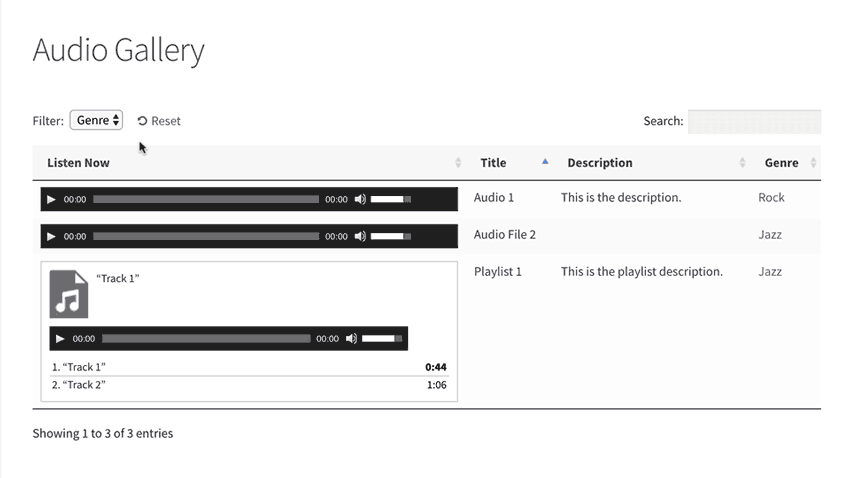
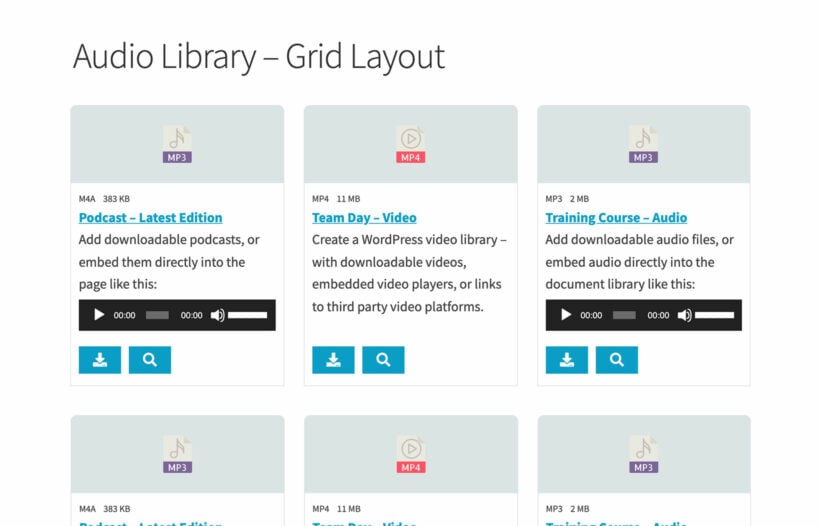

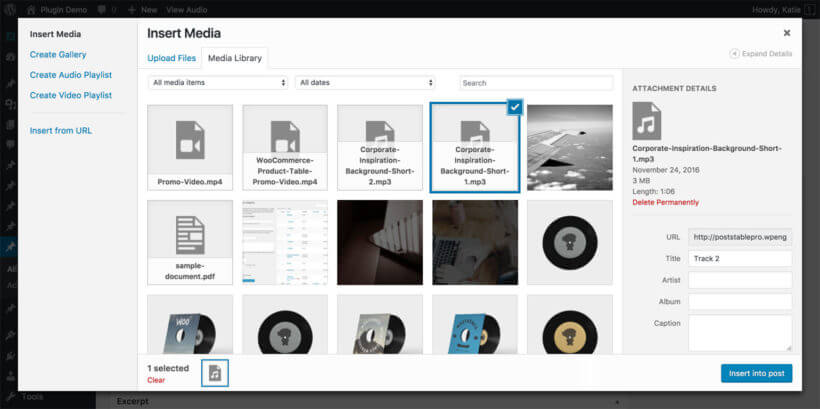
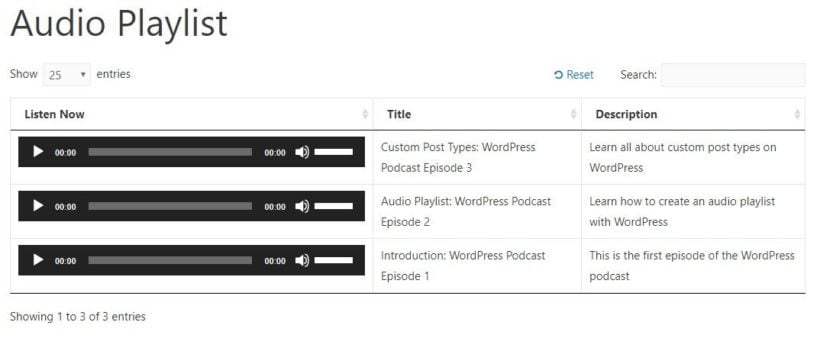
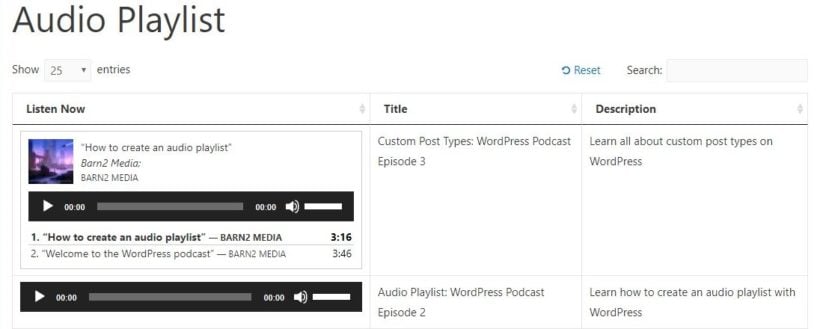

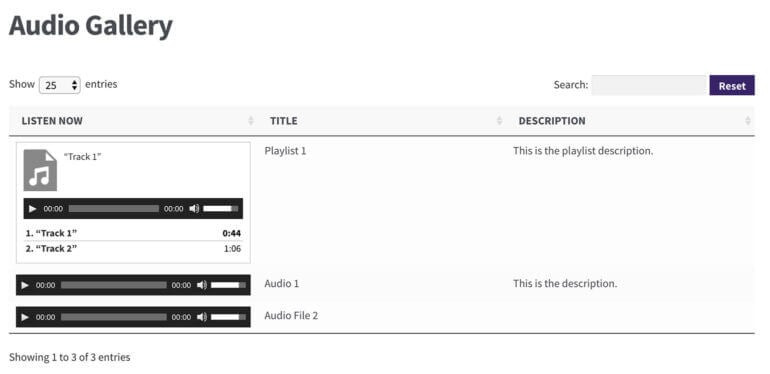
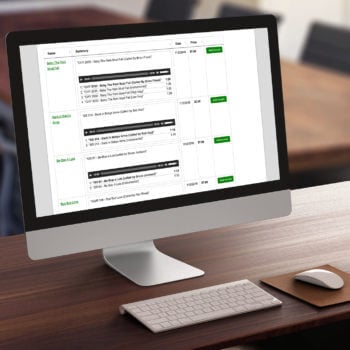

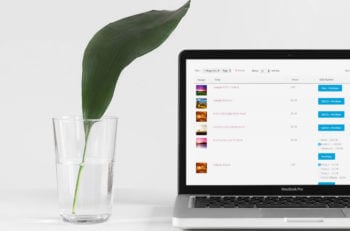
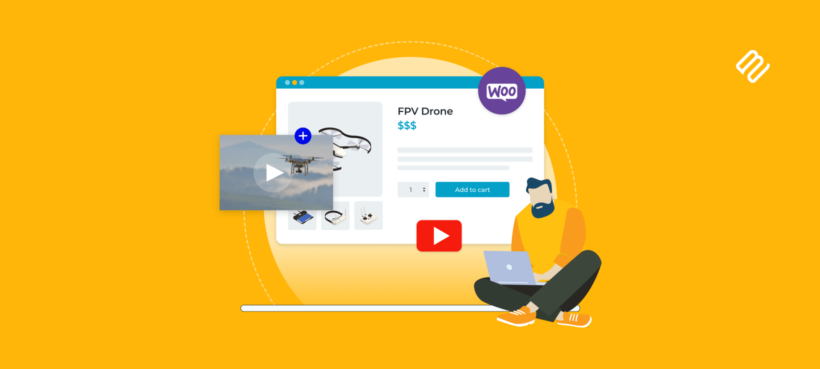

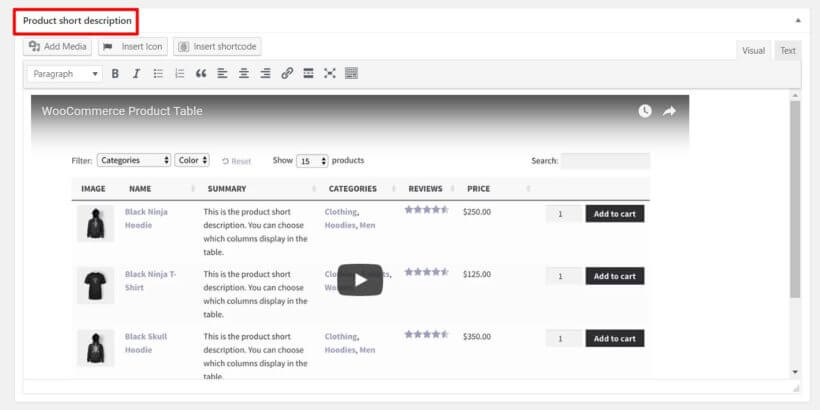


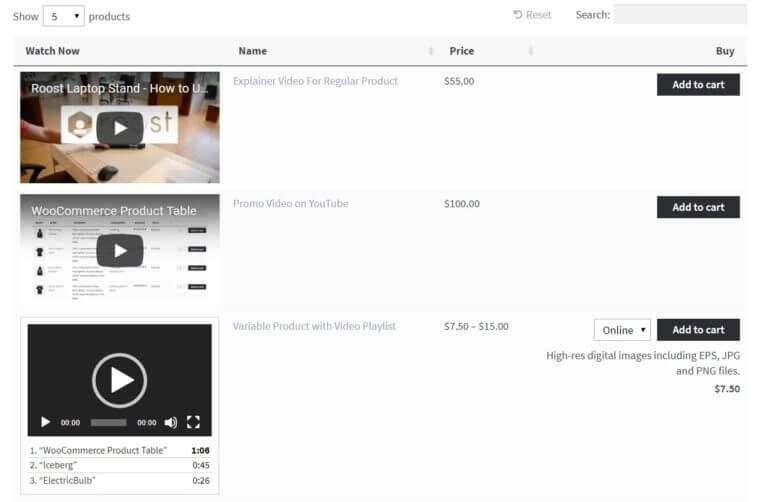
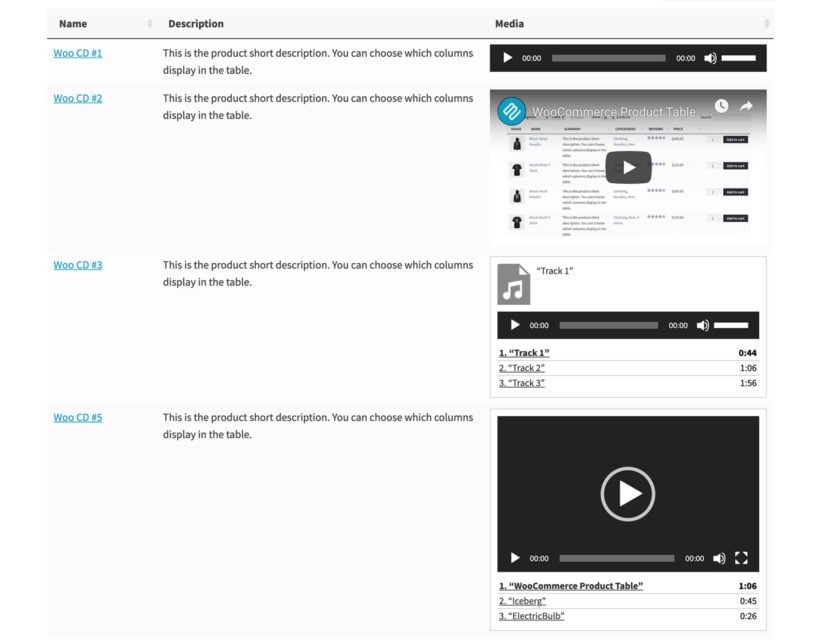
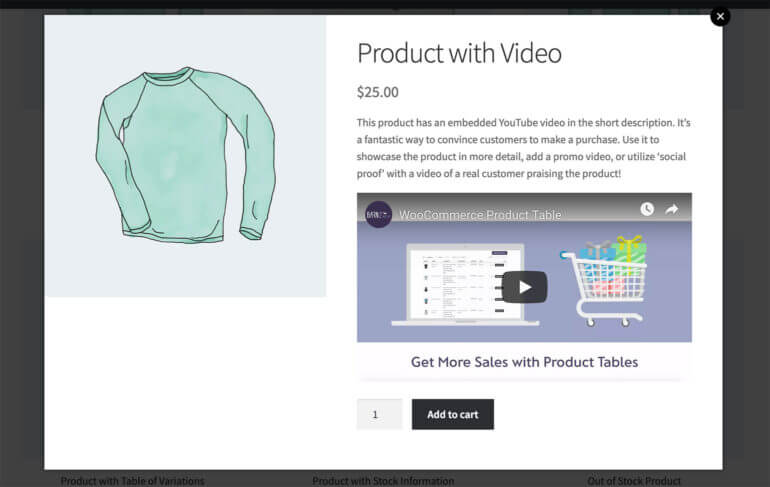
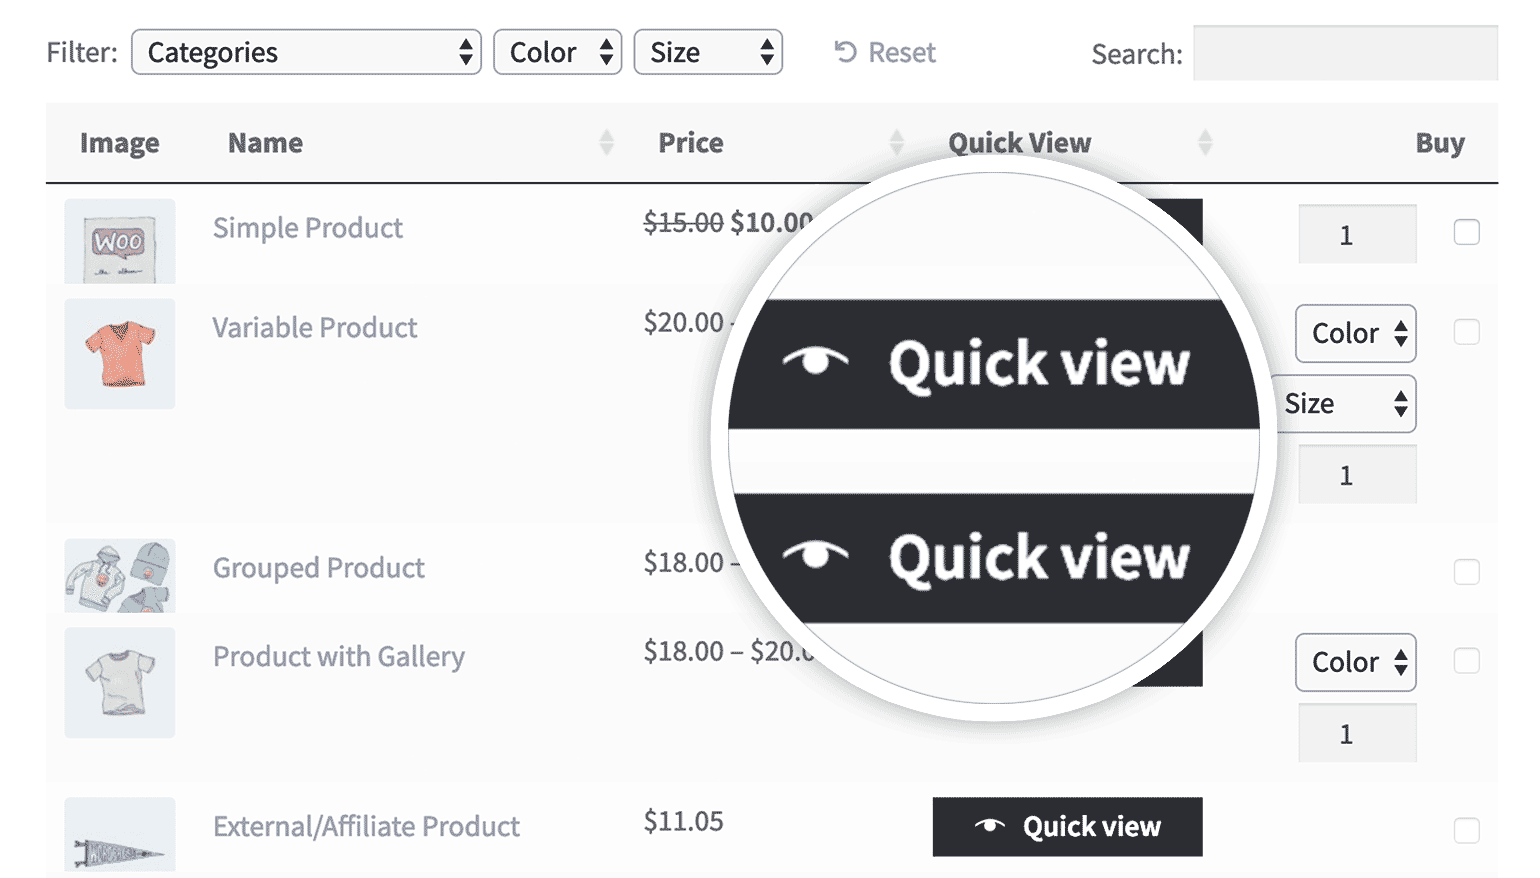
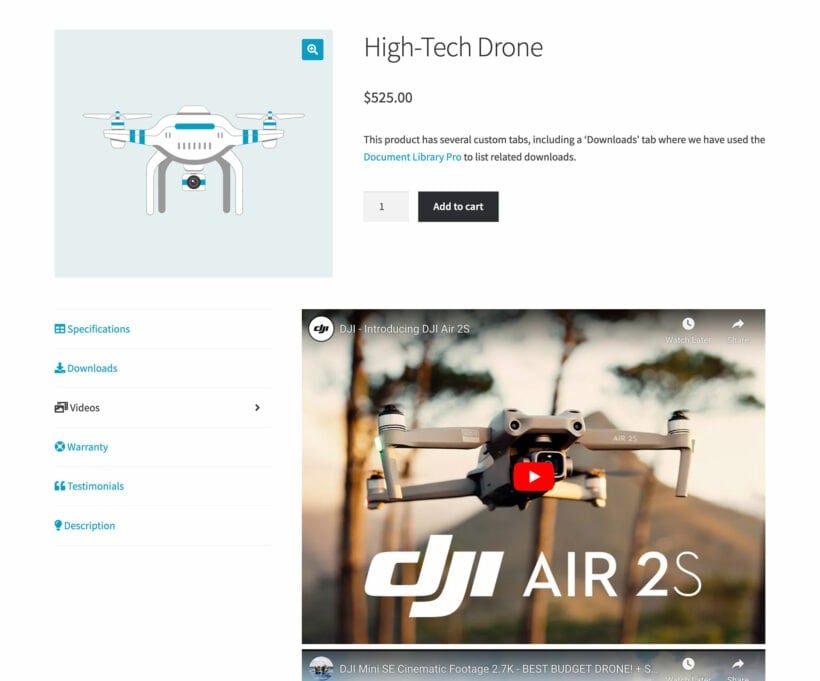
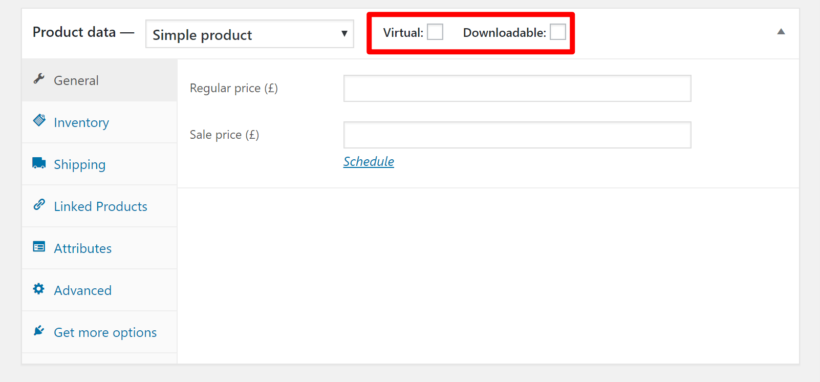
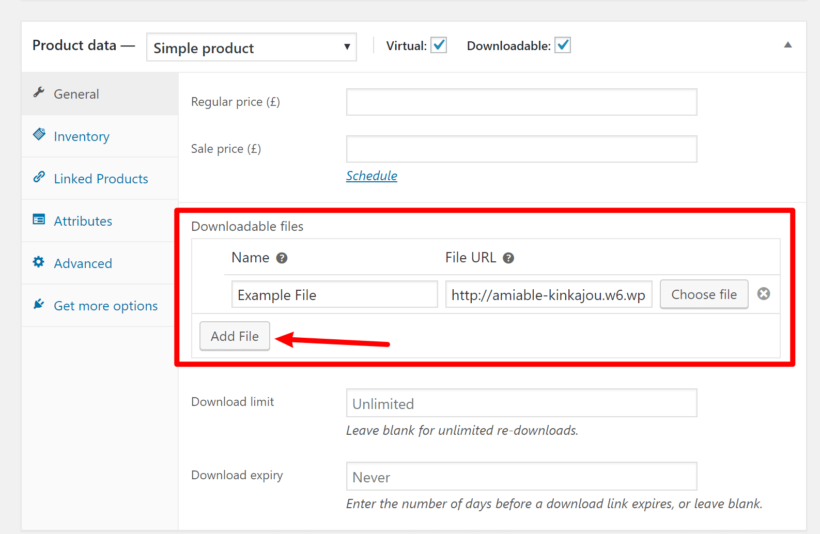
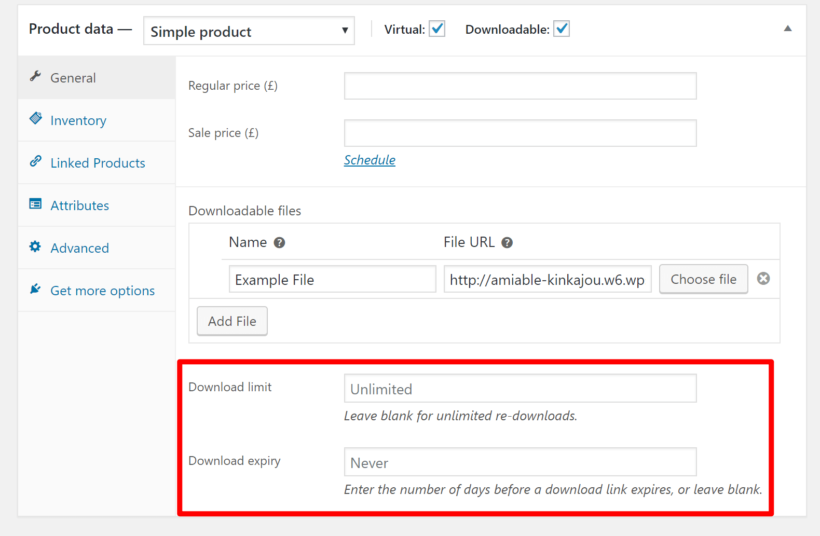
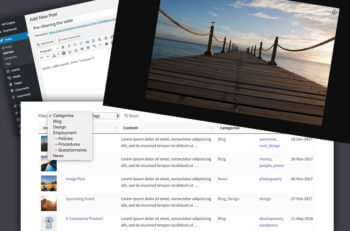
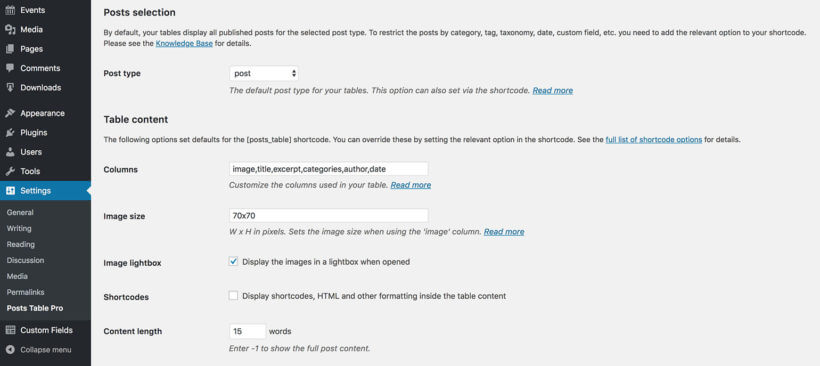

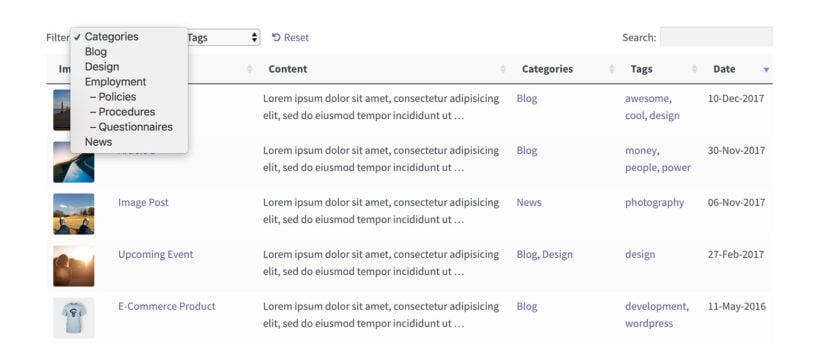
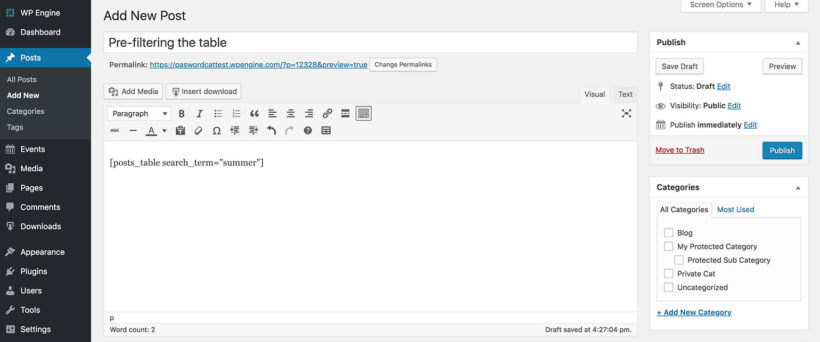
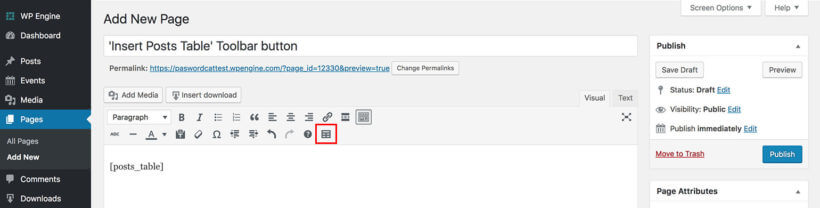
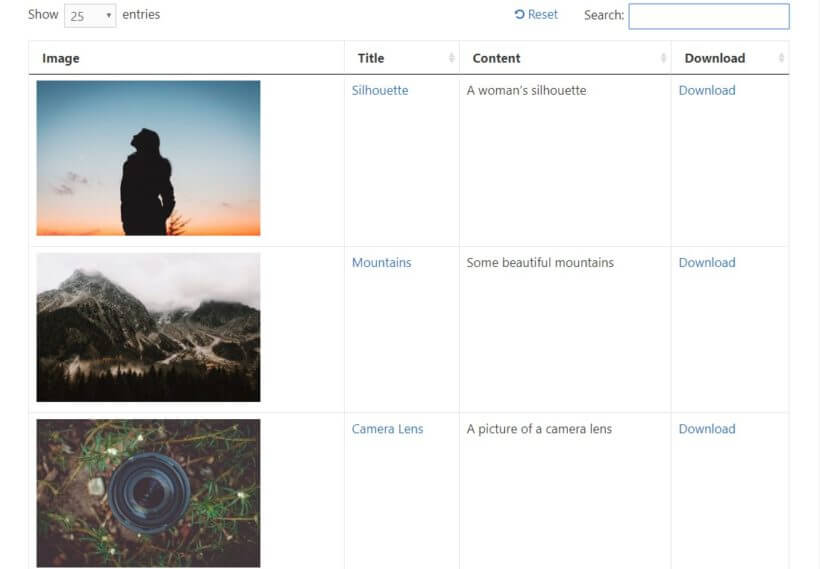
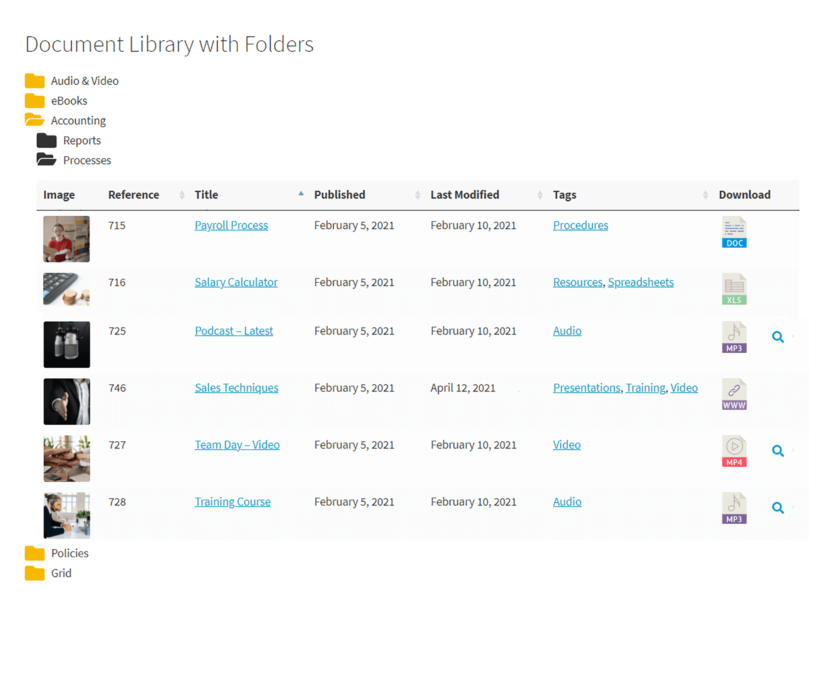
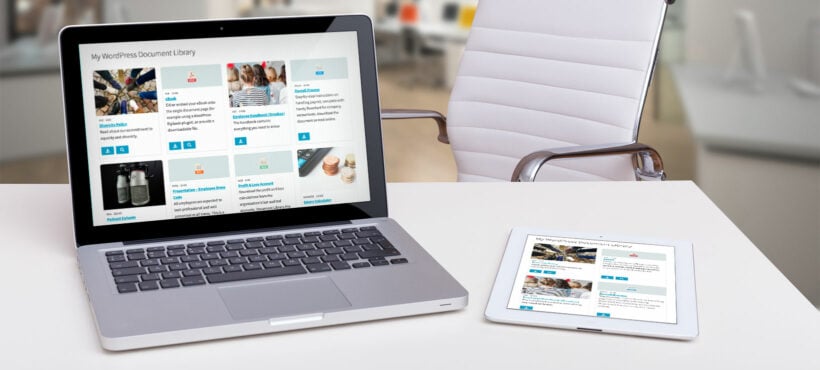
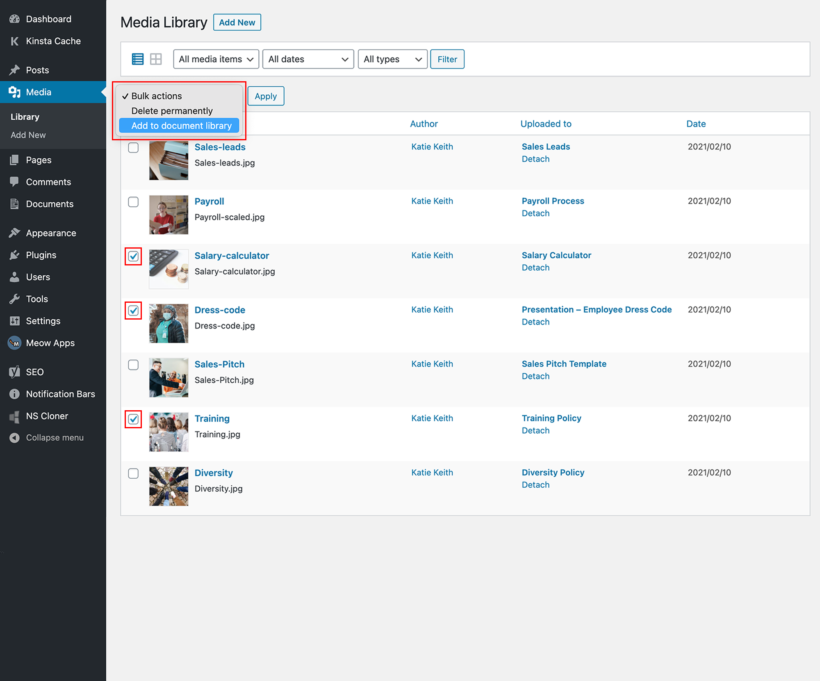
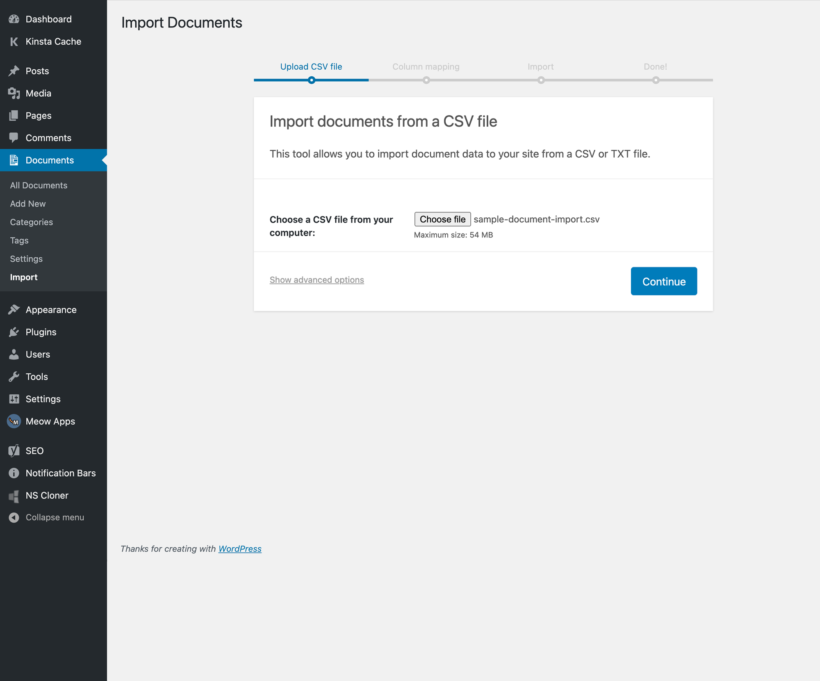
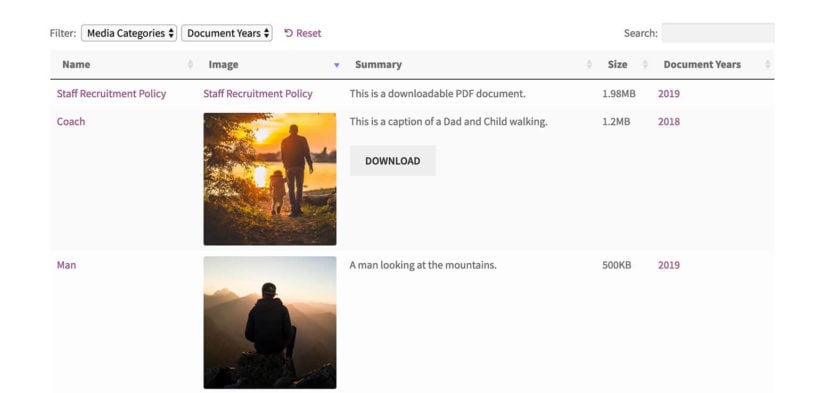
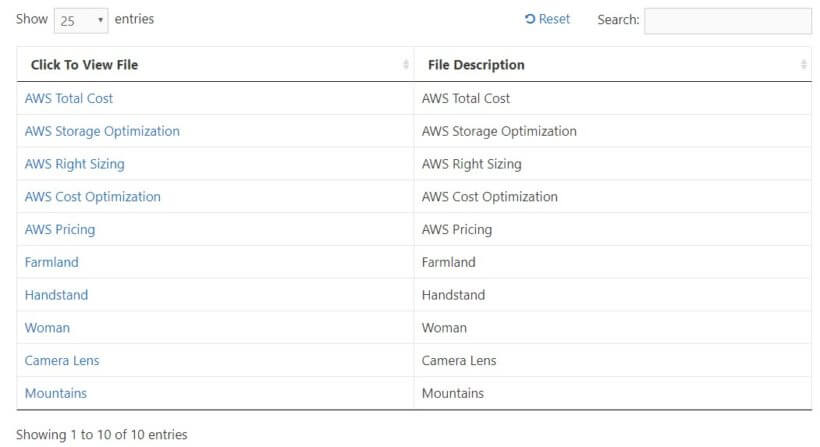
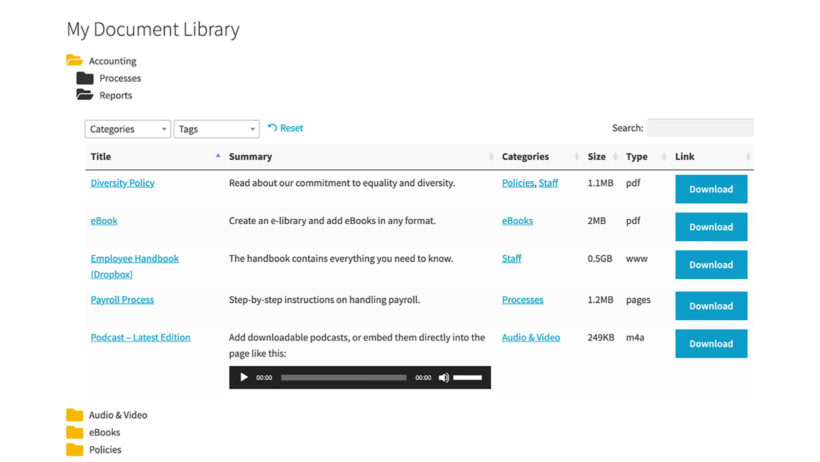


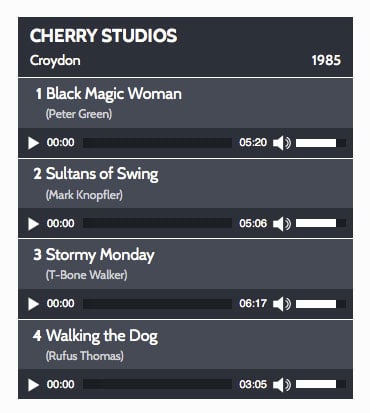


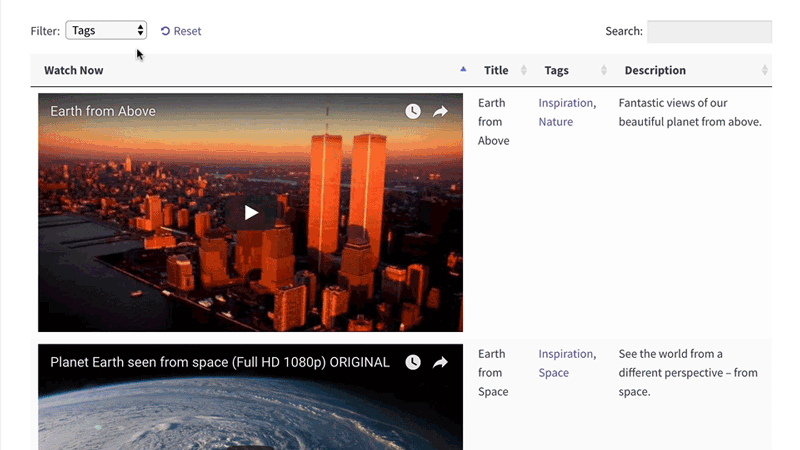
 Keep reading to learn how to use the