Lots of people ask us which WooCommerce bulk discount plugins work with our Product Table and Quick View plugins. Discover WooCommerce Discount Manager, which works beautifully with WooCommerce Product Table and WooCommerce Quick View Pro.
In this tutorial, we'll explain how you can use bulk discounts and dynamic pricing with your own product tables and quick view popups on your WordPress site. You can also see a product table with WooCommerce Discount Manager in action on our demo page.
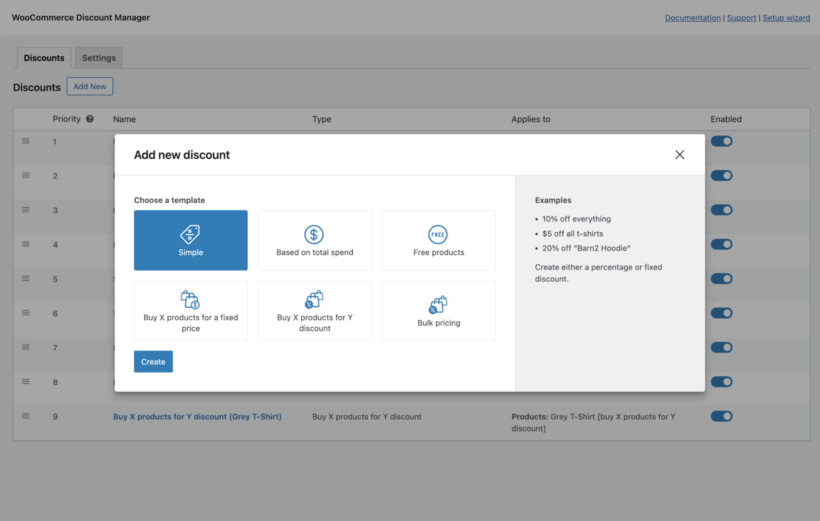
WooCommerce Discount Manager lets you create bulk discounts based on a minimum and maximum quantity for specific products, across your entire WooCommerce store, or for specific categories or even specific products. It's an incredibly advanced WooCommerce discount plugin and you can use simple or advanced logic to create sophisticated pricing rules. You can create multiple prices per WooCommerce product based on a wide range of discount rules and logic.
How it works with WooCommerce Product Table
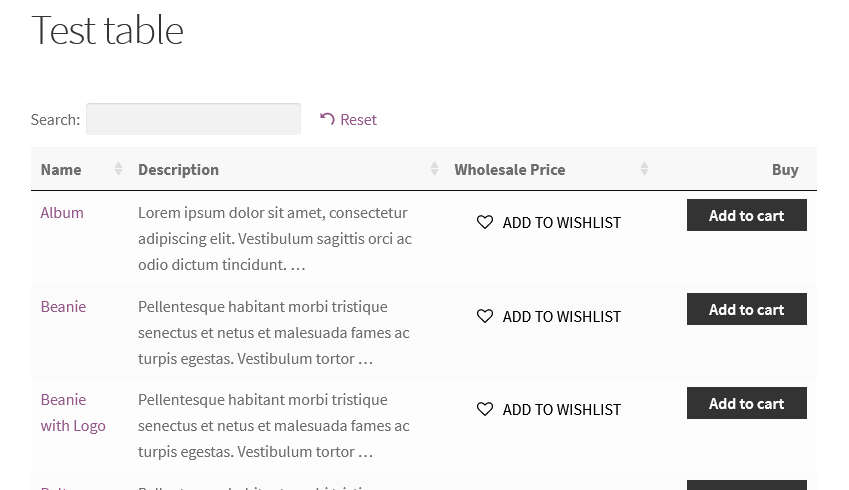
If you're using WooCommerce Discount Manager on your WordPress site, then customers can choose a quantity from the product table and click the Add to Cart button. When they click through to the cart and checkout page, the correct quantity based pricing discount will be applied based on the quantity ordered.
If your product table page has a sidebar, then you can add the WooCommerce Cart widget. When people add products to the cart, the correct volume discount or quantity discount will be shown in the Cart widget on your WooCommerce store. This reassures customers that the volume discounts are working.
If there's no Cart widget on the page, then customers can see the cart discount when they click through to the cart and checkout.
The 'Price' column in the product table will always show the price for a single item. See below for some suggestions on how you can display available bulk discounts in the product table.
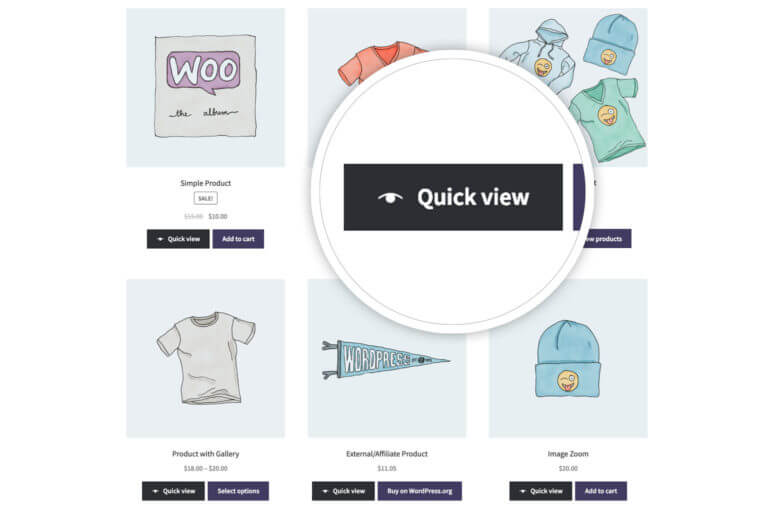
How it works with WooCommerce Quick View Pro
If you're using the Discount Manager dynamic pricing plugin with WooCommerce Quick View Pro, then the correct discounted price will appear in the quick view lightbox.
Can I show the bulk discount prices in the product table?
If your product table includes a product Price column then this will always show the product price for 1 item. This applies whichever bulk discount or dynamic pricing plugin you use - the Price column never changes.
When you create a discount, you can add some text to be displayed about the deal, and/or enable a tiererd pricing table. These always appear on the single product page (and in the WooCommerce Quick View Pro lightbox), and you can also display them in a special discount_content column of the product table like this:
Where to get the plugins
As you can see, WooCommerce Discount Manager works beautifully with the product table layout. It also works nicely with WooCommerce Quick View Pro if you want to show the discounted prices in a quick view lightbox on your WordPress site.
Lots of customers have asked us how to add wishlists to their WooCommerce product tables and quick view lightboxes. We've tested our WooCommerce Product Table and WooCommerce Quick View Pro plugins with the best premium and free WooCommerce wishlist plugins.
This tutorial will help you to choose the right wishlist plugin to use with your product tables and quick views, with setup instructions on how to use them together. All of the WooCommerce wishlist plugins have a Pro version with extra features.
MC wishlist offers a free widget for Elementor and has shortcodes for all wishlist buttons, pages, and counters that you can use everywhere you want. These features - along with the wishlist counter, pop-ups, and marketing toolkit - may be reasons to give this plugin a shot.
How it works with WooCommerce Product Table
Due to its high flexibility, the MC WooCommerce Wishlist plugin works well with the table in both standard and lazy loading modes. All the settings related to the wishlist button, such as button text, icon, color, position, etc., can be edited through the settings of this plugin, and it works in harmony with the table.
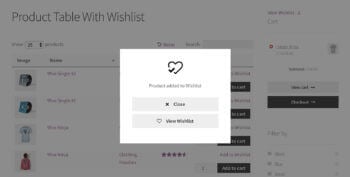
Also, when you click on the add to wishlist button, the plugin offers different modes, including pop-ups, which you can choose according to your needs.
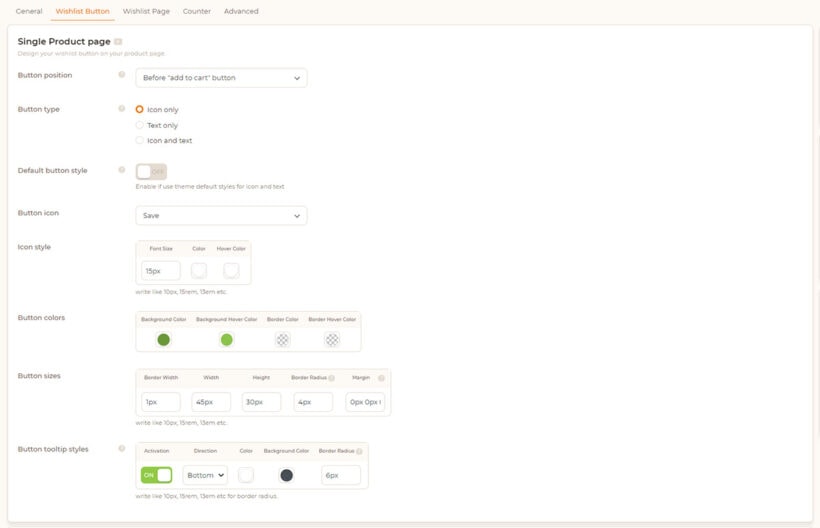
After activating the MC wishlist plugin, you will enter the setup wizard. Here you can change the location (top, bottom, left, and right of the Add to cart button) and the text of the add to wishlist button. These choices can be changed from the wishlist settings.
(If needed, you can use the [wlfmc_add_to_wishlist] shortcode to put the wishlist button in your desired location. Note that you should use the single product page settings for this purpose.) From the WooCommerce Product Table settings, add the table you want to a desired page (for example, the shop page).
Now go to the page where you added the table and see the result.
How it works with WooCommerce Quick View Pro
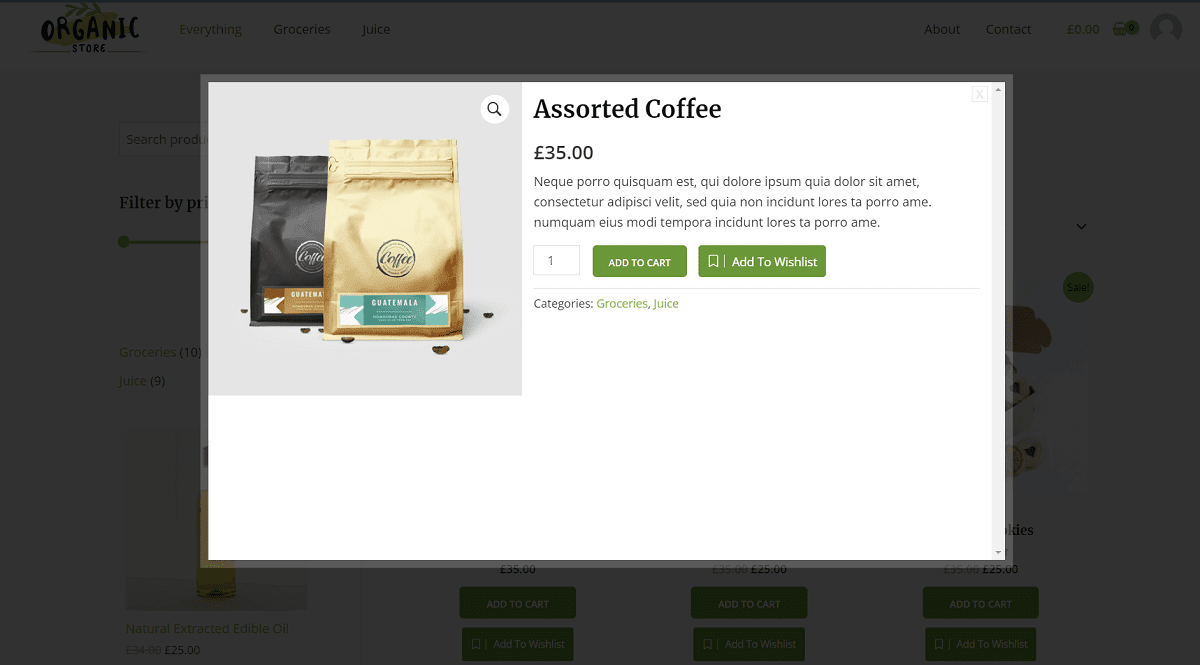
MC Wishlist is well coordinated with WooCommerce Quick View Pro. When a customer opens the quick view lightbox, the add to wishlist button is included too. The wishlist button's appearance is styled based on whichever option you have chosen in the wishlist settings.
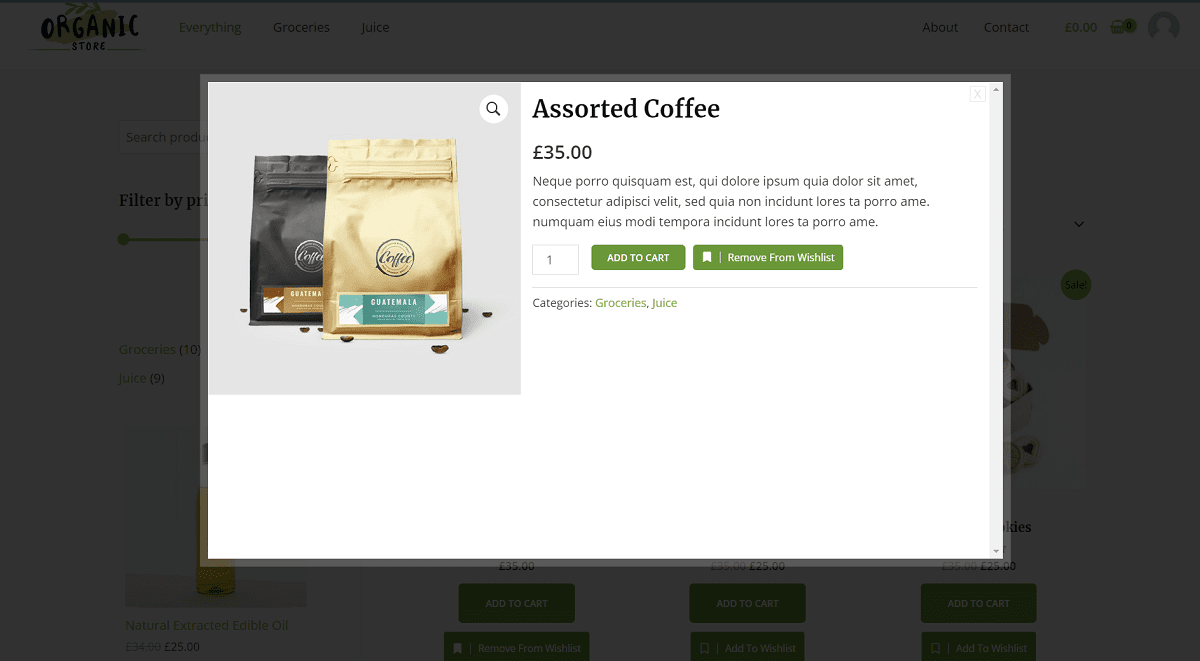
You can choose what happens after clicking on the wishlist button. For instance, you can choose to add to the wishlist only or show a customizable popup. It changes to a 'Remove from Wishlist' link after adding to the wishlist.
An Add to Wishlist button automatically appears in the quick view
It changes to a 'Remove from Wishlist' link after adding to the wishlist
After activating the MC wishlist plugin, you will enter the setup wizard. Here you can change the location (top, bottom, left, and right of the Add to cart button) and the text of the add to wishlist button. These choices can be changed from the wishlist settings.
(If needed, you can use the [wlfmc_add_to_wishlist] shortcode to put the wishlist button in your desired location. Note that you should use the single product page settings for this purpose.)
Now, by going to your product listing page, you can see the quick view button by hovering over the images. After clicking on quick the view button, you can see the wishlist button in the opened window.
YITH WooCommerce Wishlist Plugin
YITH's wishlist plugin is one of the most popular ways of adding wish lists to WooCommerce. You can use it with WooCommerce Product Table or WooCommerce Quick View Pro by adding the wishlist shortcode to the appropriate place. I'll provide instructions for both plugins below.
How it works with WooCommerce Product Table
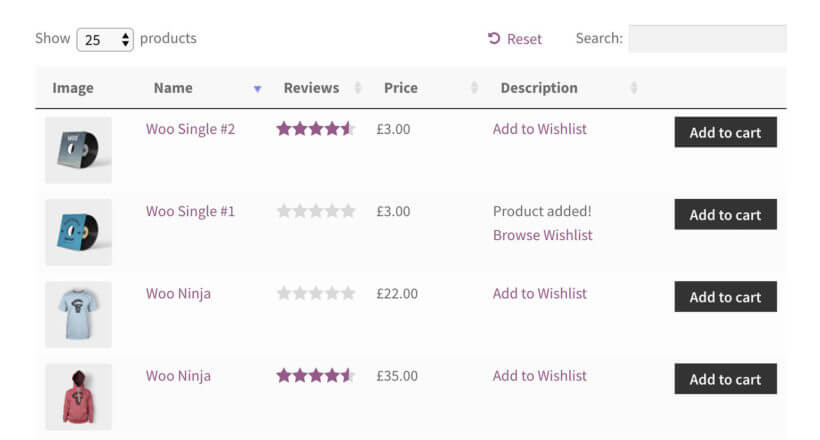
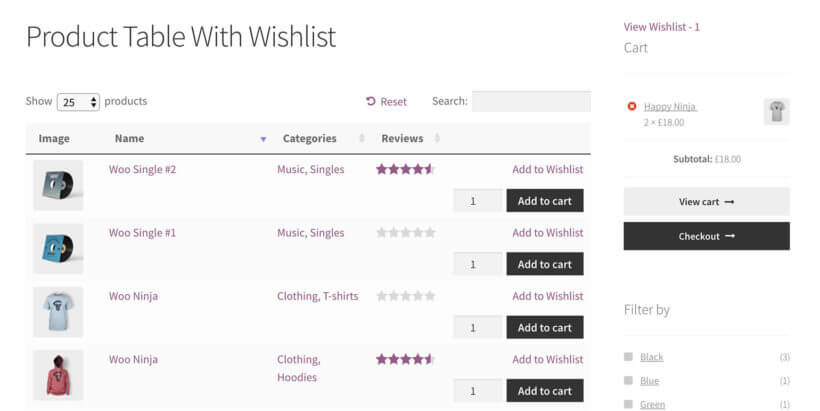
You can use the YITH WooCommerce wishlist plugin to add 'Add to Wishlist' text links in your product table. When you add a product to the wishlist, the text will change to "Product added! Browse Wishlist" (you can change this if you like), with a link to the wishlist page.
The plugin works fine with WooCommerce Product Table. However, you can't add the wishlist link within the add to cart column. You can add it to any other text-based column in the table. Or if you're a developer, then you can use the developer documentation to add a custom column containing the wishlist shortcode.
On the YITH plugin settings page (YITH Plugins → Wishlist), select 'Shortcode' from the 'Position' dropdown list. (If you select any of the other options then the 'Add to Wishlist' link will appear on the single product page, but not in the product table.)
The next step is to paste the wishlist shortcode [yith_wcwl_add_to_wishlist] into one of the fields that you're displaying as column in the product table. You need to do this for every product. You can either add the shortcode to the short description for each product, the main product description for each product, or a custom field (e.g. created using the Advanced Custom Fields plugin).
On the WooCommerce Product Table plugin settings page (WooCommerce → Settings → Products → Product tables), enable the 'Shortcodes' option. You should also use the columns option to ensure that whichever field you've added the wishlist shortcode to is present as a column in the table (for example, if you have added it to the short description then your table must contain a summary column).
Now view the page where you added a product table in Step 1, and you will see the 'Add to Wishlist' buttons in the correct column:
How it works with WooCommerce Quick View Pro
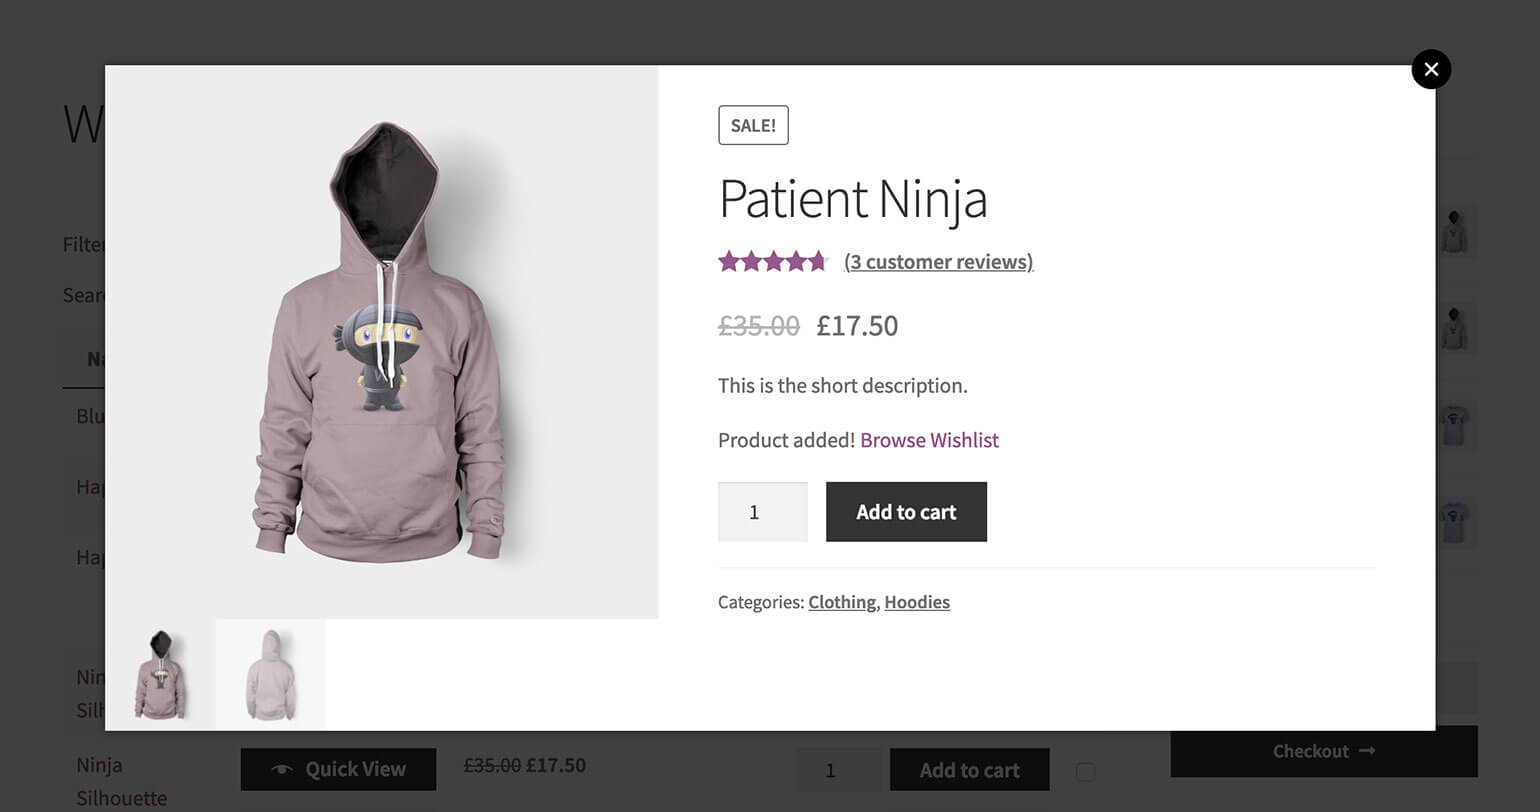
You can use YITH WooCommerce Wishlist with WooCommerce Quick View Pro by adding a wishlist shortcode to the short description field. When your customers open up the quick view lightbox for a product, they'll see a wishlist link. This appears at the end of the short description:
'Add to wishlist' link in the quick view lightbox
Customers see a 'Browse Wishlist' link after adding a product
How to set it up
To use YITH's wishlist plugin with WooCommerce Quick View Pro, you must add a wishlist shortcode to the short description for each product.
On the Quick View settings page (WooCommerce → Settings → Products → Quick view), make sure you enable the short description field. This is where the wishlist links will appear.
On the YITH plugin settings page (YITH Plugins > Wishlist), select 'Shortcode' from the 'Position' dropdown list. (The other options will add the wishlist link to the single product page. But it won't appear in the product table.)
Next, edit each product and add the following shortcode to the short description (this normally appears at the very bottom of the Edit Product screen) - [yith_wcwl_add_to_wishlist].
Also install Barn2’s WooCommerce Product Table plugin and add a product table to any page on your site.
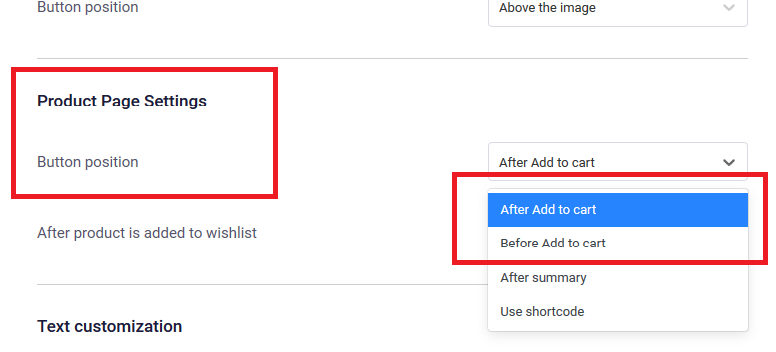
When you activate the Aco wishlist plugin, you can choose the position for the 'Add to Wishlist' button above or below the add to cart button from product page setting, and both will appear correctly in the product table.
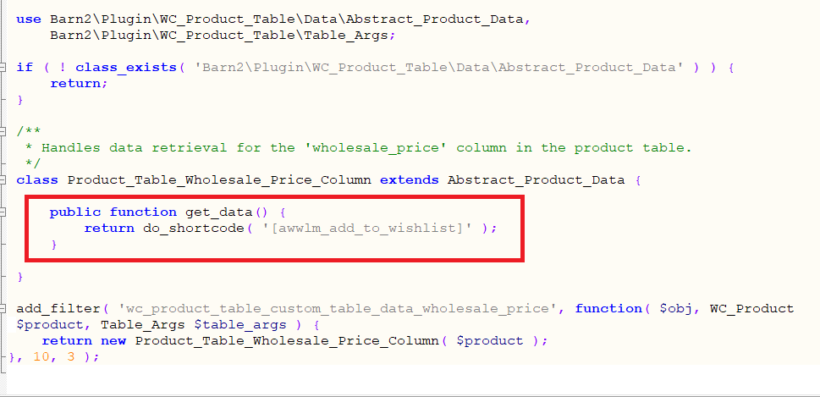
Alternatively, if your product table doesn't have an add to cart column, then you can use the shortcode [awwlm_add_to_wishlist] in any other column that appears in the table. To do this, use the documentation on adding a custom column to the product table. Specifically, when following the documentation, you should add the following code:
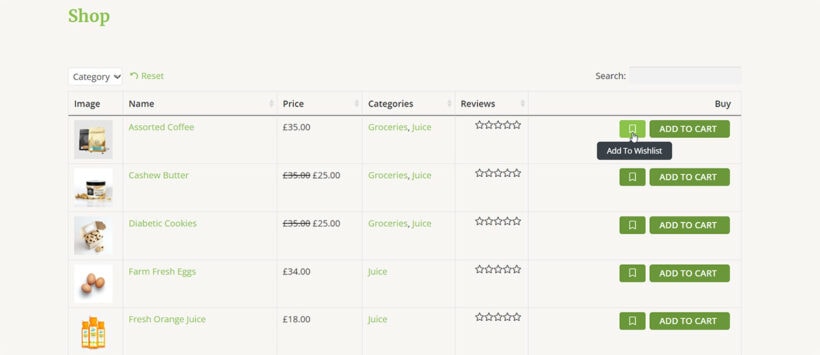
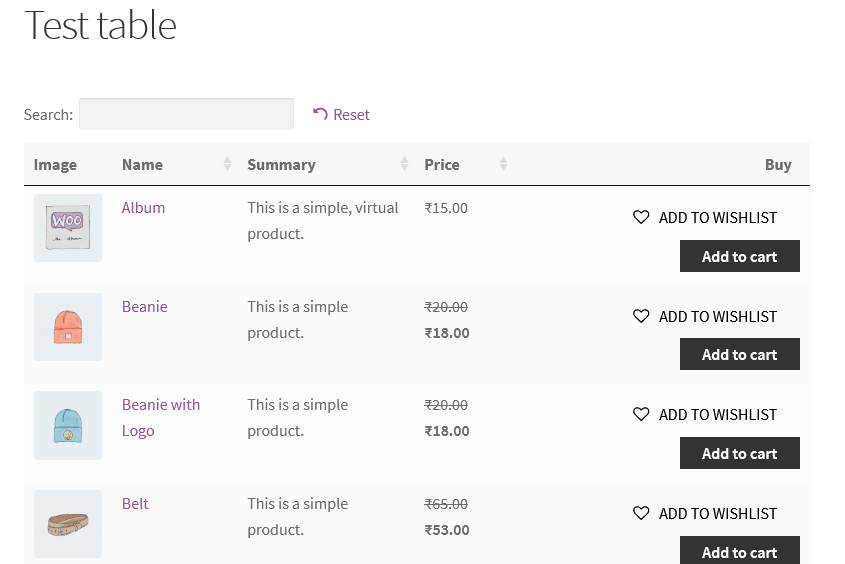
Check the page with your product table, and you will see the Add to Wishlist links in the table:
Add to Wishlist link above 'Add to Cart' button
Add to Wishlist link in a custom column
Using Aco Wishlist with WooCommerce Quick View Pro
When you activate the Aco wishlist plugin, you can choose the position for the 'Add to Wishlist' button. Use the settings page to select either above or below the add to cart button. Whichever you choose, the wishlist button will appear correctly in the quick view popup.
The wishlist plugin comes with a widget which shows the number of items in the wishlist. It has a handy link to the main wishlist page.
How it works with WooCommerce Product Table
This flexible plugin works beautifully with product tables - both the standard and lazy load methods of loading the table. The 'Add to Wishlist' links (which you can reword to anything you like) appear either above or below the add to cart button, or in any other column in the table. If you're using the add to cart checkbox option that comes with WooCommerce Product Table, then the 'Add to Wishlist' link appears before the checkbox.
When you click on the 'Add to Wishlist' link for any product, a lightbox will appear confirming that the product has been added. You can either close the popup or click through to the wishlist page, where you can view the items, share them on social media, or buy using WooCommerce.
When you activate the WooCommerce wishlist plugin, you'll be taken through a handy setup wizard where you can choose how your wishlist will work. You can choose to position the 'Add to Wishlist' button above or below the add to cart button, and both will appear correctly in the product table. Or if your product table doesn't have an add to cart column, then choose the 'Custom position with code' option and add the shortcode [ti_wishlists_addtowishlist] to any other product field that appears in the table. For example, if you add this shortcode to the short description, long description or a custom field for each of your products, then it will appear in the table.
View the page with your product table, and you will see the Add to Wishlist links!
Tip: If you're using the 'Custom position with code' option, then you must add shortcodes="true" to your product table. You can either do this in the plugin settings page, or directly in the product table shortcode.
How it works with WooCommerce Quick View Pro
The TI WooCommerce Wishlist plugin works beautifully with WooCommerce Quick View Pro, automatically adding wishlist links to the quick view lightbox. You can choose to position the links before or after the add to cart button.
An 'Add to wishlist' link automatically appears in the quick view
It changes to a 'Remove to Wishlist' link after adding to the lightbox
When you activate the WooCommerce wishlist plugin, you'll be taken through a handy setup wizard where you can choose how your wishlist will work. You can choose to position the 'Add to Wishlist' button above or below the add to cart button, and both will appear correctly in the quick view lightbox. Or if you don't need add to cart buttons in the quick view, then you can show the wishlist links by adding the shortcode [ti_wishlists_addtowishlist] to the short description for each product and including this in the quick view instead.
Test the quick view lightbox for any product, and you will see the Add to Wishlist links!
Please note: The TI WooCommerce Wishlist plugin has a 'Show successful notice in popup' option on the settings page. DO NOT enable this option because quick view is a popup, and you can't have two popups at a time. (If you do enable this option, then nothing terrible will happen - but you won't see a success message saying that the product has been added to your wishlist.)
YITH's WooCommerce wishlist plugin is good too. However, you need to manually add the wishlist shortcode. If you're happy to do that, then this is a valid option too.
Other WooCommerce wishlist plugins
If you're using WooCommerce Product Table or WooCommerce Quick View Pro with any other wishlist plugins, please let us know. We'd love to test them and publish the details of any more that are compatible. We might even be able to feature your website as a case study!
Adding minimum and maximum quantity rules to WooCommerce ensures that every sale is both profitable and manageable for your online store. This article will introduce you to the best min max quantity WooCommerce plugin, and show you how to set it up in just a few minutes.
When you use WooCommerce as it comes, your customers can order as few - or as many - of each product as they like. There are no min or max quantity restrictions. This can cause several problems for your company, including:
Unprofitable orders - customers can place tiny orders that are not cost-effective to fulfil.
Products with low profit margins - some products are only profitable when ordered in larger quantities, otherwise you lose money.
Capacity issues - you risk receiving huge orders that are too big for your warehouse to manage.
Packaging difficulties - some products can only be packaged efficiently in certain quantity groupings, e.g. in packs of 4.
Lack of flexibility - you may have different operational processes for certain user groups, such as wholesale buyers. A one-size-fits-all quantity setting makes this difficult.
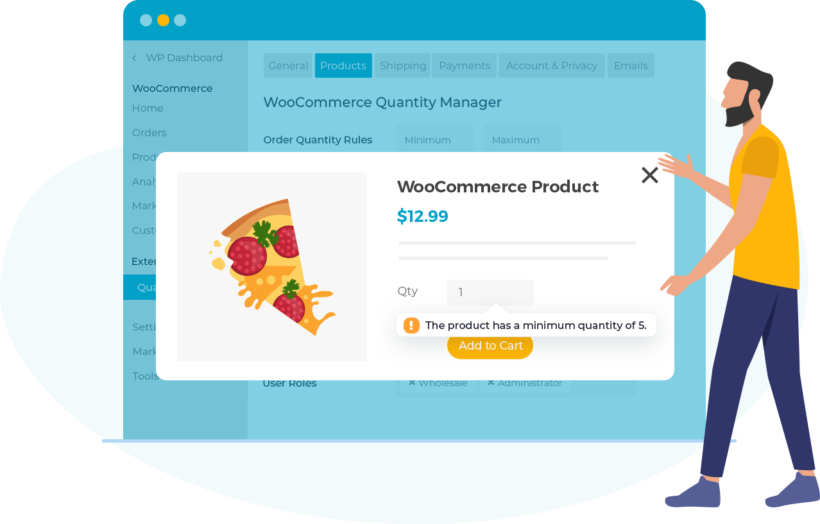
The WooCommerce Quantity Manager plugin solves all these problems and more. Unlike other min max quantity WooCommerce plugins, it's easy to use and 100% flexible. It gives you total control over the product quantities in your store, without slowing it down.
6 reasons why a WooCommerce minimum and maximum quantity plugin can increase profits
Before we start, let's look at why you might need a WooCommerce min max quantity plugin in the first place. I firmly believe that you should only install plugins that you have a genuine need for. Ask yourself: "Will this plugin make my store more profitable or easier to manage?"
The best min max quantity WooCommerce plugin lets you answer "Yes" to both questions. Here are 6 reasons why it can increase your profits while making your store easier to manage:
Reason #1 - Use the woocommerce min max quantity to increase profits
Many WooCommerce orders are only profitable if they're over a certain minimum and maximum quantity or minimum order value.
This is a big problem if you sell low value products and expect customers to order multiple items at once. For example, an online restaurant ordering system assumes that people will order an entire meal. If someone orders an individual drink or one small side salad then it's not worth preparing and packing their order.
A minimum order WooCommerce plugin lets you guarantee that every order is profitable. Simply set the min/max quantity or value. Customers will be encouraged to continue adding to their order until they can check out at a level that is profitable for you.
Reason #2 - Set a WooCommerce minimum quantity per product to make every product profitable
At the same time, you might have certain products that are only profitable when ordered in bigger quantities. In this case, setting a minimum quantity isn't much use because the issue relates to each product, rather than the overall order value.
Instead, you need a plugin that lets you set the WooCommerce product minimum quantity.
WooCommerce Quantity Manager lets you set a minimum quantity for categories, products or variations. This gives you more flexibility and saves you time. For example, if you have a hardware store with a 'Nails and screws' category then you can set a minimum quantity for this whole category, instead of having to edit each individual product.
Setting minimum quantities helps you make sure that every product is sold for a suitable profit margin.
Reason #3 - Use WooCommerce max quantity to manage capacity and keep your orders manageable
Every business loves to receive big orders, but there is a limit. Realistically, you can only handle orders that your team and warehouse have the capacity to manage. If you receive orders that you can't handle then you risk letting down customers and damaging your reputation.
Of course, WooCommerce itself has stock management features. These manage your inventory and make sure you only sell items that you actually have in stock. However, this only applies to one product at a time. Stock management won't prevent you from receiving unmanageably large orders.
The solution is to use a WooCommerce max quantity plugin such as Quantity Manager. Use it to set a max quantity for entire orders, orders from a specific category, or for each individual product or variation. Depending on your store's needs and capacity issues, you can set a maximum quantity or maximum order value.
This ensures that your store has the capacity to handle every order and won’t get overwhelmed. Your staff and customers will thank you for it!
Reason #4 - Use default quantities to increase your average order value
WooCommerce min and max quantity rules physically control the quantity that customers can order. You can also benefit from a more gentle approach.
The WooCommerce Quantity Manager plugin lets you change the default quantity which appears on the quantity field for each product. While this doesn't control what customers can buy, it's a powerful way to nudge them in the right direction.
The default quantity in WooCommerce itself is 1. Unconsciously, this suggests that it's normal to buy 1 of each product. But you want customers to buy more than 1!
Increase the default quantity or set it to zero. Either way, you're creating the impression that it's normal to buy larger quantities of your products. It's a great way of increasing the average order value in WooCommerce!
Reason #5 - Use WooCommerce quantity increments to improve operational efficiency
In WooCommerce itself, customers can select quantities in increments of 1. This means that they can order in quantities or 1, 2, 3, 4, and so on.
The Quantity Manager plugin lets you change the quantity step value to anything you like - either globally, or per product/category/variation. This works nicely alongside your WooCommerce min max quantity rules to make your warehousing, packaging and delivery more profitable.
For example, you might sell a certain type of product in pallets or boxes that can fit 4 products. If the customer orders a quantity that is not a multiple of 4 then you're paying to ship empty space. This reduces your profits, as well as increasing the carbon footprint. Instead, you can set the quantity increment to 4 and ensure that customers order in groupings of 4.
Quantity increments also help to increase profits if you have a custom manufacturing process and your order quantities need to fit with this.
Reason #6 - Set min and max quantity rules for certain user groups
So far, we've assumed that all your customers will have the same quantity requirements. That's not necessarily the case.
If you have a multi-purpose store that sells to different types of customers, then you might want to set WooCommerce min and max quantities for certain groups only. For example, if you have a B2B wholesale store (e.g. using the WooCommerce Wholesale Pro plugin) then you might want to set a WooCommerce minimum quantity for wholesale buyers only. Wholesale users often have different terms, such as bulk shipping options, which aren't available to normal customers. As a result, it makes sense to set quantity minimums for them without affecting other customers.
You can easily do this with the WooCommerce Quantity Manager plugin. Just choose which user role(s) your minimum maximum quantity rules will apply to.
Why WooCommerce Quantity Manager is the best min max quantity WooCommerce plugin
As you can see, setting minimum and maximum quantity rules can increase both profitability and efficiency. The next step is to choose which WooCommerce order quantity plugin to use.
We built WooCommerce Quantity Manager after struggling with other WooCommerce min max quantity plugins. The problems we found were:
Performance problems - particularly slowing down the cart page.
Unhelpful errors - some of the error messages were quite rude and abrupt, telling the customer that there is a problem without explaining what they need to change in order to check out.
Multiple errors showing at once - some plugins display multiple errors at once if a customer is breaking more than one quantity rule. These can fill up the page and look terrible unless the min max quantity plugin makes an effort to combine and rationalize them.
Confusing logic - A quantity plugin for WooCommerce needs to be written very carefully to achieve the right logic between the different levels of quantity rule. For example, global quantity rules should override category rules, which should override product and variation rules. Otherwise, things get confusing for the store owner and their customers.
Missing options - Most WooCommerce min/max quantity plugins focus on specific features only, so you're left with gaps in functionality. For example, a minimum order WooCommerce plugin might let you set the minimum quantity and value, without offering product minimum quantities or features such as quantity increments and defaults. To get the full business benefits, you need a fully featured WooCommerce quantity plugin that controls all aspects of your product quantities.
We decided to build a plugin that solves all these problems. WooCommerce Quantity Manager was the result.
Which industries need minimum and maximum quantities?
Before we get to the setup tutorial, let's look at some specific industries that can benefit from WooCommerce min max quantities.
WooCommerce wholesale stores with bulk ordering
B2B sales are all about buying in bulk. After all, wholesale buyers are selling on your products to their own customers. As a result, it makes sense to set a WooCommerce minimum quantity per product. This ensures that your store is only used for bulk buying.
If you run a public store alongside a wholesale area, then the 'User Role' feature in the WooCommerce quantity plugin lets you add minimum rules for B2B users only.
If you only sell in bulk then quantity groupings can also be helpful. These lets you set large step values between quantity options. For example, customers might be able to purchase in groups of 5, 10, and so on.
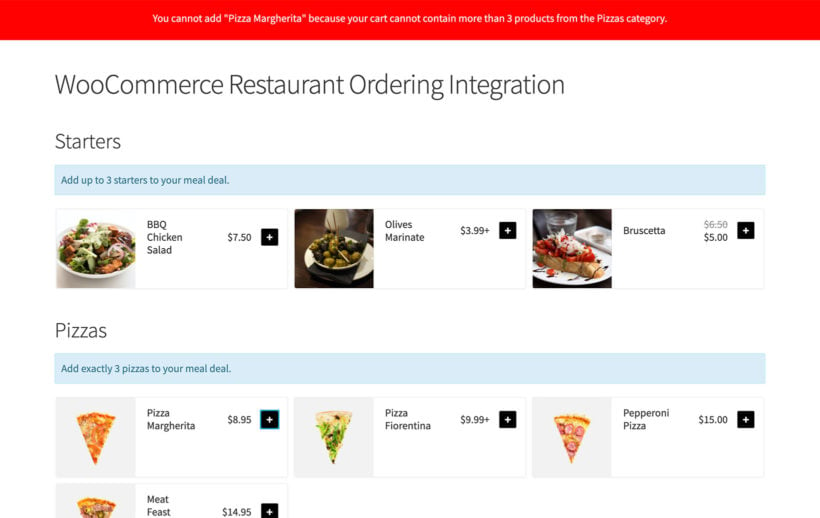
Restaurants selling meal deals
Selling meal deals with WooCommerce Restaurant Ordering and Quantity Manager
They might create a fixed price menu 'product' and then add all the food options as products with the price set to 0.00. To build their meal deal, customers must order the correct number of items from each category. For example, a meal deal might contain up to 2 starters, 2 main courses and up to $15 worth of side dishes or desserts. You can easily add these min max quantity rules and values with the WooCommerce min max quantity plugin.
Even if your restaurant doesn't sell meal deals, it might still need a minimum or maximum quantity. For instance, this is useful if you offer free delivery. Use a WooCommerce minimum quantity to ensure that all overs are expensive enough to justify the delivery cost.
Event tickets
Selling events with WooCommerce Product Table and Quantity Manager
Event tickets often need to be sold in certain groupings based on the layout of the venue. You might also want to force people to buy at least 2 tickets at a time. This ensures that you fill each part of the venue, with no awkward empty seats.
For example, let's say that you're selling tickets to events. Create a different variation for each type of seat. Add quantity groupings to force customers to buy them in pairs, or to sell an entire row together.
You can also set the default ticket number to 0. This is much better for selling events than the usual default of 1. That's because customers can make a fresh choice of how many tickets to buy, instead of assuming that they will buy one at a time.
Selling WooCommerce products in pairs
If you are displaying prices of individual items which are only available in pairs, then quantity increments are the perfect solution. Examples of this might include 'Mummy and Daughter' t-shirts, sets of chairs, sets of drinks glasses or place mats.
Your products will appear to be better value if you display the price per item. However, if it's not possible to buy items individually then you need to set quantity groupings.
Product bundles
If you're selling 'build your own' product bundles, such as gift baskets, then it's important to add min max quantity rules to WooCommerce.
Let customers build a product bundle by selecting the correct number of items from each category. This might include custom gift baskets, cosmetics sets, food boxes, and so on.
For example, you might instruct customers to choose 1 item from the shampoo category, 1 from the conditioner category and 2 from the make-up category. Use WooCommerce minimum and maximum quantity rules to prevent mistakes.
Seasonal sales
When you run a sale, it's important to make sure that everyone can access the discounts. Otherwise, a small number of customers can buy all your discounted stock before anyone else gets a chance.
During sale periods, set a maximum order quantity in WooCommerce. This prevents abuse of the sale prices and ensure that lots of different customers can benefit from the price reduction. This is particularly important for major sales such as Black Friday.
In-demand products
For the same reasons, you can ensure that popular items are shared fairly between customers. Use a WooCommerce max quantity per product to limit the number of in-demand items that each customer can buy. This helps to keep more customers happy overall.
This is also useful for products with low stock levels, preventing just one customer from buying all the remaining stock.
Now you know how you can benefit from minimum and maximum quantities, and which plugin to use. The next step is to install it. I'll show you how in the next section.
Tutorial: How to add WooCommerce min and max quantities
Ok, now we've reached the tutorial section of this article. The min max quantity WooCommerce plugin is really easy to use, and you can start adding minimums and maximums in minutes.
The main thing to think about is where to add the quantity rules:
You can set them globally so that they apply to the entire order.
There are category-level quantity rules which force customers to buy a min or max number of products from specific categories.
It's also possible to add min/max quantities to individual WooCommerce products and variations.
To save yourself time, I recommend adding min and max quantity rules to WooCommerce at the highest possible level. That's because you only have to set global rules in one place, whereas product-level rules need configuring for every product.
With this in mind, follow the instructions below that are most relevant to your store. You don't need to add every type of minimum and maximum quantity rule. Just add the ones you need, and ignore the rest. For example, it's fine to set a minimum quantity without adding a max quantity. The WooCommerce min/max quantity plugin will cleverly apply the correct rule to each product, without any conflicts.
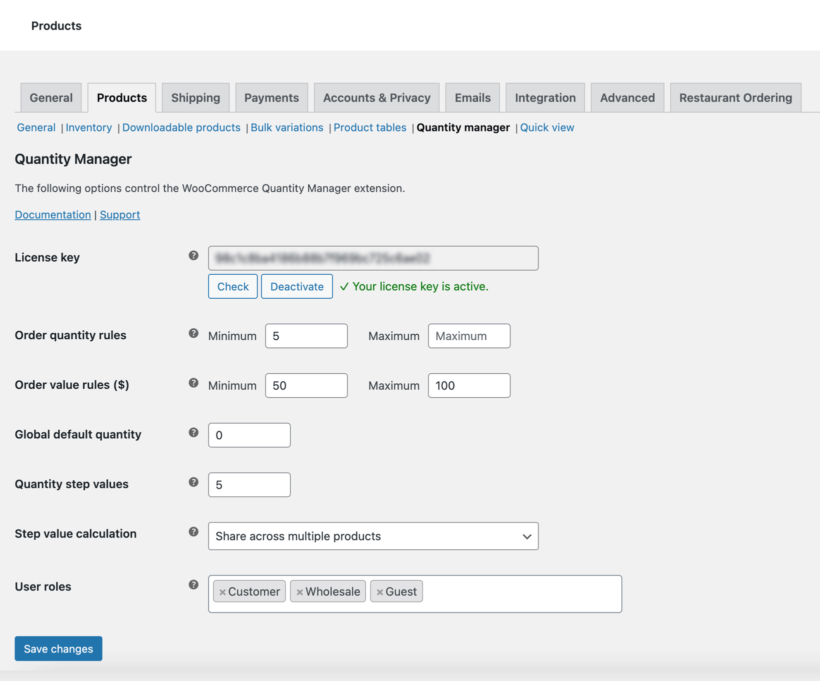
Create a global WooCommerce minimum and maximum order quantity
You can also choose which user roles the min max quantity rules in your store will apply to.
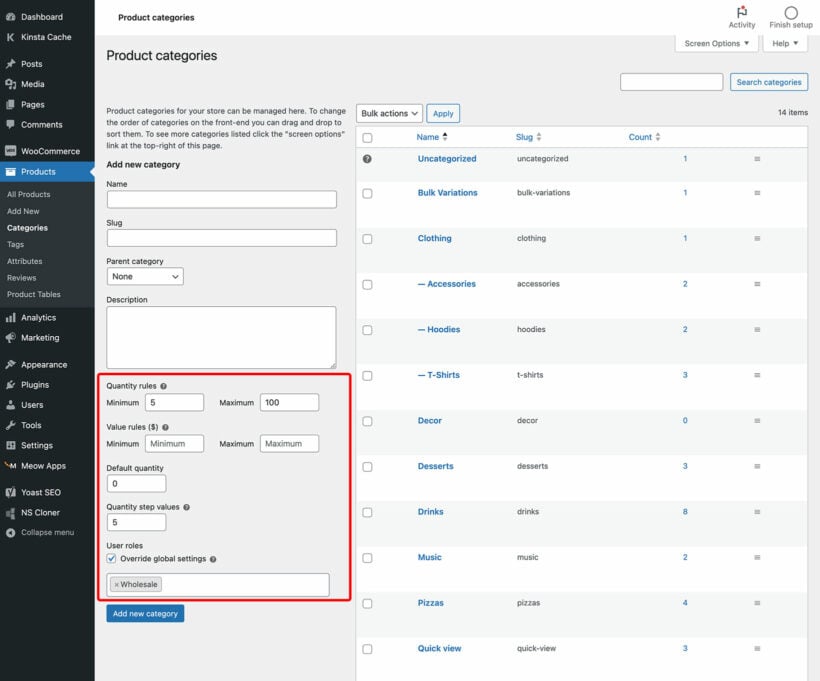
Add category min max quantity rules to WooCommerce
Do this if you want the quantity rules to be shared across all products in a specific category, instead of the entire order. For example, a restaurant creating meal deals should set min and max quantities or values for the starters category, the main courses category, and so on.
Go to WooCommerce → Products → Categories and click to add or edit a category.
Add a WooCommerce minimum quantity and/or WooCommerce maximum quantity for the category. Or if you prefer, then you can set min and max spend limits for the category (e.g. spend between $20 and $50).
You can also set quantity increments and step values for the category, although these are applied to each product individually instead of being shared across the category.
Now, if a customer adds at least one product from the category to their cart, then they must meet the category quantity rules. The cart page will contain helpful notes on any changes they need to make in order to meet the rules.
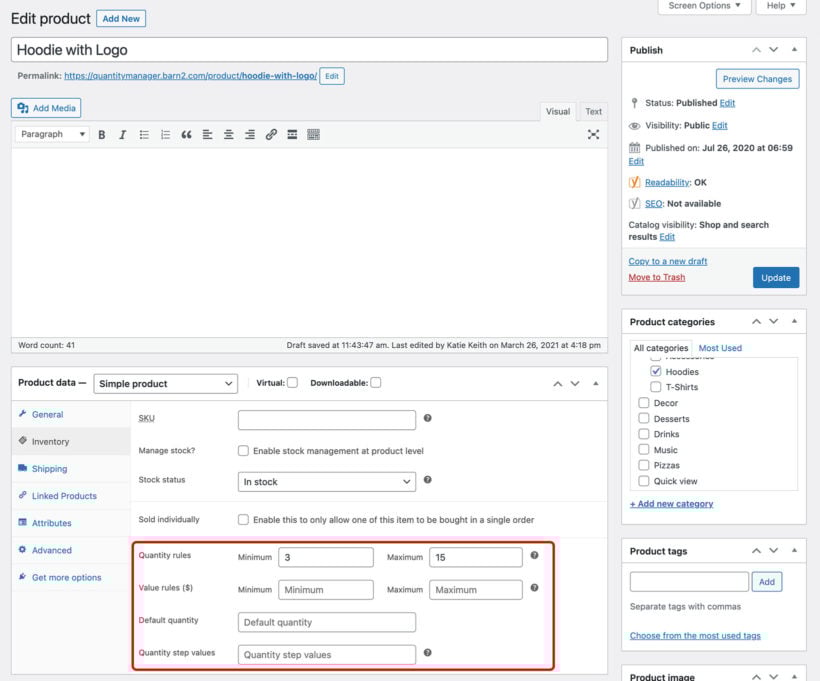
Add a WooCommerce minimum/maximum quantity per product
As we saw earlier, you can also add min max quantities per product in your WooCommerce store. This means that the quantity rules will be applied to that product individually.
Go to WooCommerce → Products and click to edit the product that you are adding min/max quantities to.
Scroll down to the 'Product Data' section and open the 'Inventory' tab.
Add a WooCommerce minimum quantity per product, a maximum quantity, or a min/max value that the customer must spend when they buy this product.
As always, you can also set a quantity step value and default starting value.
Add min and max quantity rules to individual variations
The above instructions for adding min/max quantities to specific products work for simple or variable products. If you add product-level rules for variable products then they will be shared across all the variations for that product. For example, if there's a per-product minimum quantity of 10 then customers can mix and match variations until there are at least 10 in the cart.
If you want to set min and max quantity rules on each variation individually, then you can do this. Instead of setting the rule in the 'Inventory' tab, go to the 'Variations' tab and click to edit each variation. You'll see min/max quantity fields for the variation here.
Using quantity minimums and maximums with other plugins
One of the best things about the Quantity Manager plugin is that it works with the native WooCommerce quantity field. It also uses native WooCommerce errors to advise customers how to meet the min/max quantity rules. This makes it compatible with a wide range of other plugins.
Here are some examples of how you can use it with other plugins to make your store even more profitable.
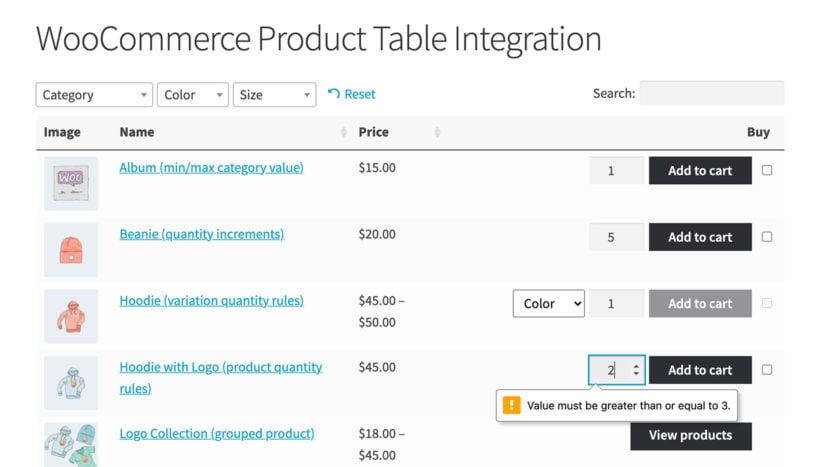
Create a one-page order form with quantity rules
Our bestselling WooCommerce Product Table plugin lists products in a quick order form. Customers can quickly enter quantities, choose variations and add multiple products to the cart at once.
Use it with WooCommerce Quantity Manager to add min and max quantity rules to the order form.
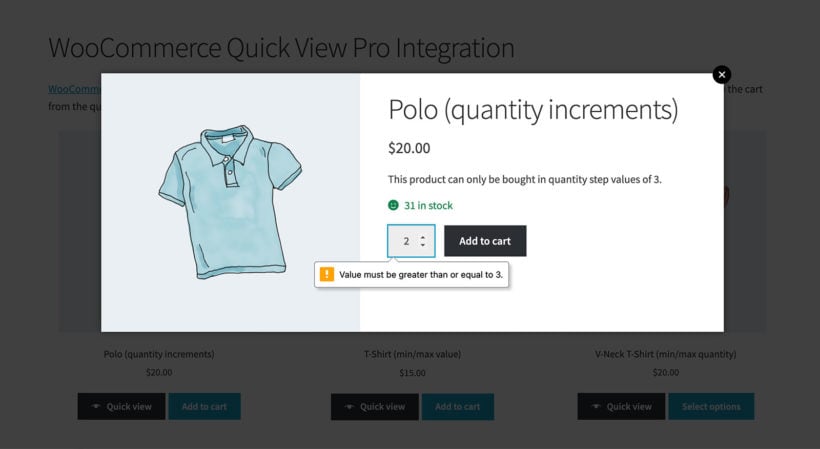
Add quick view lightboxes with quantity controls
Our WooCommerce Quick View plugin saves customers time by letting them choose quantities and add to the cart away from the single product page. When you use it with WooCommerce Quick View Pro, they are forced to select the correct quantities from within the quick view lightbox.
Start adding min/max quantities to WooCommerce today!
As you can see, nearly any online store can benefit from adding min and max quantities to WooCommerce. The WooCommerce Quantity Manager plugin has everything you need to add every type of quantity rule, so install it today.
Min/max quantities, values, step values, defaults and user role control.
Quantity rules for entire orders, or at category/product/variation level.
In-depth documentation and video tutorials.
Expert support direct from the Barn2 team.
Try it risk-free!
We're pleased to announce that WooCommerce Product Table now integrates with the free Print, PDF, Email by PrintFriendly plugin. Use the two plugins together to list products in a catalogue, list view or order form, with easy-to-use print, save as PDF, and email buttons.
What is WooCommerce Product Table?
WooCommerce Product Table is our bestselling table plugin for WooCommerce. It instantly lists products in an interactive table view with customisable columns and extra features such as search box and filters.
Product tables are popular for many types of online store, including:
It adds buttons allowing you to print any page or post in a print-friendly layout, save as PDF, and send a link via email.
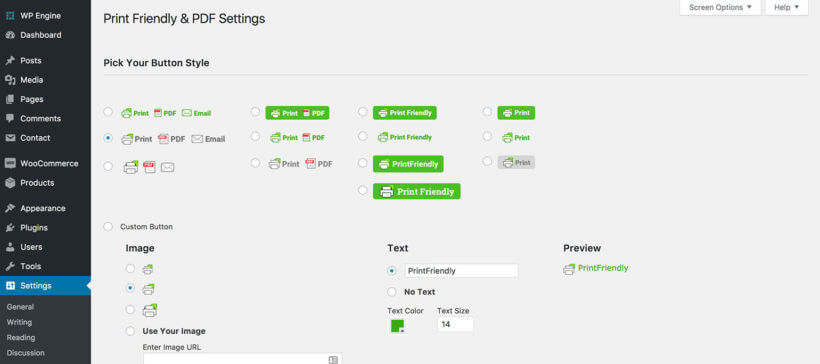
The PDF and print plugin is quite customizable. The settings page lets you choose from a range of pre-designed button, or you can upload your own or add a text version.
There are some basic styling features such as text size for your print and PDF layouts, or you can further style them using CSS.
How do the 2 plugins work together?
Print, PDF, Email by PrintFriendly lets you automatically add the print/PDF/email options to the top of every page and/or post on your website. Or if you prefer, you can use a shortcode to manually add the buttons wherever you want them to appear.
Customers can click on the buttons to open a lightbox. This contains options to print the page, save as PDF or email the page URL to a friend.
When the customer prints the page or saves it as a PDF, this will print/save the entire page as it is shown on your website. So if your page contains a title, introductory paragraph and a product table containing 15 products (10 of which are shown on the current page, with pagination buttons to view the remaining 5), then the printed document and PDF will contain all of this information except for the hidden 5 products, as they're not currently visible.
How can I set it up?
It's easy to get the 2 plugins working together. These instructions assume that you already have a WordPress website with WooCommerce installed and some products added:
Install it and the table builder will open automatically. Use it to choose the options for your table.
Copy the shortcode from the final page of the table builder.
Add a product table to any page using the shortcode, or by inserting the 'Product Table' block if you're using the WordPress Gutenberg editor.
Now go to Plugins → Add New and search for 'Print, PDF, Email by PrintFriendly'. Install and activate the plugin, then go to the settings page at: [your-domain.com]/wp-admin/options-general.php?page=printfriendly.
Configure the plugin settings to choose the button styles etc. In the 'Display button on' section, choose whether to automatically add the print/PDF/email options to all pages or posts. Untick these boxes if you'd rather add them manually.
To manually add the print/PDF/email buttons to your WooCommerce product tables, go to the page containing your product tables. Add the shortcode [printfriendly] above and/or below the product table.
View the page with your product tables. Customers can now click on the button to open a print friendly layout. They can save the product table as a PDF. They can send a link to a friend.
Perfecting your product table print and PDF layouts
The default styles that come with the Print, PDF, Email by PrintFriendly are already pretty good. The plugin automatically strips out any elements of the product table that aren't appropriate in print/PDF format, such as the search box. (After all, you can't search a printout or PDF!)
If there are any remaining elements you don't want, you can click to remove these from the preview window.
PrintFriendly have provided guidance on where you can add your own custom CSS to style the print and PDF layouts. If you don't like the built-in styling, you can create a bespoke look that perfectly matches your website.
How to print other WooCommerce content such as the single product page and category pages
To provide these options for individual products as well as the product table, you will need to also add the PDF button to the single product page (which people can access by clicking on a product in the table). They can then click the button to print the product page or create a PDF.
Similarly, to print a WooCommerce category or create a PDF, you would need to add the PDF button to the category page and it will print all products on that page. If you're using WooCommerce Product Table to list all products from a specific category then you can set the number of rows per page to a higher amount, so that the PDF includes more products from the category.
In order for PrintFriendly to work with WooCommerce Product Table, lazy_load should be disabled. If not, the contents of the table are not displayed.
More integrations coming soon!
We're always on the lookout for popular plugins that integrate with WooCommerce Product Table. If you're using product tables with other 3rd party plugins, please let us know. We might even feature you as a case study on our website!
Customers often ask if our bestselling Product Table plugin works with any WooCommerce 'add to quote' plugins. In this article, I'll share an excellent Request a Quote plugin that allows customers to add products to their shortlist directly from the product table
If you're using WooCommerce Product Table to list products in a table, you might want customers to request a quote instead of buying online. This is essential if you provide bespoke services or custom pricing which varies for each customer.
A WooCommerce add to quote plugin provides 'add to quote' buttons, which you can use in addition to or instead of the usual add to cart buttons. Your customers can select as many products as they like, choose the quantity, and create a bespoke list. They can then view the list and submit the quote request to you.
Which WooCommerce quote plugin can I use with product tables?
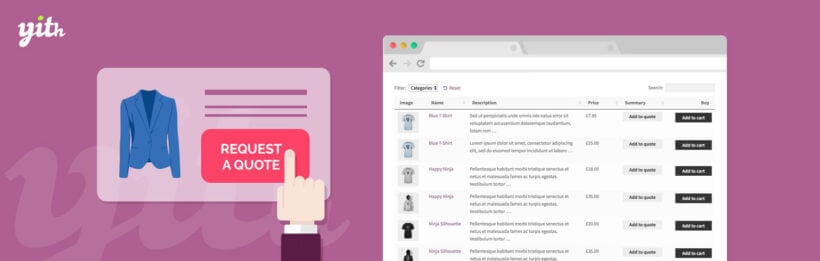
Most add to quote plugins don't work with WooCommerce Product Tables straight out of the box. However, we have integrated with the YITH WooCommerce Request A Quote plugin so that you can easily add quotation buttons to your product tables.
This video shows the 'Add to Quote' buttons in the product table. When you add a product to the quote, it is added to a list.
When you create your product table columns, add the Request quote column.
Follow the documentation for both plugins to set them up as required.
That's it! When you view the product table, it will contain an Add to Quote column containing the buttons from YITH's plugin.
FAQ
Can I hide the add to cart button?
Some people like to use add to quote buttons alongside the usual add to cart buttons. Others like to remove the add to cart button completely so that the only option is to get a quote.
The YITH WooCommerce Request A Quote plugin has an option to hide the add to cart button. This does not work with WooCommerce Product Table and will remove the add to cart button from the single product page. You can easily remove the add to cart buttons from your product tables - simply don't include an add to cart column when you add columns to the product tables.
Where can customers see their quote request?
The YITH WooCommerce Request A Quote plugin comes with a 'Request a Quote' page. This lists the products you have added to the quote request, and includes a form to submit the request.
When a customer uses the product table to add an item to the quote, a link to the Quote Request page will appear in place of the button. This makes it really easy for them to add multiple products to the quote and then click to review the quote.
You can also link to this page from your navigation menu. Alternatively, you can add a button linking to the page above/below the product table.
The premium version of the YITH WooCommerce Request A Quote plugin also has many extra features. This lets you customize the quote features to your exact needs.
Can customers choose a quantity for their quote request?
It can be a bit tricky to make the quantity picker in WooCommerce Product Table work with the YITH Request a Quote buttons. This is because the quantity picker appears in a different column of the table from the 'Request a Quote' buttons, and the two columns don't relate to each other.
Here are two suggested workarounds:
If you've enabled the option to display the product tables on your main Shop page then you can follow these instructions to make the quantity picker work with YITH's Add to Quote buttons. This method will only work when you display product tables and quote buttons on your shop page templates, and not when you create tables using a shortcode.
Where you have created tables using a shortcode, your customers should use the 'Add to Quote' buttons in the product table to built their quote. This will add a quantity of '1' to the quote for each product. When they click through to the quote page, they can modify the quantity of each product as required.
Does it work with variations?
If you want people to be able to add variations to the quote, then you need to enable the option on the WooCommerce Product Table settings page to list each variation on its own row of the table. If you display the variations as dropdowns then YITH's plugin won't know which variation to add to the quote.
Conclusion
We hope you enjoy using YITH's Request a Quote plugin with WooCommerce Product Table to create table layouts with add to quote buttons.