Setting up the clothing designer bundle
The Clothing Designer Bundle contains three plugins. Each one handles a different part of a custom clothing store:
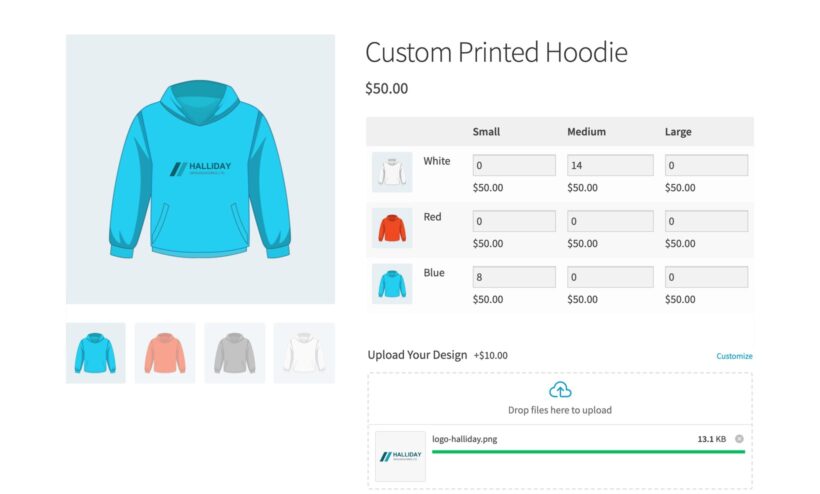
- WooCommerce Bulk Variations lists your sizes and colors as a grid of quantity boxes, so a customer can order several sizes at once.
- WooCommerce Product Options adds the personalization fields. For example, a customer can type a name for the back of a shirt, pick a squad number or upload their own artwork.
- Live Preview is an add-on for WooCommerce Product Options. It shows customers their own text and artwork on the garment before they buy.
Work through the four steps below in order. Start by installing WooCommerce Product Options and WooCommerce Bulk Variations, and enter your license key in each setup wizard. Live Preview installs itself once WooCommerce Product Options is running on a license that includes it.
1. Add your garments as variable products
Add your sizes and colors as WooCommerce variations, along with anything else you need to track the stock for. Customers will select these from the bulk variation grid. For everything that you want to display as options below the grid, do NOT add product variations - we'll add them using the WooCommerce Product Options plugin in a minute.
Only a variation carries a stock level, a SKU and a price of its own. For example, if you stock 40 medium navy polos, both 'Medium' and 'Navy' have to be variations so that WooCommerce can count them down to zero.
- Go to Products → Attributes and create a 'Size' attribute. Add each of your sizes as a term.
- Create a 'Color' attribute in the same way, and add each of your colors.
- Open a garment and click the 'Attributes' tab in the Product data box. Add both attributes and tick 'Used for variations' for each one.
- Click the 'Variations' tab, then generate the variations.
- Give each variation its own price, stock level and photo.
WooCommerce has full instructions on variable products.
Tip: Setting a price or a photo on dozens of variations one at a time is slow. Use the bulk editing feature in WooCommerce Bulk Variations to change them all at once.
2. Show the variations as an order grid
WooCommerce Bulk Variations replaces the size and color dropdowns with a grid of quantity boxes. For example, a football club can order five small, 12 medium and three large in one go, instead of adding each size to the cart separately.
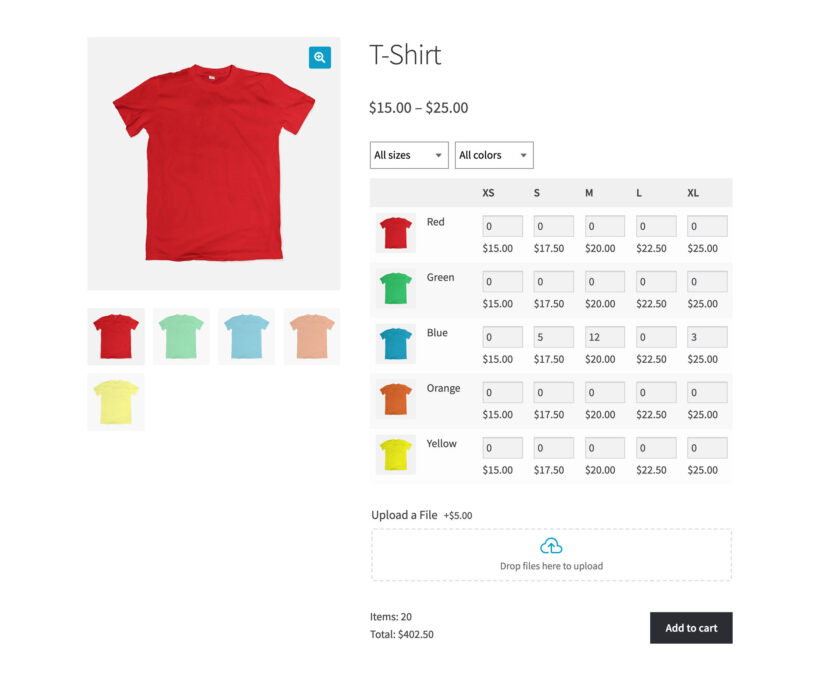
There are three ways to switch the grid on:
- Globally - Use the setup wizard that opens when you activate the plugin. You can change the same settings later at WooCommerce → Settings → Products → Bulk variations.
- For one product - Open the 'Bulk Variations' tab in the Product data box, tick 'Product-level control', then tick 'Enable'.
- With a shortcode - Use
[bulk_variations]to put a grid anywhere on your site.
You also choose which attribute runs across the top of the grid and which runs down the side. By default, the plugin puts the attribute with fewer terms across the top, and you can override that for each product. Creating variation grids covers the layout, the variation images and the filter dropdowns.
3. Add product options for the personalization
Use WooCommerce Product Options to add all the options which will appear below the bulk variations grid. For example, you can offer a name for the back of a shirt, a squad number, a font, a thread color, a print position, a decoration method and an artwork upload. None of them needs a variation.
- Go to Products → Product Options and click 'Add option group'.
- Use the 'Visibility' settings to show the group on your clothing categories, so the same fields appear on every garment without you editing each product.
- Add one field for every choice the customer makes. The list below covers the fields a clothing store usually needs.
- Set a price for each option or choice as you create it, using the 'Price Type' and 'Pricing' columns. For example, you can add $2.00 for a name on the back, or $5.00 for the 'Embroidery' choice.
- Publish the option group.
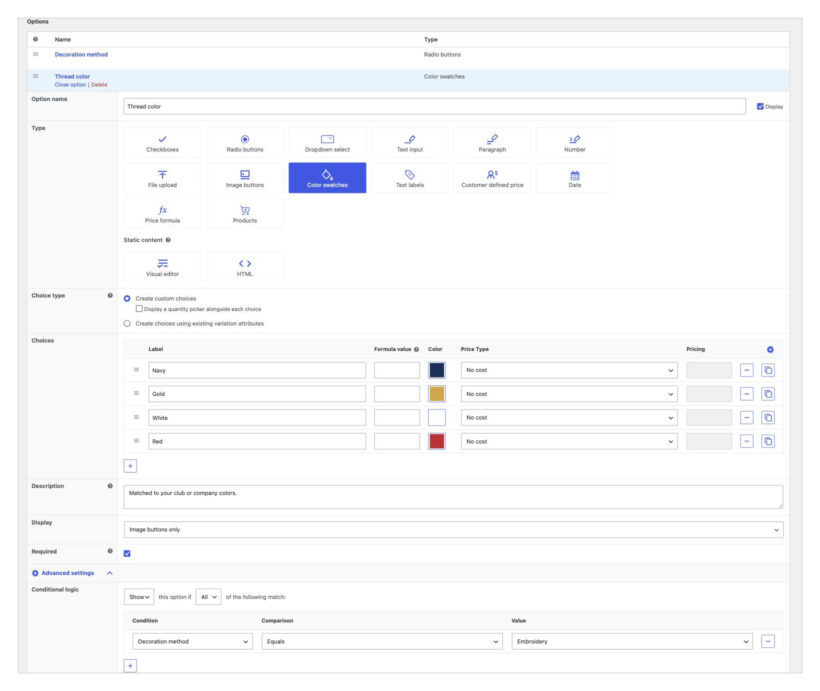
The fields a clothing store usually needs:
- Text Input - For the name printed on the garment, with a character limit so it fits.
- Number - For the squad number.
- Image Buttons - For the print position and the decoration method, so customers can see embroidery next to screen print instead of reading the words.
- Dropdown Select - For the font.
- Color Swatches - For the thread or vinyl color.
- File Upload - For a logo or artwork file. Remove the non-image file types, because the live preview only draws images.
Creating product options covers every setting, and conditional logic hides a field until the customer asks for it. For example, you can keep the 'Squad number' box hidden until someone ticks 'Add a number'.
One rule applies when you use the variations grid: Create your choices inside WooCommerce Product Options, and don't use the choice type that displays existing variation attributes. The grid already shows those attributes, and showing them twice causes errors.
If you need more complex pricing
A price per option or choice covers most clothing stores. If you need a pricing rule instead of a fixed amount, add a price formula field to the same option group. For example, you can charge a setup fee on top of a rate per garment, or drop the rate as the order gets bigger.
You don't have to write the formula yourself. Describe the pricing in plain English and our Price Formula AI Bot will write it for you 🤖.
4. Show the design on the garment with Live Preview
Live Preview draws the customer's artwork and text onto your product photo while they fill the form in. You switch it on in the product options editor, using the 'Enable live preview' setting on each field. File Upload fields have it on already, and you need to tick it for Text and Paragraph fields.
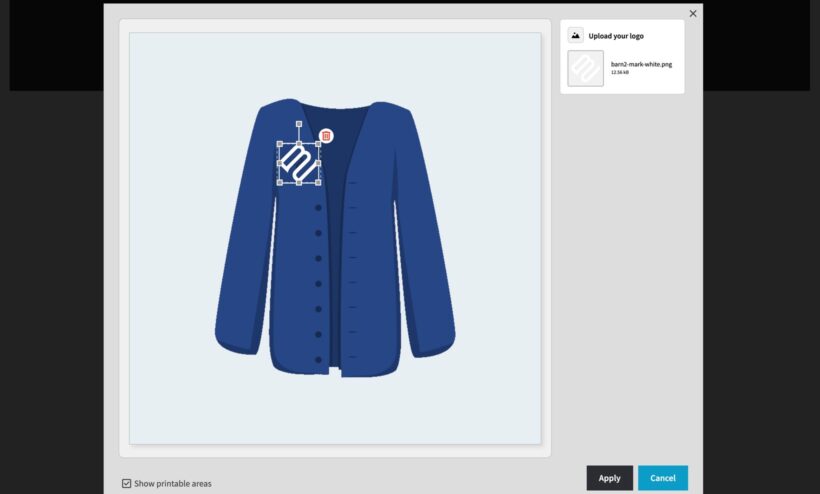
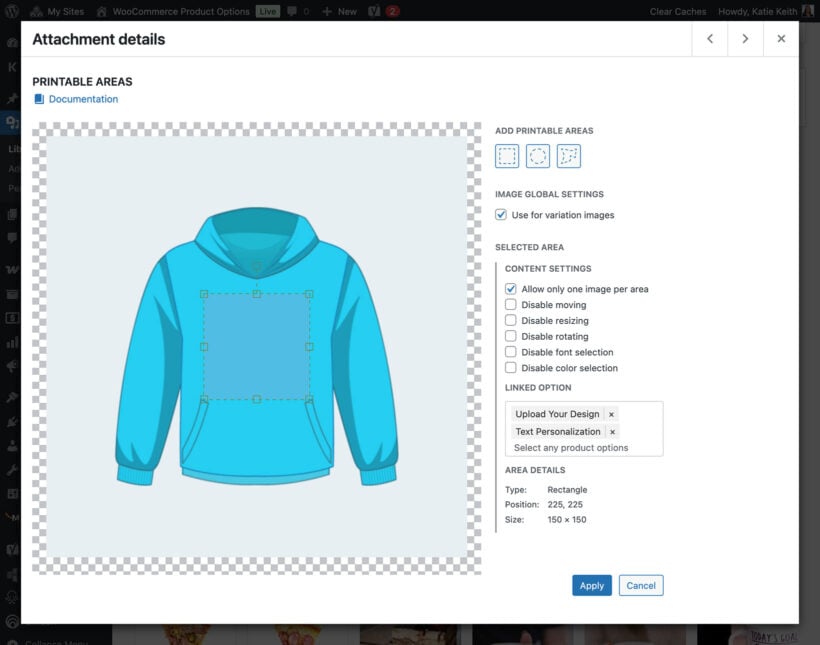
Printable areas mark the part of the photo your press or embroidery machine can reach, so customers can't drop a logo over a zip or a seam. You set the areas on the image in your Media Library rather than on the product:
- Go to Media and click the garment photo to open 'Attachment details'.
- Click 'Set printable areas'.
- Draw the area with the rectangle, circle or freeform tool, then drag its anchor points to size and position it. Add one area for each print position. For example, you might draw one area on the chest, one on the back and one on each sleeve.
- Tick 'Use for variation images' to copy the same areas onto every color of that garment.
- Use 'Linked Option' to tie an area to a single field, so your front photo pairs with your front print field and your back photo pairs with your back print field.
Using the WooCommerce Live Preview add-on covers the rest, including copying printable areas between images, stopping customers moving or resizing what they upload, and adding a Google Fonts API key for a wider choice of fonts.
Would you like us to set this up for you?
Tell us what options you need and we'll build them on your site. There's no charge and it's included with your license. Request your free setup.