How to add conditional logic to your product add-ons
When you use the WooCommerce Product Options plugin to create product add-ons, each one comes with an option to show or hide it based on the user's other selections. That way, you can create dependencies between your product options or variations.
Examples of conditional logic
Showing and hiding options
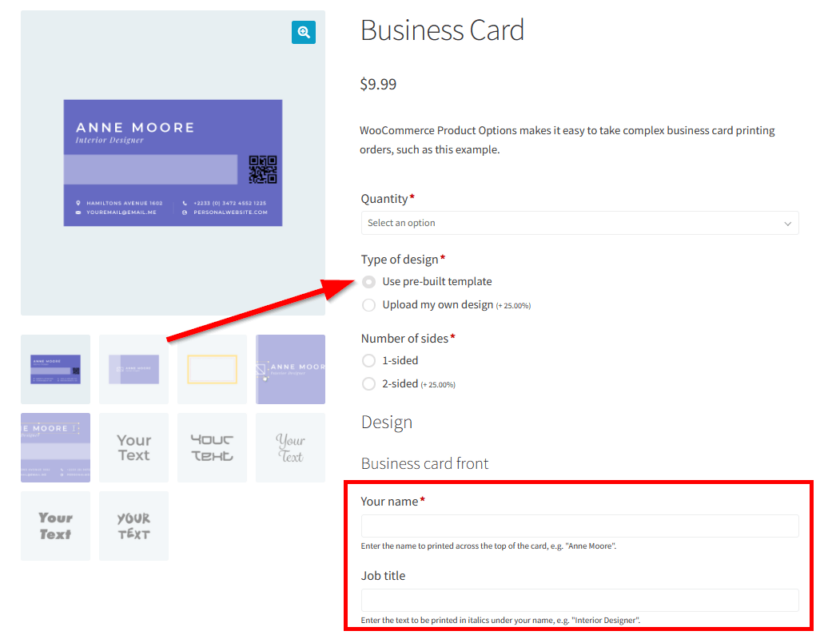
In the below screenshot, clicking 'Use pre-built template' conditionally displays the 'Your name' and 'Job title' product options, which are not required when 'Upload my own design' is selected:

Conditional logic for price formulas
The price formula field type lets you create custom price calculations based on the information provided by the customer. You can use conditional logic to use different price formulas depending on which other options the customer selects.
For example, imagine that you're selling made-to-measure curtains where the price per metre differs depending on the fabric type. You can add multiple price formulas to the same product and use conditional logic to show/hide each one so that a different formula is used depending on which fabric type the customer selects from a 'Fabric Type' dropdown.
Conditional logic for the 'Products' option type
Imagine that you're selling a smartphone and are using the 'Products' option type to display a choice of phone cases which are also available as products elsewhere in your store. One of the phone cases has a 'Custom engraving' option and you want to offer this when customers order it from the smartphone product page.
You can do this as follows:
- Create a 'Products' option to display all the phone cases on the smartphone product page.
- Create an 'Engaving' option and use conditional logic to only display it when a particular phone case is selected.
Warning: When you add the 'Products' option, there is a choice of display styles such as checkboxes, image buttons, etc. If you're using conditional logic then you must not select the 'Products' display option. That's because this gives each item its own add to cart button, and the conditional logic can only be triggered when the customer selects the item. As a result, you must use a display option which the customer can actually select instead of adding straight to the cart.
How to add conditional logic to product add-ons
- Edit the option group that contains the options that you want to add conditional logic to.
- Click to add or edit an option, and add each add-on as a separate 'Choice'.
- Click on the 'Advanced' toggle to display the conditional logic section.
- Select the logic that you require. The 'Conditions' dropdown lets you select other options from the same group, or global attributes which were created under Products → Attributes. (Note: It does not work for attributes which you created directly on the Add/Edit Product screen for individual products.)
For example, the following screenshots show how we added a gift wrap option to a product. The product page loads with only one add-on visible: "Gift Wrapping." When the customer clicks the "Yes please" checkbox, the other gift wrap product add-ons appear underneath using conditional logic.
Further reading: The complete guide to creating WooCommerce conditional variations.
Warning: Don't hide variation attributes!
If you're displaying variation attributes using WooCommerce Product Options, then we recommend that you to not use conditional logic to hide them. The way WooCommerce works is that each attribute is always required, and customers can't add a product to the cart until they have selected each one. As a result, hiding these options could cause confusion.
Can I use conditional logic based on quantities?
While you can't directly use quantity as a factor in your conditional logic, we have provided a code snippet so that you cfan do this.
Related Articles
- How to translate any Barn2 plugin with WPML
- Where can I download the options from the WooCommerce Product Options demo site?
- How to let customers make a reservation using WooCommerce Product Options
- How to create product options with repeater fields
- Do Barn2 plugins meet accessibility guidelines?
- How to manage stock for product option SKU's and add-ons

