How to let customers make a reservation using WooCommerce Product Options
The WooCommerce Product Options plugin has a date field which allows customers to select a date when adding a product to the cart. While it is not a dedicated WooCommerce reservations plugin, you could therefore use it to take table reservations, reserve rental products, or take ay other type of reservation.
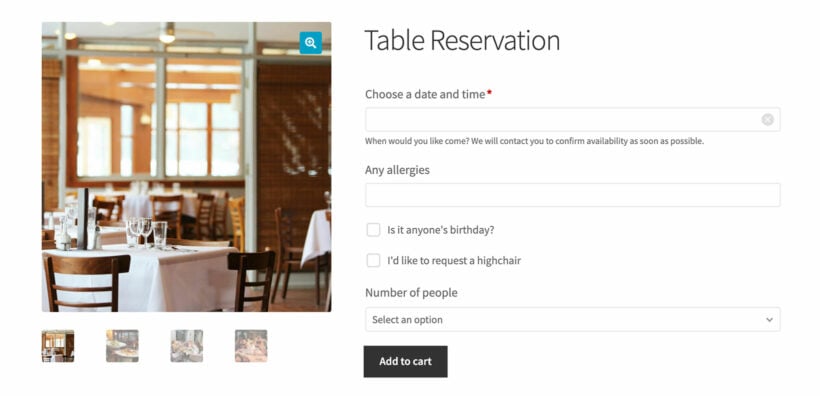
This article describes the steps to create a restaurant table reservation booking system that looks like this:

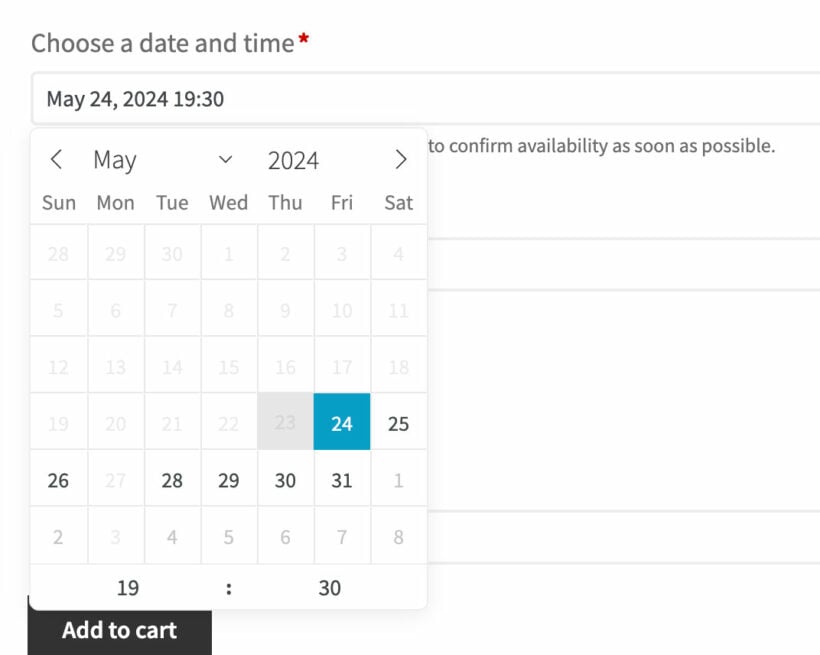
When customers click on the date field, they will be able to select a date and time:

Use this as a starting point to create a reservation system with whichever fields you need.
Step 1. Create a 'Table reservation' product
- Go to Products → Add New and add a product called 'Reserve a table' or similar.
- In the 'Product Data' section, enter the cost as 0.00. (Don't leave this blank because WooCommerce requires this field to be filled in so that you can add the product to the cart.)
- If your product page template includes an image of each product then you should add a suitable image, as we did in the screenshot above.
- Still in the 'Product Data' section, go to the 'Inventory' tab and tick the 'Limit purchases to 1 item per order' box. This will remove the quantity field from your table reservation page, as it's not really relevant.
Step 2. Add a date picker field
- Now go to Products → Options.
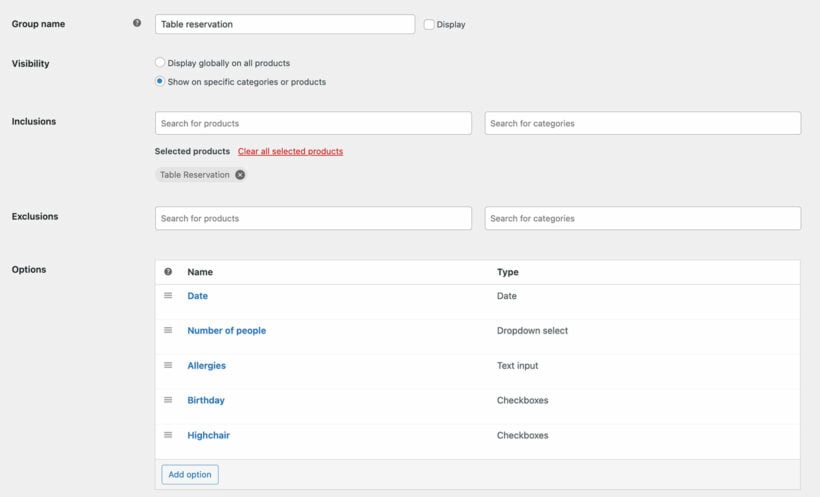
- Create an option group and name it something self-explanatory like 'Table reservation fields'.
- In the Visibility section, select the product you created in Step 1.
- Click 'Add Option' and select the 'Date' option type.
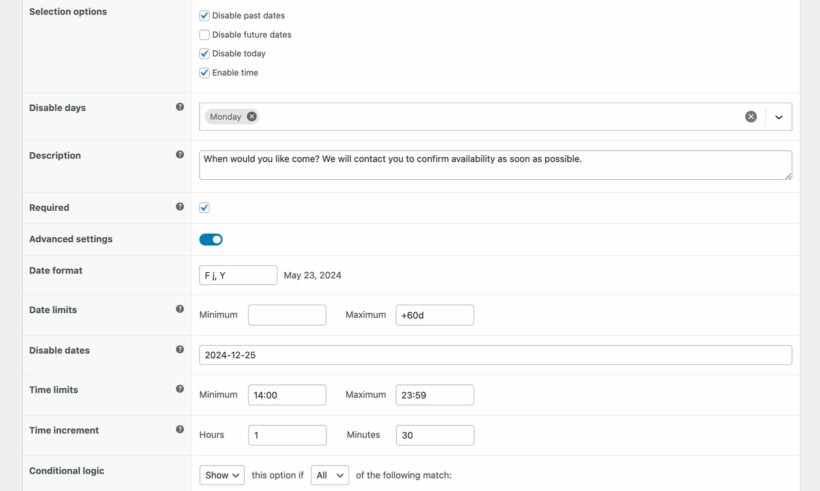
- Now go through the options to set up the date field:
- Option name - Call the date field whatever you like and untick the 'Display' field.
- Choice - Enter a label which will appear above the date and time picker, and choose whether or not charge for placing a reservation. For example, you could charge a deposit which will later be deducted from the full cost of the meal. If you do this, then I recommend adding the details to the 'Description' field below so that customers understand your policy.

- Selection options - Disable past dates and decide whether you will accept same-day table reservations. Enable the time option so that customers can choose a time as well as a date.
- Disable days - Select any specific dates that the restaurant is closed, e.g. Mondays.
- Description - This will appear below the date field. I recommend mentioning that you will contact the customer after they place the order to confirm availability and that reservations are not guaranteed until that point.
- Required - Tick this to ensure that customers must select a date and time before requesting a reservation.
- Advanced - Enable the Advanced toggle to view additional options:
- Date format - Choose whatever is commonly used in your country.
- Date limits - Select how short notice - and how far in the future - you will accept reservations. For example, entering +60d will prevent customers from requesting reservations more than 60 days away.
- Disable dates - Enter any specific dates that the restaurant is closed, e.g. 2024-12-25. (Tip: Remember to update this every few months as you plan your holidays etc. in the future!)
- Time limits - Enter the restaurant's opening time, plus the latest time that you will accept a table reservation.
- Time increment - Choose an increment for the start time of each reservation. For example, if you want all reservations to begin on the hour or half hour then the increment should be 30 minutes.
- Conditional logic - Use this if you want to dynamically show and hide the date field based on certain criteria. For example, maybe you're selling food products and want to add a 'I'd like to make a table reservation' checkbox to the page which will reveal the hidden date/time field.

Step 3. Add additional fields

Now use the 'Add Option' button to add as many additional fields as you like to the same option group. Here are some suggestions, which you can see in the screenshot at the top of in this article:
- Number of people - There are various ways to do this, depending on how you want it to look. For example:
- Number field - This allows the customer to enter the number of people. There's a 'Maximum' option in the Advanced settings which you can use to set a maximum table size, for example if you will only accept bookings of up to 8 people.
- Dropdown select field - This allows you enter a fixed number of people who can be selected, for example you might add choices of 1, 2, 3, 4, 5, 6, 7 and 8.
- Allergies - Add a text field for this.
- Birthday - If you like, then you could add a checkbox for customers to tick if it's someone's birthday. You can then add additional fields underneath and use conditional logic to make them only appear when the main 'Birthday' checkbox is ticked. For example, this would be a nice way to sell a birthday cake and collect the name of the person who's birthday it is so that the waiting staff can congratulate them.
- Highchair - You can also add checkboxes for additional requests such as highchairs for babies.
Finally, save the option group and check how the options look on the Table Reservation product page.
FAQ
Can I limit the number of available places per time slot?
No, WooCommerce Product Options doesn't have an availability checker. If you use this method to take reservations then we recommend using the 'Description' for your date field to tell customers that you will contact them to confirm the reservation and it is not guaranteed until then.
If you need a WooCommerce reservations system with built-in availability then we recommend using YITH WooCommerce Bookings instead.
Related Articles
- How to translate any Barn2 plugin with WPML
- Where can I download the options from the WooCommerce Product Options demo site?
- How to create product options with repeater fields
- Do Barn2 plugins meet accessibility guidelines?
- How to manage stock for product option SKU's and add-ons
- How to display other products as options