WooCommerce Wholesale Pro Settings – Registration Fields
WooCommerce Wholesale Pro includes a built-in registration form builder. You can create a custom wholesale registration form with a range of field types, group fields into sections, show or hide fields with conditional logic, and map the data straight to the WooCommerce user profile - all without a separate forms plugin.
The form appears on the wholesale login page (if you have enabled the registration form), and on the dedicated wholesale registration page created by the [wholesale_registration] shortcode.
Activating the registration form
If you are upgrading from an earlier version of WooCommerce Wholesale Pro, your existing registration fields are imported into the form builder automatically. You'll see a notice in the WordPress admin with a button to Activate registration form.
Your old registration form keeps working until you click this button, so there's no rush and nothing to rebuild from scratch. Once you've reviewed the imported fields, click Activate registration form to make the new form live.
On a new installation the form builder is ready to use straight away, pre-filled with a few standard fields that you can edit or remove.
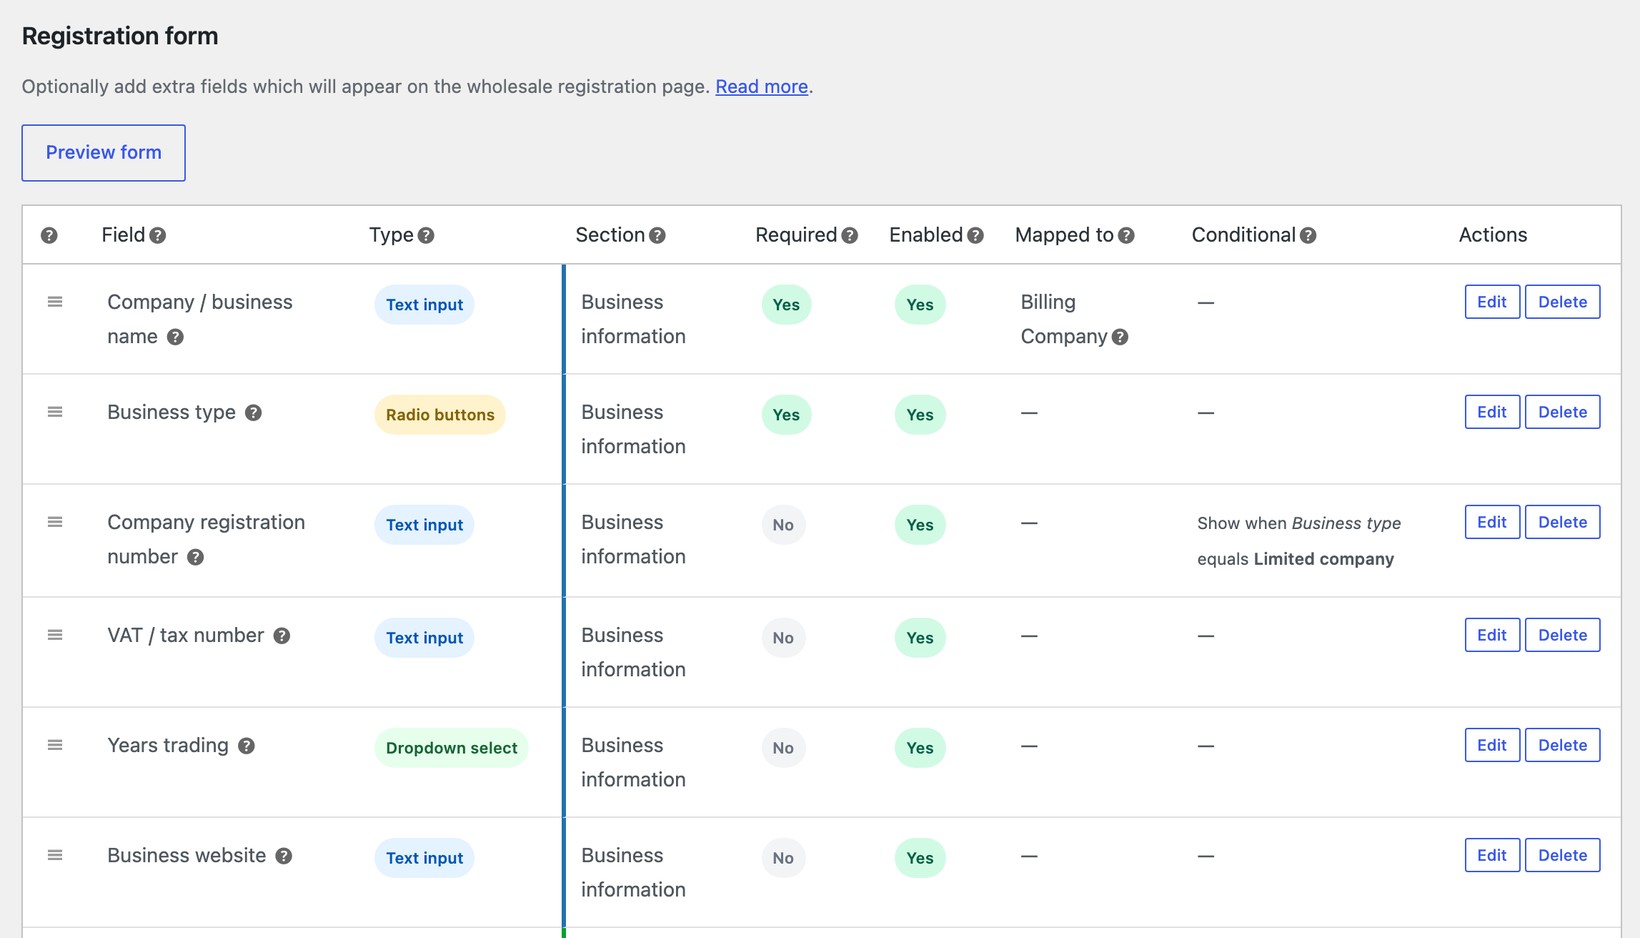
Building your registration form
Go to WooCommerce → Settings → Wholesale → Registration fields. To add a field, complete the Add new field section at the bottom of the page and click Add field:
- Field label - the text shown above the field on the registration form.
- Section - an optional heading to group related fields together (see below). Choose an existing section or type a new name.
- Field type - the kind of input, such as a text box, dropdown or file upload (see the full list below).
- Required - tick this if the applicant must complete the field before they can submit the form.
- Map to existing field - optionally save the data straight to a standard WooCommerce profile field (see below).
- Conditional logic - optionally show or hide the field based on the applicant's answer to another field (see below).
You can preview the form at any time using the Preview form button. To change a field later, click Edit next to it; to remove one, click Delete. You can also drag and drop the fields using the handle on the left of each row to change the order they appear on the form.
Field types
The form builder supports the following field types, which you can mix and match as needed:
- Text input - a standard single-line field, for example company name, VAT number or trading name.
- Text input (email) - validates the entry as an email address. Useful for a separate accounts contact email.
- Text input (phone) - for a telephone number.
- Number - accepts numeric values only.
- Paragraph - displays a block of read-only text or instructions on the form, for example a note about which documents to upload. It doesn't collect a response. For a free-text answer, use a text field instead.
- Dropdown select - lets the applicant pick one option from a list, which keeps a long set of choices tidy.
- Dropdown select (multi) - the same as above, but the applicant can choose more than one option.
- Radio buttons - one choice from a few visible options, such as a business-type or Yes/No question.
- Checkbox - a single toggle, for example a terms and conditions agreement or marketing opt-in.
- File upload - lets the applicant attach one or more files, such as a VAT certificate or reseller permit.
For dropdown and radio fields you enter the available options, one per line. You can also use a dropdown or radio field to let applicants choose their own wholesale role on registration.
Grouping fields into sections
Use the Section setting to group related fields under a heading on the registration form, for example 'Business information', 'Primary contact' or 'Billing address'. Fields that share the same section name appear together under that heading, which makes a longer form much easier to read.
Conditional logic
Conditional logic lets you show or hide a field based on what the applicant has entered in another field. This keeps the form short on the surface and only asks for the information that applies to each applicant. For example:
- Only show the Company registration number field when the applicant selects 'Limited company' as their business type.
- Only reveal the trade-reference fields when the applicant says they want to apply for credit terms.
- Hide the shipping address fields when the applicant ticks 'Shipping address same as billing'.
To set this up, tick Enable conditional logic for this field when adding or editing a field, then choose whether to show or hide it, and set one or more conditions based on the applicant's answers to other fields.
Mapping fields to the WooCommerce user profile
Each field can be mapped to a standard WooCommerce billing or shipping field using the Map to existing field option. When a mapped field is completed during registration, the data is saved straight to the matching field on the new customer's WooCommerce account.
For example, you can map the company name to the billing company, the first and last name to the account name, and the phone number to the billing phone. This means the information appears on the customer's orders automatically, with no manual re-entry. Any fields that aren't mapped are still saved as registration data on the user profile.
Example forms you can build
By combining these field types with conditional logic and field mapping, you can build a registration form for almost any B2B scenario. For example:
- Tax-exempt buyer application - text fields for the business name and tax ID, a file upload for the signed exemption certificate, and a checkbox to confirm it's current. The tax-ID field appears only when the applicant confirms they hold a current certificate.
- VAT-registered EU application - a country dropdown, a VAT number field and a file upload for the VAT registration certificate. The VAT number field appears only when the applicant selects an EU country.
- Reseller permit application - a radio field for the state the applicant resells in, a file upload for the permit, and an expiry-date field so you can chase an updated permit before it lapses.
- Credit-account application - a Yes/No radio asking whether the applicant wants 30-day credit terms. If they choose Yes, the form reveals fields for trade references, an accounts-payable contact, and an upload for recent company accounts.
- Trade-show lead capture - a short form with company name, contact name and a business-type dropdown, plus a follow-up checkbox that reveals a phone-number field when ticked.
- Multi-role wholesale store - a dropdown that lets the applicant choose which kind of buyer they are (for example Distributor, Retailer or Education). Different upload requirements appear for each, and the applicant is registered against the matching wholesale role.
Where the registration form appears
The form is displayed in two places:
- On the wholesale login page, if you have enabled the registration form in the General settings.
- On any page where you add the
[wholesale_registration]shortcode.
How to view the data
The information submitted through the registration form is stored against the customer's account and is shown in the 'Wholesale user information' area of the 'Edit User' screen in the WordPress admin.
If you are moderating new wholesale registrations, the submitted information appears above the 'Approve' option so that you can review it before deciding whether to approve the request.
Adding even more advanced fields
The form builder covers the needs of almost every wholesale store. If you have a highly specialized requirement, developers can also add fields to the form in code using the wcwp_register_form hook - see our actions and filters reference.