How to use SaveTo Wishlist with WooCommerce Product Table
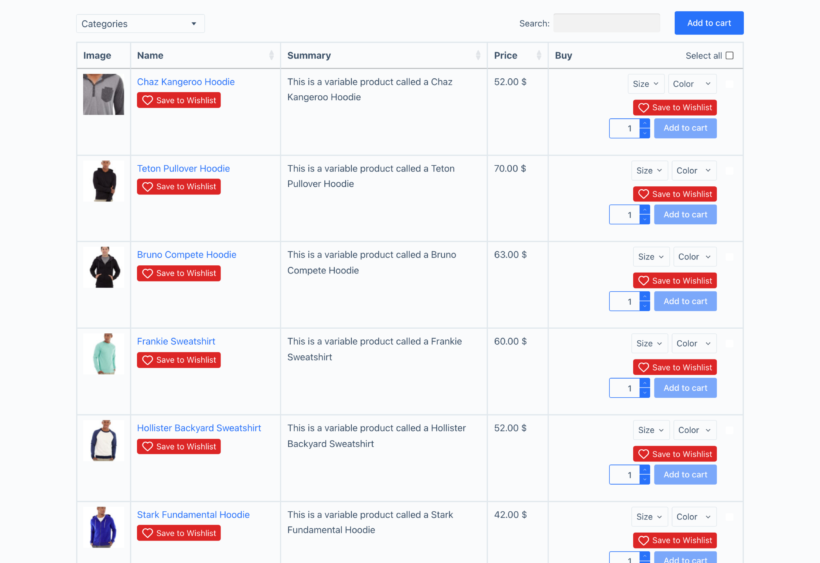
SaveTo Wishlist adds a "Save to Wishlist" button to each row of a WooCommerce Product Table, so customers can save products for later without opening each product page. The button sits in the product-name column, above or below the product name.
This guide explains what the integration does, what you need to use it, and how to control the button.
What the integration does
When both plugins are active, SaveTo Wishlist adds its standard wishlist button to the product-name column of your product tables. Customers can save any product straight from the table while they browse, compare and sort rows.
Saving a product adds it to the customer's wishlist without changing the table, the cart or the product itself. The button is added per row, so each product is saved individually.
What you need
To use the integration, you'll need all of the following installed and active:
- WordPress 5.8 or newer.
- WooCommerce 4.0 or newer.
- SaveTo Wishlist (free) 1.1.0 or newer.
- WooCommerce Product Table.
Your table must include the product-name column, because that's where the button is inserted. There's no separate connection process: once SaveTo Wishlist detects WooCommerce Product Table, the integration is available automatically.
Setting up the integration
- Install and activate WooCommerce, SaveTo Wishlist and WooCommerce Product Table.
- Add a product table to a page using the shortcode or the 'Product Table' block, making sure it includes the product-name column.
- Go to SaveTo Wishlist → Settings → Button Placement & Styles.
- In the 'Shop Page' section, make sure 'Button Placement' is not set to 'Don't show'.
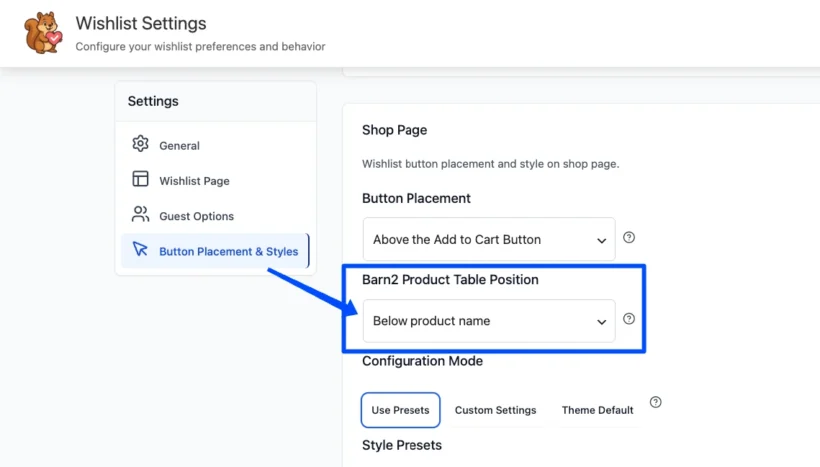
- Set 'Barn2 Product Table Position' to 'Above product name' or 'Below product name'.
- Configure the button design under the 'Shop Page' settings, and choose your confirmation behavior under SaveTo Wishlist → Settings → General.
- View the page with your table and test an item while logged in. If guest wishlists are enabled, test it again while logged out.
Choosing where the button appears
The 'Barn2 Product Table Position' setting decides whether the button sits above or below the product name. The default is 'Below product name'. You'll find it under SaveTo Wishlist → Settings → Button Placement & Styles, in the 'Shop Page' section. This setting only appears when SaveTo Wishlist detects WooCommerce Product Table.
Styling the button
The table wishlist button uses SaveTo Wishlist's 'Shop Page' button configuration, so it matches the wishlist buttons elsewhere on your shop pages. Choose 'Use Presets', 'Custom Settings' or 'Theme Default' under SaveTo Wishlist → Settings → Button Placement & Styles, in the 'Shop Page' section.
With 'Theme Default' selected, the button takes its appearance from your active theme rather than SaveTo Wishlist's own colors and sizing.
Confirmation behavior
When a customer saves a product, SaveTo Wishlist follows the 'Add to wishlist button' behavior set under SaveTo Wishlist → Settings → General:
- RedirectThe customer is sent to your configured wishlist page.
- PopupA confirmation popup appears over the page.
- FadeThe button changes to confirm the save, with no redirect.
Logged-in customers and multiple wishlists
Logged-in customers save products to their account wishlist. If you've enabled multiple wishlists, the standard list selector appears so they can choose which wishlist to save to. If a product is already saved, the button shows your configured "selected" state.
Guest wishlist support
Logged-out visitors can use the table button too, as long as guest wishlists are enabled. This is controlled under SaveTo Wishlist → Settings → Guest Options with the 'Disable Guest Wishlist' setting.
Leave 'Disable Guest Wishlist' switched off to allow guests to save products. Turn it on to hide the button from logged-out visitors, in which case only logged-in customers see it. The multiple-list selector is not shown to guests.
Search and sorting
SaveTo Wishlist adds the button through WooCommerce Product Table's own product-name output, so the button stays in place when customers search or sort the table. The rows are loaded and redrawn using AJAX, and the button survives that.
Showing or hiding the button
The table button uses SaveTo Wishlist's 'Shop Page' visibility setting. To hide wishlist buttons from your product tables, set the 'Shop Page' 'Button Placement' to 'Don't show' under SaveTo Wishlist → Settings → Button Placement & Styles.
Troubleshooting
- The button doesn't appearCheck that WooCommerce, SaveTo Wishlist 1.1.0+ and WooCommerce Product Table are all active, that your table includes the product-name column, and that the 'Shop Page' 'Button Placement' is not set to 'Don't show'.
- Guests can't see the buttonGo to SaveTo Wishlist → Settings → Guest Options and check that 'Disable Guest Wishlist' is switched off.
- The 'Barn2 Product Table Position' setting is missingThis setting only appears when SaveTo Wishlist detects WooCommerce Product Table. Confirm the plugin is installed and active.
- The button is in the wrong placeUse 'Barn2 Product Table Position' to choose whether the button appears above or below the product name.
Frequently asked questions
Do I need SaveTo Wishlist Pro for this?
No. The Product Table integration is included in the free SaveTo Wishlist plugin from version 1.1.0. Pro and a separate add-on aren't required.
Does the integration add a separate wishlist column?
No. The button is added inside the existing product-name column, either above or below the product name. It doesn't add, remove or rearrange your table columns.
Do the wishlist buttons survive searching and sorting?
Yes. The button is added through the product table's own product-name output, so it stays in place after searching and sorting.
Can guests save products from the table?
Yes, as long as guest wishlists are enabled. If you turn on 'Disable Guest Wishlist', the button is hidden from logged-out visitors.