Adding delivery and collection to your restaurant ordering system
WooCommerce Restaurant Ordering lists your food items in a quick one-page order form. Once customers have selected their foods and added them to the cart, the checkout process is provided by WooCommerce itself. This means that you can use all the amazing features which are built into WooCommerce, including letting customers order food for home delivery or collection.
This article explains how to add delivery and collection options. It also shows you how to allow customers to choose a time slot for delivery during your restaurant opening hours, for example using the WooCommerce Delivery Slots plugin.
Delivery zones
Many online restaurants offer home delivery within a specific area only, while allowing anyone to order food for collection or curbside pickup regardless of their location. You might have a free delivery radius and a paid delivery area. You can do all this using WooCommerce Shipping Zones.
For example, the below screenshot shows how you might set up shipping zones and delivery/collection options for a typical online restaurant:
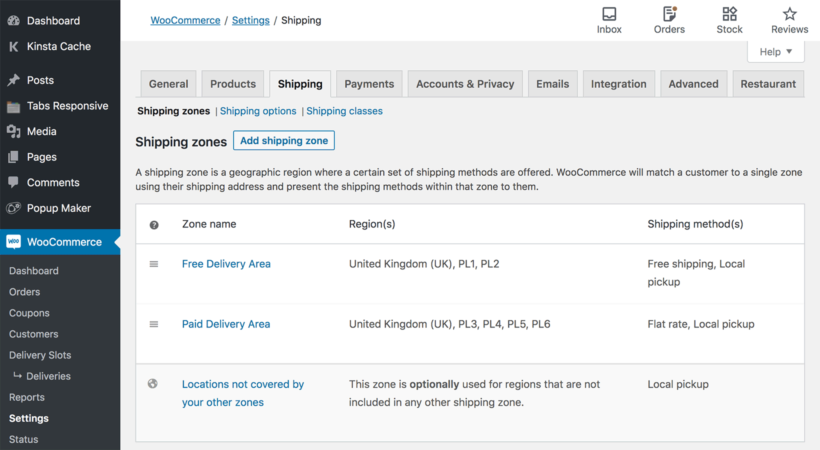
In this example, we created 2 WooCommerce shipping zones and added shipping options to each zone as follows:
- Shipping Zone 1 - 'Free Delivery Area' - This is used for customers in UK postcode areas PL1 and PL2, and gives a choice of free home delivery or local pickup.
- Shipping Zone 2 - 'Paid Delivery Area' - This is used for customers in UK postcode areas PL3-6, and gives a choice of paid delivery or local pickup.
- Other locations - Customers outside of the above locations can choose local pickup, but can not order food for home delivery.
For full setup instructions, please see the official WooCommerce.com documentation on Shipping Zones. We also have an in-depth tutorial about how to add local pickup to WooCommerce.
Delivery costs and free delivery
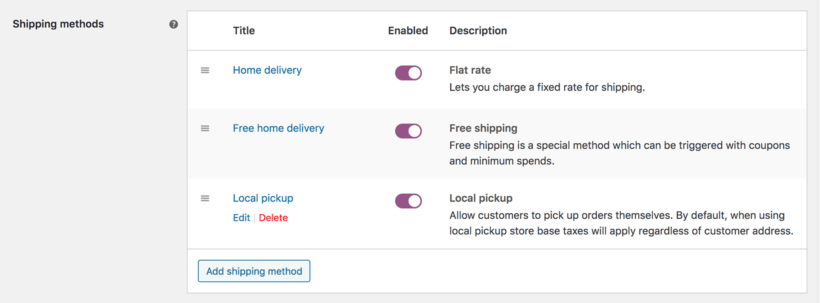
You can offer free delivery and set shipping costs by adding shipping methods to each zone. This allows you to do perform tasks such as charging for delivery, or offering free shipping for orders over a certain value.
WooCommerce provides a choice of delivery options:
- Flat rate - Use this for paid delivery.
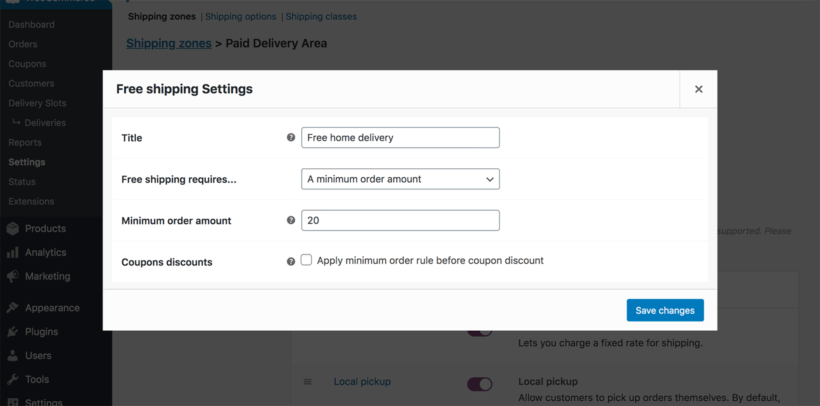
- Free shipping - You can offer this to everyone in the shipping zone, or select a minimum order value. Free shipping will only be offered when the cart contents are above the minimum value.
- Local pickup - Allows customers to avoid paying for delivery by collecting their food order from the restaurant.
Can customers choose a delivery or collection time slot?
Many online restaurants need a way for customers to choose when to receive their food delivery, or when they can collect their order from you in person.
To add these extra features, we recommend using one of the following plugins:
- WooCommerce Delivery Slots - use this if you want customers to be able to choose a delivery or collection slot before they start choosing food products, instead of just on the checkout.
- WooCommerce Opening Hours & Chosen Times - use this if you want to set different delivery and collection times per category (for example, for your lunchtime and evening menus).
Whichever plugin you choose, WooCommerce Restaurant Ordering provides the front-end food order forms, while the delivery plugin allows customers to choose a date and time slot when you are open.
See WooCommerce Restaurant Ordering with WooCommerce Delivery Slots in action on our demo site. Just add some foods to the cart, then proceed to the checkout to choose a slot during opening hours.
Instructions - WooCommerce Delivery Slots
- First, install and set up WooCommerce Restaurant Ordering.
- Next, get WooCommerce Delivery Slots and install it on your WordPress site.
- Go to WooCommerce → Delivery Slots and add your opening hours and available delivery and time slots. It's really flexible and there are lots of options:
- Choose which shipping methods the delivery slots are available for (e.g. delivery and collection).
- Add your opening hours, plus holiday dates.
- Set the maximum number of orders per slot in order to manage the capacity for your kitchen and delivery drivers.
- Add a minimum order fulfilment period (e.g. 30 minutes) to make sure the kitchen always has time to prepare the meal.
- Customers will see a calendar with a list of time slots for each day on the WooCommerce checkout page. If you'd like customers to choose a slot before they start selecting food products, then you can insert a table of available date and time slots using the shortcode
[jckwds].
Here are some suggestions of how you can add it alongside your WooCommerce Restaurant Ordering food order forms. Remember, you need the WooCommerce Delivery Slots plugin to do this:

- Option 1: Add a delivery reservation table to a pageYou can list all the available slots directly on a page, above the food order form. To do this, add
[iconic-wds-reservation-table]above the[restaurant_ordering]shortcode. - Option 2: List delivery slots in the sidebarTo reduce space, you can also list the delivery reservation table to a sidebar widget so that it appear next to the food order form. To do this, add the shortcode
[iconic-wds-reservation-table]to a 'Text' or 'Custom HTML' widget in Appearance → Widgets. - Option 3: Show delivery slots in a popupAlternatively, you can add a 'Choose a Delivery Slot' button which will display the delivery reservation table in a popup window. You can use any type of popup, but these instructions use the free Popup Maker plugin:
- Install Popup Maker.
- Add a button either above the
[restaurant_ordering]shortcode, or to a text widget. Your theme should provide a shortcode or CSS class for creating buttons. - Add the shortcode
[iconic-wds-reservation-table]to the popup. - To trigger the popup when clicking the button, add the CSS class
popmake-choose-delivery-slotto the button, replacing 'choose-delivery-slot' with the actual name of your popup. For example, if you were adding an HTML button using the class 'button' then you might add this to a HTML block or widget:
<a class="button popmake-choose-delivery-slot" href="#">Choose a Delivery Slot</a>
Instructions - WooCommerce Opening Hours & Chosen Times
- First, install and set up WooCommerce Restaurant Ordering.
- Next, get WooCommerce Opening Hours & Chosen Times and install it on your WordPress site.
- Go to WooCommerce → Opening Times and add your opening hours and available delivery and time slots. It's really flexible and there are lots of options:
- Choose what happens when the restaurant is closed. The options are:
- Allow the customer to place the order, but force them to choose a time slot when you are open (recommended).
- Allow the customer to place the order, but display a notice that the order will be fulfilled when the restaurant is next open.
- Prevent customers from placing an order while you are closed.
- Always force the customer to choose a time slot when ordering, regardless of whether the restaurant is open.
- Either add your opening hours and time slots globally, or offer different slots for each shipping method (e.g. delivery and collection).
- Add holiday dates or specific days of the week when you are always closed.
- Set the maximum number of orders per slot in order to manage the capacity for your kitchen and delivery drivers.
- Add a minimum order fulfilment period (e.g. 30 minutes) to make sure the kitchen always has time to prepare the meal.
- Choose what happens when the restaurant is closed. The options are:
- Customers will see a calendar with a list of time slots for each day on the WooCommerce checkout page.
Can customers check they're in the right area before they start ordering?
To avoid disappointment, we recommend making your delivery area clear to customers before they start selecting foods. There are several ways you can do this:
- Create a 'Delivery Area' page and link to it from your main navigation menu.
- If your restaurant ordering page has a sidebar, add a widget about the delivery area - either containing text or a custom Google map.
- Install the Delivery Area plugin and add a widget allowing customers to check whether you will deliver to them.