Can I password protect or hide the posts table?
There are several ways to restrict access to the tables that you have created using Posts Table Pro. You can either protect the overall page containing the table, or individual posts within it. It is even possible to show different posts to different people.
Hide the page containing the posts table
There are several easy ways to hide the page where you have added the table. For example:
 You can mark the page where you have added the table as private. By default, private pages only appear to logged in Administrators and Editors but you can use a plugin such as User Role Editor to make private pages available to other user roles too.
- Instead of making it available to logged in users, you could password protect the page.
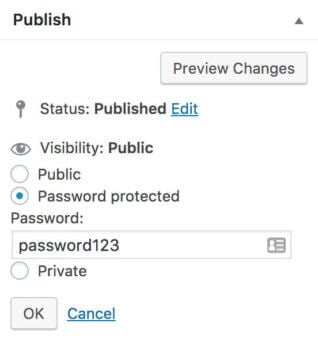
How to create password protected or private pages in WordPress
You can password protect pages or mark them as private using the visibility options in the Publish section at the top right of the add/edit page screen.
This will protect the page containing the table, but it will not product the individual items within in it, so people could still access them directly. Keep reading for instructions on how to hide the items within the table.
Restrict access to the posts in the table, or specific categories
If you want to hide individual items, categories etc. then it’s safer to use our Password Protected Categories plugin. Put all the items from your table within one or more categories, and protect the category so that only specific people can see them.
The plugin offers 3 types of protection:
- Password protection - Hide the category and its posts so that they are only visible to people who have entered the password.
- User role protection - Restrict the category to logged in users with a specific role only.
- Individual user restriction - Make the category and its posts available to specific logged in users only.
On the Password Protected Categories plugin settings page, you can choose whether the posts are actually hidden from the table until the protected content is unlocked; or whether to display them in the table to everyone but require a password to access the single post page.
Setup instructions
- Install the plugin and activate your license key from the order confirmation email.
- Go to the 'Add/Edit Category' page for the post type that you are displaying using Posts Table Pro (e.g. Posts → Categories).
- Edit one of the categories that you want to restrict access.
- Change the visibility to 'Protected' and choose one of the following options:
- Password protected - set one or more passwords which can be used to unlock the category. Once you've done this, create a central login page and add the shortcode
[category_login]. - Roles - select which user roles should access the posts within the category. By default, you can choose from all the default WordPress user roles. You can easily create additional roles (e.g. a 'Staff' role) with the free User Role Editor plugin.
- Users - select individual user accounts who should be able to see the category and its contents.
- Password protected - set one or more passwords which can be used to unlock the category. Once you've done this, create a central login page and add the shortcode
- Repeat steps 3 and 4 for any other categories that you want to restrict. (You don't need to do this for sub-categories where you have already protected the parent category because they will automatically inherit the same protection as the parent category.)
Tips on structuring the private document library
- Hiding all the posts in the table - Create a main parent category and add as many sub-categories as you like. Use the instructions above to protect the main category, and the sub-categories will inherit its protection.
- Hiding specific categories only - Protect each category that you want to hide from public view, while leaving the rest set to 'Public'.
- Showing different items to different people - Choose a different type of protection for each category. For example:
- You may create one set of categories restricted to the 'Staff' user role and a separate category for the 'Management' user role.
- To create a user-specific client portal, create a category for each client and restrict it to their individual user account. Alternatively, if you don't want to create an account for each person then use the password protection option and simply give them the password.