The management of restaurants are now being significantly impacted by the world of technological improvements. Given that the majority of people spend a significant portion of their days online, restaurants have enormous market potential. In fact, customers who frequent restaurants are more interested in buying food online. Restaurant managers and owners are constantly looking for ways to make it easier for consumers to order meals online and have it delivered quickly.
Most restaurant owners are setting up a restaurant delivery website to stay in business and give a neck to neck competition to others owners. The good news is that you can create a food delivery website in WordPress in a few simple steps.
One of the key benefits of setting up your own restaurant delivery website is that you don’t have to rely on third-party food delivery service providers and food delivery apps like Grubhub, Uber Eats, Postmates, or Doordash. Instead, you can start taking online orders for your own local restaurant and keep 100% of your profits.
In this tutorial, we’ll explain how you can create a restaurant delivery website using the WooCommerce Restaurant Ordering plugin. You can also watch this video to see how it's done.
How to create a restaurant delivery website in WooCommerce
To create a food delivery website, you’ll need a WordPress website with the WooCommerce plugin installed. You’ll also need the WooCommerce Restaurant Ordering plugin to set up your online menu and take orders online.
It's much more cost-effective than signing up with a third-party food delivery service provider like Grubhub, Uber Eats, Doordash, or Postmates.
Step #1: Add food items as WooCommerce products
The first thing you need to do is to add menu items to your restaurant delivery website as WooCommerce products.
We recommend organizing food items into different categories the way you would if you were creating a menu for your physical restaurant.
For example, your categories might be:
Starters
Main Courses
Desserts
Drinks
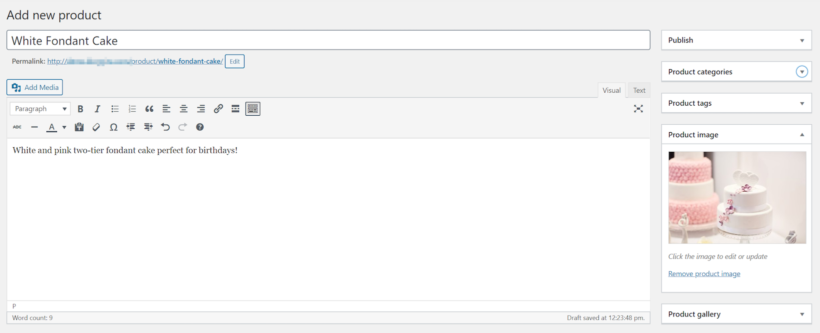
Once you’ve created the categories, simply add each food item as an individual WooCommerce product. Enter its title, description, category, and image, and then fill out the Product data section to set the price and (optionally) variations and other options.
Step #2: Install WooCommerce Restaurant Ordering on your WordPress website
The WooCommerce plugin automatically creates shop pages with its own layout for displaying products or, in this case, food items. However, this isn’t ideal for a restaurant delivery website. Instead, you can use the WooCommerce Restaurant Ordering plugin to list your online menu in a one-page order form.
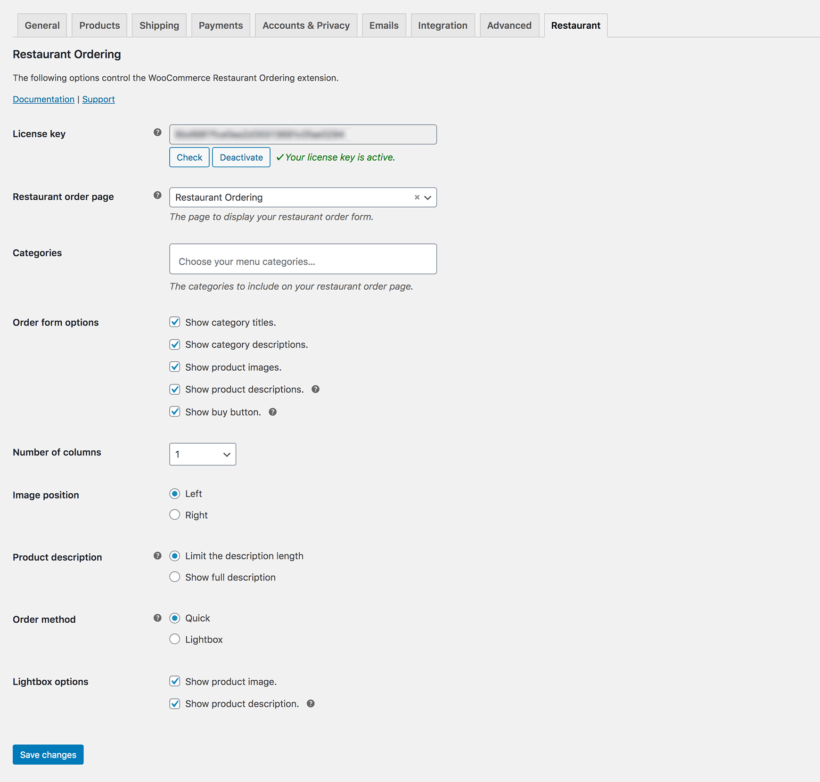
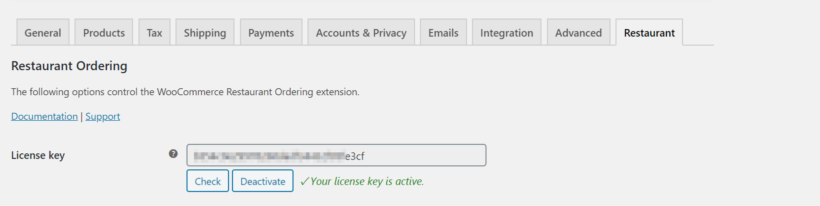
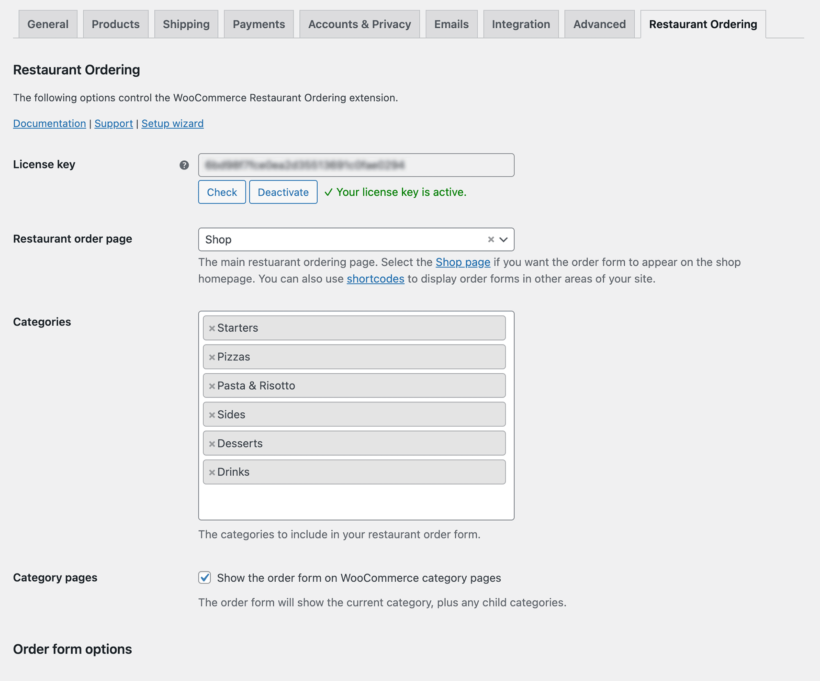
Head over to WooCommerce → Settings → Restaurant from the WordPress admin panel and enter your license key. You can choose the default settings for your restaurant food ordering forms from the same screen. Also add opening dates and times if you want to prevent people from placing orders while you're closed.
Here's how it works:
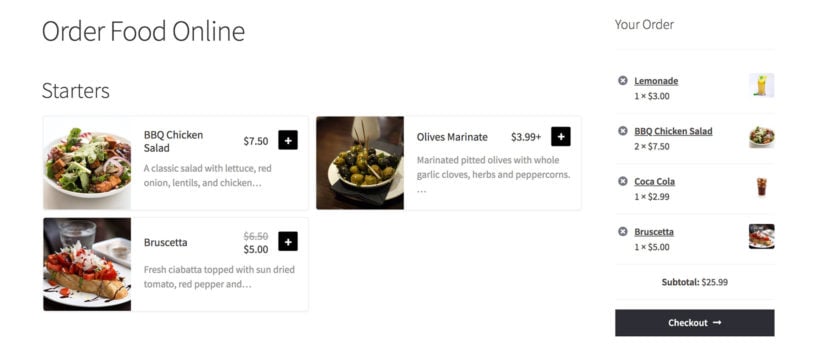
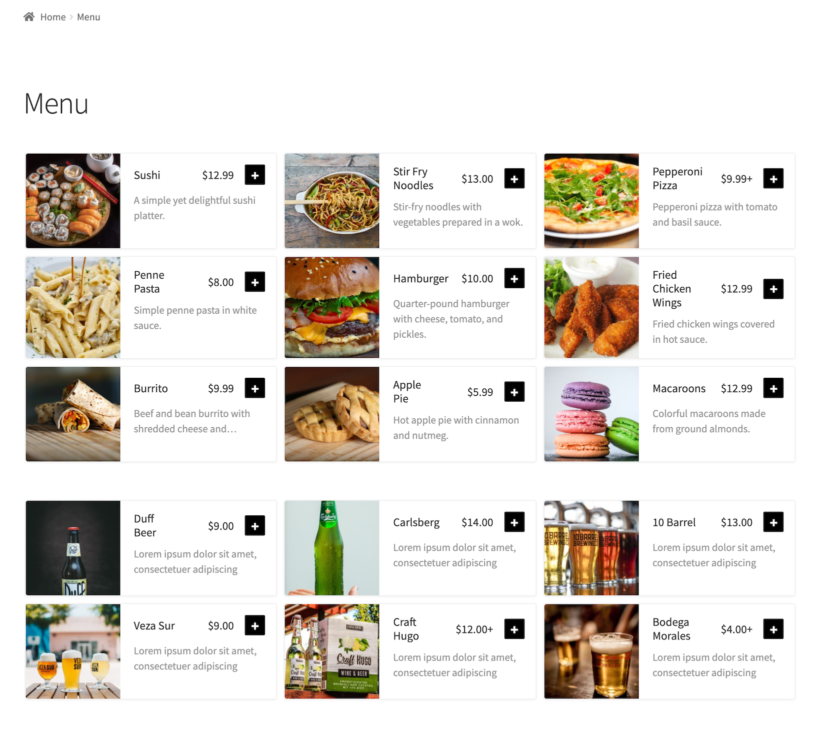
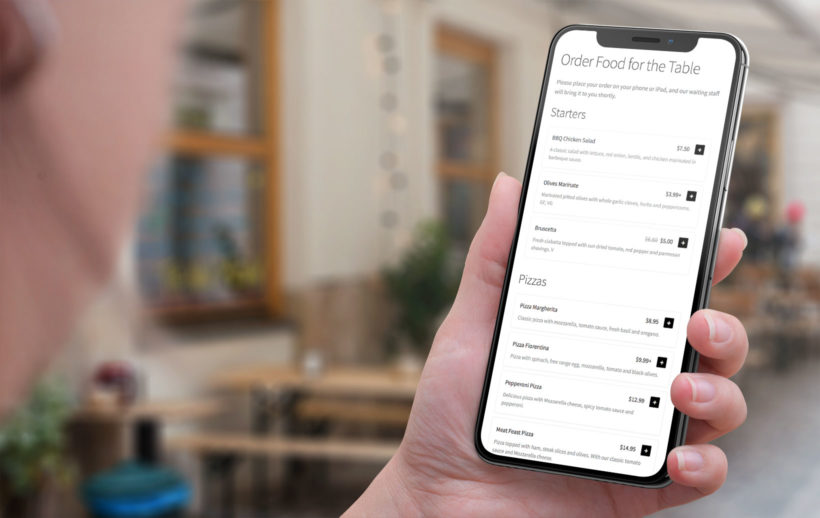
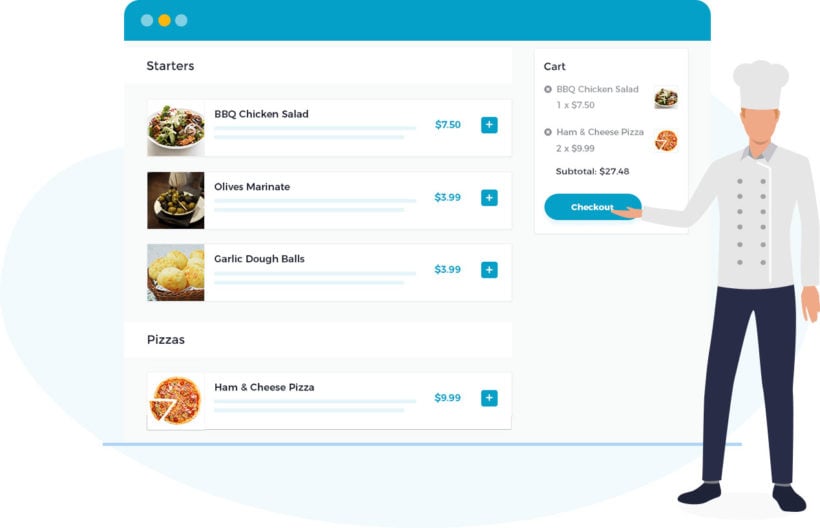
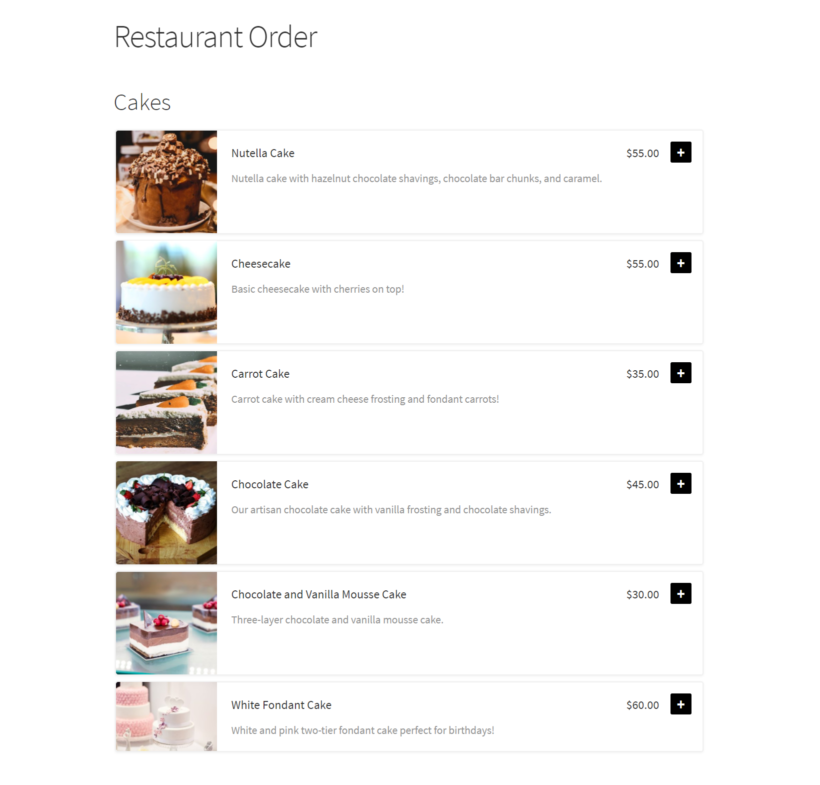
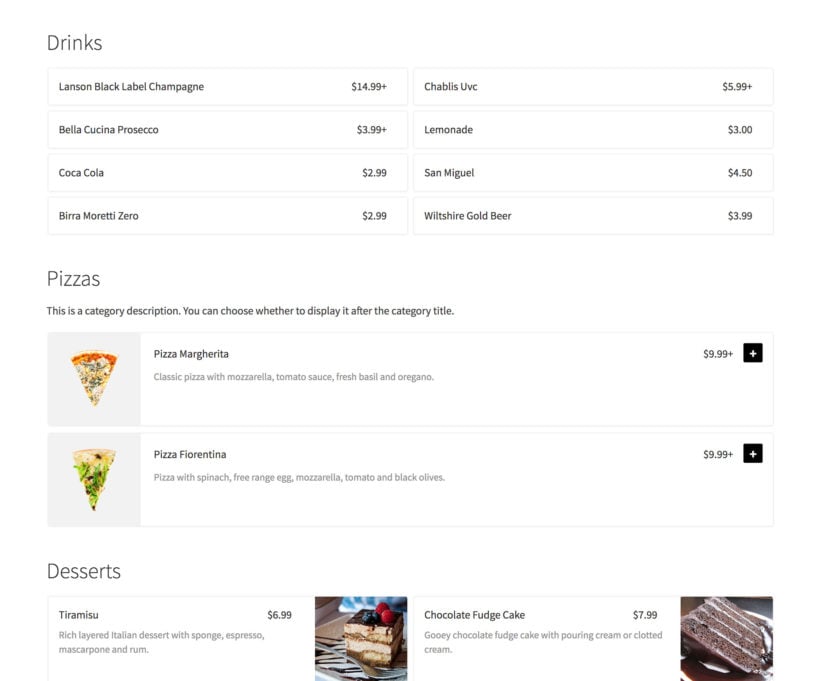
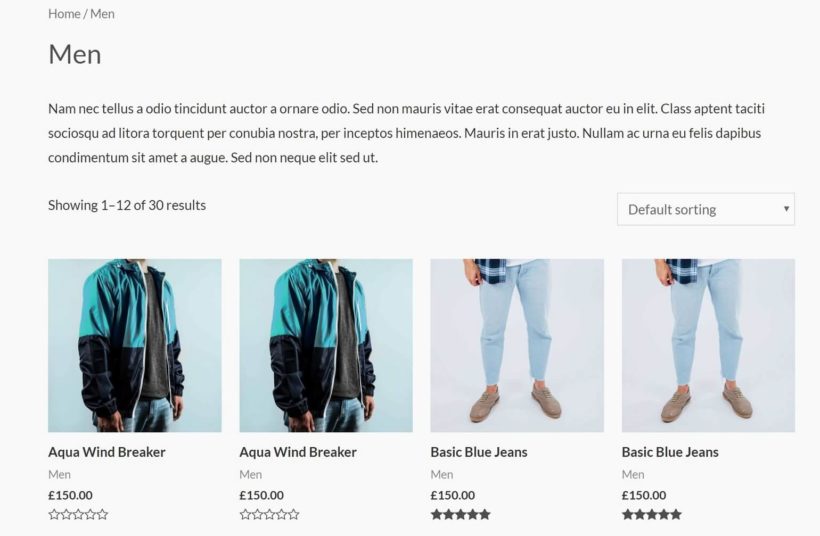
The WooCommerce Restaurant Ordering plugin automatically creates a food order form for you. If you preview your food delivery website on the front-end, it should look something like this (depending on your settings):
The food items are listed in a menu-style format with images, descriptions, and pricing information.
Optionally, you can create separate food order forms for different categories instead of listing all of them on one page. You can also create a section for Special Offers.
The easiest way to do this is by adding the [restaurant_ordering] shortcode to a page and using the shortcode options to choose which categories to include on that page.
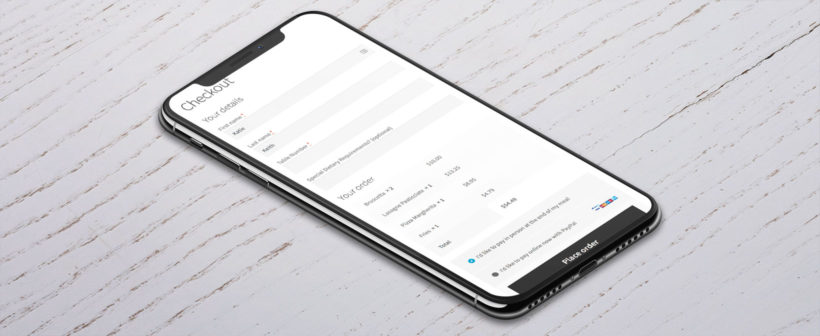
Customers can simply place their order online and then proceed to the checkout page.
Step #3: Set up delivery and collection
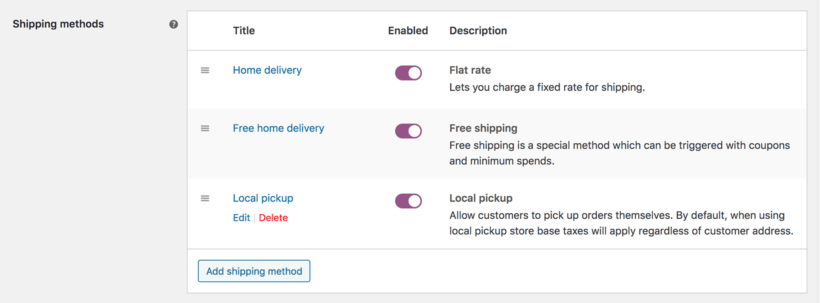
One of the biggest advantages to using WooCommerce to power your restaurant delivery website is that it has options built-in for delivery and collection. To configure these settings, simply head over to the WooCommerce → Settings → Shipping section of the WordPress admin.
For example, you can create shipping zones for the areas you offer deliveries to. Let’s say you want to offer free shipping to areas close to your restaurant and charge for areas further away. You can set up two shipping zones in WooCommerce. And, if you want to offer collection or takeout option, all you have to do is set up a third shipping zone that gives customers the option to collect their orders from the restaurant.
The WooCommerce plugin also lets you offer delivery options for each shipping zone you create. You can use these options to set up free home deliveries if the order value is above the minimum spend, charge for deliveries on orders less than the minimum spend, and offer local pickup.
To keep things simple, you can integrate a GPRS printer with your restaurant delivery website to automatically print orders in the kitchen in real-time. For this, we recommend using the WooCommerce Automatic Order Printing plugin. It offers seamless integration with WooCommerce Restaurant Ordering.
Alternatively, you can receive an SMS notification of new orders instead of printing orders to the kitchen. Our best advice is to use the SMS Alert Order Notifications plugin. You can also use the Twilio SMS Notifications plugin to send customers an SMS when their order is ready. This is especially useful if you want to offer local pickup options. Keep in mind that you’ll need to ask for the customer’s phone number at checkout if you want to offer this service.
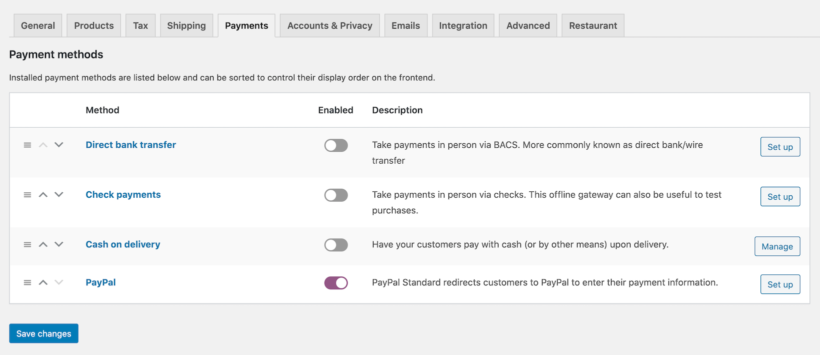
Step #5: Offer online or offline payments
The WooCommerce plugin lets you set up various payment options. If you’re just getting started and want to offer online payment options, choose PayPal Payments Standard and enter your PayPal email address. In addition to this, you can also accept credit or debit card payments without using PayPal. For this, you would simply select Stripe and follow the setup instructions.
You can also offer offline payments (such as Cash on delivery) which are particularly useful for restaurant delivery websites. This way, your delivery drivers can collect payments from customers. This way, you can rival online food delivery service providers like Grubhub, Uber Eats, Doordash, and Postmates.
Start accepting online orders today
By setting up your own restaurant delivery website in WordPress you can start accepting online orders and keep 100% of the profits. This is much better than going with an online food delivery service provider like Grubhub, Uber Eats, or Postmates. The WooCommerce Restaurant Ordering plugin makes it easy to get started with a step in the right direction.
Once you’ve set up your restaurant delivery website, there are plenty of ways to enhance the customer’s shopping experience, for example, by setting up delivery and collection and offering online payment options in your online ordering system.
Ready to set up your restaurant delivery website and make it easier for customers to order food? Get the WooCommerce Restaurant Ordering plugin today.
By the time you’ve read this article, you’ll know exactly how to set up PayPal for food orders. Your customers will be able to order food using PayPal, just like with hosted services such as Grubhub, Just Eat and UberEats - but with you in control.
Over the past few years, mobile payments have been very popular, and this trend is anticipated to continue as more businesses use this technology. This implies that more restaurants have started accepting cash-less food orders in coming years. Restaurants that set up online food ordering systems have seen a huge increase in takeaway orders! Restaurants are now having to make permanent changes to stay in business longer-term. Online food orders are an important part of this.
Of course, customers LOVE PayPal because it's so easy and they can pay for food orders from their mobiles.
So, how can a restaurant like yours set up online ordering with easy PayPal payments?
By the end of this FREE guide, you’ll walk away knowing EXACTLY:
What you need to set up online orders for your restaurant with PayPal payments just like Grubhub, Just Eat or Uber Eats.
How to set up all of the components without any technical knowledge or experience.
How to do all of this EVEN if you don’t have a website yet!
And the best part? We’ll show you how to automate the whole process.
Why PayPal alone is a terrible way to sell food online
If you’ve used PayPal to accept payments for your products or services, you probably already know that it’s not the best way to sell food online.
The problem with using PayPal for food orders is that you have to log into your PayPal account to create each PayPal payment button individually. After creating the buttons, you paste them on your website. This doesn’t look professional and makes for a terrible user experience.
Further, PayPal doesn't provide a shopping cart system that lets customers order multiple food items at once. This is a major problem since most people need to order more than one food item at a time!
From a back-end perspective, you won’t receive any sort of ‘new order’ notification or customer emails if you use PayPal alone for food orders. You will only receive basic payment notifications from PayPal which may get mixed up with other PayPal emails.
You also miss out on analytics and sales reporting features (like Google Analytics) as well as the ability to integrate with other systems, such as opening hours, delivery slots or the printer in your restaurant’s kitchen.
But what if you could set up PayPal for food orders just like Grubhub - without any of these problems?
The solution – Build a WordPress WooCommerce website for selling food online
A WordPress website with the free WooCommerce plugin is a far better way to sell food online and accept payments via PayPal. The best part is that you can enhance your site’s core functionality using specialized plugins, like WooCommerce Restaurant Ordering. This makes it even easier to showcase your food items and allow customers to place orders.
The WooCommerce plugin offers seamless integration with PayPal as standard, in a much better way than if you were to use PayPal alone to let customers place orders as we described earlier.
It’s incredibly easy to set up. As a result, you can start letting customers order food with PayPal today!
Plus, this is mobile-responsive, which means it will work seamlessly on iOS and Android devices without requiring customers to download a mobile app first.
Setting up PayPal payments for food orders
If you don’t already have a WordPress website set up with the WooCommerce plugin installed, check out this complete guide on how to get started.
Once you’ve set it up and added some food items as WooCommerce products, come back to this tutorial to learn how to set up PayPal payment options for food orders.
Step #1: Get the WooCommerce Restaurant Ordering plugin
Go to WooCommerce → Settings → Restaurant and enter the license key in the License key field.
Click the Save changes button at the bottom of the screen to continue.
Step #2: Customize your restaurant food order form
The WooCommerce Restaurant Ordering plugin automatically creates a front-end food order form for you once you activate the license key. However, you can customize the food ordering page in a variety of different ways.
For example, you can set the restaurant order page, select which product categories to showcase in the food ordering form, set the number of columns, choose an order method, and much more. You can also add your opening hours and prevent PayPal food orders from coming in while you're closed.
Based on your configuration settings, your food order form might look something like this:
Customers can click the (+) icon to add food items to their shopping cart and proceed to checkout.
Step #3: Set up PayPal payments
Now that your restaurant food ordering form is set up, the final step is to start accepting payments for food orders via PayPal. For this, head over to WooCommerce → Settings → Restaurant from the admin area.
Next, enable the PayPal payment method option and click the Set up button to start setting it up. Enter your PayPal email address in the PayPal email field. You can also configure other settings on the same screen based on your preferences.
Click the Save changes button to proceed.
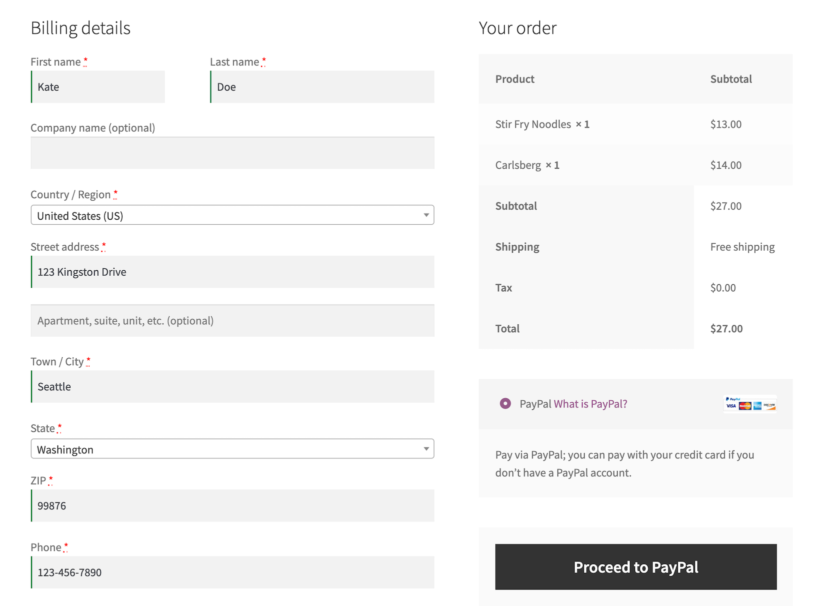
When customers proceed to checkout, they'll be able to make pay for food orders with PayPal:
That's it! Now, you can let customers place food orders and accept payments through PayPal.
Adding extra features to your PayPal-powered food ordering system
The great thing about using WordPress and WooCommerce to set up your PayPal-powered food ordering system is that you can add extra features to it using plugins. For example, you can set up food delivery slots and printing solutions that print orders straight to your restaurant’s kitchen.
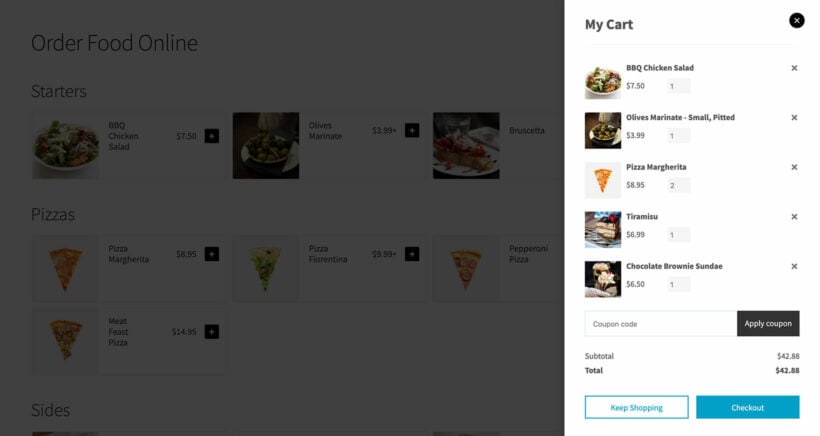
Popup cart and checkout
The WooCommerce Restaurant Ordering plugin lets customers add their food items to the cart from one page. However, WooCommerce itself still takes customers through multiple pages in order to complete their order.
To speed up the cart and checkout, install WooCommerce Fast Cart. This adds an instant floating cart to the page as soon as the customer adds products to their cart. They can then review their selections, enter their details and pay from directly in the popup.
WooCommerce Fast Cart is fully compatible with the WooCommerce PayPal Checkout Payment Gateway. This lets you add PayPal Checkout buttons to the popup cart, making it even easier for customers to 'Buy Now' and place a PayPal food order.
Delivery time slots
The WooCommerce Delivery Slots plugin lets customers choose a delivery time slot for their food delivery orders similar to Eat24 Food Delivery. This makes it easy to manage food orders, especially on high-traffic days.
For example, the WooCommerce delivery slots plugin gives you the option to restrict the number of food order bookings in each time slot. In addition to this, you can set how far in advance customers should place their food orders before their delivery or takeout time slot. You can also decide how many food orders to accept within each food delivery time slot so that the kitchen doesn’t exceed capacity.
The plugin also lets customers book a delivery time slot before they add food items to their cart in order to avoid disappointment at the checkout page. This is especially useful for local restaurants that want to let customers order online and offer food delivery services.
Print orders to the kitchen
There are a variety of WordPress plugins available that let you send new food orders straight to the kitchen and print them for staff. This is possible with the WooCommerce Automatic Order Printing plugin.
Want to set up online ordering for your restaurant with PayPal payments in 30 minutes?
This plug-and-play solution was specially designed to help stop restaurants from going out of business during the Coronavirus pandemic. PayPal food orders are now essential as part of the ongoing order management of any restaurant.
You can use the WooCommerce Restaurant Ordering plugin to set up your online food ordering system and accept payments via PayPal, credit card, or debit card just like Grubhub or Dominos. No technical knowledge is required:
Plug-&-play setup for the plugin.
FREE tutorial showing you every step and every click you need to do (absolutely no way to get it wrong).
Technical support is available if you need any help
30-day money-back guarantee. Love it or get a full refund, 0 risks.
The complete guide to dine-in restaurant ordering - let customers use their phones to order food straight from their table.
As restaurants adapt to the new requirements around social distancing, it's essential to minimize direct contact with customers. An increasingly common way is to allow customers to order food from their mobile phones from their table while they dine-in. This is safer and more convenient than taking orders in person.
This tutorial will teach you how to set up food ordering for dining-in at your restaurant. The system can be hosted on any WordPress website. You can use it to allow customers to order food for dinging in from the table and have their orders sent straight to the kitchen. Staff can also use it to take online POS orders on behalf of your customers.
Are you looking for a restaurant ordering where customers order food for home delivery? Then check out our home delivery tutorial!
What you need
For this tutorial you will need:
A website powered by WordPress. If your restaurant already uses WordPress for your main website, then you can add the mobile food ordering system to your existing site.
The free WooCommerce plugin to add e-commerce features to your website. This includes the ability to add your food menu, and for customers to place their orders.
The WooCommerce Restaurant Ordering plugin. This plugin lists your food products on a page for customers to order from. It looks similar to your traditional printed menu, making it easy for customers to select their foods while they dine-in.
The Checkout Field Editor plugin. This allows you to simplify the WooCommerce checkout, removing irrelevant fields such as the food delivery address, and adding extra fields for table number and dietary requirements or allergies.
Once you've set up the food ordering system in this tutorial, customers can use their cellphones to order food from the table like this:
Your customers arrive at the restaurant and sit at the table.
One member of the party uses their phone or tablet to order food for the table. They do this by viewing the dining in food ordering page on your website. They select their food and drink from a quick one-page order form, and then proceed to the checkout.
They enter some basic information on the checkout and choose whether to pay online or at the end of their meal. Finally, they enter any extra information such as their table number or allergies.
Once the food is ready, the waiting staff bring it to the table or leave it in a safe place for the customer to pick up.
At the end of the meal, if the customer hasn't paid online then you can give them a bill in the usual way.
1. Add products to WooCommerce
The first step is to add each food item from your printed menu as a WooCommerce product. To do this, go to Products → Add New and add all the required information. This would typically include the product name, a short description, a price, and possibly an image.
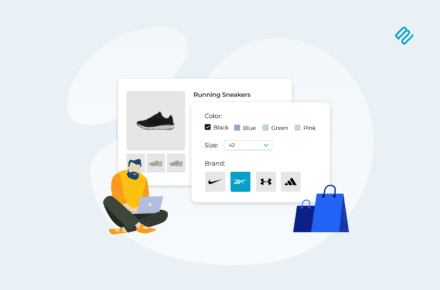
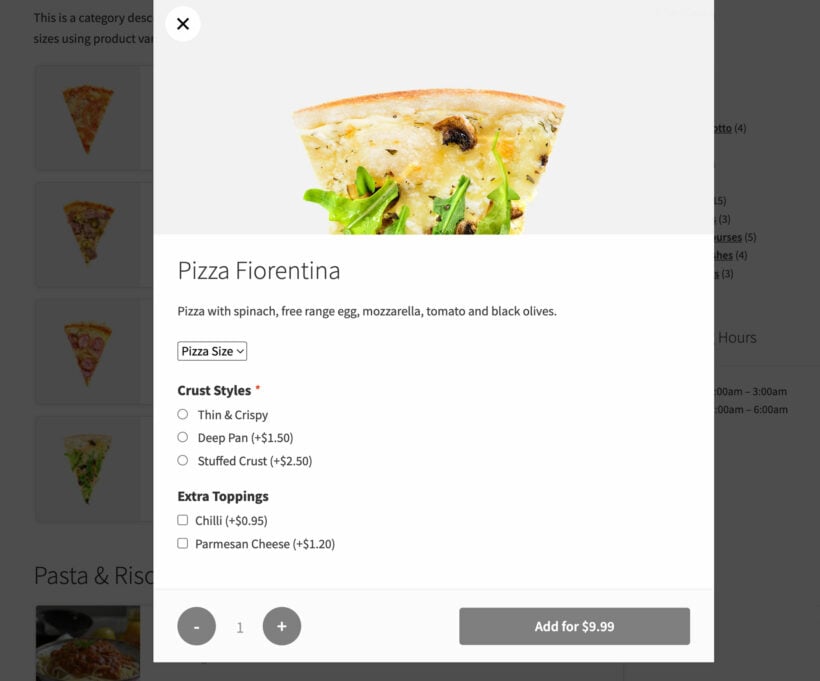
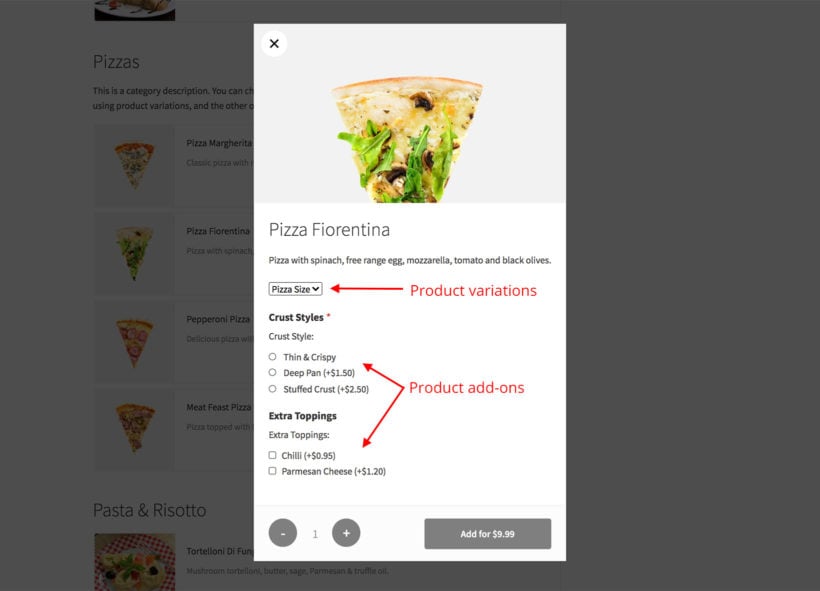
If you offer a choice of options for particular items, you can add these as product variations or product add-ons:
Use variations for dishes that come with a fixed set of options, such as Small, Medium, Large.
Use the Product Options extension for dishes where the customer can select from a list of several options. This might include pizza toppings where the customer can add multiple options, each of which will add to the price.
Customers can choose extra options from a lightbox
Structure your menu into categories
Go to Products → Categories and create the categories that you'd like to structure the mobile food order form into. This should generally be the same as the categories on your printed menu - e.g. Starters, Main Courses, Desserts, etc. Then add each food product to the correct category.
2. Create a one-page food order form
To create your order form page:
Go to Pages -> Add New in the WordPress admin dashboard. Give your page a title, then click Publish.
Next, go to WooCommerce → Settings → Restaurant. Under the Restaurant order page option, select the page you just created.
Under Categories, select the product categories to show on your restaurant order page.
You can drag and drop the categories to change the order. The settings page also includes options to show or hide certain information in the menu, select the number of columns to display, etc.
Save the settings, then open your Restaurant Ordering page on your website to se if everything looks correct. It should look something like the following:
An example of a food order form
3. Customize the WooCommerce checkout
The WooCommerce checkout is generic and not designed specifically for taking food orders. To make it perfect for ordering restaurant food at the table, I recommend adding some extra fields and hiding others. You can easily do this with the Checkout Field Editor plugin.
Install the plugin and use it to hide any fields that aren't needed. I'd recommend hiding fields such as the customer address. Since customers are ordering from their cellphones, make the checkout as simple as possible.
You may also want to add some extra fields. The most important ones for ordering food to be delivered to the table are:
Table number or location (e.g. inside or outside).
Any dietary requirements or allergies.
Payment methods
You also need to choose how customers who order food on cellphone will pay for their order. There are two main options:
Pay online when they place their orderYou can use any of the payment gateways supported by WooCommerce to let customers pay when they place their order. This is good for social distancing, while saving you time taking payment at the end of the meal. The easiest payment option to set up is PayPal - it's great for customers as there's less information to enter. For credit card payments, I recommend Stripe which supports all major credit cards, debit cards, Apple Pay, etc. Set up your payment gateway under WooCommerce → Settings → Payments.
Pay at the end of the mealYou can keep it simple and give customers a printed bill at the end of their meal. They can then pay using your restaurant's existing payment methods (e.g. cash or using your credit card machine). Alternatively, if you want the payment to go through to the website ordering system then you can use a card reader that links with the website. There are 2 main options for this:
If you're in the US and Canada then you can use WooCommerce In Person Payments to order a card reader and take credit card payments from customers.
Finally, you need to communicate how to order food from the table to your customers.
There are various options here. One way is to print an instructions sheet and put it on each table, telling customers how to order. This should include the URL (web address) of the food ordering page, for example www.myrestaurant.com/dine-in.
An example QR code
You could also include a QR code which customers scan from their phone. The QR code links directly to your order page, so gives access without having to type in URLs.
The easy way to take food and drink orders from the table
As you can see, it's surprisingly easy to set up your own online food ordering system so that customers can use their cellphone to send food orders straight to the kitchen. It promotes social distancing by minimizing direct contact between waiting staff and hungry customers.
By the end of this article, you’ll walk away knowing exactly how to sell food online from home.
It’s no secret that the online food industry is booming. You might be thinking of starting your own food business to sell food online from home. For this, you’ll need a website that lets customers browse your menu and place their orders.
If you’re in a similar situation, then don’t worry! This in-depth guide will teach you how to sell food online from home in a few simple steps:
Set up your small startup food business website using WordPress and WooCommerce.
And the best part? We’ll show you step-by-step how to sell food online from home. It’s incredibly quick and easy and there is absolutely no technical knowledge required to follow this tutorial. This means that you can set everything up and start selling food online from home today!
Introducing WooCommerce Restaurant Ordering
WooCommerce Restaurant Ordering is a WordPress plugin that makes it easy for small food businesses and mom and pop style shops to start selling food online from home. The plugin lets you create an intuitive, front-end food order system complete with a food order form. It’s the easiest way to start selling food online from home.
You can add simple food products or add variations and extra product options to your food ordering system. For example, if you sell pizzas, you might want to give customers the option to select the size or extra toppings. You can also add text boxes for dietary requirements or allergens, or for letting customers add notes like Hold the pickles!.
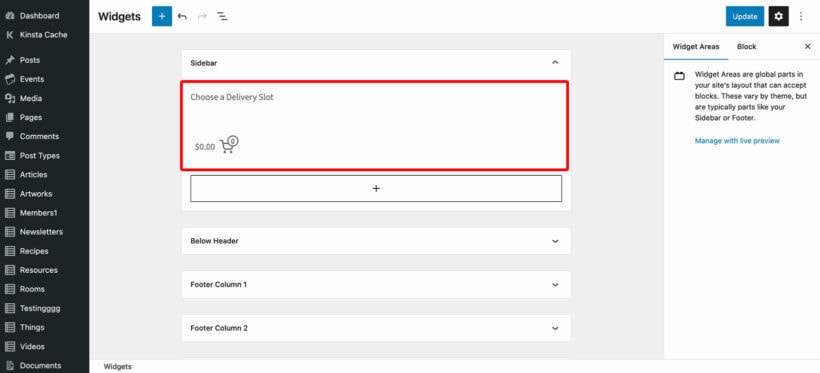
In addition to this, you can add a sidebar to your food ordering page that contains information about the customer’s cart. This is a great way to give patrons and customers a quick overview of their order before they proceed to the checkout page.
The WooCommerce Restaurant Ordering plugin is designed to help small food businesses deliver an exceptional user experience through their website and better manage customer orders in WooCommerce.
How to sell food online from home using WooCommerce Restaurant Ordering
Here, we’ll walk you through a step-by-step tutorial on how to sell food online from home. You might also like to sign up to our free online course, which has even more advice and tips:
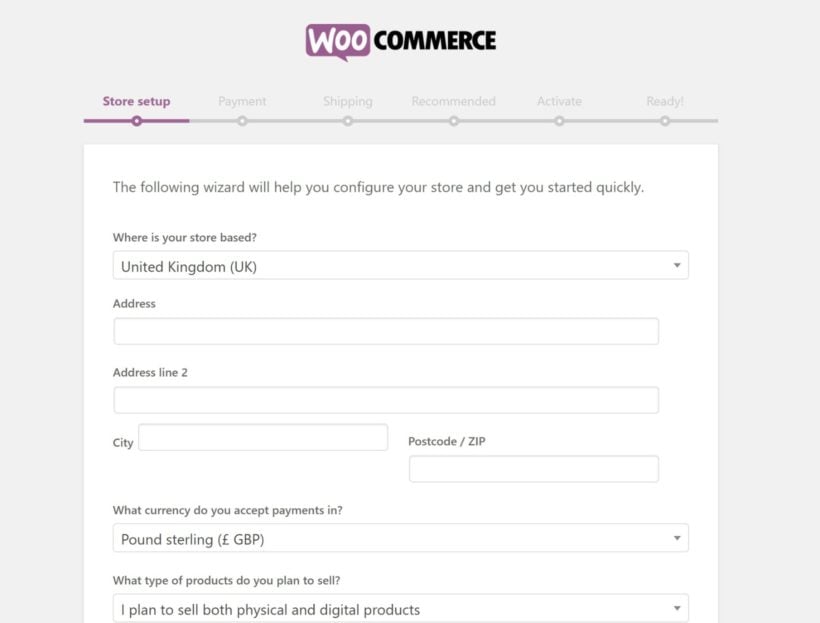
Step #1: Set up WordPress and WooCommerce
If you’re just getting started then chances are you don’t already have a website set up. So, the first step is to choose a hosting provider for your food business website. Our best advice is to go with Kinsta, but you can use any hosting provider.
Next, you’ll need to install WordPress and WooCommerce (an e-commerce platform to set up your online store) on your website. If you choose to go with Kinsta, the team will install the WordPress content management system for you. However, if you’d like to take the DIY approach, we recommend checking out these helpful articles:
Once you’ve set up your basic WooCommerce-powered food business website, you can set up your basic food ordering website by installing a WordPress theme. And once your basic website is set up, come back to this tutorial for details on how to start selling food online from home.
Step #2: Add food items as WooCommerce products
Now that your WordPress site is set up, it’s time to add food items to it as WooCommerce products. To do this, head over to Products →All Products from the WordPress admin panel and click the Add New button.
Next, enter the following information for each food item you want to sell through your food business website:
Click the Publish button to proceed. Add all of the food items to your food website in the same way. You can also add food variations and extra options.
Step #3: Get the WooCommerce Restaurant Ordering plugin
Get the WooCommerce Restaurant Ordering plugin and install and activate it on your WordPress website. You’ll receive the plugin’s license key in an order confirmation email.
From the WordPress dashboard, head over to WooCommerce→Settings→Restaurant and enter the license key in the License key field. Click the Save changes button at the bottom of the screen to continue.
Once you activate the license key, the WooCommerce Restaurant Ordering plugin automatically creates a Restaurant Order page for you. You can access this by going to Pages→All Pages from the WordPress dashboard.
If you preview the page on the front-end of your website, it should look something like this:
Next, we’ll show you how you can configure the plugin’s settings to customize the food ordering page.
Step #4: Configure the plugin’s settings
To configure the WooCommerce Restaurant Ordering plugin’s settings, head over to WooCommerce→Settings→Restaurant from the admin area.
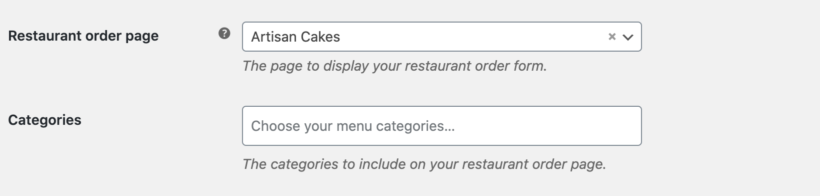
Food order page
The Restaurant order page dropdown lets you choose the page to display the food order form on.
You can leave it as is or select a new page if required. The WooCommerce Restaurant Ordering plugin adds the shortcode [restaurant_ordering] to whichever page you select.
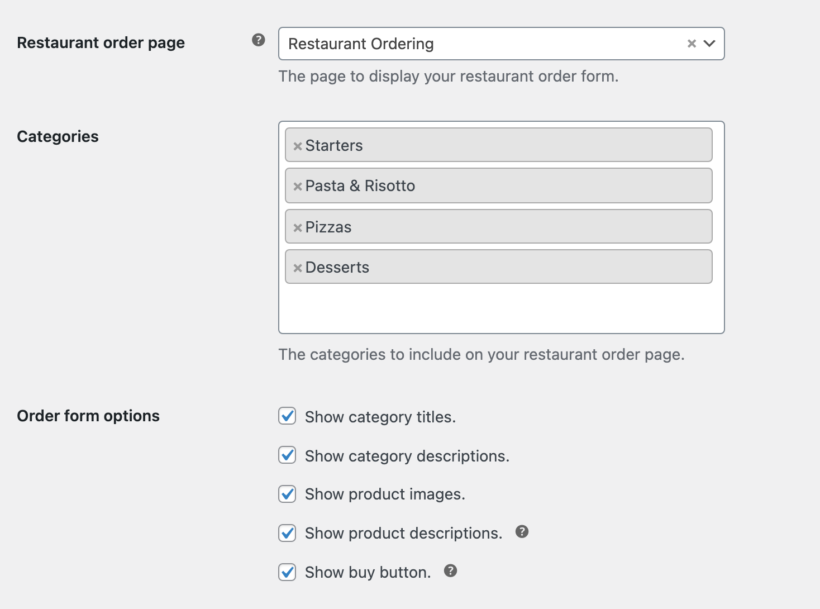
Categories
By default, the food ordering plugin lists products from all of your product categories on the food ordering form. You can use the Categories option to add the product categories you’d like to include in your food order form.
You can organize different types of food under a separate category. If you have multiple product categories selected, you can drag and drop them to change the order in which they’re listed on the front-end.
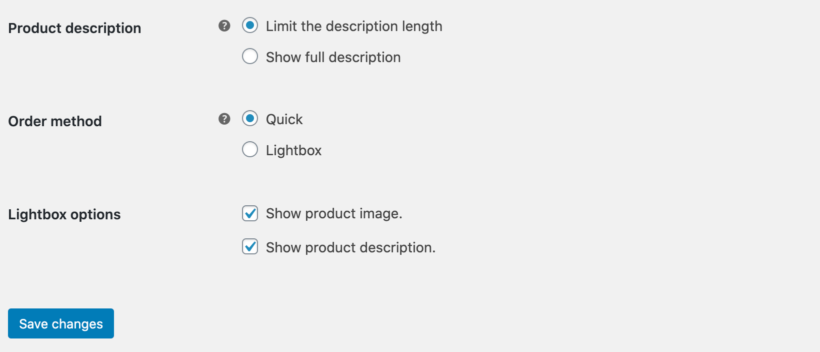
The Order form options setting lets you select the information you’d like to display in your food order forms. You can choose to display:
Category titles
Category descriptions
Product images
Product descriptions
Buy button
Order form options
If you’re selling products from a single category (e.g. only Cakes), you can untick the checkbox next to the Show category titles and Show category descriptions option.
However, if you’re selling products from multiple product categories, we recommend leaving all of the checkboxes ticked.
Number of columns
The Number of columns option lets you choose how many columns to display food items in on the front-end. This is particularly useful for online food businesses that sell a variety of food items.
It’s also a great way to enhance the look and feel of your food order form and make it more like a real-world menu.
Order method
We recommend going with the Quick order method option to let customers quickly add food items to their cart and place their order.
If you’re selling food items with variations or extra product options, the WooCommerce Restaurant Ordering plugin will automatically display a lightbox to let customers select options.
Lightbox options
Ideally, you want to display both the product image and full product description in the lightbox. We recommend leaving both checkboxes ticked.
Step #5: Preview the food ordering system
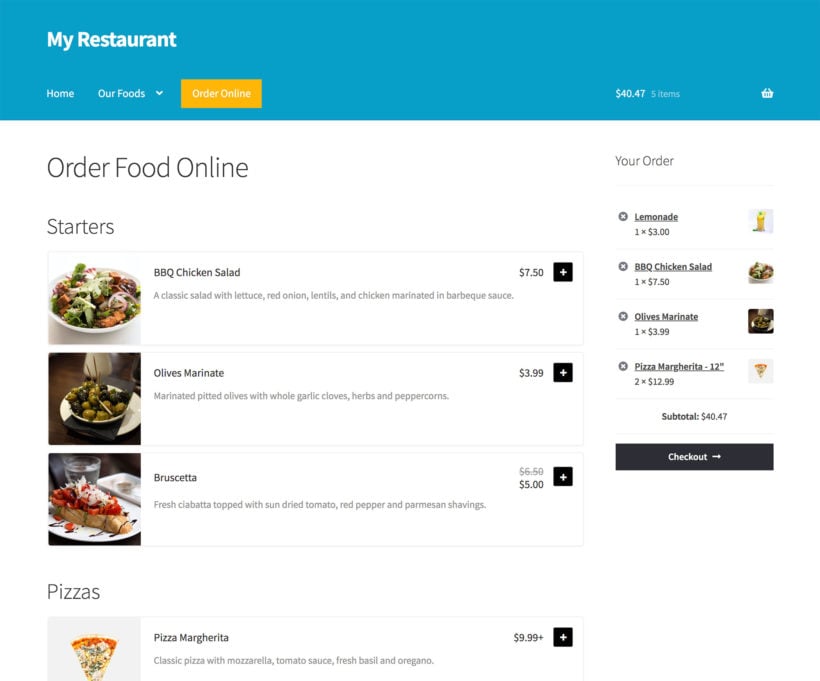
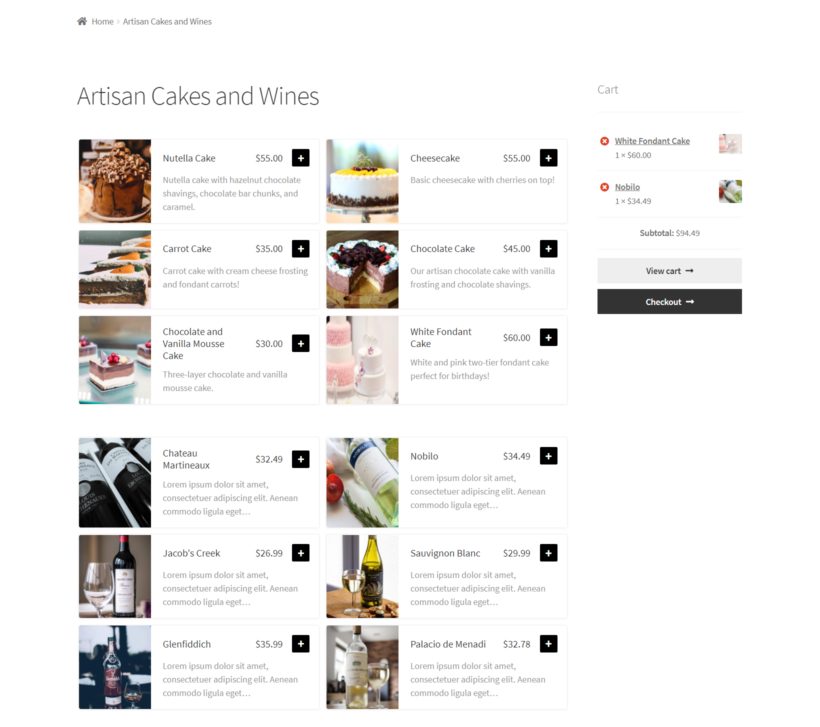
Once you’ve configured the WooCommerce Restaurant Ordering plugin’s settings, you can preview the food ordering system on the front-end. It should look something like this:
To further enhance the customer’s shopping experience, we’ve added the WooCommerce cart widget to the sidebar. This way, customers can preview their orders before proceeding to the checkout page.
The WooCommerce Restaurant Ordering plugin lets you list products in a quick, one-page food ordering form. The rest of the checkout process is provided by WooCommerce. This means that you can use WooCommerce’s built-in options to let customers order food for home delivery.
We recommend setting up WooCommerce delivery zones to offer food delivery options within a specific area only. This is much easier to manage (especially when you’re just getting started) than offering country-wide shipping options.
To take things further, you can set up a free delivery area and multiple paid delivery areas. All of this is possible with WooCommerce Shipping Zones.
Lots of small food businesses sell foods that are also perfect as gifts. Some examples of food gifts include chocolate brownies, food hampers, or gourmet marshmallows.
These are equally perfect for special occasions like Mother’s Day, Father’s Day, Valentine’s Day, and birthdays as well as for situations where you’re looking for a gift that isn’t too personal, for example, for a coworker.
To sell food gifts through your small food business website, you can use the WooCommerce Opening Hours & Chosen Times plugin to allow customers to choose an exact delivery date. This helps them rest assured that the food gift arrives at the exact right time!
You can also use the Checkout Field Editor plugin to add a Gift message field to the WooCommerce checkout. To take things further, you can create any additional fields such as a checkbox to let customers mark the order as a gift so that you don’t include any price information with their order.
Bonus tips
As a new food business owner, there are many things you’ll need to think about before you can start selling food from home.
For example, it’s a good idea to check out your local legislation (e.g. the FDA) and cottage food laws to see whether you need to apply for a business license, food licensing, or a food hygiene certificate. Food safety and kitchen inspection laws vary from state to state. You should be able to find out most of this information through Google.
In addition, we recommend checking out shipping rules (e.g. labeling requirements) for perishable items. For example, let’s say you’re based in New York, United States, and want to accept cross-border orders. You might want to check to see if you’re allowed to send gourmet marshmallows to your patrons and customers in Toronto, Canada.
Sell food online from home in less than 30 minutes!
Selling food online from your home kitchen or commercial kitchen is a great way to launch a small business and generate income through food sales. All you have to do is set up your small food business website, create a menu, and start accepting orders!
The WooCommerce Restaurant Ordering plugin can help you sell food online from home by creating a one-page food order form. You can then promote your food store on social media to spread the word. We encourage you to try it out for yourself!
You get a:
Plug-and-play setup for the plugin.
In-depth documentation (absolutely no way to get it wrong).
Technical support is available if you need any help.
30-day money-back guarantee. Love it or get a full refund, 0 risk!
WooCommerce Restaurant Ordering, the ultimate food order system for WordPress, is now available. We’ve built it during the coronavirus lockdown to help restaurants make the switch to taking orders online. Keep reading to discover how the plugin can help your restaurant, and where to get it.
Across the world, the COVID-19 pandemic forced thousands of restaurants and food outlets to close their doors. Suddenly, they were only allowed to sell takeaway food or offer home delivery. Dining in and ordering at the table, bar or counter were no longer an option.
Since then, restaurants have been trying to adapt to a new way of life. To meet social distancing guidelines, tables must be spaced further apart, and fewer customers can receive table service. This has a big impact on restaurants’ profit margins, as it reduces capacity while running costs remain the same.
But the good news is that there is a way to stay profitable. The solution is to set up online ordering for your restaurant so that customers can order food remotely for home delivery and/or collection.
Why we built a WooCommerce restaurant plugin
Ever since we launched our WooCommerce Product Table plugin in 2016, it has been hugely popular with restaurants wanting to sell food online. It lists restaurant foods in a space-saving table layout, with quick ‘add to cart’ boxes that are ideal for ordering food. However, we didn't design it specifically for selling food, and it has many features that restaurants don’t need.
We’ve looked at how restaurants use WooCommerce Product Table to sell food online, and have used this information to design the perfect WooCommerce restaurant plugin. The result is WooCommerce Restaurant Ordering, released today!
We designed WooCommerce Restaurant Ordering specifically for restaurants. It has all the features you need, with no unnecessary complexity. As a result, it loads ultra fast and is incredibly easy to set up.
As well as being the best WooCommerce restaurant plugin on the market, it's much better than any other way of selling food online:
Unlike building a bespoke system, it's quick to set up and you don't need to hire a developer.
Unlike using third party food ordering systems such as Deliveroo or Uber Eats, you keep 100% of your profits while owning your data and staying in control.
How it works
Before you install WooCommerce Restaurant Ordering, you should have a WordPress website with WooCommerce installed. Add the foods from your restaurant menu as products (either as simple products, or products with variations or add-on option fields). Structure your menu into product categories, e.g. Starters, Mains, and Desserts.
When you install the WooCommerce restaurant plugin, it automatically creates a 'Restaurant Ordering' page which lists all your foods, divided by category:
You can either start taking restaurant orders online straight away, or you can customize your food order forms on the plugins settings page. For example, you can choose which food information to display, re-order the categories, and change the layout.
Add your opening hours so that customers can only order food while you're open.
The WooCommerce restaurant plugin also comes with a shortcode for listing foods in other locations on your website. This is useful if you want to list different categories on different pages or tabs.
As a WooCommerce restaurant plugin, WooCommerce Restaurant Ordering works with the delivery options that are built into WooCommerce itself. These make it easy to create delivery areas and add delivery and collection options, with or without costs.
The plugin is also designed to work with the WooCommerce Delivery Slots plugin. This is ideal if you want customers to be able to pick an exact time slot for home delivery or collection.
Start taking food orders online today!
We hope the new WooCommerce restaurant plugin helps restaurants and other food businesses to connect with their customers online.
Quick plug-and-play setup.
Full documentation, with guidance on every aspect of selling food online.
FREE video tutorial showing you every step (there's absolutely no way to get it wrong!).
Technical support is available if you need any help.
30 day money back guarantee. Love it or get a full refund, zero risk.
The possibility for virtual eateries or "ghost kitchens" has dramatically grown as internet usage has increased. Fortunately, you can set up and run a virtual restaurant in WordPress quickly and easily.
In this complete guide, you will learn how to build your own virtual restaurant website, which you will own 100%. This will save you lots of money compared to using a hosted restaurant ordering system such as Uber Eats, Grubhub, or DoorDash.
We’ll show you how to set up a virtual restaurant in WordPress using the WooCommerce Restaurant Ordering plugin. It only takes 10 minutes and by the time you're done, your virtual restaurant site will look something like this:
What is a virtual restaurant?
Most people place an emphasis on both quality and convenience. These are services that a virtual restaurant can easily offer if it is set up on the appropriate principles and adheres to the suggested procedures for serving its customers. At times, this has been the only way to keep their business running and continue trading.
A virtual restaurant (also called a ghost kitchen, ghost restaurant, or cloud kitchen) is a restaurant that offers delivery options only. Generally speaking, virtual restaurant services are facilitated through web apps and third-party delivery companies like the Postmates food delivery app. However, you can also create a virtual restaurant website with WordPress and WooCommerce.
This restaurant concept is hugely popular in most large cities like New York, Los Angeles, and Chicago. Kitchen United, for example, is a popular virtual kitchen and restaurant brand.
This foodservice business model allows restaurateurs to cut down on traditional expenses that come with offering a dine-in experience. In fact, adapting the virtual restaurant or ghost kitchen approach helped several restaurant businesses stay operational during the global coronavirus crisis. Now it's here to stay.
How does a virtual restaurant work?
Customers can go to the restaurant’s website to view menus and place their orders online. Once a customer places their order, the virtual restaurant kitchen is immediately notified, and kitchen staff begins preparing the order.
The establishment then delivers the food directly to the customer or uses a third-party food delivery service to deliver the meal to the customer’s location. Some virtual restaurants offer both online payment options and cash on delivery. Once the food is delivered, patrons can enjoy it in their own dining room.
Benefits of online-only restaurants
As compared to the traditional restaurant business model, virtual restaurants have their own set of benefits.
For starters, restaurant owners can mitigate the costs associated with finding an ample restaurant space with room for dining in and instead use that budget to create a kitchen that focuses on improving food preparation processes. Additionally, you can also opt for a shared kitchen setup.
In addition to this, virtual restaurant owners can change their menu items whenever they’d like. This is especially useful if a particular ingredient becomes unavailable or is temporarily inaccessible. This also means that you can experiment with your menu and swap out dishes that aren’t popular with your customer base.
Not to mention, studies indicate that customers favor home-delivery dining options, which makes a strong case for setting up a virtual restaurant.
Types of food that sell best from virtual restaurants
One of the key benefits of running a virtual restaurant is that you can use the wealth of dynamic customer data available to you to your advantage. For example, you might search for the different types of foods and meals that sell best from virtual restaurants and pizzerias in your area on Google.
Here are some popular examples:
Chinese and Japanese food – sushi, noodles, spring rolls
Pizza – make your own pizza with different toppings and crust sizes
Mediterranean food – shawarmas and Greek salad
Fast-casual food – burgers, sliders, wraps, fried chicken, and fries
How to set up and run a virtual restaurant
The first thing you need to do is set up an attractive, easy-to-use website for your virtual restaurant complete with an order form and delivery slots.
For this, we recommend using WordPress and WooCommerce, so you have full ownership of your virtual restaurant website. This isn’t possible with a hosted solution like Uber Eats, Deliveroo, and Just Eat.
If you don’t already have a WordPress website, you’ll need to choose a hosting company to make your website available to patrons. We recommend going with a reliable web hosting provider like Kinsta.
Once that’s done, we’ll show you how to set up a virtual restaurant using the WooCommerce Restaurant Ordering and WooCommerce Delivery Slots plugins. Together, these fantastic plugins provide everything you need to build a WooCommerce virtual restaurant.
Here’s a complete video tutorial you can follow:
Step #1: Create your virtual restaurant website
If you don’t already have a WordPress website set up, you’ll need to create one on a hosting account. We recommend Kinsta as they’re a managed WordPress host that’s perfect for running a website for your virtual restaurant.
The best part is that you can install WordPress directly from your Kinsta account. Once you’ve entered your domain name, location, and site title, you can configure your login credentials and install WooCommerce to enable e-commerce features.
The WooCommerce Setup Wizard is incredibly intuitive and walks you through the process of setting up e-commerce features for your virtual restaurant website. Since you’ll be offering food delivery options, it’s important to configure your shipping zones and delivery areas carefully.
If you deliver food to a single area and charge the same delivery costs then you only need to create one shipping zone. However, if you’re going to deliver food to multiple areas and charge different costs depending on the area, you’ll need to create multiple shipping zones.
WooCommerce lets you choose from three different delivery options including flat rate, free shipping, and local pickup.
Later, I'll also show you how to add delivery slots and opening hours for your virtual restaurant.
Step #2: Add a food menu
The next step is to add each food item as an individual WooCommerce product. To keep things organized, start by creating different categories for your menu items similar to how you’d do it on a paper menu. For example, your categories might be Starters, Main Courses, and Desserts.
Once that’s done, head over to Products →Add New from the WordPress admin panel to add each food as a product. At the bare minimum, you should enter a title, brief description, image, and price of the food item. Select the appropriate category for the food item. Consider adding nutritional information and allergens to the product description.
If you’re thinking of selling make your own pizzas or need a way to offer a choice of options for a dish, you’ll need to create a variable product or add-on fields. Variations let customers choose from a dropdown, whereas add-ons are great for selling optional extras such as pizza toppings or sandwich fillings.
Customers can choose variations and add-ons from a lightbox
Step #3: Create a food order form using WooCommerce Restaurant Ordering
To let customers place orders, you’ll need to create an order form using the WooCommerce Restaurant Ordering plugin. You’ll receive the plugin files and license key in an email.
Install the plugin to your WordPress website and activate it.
Next, head over to WooCommerce→Settings→Products→Product table from the WordPress dashboard and activate the plugin license.
Now, go through the different settings available with the WooCommerce Restaurant Ordering plugin to configure your food order form. This includes adding opening hours. You can ignore these if your virtual WooCommerce restaurant is open 24/7. But if you only want to accept orders while you're open, then this is a must.
Control your virtual restaurant order system on the plugin settings page
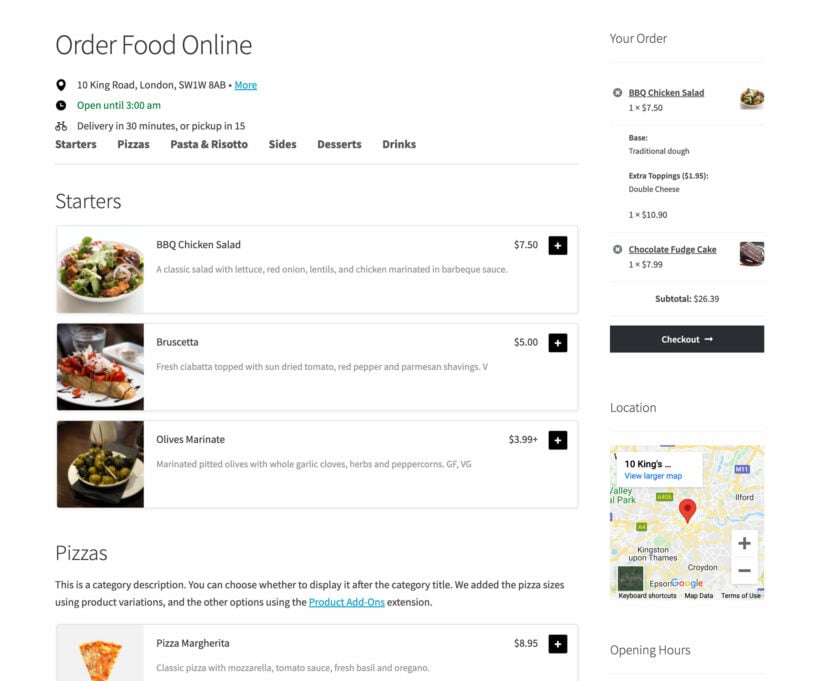
Finally, go to the list of Pages in the WordPress admin and find the page called 'Restaurant Ordering'. Rename this to whatever you like, e.g. 'Order Food Online'. This page lists all the food products that you added in step 2, divided by category:
Your main restaurant ordering page is created automatically
If you'd rather list different categories on different pages, then you can do that using the restaurant ordering shortcode.
Use the shortcode if you need different settings for each category
Add a cart
Most virtual restaurants display a cart on the food ordering page. This shows the items in your order and makes it easy to click through to the checkout.
The easiest way to do this is to add a sidebar to the restaurant ordering page. Most themes come with page templates that include a sidebar. You can then go to Appearance → Widgets and add the 'Cart' widget to the sidebar.
If you don't want a sidebar and prefer to keep your page full-width, then you can add a floating popup cart using the WooCommerce Fast Cart plugin.
Add a floating side cart with WooCommerce Fast Cart
Step #4: Set opening hours and delivery times
If you’re offering food delivery options at your virtual restaurant, you’ll need an easy way to manage customer expectations and delivery orders. You can do this with the WooCommerce Delivery Slots plugin.
Once you have the Delivery Slots WordPress restaurant plugin installed and activated on your website, go to WooCommerce →Opening Hours to configure your opening hours, delivery dates and time slots. Here are some of the main features you’ll want to use for your virtual restaurant site:
Delivery dates and time slots – You can add delivery slots based on the way you choose to structure food deliveries.
Maximum number of deliveries per time slot – This option lets you better manage kitchen capacity by adding a limit to the number of delivery orders per slot.
If you’re looking for ways to keep your restaurant running with minimal costs, consider setting up a virtual restaurant (or ghost restaurant) that serves solely as a delivery base or offers takeout. You can do this whether you have a physical restaurant or not. Virtual restaurants are hugely popular in the restaurant industry.
Start by installing the WooCommerce plugin on your WordPress website. Next, add food items as individual products in WooCommerce. Finally, use the WooCommerce Restaurant Ordering and WooCommerce Delivery Slots plugins to create a front-end order form with a table of available delivery time slots.
Ready to set up your virtual restaurant and grow your bottom line? Get WooCommerce Restaurant Ordering today!
Uber Eats is certainly a convenient way for restaurants to offer online delivery... but it also charges 20-30% of every order! In this post, you'll learn how to get the best of both worlds by using WordPress and WooCommerce to create your own restaurant ordering system to act as an Uber Eats alternative (or a Just Eat alternative, Gloriafood alternative, Deliveroo alternative, GrubHub alternative... it's up to you!).
The techniques in this article will let you create a seamless restaurant ordering system that you 100% own yourself. It will be user-friendly and work on any device (even smartphones), but you can cut out those pesky middlemen and stop letting your already thin margins get eaten up by commissions. Instead, your entire system can cost as little as ~$34 per month no matter how many orders you get.
Here's an example of what you'll be able to build without requiring any special technical knowledge:
Online food order system powered by the WooCommerce Product Table plugin instead of Uber Eats
Your customers will be able to browse your entire menu and order food for delivery or for takeout.
Ready to build your own Uber Eats alternative with WordPress and WooCommerce? Let's dig in…
Why WordPress + WooCommerce make a great restaurant ordering system
If you're not familiar with WordPress and WooCommerce, here's a quick introduction:
WordPress is 100% free, open-source software that's by far the most popular way to make a website. According to W3Techs, WordPress powers over a third of all websites.
WooCommerce is a free extension for WordPress that adds full-service ecommerce features to WordPress. WooCommerce is the most popular way to make an ecommerce store.
While you won't be using WooCommerce to create a "traditional" ecommerce store, all of the features that it adds are also what you need to create your own Uber Eats alternative for free online ordering. You can also use other extensions to customize it to meet your restaurant's needs.
The important thing about this combination is that you 100% own everything. As a restaurant owner, you're not beholden to someone else's audience and you won't have to pay any commissions.
You can run your own promotions, grow your own email and marketing lists...you get the idea - it's yours.
Additionally, your online ordering platform will work on any device - laptop, tablet, smartphone, etc.
While the biggest benefit is avoiding those 20-30% commissions that other online ordering software charges, there's also a ton of value in owning your own platform.
For example, this New York Times article does a great job illustrating how Grubhub and other delivery companies can cannibalize existing local restaurants' own delivery business - so an order that would've been commission-free in the past suddenly comes with a commission.
What you need to use WordPress as an Uber Eats alternative
To create your own restaurant ordering system and Uber Eats alternative with WordPress, you won't need any technical knowledge, but you will need a few tools to help you get the job done:
Hosting + Domain Name - this is what powers your Uber Eats alternative. (We recommend Kinsta hosting.)
WordPress - the free open-source software that powers 34%+ of all the websites on the Internet.
WooCommerce - the free open-source ecommerce extension that's the most popular way to create an ecommerce store.
WooCommerce Restaurant Ordering - an easy-to-use plugin that extends WooCommerce to create a food menu and restaurant ordering system.
We'll also mention some other optional extensions that you might want to use to enhance your food ordering website.
How much does an Uber Eats Alternative cost?
Your online ordering system will not be free, but the important thing to remember is that it's a flat cost. Whether you have 100 orders or 500 orders, you're never going to pay any more.
Here's the bare minimum cost:
Hosting - ~$300 year (paid annually)
Domain name - ~$10 per year
WooCommerce Restaurant Ordering - $99 per year
So at the very low end, you can get by for ~$400 per year, or just ~$38 per month. Compared to Uber Eats' 20-30% service fee, that's incredibly cheap for your entire online food ordering system!
What about mobile ordering apps? Do you need a mobile app?
The restaurant ordering system that you'll build in this tutorial is 100% responsive. Essentially, that term means that your Uber Eats alternative will automatically adapt based on each visitor's device and allow for mobile ordering.
So whether your visitors are on their smartphone, tablet, desktop, or other mobile device, your restaurant ordering system will still work great. And it also means your visitors won't have to install yet another food delivery app just to order from your restaurant.
How to create your own Uber Eats alternative: Step-by-Step
In this video, watch Sam from Barn2 create a food ordering system in just 25 minutes. There are written instructions below, or you can sign up to our free e-course for even more advice and tips.
1. Purchase hosting/domain and install WordPress/WooCommerce
To power your restaurant ordering system and the WordPress software, you need web hosting and a domain name.
For web hosting, we recommend Kinsta, which offers affordable managed WordPress/WooCommerce hosting.
If you're only hosting a restaurant ordering system for a single restaurant, you should be fine with the cheapest Starter plan, which will cost you just $30 per month.
You'll also need a domain name, which you probably just want to make your restaurant name. Search for an easy-to-remember domain name that closely fits the name of your restaurant, such as myrestaurant.com. You can purchase your domain name from a domain registrar like Namecheap or Google Domains and follow Kinsta's instructions to point your domain name to your new Kinsta hosting.
Once you create your hosting account, Kinsta will help you automatically install both WordPress and WooCommerce to help you get up and running.
Once you've done that, you can log in to your WordPress dashboard by going to yoursite.com/wp-admin.
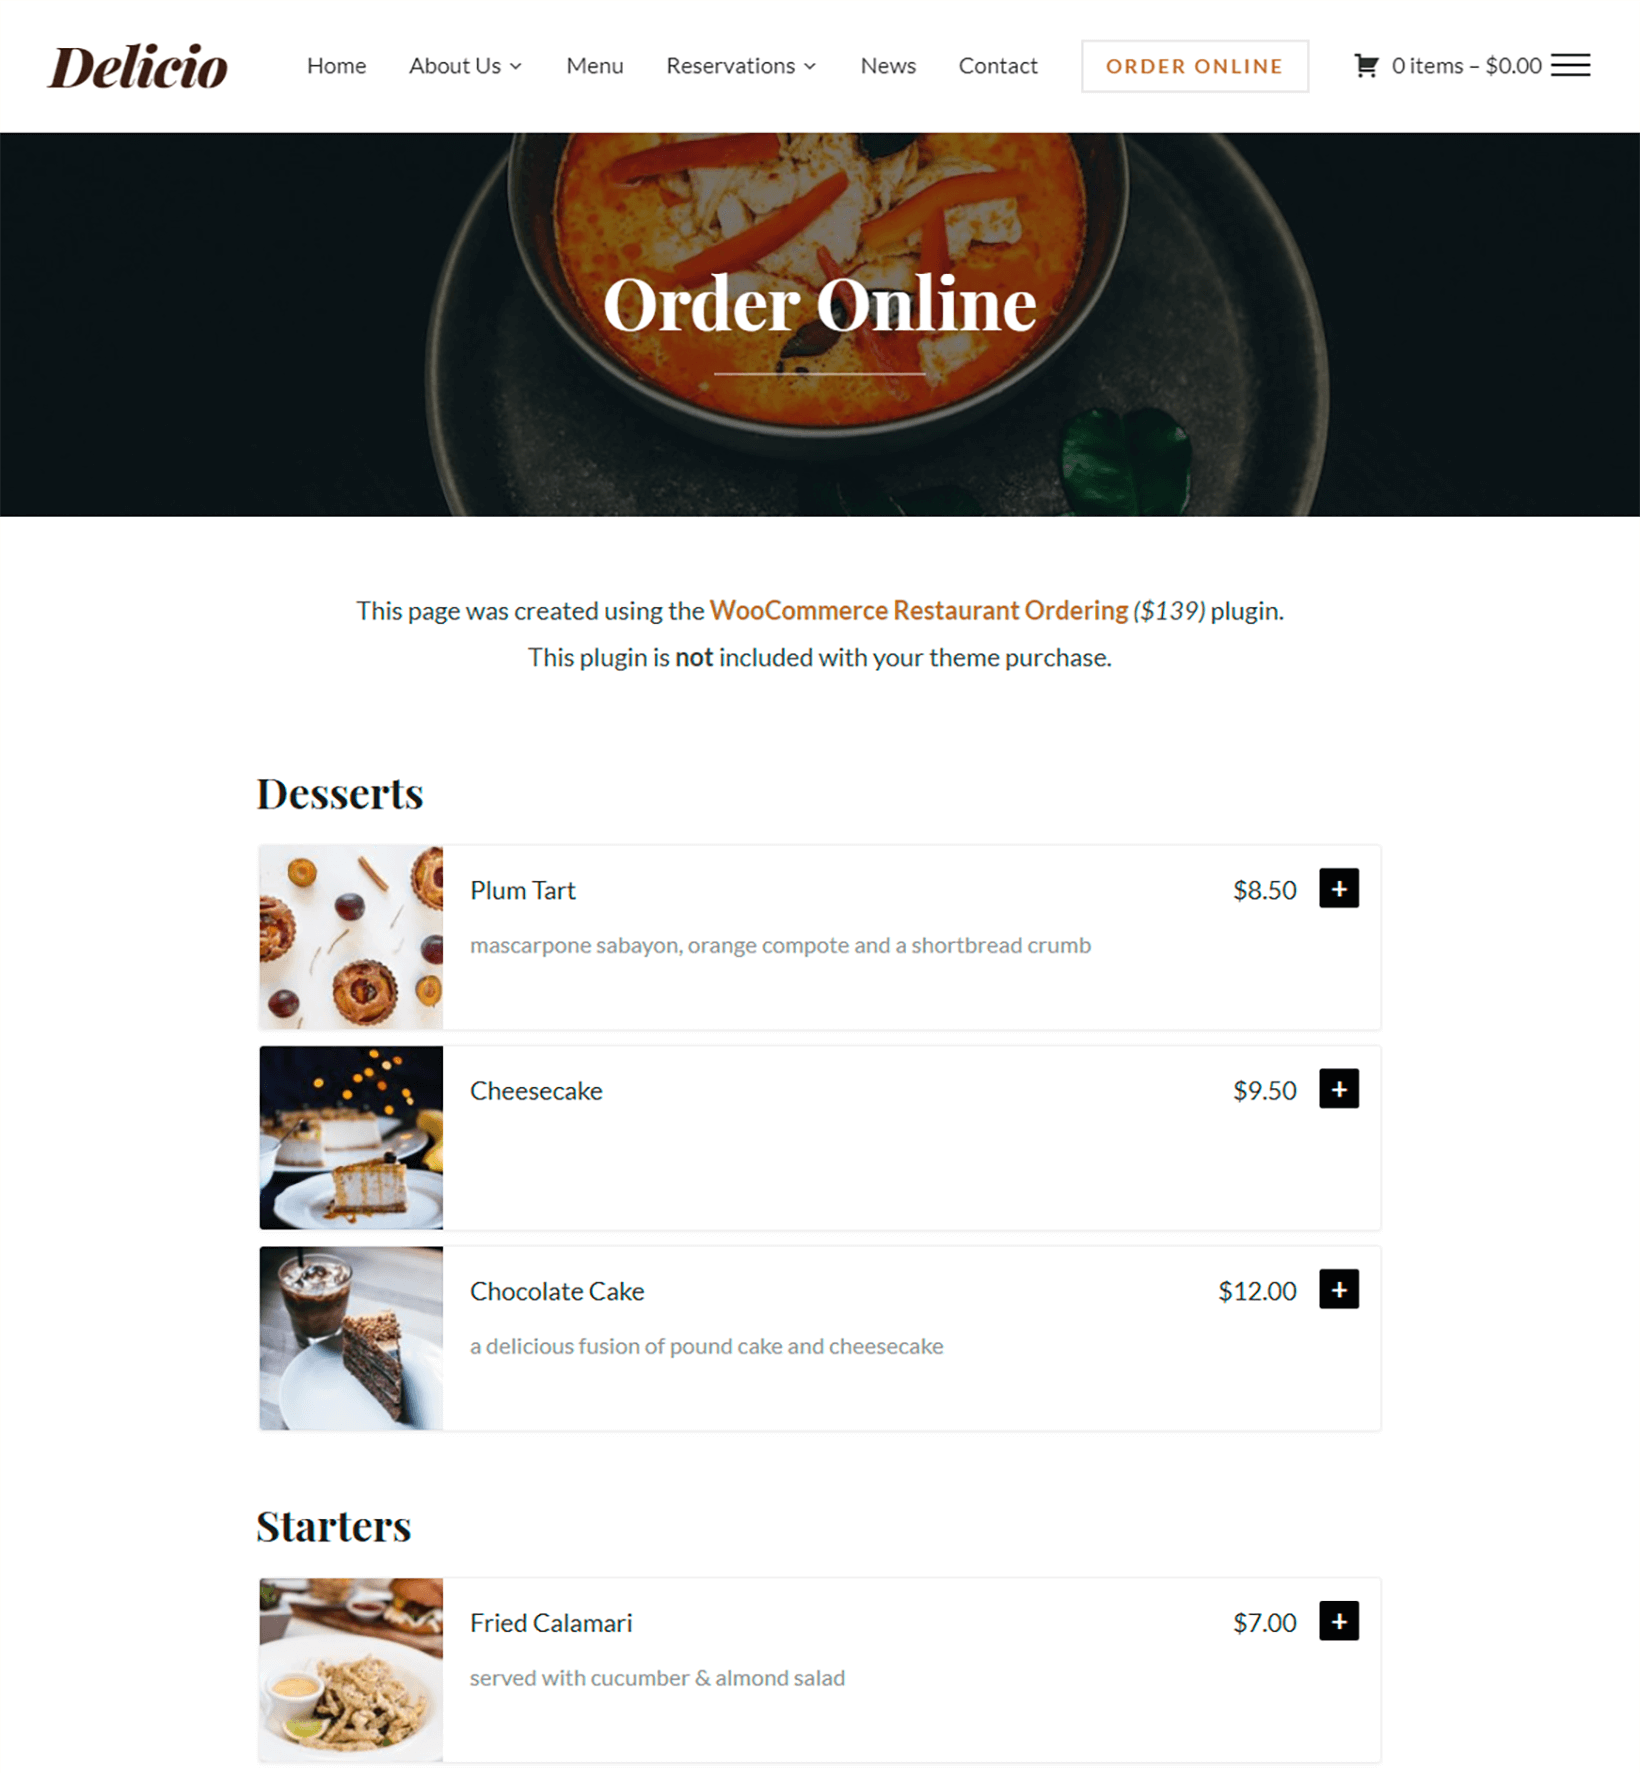
To control how the basic design of your site looks, we recommend that you use a WooCommerce restaurant in theme like Delicio.
The WooCommerce Restaurant Ordering plugin with the Delicio theme
2. Run WooCommerce setup wizard
Once you log in to WordPress for the first time, you should see a prompt to run the WooCommerce setup wizard, which helps you configure the basics for your online ordering system:
If you want to accept payments for online orders via credit card, you can set up a payment method like Stripe, PayPal, or Amazon Payments in the Payment tab. But if you want to handle payments in person, you can just choose Cash on delivery.
If you want to charge for delivery, you can add a flat-rate or percentage charge in the Shipping tab. We'll talk more about shipping in a second.
You don't need to install the recommended plugins - so feel free to skip those steps.
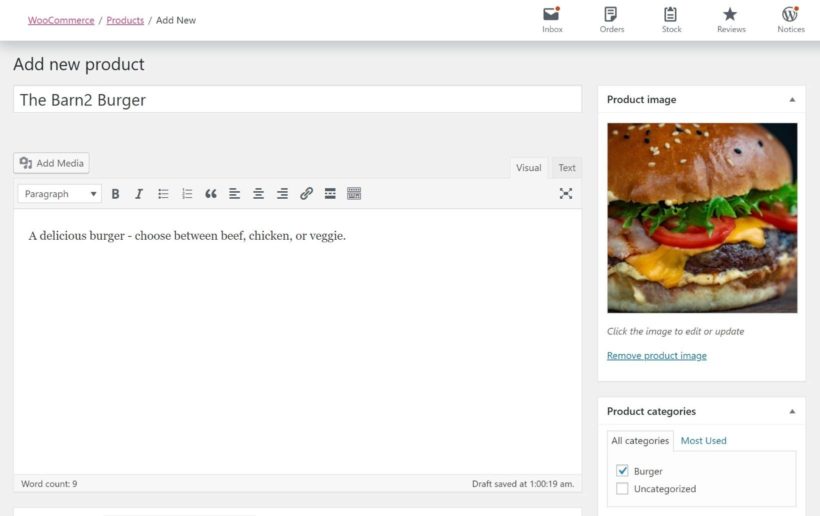
3. Add food menu items as WooCommerce products
To add your individual menu items, you'll use separate WooCommerce products for each menu item.
To get started, go to Products → Add New. There, you'll want to:
Enter the title of the dish.
Add a short description (optional). You can describe the dish here, and also add information such as calorie count, "Vegan" or "Gluten-free".
Upload an image to use on the menu page (optional).
Choose categories to organize menu items (optional). For example, a category might be "Sandwiches" or "Desserts".
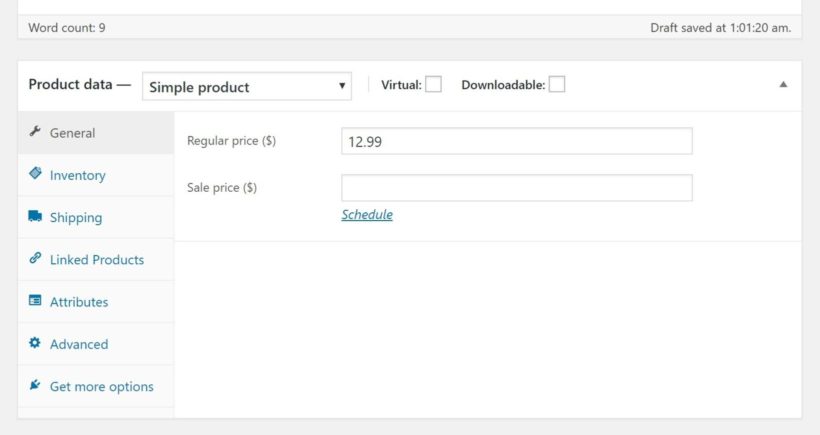
Then, find the Productdata box and add basic details like price:
For a simple dish, this might be all you need. But you'll also probably have menu items where people can customize the dish, like choosing the size and toppings of a pizza.
If that's the case, you can use either product variations or product add-ons:
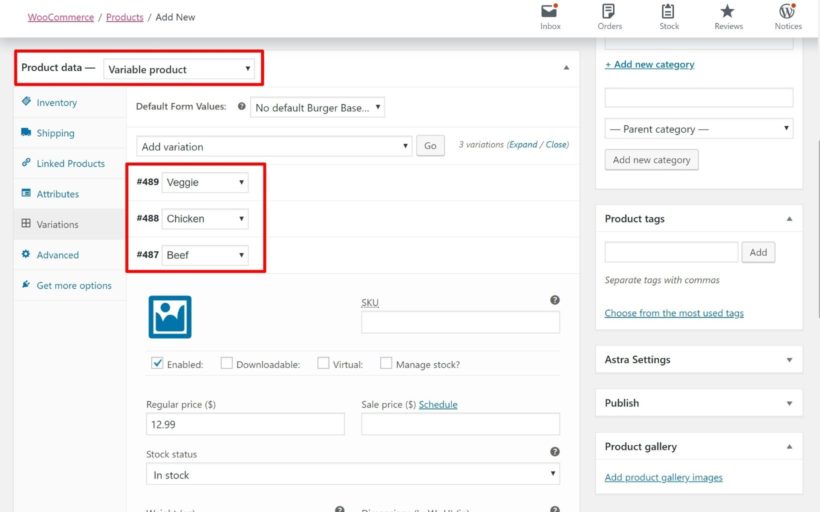
Variation - use variations when a customer can only choose one option, like the size of a pizza. Choose Variable product from the Product data drop-down to set these up.
For example, here's what it looks like to create a burger where people can choose between beef, chicken, or veggie, with each option getting a different price. For this situation, you would want to use variations:
Make sure to Publish your product. Then, repeat the process for all the menu items that you want to include in your online restaurant ordering system.
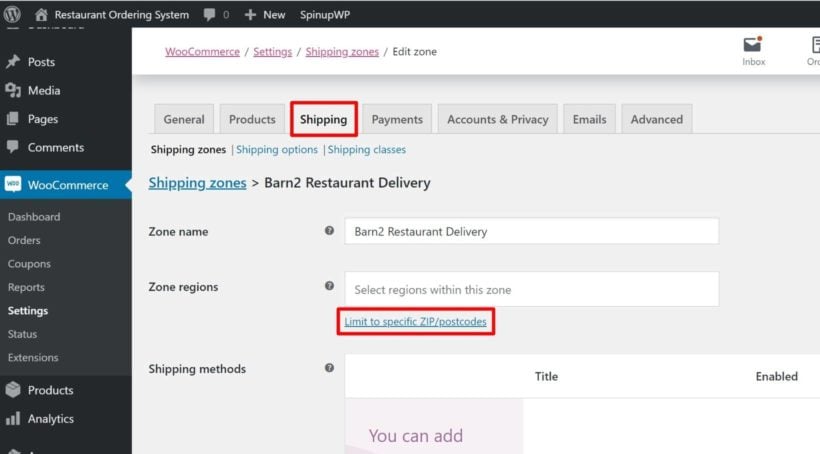
4. Restrict shipping areas
While an ecommerce store might ship nationwide or globally, your restaurant probably only delivers to a few specific zip codes.
To set this up, you can use WooCommerce's built-in shipping zones feature:
Go to WooCommerce → Settings → Shipping.
Click Add shipping zone.
In the shipping zone interface, click the link to Limit to specific ZIP/postcodes
Enter the postcodes that your restaurant delivers to
As long as you don't add any other methods, shoppers will only be able to ship to one of those zip codes.
You can also opt to charge a delivery fee or offer free delivery according to your preferences.
Once you install and activate the plugin, go to WooCommerce → Settings → Restaurant. Activate your license key, and customize the content and layout of your food order forms. Add your opening hours too.
Control your food ordering system on the settings page
Once you've configured the plugin, find the page called 'Restaurant Ordering' from the Pages section of the WordPress admin. The WooCommerce Restaurant Ordering plugin has created this for you automatically. Rename it to whatever you like. View the page to see your foods listed in a neat order form, divided by category. This is the online menu for your Uber Eats alternative:
Tip: Add a cart to the food ordering page by selecting a page layout that has a sidebar, going to Appearance → Widgets, and adding the 'Cart' widget.
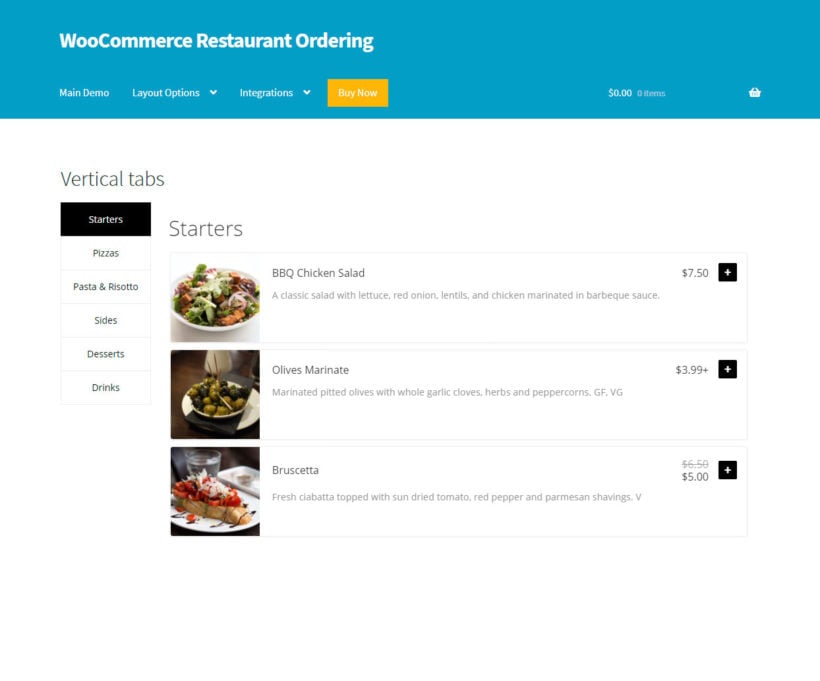
You can also create additional food order forms using the restaurant ordering shortcode. This lets you create more complex layouts, such as displaying each category within a different tab or toggle. You can also list different foods on different pages.
An example of a food order form in a tabbed layout
6. Set up backend processes for order notifications
By default, WooCommerce will send real-time email notifications when a new takeout or delivery order comes in.
However, because of the importance of getting started on orders right away, you might prefer a different method that's more attention-grabbing so you can ensure fast delivery. Here are some good options:
Official WooCommerce apps - WooCommerce has free apps for iOS and Android that can send push notifications for new orders. If you use an iPad or other tablet for your POS, you can install the app directly on your restaurant POS system.
WooSMS - receive text messages when new orders come in. It also lets you send text messages to customers to let them know the status of their order (like when your delivery person is on the way).
YITH Desktop Notifications for WooCommerce - get desktop notifications for new orders. This is great if you use a computer as your restaurant point of sale (POS) system.
7. Enhance your restaurant ordering system (delivery slots, popup cart, etc.)
Use WooCommerce Restaurant Ordering with Fast Cart for quicker ordering.
At this point, your WooCommerce food ordering system is all set up to function as an Uber Eats alternative. However, there are a few other tweaks you might want to make depending on your business.
Add a popup cart and checkoutWooCommerce Restaurant Ordering is designed to work with the WooCommerce Fast Cart plugin so that customers can complete their order from a popup cart and checkout, directly on the food ordering page.
Add restaurant opening times and delivery slotsWant to allow customers to choose an exact delivery time, or and restrict the number of deliveries within each time slot. You can do this with the WooCommerce Delivery Slots plugin. Customers can choose an available delivery slot, ensuring that your delivery drivers can cope with the number of food orders.
Manage your delivery driversUse the free Delivery Drivers for WooCommerce plugin to avoid the manual work of managing your local delivery drivers.
Add a minimum order valueLots of restaurant menu websites only want to take online orders above a certain value. Set minimum order rules with the WooCommerce Quantity Manager plugin.
Accept takeaway ordersIf you want to let shoppers pick up their orders (rather than delivering them), you can create a "Local pickup" shipping option for takeout.
If you're looking for a more flexible, cheaper Uber Eats alternative, creating your own WooCommerce food delivery platform cuts out the middlemen and gives you full ownership of your online platform. This approach also makes a great Just Eat alternative, Deliveroo alternative, Grubhub alternative, DoorDash alternative, PostMates alternative, Caviar alternative, etc.
It only takes slightly longer to set up your own food delivery service platform with a WordPress restaurant plugin, but the benefits are permanent. Not only can you stop giving up 20-30% of your orders as commission to Uber Eats, but you'll also be able to grow your own audience and build an evergreen marketing asset for your restaurant.
Choose your WordPress hosting, install WooCommerce and WooCommerce Restaurant Ordering, and create your Uber Eats alternative for online ordering today.
Do you have any questions about using a WooCommerce restaurant ordering system as an Uber Eats alternative? Leave a comment and we'll do our best to help.
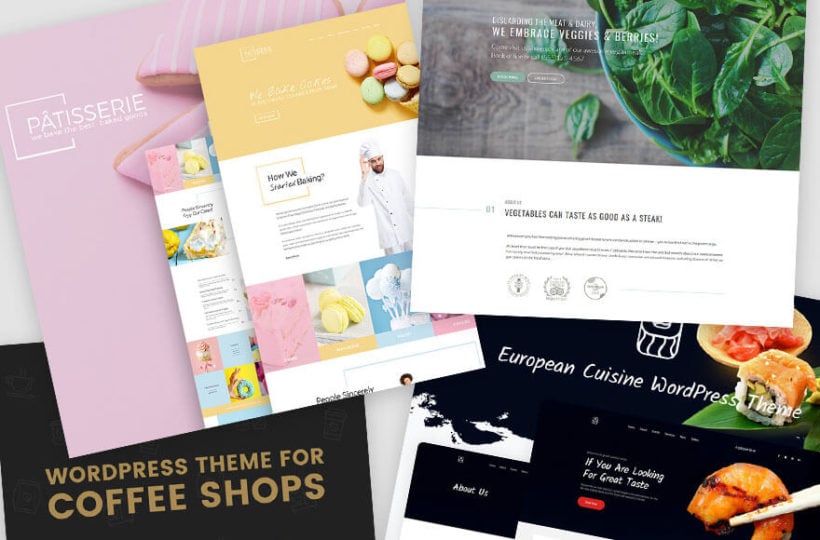
Looking for the perfect WordPress restaurant themes for your restaurant, bar, or cafe? For hungry people searching online, your website is going to be their first experience with your food, so you want it to be perfect.
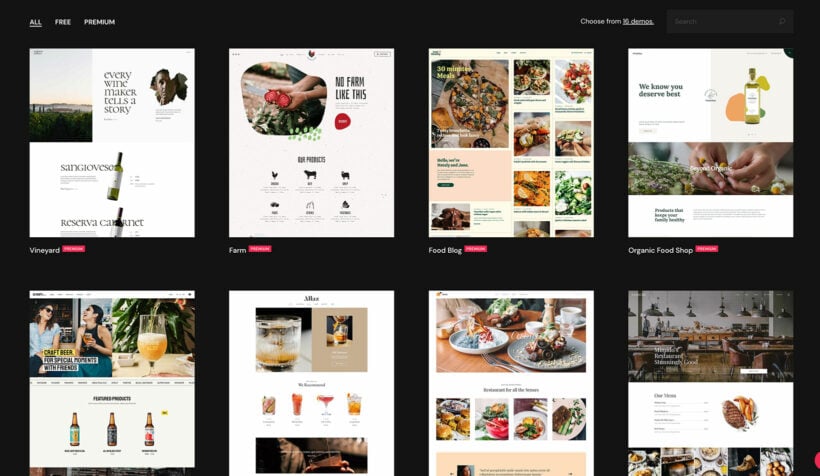
To help you create that awesome online experience, we've collected 25+ of the best WordPress restaurant themes.
But before we dig into those themes, let's quickly run over the most important elements that a restaurant website needs in 2025 and beyond. This will help you to think about what you want and pick the right theme...
What do WordPress restaurant themes need in 2025?
To pick the best WordPress restaurant theme and give your food the attention it deserves, you'll want to pay attention to some specific aesthetic and technical considerations. This will help you choose a theme that you can customize to meet your needs and also that will give your visitors a great user experience:
HTML food menu - nowadays, most people (~72%) search for restaurants on their smartphones, so a slow-loading, hard-to-read PDF menu just isn't going to cut it. You want a theme with a quick-loading HTML menu that looks great on all devices.
Responsive design - beyond an HTML menu, you'll also just generally want to choose a theme that will look great on all devices. Again, this is because a lot of hungry people are searching for restaurants on their smartphones.
Location information - look for a theme that makes it easy to display your address and contact information. An integrated map tool can also be helpful.
Reservations - if you use a WordPress restaurant plugin, make sure your theme can accommodate that. Or, you can always create your own reservation form.
Full-width homepage and parallax scrolling - these design elements make a great option for restaurant websites as they give you a chance to show off lots of pictures of your food.
Astra is the world’s most popular WordPress theme (except for the Twenty Twenty series you get with the installation). Installed over 1.7 million times, with over 5,600 five star reviews, it’s a very flexible theme.
Astra comes with over 230 Starter Templates, several of which are designed for restaurants and other food businesses. Each is lightweight, fast, fully responsive and SEO-friendly. They are fully compatible with major drag and drop page builders too.
Astra is fully compatible with most WordPress plugins, so you could add an online store, downloadable menus, table booking and any feature you like.
The Qi theme for Elementor is an excellent choice for creating restaurant websites. This theme is specifically designed to cater to the unique needs of restaurant websites, with a range of features and customization options that make it easy to create a professional and visually appealing website for your restaurant.
One of the standout features of the Qi theme is its selection of 16 pre-built restaurant demos, which provide a quick and easy way to create a stunning website for your restaurant. These demos are designed to showcase the various aspects of a restaurant website, including menus, food and drink options, events, and more. They are also fully customizable, so you can easily modify them to suit your specific needs.
Fully customizable
Alternatively, if you prefer to create your own design, the Qi theme for Elementor also provides a range of customization options that make it easy to create a unique and personalized website for your restaurant. With its drag and drop page builder, you can easily add and arrange elements on your website, such as images, text, and buttons, and customize them with a range of styling options. You can also take advantage of the theme's built-in design elements, such as sliders, galleries, and video backgrounds, to create a dynamic and engaging website.
Overall, the Qi theme for Elementor is the perfect choice for creating restaurant websites. Its selection of pre-built restaurant demos and customization options make it easy to create a professional and visually appealing website that showcases your restaurant's unique style and offerings.
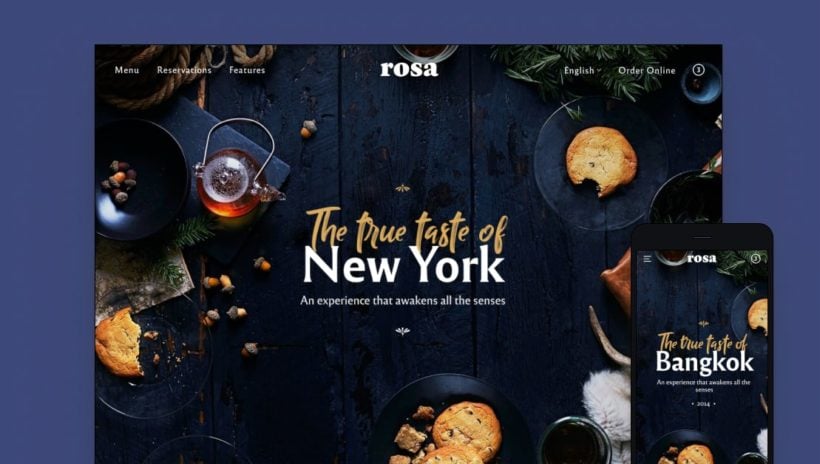
Rosa 2 is the improved version of Rosa 1, the best-selling restaurant WordPress theme with more than 13,000 customers all over the world. It is also the first theme within this industry built on top of Gutenberg, the latest WordPress's editor. This means that the entire experience is far better: from how you create content to how you showcase it to your audience.
Rosa 2 comes with multiple hero areas that you can use to grab attention with ease with full-bleed images or videos and a smooth parallax scrolling effect. On top of that, you have access to a customization tool that helps you achieve visual coherence across your website due to the predefined color and font palettes.
Another feature that brings real value within this premium WordPress theme is the integration with WooCommerce, the popular plugin that helps you set up an online store. You can launch an online food ordering system to develop new revenue streams and keep your business up and running.
All in all, Rosa 2 fits well for various culinary businesses: bistros, tavernas, fine-dining venues, pizza houses, and more.
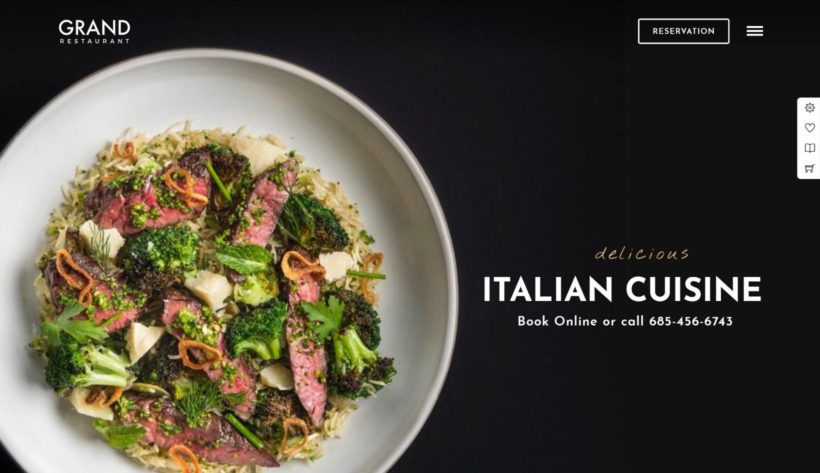
Grand is a customizable WordPress recipe theme from ThemeGoods that lets you choose from a variety of different pre-built demo sites. Currently, it has 7+ different demo sites for everything from Asian to Italian food, with more demos on the way.
No matter which demo site you choose, you'll get a range of flexible food menu styles, complete with an option to add variations to menu items. For example, you can add different sizes for a pizza.
You can also accept reservations via a custom form or OpenTable integration, as well as create your own food delivery ordering system with the WooCommerce integration.
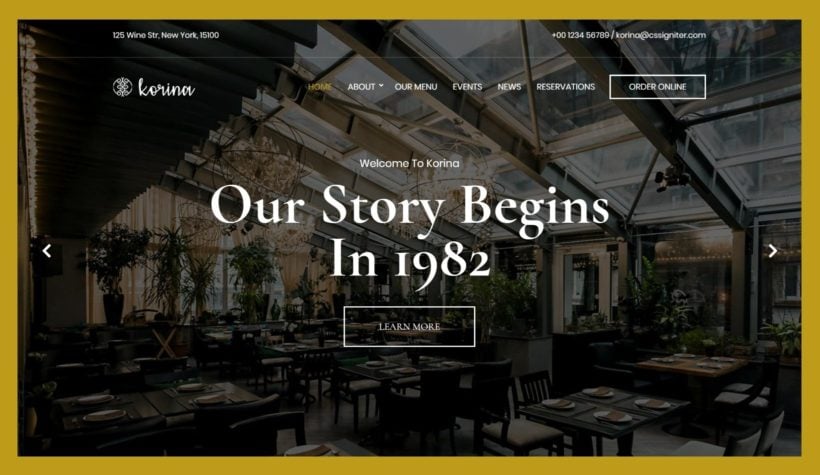
Korina is a gorgeous WordPress restaurant theme with a bold full-screen slideshow at the top of the page that helps you showcase your food or restaurant aesthetic.
To show off your food, Korina comes with a built-in HTML menu management system that lets you add new menu items as their own custom post type (just like you'd create a blog post).
To make Korina your own, you'll get tons of header variations, unlimited color schemes, typography options (including Google Fonts), social media support, and more.
Resca is a flexible WordPress restaurant theme from ThimPress that comes packed with features to help your restaurant business be successful.
With Resca, you'll get a built-in table booking system via your own form or OpenTable, a tabbed food menu interface, upcoming events list, and email opt-in form via Mailchimp.
Everything is responsive out of the box and Resca also comes bundled with the Slider Revolution plugin to help you create gorgeous slideshows. You'll also get a detailed theme options panel to customize your theme, cross-browser support, and a great-looking food blog layout.
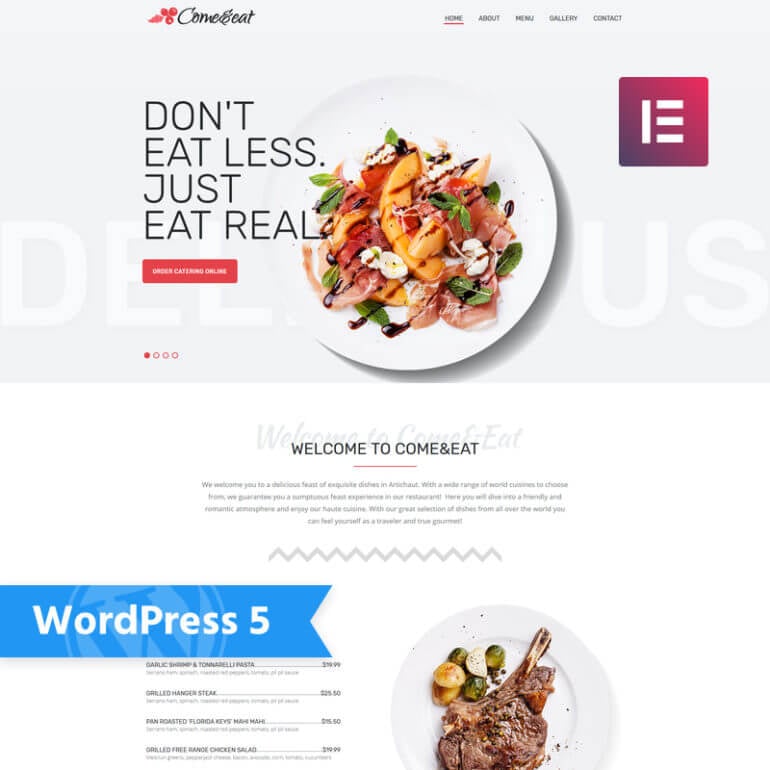
ComeEat - Modern Elementor WordPress Theme for Restaurants
Are you looking for an extraordinary modern restaurant web design? Then, go for ComeEat, a theme with present-day design and robust functionality.
With this theme, you’ll be able to uncover all the unique features of your place and dishes. Showcase a professional menu with appealing images of the dishes served at your place. You’re bound to enjoy the process of customizing your future website with content-intense JetElements widgets and Elementor builder. With JetMenu, you’re encouraged to create modern MegaMenu panels that enhance the usability of your site. JetThemeCore is yet another powerful plugin for beautifying your site’s pages.
While it doesn't come with a built-in restaurant order system, you can easily add one using our tutorial.
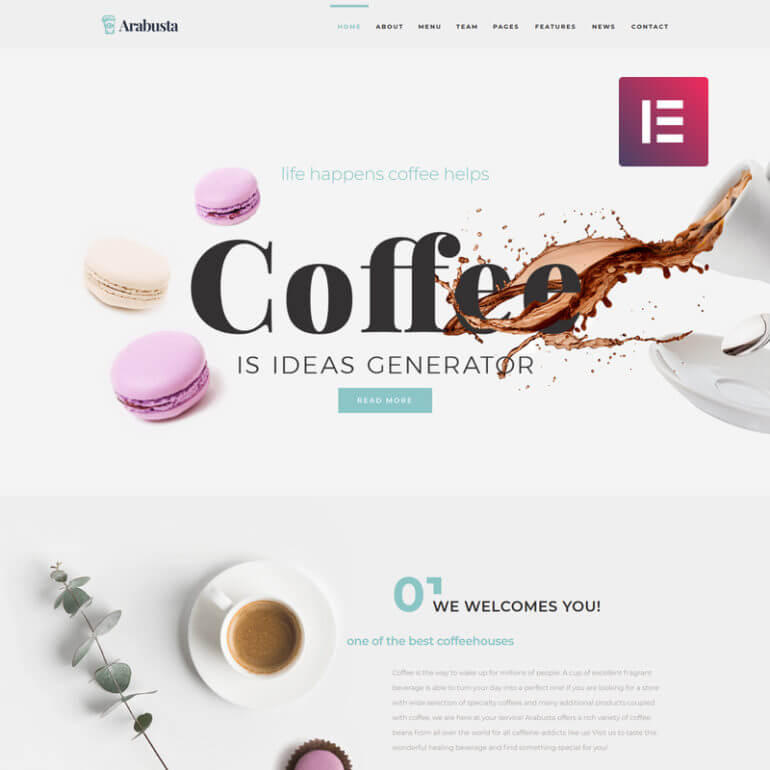
Do you want your coffee house/cafe website to look both fresh and delicate? Then, embrace Arabusta - an unparalleled WordPress design featuring amazing pastel backgrounds and conversion-optimized storytelling pages.
With this design, you get access to a large collection of premium Cherry and Jet plugins. For example, use TM Timeline and TM Event Calendar to inform users about the upcoming events. Contact Form 7 will help you stay in touch with your site’s guests. Demonstrate your mouth-watering photo gallery with the TM Photo Gallery plugin. This template is friendly in relation to the newbies in site creation. Thanks to the Elementor page builder, you’re more than welcome to completely avoid customizing the theme’s code.
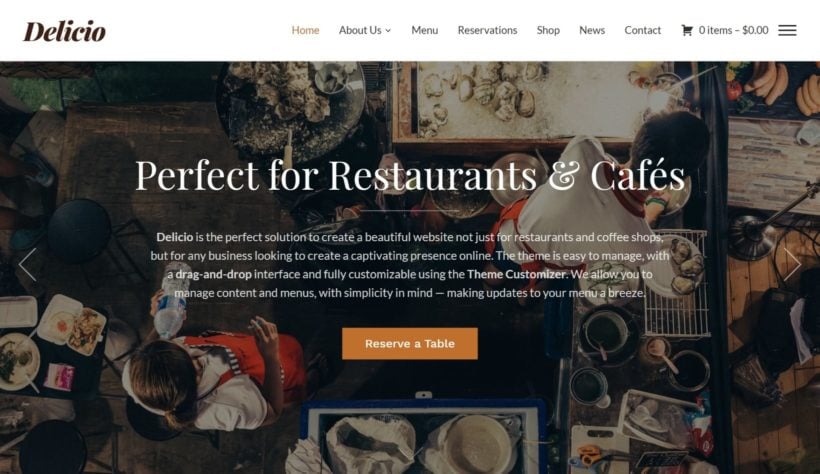
As the demo site headline above informs you, Delicio makes a great option for both restaurants and coffee shops.
It comes with built-in sections to help you highlight your food menu, team members, location (on Google Maps), contact form, testimonials, and more. You'll be able to customize exactly how all these elements are arranged using a simple drag-and-drop system.
Delicio also integrates with the free Restaurant Reservations plugin to let you accept bookings directly through your website. And if you want to accept online orders, it also integrates with WooCommerce and the WooCommerce Restaurant Ordering plugin.
The WooCommerce Restaurant Ordering plugin with the Delicio theme
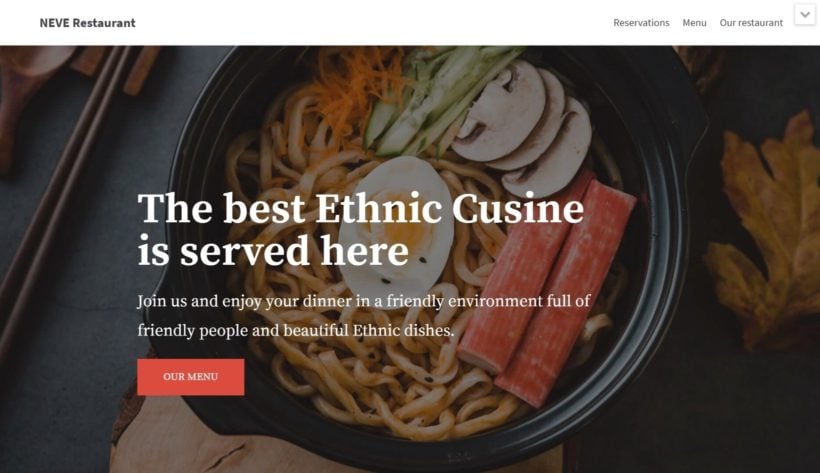
Neve is a lightweight, responsive WordPress theme that comes with a ton of demo sites for different uses, including dedicated demos to help you create a restaurant website or cafe website.
If you go with the restaurant demo, which is available for free, you'll be able to showcase your location on Google Maps, include a great-looking HTML restaurant menu, and accept reservations via a custom form.
If you value performance and page load times, this one is a good option.
Litmus is a multipurpose theme with an exceptionally powerful restaurant skin. With this theme, you get access to 3 ready-made website designs. One of them would be ideal for a creative agency/startup, the second suits for a restaurant, and the third is built for an e-store (clothes, accessories, etc.).
Litmus includes a large number of pre-built pages. With the Restaurant skin, you get such much-needed niche pages as Menu Archive, All Menu List, Menu Details, About Us, etc. Moreover, Litmus is very cool when it comes to customization. This theme includes King Composer (otherwise worth $119) and Revolution Slider. Finally, this theme also features Make a Reservation and Order forms.
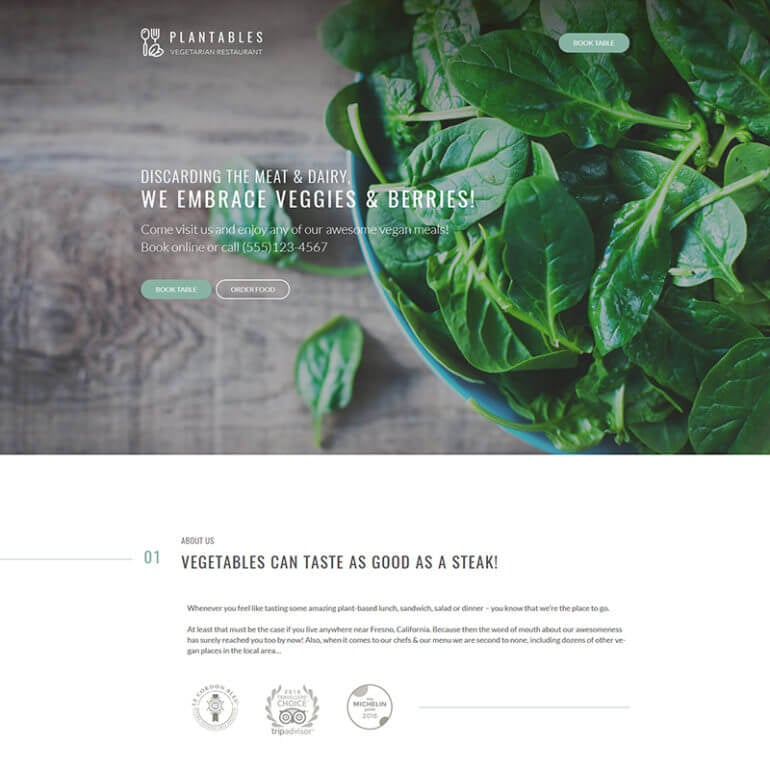
On a lookout for the hottest theme for your vegetarian restaurant? You can’t miss on Plantables, one of the latest and most advanced themes for meat-free eateries.
The theme is mobile-friendly, cross-browser compatible and performance-optimized. Despite featuring hi-res imagery and rich media content, your website will load in less than 4 seconds, pleasing you with a low bounce rate. P
lantables brings you a number of ready-made forms, such as search, contact and subscription form, as well as the newsletter subscription box. What’s more, the theme incorporates MailChimp for managing the lists of your subscribers and keeping in touch with them.
Finally, to empower online booking of tables at your place, Plantables includes the handy online table reservation functionality. It doesn't come with a food ordering system, but you can quickly add this by installing the free WooCommerce plugin and following this tutorial.
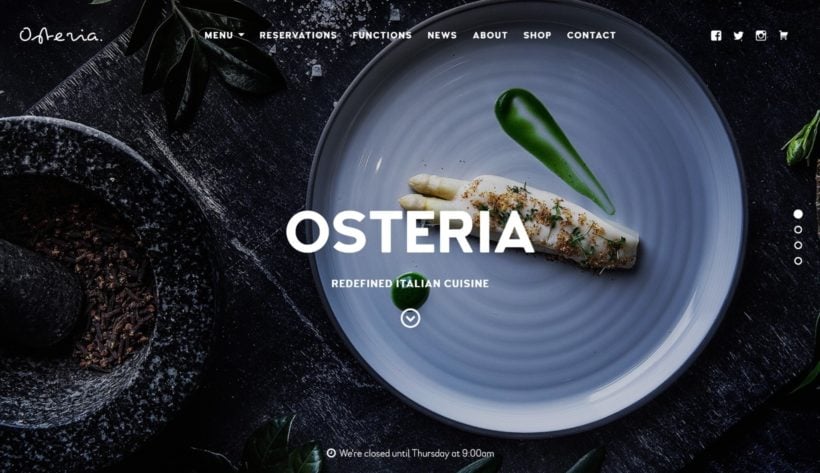
Osteria is another beautiful WordPress restaurant theme from Pixelgrade. It offers a lot of similarities to the Rosa theme above, just with a different aesthetic.
You'll still get a great-looking HTML restaurant menu system, along with options to feature specific menu items to draw attention to them. You can also integrate with WooCommerce to create an online ordering system and let visitors create reservations directly through your website.
And it's all wrapped up with an eye-catching parallax effect, lots of style options, SEO-friendly code, and fast page load speeds.
Dina is a great theme for a restaurant, bar, or bistro.
It ships with a modern look that's built with the Elementor page builder plugin, which means you can customize all the demo content using a simple drag-and-drop system.
It includes a great-looking collapsible food menu system to showcase the different categories of your culinary creations. You can also accept reservations through a built-in form or OpenTable integration.
In total, Dina offers 7 different homepage demos for you to choose from, lots of styling options and Google Fonts support, 9 different food menu layouts, and an option to add a video to the background of your homepage.
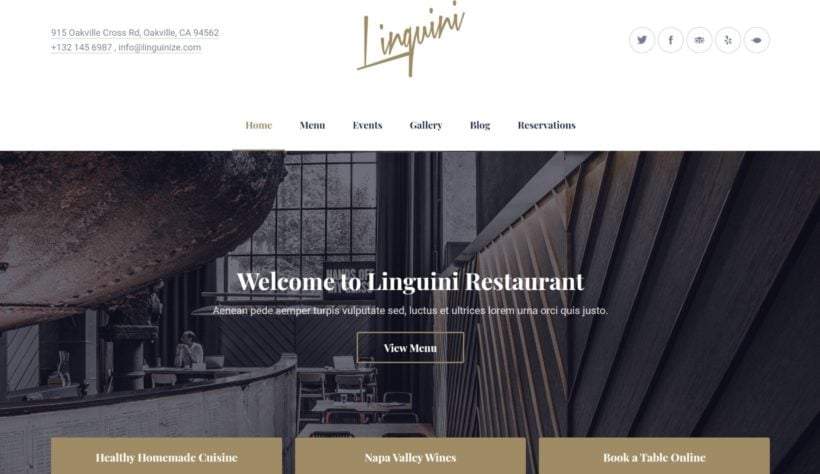
Linguini is a multipurpose WordPress restaurant theme that makes a great option for a restaurant, cafe, bistro, pub, winery, bar, or anything else related to food. It comes with 3 pre-built demo sites and you can pick the one that works best for you.
Like any good WordPress restaurant themes, it comes with a built-in HTML food menu system and a tool to help you accept reservations.
Linguini goes one step further, though, and also includes a built-in events calendar feature. So if you host a lot of live events at your restaurant, that's a reason you might want to choose this theme.
You'll also get a live theme customizer, dedicated shortcodes, 6 custom widgets, multiple page templates, and more.
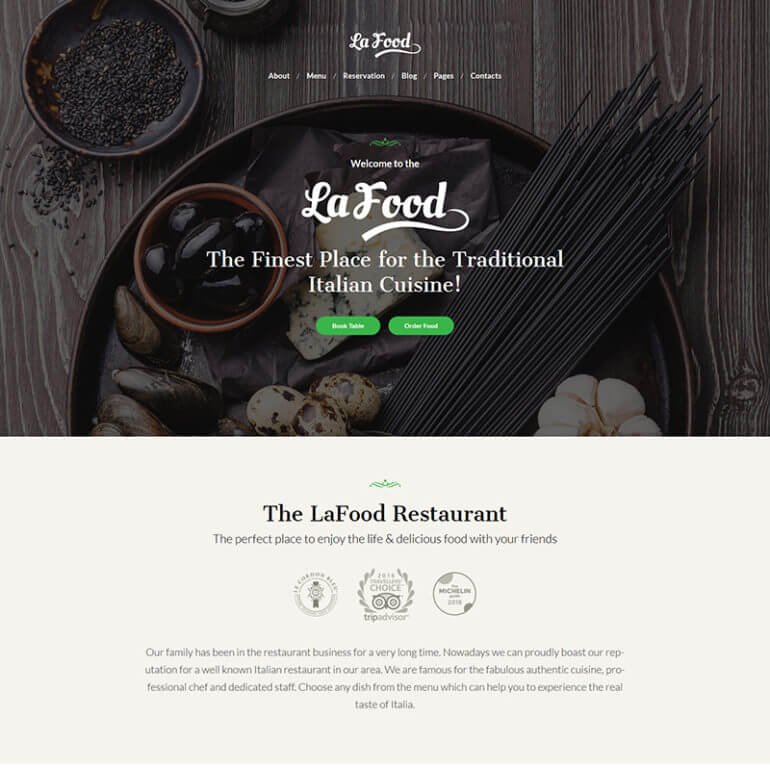
LaFood - Italian Cuisine Restaurant WordPress Theme
Fresh and minimalist, LaFood combines mouthwatering imagery and refreshing mint color accents. What’s more, the abundance of white space is what makes your content stand out and makes the theme really uncluttered.
Thanks to the employment of Bootstrap 3 framework, the layout of LaFood stays mobile-centered and equally temps site visitors from home PCs and on the go. Moreover, the theme’s setup wizard is simplified to its core and lets you run LaFood installation with sample data within 5 minutes or less.
It’s worth mentioning that the theme is also e-commerce ready. You can run a store on the pages of your website with the help of Ecwid, one of the most comprehensive e-commerce plugins out there. Alternatively, you can use it as the foundation for a WooCommerce restaurant ordering website.
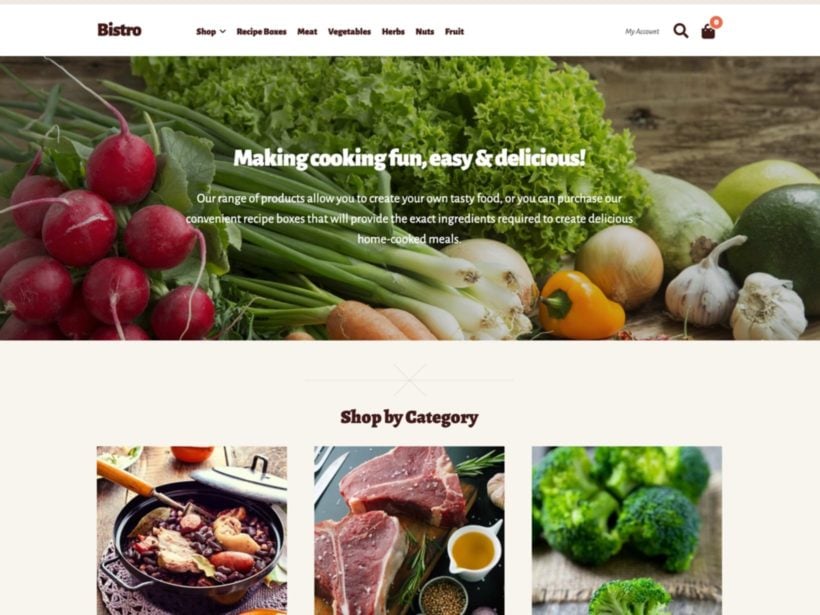
Bistro is a child theme for the popular Storefront WooCommerce theme that you can easily adapt to creating a restaurant website or other food-related website. Because it's already built for WooCommerce, Bistro will make it super easy to create your own WooCommerce restaurant ordering system.
To add your food menu, you can find plenty of free plugins or use a drag-and-drop page builder plugin like Elementor or Visual Composer.
Bistro is also super lightweight and performance-friendly, which means your restaurant site will load wicked fast.
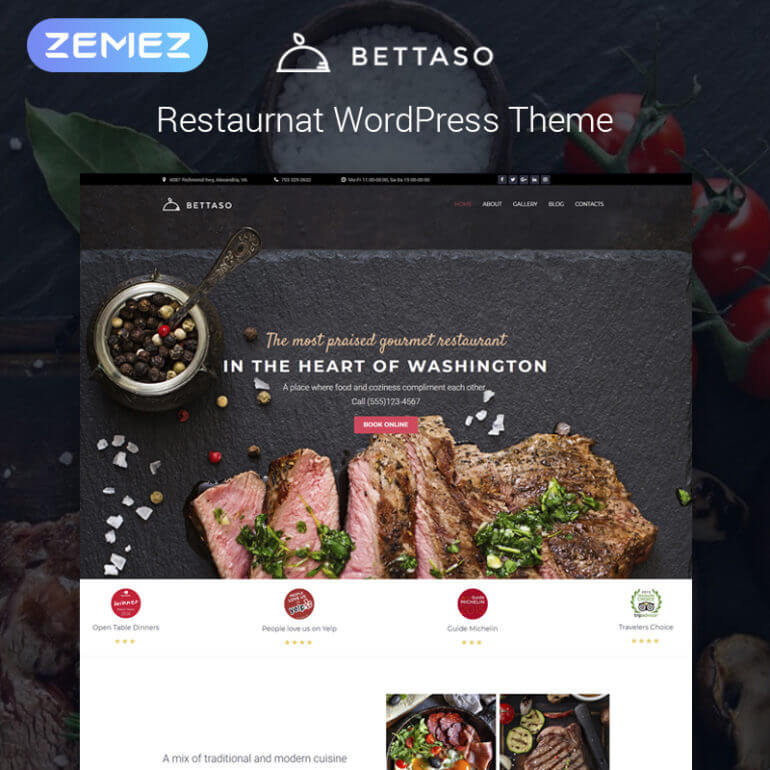
Are you after one of the juiciest meat-infused designs that make the mouth of your clients water? The Betasso WordPress restaurant theme is ultimately tempting and seducing to visit your place with its hard-to-miss-on imagery.
The theme developers sprinkled the pages of Betasso with additional content elements, all shipped within Jet Plugins. You can apply these elements and control their appearance within the drag-n-drop interface of Elementor.
Among the nice bonuses, you get all the imagery included to the Sample Data free of charge. Moreover, this theme encourages you to run an e-store on your website pages. Ecwid will be a reliable solution that you can integrate within 5 minutes for this purpose. Or if you want a more purpose-built restaurant ordering system, then you can do this by adding WooCommerce.
Are you searching for a modern and innovative theme for a stylish Asian restaurant? Then, Sushiland definitely deserves your attention.
This theme incorporates appealing thematic imagery and best handwritten fonts to craft the unique vibe of your online presence. However, if you feel that this is not what you need, you’re more than welcome to employ any of 500+ pre-built Google Fonts.
Sushiland theme comes equipped with a thick pack of pre-made pages. Using them, you get a chance to showcase your professional team in the best light, feature testimonials of your satisfied visitors and power an exemplary gallery of your dishes and premises.
Piquant is a beautiful restaurant WordPress theme that comes with 6 different homepage designs that you can import with a single click. The demos focus on specific niches, like bars, BBQ joints, a pizzeria, health food cafes, and more.
You can also choose from a variety of menu page layouts and further customize your content using the built-in WPBakery Page Builder WordPress plugin.
Other helpful features include a detailed theme options panel, tons of custom shortcodes, compatibility with WPML for translations, and multiple page layouts.
It’s hard to argue that Yummies is one of the most appealing recently released WordPress restaurant themes. The pages of this theme break and compromise the standards of the commonplace grid layouts to create your unique online presence with its own vibe and mood.
This theme allows you to fully present your business and its advantages. Use additional content elements provided with Jet Plugins to ensure the one-of-a-kind appealing display of your team, services, testimonials, products and more.
Like Bistro, Deli is another child theme for the WooCommerce Storefront theme. It also offers a lightweight approach that works great as a cafe theme or organic WordPress restaurant theme. You can also use it for a generic food business website.
It offers a deep WooCommerce integration by default, and you can easily add a restaurant menu and reservation system using some free plugins.
Patisserie is a delectable pastel-colored template that marries your website into the fresh web design trends of this spring.
This WYSIWYG-friendly theme doesn’t make you face a steep learning curve when you’re on the way to finish your project. Elementor builder makes editing the design of your site’s blocks a comprehensive process controlled with drag-n-drop and straightforward settings. Thanks to more than 25 modules that come on board of Patisserie, you’ve got a chance to power call-to-action buttons, accordion blocks, interactive counters, unconventional product showcases, and other site elements in a few clicks. Moreover, Patisserie offers you rich media integration, allowing you to embed YouTube videos, audio podcasts and media galleries to your website.
Sydney Pro is a multipurpose WordPress business theme that comes with 4 different pre-built demo sites. One of those demo sites is - you guessed it - a WordPress restaurant theme.
It has a great one-page design that includes a tabbed menu interface, space for a full-width gallery of food pictures, testimonials from happy eaters, a news and events listing, and a built-in email subscribe form.
You can also accept reservations via your own form or a third-party service like OpenTable.
Dine is a customizable WordPress restaurant theme. It comes with multiple demo sites built with the popular WPBakery Page Builder plugin. That means you'll be able to customize your site and menu using a simple drag-and-drop interface.
For diners browsing on the go, the mobile version of Dine includes a user-friendly off-canvas menu. This displays navigation menu items better on smartphones.
Of course, Dine also comes with the essentials like a table reservation system. It has gorgeous menu layouts, WooCommerce store support to let people order food online, and more. You also get an option to feature certain menu items. This is a great way to draw attention to your most popular (and profitable) dishes.
Add online food ordering to your WordPress restaurant website
More and more restaurants are needing to take food orders online. For example, perhaps you're running a takeaway restaurant. Or perhaps you need a way for customers to pre-order their food choices. Either way, you can use any of the themes in this roundup with the front-end WooCommerce restaurant ordering system described in our tutorial:
The WooCommerce Restaurant Ordering plugin fully supports product variations and product add-ons on your restaurant order form, which lets you create functional menus for online food delivery. For example, you can let visitors pick the size of a pizza with a drop-down. They can also use checkboxes to select toppings. Or, you can create a simple product for straightforward menu items.
You can also display product images for each food item, use product categories to divide menu items, and more.
Get started with your favorite WordPress restaurant themes
That wraps up our collection of the 25+ best WordPress restaurant themes for all kinds of eateries.
Remember to consider mobile experience when you choose a theme for your WordPress restaurant website. After all, it's easy to forget when you browse theme demos on a desktop computer! But remember - almost three-quarters of people use a smartphone to initiate a Google search in the food and beverage industry. As a result, your site's mobile experience is paramount.
Don't forget online ordering!
Finally, don't feel like you have to find a theme that does absolutely everything. It's fine to rely on plugins for some features.
Do you have any questions about how to choose the best theme for your restaurant? Ask away in the comments!
If you want to create a restaurant website with online ordering for home delivery, there are plenty of services built to help you do that...for a hefty commission! A WordPress restaurant plugin lets you skip the commission and keep your margins for yourself.
People want to be able to get food delivered over the Internet. Online food ordering more than doubled between 2010 and 2015, and those trends are continuing - especially due to the COVID-19 pandemic. Customers prefer ordering online rather than over the phone, and the right WordPress restaurant plugin will satisfy that demand without needing to pay a 15% commission rate.And this won't just be a desktop affair - like all the best WordPress plugins, this one works seamlessly on mobile devices as well.
In this post, you'll learn how you can use the best WordPress restaurant plugins to create your own online restaurant ordering system like the example above, complete with:
Menus
Delivery options and time slots
Pickup options
Notifications (so that you know when a new food order comes in)
You'll be able to customize it to your needs, and you won't need to be a tech savant just to get it working!
The two big benefits of using a WordPress restaurant plugin over the alternatives
There are two huge benefits to using a WordPress restaurant menu plugin over alternatives like GrubHub, JustEat and Uber Eats.
1. You'll save money
First, the big one - saving money!
Just for getting listed at GrubHub, you're giving up a whopping 15% commission rate. And if you want a sponsored listing, you'll give up 20% or more. That's crazy!
The typical margins for food just high enough to justify these commissions. Giving up 15% commission makes a huge difference to your bottom line.
With a WP restaurant plugin, there are no ongoing commissions. Instead, you'll pay a one-time or annual fee for the plugins that you need. After that, everything is profit.
So how much will it cost for a good restaurant plugin for WordPress? The two core tools you'll need - WooCommerce and WooCommerce Restaurant Ordering - will cost you under $150/year.
After that, you might want to further enhance your system with some extra plugins for delivery options or menu customization. However, even with these, you'll probably only spend $200-300 to get the whole system up and running. And again, there are no ongoing commissions after that.
2. You can offer a better user experience
Sites like GrubHub or Deliveroo are, for the most part, one size fits all. That is, your menu and listing pages look exactly like other restaurants.
However, what if your restaurant is unique? What if you make these awesome customizable burgers and you want to create a custom way for people to choose their ingredients and toppings?
With the other tools, you're out of luck. But with a WordPress restaurant plugin, you can tweak things to make them perfect, which helps you create a better ordering experience.
The best WordPress restaurant plugin system
To create your WordPress website's online restaurant ordering system, you'll need two key tools:
An ecommerce plugin This is the backend system that will help you manage food items, accept orders and payments through Stripe, Paypal, etc.
A food order form plugin This is the frontend system that will create a user-friendly restaurant menu for your hungry visitors to browse. It lists your foods in a one-page table layout. You can divide your menu up into different categories, offer customization options, etc.
For the ecommerce part of the equation, the most popular option is WooCommerce. This open-source, free plugin comes from Automattic (the billion dollar company behind WordPress.com) and is the most popular way to build an ecommerce store.
For the food order form, you'll use WooCommerce Restaurant Ordering. It makes it easy to create a customizable frontend food menu that you can adapt to your restaurant's unique needs:
In today’s environment of having to act nimbly for clients, the WooCommerce Restaurant Ordering plugin is the perfect solution for getting a website running quickly. We were able to launch on day one with the help of this plugin. It took all the heavy lifting out of the equation and let us focus on design. If you are debating whether or not this is the solution for getting a restaurant going — look no further, this is the plugin you want. The support is also top-notch!
Use your ecommerce plugin to manage food items and orders
To get started, you'll need to install and configure your chosen ecommerce plugin. For example, WooCommerce.
From there, you can add all of your menu items as "products". For example, if you sell a pepperoni pizza, you'd add that pizza as a product:
If your menu item is customizable, you can use either product variations or product add-ons to give visitors the option to customize their orders:
VariationsVariations are good if people will select a single option from a list. For example, the size of a pizza.
Add-ons Add-ons are good if people can select multiple items. For example, selecting one or more options from a list of toppings. If you want to use product add-ons, you'll need the Barn2 WooCommerce Product Options plugin.
Use the WordPress restaurant plugin to create your front-end menus
Once you've added all of your food items as WooCommerce products, you're ready for the next step. It's time to create your online menu using the WooCommerce Restaurant Ordering plugin.
See, by default, WooCommerce displays your "products" in a traditional ecommerce layout. For example, something like this:
Now, that's fine for an ecommerce store, but it's not a good option for a restaurant menu!
That's where the WooCommerce Restaurant Ordering plugin comes in.
This WordPress restaurant plugin lets you take all your items and display them in a user-friendly food and drink menu layout like this:
Shoppers can add simple food products straight to the cart, or open a lightbox to select variations and add-on options.
As you can see from the above screenshot, the plugin also works perfectly with the WooCommerce 'Cart" widget in the right sidebar, provided your WordPress theme supports templates that allow this functionality. You could also include a widget with a note about your site's delivery area, or even a custom Google Map that shows the area you serve.
The great thing about WooCommerce Restaurant Ordering is that you have 100% control over the information that displays.
Want to add a description column that marks vegan or gluten-free options, or the calorie count? You can do it! 🥗
Want to show, hide or reposition the image of each food? Yup, you can do that, too! 💯
What's more, WooCommerce Restaurant Ordering comes with a shortcode that allows you to incorporate your food ordering system anywhere on your site.
You can even add opening times and prevent people from ordering while you're closed.
The end result is that you can create a restaurant ordering system that's totally unique to your restaurant's needs and offerings.
Enhance your WordPress restaurant plugin system with other plugins
Get more sales by using WooCommerce Restaurant Ordering with other plugins like Fast Cart
At this point, you'll have a working WordPress restaurant plugin system. However, you still might want to adjust things to tweak how your ordering system works.
WooCommerce Restaurant Ordering is designed to work with many different plugins - not just WooCommerce - and any WordPress theme. That means it integrates as well with your page builder, SEO or multilingual plugins (WPML, WeGlot, etc.), as it does with more obvious pairings - restaurant reservation plugins, food delivery plugins, and so on.
Here are some good options for third-party plugins to enhance your system:
Delivery Slots Allow people to order specific time slots for delivery or collection.
WooCommerce Fast Cart Add a popup cart so that customers can complete their order from the food ordering page.
Dynamic Pricing Lets you create special deals, like buy one get one free.
Twilio SMS Notifications Lets you receive SMS notifications for new orders (by default, WooCommerce only sends email notifications).
WooCommerce BookingsLets you set up a table reservation system alongside your menu to allow your customers to fill out an online reservation form and pre-order their food at the same time.
Build your own WordPress restaurant ordering system today!
Stop giving up your hard-earned margins to middlemen!
With your own WordPress restaurant ordering system, you'll be able to offer the convenience of Internet ordering to your customers, without paying a 15% commission.