Using the WooCommerce Live Preview add-on
The Live Preview for WooCommerce Product Options add-on allows customers to preview how the image(s) and text they have added will look on the finished product.
To provide live previews, you must:
- Have both WooCommerce Product Options and the Live Preview add-on installed.
- Add file upload, text and/or paragraph fields to some or all of your products, with the live preview option enabled (this is active by default for each file upload field and disabled for text/paragraph fields).
- (Optional) Set one or more printable areas on your product or variation images.
You can find full instructions below.
Installing WooCommerce Live Preview
The Live Preview add-on will be installed automatically when you have an active license for WooCommerce Product Options which includes Live Preview. This will either happen when you first activate WooCommerce Product Options, or if you upgrade to the Live Preview bundle later then a Dashboard notice will then appear prompting you to click a button to install the add-on.
Adding file upload or text/paragraph fields with live preview
- Go to Products → Product Options and add or edit an option group as usual.
- Click 'Add option' and select the 'File upload', 'Text' or 'Paragraph' type.
- Add a label which will appear above the field, and choose whether or not customers will be charged an extra fee for choosing to upload files or add text.
- Optionally add a description which will appear under the field. For example, this might contain guidance on recommended image sizes or formats.
- The 'Enable live preview' option will be enabled automatically for upload fields, and you need to enable it for text or paragraph fields.
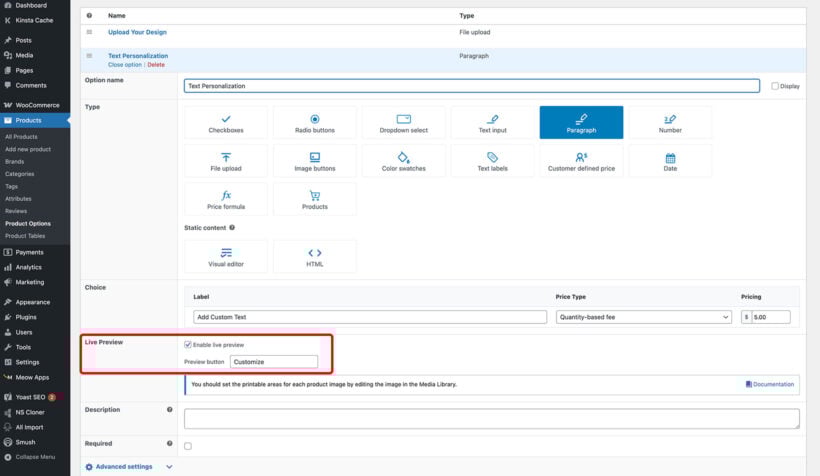
- Optionally customize the preview button text. This appears above the option on the product page after the customer has uploaded an image/added text, so that they can re-open the preview and make further changes.
- Set the field to 'Required' to prevent customers from adding the product to the cart without uploading files/adding text.
- Advanced settings:
- File upload fields:
- Maximum file size - Enter the largest file size that customers can upload, e.g. enter "10" for 10MB.
- Maximum number of files - Optionally set a maximum number of fields that can be uploaded to the field. For example, if you have only added 2 print areas to the product then you may wish to restrict this to 2.
- Allowed file types - We recommend removing any non-image file types (e.g. PDF) because the image preview only works for image files, and allowing other types might cause confusion.
- Text or paragraph fields:
- Character limits - Optionally add the minimum and/or maximum number of characters that the customer must enter.
- File upload fields:
Setting printable areas
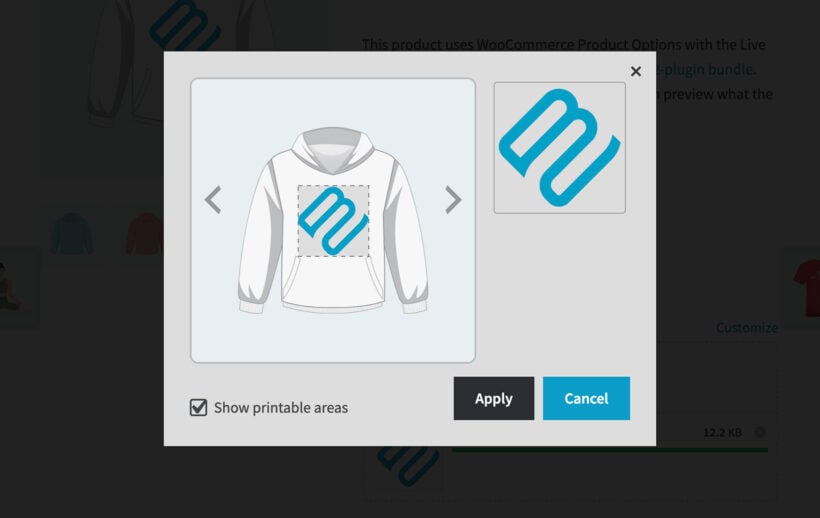
By default, customers can add their image or text to any part of the product image. You can set a printable area defines the section(s) of the product image which the customer's inputs can appear over. For example, you might add a square section to an image of a t-shirt.
- First, go to the 'Media' section of the WordPress Dashboard and make sure you are seeing the library in grid view.
- Click on one of the images that you want to use the image preview on. Alternatively, you can edit the product via the 'Add/Edit Product' screen.
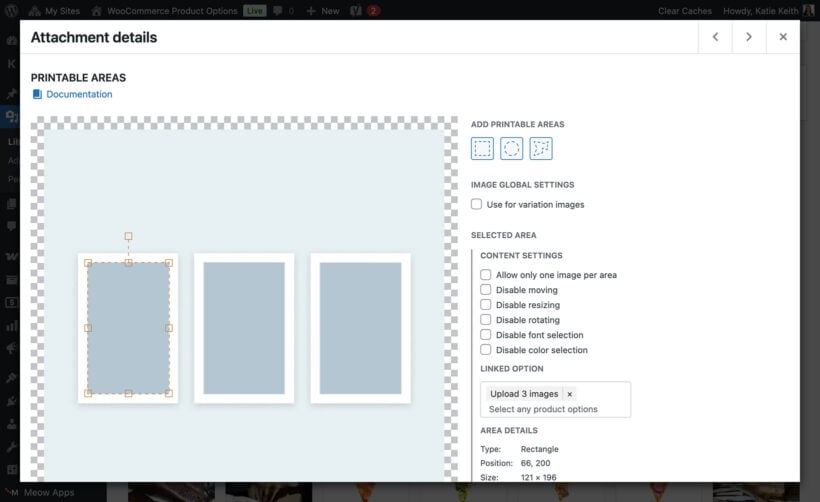
- Click the 'Set printable areas' button.
- This will open a modal window allowing you to add one or more printable areas to the image.
- Add printable areas:
- Choose a shape for the printable area - The square and circle will be added automatically. To add a custom shape, click on the third icon and then click on the image where you want to start drawing the shape. Move the mouse and keep clicking to add all the corners to the shape, and then click on the first point to close the shape.
- Size and position the printable area - Once you have added your printable areas, you can drag to reposition them, and click on the anchor points to resize them.
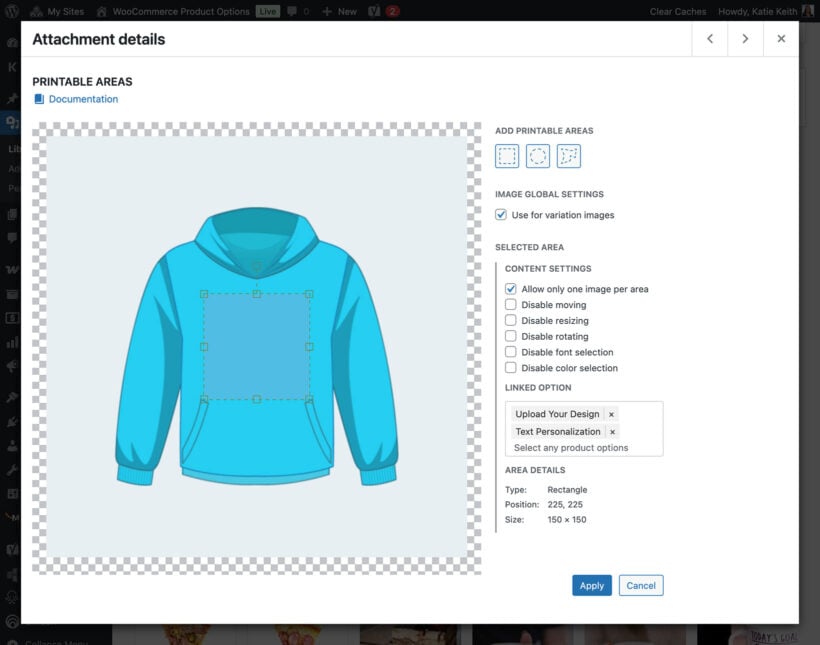
- Image options:
- Allow only one image per area - Prevent customers from adding more than one image to the same printable area.
- Disable moving - Prevent customers from dragging on their uploaded image to change the position.
- Disable resizing - Prevent customers from resizing their uploaded image.
- Disable rotating - Prevent customers from rotating their uploaded image.
- Disable font selection - Prevent customers from changing the font of the text they have entered.
- Disable font selection - Prevent customers from changing the color of the text they have entered.
- Linked Option - By default, the printable area will be used for all eligible file upload, text or paragraph fields (i.e. all fields which have image previews enabled and appear on products which use the image that has the printable area). If you want to display it on specific fields only, then select these here. For example, if you're creating a t-shirt product and will have different preview fields for the front and back of the t-shirt, then create one field for the front and select it in the printable area for the front image; and another for the back and select it in the printable area for the back image.
- Add printable areas:
How to allow customers to choose a font
By default, customers will be able to choose from a selection of fonts within the preview window for text and paragraph fields. These fonts come from your WordPress theme.
You can prevent customers from choose a font by ticking the "Disable font selection" in the printable area (see above).
To provide a wider choice of fonts, you can enter a Google Fonts API key in the plugin settings at Products → Product Options → Settings.
How to bulk-add printable areas to multiple images
Many stores need to use the same printable areas on multiple images - for example, if all their t-shirt products have images which are the same size and shape; or for a product that has a different image for each color variation.
There are 2 ways to apply the same printable areas to multiple product images at once:
- Variable products - Enable the "Use for variation images" option when you set the printable area (see above).
- Separate products:
- Go to the 'Media' section of the WordPress Dashboard and click on the image which you already set printable areas for.
- Click the 'Copy areas' button which appears next to the 'Edit printable areas' button.
- Still in the Media Library, now navigate to an image that you want to add the copied printable areas to. Click the 'Paste areas' button.
- Repeat Step 3 to paste the printable areas onto other images as needed.
Global settings
When Live Preview is installed, the WooCommerce Product Options settings page (Products → Product Options → Settings) contains several options to customizing the live preview:
- Customize button text - Use this to change the text of the link to re-open the preview window which appears on product pages, for example to "Configure" or "Edit Mockup". (You can also change the text for each individual file upload field on the Add/Edit Option Group page.)
- Preview label - Use this to change the text of the link to re-open the preview window which appears on the cart and checkout. This allows customers to view the image preview but not edit it, so we recommend using wording such as "View Preview" rather than "Customize".
- Google Fonts API key - To add a wider range of font chooses for text and paragraph field previews, enter a Google Fonts API key here. Google has provided instructions on how to generate an API key.
FAQ
Can customers add multiple images or text to 1 product image?
Yes - you can add as many printable areas to a product image as you like. For example, an image of the front of a t-shirt might have both the front and sleeves visible. In this case, you could add one printable area to the front of the t-shirt, and 2 additional printable areas to the sleeves.
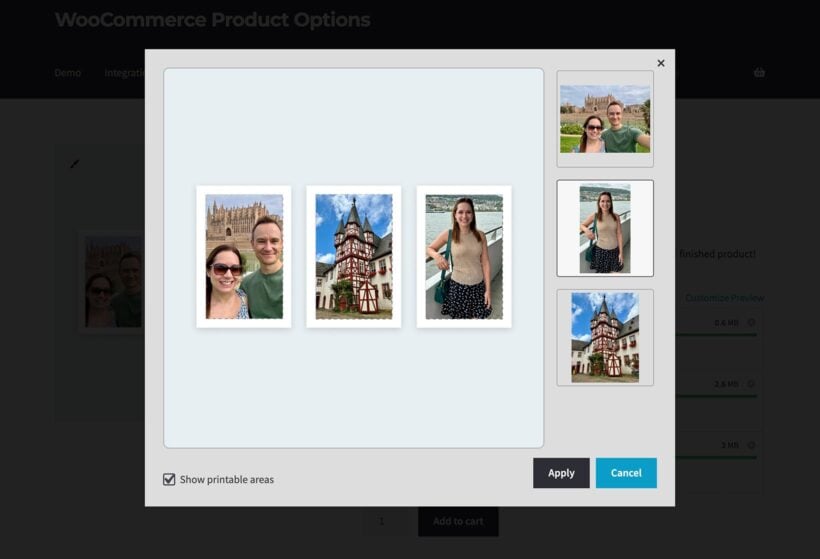
When customers upload 3 images, the preview window will contain all 3. The same happens if they enter text in more than one text or paragraph input field. The customer can then drag each one to the appropriate printable area as needed.
Can I provide multiple previews for the same product (e.g. a t-shirt front and back)?
Yes, there are two ways to do this:
- Option 1 - Provide multiple images per product, each with their own preview (e.g. one image for the t-shirt front and a different image for the t-shirt back).
- Option 2 - Provide a single image with multiple printable areas (e.g. one image which shows the front and back of a t-shirt side-by-side).
Option 1 - Provide multiple images per product, each with their own preview
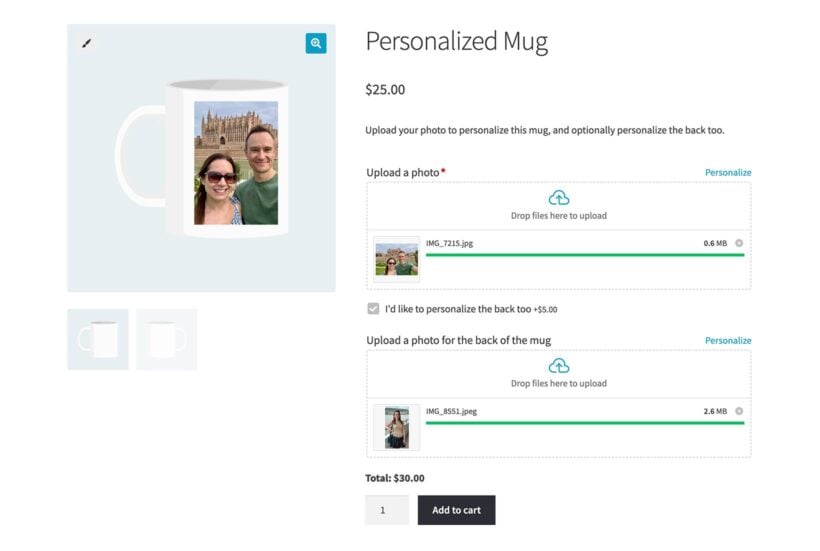
The following instructions use the example of a custom printed mug which has a separate image for the front and back. When the customer uploads an image for the front of the mug, a preview opens showing it on the front of the t-shirt. When they add different image to the 'Mug back' field, a different preview will open showing it on the back of the mug.
- Add 2 file upload, text or paragraph fields to the same options group - one for the mug front, and one for the back.
- Make sure that the product image gallery contains images of the front and back of the mug.
- Find the images in the Media Library, click the "Set Printable Areas" button, and Set printable areas for both the front and back of the mug. For each one, select the appropriate file upload/text/paragraph field under the "Linked Option" so that WooCommerce Product Options knows which field to associate with each product image.
Tip: To keep your product page looking clean and tidy, you can use conditional logic to hide the mug back field when the page first loads. For example, you could either add a checkbox saying "I'd like to personalize the back too" (as shown in the screenshot above) which customers can tick to reveal the back options.
Option 2 - Provide a single image with multiple printable areas
If you prefer, then you can add multiple printable areas to a single image. You can either allow customers to add multiple text/images and choose which one to display in each printable area, or you can associate each printable area with a specific option.
For example, this screenshot shows a 3-piece triptych which will print the customer's artwork on 3 separate pieces of canvas. If you had created a separate file upload field for the customer to add each of the 3 pictures to be printed, then you can set the Printable Areas in the Media Library and use the "Linked Option" field to associate each printable area with a specific file upload field.
Why doesn't the live preview always auto-open?
We've developed the live preview window to auto-open when the customer is likely to expect it to. It works like this:
- WooCommerce Product Options counts the number of fields on the product which have live preview enabled.
- If there is more than one, then after the customer adds their text/image into the first field and clicks outside of it, the "Customize" link will appear on the field. However, the window will not auto-open because the customer might want to add text/images to additional fields first.
- The window auto-opens after the customer has finished adding text/images to the final field on the page.
That way, the customer can click to open the preview at any time, but it will only auto-open when we are confident they have finished. This prevents them from having to open and close it multiple times, although they can still do this if they wish.
Does the customer's text and images appear on the cart and checkout?
If you're using the standard WooCommerce cart and checkout pages then the preview text and images will appear against the relevant products. Customers can click on them to reassure themselves that their customizations have been saved.
Unfortunately, it is not currently possible to display the preview images with the new WooCommerce cart and checkout blocks. We have a separate article about this.
Can customers edit the image, e.g. by re-cropping it or removing the background?
The Live Preview add-on only allows customers to reposition and resize the images. We recommend using the description field for the file upload field to provide clear instructions to the customer, for example advising them to edit and crop their images before uploading them to the product.
If you would like customers to be able to make other changes to the images then please send us a feature request with details of what you would like. In the meantime, the only plugin we're aware of that can do this is called Fancy Product Designer. This is much more complex to set up, but also has extra functionality such as the ability to edit images.
Can I customize the live preview?
The Live Preview contains several developer filters which you can use to customize it. These include:
- Changing the upscaling factor which affects the quality of the image preview
- Changing the maximum canvas size (defaults to 2400x2400).
- Changing the default object-fit when images are added to printable areas on the front end. This defaults to contain (often referred to as "fit") and can be set to cover (or "fill").
- Changing how preview files are stored on your web server. By default, they are stored as PNG files. Some store owners might want to save server space by using the JPG format.
- Changing the file preview quality when JPG is the chosen output format.
Does it work with WooCommerce Bulk Variations?
Lots of people use WooCommerce Product Options with our WooCommerce Bulk Variations plugin to display size and color variations (for example) in a quick order form with options such as file upload fields below.

You can also use the Live Preview add-on to allow customers to preview their uploaded images. To do this, you must upload a generic image as the main product image and the live preview will appear on this - as you can see with the white t-shirt in the screenshot above. It's not possible to display a live preview on each variation image because there's no way for customers to select an individual variation in the grid (by definition, WooCommerce Bulk Variations is about ordering multiple variations at one!).
When customers do this, 3 images will appear against each variation in the cart and checkout:
- The customer's uploaded image.
- The main product image with the customer's image added (e.g. the white t-shirt from the screenshot above).
- The image for the individual variation, without the customer's image (e.g. a green, red or blue t-shirt from the above example).
We are aware that some people would like to be able to display the preview on individual variation images when using Live Preview with WooCommerce Bulk Variations. We are currently investigating ways to make this possible and would appreciate your feature requests with details of how you would like the interface to work.