How to bulk edit product lead times
When you use the WooCommerce Lead Time plugin, there are lots of ways to add lead times for your products. You can set lead times globally or for entire categories to avoid having to edit each product individually. You can also import lead times in bulk.
However, there are times when you might need to set a different lead time for each product and update them all at once. When this happens, you can use WooCommerce Lead Time with a compatible bulk editing plugin.
Keep reading to discover which plugins are compatible with WooCommerce Lead Time, and how to use them to bulk edit your lead times.
Compatible plugins
The following plugins allow you to bulk edit custom metadata, including the lead time for each product.
Setary (recommended)
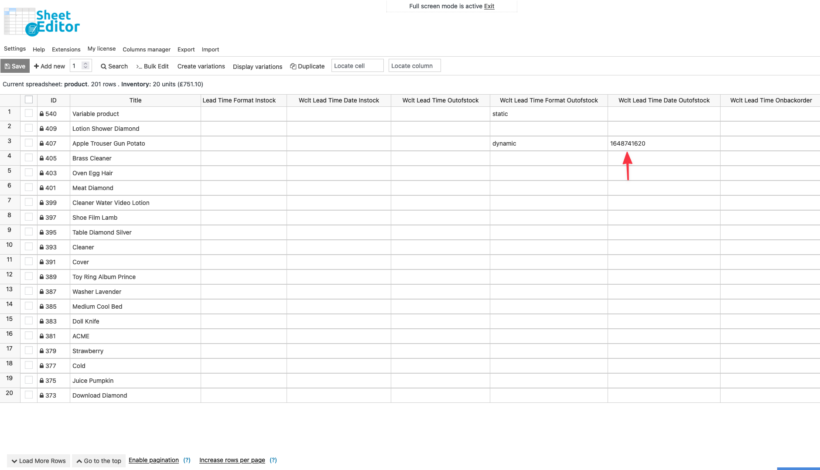
Setary is the most user-friendly WooCommerce bulk editor which we have tested. It loads your products as a spreadsheet so you can edit static and dynamic lead times across hundreds of products and variations in one session.

To edit lead times in Setary:
- Open the 'Edit Product' screen for any one product and manually set the lead time. This step is needed so that Setary can detect the lead time columns on your site.
- Go to the Setary app at https://setary.com/app. Click the 'Columns' button at the top and search for 'WClt'.
- Enable the lead time columns you need:
- Wclt Lead Time - The static lead time for simple and parent products. For example, '2 weeks'.
- Wclt Lead Time Date - The dynamic lead time for simple and parent products. Enter a Unix timestamp generated at https://www.epochconverter.com.
- Wclt Lead Time Format - Sets whether the lead time for a simple or parent product is 'static' or 'dynamic'.
- Wclt Variation Lead Time Date - The dynamic lead time for individual variations. Enter a Unix timestamp generated at https://www.epochconverter.com.
- Wclt Variation Lead Time Format - Sets whether the lead time for a variation is 'static' or 'dynamic'.
- Edit the values directly in each cell. To update many products at once, select multiple rows and use the bulk actions to apply the same lead time across all selected products or variations.
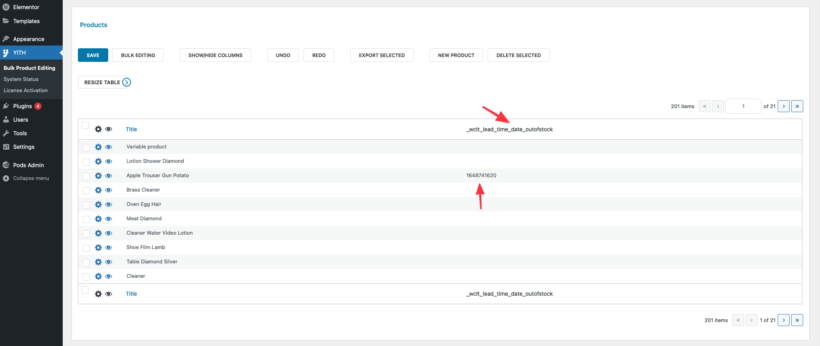
YITH WooCommerce Bulk Product Editing
YITH's WooCommerce Bulk Product Editing plugin makes it quick and easy to update product data in bulk.
WP Sheet Editor
The WooCommerce Bulk Editor plugin by WP Sheet Editor adds a spreadsheet-style editor to WooCommerce.
BEAR – Bulk Editor and Products Manager Professional for WooCommerce
You can also try the free BEAR – Bulk Editor and Products Manager Professional for WooCommerce plugin by Pluginus.Net.
How to edit lead times with other bulk editing plugins
If you're using YITH, WP Sheet Editor, or BEAR rather than Setary, follow these steps:
- Install your chosen WooCommerce bulk editing plugin.
- Use the plugin documentation to add the lead time custom metafield to the bulk editor. To do this, you must know the name of the metafield from WooCommerce Lead Time which you need to update. You can find these in our article about importing lead times.
- Once the appropriate lead time field is appearing in the bulk editor, you can update it as follows:
- Static lead times - Enter the lead time as you want it to appear on the website. For example, if you have not selected a lead time unit on the plugin settings page then you might add "14 days". If you have selected Days as the unit on the plugin settings page then you might add "14" because the plugin will add "days" automatically.
- Dynamic lead times - The date when the product will become available is stored in the WordPress database as a timestamp. As a result, you must add the date as a timestamp in order for WooCommerce Lead Time to display is correctly on your website. You can convert the required lead time into a timestamp using https://www.epochconverter.com.
If this is too technical for you then you can use our plugin customization service, and we'll be happy to do it for you.