Protecting your document library
The 'Advanced' plan for Document Library Pro comes with a wide range of privacy options for restricting access to any or all of your documents. For example:
- If you're adding a private document library to a public website, then you can restrict access to the documents while leaving the rest of the site public.
- You may wish to create a document library that is part public and part private.
- Perhaps you need to show different documents to different user groups (e.g. customers, employees, managers, etc.).
This article describes the different options for protecting the document library.
Document protection options
You can restrict access to any or all of your documents as follows:
- Make the entire document library private.
- Restrict access to specific document categories.
- Control access for each document individually.
You can mix and match the different types of protection for fine-grained control. The options work hierarchically, which means that the most specific level of protection will always take priority if there is ever a conflict. For example, if a document is in a public category but you choose to protect it individually then the individual document protection will override the category visibility.
Related: Learn more about combining multiple types of protection.
Make the entire document library private
- Go to Documents → Settings → Access Control and configure the settings as needed:
- Document library visibility:
- Public - Everyone can access the document library.
- Protected - This reveals some additional options below:
- Password protected - Restrict the document library using simple password protection so that people can unlock it without needing their own user account. Enter one or more passwords, using the plus (+) icon to add additional passwords. Click the minus (-) icon to delete a password. Customers can unlock the library by entering any correct password.
- User roles - Select this and then click in the box and select one or more user roles who will have access to the library.
- Specific users - Select this and then click in the box and select one or more specific users who will have access to the library. (Tip: If you have lots of users, start typing a username in the box to search for a specific user.)
- The user who created the document - Tick this box to ensure that each logged-in user can only see the documents they have created themselves, whether added in the WordPress admin or through the front-end submission form.
Show protected documents?
Ticking this box will show your protected documents on the public parts of your site. People must still enter a password in order to download/preview documents or access the single document pages, but will be able to see them on the public areas of your website. For example, they will appear on the main document library page (unless you have set the global visibility to 'Protected'), widgets, navigation menus, and search results. If someone tries to click on one then they will be taken to the document login page.
Untick the box to hide all protected documents from public view, so that only authorized users will be able to see them at all.
For navigation menus, this option only works if you have added the links to the menu as a category or post. It does not work if you have added them as ‘Custom Links’.
Note: Ticking this box only affects the visibility of protected documents for users who have not yet entered the correct password. Once a user enters the correct password, the document(s) will be ‘unlocked’ to them and will always be displayed for that user, regardless of this setting.
Restrict access to specific document categories
- Go to Documents → Categories and click to edit the category that you wish to restrict.
- Find the 'Visibility' settings and configure them as required:
- Inherited - The category, its sub-categories and documents will share the same protection as the overall document library and its parent category(if it is a child category).
- Public - The category, its sub-categories and documents will be available for anyone to view, even if the overall document library or parent category is protected.
- Protected:
- Password protected - Password protect the category by adding one or more passwords. To add more passwords for a category, click the plus (+) icon next to the password box and add a new row for each additional password. Click the minus (-) icon to delete a password. Customers can unlock the category by entering any correct password.
- User roles - Click in the box and select one or more user roles who will have access to the protected category.
- Users - Click in the box and select one or more specific users who will have access to the protected category. (Tip: If you have lots of users, start typing a username in the box to search for a specific user.)
- The user who created the document - Tick this box to ensure that each logged-in user can only see the documents within the category that they have created themselves, whether added in the WordPress admin or through the front-end submission form.
Control access to individual documents
- Go to the main 'Documents' page in the WordPress admin and click on the document you wish to protect.
- Scroll down to the 'Access Control' option:
- Inherited - The category, its sub-categories and documents will share the same protection as the overall document library and its parent category(if it is a child category).
- Public - The category, its sub-categories and documents will be available for anyone to view, even if the overall document library or parent category is protected.
- Protected:
- Password protected - Password protect the document by adding one or more passwords. To add more passwords for a document, click the plus (+) icon next to the password box and add a new row for each additional password. Customers can unlock the document by entering any correct password.
- User roles - Click in the box and select one or more user roles who will have access to the document.
- Users - Click in the box and select one or more specific users who will have access to the document. (Tip: If you have lots of users, start typing a username in the box to search for a specific user.)
- The user who created the document - Tick this box to ensure that the document will only be visible to the specific logged-in user who created it, whether added in the WordPress admin or through the front-end submission form.
Login page
Document Library Pro provides a login form which you can add to any part of your saite so that people can unlock the hidden areas of the document library. Add it either using the 'Document Library Login Form' block or the [doc_library_login] shortcode.
You can customize the login page using the following options. The easiest way to customize the form is to set each option globally under Documents → Access Control. If you're adding multiple login pages to different parts of your site then you can override the options directly in each individual block or shortcode.
| Option | Description | Shortcode option |
|---|---|---|
| Type of login | Displays a password entry form and/or a user login form | show_password_form (true/false) and show_user_form (true/false) |
| User form title | Customizes the title which appears above the user login form | user_title |
| User form message | Customizes the message which appears above the user login for, under the title | user_message |
| User form button text | Customizes the button text on the user login form | user_button |
| Password form title | Customizes the title which appears above the password entry form | password_title |
| Form message | Customizes the message which appears above the password form, under the title | password_message |
| Password label | Customizes the label on the password entry field | password_label |
| Use placeholder? | rue/false) - Shows or hides the placeholder text from the password entry field on the password form. Only used if the login page includes a password form. | password_use_placeholder (true/false) |
| Password button text | Customizes the submit button on the password form | password_button |
Shortcode usage example: [doc_library_login show_user_form="true" user_message="Please log into your account to unlock the document library."]
Styling the login page
The login page will automatically inherit the styles from your theme, such as the fonts. This ensures a consistent look with the rest of your site.
If you're using the 'Document Library Login Form' block then you can customize it using the settings in the design panel; otherwise you can customize it using custom CSS.
Controlling who can edit documents
Use the settings at the bottom of Documents → Access Control to control who can add, edit, delete and import documents in the WordPress admin:
- Document management roles - By default, Administrators and Authors can manage documents. Select additional roles as needed. (Tip: You can create additional user roles with the free User Role Editor plugin, for example if you wanted to create a 'Staff' role which can only manage documents.)
- Document owner access - Enable this option to also allow people to edit documents that they created themselves, whether they did this in the WordPress admin or through the front-end submission form.
Note: It is not possible to prevent Administrators from being able to manage documents. For this reason, if you remove the Administrator role and click Save then it will re-appear.
Using Document Library Pro with other membership or privacy plugins
How does Document Library Pro work with the Password Protected Categories plugin?
Before we added protection options directly to Document Library Pro, a lot of people used it with our other plugin - Password Protected Categories. This lets you restrict access to specific categories of documents.
Other membership plugins
There are many plugins which you can use to restrict access to the document library. Document Library Pro works with most WordPress membership plugins. If your document library will be part of a wider membership site then you can use it with any WordPress membership plugin that supports custom post types, such as MemberPress. Paid Member Subscriptions is excellent if you want to sell access to the document library.
Can I protect the downloadable files?
In general, no one can access files in the WordPress Media Library unless they have the direct URL. As a result, if you are using one of the above plugins to restrict access to your documents, then no one else will be able to access the downloadable files because they don't know the URL.
For an extra level of security, you can use either the Download Monitor or Prevent Direct Access (PDA) Gold plugins. We particularly recommend Download Monitor because they have specifically integrated it with Document Library Pro. As a result, there's a handy 'Protect' button when you add files to your document library which makes it quick and easy to protect each file.
You should use this alongside Password Protected Categories, so Password Protected Categories restricts access to the document categories; and Download Monitor restricts access to the underlying document files in the Media Library.
How to use Download Monitor to protect your document files
From the 'Edit Document' screen in the WordPress admin, add a file upload in the usual way:
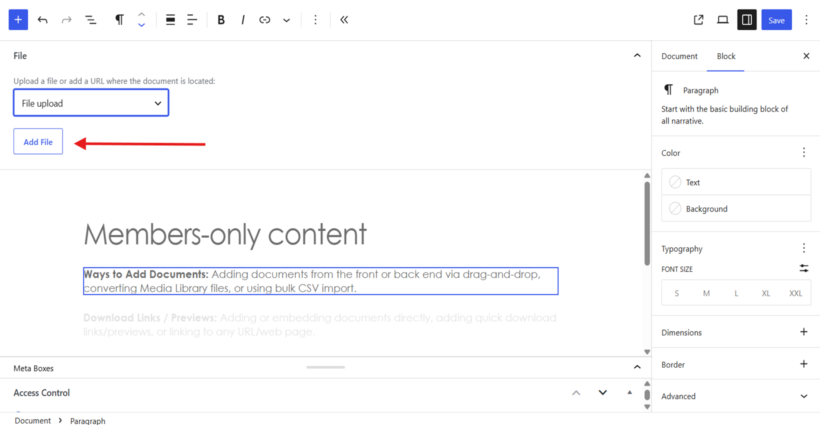
Next, upload the document file, and click on the blue 'Protect' button which is added by the Download Monitor plugin:
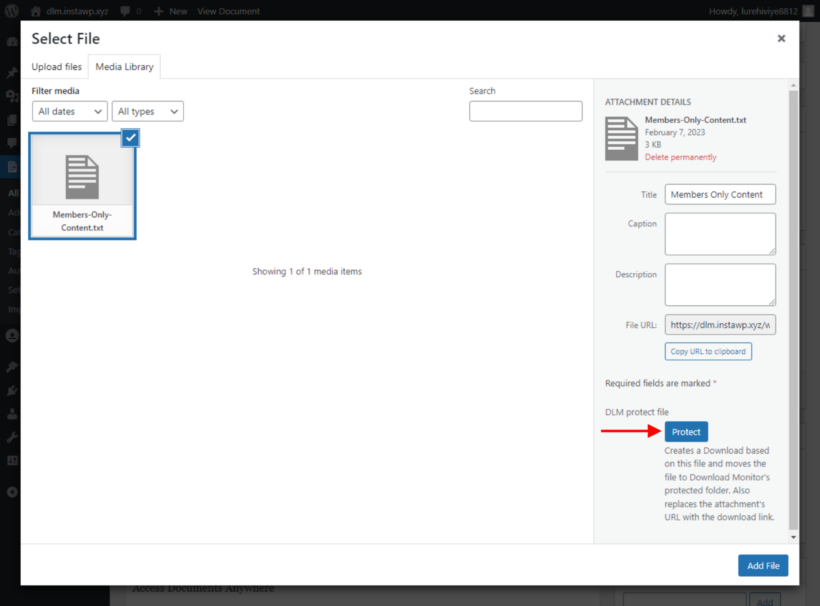
Clicking on the Protect button protects the file. Next, publish or save the document as usual. The document file is now protected by Download Monitor.
Create a 100% private document library site
Some people create a completely standalone document library website, which is not used for any other purpose. If this applies to you, then you can make it completely private so that only people with the password can access the website at all.
There are 2 main ways to password protect an entire website:
- First, ask your hosting company if they offer .htaccess protection. If you use a managed WordPress host such as Kinsta then this is easy to set up.
- If that's not an option, then install the free Password Protected plugin on your WordPress site.
Once you have set up either of these options, people will be asked to enter a password when they try to access your document library website. Give the password to the people who require access.
Tip: Since the site is 100% private, you will probably also want to hide it from search engines. You can do this under Settings → Reading in the WordPress admin.