If you are monetizing your blog, you are likely doing a number of things – soliciting advertisers, acting as an affiliate for products or services, etc. And you may even be selling or promoting products directly from within blog posts.
But you may not know how you can use WooCommerce with a product comparison table plugin. This gives you all kinds of flexible ways to showcase and compare products for your audience.
What is WooCommerce?
At its most basic, WooCommerce is an open source e-commerce plugin for WordPress. It is used by online vendors/merchants to showcase and sell their products or services. For a free plugin, it offers lots of features, including managing inventory, shipping, a secure payment system, and even taxes. And of course, there’s support for mobile devices.
There are a number of extensions for WooCommerce. One of the best is the WooCommerce comparison table plugin we're talking about today.
What a WooCommerce comparison table can do for affiliate bloggers
The idea behind this plugin is that bloggers can list products in a table directly inside their blog posts. This provides easy viewing by followers, whether you're selling your own products or performing as an affiliate seller of other companies' products (e.g. Amazon affiliates).
What makes this the best WooCommerce comparison table plugin is the availability of over 50 features. As an affiliate blogger, this gives you lots of flexibility in how to promote products within blog posts. Best of all, you can add comparison tables to any WordPress blog post with a simple shortcode.
Everything you need to sell more affiliate products from within blog posts
Here are just a few features that monetizing bloggers can use with this plugin:
The blogger adds a standard or external/affiliate product through WooCommerce. They then display it in a comparison table in a blog post. You can categorize products in a number of different ways. There are also ways to choose which products to include in each blog post.
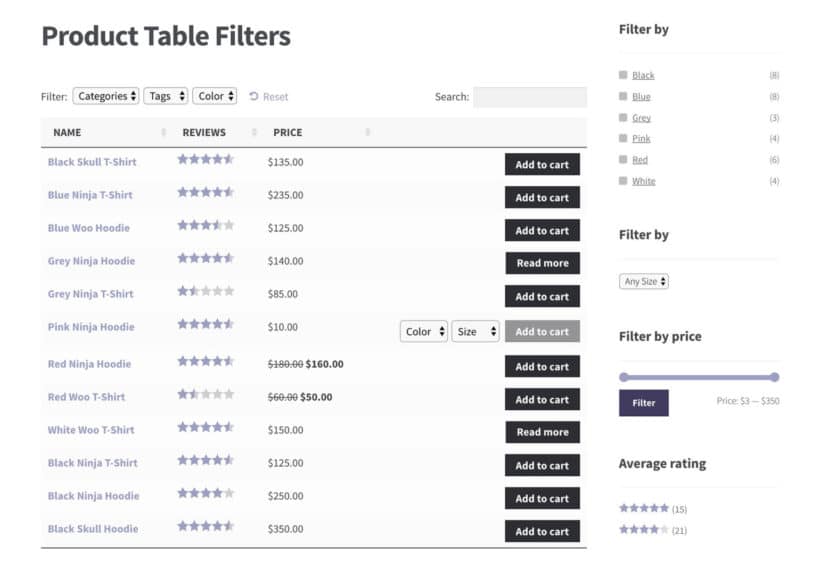
There are a number of options for columns and filters to include in the table.
If products are being sold directly on your e-commerce site, then WooCommerce provides a shopping cart feature.
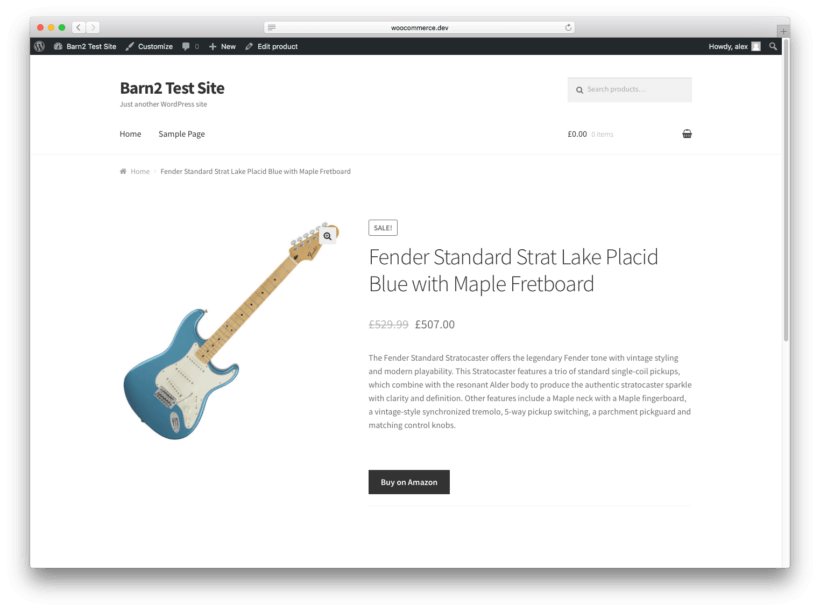
If products are sold through an affiliate link, there is an option to provide a referral link to the affiliate company. This will then appear as a button next to each product in the WooCommerce comparison table. Followers can easily compare products you've talked about in the blog post. They can then click through to buy them on the third party website.
The table has a search feature at the top, for bloggers who sell or promote numerous products or services. You can hide the search box if you only feature only a few products in each blog post.
The plugin is WPML certified for multi-lingual audiences.
Users can access full expert support from the UK WordPress agency Barn2 Media.
An interesting sideline - create an Amazon affiliates blog
Many bloggers have sites focused on specific topics of interest to them. They monetize those blogs with affiliate advertising and product offerings relating to that topic.
But one blog does not have to be the “end-all”. Many bloggers, in fact, have multiple blogs, on varied topics/themes.
One option for an additional blog would be to establish an Amazon products review blog, through Amazon’s affiliate program. This is a great source of passive income, although there will certainly be some work involved. For example, you need to write the best reviews that will draw followers to the blog and inspire them to order the products that you recommend. Even if a blogger is not an accomplished writer, you can use creative copywriters from services such as FlashEssay to write your reviews for a nominal price.
A WooCommerce comparison table plugin is perfect for displaying Amazon affiliate products. And the great thing about this plugin is that it is scalable, with the ability to add a limitless number of products, new categories, etc.
What are you waiting for?
If you have a monetized WordPress blog featuring WooCommerce products, it makes perfect sense to add product comparison tables to your blog posts. When consumers access websites and blogs, looking for products or services, they want an easy, visual method of viewing potential purchases, with all of the information they need in one place. Most do not want to read walls of text. A WooCommerce comparison table plugin is the solution.
Affiliate blogging has great potential as an income-producer, if it is done right. Getting companies to see value in advertising on a blog is a long-term process, after a blog has become popular enough with a large enough following to make it worth their while. The faster method is to develop a line of products to sell directly, or to become an affiliate marketer for other companies with products to sell. In either case, WooCommerce Product Table is the ideal plugin for adding product comparison tables to your blog posts.
Passive income is the holy grail for modern online entrepreneurs. The term conjures up images of the successful web store owner reclining in a hammock on some golden-sanded beach, cocktail in one hand, while a sales counter on a nearby laptop slowly ticks upward. A WooCommerce Amazon affiliates website is one of the best ways of achieving this holy grail of online marketing.
The internet – and WordPress (with WooCommerce) in particular – has created unique opportunities to earn money online without having to work for each sale. And one of the most effective, not to mention simplest, ways of doing this is by creating a WooCommerce product reviews website. It works by comparing and reviewing products from Amazon, utilizing the Amazon affiliates program.
You can start a WooCommerce product reviews website on a shoestring budget (under $200) and gain substantial rewards. With that in mind, this guide will show you how to build a WordPress website that can earn Amazon affiliates commissions by publishing product reviews and comparisons. We’ll focus on free tools and plugins where possible. I will only recommend paid options if there’s no free alternative.
You'll build your WooCommerce amazon affiliates site using WordPress, which is free. We’ll bolt-on to WordPress the similarly free WooCommerce plugin, which powers over 41% of all online shops worldwide. This means you’re in good company :)
We’ll also be looking at how to use the WooCommerce Product Table plugin to list products and reviews in a user-friendly product comparison table, with extra features such as search, sort, and filter. This will make it easier for customers to compare the products you’ve reviewed at a glance, make quick buying decisions. And – most importantly – click on your Amazon affiliate links.
What is the Amazon affiliates program and how does it work?
We’ve been discussing the Amazon affiliates program. But what is it, exactly, and how does it work? Well, it’s very simple. Here are the three steps involved:
You develop a genuinely useful website with comparisons and reviews of other companies’ products. These might be reviews you have added yourself and/or reviews that other visitors to your website have written.
Consumers find your website and use the information to decide what to purchase. You’ll list the products on your website using the WooCommerce plugin. But instead of selling the products directly on your site, the Buy button will take the visitor directly to the Amazon listing. This is your affiliate link.
The consumer decides to buy! They’ll do this on Amazon as usual, but since they came to Amazon via your site, and you used your Amazon affiliates link, Amazon will share roughly 5% of the value of the sale with you. (This varies depending on the specific product). This is your affiliate commission.
The great thing about this system is that everyone wins: readers find helpful information and reviews about products they’re interested in, Amazon gets more sales, and you take a share of the proceeds.
If it’s that easy, why isn’t everyone doing it?
So here’s the thing: developing this kind of site is simple (as you’ll see from this guide) – but it would be a bit of a stretch to call it “easy”. As we’ve discussed, there is a small cost involved along with the time required to set the site up. There's also the skill of making sure the reviews and comparisons are valuable to consumers.
The key phrase you should have picked up on in the previous section is that your website needs to be genuinely useful. Your WooCommerce Amazon affiliates website will only be truly successful if you offer meaningful, engaging content that provides value for consumers.
A key part of the strategy of getting visitors to your Amazon affiliates website will be ranking your site well for relevant search terms. (We’ll discuss this later.) Thus, you have to make sure Google is happy. Here’s a tweet from a Google employee that summarizes Google’s position:
DYK there's no inherent problem with affiliate links? The problem is when a site's sole purpose is to be a shallow container for aff links pic.twitter.com/y149XZ0JP6
— Gary 鯨理/경리 Illyes (so official, trust me) (@methode) March 14, 2017
You must publish quality reviews and comparisons that aren’t already available elsewhere. If you don’t get this part right, search engines (rightly) won’t think highly of your site. Consumers won’t have a reason to visit your site, and you won’t earn any Amazon affiliates commission.
However, if you work hard at finding a niche and spend time adding and promoting unique content, then the obvious appeal of passive income can work well for you. The quality content point is especially important, so be sure to get that right. Now, we’ll move on to look at how to select the niche of your WooCommerce Amazon affiliates website.
Which niche should your WooCommerce Amazon affiliates target?
If you can earn a commission for each sale you refer to Amazon, your site should just list as many Amazon products as possible, and you’ll get more commission – right? Unfortunately, no. Your WooCommerce Amazon affiliates website must focus on a niche.
Search engines will respect the authority of a site that clearly focusses on one thing. Here are some examples of good niches for a WooCommerce Amazon affiliates store:
guitars
office supplies
televisions
hot tubs (!)
These examples are fairly disparate, but they all have a couple of features in common:
Customers have a lot of choice, with no obvious “best” product. Furthermore, all the products are fairly similar in outcomes. A consumer wanting to buy a guitar is plausibly confused and will search for reviews – this is where you come in.
Each item is relatively expensive. You earn a fixed commission from Amazon, so the higher the price of the product, the higher your commission.
Amazon offers a good selection of all these products. To run a WooCommerce Amazon affiliates website you must, obviously, be able to link to Amazon products.
How to choose the right niche
When selecting your niche, you should also consider your expertise or personal experience. If you happen to be an expert (or at the very least an enthusiast) in electric guitars, you’ll find it a lot easier to comprehensively review and compare guitars.
Finally, consider the competition. Who else is already reviewing the product you’re considering? If a potential niche is particularly crowded – such as guitar reviews – then get more specific! Guitar reviews may be a well-covered market, but what about the best guitars for teenage girls? Television reviews will be well-covered, but what about the best televisions for small apartments? Get creative and find a space within your niche that is under-served. Search the relevant terms your potential visitors will use to get a sense of what is well-covered and where there is a gap in information.
Take a pen and some time now to work out your niche. You may need to go through a couple of ideas before you hit on the right one, but that’s fine! It’s incredibly important to get this section right, as it will directly impact how much affiliate commission your site will drive later.
Search engines will reward the websites and content that are demonstrably the best in their given field. The vast majority of search clicks go to the top couple of search results, so make sure your chosen niche is specific or under-competed enough, so that you can produce the best content, and take those top search rankings.
Case Study – Best Toys for 2 Year Olds WooCommerce Amazon Affiliates Site
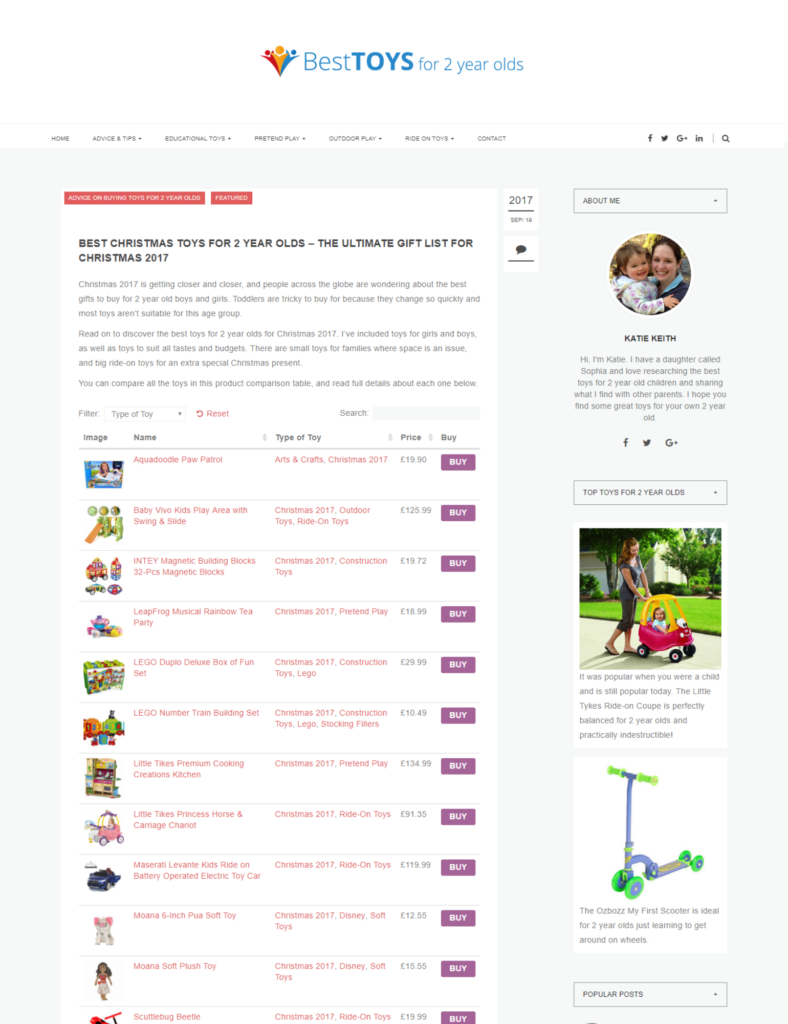
Just to prove that I’m not afraid to put my money where my mouth is, let’s take my own Amazon affiliates site Best Toys for 2 Year Olds as an example. This site is powered by WooCommerce and uses precisely the same formula as you’ll find here.
I founded the site because at the time, I had a daughter this age and had been struggling to find developmentally age-appropriate toys. It occupies a niche about which, thanks to my personal experience, I felt I could speak with some authority, giving value to readers.
It’s a very simple website that provides parent-friendly advice and reviews on the best toys for 2 year old children. It’s intentionally non-corporate and speaks from one parent to another. Parents can read the advice and then click through to buy the products on Amazon, which generates the affiliate commissions.
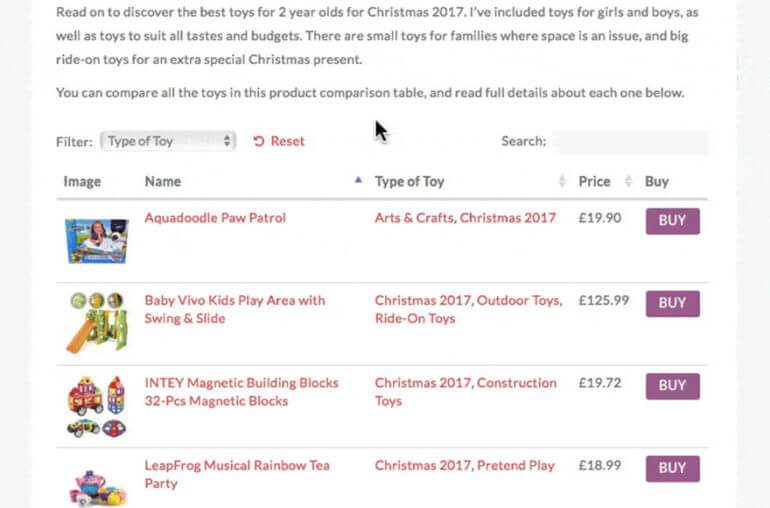
On posts such as the Best Christmas Toys for 2 Year Olds, I’ve used the WooCommerce Product Table plugin in order to display the products in very convenient, sortable tables. This lets parents generate personalized comparison lists, specific to their own criteria. If, for example, they are focused on price, they can find the cheapest toys; if they want toys from a specific category, they can also sort by these. This is the kind of genuine, added value that has made my WooCommerce Amazon affiliates site successful, and it can do the same for you.
Now that you’ve seen what can be done, let’s get on to the specific detail and step-by-step instructions you need to get started.
How much does a WooCommerce Amazon affiliates site cost?
As we’ve mentioned already, there are a handful of costs involved when setting up your WooCommerce Amazon affiliates website. The good news is that this is not expensive to set up, and a successful site will have no problem making this upfront money back in no time.
Remember, thanks to the magic of passive income, once you’ve done the work, each additional sale is pure profit, so the upside is very large!
Here are the three costs involved in setting up your site
NameCheap This is the name of your website (for example, barn2.com). You’ll need to choose a name (i.e., barn2) and an extension (i.e., .com or .co.uk). You should choose a name relevant to the niche you’ve selected, but keep in mind that millions of domains have already been registered, so you may need to get a little creative. You can use a tool such as NameMesh to make the process of finding an available domain easier and a registrar such as NameCheap for your registration.
Web hosting This is how your website is powered. As such, it’s incredibly important! Good hosting will make sure your website is fast, secure, and reliable (all this is very important for keeping and retaining visitors, and making search engines happy). We recommend WP Engine, an excellent WordPress-specialist host that does everything for you. You can get cheaper hosting elsewhere (if you have to do this, choose SiteGround), but you’ll find excellent hosting is money very well spent.
WooCommerce Product Table plugin This is the only paid plugin for WooCommerce needed for this tutorial. You need it to display your products, ratings, and affiliate buttons in a nice, user-friendly comparison table or grid, which can maximize your affiliate income. This is made by our development team at Barn2, so you can be confident of the quality.
The costs come to the low hundreds of dollars; it’s cheap to set this up, and the main investment, therefore, is your time. The setup itself won’t take long, but you will need to spend time on your content. We’ll talk more about this later on.
How to set up a successful WooCommerce Amazon affiliates website in 5 easy steps
With the prerequisites taken care of, let’s turn our attention to the specific steps you need to set up a successful WooCommerce Amazon affiliates website. You’ll want to take the time to methodically follow each of these, and once you’re at the end, you’ll have your new site live! Let’s make a start.
Step 1 – Sign up to the Amazon affiliates program
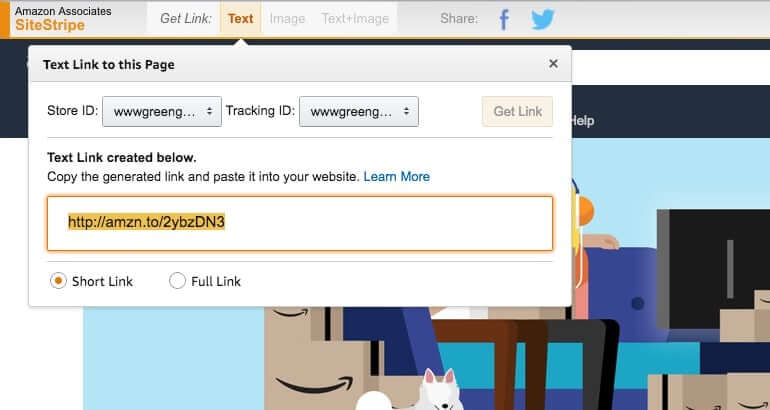
The obvious first step is to sign up for the Amazon affiliate program. You can do this from the Amazon Associates page: follow the prompts, agree to the terms, and you’ll be good to go.
Once signed up, it’s easy to get Amazon affiliate links for any product: your Amazon account will have an “Amazon Associates SiteStripe” added across the top of the site, and you just need to click Get Link → Text to get personalized affiliate links from any page on Amazon. This is what you’ll use later when linking products from your website, instead of regular Amazon links.
You can make things easier for yourself later on by selecting ten products that you want to review or compare on your site, and getting their affiliate links now. You might find it useful to save them in a spreadsheet for easy reference.
It’s worth mentioning that while this guide is focused on creating a WooCommerce Amazon affiliates website, you don’t have to use Amazon. The method here will work for any affiliate program; we’re focusing on Amazon as it’s the easiest and most convenient. You could, for example, choose to join our WordPress plugins affiliate scheme, and earn a 30% commission on the sales you refer to us :)
Step 2 – Set up WordPress with WooCommerce
It’s now time to get started with your WordPress website
If you’ve chosen WordPress hosting with WPEngine (as we recommended), you’ll find everything set up for you. If you went with SiteGround, the cheaper, option, you’ll need to follow a couple of simple steps, but it’s all self-explanatory.
Once WordPress is setup, head to your new WordPress Dashboard (available at yoursite.com/wp-admin). You’ll want to take a minute to get familiar with how WordPress works: click around to get a feel.
Install a WooCommerce-ready theme
The first thing we’ll do is install a WordPress theme. This is a pre-built, professionally-made website design that can be dropped onto any WordPress site – including yours! Here, we’ll be using a free WordPress theme specifically designed for WooCommerce called Storefront.
Storefront is really easy to install: from the WordPress Dashboard, head to Appearance → Themes, search for Storefront, find the theme, then click Install > Activate.
If you don’t like the design, you can use one of the Storefront child themes, which provide a nice choice of skins. The child theme designs are either free or $39. They all come with full instructions and documentation on how to set them up.
If you want a more versatile theme, there are plenty of WooCommerce-ready themes on ThemeForest. These typically have significantly more features than Storefront and its child themes, but take a lot more work to set up. There’s also a greater potential for things to go wrong, due to the extra complexity. You should only choose a more flexible/complex theme if you’re sure you know what you’re doing and can see that there are definite benefits in doing so.
WordPress makes it remarkably simple to install a theme (it’s just the setup that can take longer), so whichever you go with, you’ll find you very quickly have a great design on your site.
Step 3 – Install WooCommerce
Next, we’ll install WooCommerce. As we’ve touched on, this is the leading ecommerce platform that we’ll use to list and sort the products you’re reviewing. WooCommerce is normally used for selling products, but it can equally be used to power affiliate websites. We’ll get to this later on.
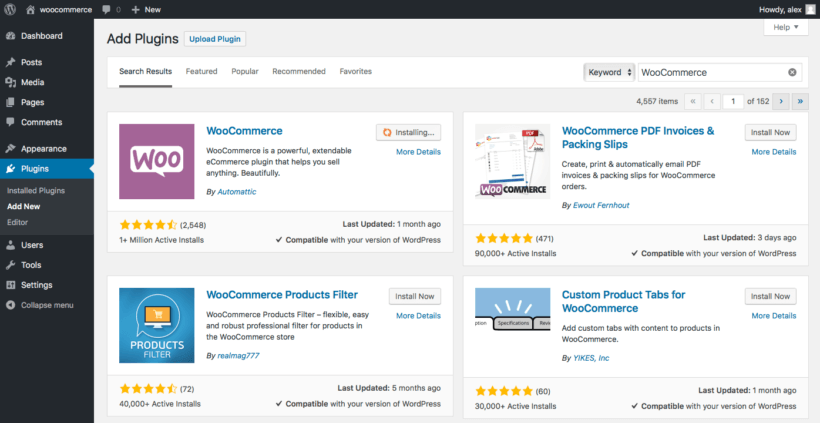
WooCommerce is free and incredibly easy to install. Head to the WordPress Dashboard, then Plugins → Add New. Search WooCommerce, and then install and activate the plugin.
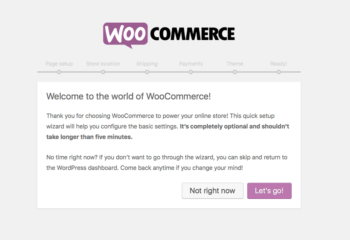
Next, run through the WooCommerce Setup Wizard. This is the quick way to set up your affiliate store, so follow the steps through to the end. Skip any steps that only apply to regular ecommerce stores.
Now you're all set up with WooCommerce!
Nice work: you now have a website, a professional design, and the world’s leading ecommerce platform. Next up, it’s time to add your products.
Step 4 – Add your Amazon affiliate products, with descriptions or reviews
This has all been fairly straightforward so far - technical, perhaps, but straightforward nonetheless. Here we get to the part that requires your personal skills: adding your products and writing the descriptions and reviews.
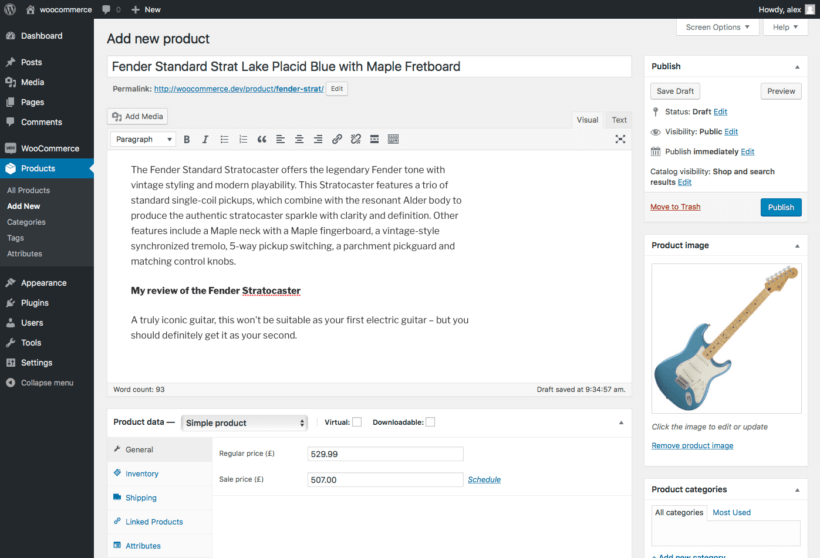
You can add your first product by heading to Products → Add New, and filling in the fields:
Add all the information for the product, starting with the title. Some info, such as categories or tags won’t be relevant, but make sure to add everything that is. You can copy this from the Amazon listing.
Add a product image. Images ensure that your reviews are more engaging. You can also copy these from the Amazon listing, and add them under the Product Image box.
Add the main description! Now we’re getting into the fun part. You’ll need to describe the product in your own words; do not just copy from the Amazon listing, as visitors and search engines will want to see original content here. Remember, visitors need a good reason to come to your website, so add value here by adding extra information or by displaying the information in a more accessible format.
Add your review of the product. If you decide to add product reviews rather than just comparisons, then add your review below the main description! Make it easy for the reader by highlighting the key information they need to know, answering the questions they’re likely to have, and making a recommendation on whether the product is right for them.
Now add your WooCommerce Amazon affiliates product info
This section is where your site can really add value – something that makes or breaks the success of a WooCommerce Amazon affiliates site – so take the time to get this right. With this section complete, you can turn to add the product data. Again, there are a couple of steps to follow:
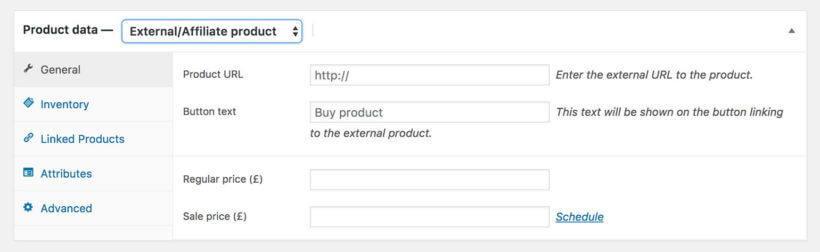
Select External/Affiliate product from the dropdown list in the Product Data section. Add your Amazon affiliate link for the product under Product URL, and add the text you want to appear on the button under Button text. “Buy on Amazon” or similar will be appropriate.
You may wish to add the product price and sale price. This makes it more convenient for the reader by displaying the product price before they click through – but lines you up to have to update the price regularly. If you’re okay keeping this up to date, you’ll find readers appreciate the extra information.
Reader-generated content is some of the best content you can have. Why? Because it adds value and you don’t have to write it! Under the Advanced tab, you can tick “Enable reviews” to let visitors leave their own reviews. This has the added benefit of adding “social proof” to your site, which can in turn make your own reviews more credible. WooCommerce will collate the product ratings, and you can display these as a column in your comparison tables (we’ll get to this in the next section).
Finally, click the blue ‘Publish’ button to set your product live!
Now add your other Amazon affiliate products in WooCommerce
It’s now just a case of repeating the steps for all of the products you want to add. This will take you some time, but do make sure to do a thorough job: these reviews will be the backbone of your site!
Once you’ve got your content added, we’ll move onto making their display look nice.
Step 5 – Setup the WooCommerce Product Table
A site filled with excellent products and reviews is no use if nobody can find them! Your next task is to lay out your products and reviews into an easily-accessible format, so that visitors can both browse and find what they’re looking for more effectively.
To do this, you’re going to need the WooCommerce Product Table plugin we mentioned earlier. Buy yourself the plugin (this is the only plugin you’ll have to pay for in this guide). Follow the included instructions to install, and then enter the license key.
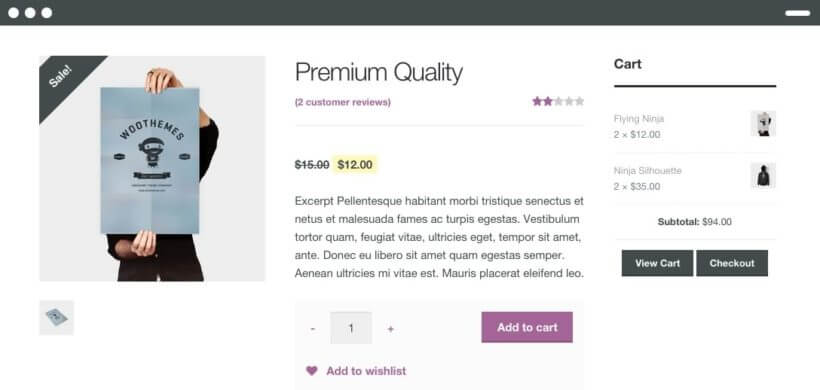
You can now add a neat table of your products to any post or page on your site! Earlier, we mentioned the advantages of having this in practice on Best Toys for 2 Year Olds. Readers can take the available information and sort it according to the criteria most important to them. This makes your site much more valuable!
The product table also lets you collate products for specific events and dates. On our case study site, birthdays and Christmas would be great examples.
Add your WooCommerce affiliate product tables
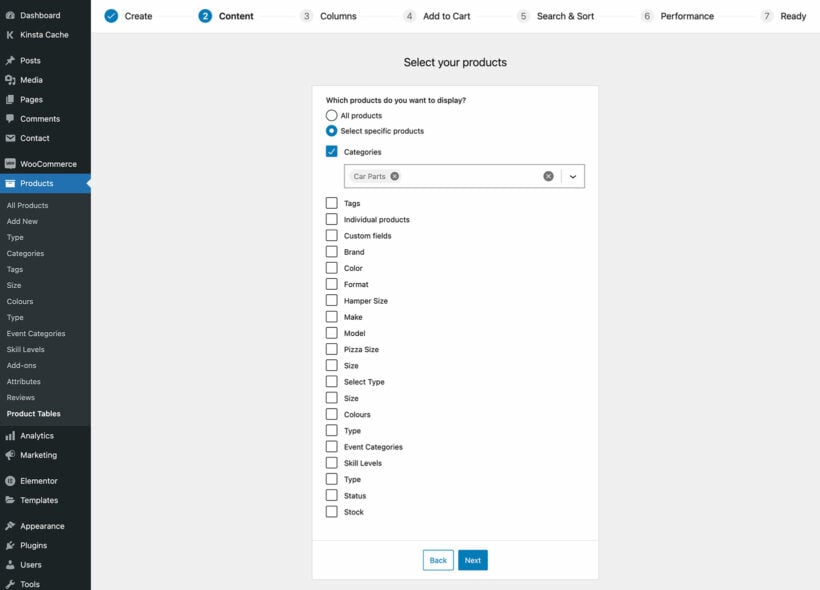
First, go to Products → Product Tables → Add New and create a table listing the products you want to include in the affiliate review blog post.
Create a new post by heading to Posts → Add New. You’ll need to flesh the post out with a title, introduction, categories, images, and so on, but you can come back to these later.
The process for adding the list of affiliate products to the blog post depends on whether you use the WordPress block editor to create your posts:
Block editor - Add a 'Product Table' block and select the table you created a minute ago.
All other editors - Get the shortcode from Products → Product Tables and add it to the page wherever you want the products to appear.
An example
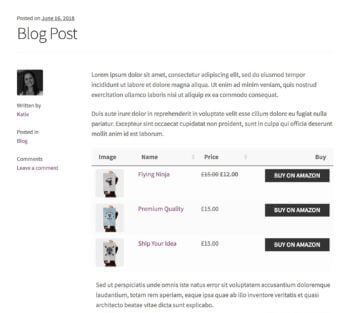
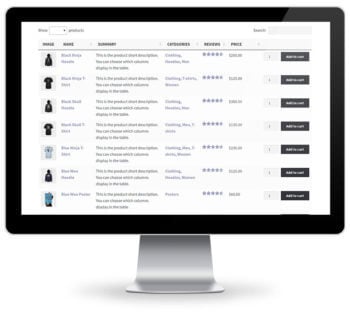
Here’s an example to get you started. This product table is suitable for most WooCommerce Amazon affiliates or review websites:
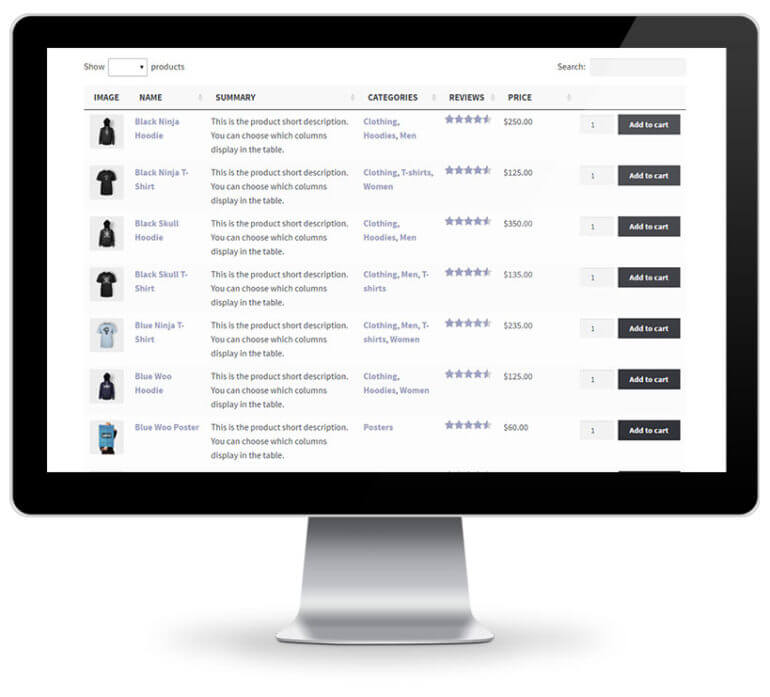
This table will list products from a category called “clothes” with their image, name, full description, overall star rating, and affiliate link buttons. Replace “clothes” with the slug of the category you want to list in the table.
The description may be the full review that you have written or simply your description of the product.
If you prefer, you can reduce the description length to show an excerpt, and customers can click through to the read the rest on the single product page.
Or, if you don’t want customers to be able to access the single product page, then edit your table (Products → Product Tables) and click the pencil next to each column to view the option to disable the links. This means that the only action that people will be able to take is to click your affiliate links!
The product reviews column will contain the average star rating, based on reviews that other visitors to your website have added. (The stars will be empty or colorless at first, as there are no reviews yet.)
You can now click Publish in order to set your post live, or continue reading for extra WooCommerce Product Table tricks :)
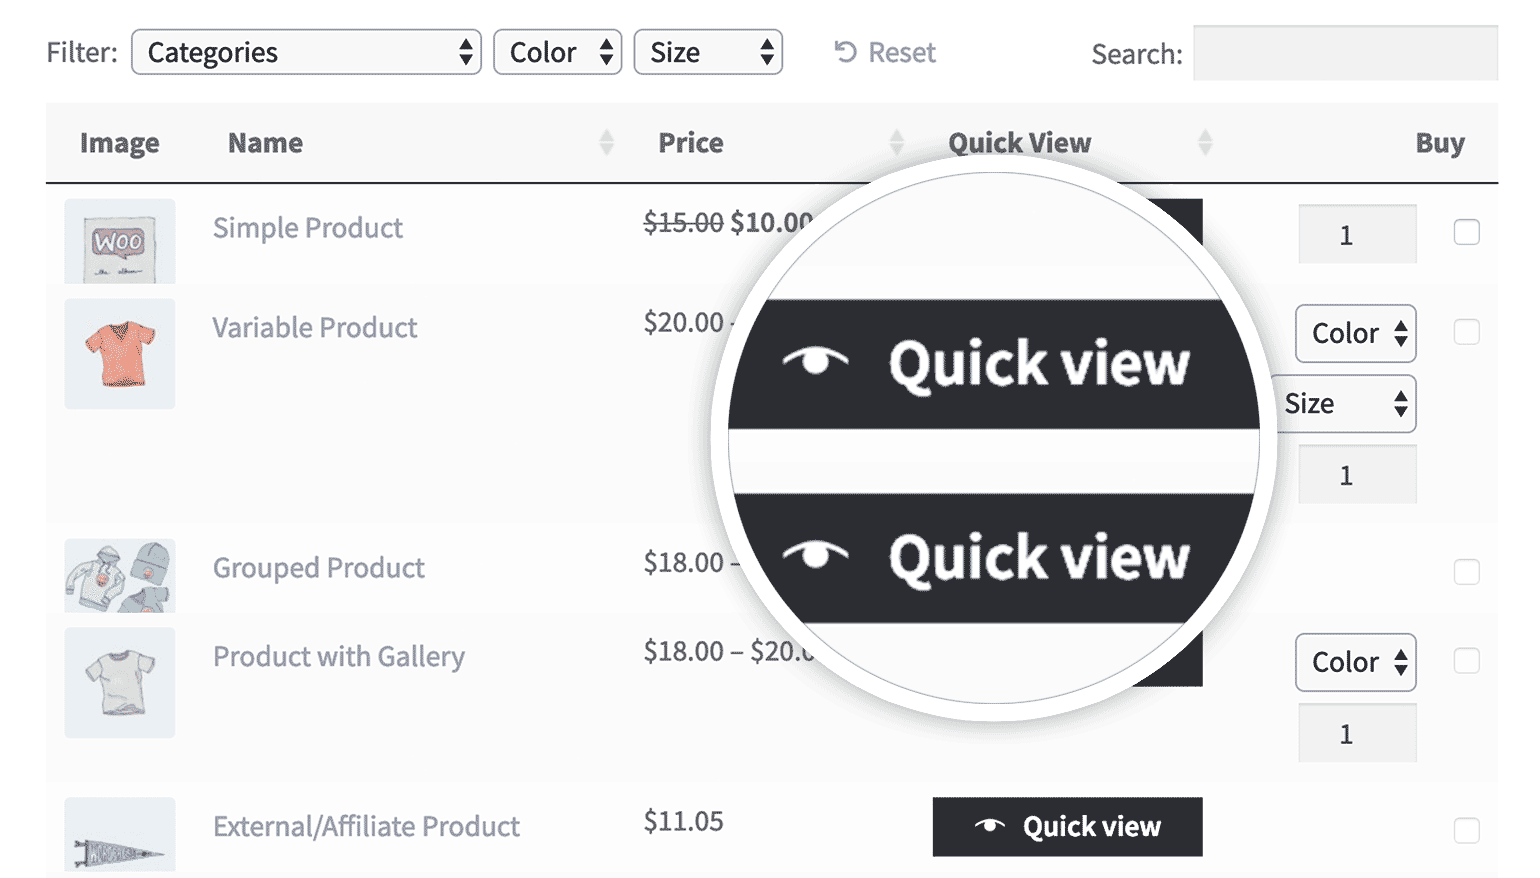
Table Tricks 1: Replace the single product page with quick view
The faster customers can complete a purchase, the less likely they are to give up and go elsewhere. As a result, you need to ensure that customers can buy as quickly as possible. This involves minimising the number of pages that the customer has to visit.
If you're building an Amazon affiliate website then by definition, customers have to load an extra page in order to buy. That's because they have to visit your website first, and then click through to the affiliate site to buy the product.
By default, WooCommerce creates a separate page for each product. This includes affiliate products.
If you want to show extra product images or a short description directly on your WordPress Amazon affiliate website, then you can do this on the single product page. Customers can view products in the comparison table layout, and click on one to access the individual product page. However, this involves loading an additional page for each product.
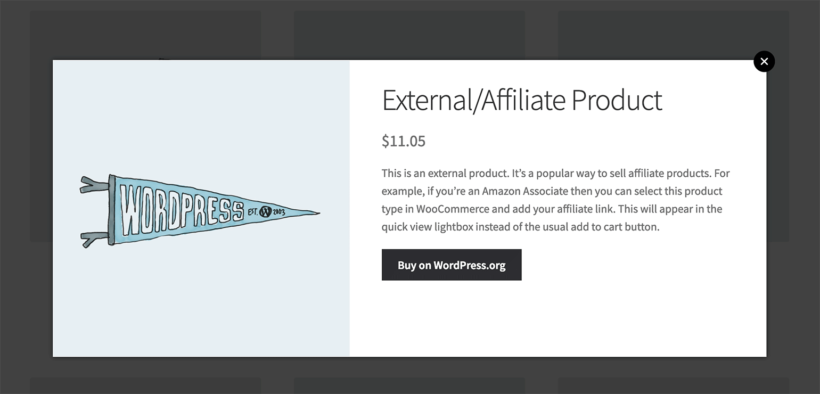
Add quick view buttons to the list of affiliate products.Instead, you can install the WooCommerce Quick View Pro plugin. This lets you add 'quick view' buttons to the product table. Customers click on these to view the full product image gallery and/or extra information. This might include the short description and a button with your affiliate link. The extra information appears in a quick view lightbox popup. It's much more user-friendly than taking them to a separate page.
Customers use the quick view to speedily learn more about each product. When they're ready, they click on your affiliate link to complete their purchase on Amazon.
To add quick view buttons to the product table, make sure both WooCommerce Product Table and WooCommerce Quick View Pro are installed. You can then edit the table at Products → Product Tables and add a 'Quick View' column.
Tip: If you're using WooCommerce quick view, then you might want to disable the links to the single product page completely. This is an option on the WooCommerce Product Table plugin settings page.
Table Tricks 2: Add extra product data to the comparison table
When we added our products earlier, we added various types of data such as title, description, price, categories and tags. You can display all of this in the WooCommerce product comparison table.
If you need to store and display even more data about the products, then you can do this by creating WooCommerce custom fields and taxonomies. Add them as columns in the table. You could, for example, add extra technical data to your televisions review site. This will help visitors filter which products are right for them.
Remember that you need to add value with your site. Adding extra information to your comparison table is a great way of doing this.
Table Tricks 3: Add filters to the WooCommerce Amazon Affiliates product table
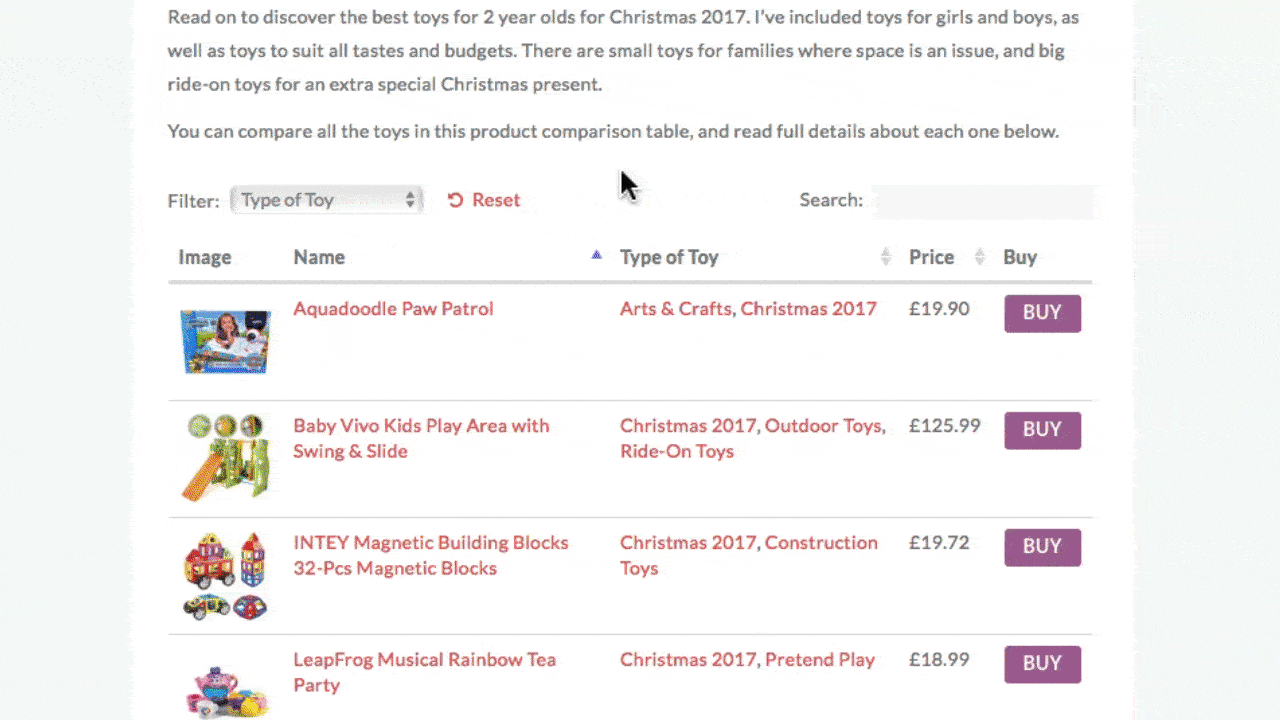
If you’re comparing lots of products, then filters can make it easier for visitors to find the products they’re looking for.
WooCommerce Product Table has 2 types of filters: dropdown lists above the comparison table, plus sidebar widgets. Customers can use these to filter by various types of product data, price, or average rating.
These are just additional ways of adding extra information, sortability, and value to your site. This won’t be appropriate for all WooCommerce Amazon affiliates sites, but think about whether it works for yours.
Note: If you’re just comparing a couple of products, then there’s no need to worry about filters. This is because everything will be on one page regardless.
You’re now ready to enjoy your passive income
That wraps up our guide to earning Amazon affiliates commission – and that sweet passive income – by starting a WooCommerce product reviews website. We’ve shown you the step-by-step details (and a real life case study). So you’ve got all the information you need to make your website a success.
The most effective product review websites will continue to receive attention after launch, with new reviews and comparisons added. You don’t have to spend a lot of time on these. However, do spend some time on them in order to keep visitors and search engines happy.
If you’d prefer, we can take some of the pain out of dealing with search engines with our WordPress SEO packages. Take a look, and discover how we can promote your website for you.
Thanks for reading, and we hope we’ve helped set you on the way to enjoying passive income! Now over to you: do you already earn affiliate income by publishing product reviews and comparisons in WordPress and WooCommerce? Let us know your thoughts and experiences in the comments below :)
Passive income is the holy grail for modern online entrepreneurs. The Internet - and WordPress in particular - has created unique opportunities to earn money online without having to work for each sale. A little known way of earning passive income is to create a WooCommerce affiliate website which compares and reviews products from other companies.
Most WooCommerce affiliate review websites are started on a shoestring budget. With that in mind, I will teach how you to build a website to earn commission through publishing product reviews and comparisons, for minimum cost. We'll focus on free tools and plugins where possible, and I will only recommend paid options if there's no free alternative.
The website will be built using the free WordPress content management system, which gives you full control over your website content. The products and reviews will be listed using the free WooCommerce plugin, which powers over 41% of all online shops worldwide.
To improve on the rest of the 41%, I'll show you how to use the WooCommerce Product Table plugin to list products and reviews in a user-friendly product comparison table, with extra features such as search, sort and filter. This will make it easier for customers to compare the products reviewed at a glance, make quick buying decisions and click on your affiliate links.
How can I earn affiliate income by publishing product reviews?
It works like this:
You develop a genuinely useful website with comparisons and reviews of companies other companies' products. These might be reviews you have added yourself, and/or reviews that other visitors to your website have written.
Each product is added to your website using the WooCommerce plugin. However, instead of selling the products directly on your website, the 'Buy' buttons are affiliate links to the website that sells them (e.g. Amazon).
When a customer reads a review and clicks on the Buy button, they are taken to the other companies' website. A cookie is stored in their browser to record that they clicked on your affiliate link. If they buy the product, you will earn a percentage commission of the total sale price.
It's that easy! With this method, you can list products and product reviews and ratings on your website. This provides useful information to your visitors, giving them an incentive to use your site. Once they find a product they like, they can click on your affiliate link and buy from the other website.
Most major e-commerce stores have affiliate schemes. The easiest option is to sign up with Amazon Associates, since Amazon sells a huge range of products and offers generous commission. However, you can implement this tutorial using any store that provides referral links that will pay you affiliate commission.
Can I really earn affiliate commission that easily?
Ok, no. Did you notice the phrase 'genuinely useful' in the previous suggestion? That's the key.
Your WooCommerce affiliate reviews website will only be truly successful if you offer something useful that people will benefit from.
If you're lazy and publish content that is already available elsewhere, then your site won't get a good search engine ranking and no one will visit it. That means that you won't earn any affiliate commission.
However, if you work hard at finding a niche, and spend time adding and promoting unique content, then this is a good business model that could work well for you.
Case study - Best Toys for 2 Year Olds Amazon affiliate site
For example, my reviews website Best Toys for 2 Year Olds is a WooCommerce Amazon affiliate website. It's a very simple blog-style website that provides parent-friendly advice and reviews on the best toys for 2 year old children. It's intentionally non-corporate and speaks from one parent to another. Parents read the advice and click through to buy the products on Amazon, which generates affiliate commission in the process.
To do this, I publish a blog post reviewing a range of products. Next, I add each product to WooCommerce with my Amazon affiliate link. Finally, I use the WooCommerce Product Table plugin to list the products directly in my blog post. This makes it really easy for customers to compare products and click through to buy - using my affiliate links, of course!
In this tutorial, I'll show you how to use WooCommerce to create an affiliate reviews website just like this.
What types of products can I include in my WooCommerce reviews website?
You can use WooCommerce to review almost any type of product. In terms of earning affiliate commission, it's best to focus on products that can easily be compared with similar products.
Here are some examples, but do your research and find an area that interests you personally! For instance, I founded Best Toys for 2 Year Old because I had a daughter this age and had been struggling to find developmentally age-appropriate toys. Think about what interests you, start Googling, and look for gaps in the market.
Generic affiliate websites reviewing a wide range of products
If you're an affiliate for a diverse website like Amazon, or for a range of different companies, then it's tempting to review many different types of product. While this is a chance to get a nice variety of traffic to your website, it's hard to find success by trying to be all things to all people.
Instead, I'd recommend finding a niche industry or even focus on a specific type of product.
Affiliate websites focusing on a specific industry
Another option is to choose a specific industry and feature a range of products for that market sector. This could be anything from lightbulbs, spare parts or tools, to electronics, appliances or WordPress plugins.
By reviewing lots of products from a specific industry, you can create a website with plenty of high quality, keyword-rich content. This is a good opportunity to establish your affiliate reviews website as an authority in your industry, which will reward you with a good search engine ranking. This will drive more traffic to your website and more people are likely to use your affiliate links.
Niche websites reviewing one type of product
As anyone in the SEO (search engine optimisation) industry will tell you, it's better to be no. 1 in Google for a less competitive keyword than to be no. 30 for a popular one. With that in mind, look for a specific type of product where you have a reasonable chance of success.
For example, I was recently researching hot tubs and discovered an affiliate reviews website which reviewed all the main hot tubs on the market. It provided unique and genuine comparisons of the options, with plenty of advice. By adding extra value and information that wasn't available elsewhere, their website was ranking nicely in Google and was probably attracting enough traffic to earn affiliate commission.
What will it cost?
There are very few upfront costs. These are the main financial costs:
Domain name All websites need a domain name, e.g. barn2.com. These aren't expensive and cost a few pounds per year, depending on the type of domain name you choose. A local domain (e.g. .co.uk) is cheaper than a generic domain such as .com.
WordPress web hosting All websites need a good host. I recommend an optimised WordPress host such as Kinsta. Don't use cheap web hosting because your website will be slower and less reliable. This will harm your search engine ranking, reduce visitor numbers and increase bounce rates - all of which will reduce your affiliate commission. Investing in good hosting is money well spent.
WooCommerce Product Table plugin This is the only paid plugin needed for this tutorial. You need it to display your products, ratings and affiliate buttons in a user-friendly comparison table or grid which will maximise your affiliate income.
This tutorial will show you how to save money by using free options where possible. For example, we'll be using the free WordPress content management system (CMS) and the free WooCommerce plugin. The screenshots in this tutorial use a free WordPress theme, so there are no design costs. I'll even tell you how to add affiliate links in WooCommerce without needing any dedicated WordPress affiliate plugins. (Special affiliate plugins are available and they all work with the methods in this tutorial, but they're not essential.)
As you can see, you can launch a WooCommerce affiliate reviews website with very little upfront cost. The main investment is your time. While the overall website setup won't take much time, you need to invest more time in your website content. If you're prepared to do this, let's get started!
#1 - Sign up to 1 or more affiliate programs
Before you start setting up your WooCommerce product reviews website, you should register for one or more affiliate schemes.
If you're just getting started, then I recommend signing up to Amazon Associates as a minimum. This is a good starting point because Amazon sells nearly every type of product. They probably have the biggest affiliate scheme in the world and pay fairy generous commission.
You can also sign up to any other websites that offer an affiliate scheme. (If you're reviewing WordPress plugins, sign up for our own affiliate scheme and earn 30% by writing about Barn2 Media's plugins!) The important thing is that the scheme provides referral links or affiliate links that you can use online.
Once you've done that, get the affiliate link for each of the products that you're planning to review or compare on your WooCommerce website.
Next, sign up to a good WordPress hosting package (we use and recommend Kinsta). They should provide a tool to install WordPress and help you get up and running with a domain name.
You need to install a theme for the design of your website. Since you'll be using WooCommerce, I recommend using a theme that is designed to work with WooCommerce. This will avoid a lot of problems later on.
The best free WooCommerce theme is Storefront - you can find it by going to Appearance → Themes in the WordPress admin and searching for it. This is the official WooCommerce theme and is the theme I used for the screenshots in this tutorial. If you don't like the design, you can use one of the Storefront child themes which provide a nice choice of skins. The child theme designs are either free or $39. They all come with full instructions and documentation on how to set them up.
If you want a more versatile theme, there are plenty of WooCommerce-ready themes on ThemeForest. These typically have significantly more features than Storefront and its child themes, and are a lot more work to set up. There's also a greater potential for things to go wrong, due to the extra complexity. You should only choose a more flexible/complex theme if there are definite benefits in doing so.
#4 - Start blogging or writing reviews
This section depends on how you're planning to structure your WooCommerce reviews website.
If you're planning to publish your reviews as comparison-style blog posts, then you can start writing posts. This is easy - just log into the WordPress admin and go to Posts → Add New. Each post should compare multiple products.
Alternatively, perhaps you're adding your reviews in a more permanent format. You can use pages for that (Pages → Add New).
Either way, you can write about the products that you're reviewing and add your reviews in whichever format you're like. Then, use the following steps to add a product comparison table to boost your affiliate commission.
#4 - Install WooCommerce
Now it's time to install WooCommerce. This is the world's leading e-commerce plugin and is 100% free. While your affiliate reviews website won't be selling products directly, you need this to create your affiliate products, add information and reviews about them, and add your referral links.
Still in the WordPress admin, go to Plugins → Add New and search for 'WooCommerce'. Install and activate the free plugin.
You'll be taken to the WooCommerce Setup Wizard. This is the quick way to get your affiliate store set up. Follow the steps in the wizard. They won't all be relevant to your affiliate product reviews website, but don't worry about that.
#5 - Add your affiliate products, with descriptions or reviews
Next, go to Products → Add New and add your first product:
Add the various information for the product, e.g. title. Most fields aren't compulsory (e.g. categories and tags) - just use the relevant ones.
Upload a product image. I recommend using images for a WooCommerce affiliate review website because images will attract customers and make them more likely to click your affiliate links.
For the main product description, add one of the following:
Information about the product, such as the specification. I strongly recommend writing unique content here. Don't copy and paste text from the manufacturer's website because if you do this, your website is very unlikely to get a good ranking for that product in the search engines. While you probably won't be penalised for duplicate content (although this is a danger and there are copyright issues), the search engines will reward you for unique content.
Your own review of the product.
Add the product data
Next, find the 'Product Data' section. Select 'External/Affiliate product' from the dropdown list. Add the following:
Product URL - Add your affiliate link for the product here.
Button text - Enter the text that will appear on the button with your affiliate link. This might be 'BUY', 'BUY NOW', 'Buy on Amazon' or similar.
You can also add a product price and sale price below. This will display the price on your website so that people can see what it costs before clicking through. However, if you do this, I recommend that you regularly check the price on the website selling the product. You don't want to advertise the wrong price!
In the 'Advanced' tab, tick 'Enable reviews'. This will allow visitors to review the product. It's an excellent opportunity to increase your affiliate clicks by providing 'social proof', which makes the products more credible. Customer reviews add keyword-rich content to your website and can boost your search engine ranking. WooCommerce will collate the product ratings and you can display these as a column in your comparison tables (see next section).
Click the blue 'Publish' button.
Repeat the steps in this section to create each of your affiliate products.
#6 - Create your affiliate products table
The next step is to install the WooCommerce table plugin, which you need to list your products and their ratings in a comparison table layout:
After activating your plugin license key, the table builder will launch. Use it to set up the affiliate products table, for example by adding columns and filters.
You can also choose exactly which products to display in the table.
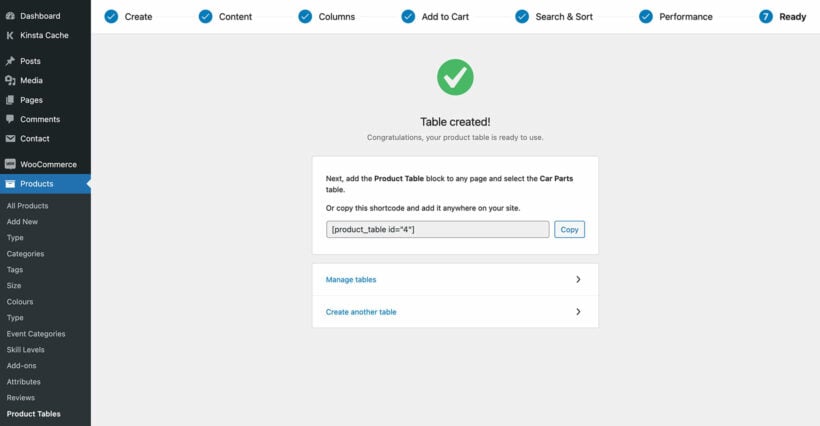
Copy the shortcode from the final page of the table builder.
Next, go to the page or blog post where you want to add a product comparison table with affiliate links. Either insert the 'Product Table' Gutenberg block, or the shortcode that you copied a minute ago.
This will create a default WooCommerce table listing your products. As your WooCommerce reviews website grows over time, you'll probably want to list different products on different pages. You can do this by creating multiple tables, each containing different affiliate products. For example, you might want to create a different product category for each type of product, or use tags too control which products to show in each table. Play around with all the options and create as many WooCommerce comparison tables as you like, each listing different affiliate products.
Add extra product data to the comparison table
When you added your products earlier, you added various types of data such as title, description, price, categories and tags. All of this can be displayed in the WooCommerce product comparison table.
If you need to store and display even more data about the products, then you can do this by creating WooCommerce custom fields and taxonomies. Each of these can also be displayed as columns in the table. For example, you can use these to store technical data that will help customers to check the suitability of each product.
Add product quick view popups
You can choose which columns of product data to include in the list of products reviewed. But what if you want to show more data than will fit in the table, or you've added multiple images of each product? In that case, you'll need to provide extra information outside of the comparison table. There are a couple of ways to do this:
You can add the extra information to the main product review. For example, if you've published a blog post reviewing the best 5 smartphones then you can add extra information to the main content of the post. You can then keep the product table simple, with more basic information.
WooCommerce automatically creates a separate page for each product. Visitors can access by clicking on the name of a product in the table. However, this means loading an additional page for every product, which isn't very user-friendly.
A better option is to use WooCommerce Product Table with its sister plugin - WooCommerce Quick View Pro. This adds user-friendly quick view buttons to the list of products. Visitors can view the full image gallery for each product and extra information in a popup lightbox, without having to visit a separate page. The lightbox also includes a button with your affiliate link, so customers can learn more about the product and immediately click through to buy. (Tip: If you add quick view to your WooCommerce reviews website, then you should enable the option to replace all links to the single product page with quick view links.)
Add filters to the product table
If your tables are just comparing a few products, then you don't need to worry about filters. After all, visitors will be able to see everything on one page!
If you're comparing lots of products, then filters can make it easier for visitors to find the products they're looking for. WooCommerce Product Table has 2 types of filters: dropdown lists above the comparison table, plus sidebar widgets. These can be used to filter by various types of product data, price, or average rating.
Creating a successful WooCommerce affiliate reviews website
If you follow the steps in this tutorial, you'll be well on your way to creating a successful product reviews website that will generate affiliate commission.
Once your website goes live, it's important to continue adding search-engine-friendly content to it. This will build your search engine position over time. To give you website the best possible chances, check out our WordPress SEO packages and discover how we can promote your website.
Do you already earn affiliate income by publishing product reviews and comparisons in WordPress and WooCommerce? Please share your tips and advice with our other readers by adding your comments below.
Lots of people have asked how to become an affiliate and earn commission on our WordPress plugins. Today we have finally launched the Barn2 Media affiliate program. You can earn a generous 30% commission by promoting any of our premium plugins.
Who can become an affiliate?
Anyone can join our affiliate program. It's perfect for:
WordPress-related blogs or magazine sites
WordPress designers and developers wanting to recommend our plugins to their clients
Individual bloggers and website owners who know someone who might benefit from our plugins
WordPress plugin directories
Review websites
Affiliate websites
How does the affiliate program work?
It's really easy to earn money for recommending our WordPress plugins. Here's how it works:
We send you a referral link, or you can create your own in the affiliate area.
You use the referral link whenever you recommend our plugins. Use it in blog posts, online reviews, email newsletters, and emails to clients and colleagues.
Whenever someone clicks on your affiliate link, a harmless cookie will be placed on their website and stored for 30 days. If they purchase one of our WordPress plugins during the 365 days, you will earn 30% commission on their first year's payment.
You can log into your affiliate area at any time.
We'll pay your commission via PayPal every month.
Which WordPress plugins can I recommend?
When you become an affiliate, you can earn commission for recommending any of the premium WordPress plugins sold on our website. Here's a summary of our plugins:
Posts Table Pro - list content from a WordPress website in an interactive table
Posts Table Pro is a unique WordPress table plugin. It's the only one that creates instant tables displaying content from a WordPress website. You don't have to input the data manually - Posts Table Pro does it all for you.
You can use our table plugin to display WordPress posts, pages or custom posts, plus other data such as images, multimedia content, custom fields and taxonomies. This creates endless possibilities in terms of how the plugin can be used.
To earn affiliate commission for Posts Table Pro, I recommend thinking carefully about the different ways it can be used. If you're an individual, think about whether any fellow website owners would benefit from dynamic tables of their website content. If you're a blogger or reviewer, think of new and exciting use cases that no one else is writing about!
WooCommerce Product Table - create product grids, order forms & catalogs
We created it in response to popular demand from Posts Table Pro customers who wanted WooCommerce-specific features in their tables. We rose to the challenge and created WooCommerce Product Table. As well as displaying an online store's products in a table, it includes extra features such as add to cart buttons, quantity selectors, customer reviews and more.
To earn affiliate commission for recommending WooCommerce Product Table, I recommend thinking about the different ways in which online shops can benefit from a table-based view. Many different websites can benefit from displaying products in a grid format. This includes trade or WooCommerce wholesale stores and product catalogues. It's popular for one-page order forms in WooCommerce. You can even use it as a restaurant online food order system. It's popular for large product directories with thousands of products. Think about how else it can be used!
With nearly 2 million websites using WooCommerce according to the latest WooCommerce usage stats for 2017, the market for any WooCommerce plugin is absolutely huge. This creates big opportunities to earn affiliate commission.
WooCommerce Password Protected Categories - lock down whole areas of a WooCommerce store
WooCommerce Password Protected Categories is a simple but hugely effective plugin. We developed it to fill the gap for WordPress plugins to protect areas of a WooCommerce online shop. Surprisingly, nothing else is available to meet this need so you can benefit as an affiliate.
The plugin does what is says on the tin. It lets you password protect one or more categories in a WooCommerce store. By password protecting a category, the category page, its sub-categories and products are instantly protected with a single password. You can also mark categories as private so they're only available to certain user roles.
The plugin has many important use cases. You can lock down an entire WooCommerce store or just one part of it. It lets you create separate categories for each customer (perfect for photographers etc.). You can create a trade area of your online shop to use as a WooCommerce wholesale store, separate from the public retail store. Photographers can securely upload photos and sell them to specific clients.
As an affiliate, you can recommend WooCommerce Password Protected Categories to anyone wanting to create private areas in WooCommerce. You can blog about different ways it can be used that can't be achieved using any other plugins. This puts you in a great position to each commission via your referral links.
How to become an affiliate?
Join our affiliate program today. It only takes a minute and you can start earning commission straight away.
It's 100% free to become an affiliate. You only need your name, website address, and the email address that you use to log into PayPal (so we can pay you!). We'll also ask for basic information about how you plan to promote our WordPress plugins.
Many popular WordPress resources have partnered with us as affiliates, like WPMayor, WPLift, ThemeTrust, LearnWoo, IconicWP, WPMUDev, WPGlob, and many others. Recently, our top affiliate crossed the $50,000 lifetime earning milestone. You can too!


 If you are monetizing your blog, you are likely doing a number of things – soliciting advertisers, acting as an affiliate for products or services, etc. And you may even be selling or promoting products directly from within blog posts.
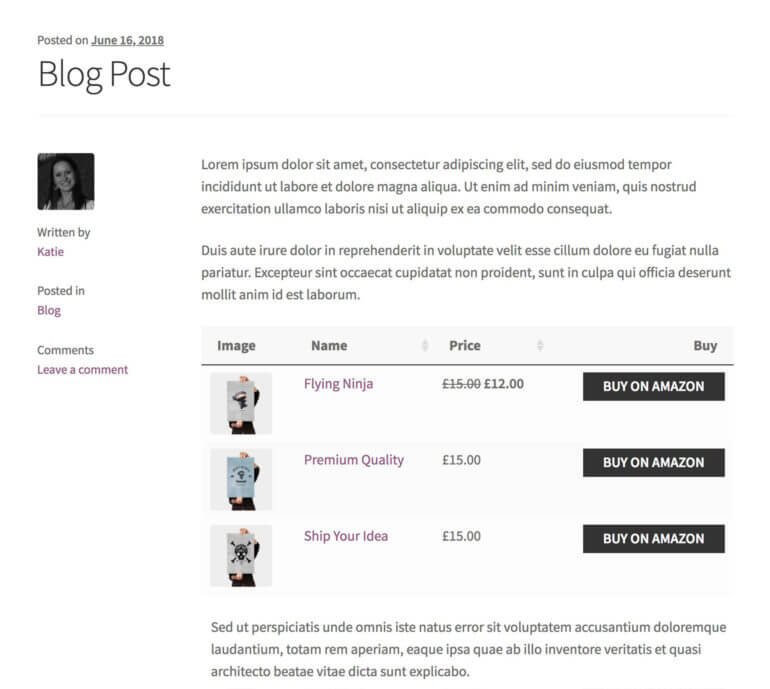


 WooCommerce Product Table
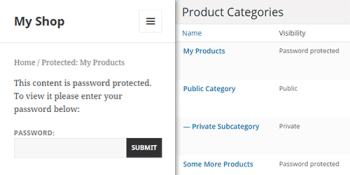 WooCommerce Password Protected Categories