How to let users edit documents from the front end
The Document Library Pro plugin has a front end document upload form, which makes it easy for users to add documents without needing access to the WordPress admin.
However, there's no built-in way to allow users to edit documents from the front end. You can do this by using Document Library Pro alongside another high quality front end editing plugin. Below is a choice of recommended plugins.
Document Library Pro Power Pack
Document Library Pro Power Pack is an independent add-on which adds advanced analytics, user tracking and new frontend upload / edit forms for logged in users.
It makes it easy to add frontend document editing to your existing document library. It works like this:
- An "Edit" link will appear alongside each document for logged in users. (Nothing will change for logged out visitors/guests.)
- When a logged in user clicks the Edit link then this will take them to a page where they can update the document data.
Setup instructions:
- Install the Document Library Pro Power Pack plugin and activate it using the license key provided in your order email.
- Create and publish a new page called 'Edit Document' (or similar) with the
[dlp_frontend_edit]shortcode. This will display the new editing form. - Go to DLP Power Pack → Power Pack Settings and set the Display Edit Icon to "By Link".
Enter your edit page’s URL into the Frontend Editing Page field (for example: /edit). Save changes. - Edit your existing Document Library Page, updating your [doc_library] shortcode to become
[doc_library_powerpack]. Publish the changes. - Visit your Document Library Page as a logged in user / administrator to see the new edit icon in the Links column.
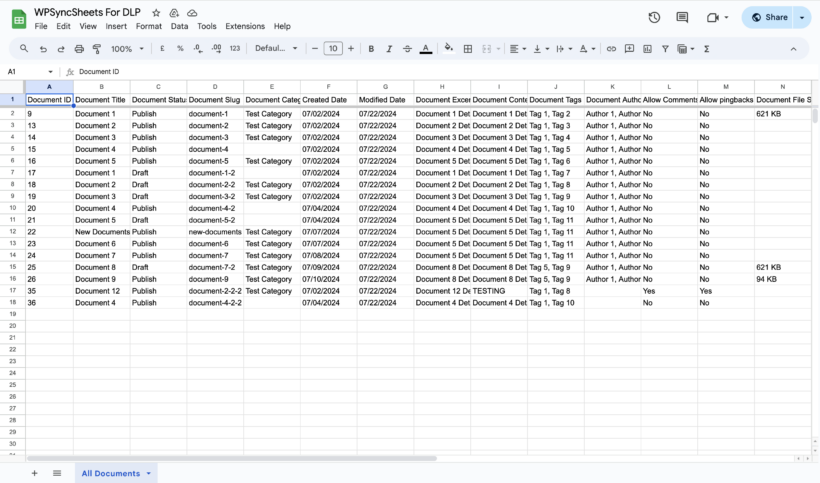
WPSyncSheets
WPSyncSheets syncs any type of WordPress content with a Google spreadsheet. The developers from WPSyncSheets have created the WPSyncSheets for Document Library Pro add-on which integrates it with Document Library Pro. This allows you to edit all of the data about your documents, including the download links, from a Google spreadsheet.
You can use this integration to:
- Sync documents with Document Library Pro.
- Manage document data.
- Import documents.
- Edit Documents.
- Create new spreadsheets and Google sheets.
- Enable/disable/freeze the header row of the spreadsheet.
- Edit sheet headers.
- Sort the sheet.
- Clear the sheet.
Setup instructions
For full setup instructions, see the WPSyncSheets for DLP documentation.
How to control who can access the spreadsheet editor
Use the API settings in WPSyncSheets for DLP to enter your Client ID and Client Secret Key. This ensures that only you can access the Google Spreadsheet using the eye icon which appears near the 'Select spreadsheet' dropdown. If we need to share it with different users, then you can use Google Sheets' sharing settings to give them access to the spreadsheet.
Importing documents from a Google Sheet (Insert/Update/Delete)
- First, make sure that both Document Library Pro and WPSyncSheets are installed, including the Document Library Pro add-on.
- In the WPSyncSheets settings, enable the 'Import Document' option using the toggle.
- Then enable any of the 3 columns; Insert, Update, and/or Delete respectively.
- To import a new document, add the document's information on a new row in the spreadsheet, but Leave the "Post ID" column blank
- Add a "1" to the 'Insert' Column, then sync the spreadsheet with your site with the 'Import' button.
Updating existing documents
The method for updating documents is the same as importing them (above), but you should enter "1" in the Update Column.
Deleting documents
When you delete a document from the Google Sheet, it will automatically be deleted from Document Library Pro.
Add a "1" value in the delete column, then sync the spreadsheet to delete any document.
Exporting documents
- Set up the Document Settings tab with sheet headers and create a new Google Spreadsheet.
- Once you save those settings then a button called "Click to Sync" appears. Use this to export all existing documents to the Google Spreadsheet.
WP Sheet Editor
WP Sheet Editor adds a button above or below the document library (which you can show for specific user roles only). They can click this to open a spreadsheet-style editing interface for the documents.
People can use this to enable front end editing of any of the information which is stored about your documents. For example, if you want to edit document filenames or titles in bulk then you can do it with WP Sheet Editor.
You can find full setup instructions in our tutorial.