Installation & basic setup
WooCommerce Private Store just takes a few minutes to set up. Your entire WooCommerce store will be completely private and hidden from the public parts of your website.
Use this video tutorial to watch the private shop plugin being set up, or read the written instructions below.
1. Install WooCommerce Private Store
Once you have purchased WooCommerce Private Store, you can get the plugin files and license key from the confirmation page. You will also receive a confirmation email with your license key and a download link to the plugin. If you don’t receive this email, please check your spam folder. If it’s not there, send us a support request.
Your confirmation email also contains a link to download your purchase invoice as a PDF.
Once you have downloaded the plugin, go to your WordPress admin, then go to Plugins → Add New → Upload Plugin. Click Choose File and select the woocommerce-private-store.zip file you just downloaded. Once uploaded, click Activate.
Note: WooCommerce Private Store requires the free WooCommerce plugin to work. If you can't see the plugin settings page, make sure you have WooCommerce installed.
2. Enter your license key
You can find your license key in the email confirmation that was sent to you after purchase. The plugin will not work until you activate your license key.
There are two ways to enter your license key:
- In the setup wizard - Once activated, the setup wizard will open. This walks you through each step of the setup process, including entering your license key.
- On the settings page - Alternatively, you can go to WooCommerce → Settings → Products → Private Store and enter your license key.
If you get an error saving your license key, please try a second time. If the error persists, please view the article on license key problems.
3. Configure the plugin settings
The setup wizard will guide you through configuring the main plugin settings. You can also access these at any time on the settings page at WooCommerce → Settings → Private Store.
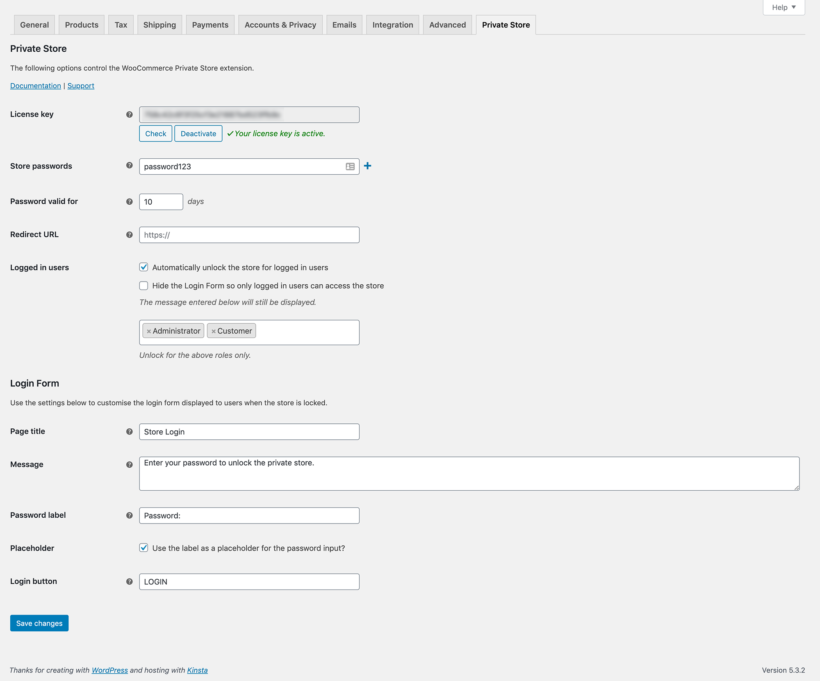
Main Settings
License Key
Enter your license key here. The plugin will only work with a valid license key.
Store Passwords
Enter one or more passwords that will be used to password protect WooCommerce. Customers can use any valid password to unlock your entire store. There is currently only one password, which when entered, will unlock all shop pages including the main shop page, products, product categories, the shopping cart, checkout, and the “My Account” area.
Password Expires After
This setting controls how long the customer will remain logged into the store before their password expires. This works by adding a cookie in the user's browser. The minimum cookie expiry period is 1 day and the maximum is 9999. Enter the number of days you would like them to remain logged in after entering a correct password.
Login Redirect URL
By default, if a customer logs into the private store via the main login page then they will remain on that page and will see a message that the store is unlocked.
If a customer tries to access a page in your store by clicking on a direct link (e.g. to a product page if they know the URL) then they will be shown the login form. On entering the correct password, the store will be unlocked and they will be taken back to the page they were trying to view.
You can add a Login Redirect URL to automatically redirect customers to a specific page (e.g. the main shop page) after entering a correct password.
Logged In Users
Tick this box to automatically unlock the store if the customer is logged into their WordPress user account (e.g. administrators, blog authors, logged in customers, etc). This means that logged in users can access your private WooCommerce store without having to enter a password.
For more advice on using this option, please see our article on How to Unlock the Private Store for Logged In Users.
Hide the login form so only logged in users can access the store
This option only appears when the 'Logged In Users' box is ticked.
It hides the password input form and submit button from the store login page. If you do this, then the only way to unlock the store will be to log into a user account on your website.
We recommend using the the Form Message field (see below) to provide clear instructions on how customers can log into their user account. You can either do this by linking to your login page, or you can embed a login form created using a plugin such as Theme My Login or Profile Builder.
Unlock for the above roles only
This option only appears when the 'Logged In Users' box is ticked. Use it to select which user roles can access the store when they are logged into their account.
For example, if you tick the 'Logged In Users' box and select 'Administrator' and 'Wholesale' (assuming that your store has a wholesale user role), then only these roles will be able to access the private store. It will remain hidden from other logged in users, such as subscribers.
Tip: If you want to create a specific user role that can access the private store, then we recommend the free User Role Editor plugin.
Login Form
WooCommerce Private Store comes with a login form shortcode which you can use to add a password entry form anywhere on your site. These settings allow you to configure the login form which is created by the shortcode:
Page Title
You can enter some text here to customise the wording that appears on the WooCommerce login form, above the password entry box.
Form Message
This is the message displayed to customers above the password box on the login form. (Tip: This field supports HTML in case you want to add more advanced content here.)
Password Label
This is the label used next to the password box on the login form.
Label Placeholder
Tick this to put the label inside the password box (i.e. a placeholder) rather than in front of it.
Button Text
You can change the text on the ‘Submit’ button for the password protection form for WooCommerce.
4. Create a password entry login form
If you're using the password protection provided by WooCommerce Private Store then you can add a login form to any page or widget. Customers will use the login form to enter their password and unlock your store. Once a customer has unlocked the private store, they will be able to view all the WooCommerce content including menu links to the main Shop page, product categories, product widgets etc.
Note: If you're ticked the Logged In Users option on the settings page, then you don't need to use the built-in password protection. Instead, the store will automatically unlock whenever a customer logs into their WordPress user account on your website. If you're using this option, you can use the built-in WordPress login form (at /wp-login.php), the WooCommerce Account page (which shows a register/login form for logged out users), or another login plugin such as Theme My Login.
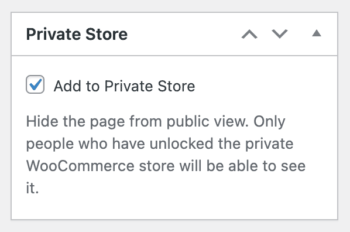
5. Hide additional pages (optional)
Plugin installation & setup service
If you don't want to set up the plugin yourself, then you can use our plugin setup service.
WooCommerce Protected Categories
The WooCommerce Private Store plugin is designed to hide your entire WooCommerce store. If you just want to protect parts of your online shop while leaving other areas of your store public, you might be better off with our WooCommerce Protected Categories plugin instead.