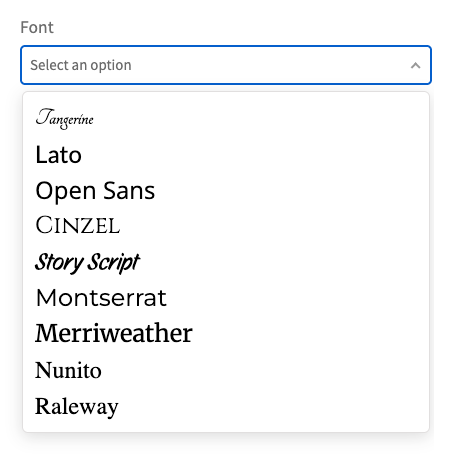
Display font names in their actual typeface in a dropdown
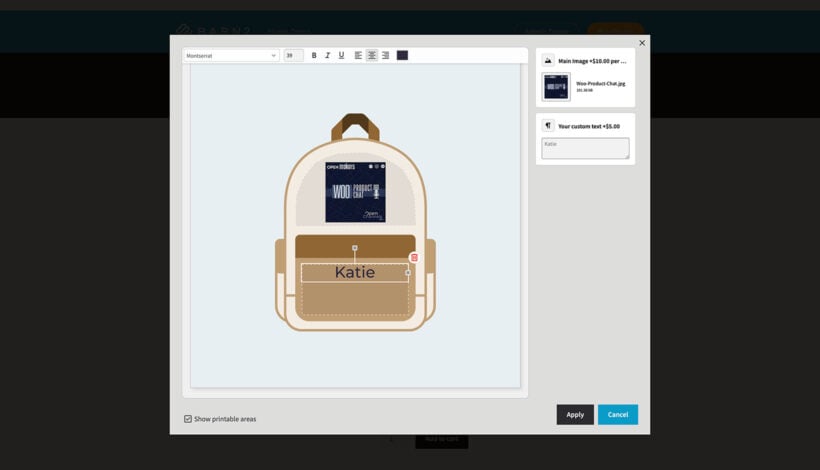
WooCommerce Product Options offers a broad variety of option types that you can add to your products. An interesting use is allowing your customers to pick their favorite fonts. For example, a store selling customizable jewelry may let shoppers decide how to engrave bracelets and select which font to use for the custom engraving.
If you're using WooCommerce Product Options with the Live Preview add-on then customers can select the font from the live preview popup window. However, if you're simply allowing customers to select a font from a normal dropdown list then the font names will normally be listed in your theme's default text, instead of showing what each font actually looks like.
To make this more helpful, we have provided a code snippet below which changes the font family of each item in a dropdown to its corresponding name. For example, if a choice is called "Times New Roman", then its font-family will be set to 'Times New Roman'.
Instructions
- For each dropdown product option where you list font choices, go to Advanced Settings and set the Custom CSS class to
font-families - Make sure every font choice is spelled correctly with the exact name you want it to represent. Choice labels must correspond to the exact names you use for the font faces you define in your custom CSS
@font-facedefinitions (see point #4 below). - Upload the actual font file to a location on your web server. We recommend using the
/wp-content/fonts/path. For example, if you upload thearial.ttffont file, its path relative to the root of your website should be/wp-content/fonts/arial.ttf. You can also choose any other publicly accessible path on your web server. -
Add a
@font-facedefinition of each custom font you upload to your website. You can do that by adding a series of CSS rulesets like the one below:@font-face { font-family: Arial; src: url(/wp-content/fonts/arial.ttf); }If the name of the font contains space characters, remember to enclose its name in quotes in the font face definition, like in the ruleset below:@font-face { font-family: 'Times New Roman'; src: url(/wp-content/fonts/times.ttf); } - [Optional] The regular design of a dropdown and its options has a smaller font size and line height. So, adjusting the styling of the dropdown elements that list font families may be necessary to display font family names more effectively.
- Add a script applying the correct font family to each option in the font dropdown and changing the font family of the currently selected option (see this section).
What about Google Fonts?
The workflow described above works with both local fonts and Google Fonts. Any fonts would work with this method, as long as:
- You have the actual font files (TTF, OTF, WOFF or WOFF2)
- You upload them to a publicly available folder of your website
For Google Fonts, what you need to do is choose the ones you want to offer to your customers and download them. After expanding the ZIP file you get from Google, select the TTF file of the regular variant. You can also rename it to a shorter name so that it is easier to reference it in the @font-face definitions.
Can I get a live preview of the product?
The scope of this customization is limited to showing the font options you list in Dropdown fields with the actual font family each font represents. If you are looking for the possibility to show your customers a live preview of products with the text they enter and the font they choose, you may be interested in our WooCommerce Product Options with Live Preview bundle.
The drop-in code snippet
For your convenience, we collected all the scripts required by this process into a single code snippet, which you can simply drop into the functions.php file of your child theme or your favorite code snippet plugin, after adding all the font face definitions that you need.
<?php
add_action( 'wp_footer', 'my_wpo_add_font_dropdown_script' );
function my_wpo_add_font_dropdown_script() {
if ( ! is_product() ) {
return;
}
?>
<script type="text/javascript" id="wpo-dropdown-update-font-families">
window.addEventListener(
'load',
() => {
document.querySelectorAll('.wpo-field.font-families li.option').forEach( (li) => {
li.style.fontFamily = li.textContent;
li.addEventListener('click', (event) => {
const target = event.target;
const currentItem = document.querySelector('.wpo-field.font-families .nice-select .current');
const field = target.closest('.wpo-field');
currentItem && ( currentItem.style.fontFamily = `'${target.textContent}'` );
let currentFontPreview = field.querySelector('.current-font-preview');
if ( ! currentFontPreview ) {
currentFontPreview = Object.assign(
document.createElement('div'),
{
className: 'current-font-preview',
textContent: 'Aa Bb Cc Dd Ee Ff Gg Hh Ii Jj Kk Ll Mm Nn Oo Pp Qq Rr Ss Tt Uu Vv Ww Xx Yy Zz 0123456789 !@#$%^&*()-=_+',
style: {
}
}
);
field.appendChild( currentFontPreview );
}
currentFontPreview.style.fontFamily = `'${target.textContent}'`;
})
} );
}
);
</script>
<?php
}
add_action( 'wp_footer', 'my_wpo_add_font_dropdown_style' );
function my_wpo_add_font_dropdown_style() {
if ( ! is_product() ) {
return;
}
?>
<style>
// Add a font-face definition for each custom font
@font-face {
	font-family: Arial;
	src: url(/wp-content/fonts/arial.ttf);
}
@font-face {
	font-family: 'Times New Roman';
	src: url(/wp-content/fonts/times.ttf);
}
/*
Add more font-face definitions, if you need them.
Don't forget to upload the actual font file to the location
that you specify in the font-face definition.
*/
</style>
<style>
/*
Further customize the dropdown elements
to make the font stand out
compared to other regular dropdown options.
*/
.wpo-field.font-families {
& {
height: auto;
}
.nice-select {
& {
line-height: 28px;
}
li.option {
font-size: 24px;
line-height: 1.5em;
padding: 0 12px;
}
&:has(li.option.selected) span.current {
font-size: 16px;
}
}
.current-font-preview {
font-size: 28px;
margin: .125em 0;
padding: .25em;
border: 1px solid var(--wpo-input-border-color);
border-radius: .25em;
line-height: 1.25em;
}
}
</style>
<?php
}