Posts Table with Search & Sort Documentation
List your WordPress blog posts with the Posts Table with Search & Sort plugin.
This article explains how to use Posts Table with Search & Sort to list your WordPress posts. If you need more features, consider upgrading to Posts Table Pro plugin.
Creating post tables
- To create a posts table, add the shortcode
[posts_table]to any page, post or widget. - Go to Settings > Posts Table With Search & Sort and choose the default options for your table.

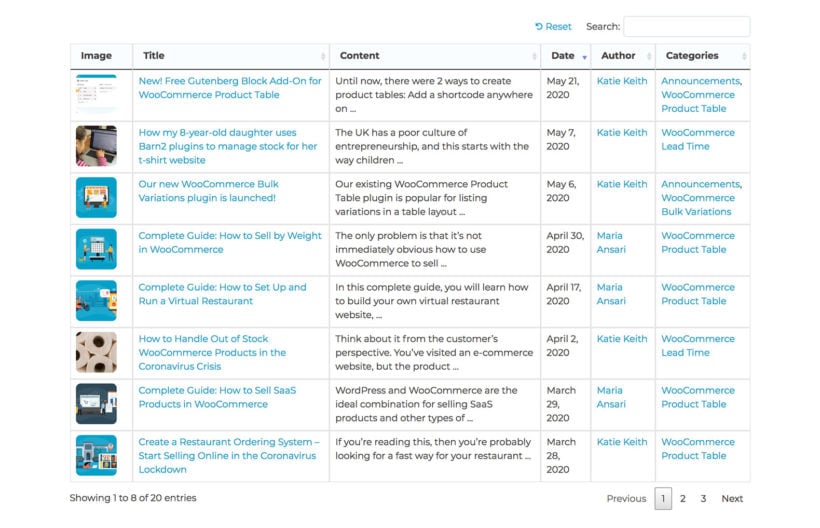
- Save the page and view it on your site. You will see a table listing all your posts.
Shortcode options
If you wish to list specific posts only, or want different settings for each table on your site, then you can use the shortcode options. Here's an example of a shortcode which combines several of the options. If any of the options aren't set in the shortcode, then the table will use the options from the plugin settings page.
[posts_table columns="id,title,tags,date,author" sort_by="date" sort_order="asc"]
Table columns
Use the columns option to enter a comma separated list of all the the columns you’d like to include in the table of blog posts. This can be any combination of: id, image, title, content, categories, tags, author, or date.
The default columns are: title,content,date,author,categories
Posts Table Pro also has columns for any custom field, custom taxonomy, post excerpt, post status, modified date, and button linking to the single post page.
List specific posts
You can create a table listing specific posts as follows:
category- list posts from a specific category only. Use the category ID or ‘slug’, NOT the name of the category. You can find the slug under Posts → Categories.tag- list posts with a specific tag only. Use the tag ‘slug’ or ID here. You can find the slug under Posts → Tags.author- list posts published by a specific author. restrict the posts in the table to the specified author. You can use the author name (e.g. user_nicename), author ID or a comma-separated list of IDs.post_status- list posts with a specific status only (draft, pending, publish, future, private or any). The default is 'publish'.
Example: [posts_table category="recipes" tag="christmas" post_status="publish,private"]
Rows per page
Use the rows_per_page shortcode option to control the number of posts that appear on each row of the table. Set it to false to disable pagination and list all posts on one page. The default is 20 rows per page.
Examples:
[posts_table rows_per_page="10"][posts_table rows_per_page="false"]
Warning: The free Posts Table with Search & Sort plugin will load all the posts in the table when the page first loads regardless of the number of rows per page. This can cause performance problems if you have a large blog. To avoid this, you can upgrade to Posts Table Pro which has a lazy load option.
Sort options
sort_by– select which column the table is ordered by when it first loads. The default is 'date'. If the column you want to sort by isn’t shown in the table, then it will be added behind the scenes as a hidden column. This means, for example, that you can sort by date without actually showing the date column.sort_order– whether to sort the table in ascending (asc) or descending (desc) order. If you are sorting the table by date then it will default to desc (newest posts first), otherwise it defaults to asc.
Example: [posts_table sort_by="title" sort_order="desc"]
Date format
You can set the date_format option to choose the way the post date is displayed in the table. The default is Y/m/d. See this page for the full list of date formatting options.
Example: [posts_table date_format="M j, Y"]
Miscellaneous options
search_on_click– this shortcode option controls whether clicking on categories, tags and authors in the table will automatically search by that category/tag/author. Default: true.wrap– controls whether the table content wraps onto more than one line. Set to false to keep everything on one line or true to allow the content to wrap onto multiple rows. Default: true.content_length– the number of words from the post content to show in the content column of the table (if included). Default: 15 words.scroll_offset(advanced option) - the table scrolls back to the top each time you navigate between pages in the list of posts. This option controls the ‘offset’ for the scroll. For example, if your website uses a sticky header then you can adjust the scroll amount here to compensate and ensure that it scrolls back up to the correct height, taking account of the sticky header. Enter a whole number (e.g. 50) or set to false to disable scrolling to top.
Example: [posts_table search_on_click="false" wrap="false" content_length="25" scroll_offset="30"]