Creating a volume bundle or bulk discount
You can create a new bundle or discount in Barn2 Bundles & Bulk Discounts as follows:
- Go to the 'Barn2 Bundles & Bulk Discounts' home screen.
- Click the 'Add New' button above the table of .discounts.
- Use the following fields to configure the discount.
Discount name
Enter a self-explanatory name for the discount, for example "$20 off sunglasses" or "Black Friday - 50% Off". This will appear on your main list of discounts in the Shopify dashboard, and also in the customer's cart when the discount is applied.
Discount type
Select one of the following types of discount:
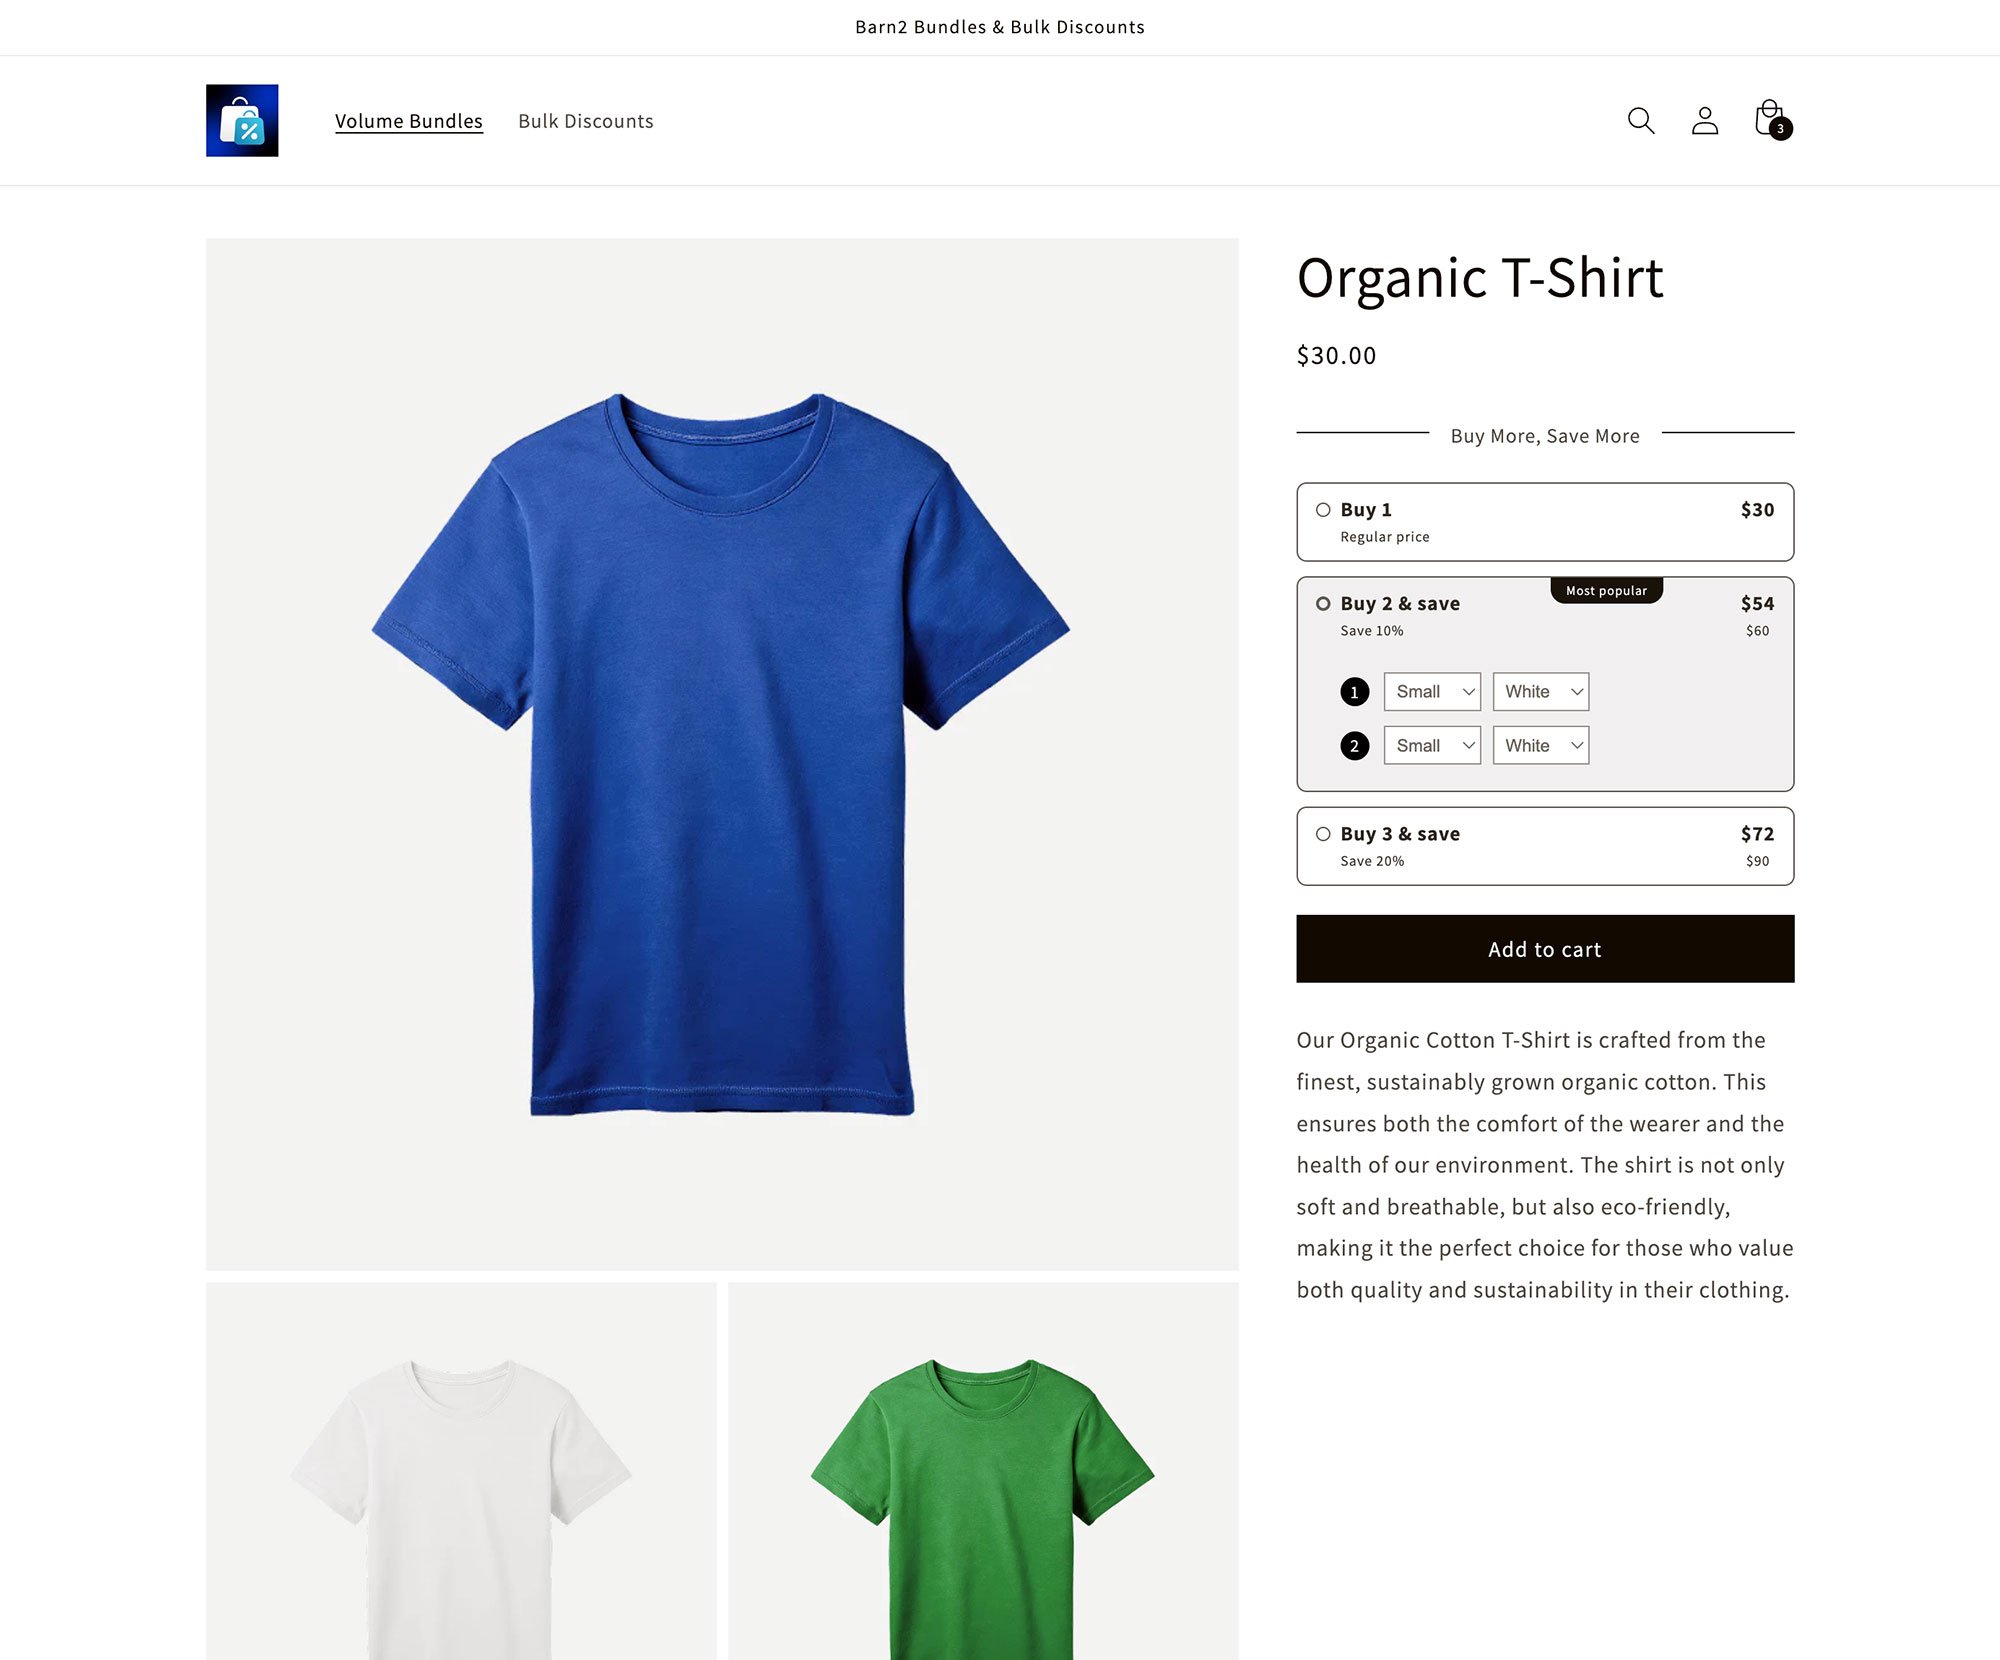
- Volume bundle - Display eye-catching discounts for buying fixed quantities of the same product.
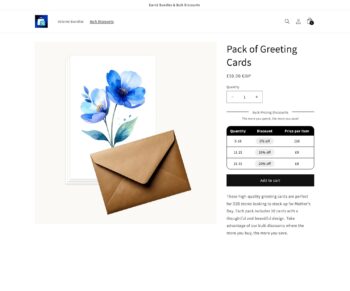
- Bulk pricing - Create pricing tiers for one or more products, e.g. “Buy 10+ t-shirts and save 25%”.
-

- Volume bundles
-
- Bulk pricing

The options elsewhere on the page will change depending on which discount type you select.
Which products?
Select which product(s) you would like the discount to be used for. Choose between:
- All products (the default) - The discount will be used globally throughout your store.
- All products except selected - Selecting this will display fields for selecting specific products and/or collections which the discount will not apply to. For example, if you exclude the 'Personalized products' collection then all products except for the items in this collection will be excluded. (Note: If a product is in multiple collections and only one of them is excluded, then the discount will not be used on that product.)
- Selected products - Choosing this will display a field for selecting specific products which the discount will apply to. If you select any variable products then the discount will be used for all variations.
- Selected collections - Choosing this will display a field for selecting specific collections which the discount will apply to. It will also display a field for excluding products, for example if you want to apply the discount to all your t-shirt products except for the personalized t-shirt.
Which markets?
Select which markets(s) you would like the discount to be used for. Choose between:
- All markets (the default) - The discount will be used globally throughout your store in all markets.
- All markets except selected - Selecting this will display fields for selecting specific markets which the discount will not apply to. For example, if you exclude the 'Europe' collection then all products in your European markets will be excluded.
- Selected markets - Choosing this will display a field for selecting specific markets which the discount will apply to. It will also display a button for excluding markets, for example if you want to apply the discount to all your markets except for Europe.
Active dates
Optionally use this section to set a start and end date for when the discount will be active:
- Always available (the default) - The discount will be active as soon as you save it, and will remain active indefinitely.
- Specific dates - When you select this, a date and time picker will appear. Use it to set the start and end date and time for the discount, for example to cover the period of your Black Friday sale.
Note: The start and end time will use your store's default time zone, as set in Settings → General in your Shopify store's admin. If your discount isn't live at the expected time then it may be that your time zone is different from your store's time zone.
Volume bundle options
The following options appear when the ‘Volume bundle’ Discount Type is selected:
Table of volume bundles
A table will appear listing the different deals in the volume bundle. It contains 3 offers to get you started, based on a quantity of 1, 2, or 3. Edit these, delete them, or add more as needed.
- Quantity - Select the quantity of the product that the deal applies to. For example, if you're creating a fixed price deal for ordering 4 items then you would enter "4" here.
- Discount - Use the dropdown to select either a percentage or fixed amount discount, and also add the discount amount in your store's default currency. For example:
- % discount - Enter the percentage value, e.g. "20" for 20%.
- Fixed discount - Enter the exact amount that will be deducted when the customer orders the quantity you selected above. (E.g. if you're offering a flat $10 discount when you order 4 of the item, then enter "10" here.)
(Tip: Typically, the first row of the table would have a quantity of "1" and no discount.)
- Description - Optionally enter some text describing the deal which will appear to customers on the front end. For example, you might enter “Buy 2 & save”.
- Label - Optionally enter some brief text which will appear as a prominent badge to draw attention to the deal, for example "Popular" or "Best value". This is optional and we recommend only using it for the deals that you particularly want to promote, such as the highest quantity option.
- Highlighted - Select one or more rows in the table to add a prominent border to it on the front end. This is a common strategy to encourage customers to purchase a more expensive option.
- Delete - Use the trash icon to delete the deal from the volume bundle.
Use the ‘Add tier’ button underneath the table to add additional deals to the volume bundle.
Tip: There is no maximum number of tiers. However, we recommend limiting it to about 5 to avoid cluttering up the product page or overwhelming customers. If you want to offer more complex quantity discounts then you should generally use the 'Bulk pricing' discount type instead.
Layout
Choose from either of the following layouts:
- Vertical - The bundle tiers appear as rows, one on top of the other.
- Horizontal - The bundle tiers appear as columns, side-by-side.
Bulk discount options
The following options appear when the ‘Bulk discount’ Discount Type is selected:
Table of bulk discount tiers
A table will appear listing the bulk discount tiers. This will be empty at first, and you should use the 'Add level' button to add as many tiers as you like. (For example, you might add a tier for giving 10% off quantities of 2-5 products; and a second tier for giving 20% off quantities of 5+.)
- Minimum quantity - The minimum quantity required to qualify for the bulk pricing tier. For example, if the tier will give a discount when you order 2-4 items, then enter "2" here.
- Maximum quantity - The minimum quantity required to qualify for the bulk pricing tier. For example, if the tier will give a discount when you order 2-4 items, then enter "4" here. Leave it blank if you don't want to set a maximum, for example if you're offering a discount off any quantity over 5.
- Discount - Use the dropdown to select either a percentage or fixed amount discount, and also add the discount amount in your store's default currency. For example:
- % discount - Enter the percentage value, e.g. "20" for 20%.
- Fixed discount - Enter the exact amount that will be deducted when the customer orders within the quantity range for the tier. (E.g. if you're offering a flat $10 discount when you order more than 5 of an item, then enter "10" here.)
(Tip: Typically, the first row of the table would have a quantity of "1" and no discount.)
- Delete - Use the trash icon to delete the deal from the volume bundle.
Discount calculation
Select an option based on how you want the bulk discount to work:
- Same product and variant - Calculate the discount separately for each individual product or variant. For example, imagine that you've created a storewide discount that gives 20% off quantities of 5 or more and the customer adds 1 red t-shirt, 1 blue t-shirt and 3 hoodies to their cart. They will not qualify for the discount.
- Same product (any variant) - Calculate the discount separately for each individual product, but allow variants to be combined to quality for the discount. For example, imagine that you've created a storewide discount that gives 20% off quantities of 5 or more and the customer adds 1 red t-shirt, 1 blue t-shirt and 3 hoodies to their cart. They will not qualify for the discount. However, if they add 2 red and 3 blue shirt variants to the cart then they would qualify.
- Combine across discounted products - Calculate the discount based on the combined value of all products selected in the "Which products?" section, above. In our t-shirt and hoodie example above, the customer would qualify for the discount because they have ordered 5 products in total, which meets the minimum quantity for the deal.
Design options
By default, the front end display of your volume bundles and tiered pricing tables will adapt to match your theme. For example, the theme's primary color will be used. You can see this in the 'Preview' section on the right hand side of the page.
Select the 'Custom' option to customize the design as needed. When you do this, different design options and color pickers will appear depending on the discount type.
Previewing your discounts
The right hand side of the page contains a preview window, plus some additional display options.
At the top, you will see a preview of how the table of discounts will appear on the front end:
- For volume bundles, this will show the bundle tiers that you have created. It is impossible to disable the front end display of volume bundles because they replace the standard quantity field on the product page, so they are the only way for customers to add to the cart.
- For bulk pricing, the discount tiers appear in a tiered pricing table. There is a toggle allowing you to stop this from appearing on the front end if you wish (e.g. for B2B stores that already know about your quantity discounts). In this case, your product page will appear as usual and the correct quantity-based discounts will be applied and displayed on the cart page.
The preview provides an example how the discount will look on the front end. It uses the oldest product in the store which is eligible for the discount. It updates in real time as you edit the settings for the discount.
Display
- Heading - Optionally add a title which appears above the table of discounts on the front end, e.g. “Buy More, Save More”.
- Description - Optionally display some brief text underneath the title, e.g. “Time-limited offer!”
- Show original price (enabled by default) - This only appears for Volume Bundles and allows you to choose whether or not to display the original price crossed out.
- Show amount saved (enabled by default) - This only appears for Volume Bundles and allows you to choose whether or not to display the amount that customers will save by selecting each option.
- Layout - Choose between a horizontal or vertical layout for your volume bundles.
Saving your discount and activating it in your theme
Once you've finished setting up the discount, use the Save button at the top to add it to your store.
If this is the first discount you created and it will be visible on the front end of your store, then you'll be taken to a page prompting you to activate the widget in your theme. This is an essential step for displaying the discount information on the product page, and we've made it as simple as possible for you:
- Click on the button in the popup window.
- You'll be taken to the theme editor, with the Barn2 Bundles & Discounts widget already enabled.
- If you like, then you can use the navigation panel on the left to drag the widget to any other location on the product page.
- Simply click 'Save' and this will add the widget to your site!