Customizing your WooCommerce sidebar filters: A detailed how-to guide

The sidebar is one of the most popular locations to place product filters on an ecommerce online store. In this post, I'll show you the quickest way to set up sidebar filters using WooCommerce's native options and with the best WooCommerce sidebar filter plugin.
Want to add product filters to the sidebar of your WooCommerce store? This guide has your back. I'll walk you through:
- How WooCommerce's default filters work and the steps to set them up on your store.
- An overview of the best WooCommerce sidebar filter plugin.
- A step-by-step walkthrough to setting up WooCommerce sidebar filters using the default options and with WooCommerce Product Filters.
- Best practices for implementing sidebar filters in WooCommerce.
Let's kick things off with a quick run-through of WooCommerce’s built-in sidebar filter widgets and how to configure them.
An overview of the native WooCommerce sidebar filter widgets
The more products your store offers, the more important your filtering system is. If you have a large product catalog, say comprising of hundreds or thousands of items, without the option to narrow down products by specific criteria, the browsing experience will quickly get frustrating and overwhelming for customers.
And when customers feel bombarded with too many options, they are more likely to bounce off your site without making a purchase.
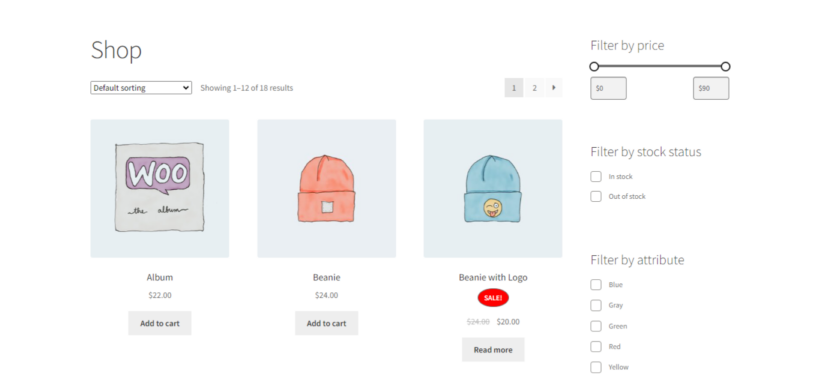
WooCommerce offers the following default sidebar product filters: filter by stock, filter by price, filter by attribute, and filter by rating. You can also add the "active filters" block to separate operational filters by attributes and enable shoppers to quickly remove specific active filters or clear them all at once. These text-only filters can either appear as checkboxes, dropdown lists or a price slider, like this:
How to add the default WooCommerce sidebar filters
- Navigate to Appearance → Widgets in your store's admin dashboard.
- Locate the appropriate sidebar panel. Click on the "+" sign to add a new filter block.

- Type "filter" into the search box and select the product filter blocks you wish to add to your store's sidebar area.

- Hit "Update" on the top-right of the page.
Although WooCommerce's default sidebar filter widgets are decent at helping customers narrow down product searches, they are not ideal for stores with large product catalogs. Below, we'll explore why.
Limitations of the default sidebar filters
WooCommerce's default sidebar filtering system can be pretty limiting. Here's what I mean:
❌ The filtering elements are way too basic
WooCommerce's default filters only cover 4 basic criteria: price, stock availability, product attributes, and product rating. While these filters can help customers to some extent, they are simply not flexible enough for most online stores. For example, if you sell electronics, customers may want to filter by brand, battery life, or storage capacity. The default filtering system doesn’t include the ability to add filters for more detailed options. This means they are not effective enough at helping customers whittle down their search for specific products.
❌ Poor user experience (UX)
The default sidebar filters aren't built with AJAX. This means that when a user applies a filter, the entire page has to reload to display the results 😧! As you can imagine, repeated page reloads every time a customer selects a filter interrupts their browsing flow. It can lead to a super frustrating shopping experience, especially for customers who want to apply multiple filters or browse through different options quickly.
❌ There are too few filter styles
When it comes to customizing the look and feel of your filters, WooCommerce’s default options are pretty barebones. There’s little you can do to style the filters in a way that's intuitive and visually appealing, which can make them less effective. For example, if you run a store that sells shoes and clothing, you might want to use color swatches, image pickers, tag labels, etc., which are more user-friendly than WooCommerce's plain checkboxes with text. These types of sidebar filter simply don't exist in WooCommerce as it comes.
Here's the bottom line:
A poor filtering system can be quite costly for your online store. When customers can’t find the products they want easily, they’re more likely to leave your site and shop elsewhere. This is especially true for ecommerce stores with large inventories or complex products.
Online shoppers expect a smooth, fast, and intuitive filtering experience. Considering how limited WooCommerce's default sidebar filters are, many store owners prefer to use a sidebar filter plugin.
In the next section, I'll introduce you to the best sidebar filter plugin for WooCommerce and discuss how it can upgrade your store's product filtering system.
Introducing the best WooCommerce sidebar filter plugin
Barn2's WooCommerce Product Filters is a powerful product filter plugin that overhauls WooCommerce’s default, clunky sidebar filtering system. It is the best choice to add robust sidebar filters along with advanced search and sorting options to your store.
Kinsta recently voted it in their list of the best WooCommerce product filter plugins as “A powerful and flexible tool for improving the product filtering capabilities of any WooCommerce-powered store”.
WooCommerce Product Filters enables you to set up filters for pretty much any criteria. This includes product data like attributes (e.g. product models, colors, sizes, brands, etc.), product categories, tags, custom fields, custom taxonomies, and much more.
You can use it to add and display the product filters on your site's front end in a variety of ways, including:
- A left-page sidebar.
- A right-page sidebar.
- A slide-out panel which is activated by clicking a button.
- Above the list of products on the catalog page.
- A mobile-optimized fly-out filter panel.
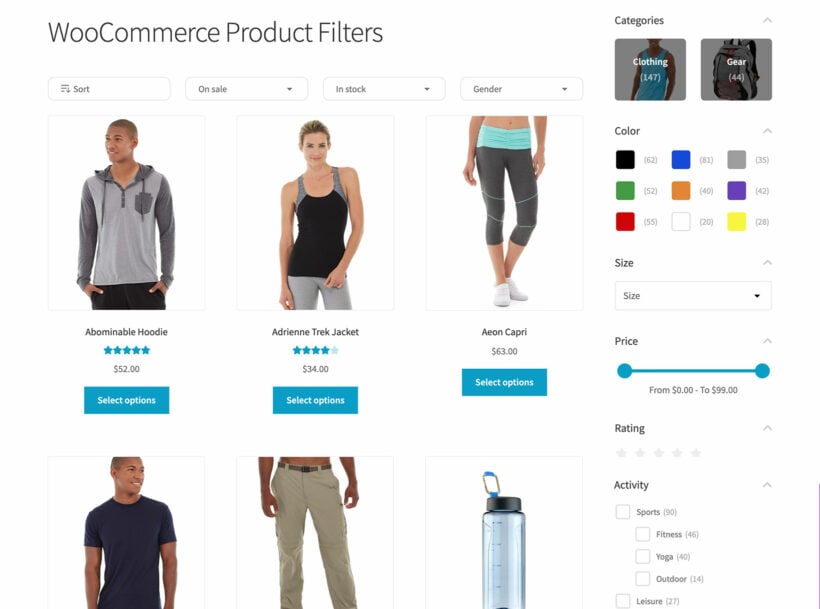
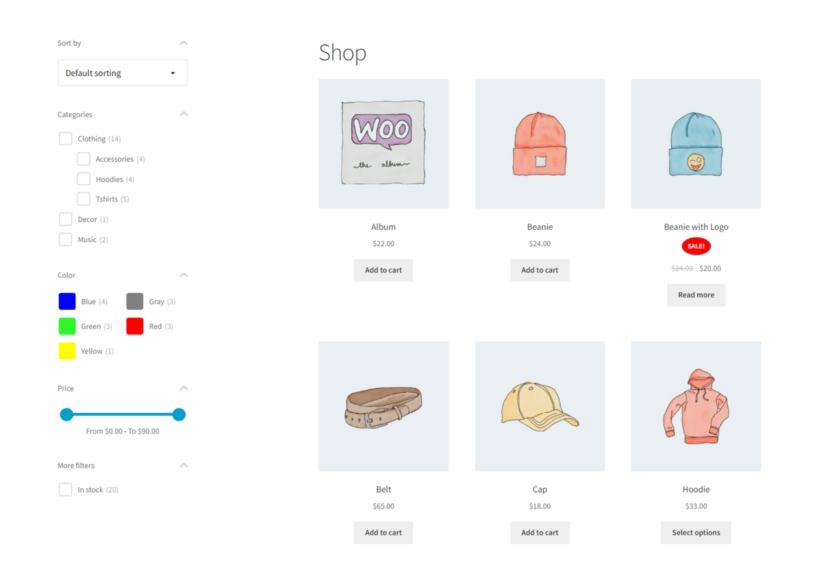
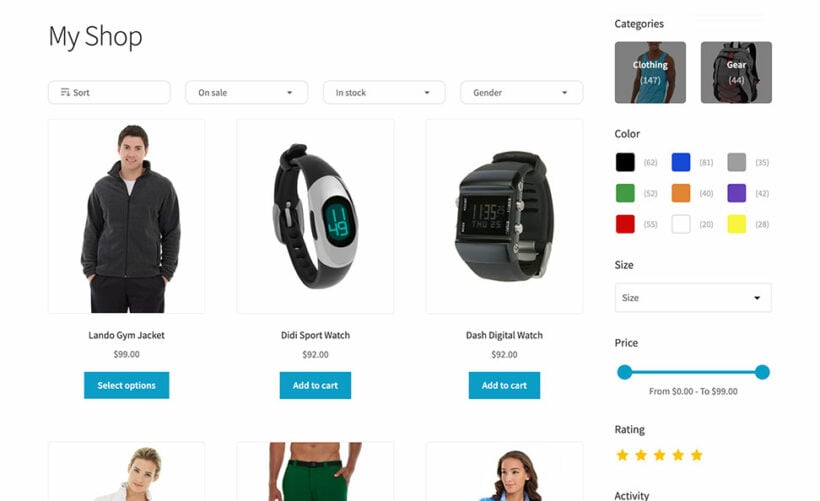
For example, here's a preview of the sidebar filters on the left side on front end of a WooCommerce store:
Here's how they look on the right sidebar area:
A quick note about filtering for mobile shoppers:
Because most websites don't have a sidebar on mobiles, WooCommerce Product Filters displays a "View Filters" button above the list of products on small screen sizes. This opens a fly-out filter panel which is optimized for mobiles. This filter layout is similar to those used on Etsy — they use a button that states "All Filters" on desktop or a filter icon for mobile before revealing its vertical sidebar filter.
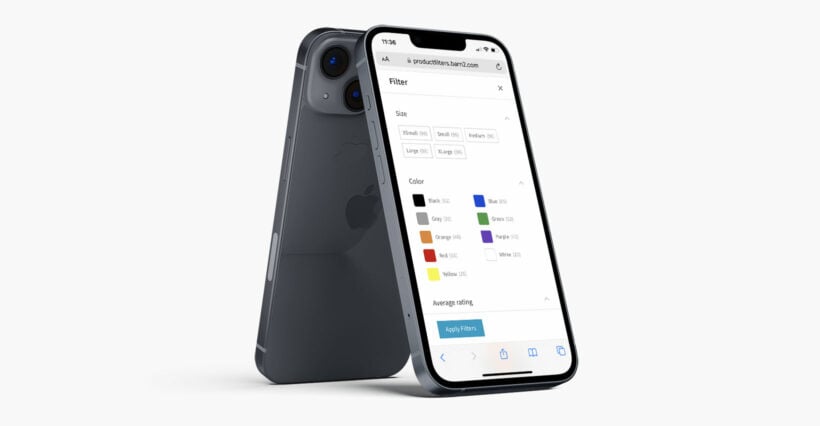
Overall, this WooCommerce sidebar filter plugin is super simple to set up and tailor, even if you are not tech-savvy. And there are ample resources to guide you along, including this guide, detailed documentation, and countless YouTube tutorials. You also get access to a friendly support team to help you if needed.
Benefits of upgrading your store's sidebar filters with WooCommerce Product Filters
1. It lets you set up filters for any criteria
WooCommerce Product Filters lets you set up product filters to allow customers to filter products by pretty much anything. This can be product attributes (e.g. product models, colors, sizes, brands, etc.), product categories and their subcategories, product tags, custom fields (like brand, product specifications, etc.), and more.
For example, let's say your online store sells furniture, you can configure your filter options to enable shoppers to filter by material (wood, metal), style (modern, vintage), price range, stock availability, and more—all at once.
2. It improves customers' browsing experience
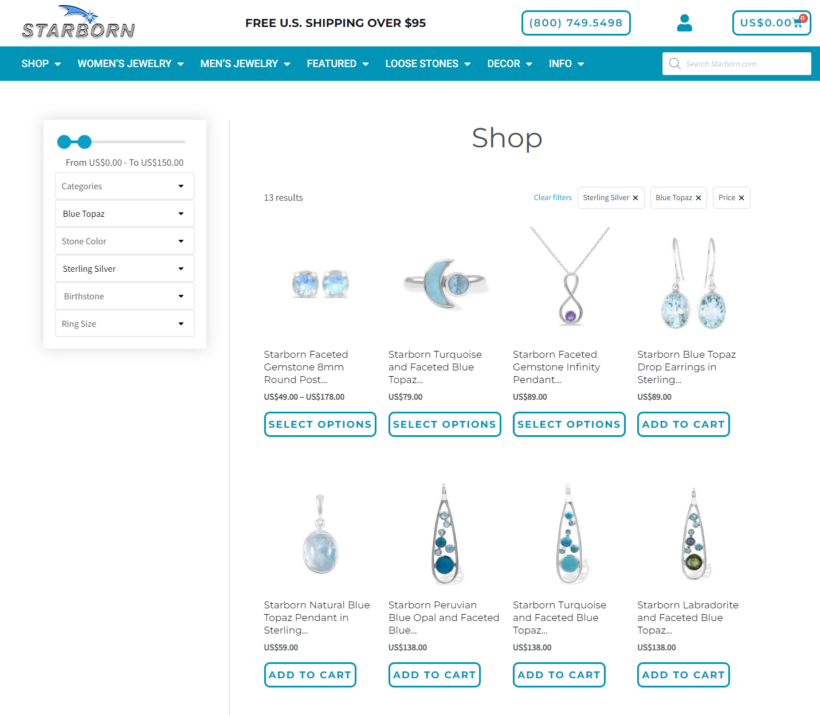
WooCommerce Product Filters offers a smooth, seamless, and fast filtering experience. It is built with AJAX, which makes sure that product listings are instantly updated as users apply filters — without them needing to reload the page.
This keeps customers engaged throughout the browsing process and reduces the chance of them abandoning their search due to slow page load times.
Customizing your WooCommerce sidebar filters can make a huge difference in user experience and conversion rates. In my analysis of various stores, those with well-optimized filters saw visitors staying 20% longer and a 15% increase in sales. Effective filters make it easier for customers to find what they want, which keeps them happy and more likely to make a purchase.
MahdiAli KhanusiyaCo-Founder at Ilmosys
3. It expands the range of filter styling options
As a store owner, you know firsthand that how options are presented to customers matters as much as the options themselves — and this applies to product filters too.
Instead of being limited to WooCommerce's plain checkboxes with text, you can use a variety of visual filter styles to match the filter options, such as radio buttons, color swatches, image pickers, range sliders, label/tag clouds, and others.
4. It improves your store's SEO
WooCommerce Product Filters allows filtered product results to generate unique, indexable URLs. These URLs can be crawled by search engines, which can help your store rank higher for specific, long-tail keywords.
For example, if a customer filters to find “blue men’s running shoes under $100,” the plugin can create a unique URL for that filtered search. This URL can then appear in search engine results when someone looks for that specific product combination, driving more targeted search traffic to your store.
Bottom line: WooCommerce Product Filters upgrades your store's default sidebar filters. The result? A more fruitful browsing experience where shoppers find it easy to locate exactly what they’re looking for and higher conversions for your store.
Step-by-step guide to setting up the WooCommerce sidebar filter plugin
In this section, I'll run you through the steps to configure WooCommerce Product Filters' settings and add sidebar filters to your online store.
The best part? The whole process takes ten minutes or less from start to finish.
Let's dive right in.
Step 1: Configure the core product filtering system
- Add WooCommerce Product Filters to your website and activate it.
- Open the plugin setup wizard to start configuring the filters.
- Select "None" from the options on the "Shop filters" page. This ensures that filters aren't added at the top of your product listings page.

- Next, you'll set "Filter visibility" for desktops and tablets. You have two main options:
- Always display all filters.
- Hide filters by default, with a button to reveal them.
- Consider how you want mobile shoppers to access the product filters. As before you can, choose to always display all filters or hide filters by default, with a button to reveal them.
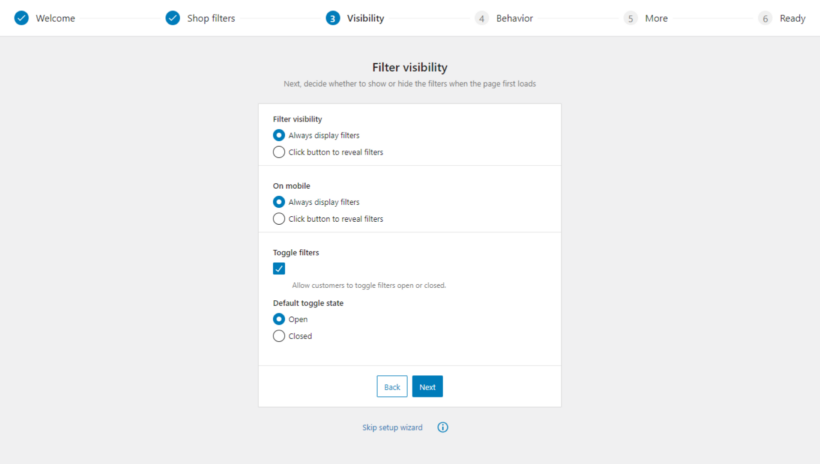
- The "Toggle filters" setting is useful for stores with many filter options. Enabling this lets customers open or close individual filters as needed.
- You'll also need to decide the default toggle state. This determines whether filters start open or closed.
- The "Filter mode" is an important usability feature. You can either auto-apply filters as soon as customers select them or require customers to click a button to "Apply" them after selecting their desired filters. I recommend the second option as allows customers to select multiple filters before seeing results.
- Another important usability feature, "product count" shows how many products match each filter option. It gives customers context about how many results they need to sort through to locate the specific items they want. I recommend enabling this.
- Lastly, click on "Manage filters" to exit the setup wizard.
2: Create product filter groups
When you add WooCommerce Product Filters to your website, it adds a default set of filters to help you quickly set up your filter groups. You can use them right away or tweak them if needed. You can also add new filter groups, and amend, and remove them as needed.
Here, I'll show you how to customize the default filter group as needed. Follow these steps:
- Access your WordPress admin and navigate to Product → Filters.
- Open the "Edit" page for the "Default" filter group.
- You can rename it as you prefer, especially if you plan to create extra filter groups for other areas of your store.
- Next, customize each filter option within the group. Note: Refer to this knowledgebase guide for the full list of customization options. Examples of how you can customize this are:
- Give the filter a new name.
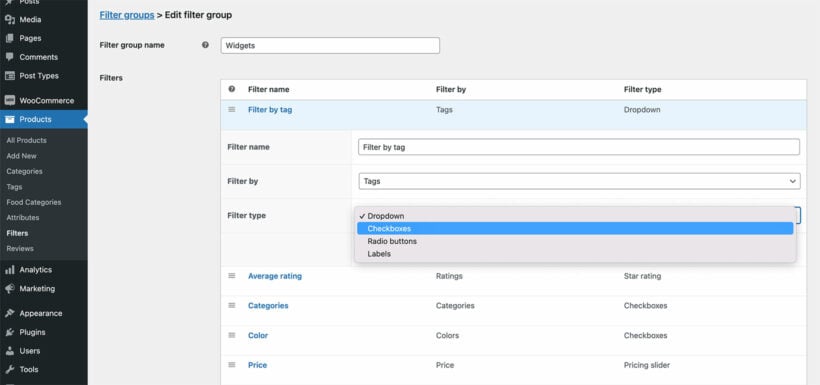
- Change the type of filter.
- Change the criteria for the filter option.
- Use a different filter style — for example, image pickers, color swatches, range sliders, dropdowns, radio buttons, checkboxes, or labels.
- Give the filter a new name.
3: Customize the appearance of the filter group (Optional)
WooCommerce Product Filters inherits your theme's styling so it'll fit right in with the rest of your content. However, you can choose to amend these settings to be more on-brand for your online store.
Follow these steps to customize the design and messaging on the filters:
- From within your WordPress admin, navigate to Product → Filters → Settings. You find the same settings from the setup wizard here too.
- Look for the "Filter text" section. This is where you can amend the text that's displayed on the filter panel, i.e. the slide-out panel heading, the "Show filters" button, the "Apply filters" button, and the "Clear filters" button. For example, instead of "Apply Filters" you could say "Refine Results", "Update Search", or "Show Matches".
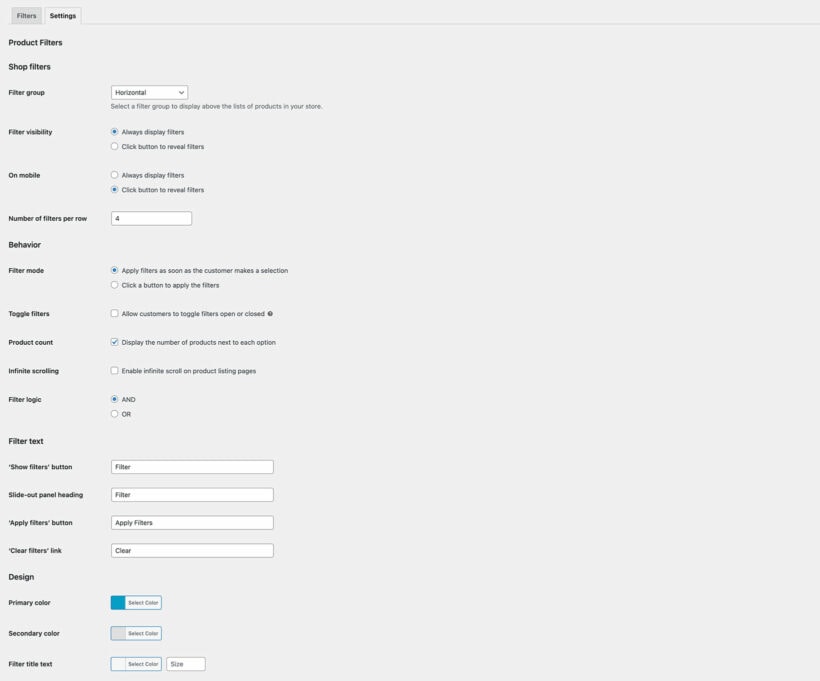
- Next, go to the "Design" section to customize the appearance of the filter, i.e. the primary and secondary colors and filter title text.
- Press "Save changes" once done.
4: Add the upgraded sidebar filters to your site's front-end
The process of adding filter groups created with WooCommerce Product Filters to your store's sidebar is pretty similar to setting up WooCommerce's default sidebar filter widgets. Follow these steps:
- Access your WordPress dashboard and navigate to Appearance → Widgets.
- Locate the appropriate sidebar panel and click on the "+" sign to add a new filter block.
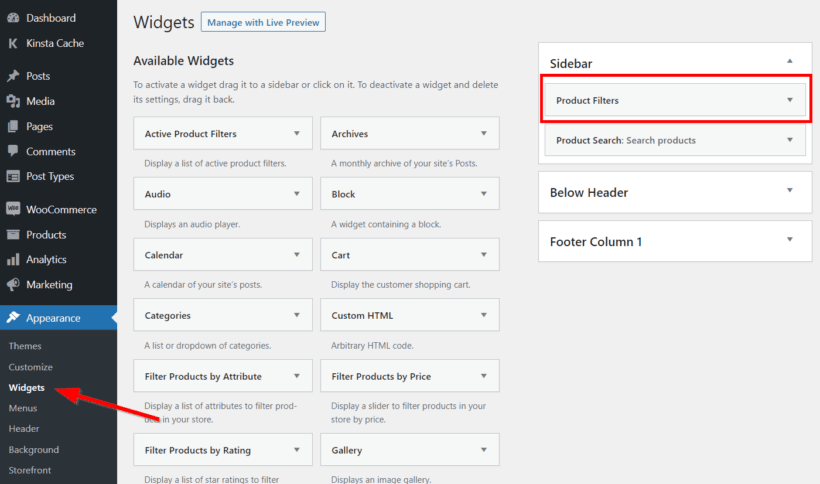
- Type "Product Filters" into the search box and select the "Product filter" block.
- Enter the title for the product filters.
- Choose the appropriate option from the filter group dropdown.
- Hit "Update" on the top-right of the page.
Here's how the filters looks in the left sidebar area on the front end of a WooCommerce store:

Tips for setting up WooCommerce sidebar filter options
Here are five practical tips to help you make the most of sidebar filters on your WooCommerce store:
1. Place filters on the left side of the page
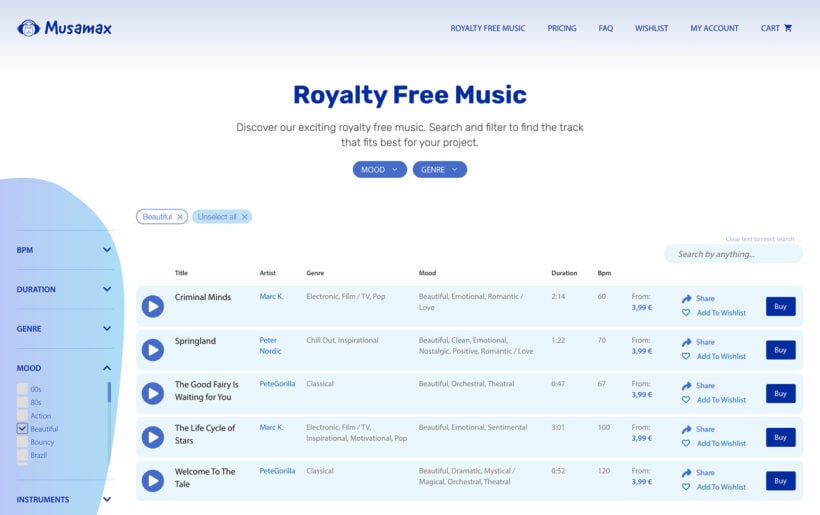
Research by Nielsen Norman Group shows that people spend disproportionately more viewing time — around 80%! — on the left half of the page. Similarly, that's where most users expect filters to be when browsing an online store.
Placing filters on the left keeps them exactly where customers naturally expect them to be so that it's easier and more intuitive for them to find the product(s) they need.
2. Use clear copy throughout
According to Baymard Institute’s ecommerce UX benchmark, 62% of sites use unclear labels, which users tend to skip when filtering for desired items.
Like with other text on your site, stick to filter labels that are simple to understand. Customers shouldn't have to guess the type of filter so avoid technical jargon or overly creative wording.
3. Arrange filters hierarchically
Organize filters in a logical hierarchy. Start with the most important filters at the top—those that customers are most likely to use first—such as price, category, or brand. Then, place more specific or less commonly used filters lower down.
For example, in an electronics store, it makes sense to have filters like "Brand," "Price," and "Category" at the top and filters like "Storage Capacity" or "Screen Size" under them. Arranging filters this way allows customers to refine their choices step-by-step without feeling overwhelmed by too many options at once.
4. Use visual filters where necessary
Visual filters are powerful, especially when used for certain types of products. For instance, if your online store sells clothing, it makes sense to use color swatches and image pickers instead of plain dropdowns with text listing “Red,” “Blue,” or “Black” as they allow users to quickly scan and pick the colors they want.
5. Display product counts
Showing product counts next to each filter option lets customers know how many products will appear after applying the filter, which helps manage their expectations and guide their filtering behavior.
It can be frustrating for customers to select a filter only to find no products match — product counts help avoid this.
Add WooCommerce sidebar filters to your store!
Well-designed sidebar filters help customers whittle down products and find what they want quickly and efficiently.
Although WooCommerce offers a handful of sidebar filters by default, the options are pretty basic. Not to mention, the default filter options aren't powered by AJAX, so they reload the page every time a customer selects a new one.
WooCommerce Product Filters is an AJAX-powered plugin that overhauls WooCommerce's default, barebones sidebar filters and replaces them with modern-looking, user-friendly filters. With this sidebar filter plugin, you can:
- Create filters for virtually any parameter, including custom fields, custom taxonomies, product categories, product tags, attributes, and more.
- Set up filters using a wide array of filter styling options, including color swatches, image pickers, dropdowns, radio buttons, etc.
- Add filters anywhere on your site's web pages — left sidebar, right sidebar, on top of the product list page, mobile-optimized fly-out filter panel for mobile shoppers, and anywhere else on your site using shortcodes.
Improve your WooCommerce site's search rankings with SEO-friendly URLs.
Get WooCommerce Product Filters and add sidebar filters to your store in ten minutes or less!
2 Comments
Hi Priyanka,
All the points that you said on Limitations of the default sidebar WooCommerce filters are correct. It may hinder a fully optimized shopping experience on our online store.
These limitations become more apparent as a WooCommerce store grows in scale and complexity, especially for stores with diverse product offerings. Your plugins offering to tackle these challenges is necessary to overcoming this effectively.
Thank you for this great post.
Hi Toko! Thank you for sharing your insight about this subject matter. I'm happy to know that you found this post helpful. Should you have any questions about our plugins, feel free to reach us at anytime via our Support Center. Cheers!