Creating a Shopify style checkout in WooCommerce (2026)
Have you ever paid close attention to the checkout process on Shopify? Pretty fast and user-friendly, right? What if I told you that you can bring this Shopify-style checkout to your WooCommerce store? Let me show you how to improve your store with a WooCommerce Shopify checkout.
E-commerce has successfully revolutionized how business is run all over the world. And WooCommerce and Shopify are the two most popular platforms behind this revolution. Over 6.3 million websites worldwide use WooCommerce. This accounts for 23% of all online stores. And there are many good reasons why this is so.
The WooCommerce software is free, open-source, and relies on the equally popular WordPress platform. It's also arguably the most flexible and customizable self-hosted ecommerce solution out there.
One aspect of Shopify that even WooCommerce store owners love is the checkout process. It's fast, user-friendly, and highly optimized for high conversion rates.
Fortunately, you can enjoy the good of both worlds. In this article, I'll show you how to make your WooCommerce checkout like Shopify with plugins. With these plugins, you can easily combine WooCommerce's cost-effectiveness with Shopify's high-converting checkout.
Let's get to it!
What's so special about the Shopify checkout page?
The checkout process is a critical part of any online monetary transaction. This is the point where customers decide whether to complete the purchase or abandon their cart. Shopify's checkout page is widely regarded as one of the best in the ecommerce industry. And for good reason.
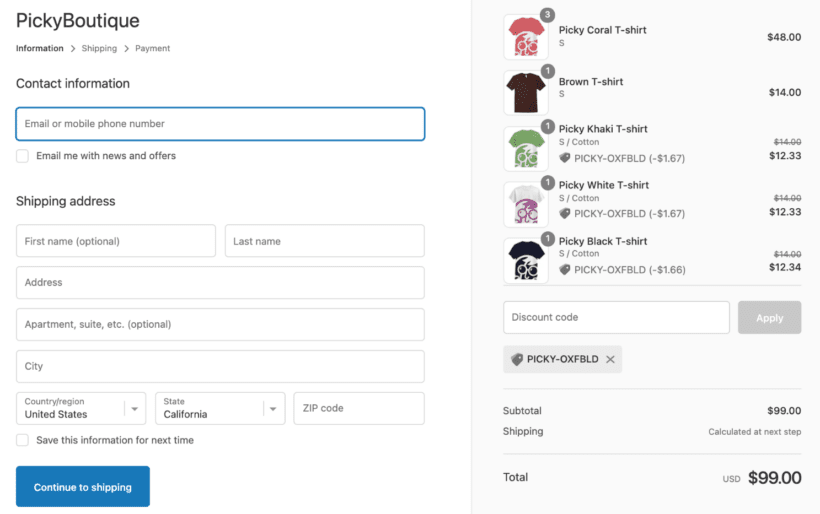
The best checkout experience focuses on making the process as easy, fast, and reliable as possible. Shopify does this perfectly. It has a clean and user-friendly design in a two-column layout. This largely explains why it has one of the highest conversion rates and lowest cart abandonment rates.
Here are some of the key features of the checkout experience that make it stand out. It's also why you should consider creating a WooCommerce Shopify checkout.
Shopify checkout features
- Clean and simple design Probably the first thing you notice on the Shopify checkout page is the clean minimalist design. The entire process focuses on the product the customer is about to buy. The page uses a neutral color scheme that doesn't distract from the product. Also, the font size is easy to read. At any point in the checkout process, the customer can see a clear, concise summary of their order. This includes product images, quantities, coupon information, and prices. This makes it easy to review their order and confirm the purchase. (Not sure what to sell? Discover the best products to sell on Shopify.)
- Two-column layout Shopify's two-column layout is another standout feature. The right column displays the customer's order summary. And on the left, you can see the checkout form. Customers can enter their billing and shipping address information and any other thing you choose to request. The form fields are also broken into clear sections. This layout ensures that customers can easily navigate the checkout process. It feels intuitive and streamlined, without overwhelming the customer.
- User-friendly interface Similarly, the Shopify checkout process is seamless. Even for first-time shoppers. Each page incorporates clear and concise messaging enhanced by a progress bar. This progress bar informs the customer of their current stage in the checkout process. There's also little to no distraction that could cause the customer to abandon their cart.
- Multiple payment options By default, Shopify offers a variety of payment options. This includes credit cards, Apple Pay, Google Pay, and PayPal. This flexibility increases the chances of the buyer completing their transactions using their preferred method.
- Mobile-friendliness Finally, Shopify checkout is fully optimized for mobile devices. This is highly important as there's an increasing number of consumers who shop on their mobile devices.
Related tutorial: How to build a Shopify store from start to finish.
Problems with the default WooCommerce checkout
I've shown you why the Shopify checkout process is one of the platform's major selling points among business owners. But you're probably still wondering "Why implement WooCommerce Shopify checkout?"
Simple! There are a couple of optimization issues that come with the default WooCommerce checkout experience. Let's examine a few of them.
- Poor user experience The default WooCommerce checkout can be rather confusing and frustrating for customers. In most cases, the checkout process is lengthy. And the customer doesn't get to see a progress bar that shows their current stage in the process.
- Bland design (depending on the theme) Except for certain premium WooCommerce themes, the WooCommerce checkout page is not very visually appealing. Important design elements like call to action button text, preset field text, and guest checkout options often need some improvement. Also, there are no clear calls to action to guide customers through the process.
- Lack of customization options Another issue is that when it comes to the checkout page, WooCommerce doesn't allow you to move things around so much. Quite in contrast with the platform's high customizability. Granted, it's possible to customize the checkout page using code or third-party plugins. But this can be challenging and time-consuming.
- No two-column layout The default WooCommerce checkout page also comes with a single-column layout. This makes the page appear long and overwhelming to customers. Shoppers have to scroll back up to see their order details while filling out the checkout form.
In the end, what you get is a checkout page that is hard to navigate, visually unappealing, and limited in terms of customization. This can result in low conversion rates and potential revenue loss. You can avoid this by configuring a WooCommerce Shopify checkout. Let's show you how to do this.
How to create a WooCommerce Shopify checkout
Ready to start enjoying the benefits of a WooCommerce Shopify checkout? The easiest way to do this is to use a third-party WooCommerce plugin. There are many checkout plugins in the WordPress ecosystem. And I've tested a good number of them extensively.
In this section, I'll walk you through 2 methods of setting up WooCommerce Shopify checkout. Each method relies on a powerful plugin. With either, you can set up a streamlined express checkout experience in a few minutes, even without prior experience. Let's dive in.
Method 1 - WooCommerce Fast Cart
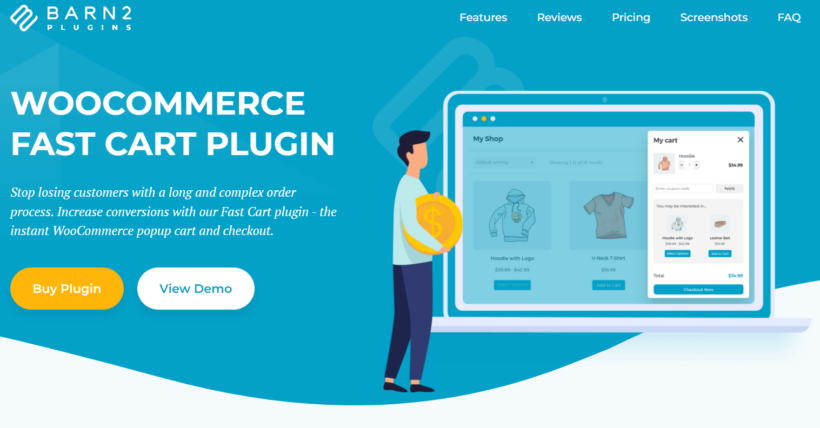
Our top recommendation for creating a WooCommerce Shopify checkout is to use WooCommerce Fast Cart. The plugin brings all the best things about the Shopify checkout experience (and even more) to WooCommerce. By configuring checkout with this plugin, you create an even faster, more visually pleasing, and user-friendly experience.
WooCommerce Fast Cart not only optimized the checkout page. It steps things a notch higher by displaying the WooCommerce checkout in an on-page popup cart. The first benefit here is that customers can now create their orders more quickly.
In other words, they get to complete their order from the same page where they clicked the "Add to cart" button. This is even significantly faster than the Shopify checkout!
Once you install and activate Fast Cart, it automatically replaces the WooCommerce cart widget. What you now get is an on-page popup cart. So each time a customer adds a product to their cart, the popup cart will automatically appear on the screen. This allows them to complete their order without leaving the page.
Let's look at some of its key WooCommerce Shopify checkout features.
Features and Pros of Using Fast Cart
- On-page popup cart The WooCommerce Fast Cart plugin replaces the standard WooCommerce cart widget. With the new on-page popup cart, our customers don't need to go to a separate checkout page. As a result, they can enjoy a faster and hassle-free checkout.
- One-page checkout If you choose, you can even opt for one-page checkout. This perfects the WooCommerce Shopify checkout experience. With ecommerce checkout, the fewer the steps the better. Using Fast Cart, you can set the popup cart to open automatically immediately after adding a product to the cart. You can also skip the cart completely and head straight to checkout.
- Highly customizable checkout design The on-page popup cart is also fully customizable. You can choose between a sidebar or centered popup. You can also configure which elements to include in the popup (e.g upsells, cross-sells, and recommended products). Design elements like the color of the text and background can also be tweaked.
- Mobile responsive and AJAX-based Your WooCommerce Shopify checkout works on mobiles and is fully responsive. So, irrespective of the customer's device, checkout will be fast and hitch-free. Fast Cart also updates the cart in real time. This means that customers don't need to refresh the page to see their updated cart.
How to create a WooCommerce Shopify checkout with Fast Cart
The first step to creating a WooCommerce Shopify checkout is to grab your copy of the WooCommerce Fast Cart plugin here.
Once you've gotten your WooCommerce Fast Cart license, you can now download the plugin as a ZIP file. You'll also receive an email with your license key. You'll use this key to activate the plugin later within your WordPress dashboard.
Next, it's time to upload the plugin to WordPress.
- Log into your WordPress dashboard. Then navigate to Plugins → Add New → Upload Plugin.
- Select the ZIP file you downloaded after getting your copy of the plugin and click Install Now. Once the plugin is installed, click Activate Plugin.
- The next step is to activate the plugin's license. To do this, go to WooCommerce → Settings → Fast Cart, and enter your license key from the email. Then click Activate.
Now that the plugin is activated, it has automatically replaced the default WooCommerce cart page. Let's tweak things a little bit.
Configuring the WooCommerce Shopify checkout page
Next, go to WooCommerce → Settings → Fast Cart and scroll down to the Content section.
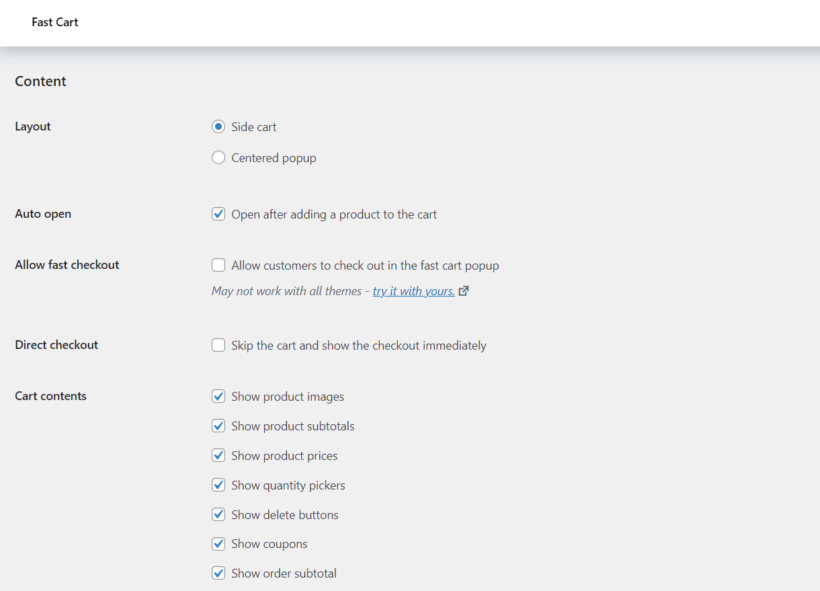
Each section allows you to customize your cart in different ways. Here are a few important ones:
- Content Here, you can choose the floating cart's layout (sidebar or centered popup), the elements to add to it (product images, prices, etc.), or enable auto-open. You can check Allow fast checkout to optimize the WooCommerce Shopify checkout even further.
- Cart icon You can choose to display a small floating cart icon either at the top, center, or bottom right corner of the page. Shoppers can then click this icon to see the full sidebar.
- Replace pages This option replaces the default cart page with the floating cart.
When you're done, click Save changes.
That's it! You've configured your WooCommerce Shopify checkout. You can test the new checkout results by heading over to the shop page on the front end. The results should look like this.
Method 2 - CheckoutWC
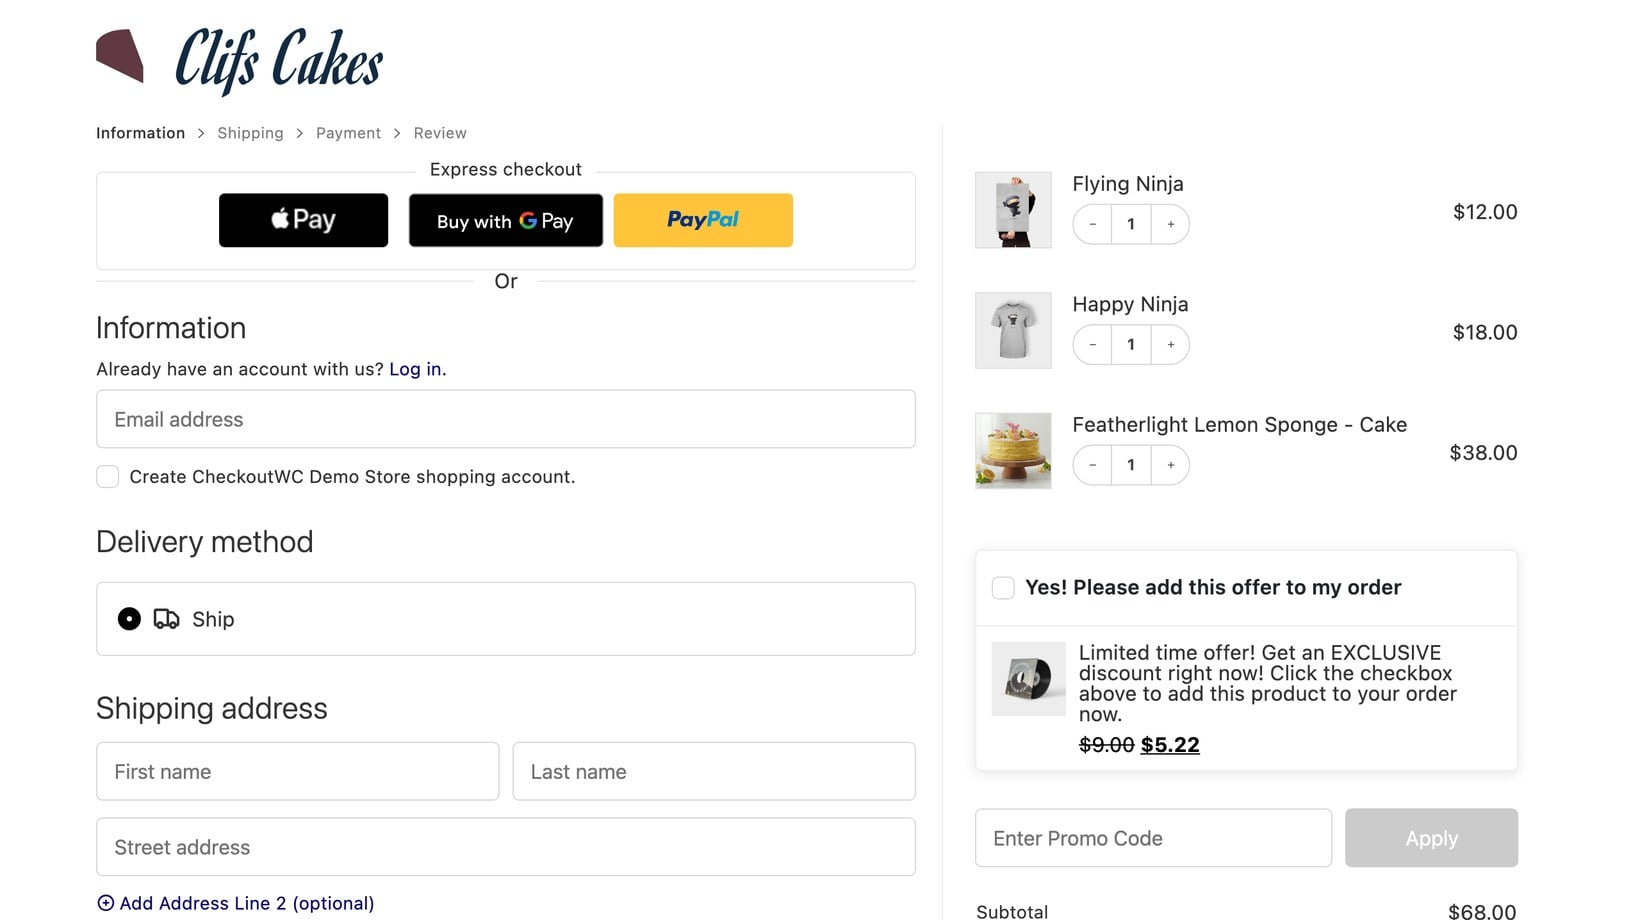
The second plugin we recommend for creating a WooCommerce Shopify checkout is CheckoutWC. The plugin is easy to set up and gives you a polished, Shopify-inspired checkout in minutes.
Just like Fast Cart, CheckoutWC replaces the default WooCommerce checkout. You get a clean, modern design with templates based on Shopify, Stripe, and other proven checkout flows. The plugin handles the look and feel while WooCommerce stays in charge of the order data.
Features and pros of using CheckoutWC
- Shopify-style templates Pick from a library of conversion-focused templates inspired by Shopify, Stripe, and other modern stores. Apply a template in a few clicks without writing any code.
- Multi-step or one-page layout Switch between a multi-step or single-page checkout depending on what works best for your store. Both layouts include a clear progress indicator.
- Address autocomplete and side cart Customers can autocomplete their address as they type. A persistent side cart lets them adjust quantities without leaving the checkout.
- Mobile-first design All templates are designed mobile-first, so the checkout feels fast and tap-friendly on phones and tablets.
How to create a WooCommerce Shopify checkout with CheckoutWC
You can get started with CheckoutWC by purchasing it from checkoutwc.com. Next, install and activate the plugin in your WordPress dashboard.
CheckoutWC swaps out the default WooCommerce checkout as soon as it's activated. Go to WooCommerce → CheckoutWC to pick a template, adjust colors, and toggle features like the side cart.
Once you're happy with the settings, save your changes. Test the checkout on the front end to make sure everything looks the way you want.
Comparison between Method 1 and Method 2
WooCommerce Fast Cart and CheckoutWC help you to create a WooCommerce Shopify checkout in a very similar way. Both plugins replace your default checkout immediately after they're installed and activated. This means you don't need to do much to set the new optimized experience in motion.
They also both offer a clean design with a more user-friendly interface. CheckoutWC retains the same two-column layout that Shopify uses. However, Fast Cart delivers a faster and more efficient checkout experience. The difference between both tools is evident in two areas.
- Fast Cart completely eliminates the need to visit a separate checkout or cart page. It automatically opens an on-page popup cart immediately after the customer clicks "Add to cart." You can also enable checkout right within the popup cart. This speeds up the checkout process and boosts your store's conversion rate.
- Fast Cart supports one-page checkout right out of the box. Again, this is faster and more efficient. CheckoutWC can do multi-step or single-page, depending on the template you pick.
Overall, it's hard to go wrong with either plugin solution. Both deliver a user-friendly WooCommerce Shopify checkout experience. They also offer lots of customization options. But with Fast Cart's better-optimized process, you're more likely to see a more positive impact on conversion rates.
Best practices for optimizing the Shopify-style checkout
For even better results, you can check out these simple store optimization tips. They'll help you further improve user experience, reduce cart abandonment, and increase conversion.
- Streamline the checkout process and use a progress bar The golden rule is to limit the number of steps and fields required to complete a purchase. Also, add a progress bar if you're using a multi-step checkout process. This reduces anxiety and increases the likelihood of pushing through.
- Use visual cues to guide users Visual cues like arrows and icons are very important. They guide users through the checkout process. They also draw their attention to important information.
- Allow guest checkout This is a simple default WooCommerce functionality. But it can boost your bottom line drastically. By allowing a guest to check out without first creating an account, you can further reduce abandonment.
- Offer multiple payment options and security features The more relevant payment methods, the higher the likelihood of landing a sale. The same applies to shipping methods. And remember to also display security and trust badges prominently to reassure users that their information is safe and secure.
- Use abandoned cart recovery emails Abandoned cart recovery emails remind users of items they left in their cart. This way, you can encourage them to complete the purchase.
Boost your conversion rate with a WooCommerce Shopify checkout
A fast and hassle-free checkout remains a major priority for ecommerce business owners. No doubt, WooCommerce is popular, cost-effective, and packs a lot of features. But the default checkout can be slow and leaves a lot to be desired. Fortunately, you can improve this by creating a WooCommerce Shopify checkout.
In this tutorial, I showed two highly effective methods of creating a Shopify-style checkout page in WooCommerce using two plugins:
- WooCommerce Fast Cart: It eliminates the need to go to a separate checkout page by opening an on-page popup cart.
- CheckoutWC: It replaces the default WooCommerce checkout with a more user-friendly two-column, Shopify-style checkout.
Both plugins deliver the same fast and highly optimized checkout experience as Shopify. But Fast Cart does it better with the much faster same-page popup approach.
Ready to create a WooCommerce Shopify checkout today? Then it's time to get your copy of WooCommerce Fast Cart!
Phew, that's been quite a read! Please let me know me if you have any questions in the comments section below.
2 Comments
Hello, does this plugin works also on website using Divi THeme?
Hi, Vilma. Thanks for your interest in WooCommerce Fast Cart. The Divi theme is popular and our plugin has indeed been tested to work with it. You can see Divi mentioned as one of our Supported themes. Please let me know if you have any more questions. You can also get in touch to discuss your needs in more detail via our dedicated Support Center.