WordPress instant online quote calculator

When we used to offer web design services (before we switched to selling plugins), our web design quote calculator was the most visited page on our website. Lots of people asked us how to create an instant online quote calculator for their own WordPress website. It's time for me to share the secret of how we did it, so that you can too!

The good news is that we used a widely available WordPress plugin for our instant quote calculator. With over a million users, Gravity Forms is the world's most successful WordPress forms plugin. Most people use Gravity Forms for straightforward enquiry forms like the ones in our own support center. However, you can also use it to create instant online quote calculators.

This is how we did it.

Getting Gravity Forms

First, you'll need to buy Gravity Forms. Install and activate it on your WordPress website.

To create an instant quote calculator like ours, their Personal License will be fine. If you want to sign people up to MailChimp when they submit the form, you'll need the Business License. Or if you want to take payment from people who submit the form (e.g. a PayPal deposit), you'll need their Developer License. Check out the Gravity Forms extensions to decide which license you need.

How to create an instant quote calculator with Gravity Forms

Gravity Forms provide excellent documentation on how to get started with creating online forms in WordPress.

I'll talk you through the specifics of using Gravity Forms to create an instant online quote calculator for your website. We'll base this on our own quote calculator. If you want something different then you can follow these steps in conjunction with the official documentation.

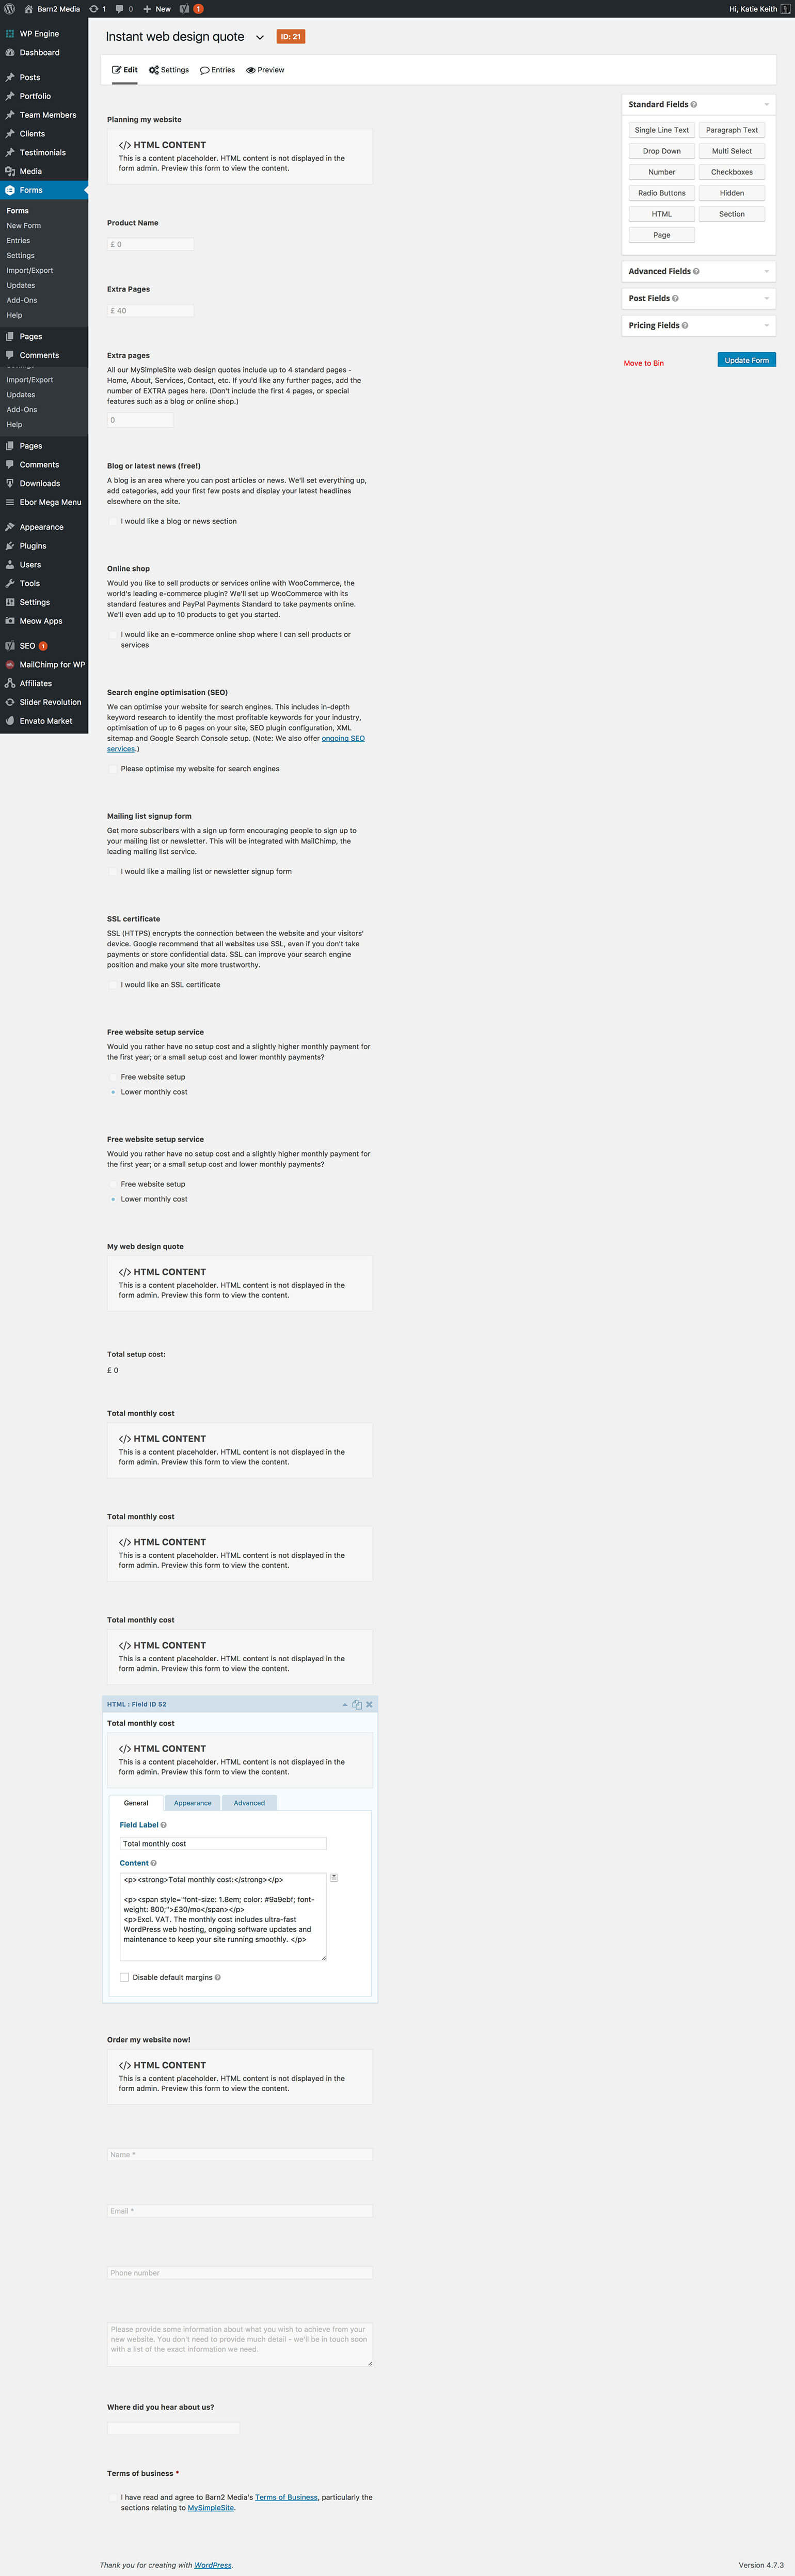
I've added a screenshot of our own price calculator so you can see how it looks in the WordPress admin. You can also download it directly here.

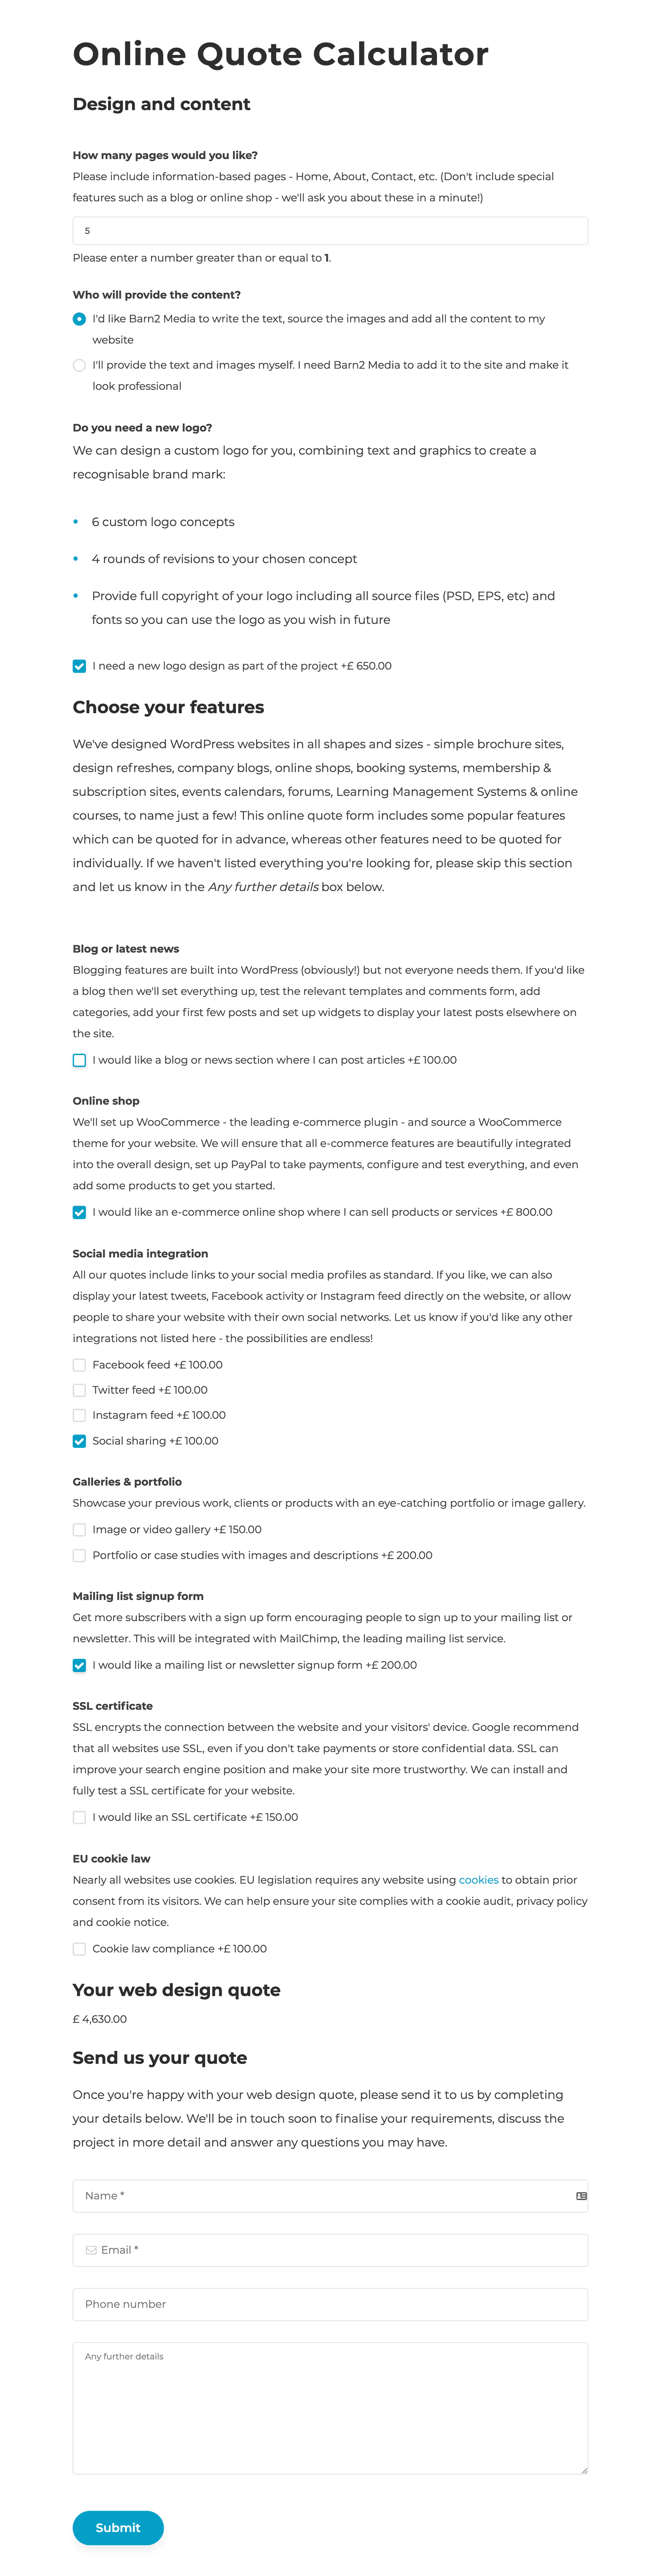
1. Add the quote calculator title and description

First, create a new form in the 'Forms' section of the WordPress admin. Add the form title and description. When you add the form to the page, you can choose to show or hide these. On our quote calculator, we show them at the top of the page.

2. Add headings

You can make your price calculator more user-friendly by adding sub-headings to divide up the form.

To do this, drag an HTML element from the right to the left - one for each heading. Add your heading content and format it as needed. This uses HTML which is a bit confusing for some people, so leave your headings as plain text if needed.

HTML elements are a good opportunity to add static information to your form which won't be part of the price calculations. So use it for headings, explanatory information, etc.

3. Add products

Product fieldNow it starts to get a bit tricky!

Open up the Pricing Section Fields section on the right of the form editor screen. Drag a 'Product' from the right to your form on the left.

Choose 'Hidden' field as the product will just be used as a base price for your calculations.

In our calculator, we set the product price to £0 because we offer a free web design option and only charge for extras. You may want to add a base price here which will be added to all prices, even if your customers don't select any other options.

Most online quote calculators will just need 1 product, which is used for the base price.

We added 2 products because we use 1 product for the base price, and another to calculate the price for extra pages. To give you some background, our standard web design cost includes 4 pages and we charge a price-per-page for additional pages. To do this, we added a second 'Product' field in Gravity Forms to set the price per page. When we added the other options to the calculator (see step 4), we selected the Base Price product for most of the fields and the Price Per Page product for the extra pages field.

4. Add extra options

Next, drag some 'Option' fields from the Pricing Section Fields section on the right to your form on the left. Add one Option for each of the options you want to include in your instant quote calculator.

We added Option fields for:

  • Gravity Forms Conditional LogicBlog or latest news - this actually doesn't affect the cost so we set the price to £0
  • Online shop
  • Search engine optimisation (SEO)
  • Mailing list signup form
  • SSL certificate
  • Free website setup service - this is a bit more complicated because we have different prices depending on whether or not people want an online shop. To achieve this, we added 2 Options for 'Free website setup service', and used Conditional Logic to display the correct one depending on whether they have ticked the 'Online shop' Option. To use conditional logic, click the 'Advanced' tab when you edit the Option. You can show or hide the Option depending on which other Options have been selected. Have a play - it's really clever once you figure it out!

We also added extra pages as a Quantity field associated with a different Product (see step 3, above). This let us add an extra price depending on the number of extra pages people wanted for their website.

4. Display the total price quoted

Next, drag a 'Total' field from the Pricing Section Fields section into your form. This will automatically calculate all the other fields to create the total.

5. Bonus tip - monthly costs

Our requirements for the instant quote calculator are a bit complex as our quotes consist of one-off setup fees PLUS ongoing monthly pricing.

We used the 'Total' field (see step 4) for the one-off quote, which was fairly straightforward. We added a static HTML element to display the monthly pricing.

The monthly pricing changes depending on which options are selected in the form. To achieve this, we used conditional logic to display different HTML elements depending on the options selected. This is a bit of a workaround, but suited our purposes and is the only way to do it in Gravity Forms.

6. Add a 'Submit my quote' section

Once someone has calculated an instant quote on your website, you presumably want them to submit the quote to you and place an order!

You can do this by adding more fields to the end of the form - either on the same page or a different one. (To divide your form into multiple pages, drag a 'Pages' element from the `Standard Fields' section on the right.)

Add fields for name, email address, phone number etc. A Submit button will automatically be added to the bottom, which you can reword in the form settings tab.

7. Configure the form settings

Now go back to the top of the page and go through all the settings and notifications. Make sure the quotes will be sent to the correct address, the 'Success' message is relevant and professional, etc.

8. Add the form to a page

Finally, go to edit any page or create a new one via Pages > Add New. You'll see an 'Add Form'  button above the toolbar. Click this and insert your form into the page.

Save the page and start testing your form!

9. Test, test, test!

Online price calculators are complicated, with lots of possible options. Spend a long time testing every combination and make sure your sums are all correct. Make any tweaks to get it just right.

Styling the form

We did some custom styling to ensure the website quote calculator matches our overall branding and colour scheme.

Gravity Forms looks pretty good on most websites straight out of the box, so you may not need to restyle it. You can restyle your website quote calculator using CSS. If you don't know how to do it, I recommend posting a job on Codeable. Their panel of pre-approved WordPress experts will bid for the work so you can easily find a good developer for the right price.

Help, I'm stuck!

In this tutorial, I've explained how we created our own instant online quote calculator so that people can get web design prices online. Your needs will inevitably be different and the logic to get your pricing right can be quite complicated.

If you get stuck, your first port of call should be the Gravity Forms documentation. This contains a wealth of knowledge. You can also contact Gravity Forms support for help in getting your online price calculator just right.

Do you have an online quote calculator for your website?

Have you set up an instant quote calculator on your own website? Did you use Gravity Forms or is there another tool you'd recommend? Please let me know in the comments below.

clearer-images-wordpress-website-water-drops

I've discovered a retina WordPress plugin that makes it easy to serve crystal clear images to visitors with high definition screens. It's simple for non-techies to set up. It doesn't even increase page load times for non-retina visitors. This makes it a win win.

Why do you need a WordPress retina plugin?

I've known about retina images for years. We've developed retina-enabled WordPress sites for clients that serve larger versions of images to users with high definition (HD) screens. However until I switched from PC to Mac a few months ago, I didn't have direct experience of working with retina screens.

Because I wasn't using an HD screen myself, I didn't really take retina seriously. Website images looked fine on my PC so I assumed that they would look the same on a retina screen. I thought that adding a retina version of an image would make it even clearer, but that standard images would still look fine for retina users. That's where I was wrong.

When I got my MacBook Pro with its HD retina screen, I was shocked at how bad most website images looked. The same images looked great on my old PC, but fuzzy and blurred on the MacBook. I have no idea why this is (if you do, please add a comment below!) but the fact is, standard website images look horrible on retina screens.

This means that retina images are important if you want your website to look professional.

Introducing the Perfect Images plugin

Perfect Images is a plugin that automatically creates retina and non-retina versions of your images.

Once you have set it up, the only thing you need to do differently is to add all your images twice the size you normally would. For example, the featured images on our blog are 440 x 290 pixels so I need to upload them as 880 x 580px. The Perfect Images plugin automatically creates two versions of each image - a normal one for standard screens and a bigger one for retina screens. It cleverly detects each user's device and serves the appropriate image.

Will retina images slow down my site?

A retina images WordPress plugin will increase page load times slightly for visitors with retina screens. This is because they'll be viewing images twice as big as standard images in order to achieve the high definition effect.

However there will be no performance impact for visitors with standard screens. The Perfect Images plugin cleverly serves standard images to non-retina users. This means the larger images are only used for users who will benefit from them.

How can I set up Perfect Images?

To set up the plugin, I recommend following this tutorial. This covers the Pro version of the plugin which has some extra features such as a dashboard showing the retina status of all your images. However it's useful for users of the free version too, which is what we're using on this website.

Do you use retina images on your website?

Now it's your turn! Do you use a plugin (or another method) to add retina images on your own WordPress website? Maybe you like Perfect Images. Do you use a different plugin? Is it worth accepting slightly slower page load times for retina users in return for sharper images? I'd love to hear your thoughts in the comments below.

Go live

So you've designed a new WordPress website and it's ready to go live. Congratulations!

Going live is an important part of the web design process. Over the years, we have developed a detailed checklist of essential steps for launching a WordPress website. Read this checklist before you launch a website into the big wide world, and give it the best possible start.

1. Set the date

There's a right and a wrong time to go live. For some reason our clients always want to go live on a Friday. Bad idea!

Schedule the launch of the website for as early in the week as possible. This leaves the longest possible time to complete the go-live checklist and fix any teething problems before the weekend, when your WordPress web designer may not be available.

2. Move the WordPress website to its final location

Some people develop their WordPress website directly on their web host. If so, you can skip this step.

Others develop websites elsewhere, for example on a separate staging server or stored locally on their computer. This means that you'll need to arrange to move the finished website to your hosting account. This can take a while, so schedule it for at least a day or two before go-live.

Tip: If you haven't chosen a web host yet, we highly recommend WP Engine - the fastest, most reliable WordPress host we have ever worked with.

3. Final checks before going live

Our go-live checklist includes a few quality control checks to make sure we haven't missed anything during the WordPress web design process:

  1. Test everything on the website and ensure it's working correctly. Leave no stone unturned!
  2. Make a final check of the Settings section in the WordPress admin. Ensure things like the time zone are correct.
  3. If you're using an off-the-shelf WordPress theme with a child theme, make sure no custom CSS has been added in the theme options. Custom CSS should be either in the theme options or the child theme, but not both.
  4. Look at the Pages list in the admin and make sure all the pages are in the correct order. If there are lots of pages to re-order, consider a plugin such as Swifty Page Manager. This is worth doing even if you use custom menus and the order of pages isn't reflected on the public-facing website, as it makes it easier to work with the pages in future.
  5. Ensure there's no demo content from the theme still on the website - e.g. pages, posts, custom posts, media files.
  6. Go to Appearance > Themes, delete un-used themes and just keep the active theme (if you're using a child theme, you'll need to keep the parent and child theme) and the most recent default theme (e.g. TwentyFifteen).
  7. Make sure all contact forms, admin emails etc. are set to the correct address - the WordPress designer's email address will often be used during the development process, so don't forget to change this before go-live.
  8. Run the WP-Sweep plugin to remove all the page revisions etc. from the development phase. Delete this plugin afterwards.
  9. Make sure none of the images are more than approx. 1,920 pixels wide, or bigger if you are using retina images. Use the Imsanity WordPress plugin to bulk-resize them if needed. Leave this plugin active to resize any huge images that are accidentally uploaded in future.
  10. Use an image optimisation plugin such as WP Smush to bulk-optimise all the images on the site. Leave this plugin active if images will be added to the website in future.

4. Set up caching measures for improved page load times

Caching is an important way to speed up a WordPress website. Most people don't use caching during the development process because it can interfere with your work, for example by preventing you from seeing your changes straight away. This means that you need to set up caching immediately before the website goes live.

Caching is most effective when applied at hosting level. If your host doesn't offer caching, install a caching plugin.

  • If the site is hosted on WP Engine (our recommended WordPress web host), log into WP Engine and change the following settings:
    • CDN > Enable (this isn't caching, but it also boosts performance if it's available on your plan)
    • Utilities > Enable Object Caching
  • If the site is hosted on SiteGround (our recommendation for smaller or personal websites) or another company that provides caching - set up caching using the instructions from your web host.
  • Other hosting - install a caching plugin. Our favourite (if you're using an inferior web host that doesn't do their own caching!) is W3 Total Cache. To use it to its best effect, it ideally needs setting up by a WordPress professional as it requires quite a lot of knowledge to get right.

5. Set up automatic backups

Our recommended web hosts WP Engine and SiteGround have such good backups that we don't use backup plugins, unless a client has very specific requirements for storing backups. If you're using a web host with less good backups, or just want extra peace of mind, then it's worth adding a plugin.

Our favourite backup plugin is BackupWordPress and we also quite like BackWPup. For most websites, I'd recommend scheduling a weekly file backup and daily database backups. You will want more frequent backups if you're planning to make significant changes on a regular basis or if your website includes a lot of user-generated content.

Go through the settings for your backup plugin carefully and make sure it's not backing up anything non-essential such as the WordPress core and backup folders (don't backup your backups!). If you're running file and database backups at separate intervals, don't bother with a 'Full' backup as this will double up on other backups. Set your backups to auto-delete after a set period so they don't take up too much space.

The simplest option is to set your backups to save to a folder within your hosting account. For extra peace of mind (for example if anything happens to your web host), save your backups to a third party location such as a separate FTP account with a different host, Dropbox or Amazon storage.

Tip: Backup plugins use a lot more server resources than backups created directly on the server. This means that the website may slow down while a backup is being created using a plugin. Schedule the backups to take place in the middle of the night, and consider doing backups in some other way - particularly for very large websites.

6. Update your links

If you have been developing the website on a temporary URL, for example because your old website is still on your live domain, then you'll need to run a thorough 'search and replace' script to update all the links. Backup the database first in case anything goes wrong, then do a search and replace to replace all instances of the temporary URL with the finished URL.

Be aware that once you have done a search and replace, the website probably won't function correctly until you have updated the settings for the domain name (see step 7).  This is because the website is pointing to the final domain but the domain isn't yet pointing to it. Don't worry about this - you should already have tested the website in step 3. If you have done the search and replace correctly, things should start working properly as soon as the domain settings update.

Tip: There are lots of different methods for running a search and replace script. If you do it by installing a PHP file on the server, ALWAYS remember to delete this immediately afterwards - this is really important for security.

7. Update the domain name

If you have been developing the website on the actual domain name then you can skip this step.

If you have been using a temporary URL - for example because the domain is currently pointing at the old website - then you will need to update the domain name to point to the new website.

You can set the nameservers to your web host, but this method isn't suitable if you use your domain name for anything else, for example if you use a different host for your email or if you have separate subdomains. The best method is to go into the Advanced DNS for your domain name and update the following records to use the IP address where the website is hosted:

    • The root A record (this is usually indicated by a * or www)
    • The WWW A record

Note: Domain name settings are very complicated and if you don't know what you're doing, I recommend that you speak with your domain name register, your web host or a WordPress web designer. The above is a very basic guide and won't apply to all scenarios.

8. Wait!

If you have updated the nameservers in step 7 then the changes can take up to 48 hours to take effect. The changes populate slowly across the internet, so there might be a strange interim period where customers can see the old website (if you have one) and you can see the new one, or vice versa!

If you used Advanced DNS to update the domain then this usually happens quite quickly, depending on the domain name registrar - usually within a few hours although there are no guarantees. If you can see a field called 'TTL' in the Advanced DNS, try to decrease this to the smallest number it will accept - this means 'Time 'Till Live' and affects the length of time before the changes will take effect.

Please be patient - this stage is frustrating when you're excited about the new website going live. Unfortunately there's nothing you can do to speed it up.

9. URGENT! Unblock the website from search engines

As soon as the website goes live, log into the admin, go to Settings > Reading and untick the 'Discourage search engines' box. (I sincerely hope this was ticked during the development process!)

10. Submit to search engines

You should also submit the website to search engines, whether it's a new site or a redesign of an existing website. This encourages the main search engines to crawl the new website as soon as possible to index the new content.

11. Set up Google Analytics

Google Analytics is a powerful tool to track how many people are visiting the website and how they are interacting with it. In my experience, nearly all WordPress websites will benefit from having Google Analytics or a similar tool installed. This should be done as soon as the website goes live on the final domain.

  1. Log into Google Analytics and add the website as a new Property
  2. Install and set up the Google Analytics for WordPress plugin

Tip: I recommend using the above method even if the theme has a 'Google Analytics Tracking Code' box. This is because using a separate Analytics plugin means that you won't lose your tracking code if you ever switch theme.

12. Set up Google Webmaster Tools

Log into Google Webmaster Tools and add both the www and non-www versions (e.g. www.barn2.com and barn2.com) so that you can tell Google which is your preference. Verify it using your Google Analytics account, which you just set up in the previous step.

Look at the information in Google Webmaster Tools to make sure Google is able to crawl the site correctly. Fix any problems that are reported. (Webmaster Tools will also email you if it detects any major problems in future.)

Other search engines have their own version of Webmaster Tools which are specific to them. Our go-live process only includes Google Webmaster Tools because Google is the main search engine and the issues they are having will be relevant to other search engines too.

13. After go-live - Building traffic and keeping the website running smoothly

Once the new WordPress website has gone live, I hope you feel proud and start receiving positive feedback. But there's no time to relax - there's still lots of work to do! You need to build traffic to the website and keep it properly maintained.

Ongoing SEO

Your WordPress website may look beautiful, but it will only achieve its aims if enough people are visiting it. A good ongoing SEO (search engine optimisation) strategy is essential for this, in conjunction with effective social media marketing and adding regular content to the website.

Software and security updates

Within a few days of going live (I'm not exaggerating!), most WordPress website owners will start to see updates becoming available in Dashboard > Updates.

It's really important to keep WordPress itself, the theme (if you're using an off-the-shelf theme) and plugins on the website up to date. This is the main thing you can do to protect the website from hacking. It will also make sure your website is compatible with new versions of WordPress that are released in future. When WordPress is updated, theme and plugin authors usually release an update to achieve this so it's important to install them. This is especially important for websites with complex plugins such as e-commerce and membership.

Some WordPress web hosts will update WordPress automatically for you. This is great, but you're still responsible for updating the theme and plugins.

Future developments to your WordPress website

A well designed WordPress website should be able to grow with your company. Don't let it go out of date - keep the content fresh and add new pages and features over time. This will help it to achieve its potential so that it keeps working for you, both immediately after go-live and into the future.

Finding the best WordPress login widget plugin should be a simple task. But when I did it today, it took longer than I expected and most of the plugins weren't worth bothering with. I'm writing this post to share what I learned.

Having just set up a WordPress membership website using the S2Member plugin (fantastic, by the way - unlike WishList Member which is a nightmare to get right, S2Member worked first time), I wanted to add a sidebar widget that allows users to register or login without going through a login page.

Surprisingly, no sidebar login widget is provided by S2Member so I decided to look for a plugin. I wanted something simple instead of a full SSO solution; maybe with some JavaScript AJAX for a good user experience. This way, users can log in directly from the homepage e.g. example.com instead of from a separate login page.

Instead of heading over to Google search, I searched the WordPress plugin repository for sidebar login widgets and tested a few. This is what I found. (more…)