How to set up WooCommerce shipping classes: Complete guide

Want to learn more about WooCommerce Shipping Classes for your online store?
WooCommerce shipping classes help you get better control over allocating shipping charges to different products within your store. This way you're neither overcharging nor undercharging customers for real shipping costs incurred:
For example, larger products might carry higher shipping prices on your store because couriers charge more for larger or heavier items. Also, online customers are becoming more conscious of 'eco-friendly' packaging and are demanding the choice, despite it affecting the price paid.
Aside from this, you might also use 'discounted' shipping rates as a promotional tactic (instead of, say, coupons) to make certain deals more attractive:
For instance, (like some savvy store owners) you could offer free shipping on purchases above a certain spend threshold to increase your average order value.
So, greater price transparency, extra value offers and less friction at the checkout for your customers will help your WooCommerce store convert more sales and increase profit.
In this tutorial, I'll describe how to:
- Add WooCommerce shipping classes to your store
- Edit and delete shipping classes
- Allocate products to shipping classes
NOTE: WooCommerce shipping classes only help you set up common shipping rules for types of products. They don't control the rates offered on shipping. For setting shipping rates you'll need to use: shipping zones and class costs - which I'll describe later on in this guide.
And now, find out exactly what WooCommerce product shipping classes are and how best to use them for your store (with examples and recommendations) below.
Understanding WooCommerce shipping
To begin with, it's important to understand the difference between shipping classes and shipping rates in WooCommerce.
(It's easily done and can make things confusing if you're new to using WooCommerce.)
To clear things up, think of it this way:
When managing 'shipping' in WooCommerce use...
- 'CLASSES' for grouping products under certain shipping rules that you'll set up
- 'ZONES' and 'CLASS COSTS' to control RATES applied to specific shipping classes
Here's a quick and easy 3-step 'real-life' example demonstrating shipping classes, zones and costs:
- You sell furniture and set up a new shipping class called 'bulky' for larger items like a sofa.
- Then, you set up shipping zones to represent both the geographical coverage (by zone region) and shipping methods used. In this case, the shipping zone is called 'Domestic' and is used for nationwide delivery.
- Lastly, you set a standard flat rate class cost of $79.00 for all 'bulky' furniture items shipped.
Now, if your shipping destinations are likely to be more complex i.e. local, plus, nationwide and perhaps even international, WooCommerce shipping zones are very flexible and allow you to set up relevant shipping methods for each zone.
For example, your local shipping methods might include: customer collection / pick-up, or free shipping which is, of course, at zero cost to your customer. Whereas for international purchases you might apply a worldwide flat rate.
What are shipping classes?
For every WooCommerce shipping class that you set up, there are 4 attributes given: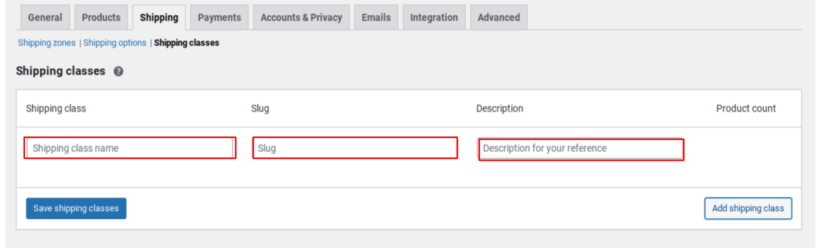
- Shipping class name
- Slug
- Description for your reference
- Product Count
Each shipping class would then give you the ability to apply shipping rules across a certain group of products.
Let's take a look at what makes up a shipping class in detail:
1. Shipping class name
This is what you will call the shipping class. It's best named in a way that makes sense that you can readily identify when doing your back-end store admin. e.g. Lightweight
2. Slug
The unique identifier used in your WooCommerce store database. e.g. Light (leaving this blank will result in an auto-generated slug based on your class name being used)
3. Description
A quick note and reminder of the reason for each particular shipping class. e.g. lower rate for lighter items.
4. Product count
Tells you how many different products you have currently allocated to any particular shipping class e.g. 150.
By setting up shipping classes in your WooCommerce store, you can separate out (in a meaningful way) certain shipping rules that you want to be applied to your products, by distinctly grouping them.
This significantly improves your level of customer service and helps you better manage cost control, making for a far more rewarding outcome for you and your customers.
That being said, the obvious question would be "How do I use WooCommerce shipping classes on my website?"
To answer this, I've laid out some very simple step-by-step instructions to show you just how easy this is to master.
How do I add a shipping class in WordPress and WooCommerce?
First you'll need shipping settings. Go to WooCommerce → Settings in the horizontal WordPress admin menu on the left of your screen.
Once in WooCommerce Settings, click on the tab labelled Shipping located at the top of the box in the middle of your screen.
Under Shipping, click the blue link that says, Shipping Classes.
Here you can begin adding shipping classes, giving each of them a name, slug, and description.
I recommend you write short descriptions, but distinct and easy to understand. As your store grows and you perhaps accumulate more shipping classes you want to avoid confusing class descriptions that risk admin errors or time wasted.
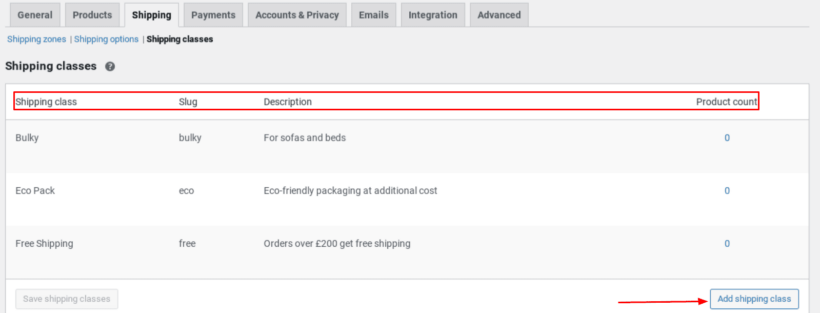
When you save shipping classes, pressing the Add Shipping Class button each one shows as a new row in the table.
Assigning shipping classes to products
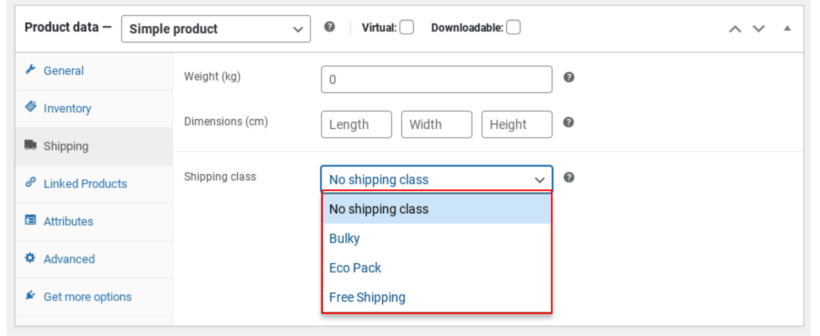
Now, to assign a shipping class to a product, you edit the Product page.
To do this, go to: WooCommerce → Products, select the product you want and click the Edit link.
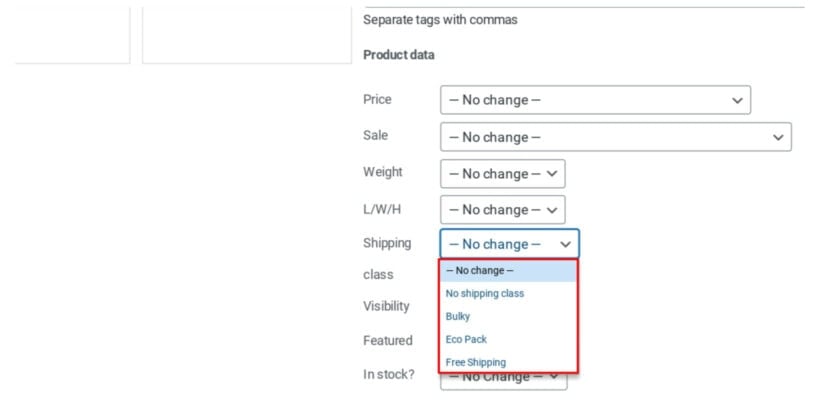
Within the Product Data box, click on the Shipping tab. Then, using the Shipping Class drop-down menu, select the shipping class you want to assign to this selected product.
If you are assigning a shipping class to a 'variable' product with many variations of size, let's say - then, also click on the Variations tab in the Product Data box and scroll down the list of product variations, assigning shipping classes to each one.
Remember to save your changes by clicking the Update button when editing products.
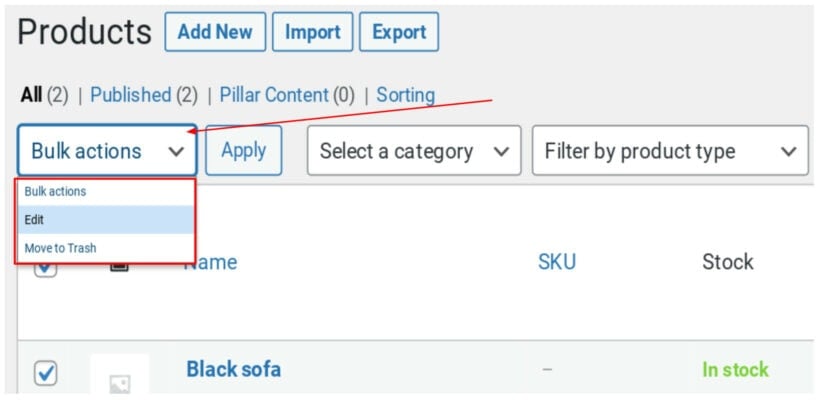
Want to assign shipping classes to many products quickly and easily?
Simply, go to Products → All Products and tick the checkbox to the left of every product you want to edit simultaneously. Next, within the Bulk Actions drop-down, select Edit, then click the Apply button.
A new screen then appears.
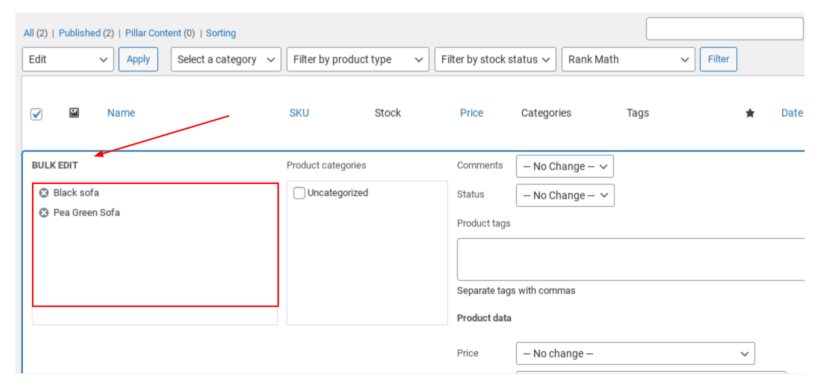
Next, under Product Data in the new screen, you'll find an option called Class. Using the drop-down menu, select the shipping class you want to assign to the products (now auto-inserted within the Bulk Edit box).
How do I add shipping costs to a shipping class in WooCommerce?
Next, you'll want to apply a shipping rate to each shipping class.
Let's say, for example, you wanted to apply a nationwide flat rate shipping fee of $50.00 (under the 'Domestic' class) to all bulky items of furniture (under the 'Bulky' class).
Here's how you'd do that...
Go to: WooCommerce → Settings → Shipping. Then, under the 'Domestic' Shipping Zone, click the blue Edit link.
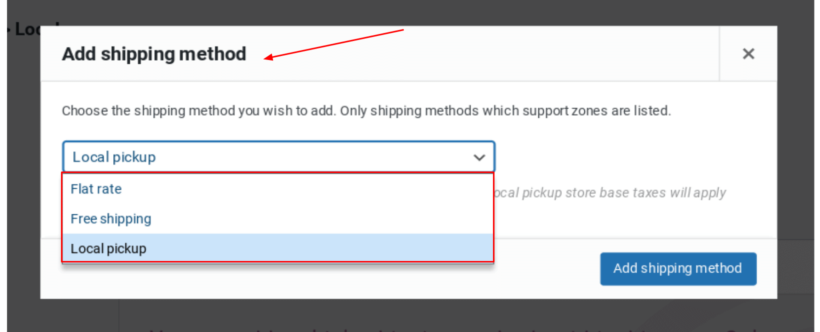
On the following screen, click the Add Shipping Method button.
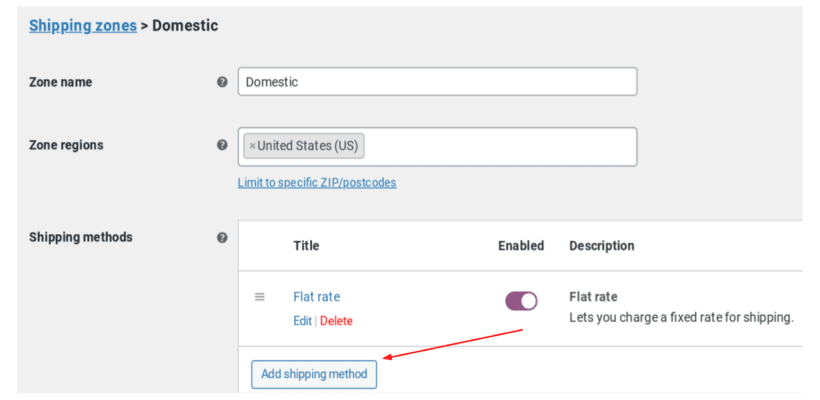
When the Add Shipping Method drop-down menu appears, select Flat Rate. When the Flat Rate options appear, click the Edit link under the relevant option.
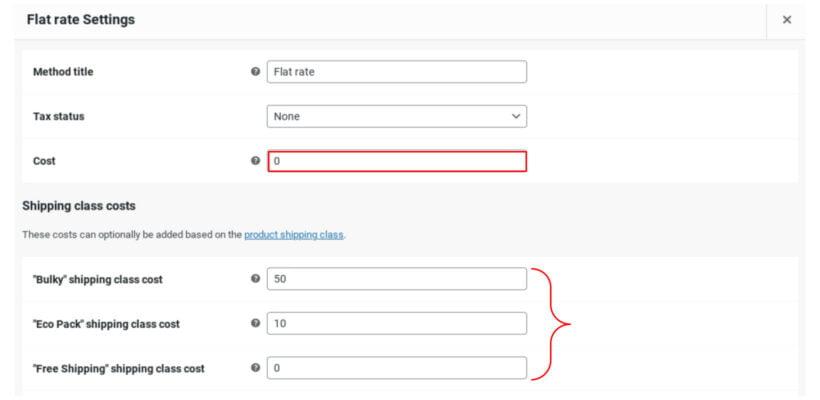
Within the Flat Rate settings, you'll find 3 input fields:
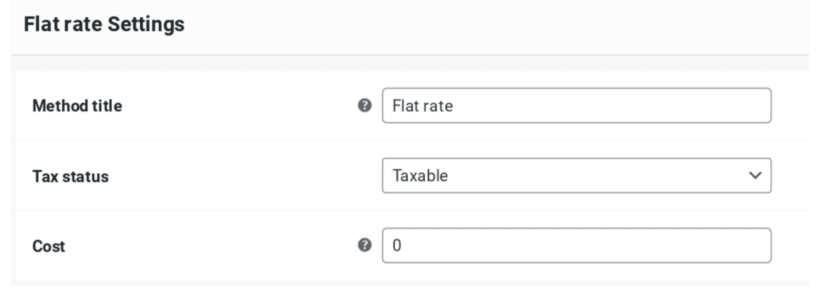
- Method title
- Tax status
- Cost
Method title
Enter a title that will make sense to your customer as this will be shown at the front end of your shop.
Tax status
Define whether tax should be applied to this shipping rate, or not.
Cost
Enter the Flat Rate shipping cost, which in the case of this example is $50.00. This cost is added to the entire cart cost (with tax, which if applicable, is applied before the cost is added to the order total).
With a $50.00 shipping cost now set for the 'Bulky' shipping class and applicable to purchases within the 'Domestic' shipping zone - simply assign this shipping class to specific products as described in the previous section above.
Advanced shipping costs
But your WooCommerce shipping options don't just end with simple flat rate shipping methods, you can also apply advanced shipping rates (under Shipping Class Costs) according to:
- number of items in the shopping cart, or;
- a percentage of the total order cost
For example,
...the following formula: 30 + ( 3 * [qty] ) would apply a base rate shipping charge of $30.00 to the order and an additional fee of $3 per item in the shopping cart.
Also,
...the formula: 10 + [fee percent="25" min_fee="5"] would apply a $10.00 base rate shipping charge this time, plus a 25% additional fee of the overall order total, which at the least amounts to $5.00.
How do I create a free shipping class in WooCommerce?
Perhaps you want to give a typical 3-tier shipping option to customers for certain orders.
This might be:
- Regular (3-day) flat-rate shipping
- Expedited (next day) shipping
- *Free shipping* (5-day)
In cases like this, first you'll set up shipping classes for each of the WooCommerce options (Regular, Expedited and Free), then you'll use the Advanced shipping costs controls again to assign each cost rule with a formula to match:
- So, to set up a $20.00 Regular Flate Rate shipping cost, for example, you'd type in
20 * [qty] - For an Expedited Flate Rate shipping cost of $35.00, you'd enter
35 * [qty] - And for *Free* shipping (i.e. $0), you'd enter
0 * [qty]
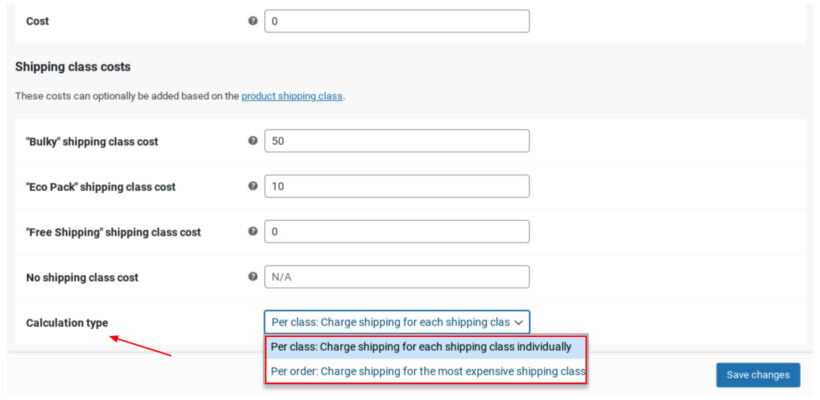
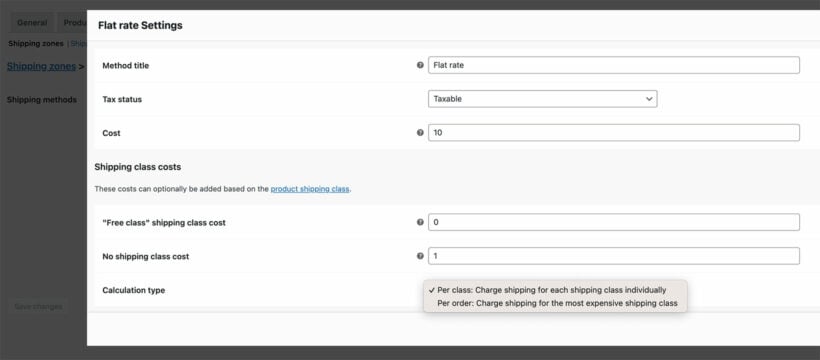
However, it's important to note that to get the result above, you must set the Calculation Type (under Shipping Class Costs of the chosen Shipping Zone) to read, "Per Class: Charge shipping for each shipping class individually” and leave the field next to Cost blank.
Setting up shipping zones
WooCommerce shipping zones have 3 attributes:
- Zone name
- Region(s)
- Shipping Method(s)
By using shipping zones, you can apply shipping class costs to customer orders according to the geographic area where the products will be shipped.
Only the relevant shipping zone is offered to the customer at the checkout according to the shipping address. Each customer will only have one shipping zone offered.
There's no limit on shipping zones to set up. And it's possible that each shipping zone can have several shipping methods applied.
Zone name
Enter a name to represent the zone you're setting up. e.g. Local, for local area shipments.
Region(s)
Collective areas within this shipping zone. e.g. United Kingdom, for nationwide shipments.
Shipping Methods(s)
The means by which the items will reach the order's shipping address. e.g. Local pick-up, for customer collection.
Shipping zones allow for a shipping cost to be assigned according to geographic destination.
This control element means customers are automatically given the appropriate shipping method options based on the shipping address used by the customer at checkout.
The benefits?
A more streamlined customer checkout leads to better sales conversion and higher store revenues.
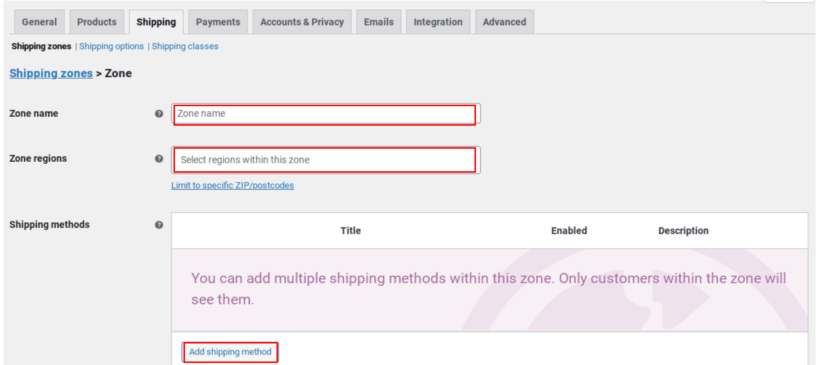
How to create shipping zones in WooCommerce
Go to: WooCommerce → Settings → Shipping → Shipping Zones.
When the related screen appears, click the Add Shipping Zone button.
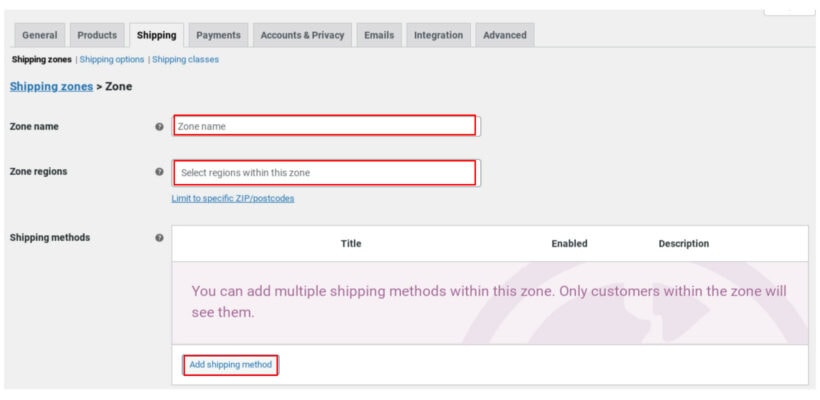
On the new screen, enter a Zone Name, and select Zone Region(s) by countries, states, or continents.
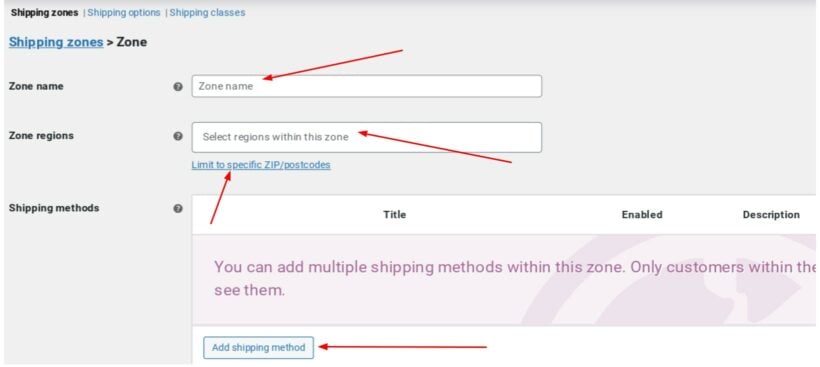
Want to control shipping zone by zip/postcode? Click the Limit to specific zip/postcodes link beneath the Region(s) field.
Finally, select which Shipping Methods should be available within this zone.
When you've set the shipping zone details, then click the Save button to save changes.
NOTE: WooCommerce matches Shipping Zones to each customer order in descending order to how your zones are listed on the admin screen. In other words, from the top listed Shipping Zone first. To change the order of Shipping Zones on the page, simply drag and drop to swap them around. This way you can manipulate how your WooCommerce store matches shipping zones to customer orders.
Assigning shipping classes to shipping zones
To assign a shipping class (along with its cost) to a particular shipping zone, go to WooCommerce → Settings → Shipping → Shipping Zones.
Then click on the blue link of the relevant Shipping Zone Name.
On the next screen, set the Cost under Fixed Rate Settings to '0'.
Now, take a look under Shipping Class Costs and you'll see your available Shipping Classes listed with input fields.
Simply, enter the Class Cost for each Shipping Class.
Finally, select the relevant Calculation Type from the dropdown box and Save changes.
2 things to know when creating WooCommerce Shipping Zones
In the real world, Shipping Zones don't always match at the checkout. In such cases, you need to know the fallback rules built into your WooCommerce store:
- If a customer has a shipping address that doesn't match any of your Shipping Zones, they are given notice that shipping is not available to their destination.
- Areas entered that don't overlap with other Shipping Zones cannot be amended nor removed, this way your store has a 'catch-all' default for when no other zones match.
What happens if a customer orders products from multiple shipping classes?
As we've seen, each product can have a different shipping class. This means that it's very possible that customers will place an order containing products from multiple shipping classes. So what will these customers be charged for shipping?
Fortunately, WooCommerce handles this nicely and even lets you choose what happens in this situation.
If you have already added one or more shipping classes to your store, then some extra options appear when you edit a shipping zone:
- Cost field for each of your WooCommerce shipping classes. Use this to enter the shipping cost for products within each shipping class.
- A field called "No shipping class cost", which will set the shipping cost for products which are not in any shipping class.
- A calculation type field where you can choose what happens when a customer orders products from multiple shipping classes together. The options here are:
- Per class: Charge shipping for each shipping class individually
- Per order: Charge shipping for the most expensive shipping class
Use these options to ensure that you never lose out if customers order products from different shipping classes at the same time.
What else can I do with shipping classes in WooCommerce?
You might find that beyond the basic shipping class scenarios (detailed above) that your WooCommerce store calls for a little extra.
Here are some examples of the kinds of situations that might require you to do more than the norm (I've also included recommendations of the best shipping plugins for WooCommerce where necessary):
How do I ship by product category in WooCommerce?
It isn't possible to set shipping rules by product category within the default WooCommerce plugin.
Shipping as described above is controlled via the Shipping Classes feature.
So, as a work around, what you'd have to do is visit each product within a particular product category and add Shipping Classes individually.
This way, you'll have a certain shipping class assigned manually to all products within a particular product category.
The best way to show shipping in your WooCommerce store
Within WooCommerce, the customer sees their relevant shipping changes calculated and added to their order total at the checkout.
But often, customers find shipping costs added at the late checkout stage off-putting within the general flow of buying a product online.
That's because only showing shipping costs on the checkout is last minute and rather 'slid under the door'. It's a far cry from showing any hidden costs up-front, and with total transparency.
So how do you avoid the shock (and potential 'cart abandonment', a common threat to ecommerce profitability) caused by 'sneaky' shipping costs applied at the checkout?
The answer is to gently lead customers in to seeing their shipping costs at an earlier stage - directly on the product page. The WooCommerce Shipping Calculator plugin seamlessly brings shipping calculations right inside your WooCommerce product pages.
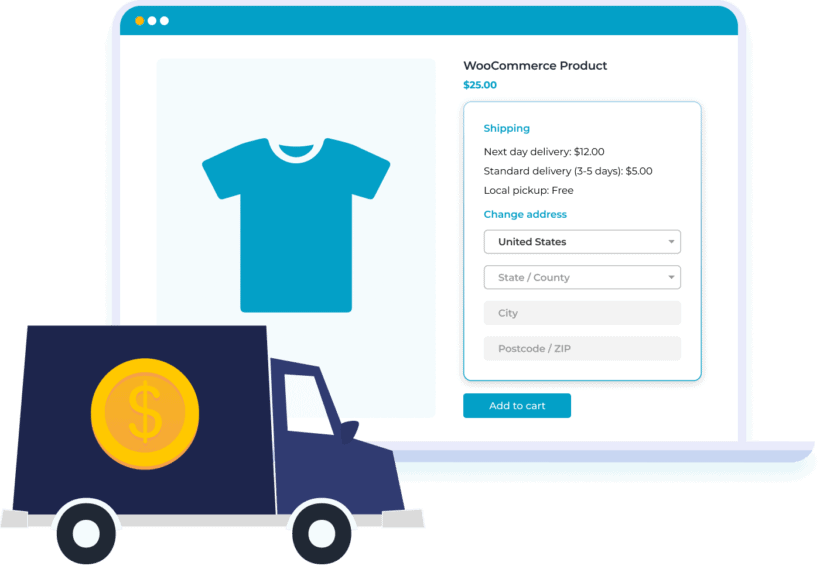
Using this plugin, will build trust with your store's customers and help them make more confident buying decisions when using your store.
Table rate shipping
For your store, you might want to apply more complex conditional-based shipping rules.
One example might be to set shipping rates based on a variety of weights within a shipping class.
Such occasions call for an advanced extension of the core WooCommerce plugin.
A particularly effective tool is the Product Shipping plugin.
The plugin combines multiple cost variables (laid out in a easy to use checkbox based tabulated format) for calculating shipping costs where, a more advanced approach is necessary.
It's the ideal solution for getting smarter with how you calculate WooCommerce shipping rates.
Using LIVE rate shipping
Often customers will opt to use a leading parcel delivery courier, like USPS, FedEx or DHL to deliver their order.
In such cases, the ideal situation would be to have the LIVE, up-to-date rates offered by the delivery companies direct inside your WooCommerce checkout.
The standard WooCommerce plugin is not integrated with delivery network data.
I recommend few neat plugins for this, DHL Express Shipping for WooCommece, FedEx Shipping Method and USPS Shipping Method.
Installing the plugins above will cause LIVE rates for both DHL, FedEx and USPS to be present for your customers at the checout.
How to charge shipping per product
There are occasions when applying blanket shipping conditions to whole classes of products within your WooCommerce store just isn't fit for purpose. Like when selling bespoke items, for example.
In such cases, what you really need is to set up 'per product' shipping rates.
Now, the core WooCommerce plugin doesn't offer this level of granularity. But there is a neat, professional extension I'd recommend called Per Product Shipping plugin.
It's quick, and simple to use and effortlessly integrates into your WooCommerce admin, giving you instant control on product-based shipping charges.
Per Product Shipping plugin is ideal for selling custom products with unique dimension and weight.
Quick tip: Are you looking to generate and print labels for your WooCommerce product orders? I recommend reading our guide - How to generate and print shipping labels in WooCommerce (step-by-step).
Shipping methods per user
There may be instances where you want your WooCommerce store to offer shipping methods based on user role.
For example, if your online store serves both wholesale and retail customers, it would make sense that the shipping methods offered would be dependent on the type of business account each customer has.
Therefore, wholesale customers would be presented with different WooCommerce shipping methods and rates (due to larger shipment size), compared with retail customers.
WooCommerce doesn't offer this level of flexibility built-in.
But using the WooCommerce Wholesale Pro plugin, it is possible to set up your store to control WooCommerce shipping methods based on user role within the WordPress dashboard.
It's time to set up shipping classes in your store
Now you've learned all about how to use WooCommerce shipping classes, it's time to set them up on your WordPress site. After all, they're the best way to charge different shipping per product.
While you're doing it, make sure you've correctly configured all aspects of shipping in your store. This includes your shipping zones, and at what point in the buying journey you display shipping costs to customers. The WooCommerce Shipping Calculator plugin is ideal for this because it lets customers see the shipping cost for each product exactly where they need it - on the product page. That way, there are no unexpected shocks at the checkout - whichever shipping class your products are in.
4 Comments
Hi Katie,
I wonder if you could help me. I am now selling gift boxes on my website with a final total of 84.99 which would include everything, items, taxes and shipping within Canada. I have created a zone and class but it is not reflected on the check-out page. How do I connect the two?
Hi, Debra. I appreciate your comment. Once you've configured the zone and class in WooCommerce, there shouldn't be any special process for the shipping information to appear. It should be visible on the cart and checkout pages right away. If you're still experiencing this issue, especially with the WooCommerce Shipping Calculator on your site, please don't hesitate to contact us through our Support Center for assistance. Thank you!
Hi Katie,
Great article! This is one of the best explanations of Shipping Classes and Zones I've found. I have a question I'm wondering if you can help with. Is it possible to limit a product to only being able to be shipped by a flat rate shipping class? I've set up a special shipping class for $10 and added it to the Flat Rate method in my US Shipping zone. I've then gone in an assigned that shipping class to the 1 product I want to use. The problem I'm having is that when I test adding that product to my cart, my checkout page still shows all the other shipping options, (priority mail, UPS, etc) in addition to the flat rate. Is there a way to somehow limit that product so it ONLY shows the flat rate option?
Thanks in advance,
Justin
Hi Justin, To achieve this, you have two options. The first is to disable the other shipping methods per country. Alternatively, you can utilize a custom code snippet or a third-party plugin to fulfill your specific requirement, as it is not inherently supported by WooCommerce itself.
I hope this makes sense and helps. If you have any more questions, you can get in touch via our Support Center. Many thanks!