WooCommerce filter by tag: How to add tag-based filters to your store

Are you looking for the best way to add tag-based filters to your online store? Product filters are a very handy feature for boosting the user experience in any store. The more options available for filtering your products, the fewer products your customers will have to search through. A WooCommerce filter by tag is particularly useful for helping shoppers find what they want faster.
Most WooCommerce store inventories feature hundreds of products and variations. Of course, offering your customers multiple purchase options increases your chances of getting more conversions. But from a shopper's perspective, having to browse through long item listings can take the fun out of the shopping process.
To make navigating your site easier, it makes sense to add product filters to your shop page. One of the attributes that can help customers see a shorter product listing is the product tag. Though the default WooCommerce allows you to add tags to products, there is no way to allow customers to filter by tag.
In this article, we'll show you the 2 best ways to add WooCommerce filter by tag to your store. But let's first talk about how this feature can help you offer your store visitors a better user experience.
Why add tag filters to your WooCommerce store?
Product filters are an important part of every digital store's user experience. For example, a typical electronics store contains multiple products from the same brand. Each product also has different variations of attributes like storage, memory, and screen size.
Customers looking to find a specific product can do so faster using a product filter at the top of the shop page or in a sidebar filter widget. With this feature, they won't have to scroll through dozens or even hundreds of results when they search for a brand name or any other keyword.
A tag filter is particularly useful for stores with products or groups of products that cannot be easily classified using other common product attributes.
Related: How to add WooCommerce product attribute filters to your store.
Examples of WooCommerce filter by tag in action

Lots of people use the Restaurant Ordering plugin to create a WooCommerce online food ordering system. To make things easier for hungry shoppers, they allow customers to filter by tag according to their dietary requirements. You can see this in the above screenshot - customers can filter to find food that is healthy, vegetarian, vegan, and so on.
Another good example is a customer looking to buy a mobile phone and a phone case of the same color. Using a filter with popular attributes like storage, memory, or product category, they won't be able to see both items on the same search results page. But by filtering with a tag like 'black' or any other characteristic previously assigned to both products, the customer can find the products faster.
So, WooCommerce filter by tag can benefit your store in 2 major ways:
- Site navigation Get your customers to buy more and buy faster. Shoppers won't only see the products they search for but also see relevant product recommendations. This improves the customer journey significantly.
- Search engine optimization Since product tags affect site navigation, they influence how search engines rank your site as well. Tags serve as text evidence that your product page offers a product that a search engine user is querying.
But as useful as they are, you shouldn't add too many product tags to your store. Doing this will only clog your shop page and even worsen the user experience.
How to add WooCommerce filter by tag to your store
We've established that WooCommerce allows you to add text labels called tags to your store's products. These tags work like categories as they help you to classify related products. But unlike product categories, the default WooCommerce doesn't provide any built-in tag filters
Typically, you would need to add custom code to your WordPress site to be able to support WooCommerce filter by tag. Of course, this requires you to be an expert or hire an expert. And even if you do, it's expensive and can easily break your site.
A better alternative would be to use a WordPress plugin. A WooCommerce filter by tag plugin doesn't require you to write a single line of code. Even better, you don't pay a huge sum to hire an expert developer either.
Talking about WordPress plugins, we recommend two products that add professional tag filters to WooCommerce. Let's take a look at them.
Option 1: WooCommerce Product Filters
WooCommerce Product Filters offers the most extensive features in the market. The plugin is specially designed to offer you as much flexibility as possible when setting up product filters for your store pages. And you guessed it - it comes with WooCommerce tag filters as well as just about every other type of filter you can imagine.
Best features
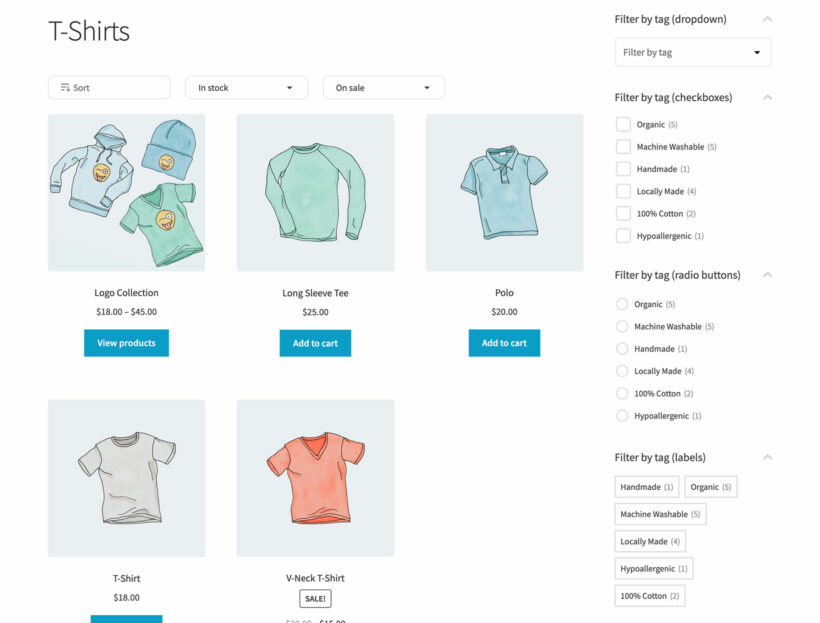
- Style your tag filter displayChoose whether to display filters as dropdowns, checkboxes, radio buttons, or labels. Also, you can choose where to display the filters: either at the top of the product listing or in a sidebar widget.
- Filter products using different product attributesAllow customers to filter products using all the product data they want. Filter WooCommerce products by color, tags, categories, price, ratings, or any custom taxonomy you create yourself. Once your customers apply these filters, they get to see which filters are active and the number of products that match their selection above the filter block.
- Lots more featuresYou can offer your customers even more with your product filters. For example, you can enable AJAX filtering or customize the 'Apply Filters' button text. AJAX filtering applies the filters the instant the customer selects them. Also, you can choose to hide or show the filters by default and display them in a horizontal or vertical layout.
Looking for the easiest and most flexible way to add product tag filters to WooCommerce? WooCommerce Product Filters Pro is easily the best product filter plugin to check out.
Let's show you how to set up a WooCommerce filter by tag with it.
How to set up a WooCommerce filter by tag
The first step to setting up a WooCommerce tags filter is to get your copy of WooCommerce Product Filters here. After getting the plugin, you'll receive a license key in the email you registered with. You'll need this key after uploading Product Filter Pro to your site.
Next, you can continue by following these steps:
- Download the plugin ZIP file from your Barn2 account.
- Log into your WordPress admin dashboard and navigate to Plugins → Add New → Upload Plugin. Then select the ZIP file you just downloaded and click Install Now. By default, the file is named 'woocommerce-product-filters.zip'.
- Once it's uploaded, click Activate.
Next, the plugin setup wizard will open automatically. Follow the steps in the wizard to choose how you want your filters to work. After that, it's time to create a tags filter:
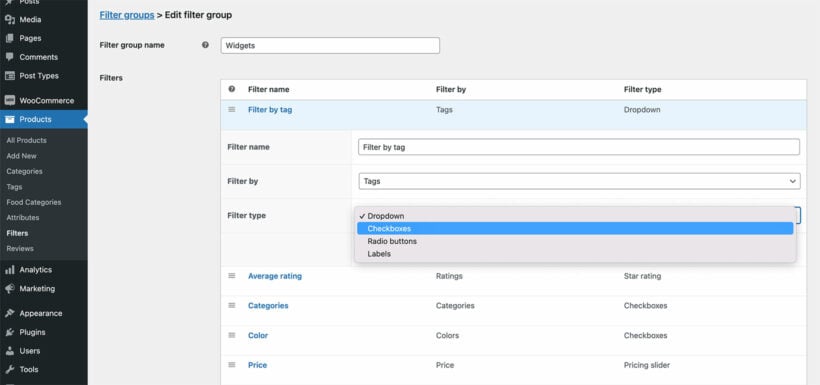
- Go to Products → Filters. Click on the filter group that you want to add the WooCommerce tag filter to, and then click Add new filter'.
- The first field in this form is the 'Filter name' field. Call it something helpful like "Filter by tag", or just "Product Tags". Or if you're using the tag filters for something specific then name it accordingly, e.g. "Brand" or "Dietary Requirements".
- The most important field is the 'Filter by' field. Since we want to add a tag filter, make sure you select 'Tags'.
- Still within this form, you also want to set the filter type and add the new filter to an existing filter group if you choose to. The filter types let you choose how you want to display your filter: either as a dropdown, checkboxes, radio buttons, or labels.
- When you're done, click Save changes and that's it!
You've just successfully created your first WooCommerce filter by tag. Simple and easy!
Of course, you'll probably want to create other types of filters as well as tag filters. Repeat the above steps and add as many filters as you like. For example, in the screenshot above we added a WooCommerce tag filter along with filters for average review, product category filter, color swatches, and a WooCommerce price filter.
Option 2: WooCommerce Product Table
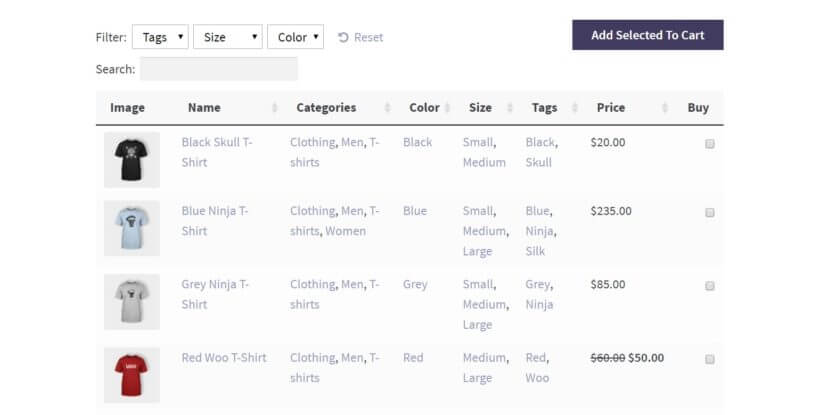
If you're looking for a WooCommerce tag filter that also changes how your products are displayed, then you may want to try WooCommerce Product Table. This plugin uses a different approach by listing products in a sortable table, with various filters - including tag filters (as dropdowns) above.
As the best product table plugin for WordPress sites, WooCommerce Product Table is ideal for stores that will benefit from the one-page order form layout. These are generally stores with loads of products. Your customers will love seeing product listings in a structured easy-to-view, filterable table.
The table format allows you to display detailed information about your products in the extra columns of data available. This means they can compare products and add them to the cart directly from the table without having to visit single product pages.
Another helpful feature is that customers not only get to filter products by tags but you can also add a tags column for each product within the table. They can even click on a tag in the tags column and the table will instantly update to show only the products with that tag.
These flexible options make it very easy for the shopper to navigate your store quickly and enjoy an outstanding user experience.
Here are some other interesting features you get:
- List unlimited products and decide which products to include.
- Display different product variations.
- Customize the size of the table.
Now, let's consider how to create a WooCommerce filter by tag in a product table.
How to create a product table with tags and tag filters
To create a WooCommerce product table with tag filters, you first need to get WooCommerce Product Table here.
The next thing to do is download the plugin and upload it to your site. You can do this by going to Plugins → Add New → Upload Plugin. Select the ZIP file you just downloaded and click Install Now followed by Activate.
Now, the plugin setup wizard will open. Enter the license key you got from the email you received and click Activate.
Creating your first product table
After activating the plugin license, it's time to create a product table that includes a tags column and/or a tag filter. You can do this on the plugin's settings page by going to WooCommerce → Settings → Products → Product tables.
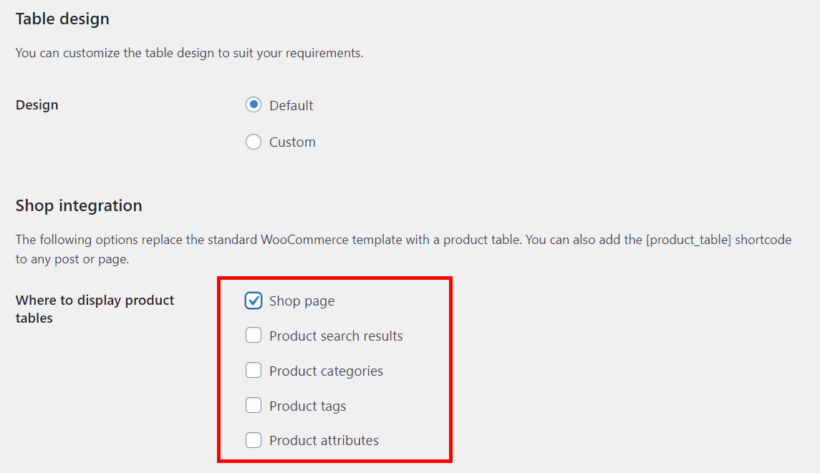
On this page, all you need to do is enable product tables on all the pages you want to add them. You can display product tables on your shop, product search results, product categories, product tags, and product attributes pages.
Simply check as many boxes as you want under 'Where to display product tables' in the 'Shop integration' section.
Adding a tags column to the product table
After enabling product tables, you also want to decide the content of the tables' default columns. To do this, enter specific shortcodes in the 'Columns' field of the 'Table content' section.
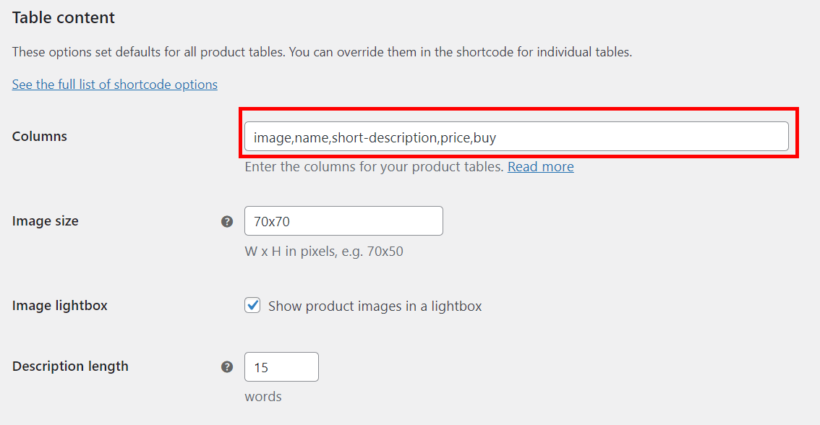
The product attributes added by default include the product image, name, short description, and price. Then a 'Buy' button is added in the fifth column. You can add more attributes or replace the default attributes by entering the corresponding shortcode.
To add a tags column to the product table, type tags in the 'Columns' field. A comprehensive list of all the available product table columns can be found here.
Adding a tag filter to the product table
Finally, you can add a WooCommerce filter by tag feature to your product table by scrolling down to the 'Table controls' section. In the 'Product filter' field dropdown, you can either select Show based on table content or Custom.
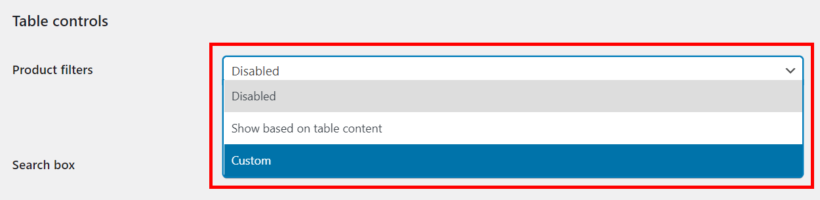
The first option adds a filter based on the columns you added to the table earlier. If you don't want to add all the table attributes to the filter, select Custom.
Now you'll be able to enter the filters you want. For a tag filter, type tags in the 'Custom filters' field. You can also add more filters separated by a comma.
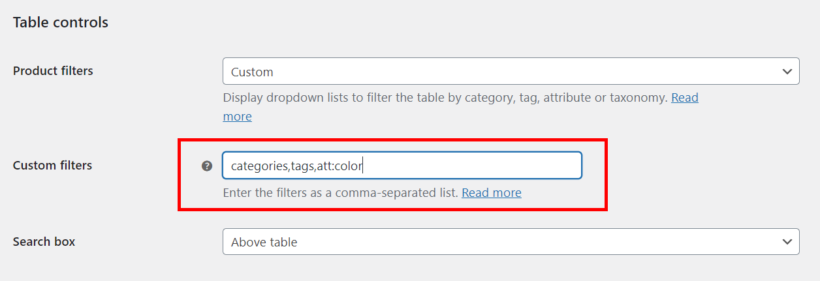
There are lots of other settings you can customize on this page. For example, you can decide where to display the product filter (either above or below the table or both) or set a maximum number of products to be added to a single table.
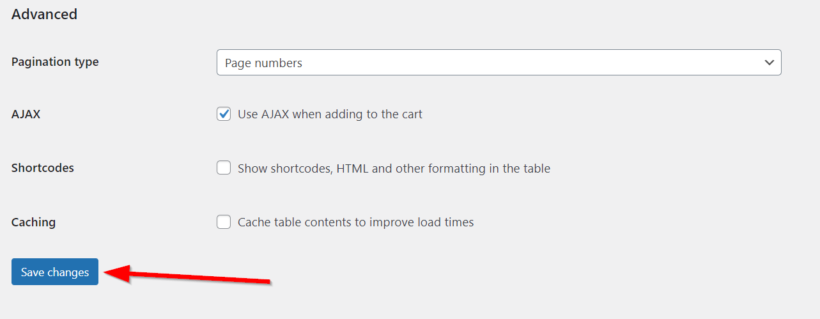
When you're done tweaking the table as much as you'd like, scroll to the bottom of the page and click Save changes.
Now when you view your WooCommerce store, you should find a table that looks like this.
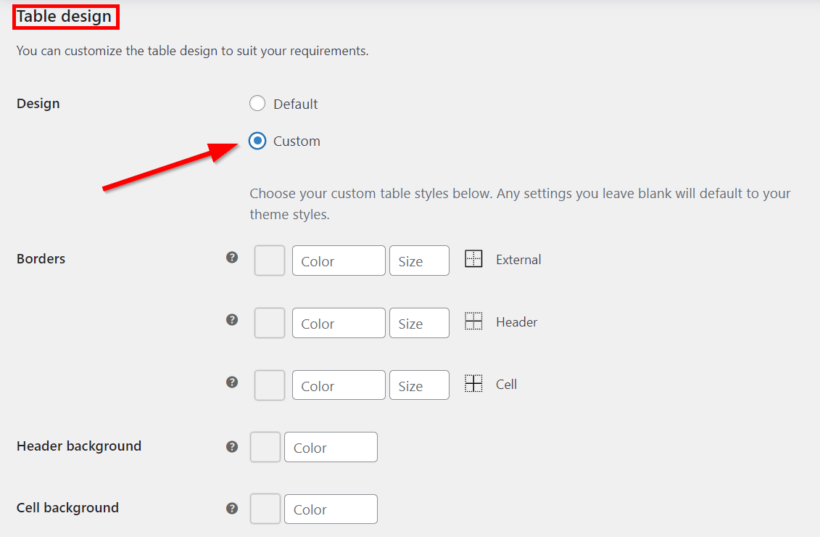
Adding a product table to your WooCommerce store this way uses the default table layout. You can also modify the table's design by choosing the 'Custom' option in the 'Design' field of the 'Table design' section. This allows you to tweak the table's style elements like the borders or cell and header background.
You can also create a product table with a Gutenberg block or a shortcode that can be added to any page, post, or text area.
Adding advanced tag filters to your product tables
We have now looked at two amazing plugins for adding WooCommerce tag filters:
- WooCommerce Product Filter - Create advanced tag filters as a dropdown, checkboxes, radio buttons or labels/tag clouds, either above your store or as a sidebar widget.
- WooCommerce Product Table - List products in a user-friendly table layout with tag filter dropdowns above the table, and/or a filterable 'Tags' column.
But what if you can't choose between these two amazing options?! Luckily, you don't have to choose because you can use both plugins together.
Use WooCommerce Product Table to display products in a neat table view, and WooCommerce Product Filters to add advanced tag filters to the table.
That way, you can benefit from quick one-page order forms with a tags column, AND fully customizable WooCommerce tag filters. It's the perfect combination for the best possible results.

Best way to create WooCommerce filter by tag?
Just like all other product filters, WooCommerce tag filters help your store visitors navigate your site better and find the exact products they need in little time. As an added advantage, this type of filter also improves your SEO rankings.
In this article, we've shown you 2 plugins that add tag filters to your WooCommerce store without writing a single line of code.
If you're looking for the best product filtering options for your store, then WooCommerce Product Filters offers the most advanced features in the market. Apart from tag filters, you can also add many other filter types, display them as dropdowns, checkboxes, or images, and even enable instant AJAX filtering.
But if product tables will help your store customers navigate your site better, WooCommerce Product Table also displays product tags and a tags filter dropdown.
Or if you love both options and can't decide, then use the plugins together for maximum impact.
Ready to improve your store's customer experience with WooCommerce filter by tag? Then check out WooCommerce Product Filters Pro.