WooCommerce dine-in - let restaurant customers order food from the table using a cellphone or iPad

The complete guide to dine-in restaurant ordering - let customers use their phones to order food straight from their table.
As restaurants adapt to the new requirements around social distancing, it's essential to minimize direct contact with customers. An increasingly common way is to allow customers to order food from their mobile phones from their table while they dine-in. This is safer and more convenient than taking orders in person.
This tutorial will teach you how to set up food ordering for dining-in at your restaurant. The system can be hosted on any WordPress website. You can use it to allow customers to order food for dinging in from the table and have their orders sent straight to the kitchen. Staff can also use it to take online POS orders on behalf of your customers.
Are you looking for a restaurant ordering where customers order food for home delivery? Then check out our home delivery tutorial!
What you need
For this tutorial you will need:
- A website powered by WordPress. If your restaurant already uses WordPress for your main website, then you can add the mobile food ordering system to your existing site.
- The free WooCommerce plugin to add e-commerce features to your website. This includes the ability to add your food menu, and for customers to place their orders.
- The WooCommerce Restaurant Ordering plugin. This plugin lists your food products on a page for customers to order from. It looks similar to your traditional printed menu, making it easy for customers to select their foods while they dine-in.
- The Checkout Field Editor plugin. This allows you to simplify the WooCommerce checkout, removing irrelevant fields such as the food delivery address, and adding extra fields for table number and dietary requirements or allergies.
Before you start, make sure you have the WooCommerce, WooCommerce Restaurant Ordering, and Checkout Field Editor plugins installed and activated.
How it works
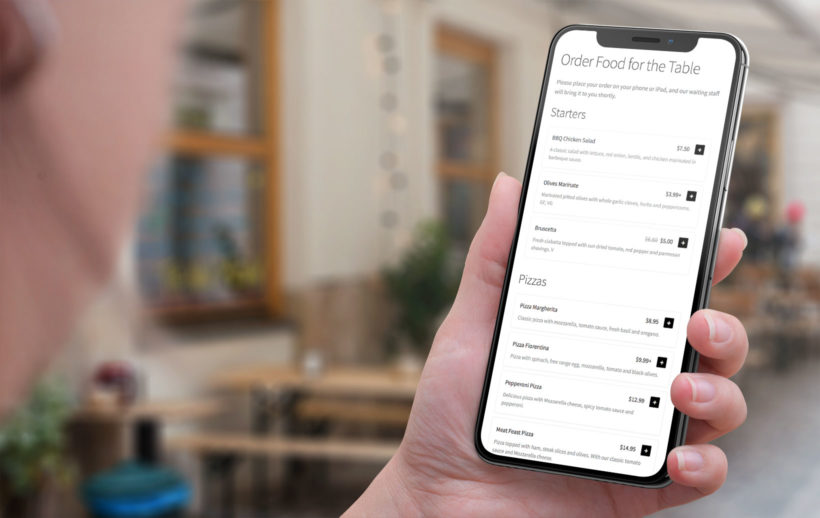
Once you've set up the food ordering system in this tutorial, customers can use their cellphones to order food from the table like this:
- Your customers arrive at the restaurant and sit at the table.
- One member of the party uses their phone or tablet to order food for the table. They do this by viewing the dining in food ordering page on your website. They select their food and drink from a quick one-page order form, and then proceed to the checkout.
- They enter some basic information on the checkout and choose whether to pay online or at the end of their meal. Finally, they enter any extra information such as their table number or allergies.
- The order is sent to the kitchen via email or you can add a WordPress restaurant plugin to automatically print to the kitchen.
- Once the food is ready, the waiting staff bring it to the table or leave it in a safe place for the customer to pick up.
- At the end of the meal, if the customer hasn't paid online then you can give them a bill in the usual way.
1. Add products to WooCommerce
The first step is to add each food item from your printed menu as a WooCommerce product. To do this, go to Products → Add New and add all the required information. This would typically include the product name, a short description, a price, and possibly an image.
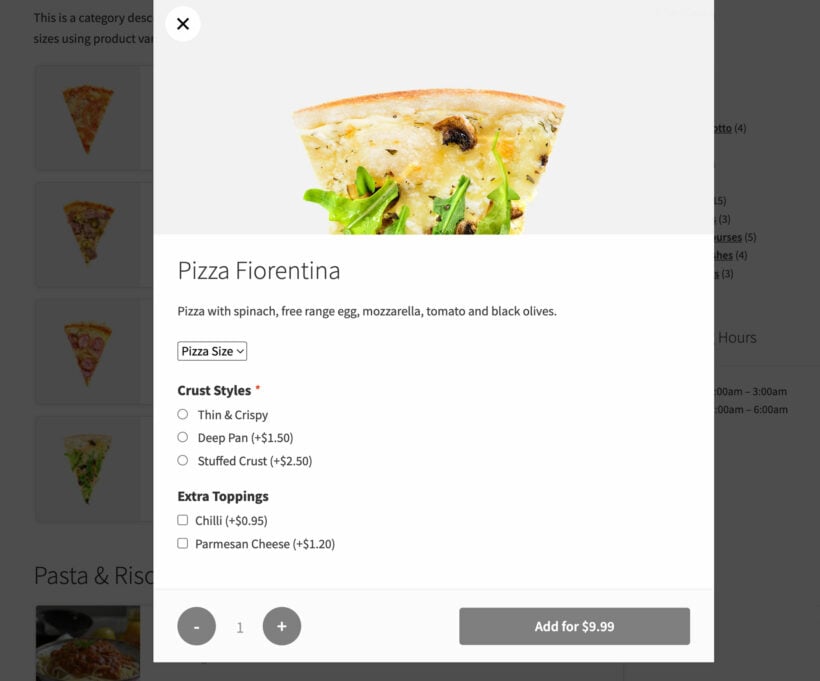
If you offer a choice of options for particular items, you can add these as product variations or product add-ons:
- Use variations for dishes that come with a fixed set of options, such as Small, Medium, Large.
- Use the Product Options extension for dishes where the customer can select from a list of several options. This might include pizza toppings where the customer can add multiple options, each of which will add to the price.
Learn how to add variations and add-on options for your food items.
Structure your menu into categories
Go to Products → Categories and create the categories that you'd like to structure the mobile food order form into. This should generally be the same as the categories on your printed menu - e.g. Starters, Main Courses, Desserts, etc. Then add each food product to the correct category.
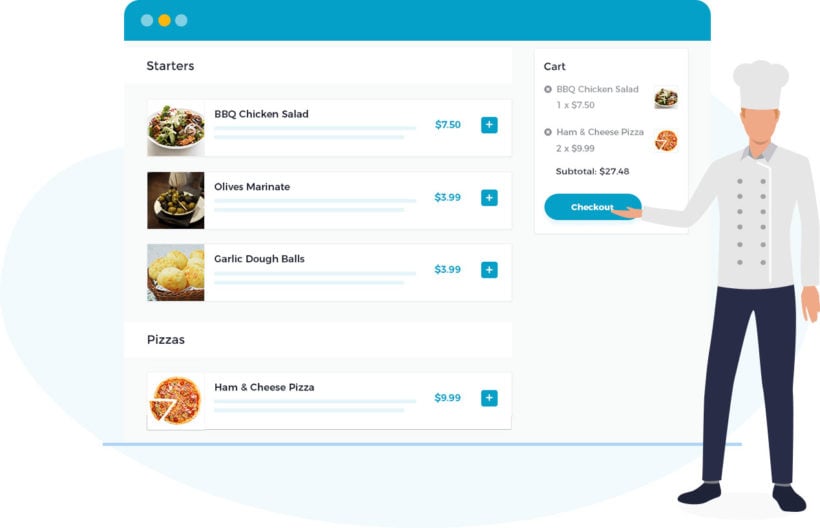
2. Create a one-page food order form
To create your order form page:
- Go to Pages -> Add New in the WordPress admin dashboard. Give your page a title, then click Publish.
- Next, go to WooCommerce → Settings → Restaurant. Under the Restaurant order page option, select the page you just created.
- Under Categories, select the product categories to show on your restaurant order page.
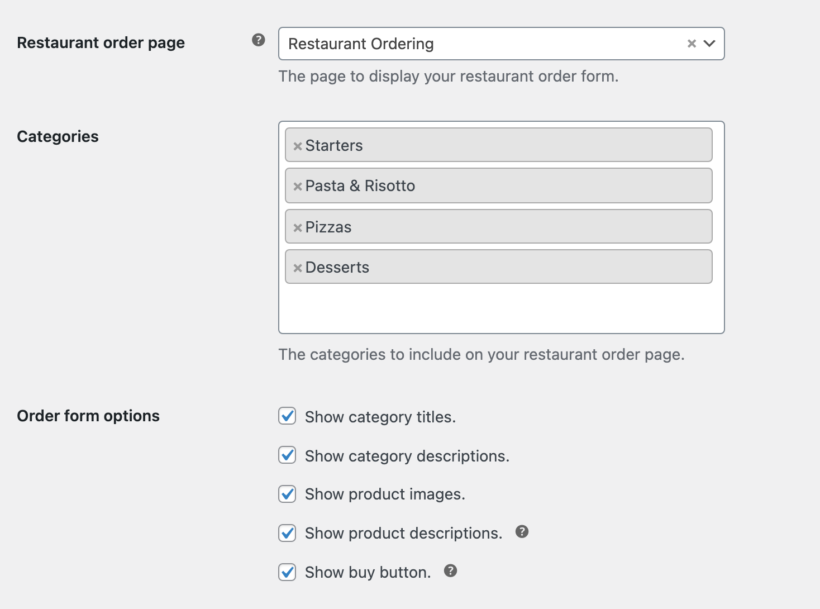
You can drag and drop the categories to change the order. The settings page also includes options to show or hide certain information in the menu, select the number of columns to display, etc.
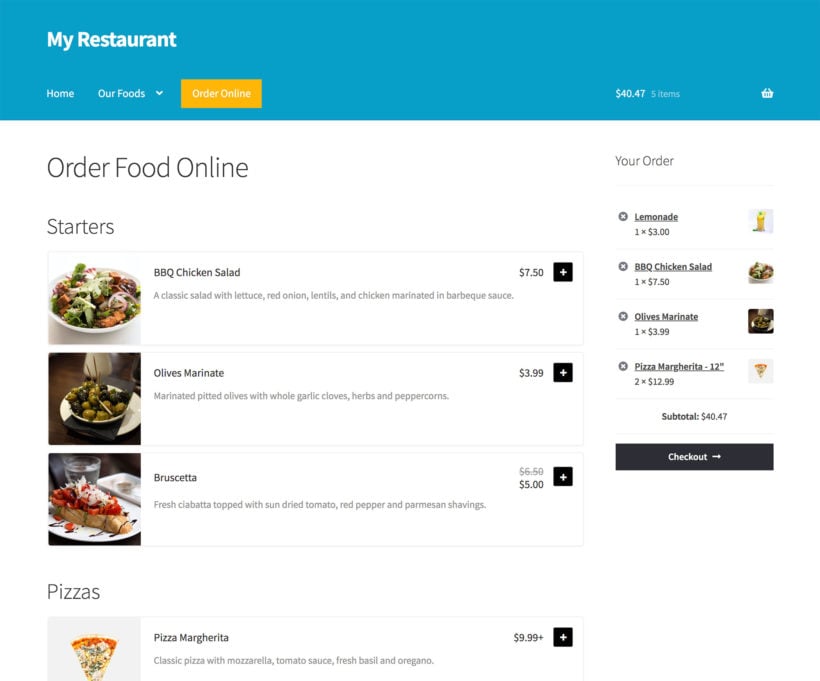
- Save the settings, then open your Restaurant Ordering page on your website to se if everything looks correct. It should look something like the following:
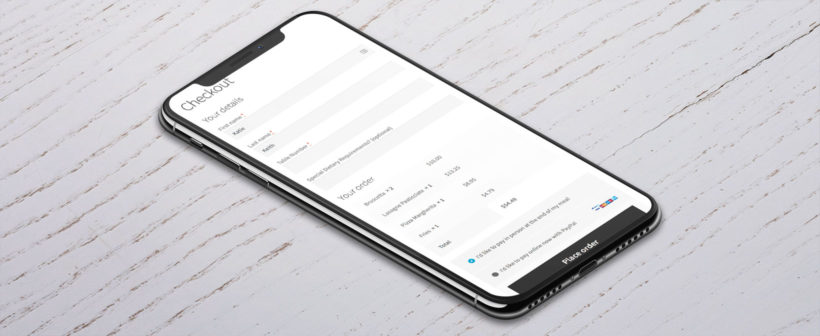
3. Customize the WooCommerce checkout
The WooCommerce checkout is generic and not designed specifically for taking food orders. To make it perfect for ordering restaurant food at the table, I recommend adding some extra fields and hiding others. You can easily do this with the Checkout Field Editor plugin.
Install the plugin and use it to hide any fields that aren't needed. I'd recommend hiding fields such as the customer address. Since customers are ordering from their cellphones, make the checkout as simple as possible.
You may also want to add some extra fields. The most important ones for ordering food to be delivered to the table are:
- Table number or location (e.g. inside or outside).
- Any dietary requirements or allergies.
Payment methods
You also need to choose how customers who order food on cellphone will pay for their order. There are two main options:
- Pay online when they place their orderYou can use any of the payment gateways supported by WooCommerce to let customers pay when they place their order. This is good for social distancing, while saving you time taking payment at the end of the meal. The easiest payment option to set up is PayPal - it's great for customers as there's less information to enter. For credit card payments, I recommend Stripe which supports all major credit cards, debit cards, Apple Pay, etc. Set up your payment gateway under WooCommerce → Settings → Payments.
- Pay at the end of the mealYou can keep it simple and give customers a printed bill at the end of their meal. They can then pay using your restaurant's existing payment methods (e.g. cash or using your credit card machine). Alternatively, if you want the payment to go through to the website ordering system then you can use a card reader that links with the website. There are 2 main options for this:
- If you're in the US and Canada then you can use WooCommerce In Person Payments to order a card reader and take credit card payments from customers.
- Alternatively, you can get a "PayPal Here" card reader and use the free WooCommerce PayPal Here plugin to push the payments through to your website.
Let your customers know
Finally, you need to communicate how to order food from the table to your customers.
There are various options here. One way is to print an instructions sheet and put it on each table, telling customers how to order. This should include the URL (web address) of the food ordering page, for example www.myrestaurant.com/dine-in.

You could also include a QR code which customers scan from their phone. The QR code links directly to your order page, so gives access without having to type in URLs.
You can easily generate a QR code using QR Code Monkey.
The easy way to take food and drink orders from the table
As you can see, it's surprisingly easy to set up your own online food ordering system so that customers can use their cellphone to send food orders straight to the kitchen. It promotes social distancing by minimizing direct contact between waiting staff and hungry customers.
The WooCommerce Restaurant Ordering plugin is perfect for creating a one-page food order form.
- Quick 10-minute setup
- Flexible display options
- Works on any mobile or tablet
- 30-day money back guarantee
6 Comments
Pricing info please.
Hi Wesley. Our WooCommerce Restaurant Ordering plugin Yearly Starter (1-site) costs $99 and the Lifetime Starter is $349. You can check all available licenses for this plugin and their prices at https://barn2.com/wordpress-plugins/woocommerce-restaurant-ordering/#pricing. Cheers!
I would like to know if you guys integrate with Micros Symphony
Hi Jose, thanks for your interest in our plugin. Our plugin integrates with the WooCommerce plugin. For you to use your POS together with our plugin, you will need to integrate your POS system with the WooCommerce plugin via your site's WooCommerce API. For the best advice about this, I suggest that you contact official WooCommerce Support. Please let me know if you have additional questions. You can also get in touch with us via our Support Center. Thank you.
I Would like to know if is possible configure multiple restaurant IN the same place?
Hi Hamilton, Thank you for your interest. We have discussed the options on how to do this in our documentation - Enable food ordering for multiple restaurant chains or vendors. We discuss three options in that article. Please check it out and see which one works for your needs. Please let me know if you have additional questions. You can also get in touch with us via our Support Center. Thank you.