How to hide categories for specific users in WordPress: Complete guide

Looking for a WordPress hide category plugin? Password Protected Categories will help you hide categories - the easy way. Keep reading to learn how it works and how to set it up.
WordPress categories offer a great way to group related posts and display them on your website. This helps visitors to find topics they are interested in so that they stay longer on the site.
There are several reasons why you might need to hide WordPress categories. For instance, some website owners want to hide portfolios or events from public view. Others may want to create a WordPress members-only area.
However, unfortunately WordPress does not allow you to hide categories. You will need a separate plugin to achieve that. In this article, we will show you how to hide a WordPress category without breaking a sweat.
The best way to go about it is by using a WordPress hide category plugin like Password Protected Categories. It’ll help you hide categories of posts, pages as well as custom post types (like events, portfolios, products, etc). Once you enable the plugin, you will have the option to password-protect categories and its subcategories. Alternatively, you can choose which user roles or users who can access the categories and subcategories.
Let’s get started...
Why hide a category in WordPress?
Before we proceed with the steps, let’s take a look at the benefits of hiding a WordPress category. The most common ones are:
- You can build a members-only area without the hassle of setting up and maintaining a full-fledged membership site.
- It’s a great way to maintain confidentiality on projects not meant for public view. Hide your case studies of clients who don’t want their projects to be published widely. Learn more about password-protected portfolios.
- You can hide private events that only selected members can access and book seats for. Learn more about password-protected events.
- Hiding categories is an ideal way to sell courses online which only paid students can access. Just create a simple WordPress membership area and publish exclusive content, sell subscriptions, and accept payments from students.

- You can choose to hide categories to prevent the public, colleagues or even family members from reading sensitive or controversial topics on your website.
- Categories in a custom post type can also be password protected. Only people with the correct password can have access to the posts. For instance, a travel blog can offer exclusive stories, insights into meaningful travels, and self-discovery to paid members.
- Occasionally, website owners have the need to hide pages. While there is a password protection option on WordPress, restricting pages individually can be tedious. Even worse, it doesn't actually hide them - it simply restricts access to the page. Instead, use the free Create And Assign Categories For Pages plugin to categorize your pages. You can then follow the steps in this tutorial to hide the categories.
These are some of the common reasons why you may need a WordPress hide category plugin.
How to hide a WordPress category (easiest method)
Here’s a secret: The fastest way to hide categories on your WordPress website is to use the Password Protected Categories plugin.
You can hide normal WordPress categories, as well as categories of custom post types. You can even create categories for pages (with the Create And Assign Categories For Pages plugin) and then hide them using Password Protected Categories.
Here’s what one customer has to say about the plugin:
We have a membership-based organization (no web logins), and we needed a protected area where we could post private information. Password-protecting each page/post was not an easy option. What we wanted was to protect an entire category and all posts within that category. Password Protected Plugin does exactly that. Not only is the category list page protected but each post page is protected as well.
You can use this WordPress hide category plugin in three different ways. These are:
1. Password Protection
Easily password protect a category and all its sub-categories. You have the option to add more than one password. This is ideal if you plan to remove the passwords later for specific users.
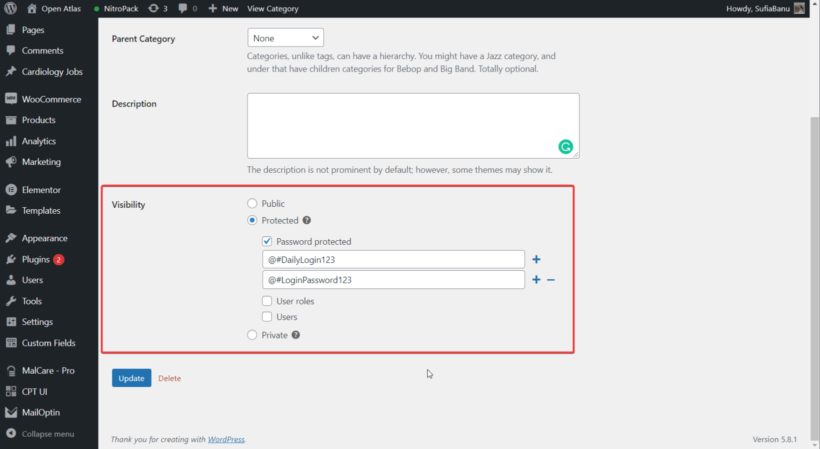
Password Protection is ideal if you don’t want to deal with the hassle of creating new user accounts for providing people access to a category and its subcategories.
For offering access to existing users, we recommend the following options instead.
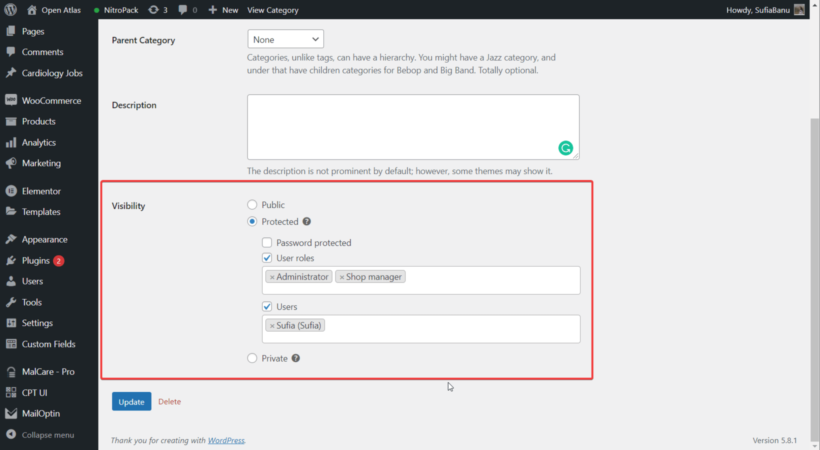
2. User roles
As the name suggests, this option allows you to give only specific user roles access to the category and its subcategories. You can choose more than one user role.
3. Users
With this option, you can specify which users can access the category and sub-categories. Choose as many users as you like.
The Password Protected Categories plugin is very easy to install and set up. In the next section, we will show you how to use it.
How to hide WordPress categories for specific users
There are 3 main steps that you need to take. Those are:
Step 1: Install Password Protected Categories
Get the WordPress hide category plugin, i.e. Password Protected Categories, and install it on your website. To activate the plugin go to the Settings → Protected Categories → license key.
Scroll down on the same page. Make sure the Show protected categories are unticked so that the protected categories are hidden from public view.
Step 2: Hide categories
It’s very simple. Just go to Posts → Categories. Whether you choose an existing category or create a new category, simply open the category page and scroll down. You should be able to see a Visibility section with the following options:
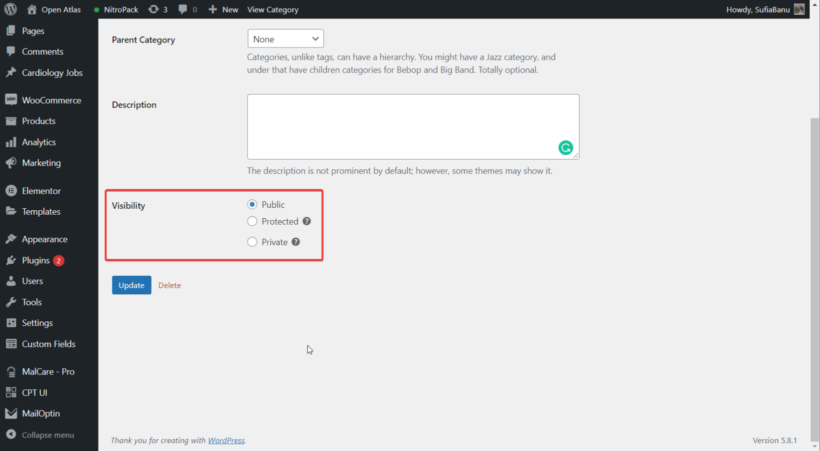
- Public: This is self-explanatory.
- Protected: Under this, you will find the Password Protection, User Roles, and Users options. Take a look at the previous section to learn what these options offer and when you need them.
Implementing these options is far from complicated. Just select the option you need and then add a password or user roles or users. Below you will find a video tutorial for a visual walkthrough of the same.
- Private: Setting the category private means only logged-in users with certain user roles (generally Administrators and Editors) can access it. It functions in the exact same way as a private WordPress page or post. To be honest, it's easier to use the 'Role' protection rather than private categories because you get more control over exactly who can access the category.
Step 3: Creating login forms
In the previous step, if you choose 'User Roles' or 'User', then there is no need to create a new login page. They are existing users of your website. All they need to do is log into the website to access the category. If you want, then you can create a frontend login with plugins like Theme My Login or Profile Builder.
If you choose 'password protection', then users need a login page where they can enter the password and the access-protected categories. There are two ways to do this.
- When visitors try to access the protected category or subcategories, they will be shown a login form. All they need to do is enter the password to unlock the category. In this case, there is no need to create a separate login form here.
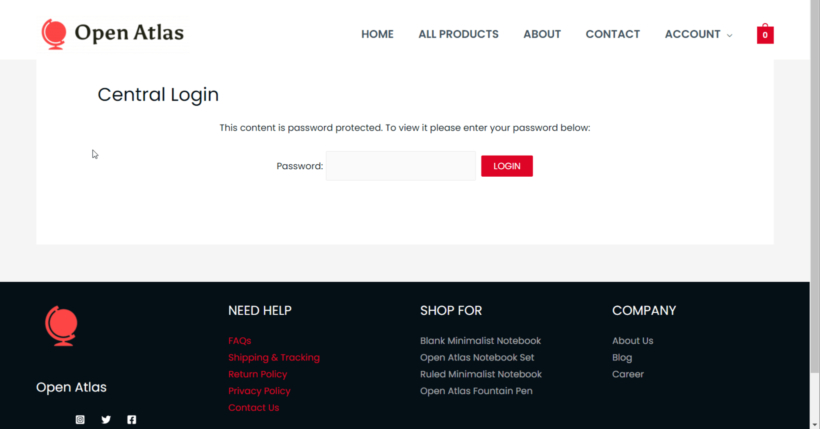
- Alternatively, you can create a central login page. When visitors enter the correct password, they are redirected to the category. Adding different passwords to different categories is recommended to avoid potential conflicts.
There are two ways to create a central login page.
- Create a new page and add the following shortcode: [category_login]. When you publish the page, this is how it’ll look -
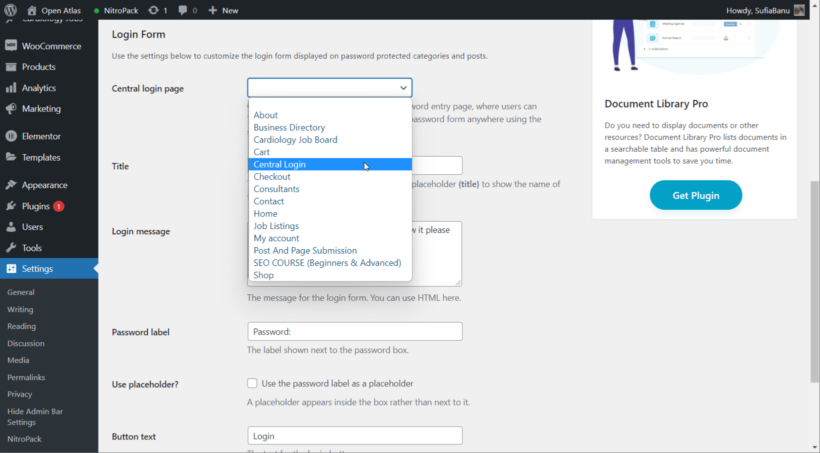
- Or you can create a page, publish it, then go to Settings → Protected Categories → Central Login Page. From the drop-down menu, select the new page you just created and save your settings.
That’s it folk. You now know how to hide WordPress categories using a WordPress hide category plugin. For further assistance with the plugin, these documents will help you.
How to hide WooCommerce categories
So far, you've learned how to use the Password Protected Categories plugin to hide any type of WordPress content. If you're using WooCommerce then there's a dedicated plugin for that - WooCommerce Protected Categories. We have a separate guide covering how to set up the plugin to hide WooCommerce categories.
Where to get the WordPress hide category plugin
WordPress offers no native option to hide categories. But as you can see from this tutorial, it’s easy to implement with the Password Protected Categories plugin. All you need to do is:
- Install and activate the WordPress hide category plugin.
- Choose whether you want the category to be password protection, or restricted to specific user roles or users.
- If you choose to implement password protection, then you can also create a central login page.
Try out Password Protected Categories and let us know how things go.