How to add file uploads to WooCommerce products

Are you looking for a way to enable file uploads on your WooCommerce store? Discover how to add a file uploads field quickly and easily with the WooCommerce Product Options plugin.
File uploads are a great addition to WooCommerce stores that need to offer customizable and personalized products. They not only allow customers to upload their own unique designs, but they also make your store stand out from the competition. However, there’s no way to allow customers to upload files with WooCommerce as it comes.
In this tutorial, we’re going to explain the importance of file uploads, and give you a step-by-step guide on how to enable them on your store. We'll use the WooCommerce Product Options plugin, which not only allows you to add a file upload field but also includes a bunch of other options for making your products truly customizable.
Let's get started.
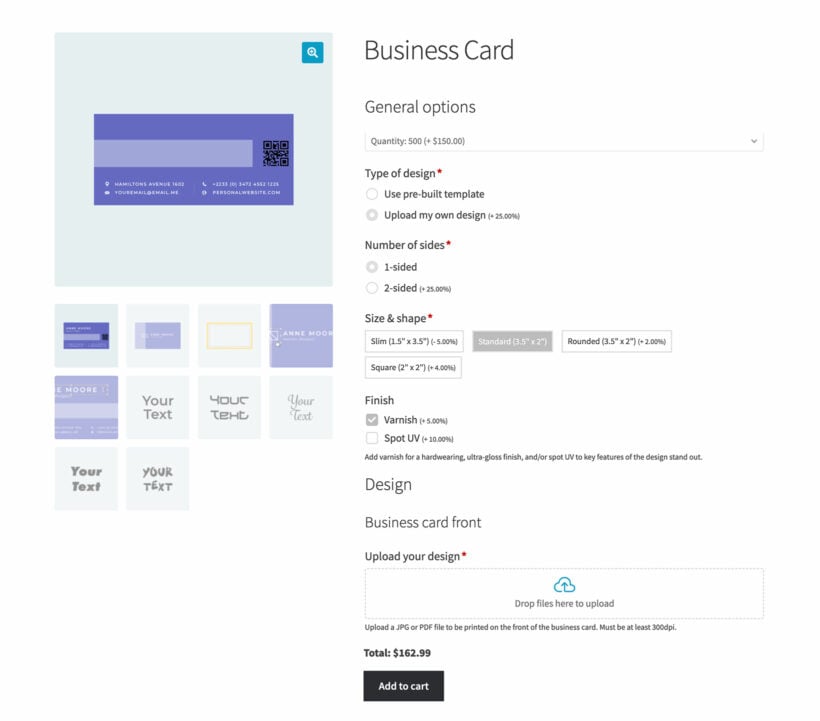
How to add a file upload option to the WooCommerce product page
The WooCommerce Product Options plugin provides everything you need to allow customers to upload files to the WooCommerce product page:
- Upload any file type, including JPG's, PDF's or transparent PNG files, the product pages.
- Set printable areas and preview the finished product with the customer's uploaded file.
- Set a maximum file size.
- Control the number of files that can be uploaded.
- Add fees for custom file uploads.
- Use conditional logic to hide the upload field until another product option is chosen.
However, WooCommerce Product Options isn't just a plugin to add file uploads on the product page - it's much more than that. It also lets customers personalize other aspects of the product. For example, a print store can let customers customize their paper type, font, and paper weight alongside the custom design they upload. Equally, a clothing store can allow customers to upload files to the product page and see an instant print preview:
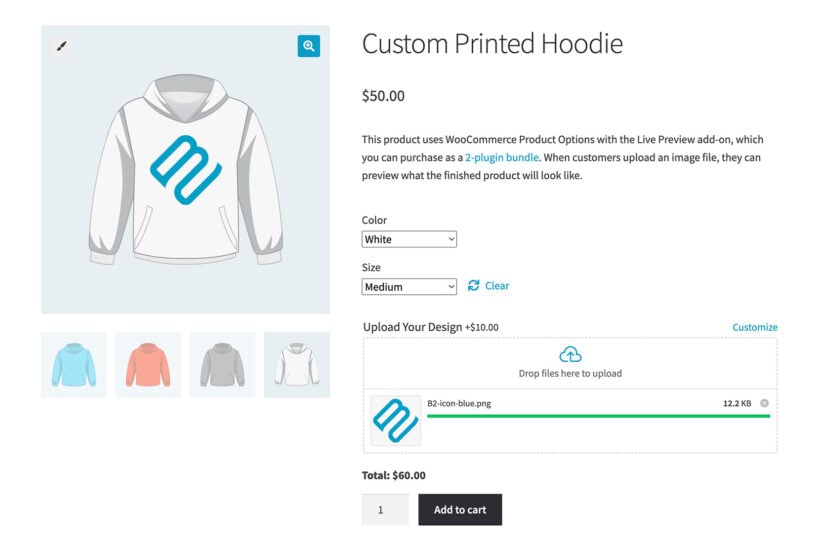
With full documentation and expert support available, WooCommerce Product Options is easy to set up and start accepting drag and drop file uploads. Let's look at how to install it on your WordPress site.
1. Adding a WooCommerce file upload field to the product page
- Start by purchasing the WooCommerce Product Options plugin and installing the zip file on your website.
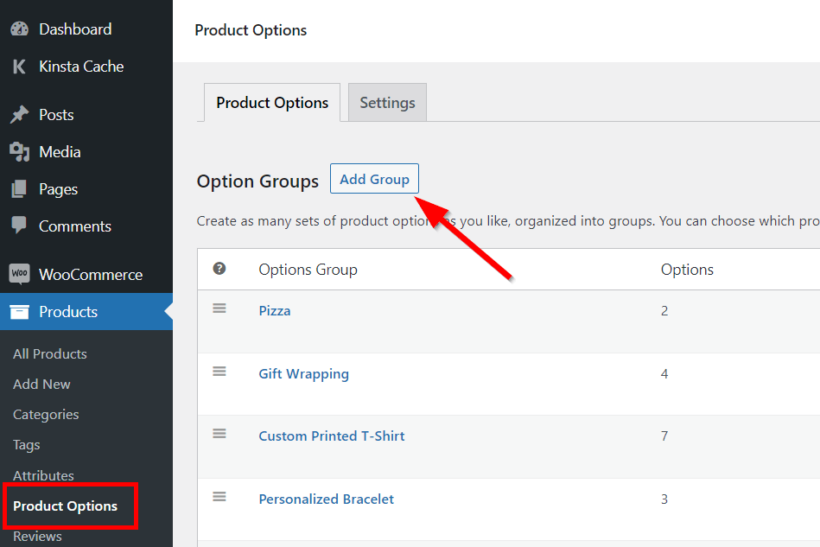
- Navigate to Products → Product Options in the WooCommerce admin dashboard sidebar.
- To start adding a file upload option, click the Add Group button and give it a name.
- Next, choose the products or categories for which you want to enable file uploads. For example, if you want to enable it only for the personalized cake category but not for other cakes, then choose your personalized cake category under ‘Inclusions’.

- Click the ‘Add option’ button, select the ‘File upload’ field type, and give it a name.

- Set the following information to configure the WooCommerce upload files section of the product page file:
- A label (the text that appears next to the file upload field).
- Price type (whether you want to charge a fee or percentage for the ability to upload files, or to price based on the number of files uploaded).
- A description (the text that appears below the option).

- Whether to make the WordPress file uploads a required field before adding the product to the WooCommerce cart.
2. Setting maximum file sizes and type of files
If you want to limit the number or size of files that customers can upload, expand the ‘Advanced settings’ toggle. This will reveal settings that allow you to define the maximum file size and number of files. Set the limit to 1 to allow single files only:

These settings can be helpful for stores that have limited storage space or hosting restrictions. They serve as a preventive measure, ensuring that customers cannot upload large files that may slow down your WooCommerce store.
You can also set allowed file types that users can upload. WooCommerce Product Options supports all WordPress-supported file formats such as PNG, JPEG, and PDF files. This is useful for stores that, for example, must accept specific file types for printing.
3. Charging a price for file uploads
If you wish to monetize the file upload feature on your store, you can choose from the following pricing structures:
- Flat fee - Charge a fixed fee to customers for the ability to upload their own files.
- Quantity-based fee - Add a specific amount for a certain number of file uploads.
- Percentage increase and percentage decrease - Increase the price of the product by a certain percentage when a customer adds a file upload on the WooCommerce product page. For example, if you run a gift store then you might want to charge 15% extra for personalized gift cards.
- File count - Charge a fee depending on the number of files that the user chooses to upload. For example, if the fee is $5 and they upload 3 files then the cost would be $15.
Now visit the single product page on the frontend to view the WooCommerce upload files section on the product page. Customers can drag and drop the file, which will then be visible on the cart page and during the WooCommerce checkout page. As well as showing files during checkout, thumbnails of the file uploads will also appear on the WooCommerce order details page and in their order confirmation email notification.

As the store owner, you can find the customer uploaded files on the individual order page by going to WooCommerce → Orders.

4. Enabling live previews of the uploaded files
If you bought WooCommerce Product Options with the Live Preview add-on then you can display print previews of image files that the customer uploads. Here's how to set it up:
- Edit your file upload fields to only allow image files. This avoids confusion, as you can't preview other file types like PDF's.
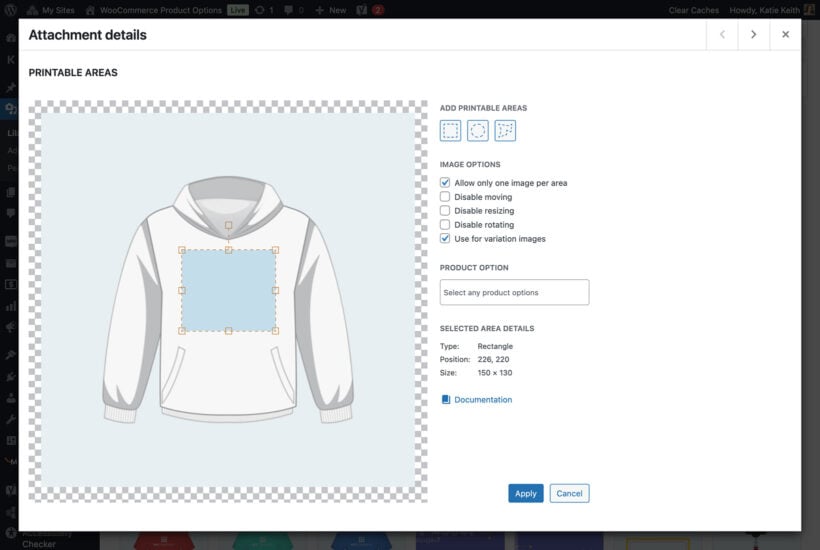
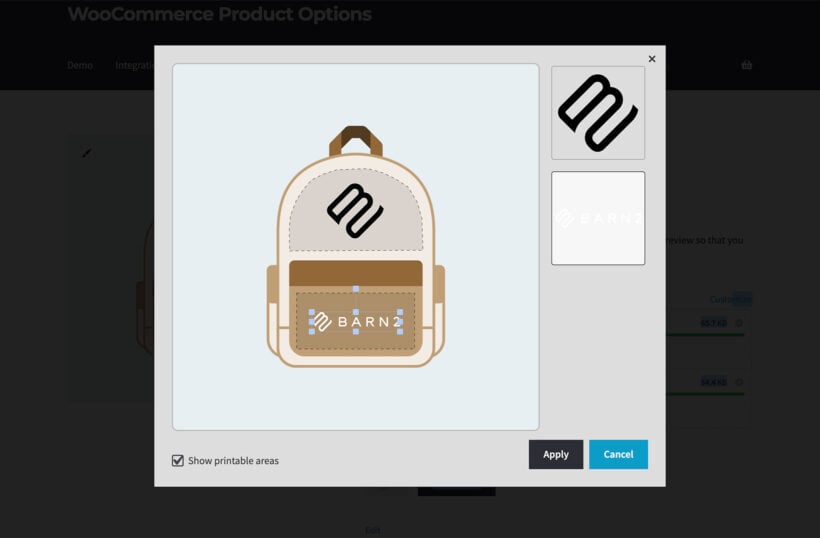
- Find the relevant product images in the Media Library, click 'Set printable areas' and add the area(s) that the preview can appear on. For example, if it's the front of a t-shirt then you might add a printable area across the chest area.
Now view the product and upload an image file as a test. Customers can upload one or more files to WooCommerce and adjust their size and position as needed:
5. Add more personalization options for customers
WooCommerce Product Options also lets you add other types of options such as checkbox, dropdown, radio buttons, text input, image buttons, and more. These product addons allow you to further personalize your products.
For example, you can add new text input field to let customers add a personalized message on products.
Implementing file uploads on your site can be a game-changer. Allowing your WooCommerce customers to upload files directly on the product page not only saves time but also sets your store apart from competitors. With the use of WooCommerce Product Options, online stores that sell personalized products can easily add file upload buttons. It allows customers to submit their own designs, artwork, or important documents directly on the WooCommerce product page. WooCommerce Product Options also comes with a range of other customization options to allow store owners to sell all kinds of configurable and custom products. It includes extensive features, such as maximum file type and sizes and file upload pricing structures. You also get conditional logic that allow it to cater to diverse business needs. Enhance your customer experience today with the best WooCommerce file upload plugin 🪄 Customers love being able to provide detailed specifications for their orders. In fact, 81% of ecommerce customers in a recent survey were willing to pay more for a configurable product. This shows how offering file uploads can positively impact your revenue as an ecommerce store. It can also save both you and your customers time. By allowing file uploads on the WooCommerce product page, you eliminate the need for manual requests for additional details. This reduces back-and-forth communication and facilitates a smoother order fulfillment process. Install a WooCommerce upload files plugin is great for businesses that provide customizable or personalized products. For example: By allowing customers to provide their own designs, adding upload fields to WooCommerce products makes all of this possible.
Enhance your WooCommerce site with files upload field today
FAQ
Benefits of file uploads for businesses and customers
What types of WooCommerce product pages need a file upload plugin?
Customers can upload their custom t-shirt designs, logos, or artwork to be printed on the garments.
Customers can provide their designs for custom cases, skins, or panels, ensuring a perfect fit and look for their gadgets.
Businesses can ensure accurate branding by allowing customers to upload logos or graphics for promotional materials, packaging, and merchandise.
Customers can upload custom designs, texts, or images to be engraved on jewelry, trophies, or gift items.
Customers can upload images, messages, or personalized content to create customized gifts for special occasions like birthdays, anniversaries, or weddings.
Customers can submit their print-ready files for business cards, flyers, or posters, ensuring accurate printing results.
Customers can provide measurements or design inspirations for custom-made garments.
2 Comments
Is it possible for my clients to see the files they have uploaded via their My Account page, and to upload documents here after an order has been placed?
Hi Lee! Yes. Customers will be able to see the files they have uploaded in their My Account page via the 'Orders' section but they will no longer be able to upload documents once an order has been placed. Should you have further questions, please reach us via our Support Center. Thanks!