Stock management in WooCommerce: Complete guide to managing your inventory (2025)

Keeping your WooCommerce stock levels accurate is essential—but doing it manually can be a serious headache. If you're looking for a faster, more scalable way to manage inventory, you're in the right place.
Managing stock in a WooCommerce store can quickly become overwhelming—especially if you're dealing with a large catalog of products. The default WooCommerce interface only lets you update stock statuses and quantities one product at a time, which is time-consuming and inefficient at scale.
Fortunately, there are better ways to manage this process. In this article, we’ll explore the most efficient way to bulk edit stock statuses and stock levels using the powerful Setary app. You'll learn how Setary’s spreadsheet-style interface makes it fast and easy to update your inventory across hundreds or even thousands of products.
I’ll also show you how to enhance your store’s stock messaging using the WooCommerce Lead Time plugin. This lets you display accurate lead times based on each product’s stock status—so your customers always know when to expect their order.
By the end of this guide, you'll have a complete solution for managing your stock efficiently and communicating clearly with your customers.
Why managing stock in WooCommerce is difficult
WooCommerce provides basic stock management tools, but they quickly become inefficient when you're working with multiple products. If you’ve ever tried to update stock statuses or quantities for more than a handful of items, you’ve likely run into some frustrating limitations.
By default, WooCommerce requires you to open and edit each product individually. That means going into the product editor, scrolling to the inventory section, updating the stock level or status, saving, and repeating the process for every product.
There’s no easy way to:
- Quickly scan and compare stock levels across your product catalog.
- Sort or filter by stock status to identify low-stock or out-of-stock products.
- Centrally manage stock for product variations.
- Make bulk updates to stock data (unless you're prepared to export and reimport CSV files 😩).
If you have dozens, hundreds, or even thousands of products, this manual process becomes a major time sink. It also increases the risk of human error.
And that's where a dedicated bulk stock management tool like Setary can make a huge difference.
The best way to bulk edit stock status: Setary
If you regularly update stock statuses or inventory levels in WooCommerce, then Setary is a game-changer. The Setary app connects to your WooCommerce store and provides a fast, spreadsheet interface for editing product data and stock information in bulk. It also lets you select products based on various criteria and instantly apply bulk actions to them. You can update stock for entire products, or manage stock at variation level.
As you can imagine, using Setary is much easier than manually updating stock levels for individual products or wrestling with CSV imports. Everything takes place on one screen ☺️
Using Setary for WooCommerce stock management
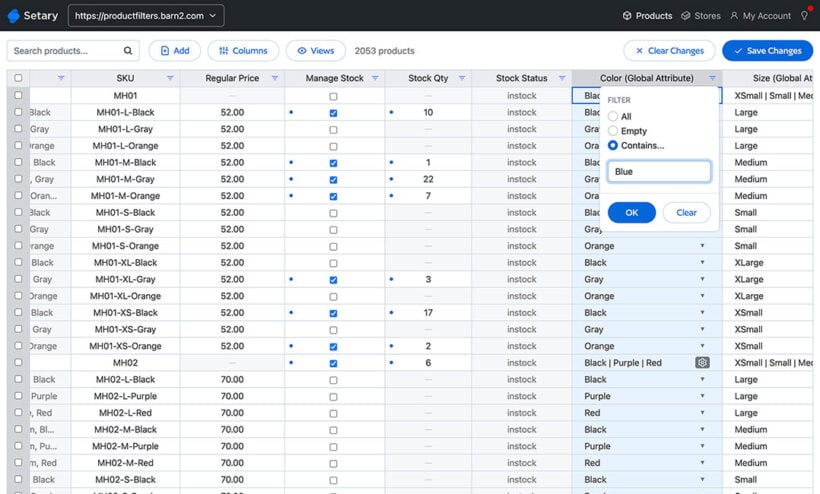
Setary is designed specifically for WooCommerce users who need more control and efficiency when managing stock. It allows you to:
- Instantly view all your products with key details like stock status, stock quantity, SKU, category, and more.
- Filter and sort by stock status, product type, category, or any other type of product data. This makes it perfect for identifying low-stock or out-of-stock items.
- Edit stock quantities and statuses inline, just like using Excel or Google Sheets.
- Make bulk changes across hundreds (or thousands) of products in seconds.
- Sync changes directly to your WooCommerce store, with no need for manual imports or exports.
- Enable team members or clients to update stock information without needing access to the WordPress Dashboard.
What types of stores can benefit from Setary?
Setary is ideal for any WooCommerce store that needs to update stock information for multiple products at once. For example, this includes:
- Large product catalogs – Save hours of time by editing products in bulk rather than one by one.
- Dropshipping and multi-supplier stores – Quickly adjust stock levels when suppliers provide updates.
- Retailers during sales events – Make quick stock adjustments before or after busy periods like Black Friday or seasonal promotions.
- Warehouse or inventory managers – Keep WooCommerce in sync with physical stock counts.
Whether you run a small shop or a large-scale store, Setary can streamline your workflows and reduce manual admin.
How to get started with Setary
Setting up Setary is simple and only takes a few minutes:
- Sign up for a Setary account at setary.com.
- Connect your WooCommerce store by installing the free Setary plugin and authorizing access. The setup wizard will guide you through this.
- Launch the Setary dashboard to see your product data laid out in a familiar spreadsheet-style format.
- Start editing! Click any cell to change stock quantities, toggle stock status between “In stock”, “Out of stock”, or “On backorder”, and apply changes across multiple rows instantly.
- Use filters and bulk actions to target specific products, categories, or conditions—for example, everything in a certain category that’s out of stock.
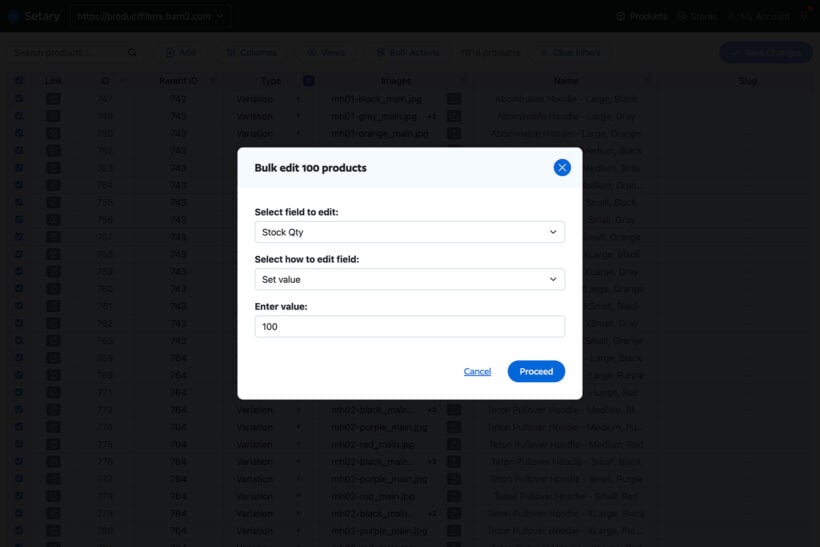
You can change the stock status for each product, enable/disable the "Manage stock" setting, or enter exact stock quantities for each product. There are also plenty of bulk options which you can apply to all of the selected products at once. These include setting an exact stock value, increasing/decreasing stock quantities by an amount or percentage, and so on:
All changes are synced back to WooCommerce in real time, so your store stays accurate and up to date 💪
How to display stock information for WooCommerce products
As you can see, Setary transforms what used to be a tedious, manual process into something fast, intuitive, and scalable. However, it doesn't change how stock information is displayed to customers on the front end of your website. Next, we’ll look at how to take your stock management even further by displaying accurate lead times based on stock status. We'll do this with the WooCommerce Lead Time plugin.
There are plenty of reasons why store managers need to show the WooCommerce stock status on the front end:
- Reassuring customers that an item is in stock.
- Showing which products are out of stock.
- Displaying the lead time between order and delivery.
- To increase urgency by displaying the exact stock level for products with low stock.
What stock information can WooCommerce display?
Before we talk about the WooCommerce Lead Time plugin, I'll show you what you can do with WooCommerce as it comes.
WooCommerce lets you set the default stock display format, enable out of stock notifications, and set low stock thresholds. You can do this at WooCommerce → Settings → Products → Inventory:
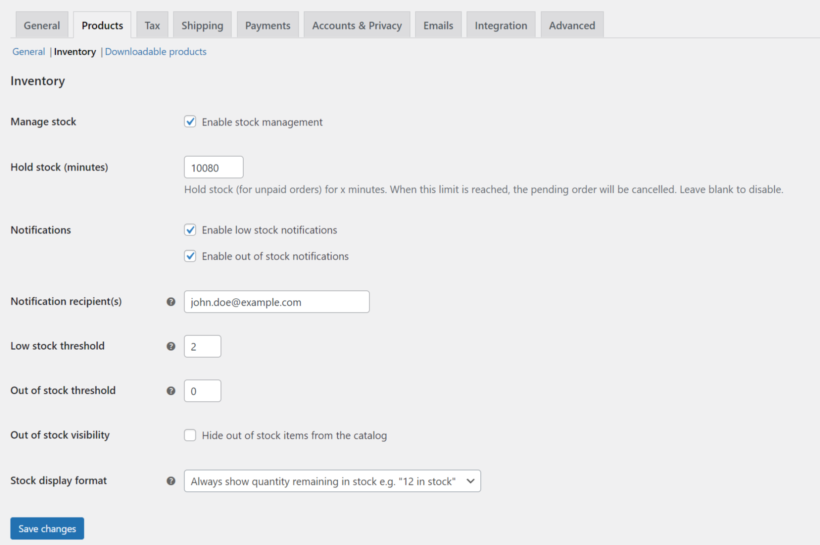
Once you've done this, WooCommerce will displays the stock status on the single product page for each item. This will either be the status (e.g. "In stock") or the exact stock quantity (e.g. "10 in stock"). However, this isn't ideal because:
A better way to display WooCommerce stock information
The solution is to display WooCommerce stock status and other stock-related information on your main shop pages. You can easily do this with the WooCommerce Lead Time plugin, which lets you:
It’s the perfect solution for selling custom, made-to-order, or non-stock products and to give customers the correct information before they make purchase orders. You get complete control over the WooCommerce stock status. As a result, you can increase transparency with your customers.
Here’s what you need to do to display the WooCommerce stock status in your store:
Step #1: Get the WooCommerce Lead Time plugin
- Get WooCommerce Lead Time - you’ll receive the plugin files and license key by email.
- Log into your WordPress website and install and activate the plugin. Go to WooCommerce → Settings → Products → Lead time from the WordPress admin. Enter your license key and click the Save changes button to continue.
Step #2: Display WooCommerce stock status and lead times
You can use WooCommerce Lead Time to show stock status information and lead times in prominent places in your e-commerce store. This includes the shop page, category pages, product pages, cart pages, and checkout pages. You can also set it up to show WooCommerce lead times in order detail emails.
By default, it’ll look something like this:
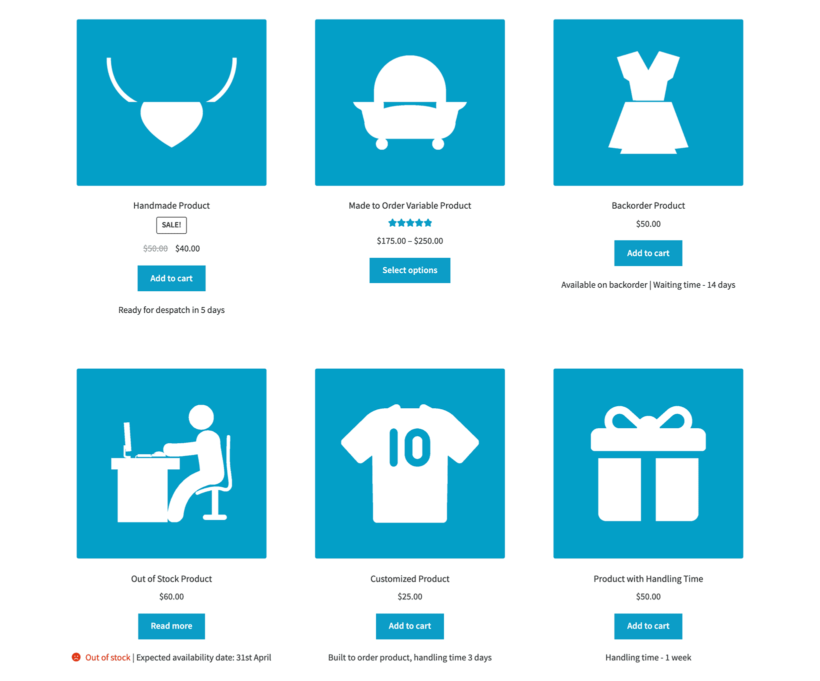
As you can see, WooCommerce Lead Time can display both the product stock status and lead time on the shop page and category pages. This way, customers can see which products are in stock before they click on them.
Doing this helps you enhance the shopping experience on your online store. Customers no longer have to click through to each product to find out if the product is available for purchase. With the WooCommerce Lead Time plugin, they can quickly see the product stock status at a glance when they’re browsing the shop page or category pages.
Alternative method: Display WooCommerce stock status in a product table
Another way to show WooCommerce lead times on the shop page or on category pages is by using the WooCommerce Product Table plugin. It lets you list products anywhere on your website. All you have to do is add a stock and lead_time column to the table:
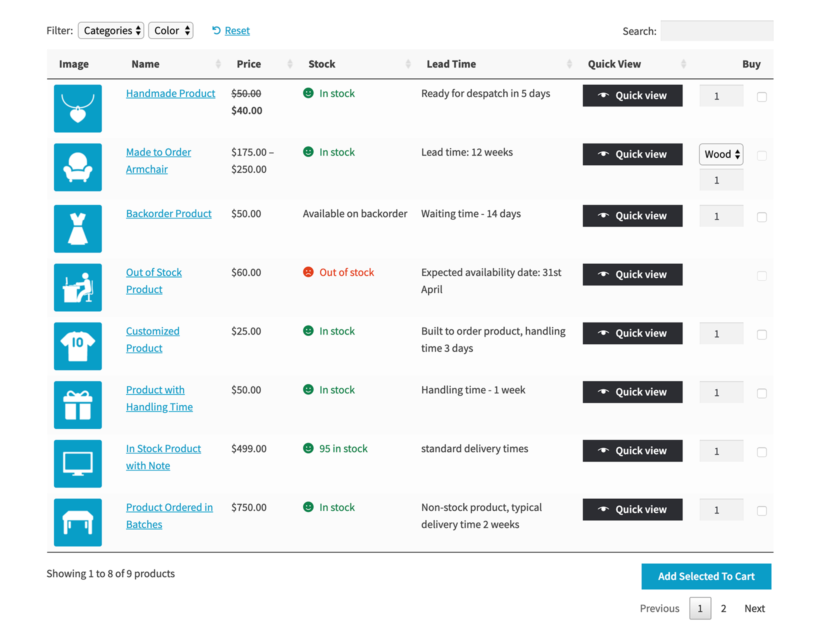
Other columns you can display include SKUs, images, price, and add-to-cart buttons.
Step #3: Set the processing time
Using WooCommerce Lead Time, you can set the processing time globally or per category, simple product, or variation (variable products).
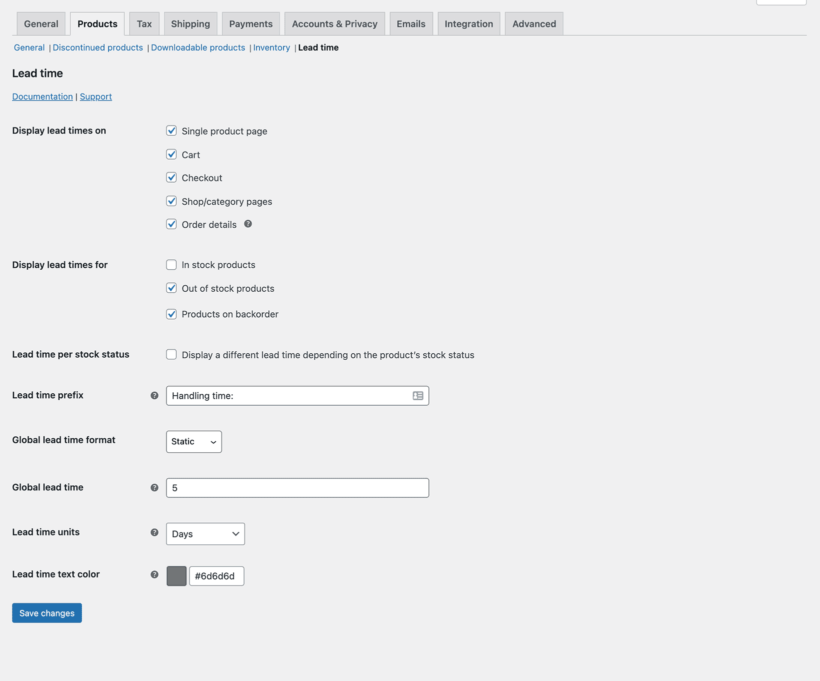
You can set the processing time globally by going to WooCommerce → Settings → Products → Lead time and entering the lead time in the Global lead time field.
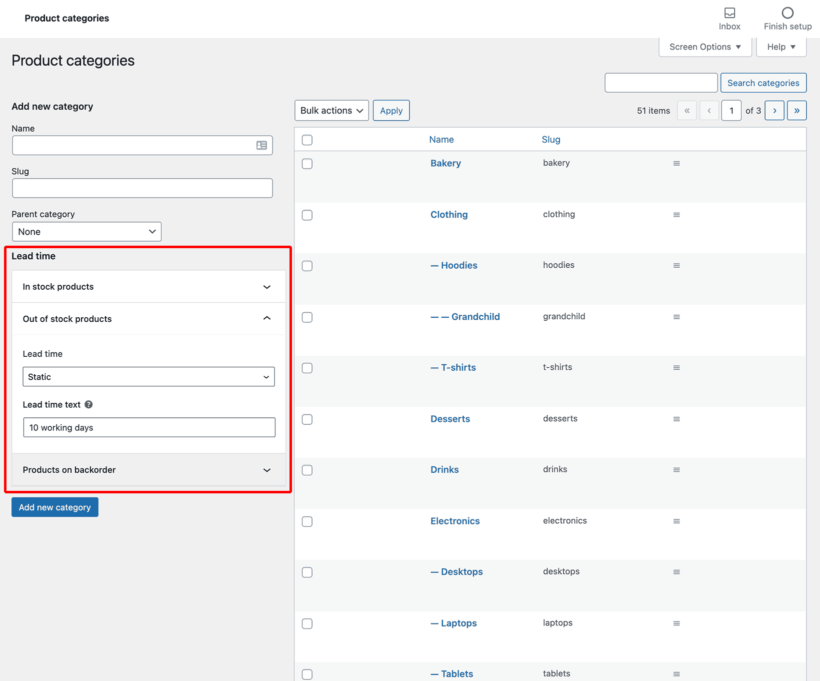
To set the processing time on a product category basis, go to Products → Categories and choose either Static (enter static lead time text) or Dynamic (calculate the processing time dynamically) using the dropdown from the Lead time field.
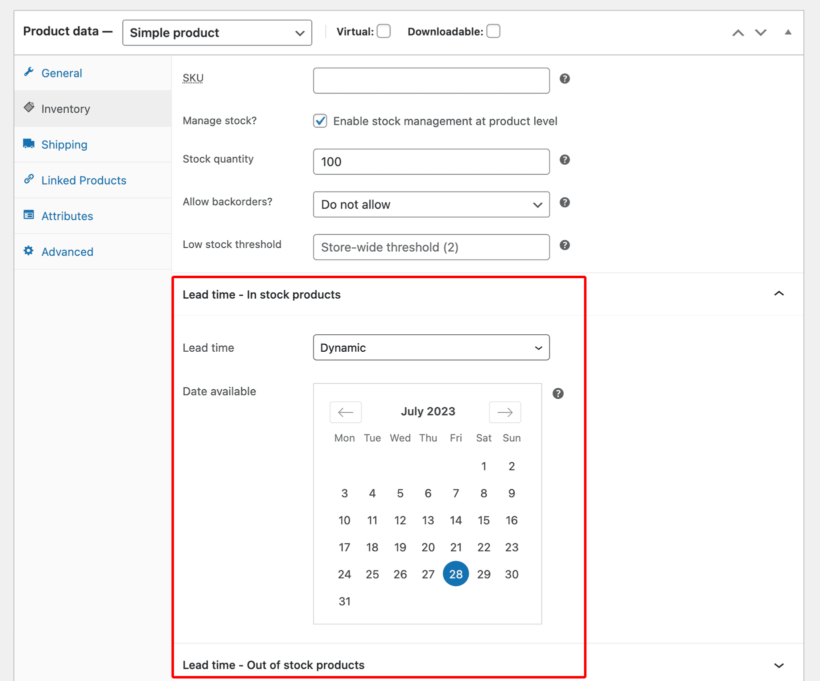
WooCommerce Lead Time also lets you set the processing time for individual products (and variations). Open the product you want to set a processing time for in the Edit Product screen. Scroll down to the Product data section and click on the Inventory tab. From here, you can set the lead time for the product. You can also do this for variable products.
Step #4: Customize the lead time wording and text color
One of the best features of the WooCommerce Lead Time plugin is that it lets you customize the lead time wording and text color. This means that you can tweak it to get the exact look and feel you want.
For example, you might consider changing the custom status wording to something like:
- Available on
- Ready to despatch in
- Handling time
- Waiting time
- Made to order
Check out our article on
Choosing the right wording for your WooCommerce Product Lead Times for inspiration and ideas on setting a custom stock status.
To change the text color, go to the plugin’s settings page (WooCommerce → Settings → Products → Lead time) and use the Lead time text color option to select a new color.
The easy way to provide stock information to customers
Efficient stock management is crucial for running a successful WooCommerce store—especially as your product catalog grows. The default tools simply aren’t built for speed or scale, which is why a dedicated bulk editing solution makes all the difference.
Setary gives you the power to update stock statuses and quantities across your entire store in seconds. Its simple, spreadsheet-style interface and bulk edit forms save huge amounts of time and reduce errors.
To go a step further, the WooCommerce Lead Time plugin lets you communicate stock availability clearly to customers by displaying accurate lead times based on the current stock status.
Together, these tools offer a complete solution for managing and communicating inventory more effectively—keeping both your team and your customers informed.
2 Comments
Can someone please help me? I'm so frustrated. When I allow "Out-of-stock" products to be shown, then I can see ALL of my products. But if I click "Out-of-stock" to HIDE all the out of stock items, then a bunch of my "In-stock" items stop showing up. I am using "Stock Management." The stock threshhold for each item is 2. I have products with stock of 16 to in the hundreds and yet they are not showing up on my shop. I've checked all the standard stuff, and I can't find the problem.
Hi Anna! Sorry to hear you're having trouble with your shop. If you're using any of our plugins, the best way to get assistance would be to raise a support ticket via our support page. Our team will be happy to look into this and help you troubleshoot.
If you're not using any of our plugins, then it’s likely an issue related to your WooCommerce settings. In that case, it would be best to contact WooCommerce support directly, as they’ll be able to assist with more specific troubleshooting especially that you've already gone through the basic troubleshooting.