How to add a date picker to your WooCommerce store

Thinking about adding a calendar so customers can select custom date and time slots for products on your ecommerce website? In this step-by-step tutorial, we'll show you exactly how to add a WooCommerce date picker to product pages and checkout pages.
Do you want to add a WooCommerce date picker to your online store?
Many online store owners need to allow customers to add a delivery time slot, choose a date and time for pickup, or use a calendar for various other purposes. And it's good for your bottom line too, as research has shown that businesses with a 24/7 booking calendar open on their website see a 37% increase in conversions.
Further Reading: The best way to setup local pickup in WooCommerce.
Some common examples of businesses that may need the date picker feature are stores that:
- Rent or lease products.
- Offer services that must be provided within a specified duration.
- Sell personalized or customized products.
- Sell tickets to courses, conferences, and events.
- Sell products that have to be delivered on a fixed date and timeframe.
WooCommerce is a powerful ecommerce platform that powers stores ranging from just one product to thousands. However, by default, it doesn't allow customers to select a date or time while shopping.
Fortunately, with the right product add-ons plugin, adding a date and time picker to a WooCommerce product is relatively straightforward. The best plugin to add the date and time picker feature to all types of store is the WooCommerce Product Options plugin.
WooCommerce Product Options is a lightweight WooCommerce plugin that easily adds a time and date picker, as well as several input fields to the front end of your store, with just a few clicks. And as the store administrator, you'll be able to view the date and time customers selected on the back end.
In this complete tutorial, we'll show you how to set up the date and time picker field on your WooCommerce store.
Ready? Watch this tutorial or continue reading to start with the basics.
What is a date picker?
A date picker/calendar field is an option typically added to WooCommerce product pages. It allows customers easily select a date for their order to be delivered, picked up, or any other relevant event.
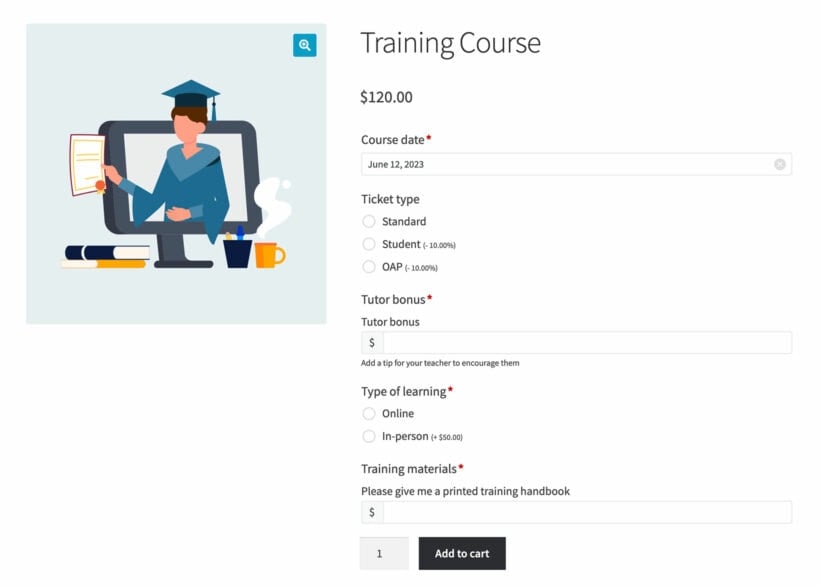
Here's a snapshot of how the date picker feature looks on the product page of a demo store. This was created using the WooCommerce Product Options plugin:

As you can see, the date picker makes it really easy for customers to select specific dates from a simple, visual calendar interface. The customer only needs to click on the date they want, and it will automatically fill in for them.
Why set up a date picker on your WooCommerce store?
Adding date picker functionality to your WooCommerce store can provide several benefits for you as the store owner, as well as your customers, such as:
- Reduced risk of errors and confusion: Without a date picker, customers may have to manually enter their preferred date and time while placing their orders. This can lead to confusion or errors in the information that they provide. Adding the date picker field reduces the risk of mistakes and ensures that the delivery or pickup date selected is correct.
- Streamlined ordering process: Customers expect to see all the necessary product information, including delivery dates, right on the product page. Many customers will likely leave your website if they can't select the desired delivery date and time while placing their order.
- Improved customer experience: Setting up a date picker in WooCommerce improves your website's user experience (UX). In addition, it makes the shopping experience more pleasant for customers, which leads to a more positive experience for your customers overall.
What products need a date calendar field?
You can set up the date calendar field on product pages for any virtually type of product or service. However, it is especially beneficial for e-commerce businesses that sell products or services with a time-sensitive component. Here are a few examples:
Event tickets
Running a WooCommerce events website for courses, workshops, seminars, concerts, conferences, and other events spanning a few days? Adding a date picker field lets your customers easily choose the correct dates they want to attend the event.
Rental equipment
Adding a date calendar field makes it easy for customers to know when the tools or equipment, such as cars, party supplies, musical instruments, etc., will be available for rent so they can reserve it. For multi-day rentals, you might add two WooCommerce date picker fields: one for the start date, and another for the end date.
For example, the equipment rental market is predicted to rise to a market volume of US$124.12bn by 2029. Adding date pickers to your store is one way to capitalize on this, providing an easy way to take rental bookings.
Personalized items
Personalized products, such as monogrammed items or products created in custom sizes, typically take more time to prepare and get ready. Adding the date calendar field helps ensure the item is available for delivery at the customer's desired date and time.
Appointment bookings
If you offer services that must be provided within a specified timeframe, such as furniture installations, equipment servicing, hair styling, etc., adding a date calendar field automates the appointment-booking process for your business.
Gift deliveries
E-commerce businesses that sell products often given as gifts, such as flowers, cakes, or baked goods, need to allow customers to choose a specific delivery date or pickup date for their orders.
Subscription-based products
Adding a date calendar field to products or services that require a start date for the subscription period, such as fitness classes, meal delivery services, or software subscriptions, is essential for customers to select their preferred start date.
Age-restricted products
Stores selling products containing CBD, alcohol or tobacco are required to ask customers to provide their date of birth for age verification to abide by legal and compliance regulations.
Seasonal products
Items only available seasonally or during holiday periods, such as Christmas ornaments, Halloween costumes, or Valentine's Day gifts, require customers to choose the preferred dates for delivery or pickup.
Pre-order products
If you sell products that need to be pre-ordered, such as books, video games, limited edition items, etc., adding the calendar field allows customers to select a preferred upcoming delivery date.
Booking-based services
Businesses that offer booking-based services, such as accommodations, tour bookings, or experiences, need to enable their customers to select the specific dates for their booking during the checkout process to avoid double bookings.
How do I add a date picker in WooCommerce?
WooCommerce Product Options let you effortlessly add product add-ons, including a calendar/date picker field to any product on your WooCommerce store. It gives you full control over available dates — you can easily disable past, current and future dates and mark specific dates as unavailable. Check out the Product Options plugin documentation for a full list of available settings.
Here's a quick overview of how to add date pickers in WooCommerce. I'll also provide detailed step-by-step instructions below.
- Install the WooCommerce Product Options plugin on any WordPress site.
- Go to Products → Product Options.
- Click 'Add New' to create an option group.
- Click 'Add option' and select the 'Date' field type.
- Set up the date field options as needed, such as adding a price and limiting which dates are available.
How to add a WooCommerce date picker field - Detailed tutorial
Step 1: Install the date calendar field plugin
- Buy the plugin from Barn2's website.
- Go into your WordPress admin dashboard. Select "Plugins" → "Add New".
- Upload the plugin's zip file. Click on "Install" → "Activate".
- Use the plugin setup wizard to activate your license key.
Step 2: Set up a date picker field
After you've activated the plugin with the license key, it's time to add a date calendar to your website and customize it:
- From your WordPress admin dashboard, select "Products" → "Product Options" → "Add Group".
- Type in a name for the product options group.
- Choose where to display the product options group in WooCommerce. You can display the date picker globally on all product pages, display the date picker only on specific products or product categories, or exclude the date picker from specific products or categories.
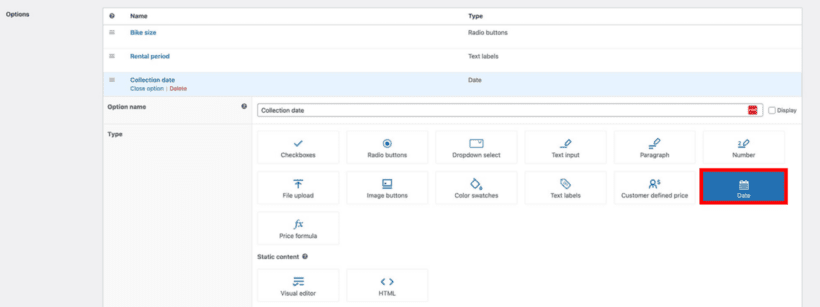
- Next, click on "Add Option" and select "Date" to create the date picker field.
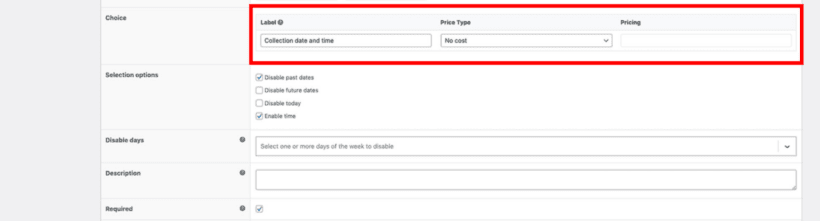
Set up a price
Next, update the label fields to set up the product price.
All products will be priced the same, irrespective of the dates the customer selects. If you want to add variable prices, for example, to charge a higher fee on certain days of the week, there are two ways to set this up with the plugin:
- Create multiple products with different prices and add one date picker field.
- Add multiple date fields to each product and set different prices for each calendar.
Note: Adding variable prices is an optional setting.
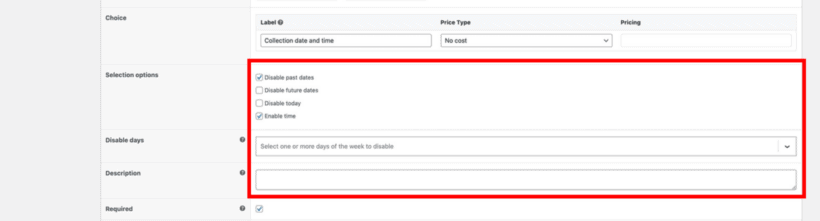
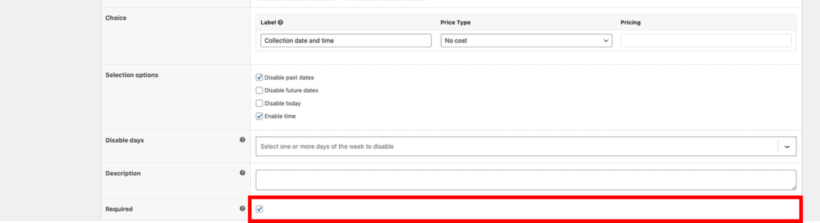
Set date parameters
You can further customize the calendar to control the options that customers can choose from while selecting their preferred dates. Here are the available options and what they mean:
- Disable past dates: This prevents customers from selecting past dates.
- Disable future dates: This prevents customers from selecting future dates.
- Disable today: This prevents customers from selecting dates on the same day.
- Enable time: This setting allows customers to choose their preferred time slots.
- Disable days: This prevents customers from selecting specific days of the week. For example, you may want to use this setting if you're closed on weekends.
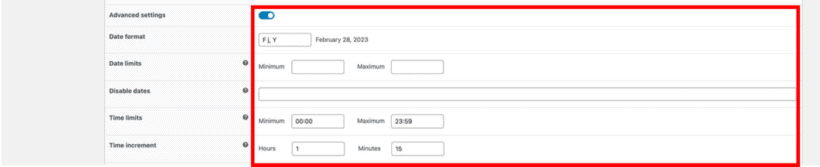
- Date format: The default plugin setting is the ISO format, i.e., 'F j, Y', equal to 'April 20, 2025'. If you want to change this, you can use a new date format from the WordPress Codex.
- Time format: The plugin works in the 24-hour format. You can select the length of each available time slot in 15-minute intervals. If you only want customers to choose from a specific window, you can enter the earliest and latest time.
- Minimum and maximum date selection: This allows you to set a timeframe of the earliest and latest dates customers can select. It will block dates outside those limits.
Set the date picker as a required field
Tick the checkbox if you want to make it mandatory for customers to select a date before adding the product to their cart. If you choose this option, WooCommerce will prevent customers from adding the product to the cart if they don't select a date from the calendar.
Note: This setting is optional.
Create conditions
Next, you can enable conditional logic. Conditional logic allows you to create rules that determine when the date picker is displayed on the WooCommerce product page.
Essentially, this allows you to choose whether to show or hide the date picker field based on the customer's previous selection.
Note: This setting is optional.
To setup conditional logic:
- Click on the "Advanced Settings" option.
- Configure the "Conditional logic" settings as you prefer.
- Click on "Add Option" → "Save Changes".
How to add multiple date pickers
You can use the instructions above to add multiple date pickers to a WooCommerce product. For example, this is a good way to allow customers to select a start and end date.
Simply add as many 'Date' options as you like, each with its own pricing and other settings as needed.
If not all customers will select multiple dates then I recommend using conditional logic to keep things neat and tidy. To do this, set up each date field to only be visible when the customer has selected a date from the previous field. That way, only people who might want to select additional dates will see the multiple date pickers 😎
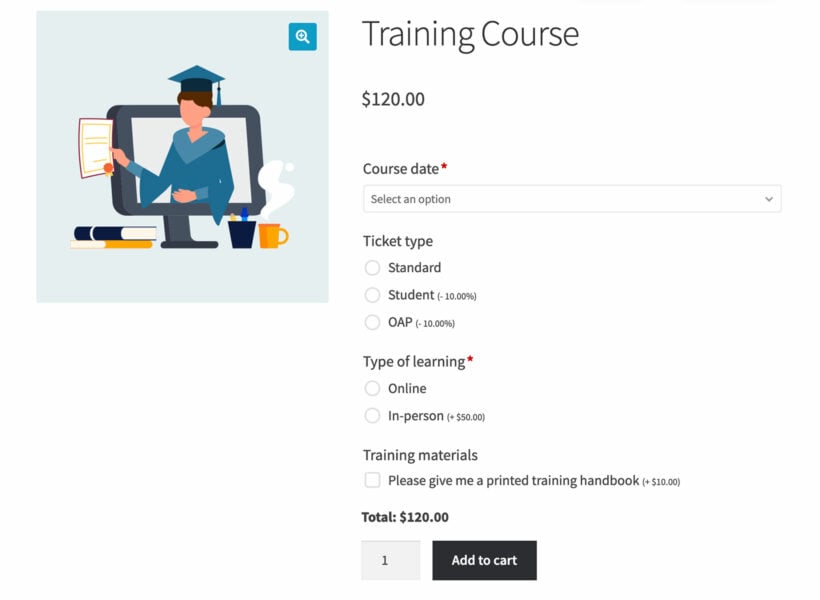
Add extra fields to your products
As we mentioned earlier, you can also use the WooCommerce Product Options plugin to add extra fields apart from the date picker calendar to your store's product pages.
Take a look at the example below. This is the product page of an ecommerce store that sells training courses. You'll notice that they've used various field types, such as checkboxes and text field areas, to offer customers extra options right on the product page.
The difference between the date picker field for customers and store owners
The time and date picker field is similar to any other input field in WooCommerce. Here's an overview of how the feature works:
For customers:
- They go to the WooCommerce product page, select a date (and time if enabled), and add the product to their cart.
- The customer continues to see the selected date and time as they proceed to the cart checkout page.
- After placing their order, they'll receive an order confirmation email mentioning the selected date and time.
For store owners:
WooCommerce store administrators will be able to see the selected date and time in the:
- WooCommerce Order notification email.
- WooCommerce Order page in the WordPress admin dashboard.
Pro tip: Use the WooCommerce Multiple Email Recipients plugin to automatically send emails to additional people who need to know when a customer orders a product with a date field. The plugin allows you to add extra recipients to the order notification email which WooCommerce sends whenever customers order from specific products or categories. This WooCommerce plugin is extremely useful if particular people need to manage these orders and aren't store administrators. For instance, if your e-Commerce store sells furniture, you might need to notify your service partners to install the order at the customer's selected time.
FAQ
Before we finish, here's a quick recap of the main questions we answered about WooCommerce date picker fields:
- What is a date picker field?A WooCommerce date pickers is a field which appears above the add to cart button allowing customers to select a date and/or time. This is then associated with the product when they place their order.
- How can I add a date picker to my product pages?Simply install the WooCommerce Product Options plugin, go to Products → Product Options and add a date picker field.
- Can selecting a date change the product page?Yes - you can add any type of dynamic pricing for when the customer selects a date. For example, you could increase the price by a fixed amount or a percentage.
- Will the date picker field slow down my site?No - a date picker has an absolutely minimal impact on performance. The calendar uses a very tiny file that will have no impact on page load times.
Add a date picker to your WooCommerce products today!
Adding a date picker to your WooCommerce website improves your website's user experience (UX) and can significantly benefit your customers by allowing them to select their preferred dates while shopping.
Barn2’s WooCommerce Product Options plugin is the best plugin to add the WooCommerce date picker feature to your online store. Apart from the date and time field, it also includes over 15 custom field types, giving you more value for your money.
The date and time field is incredibly flexible. You can add a price, restrict which dates are available, and much more. And even better, the plugin comes with a 30-day guarantee so you can try it on your site risk-free 😀
6 Comments
In the italics at the top of the page it states the date picker can be added to the checkout page. This doesn't seem to be an out of the box option, only product pages allow insertion of the date picker (or any option), and the plugin is not a solution for a site selling multiple items that need a single pickup date to be scheduled. If I'm missing something to easily add it to the checkout page, please let me know.
Hi, CJ. Thanks for your comment. I see what you mean. I'm relaying this to our team for review. In the meantime and to clarify, you can use our WooCommerce Product Options plugin to add a date picker to the single product pages on your site, and the date selected on which will also be displayed at checkout. i.e. Customers can purchase products that each require a date picker, and the dates they selected will be displayed for each product at checkout.
For what you're asking about, you can use the WooCommerce Delivery Slots plugin by our friends at IconicWP to add/display a delivery date and delivery time option that customers can choose from at checkout.
I hope this makes sense and helps. Let me know if you have any more questions. You can also get in touch via our dedicated Support Center.
I would like to change date picker's language/format to Finnish.
Is the a tutorial or a guide available?
Hi Mika. Thanks for your comment. You may refer to our article about Translating WooCommerce Product Options. If you have further questions/concerns, feel free to reach us via our Support Center anytime. Thanks!
I would have loved to use it if the data picker allowed users to select a date in the form of a check box.
For example:
Choice between
1) 24.05.2024 à 28.05.2024
2) 04.07.2024 à 07.08.2024
Do you have a solution?
Hi, Samuel. Thank you for your comment! For this specific scenario, delving into code customization would be the most effective approach to accomplish your goal. You can refer to our plugin customization article for further guidance on this matter. Should you have any additional inquiries, please don't hesitate to contact us through our Support Center.