How to set up conditional logic for WooCommerce product variations

WooCommerce conditional variations can keep your product pages clean and simple, only showing relevant options to each customer. Let’s see how you can set this up.
Offering customizable product options is a great way for online merchants to meet their customers' unique needs and preferences. However, it's important to avoid overwhelming customers with too many choices. This is where WooCommerce conditional variations come in.
Adding conditional logic to variations allows store owners to show or hide specific product options based on their customers' previous choices, making the shopping experience more streamlined and user-friendly.
In this article, we'll explore how to set up conditional logic for WooCommerce product variations, step by step. We'll also discuss how it can benefit both store owners and customers, and offer full instructions on how to set up this powerful feature effectively.
We'll do it using the WooCommerce Product Options plugin, which lets you add a huge range of conditional variations to your products.
Let’s get to it!
What is a conditional variation?
In WooCommerce, conditional logic is the ability to show or hide certain elements of product pages based on specific conditions. This works for the checkout process and order emails as well.
For example, you can use conditional logic to display different shipping options based on the customer's location. You can show or hide certain payment gateways based on the product the user is buying.
You can use conditional variations to show or hide specific product variations based on certain conditions. This offers customers a tailored experience by presenting them with only the variations that are relevant to them.
WooCommerce conditional variations in action
One example of conditional variations is showing different product sizes based on the customer's color choice. It could also mean offering a specific gift-wrapping paper option only if a particular ribbon color is selected, like this:
Another practical example is shown in the business card demo for the Product Options plugin. Visit the page and select some options to see how it works. The options change depending on your selections, as you'll see in the screenshots below:
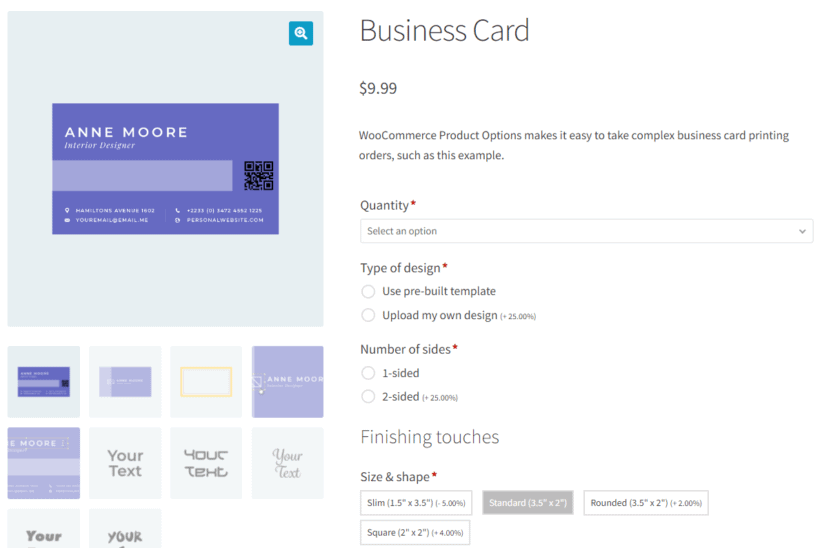
When you select Use pre-built template under the Type of design, a set of options appear:
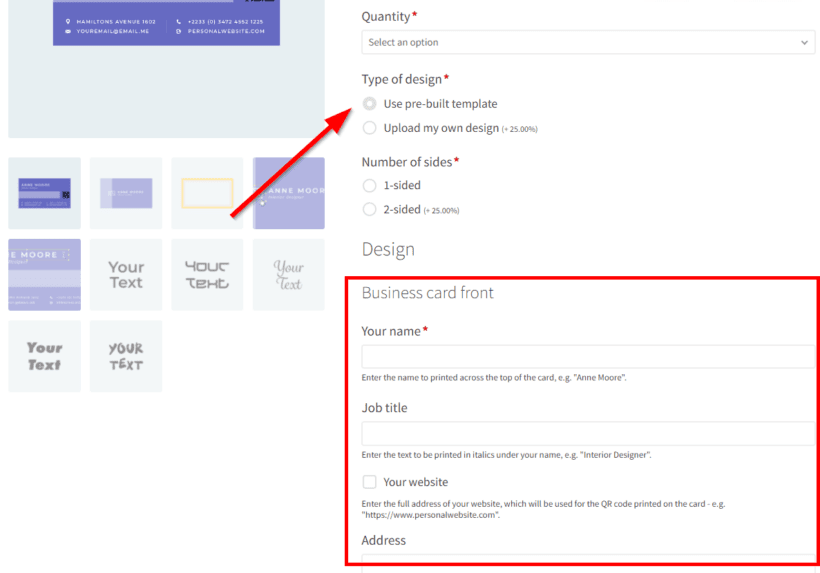
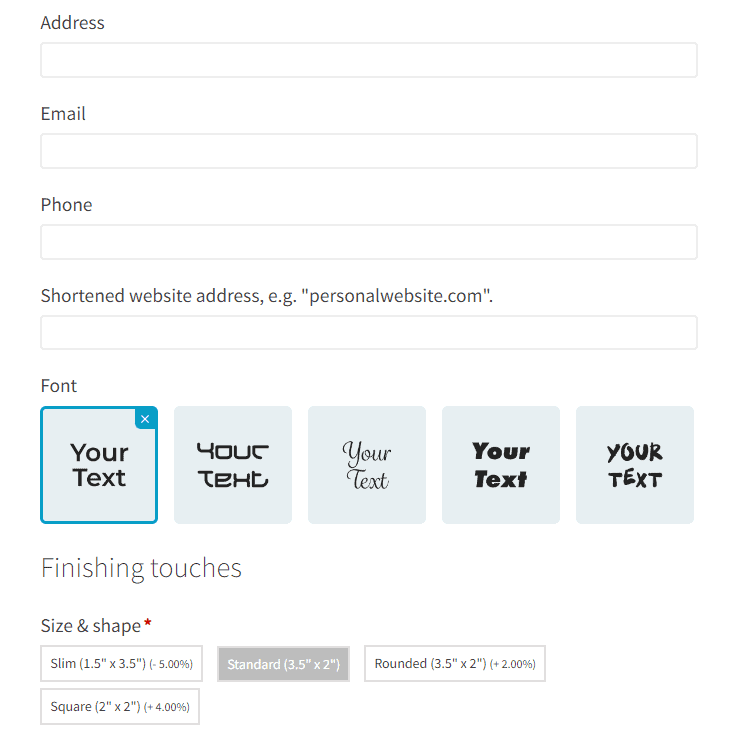
When you scroll down, you'll also see other options. These include information fields and font selection image swatches:
On the other hand, the page displays another set of options when you select the Upload my own design option:
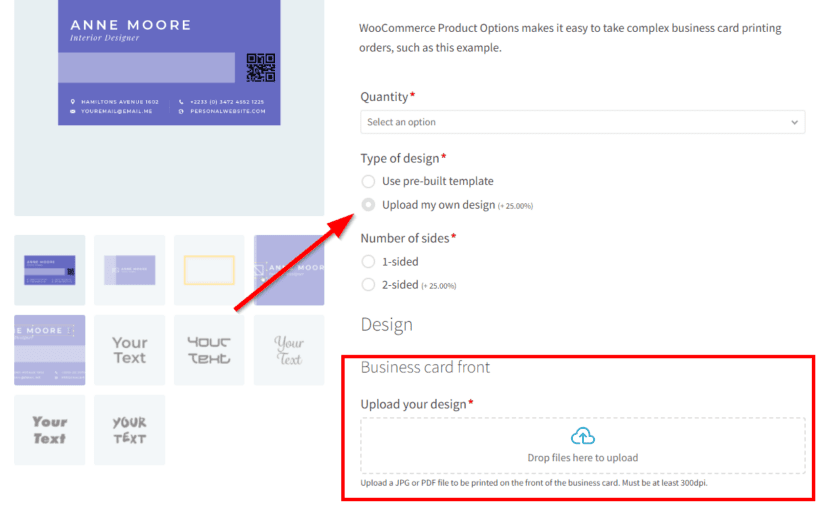
When you choose the Upload my own design option, the variation custom fields displayed may also vary. This depends on the number of sides you want the design to appear on:
What are the benefits of using WooCommerce conditional variations?
As a business owner, Woocommerce conditional variations can help you improve customer satisfaction while boosting sales and revenue. Some specific benefits of using WooCommerce conditional variations for your ecommerce business are:
- Improved user experienceWooCommerce conditional variations allow you to present customers with only relevant product options. This helps you to streamline their shopping experience and makes it easier for them to find the right product.
- De-cluttered product pagesUsing conditional variations gives the product page a clean and organized look. This is because product options are now displayed based on customers' selections.
- Increased salesOffering customers the right options for a product encourages them to buy it, increasing overall sales. It can even help you boost your average order value and cross-selling profit.
- Enhanced product flexibilityWith WooCommerce conditional variations, you can offer customers more options and variations for a product. This makes your store more flexible and capable of handling a wider range of products and services.
- Improved product managementBy creating different variations for different conditions, you can better manage your inventory, prices, and product information.
- Increased customizationUsing conditional variations allows you to create tailored experiences for different customer categories. This often delivers a more personalized and engaging shopping experience.
So, we've shown you what your business stands to gain from using WooCommerce conditional variations. Now, let's take a look at the best plugin you need to get it working on your WooCommerce store - no custom code snippets needed!
How to create conditional variations with the WooCommerce Product Options plugin

WooCommerce Product Options is a WordPress plugin that adds extra product options to your online store. It lets you add extra custom fields, checkboxes, and dropdowns to product pages. This allows customers to personalize products to suit their needs. All without any PHP or HTML code!
The plugin works with simple and variable products. Its user-friendly interface allows you to set WooCommerce conditional variations for a single product or multiple products in seconds.
So, how can I use conditional variations to show a different variation based on the product color? I'll tell you how to do this next.
2 ways to create conditional variations
WooCommerce Product Options provides 2 ways to create conditional variations:
- You can use it to show and hide normal product variations based on the customer's other selections. For example, you might want to show different color options depending on which size the customer chooses.
- Alternatively, you can create extra options directly in the plugin, and display these conditionally depending on which variations the customer has selected.
The second option is more flexible due to the way WooCommerce works. While you can use WooCommerce Product Options to hide variation dropdowns, this could cause problems because WooCommerce requires customers to select one option for each variation attribute. If these are hidden due to their other choices, then they can't add the product to the cart!
It's far better to use product variations for the choices that don't need to be conditional, and to use WooCommerce Product Options to create the options that you want to display for selected variations.
As a result, the following instructions assume that you'll be using this method.
Step 1: Install and activate the plugin
- To install and activate WooCommerce Product options, get your copy of the plugin here. You'll receive an email with a downloadable zip file and license key. Log into your WordPress admin area and go to Plugins → Add New → Upload Plugin.
- Select the plugin zip file. Click Install Now then Activate Plugin.
Now that the plugin is active, let's create some WooCommerce conditional variations. I'm assuming that you have already set up some products with the variations that you want to use in the conditional logic.
Step 2: Create a new product option group
Next, go to Products → Product Options → Add Group.
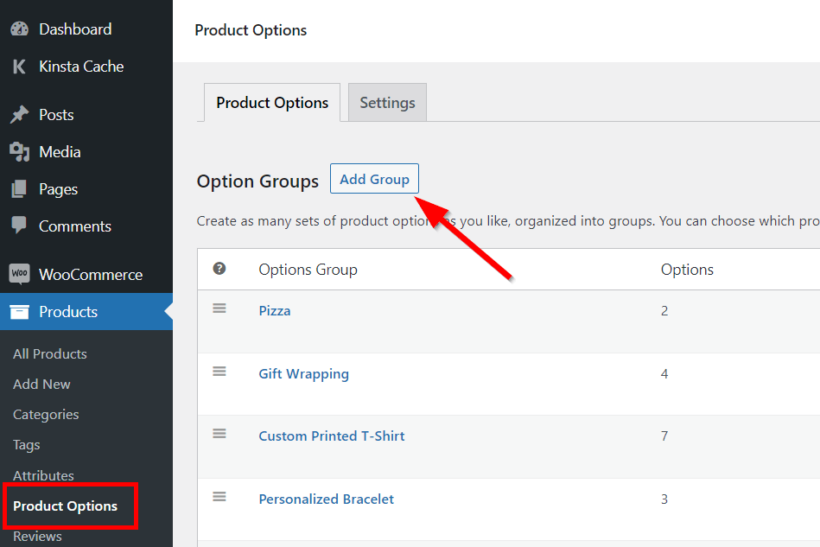
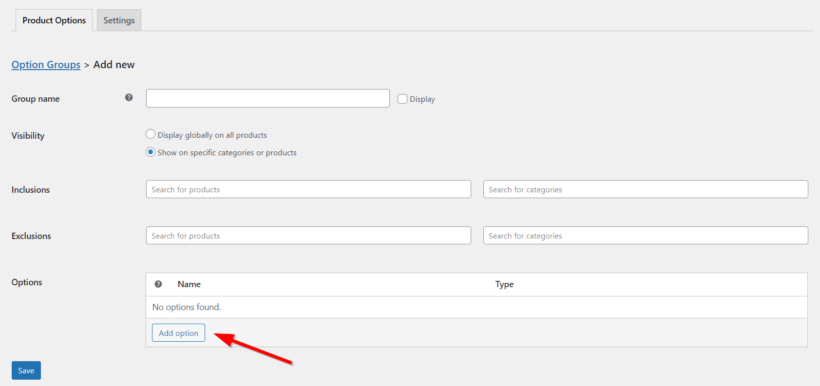
On the next page, add the group name and select the products or product categories you want the conditional variations to apply to.
Next, click Add option.
Step 3: Add conditional options
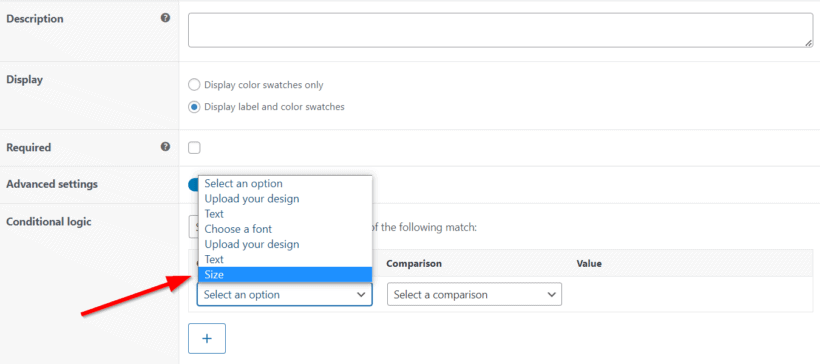
Now, enter the option name and select the option type. In this example, I'm going to select 'Color swatches' and display a color selector when the customer chooses a certain variation. Alternatively, you can create text fields or text areas, dropdown lists, and other types of input fields.
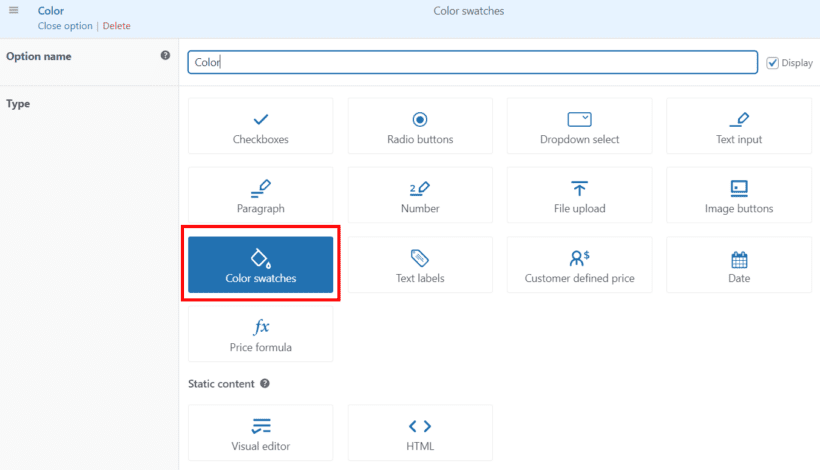
Below this, you'll see a 'Choice type' option. Use this to decide whether to create the conditional options directly in WooCommerce Product Options (recommended - see above) or display existing variation attributes.

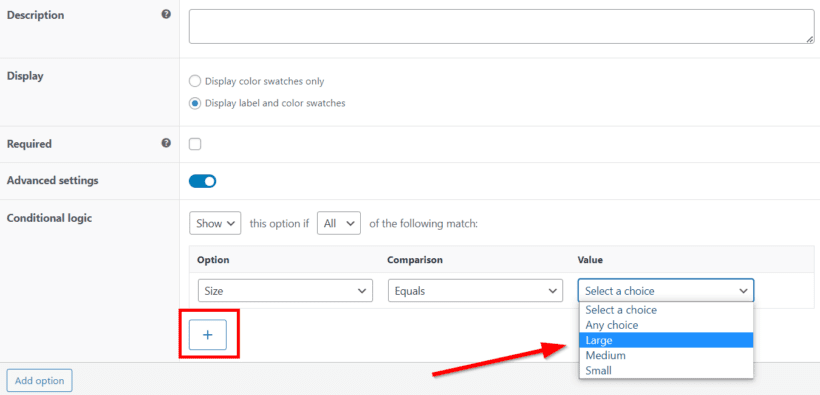
Create the choices which customers can select from, such as all the different colors. You can optionally add prices which will be added when the customer selects a particular choice.
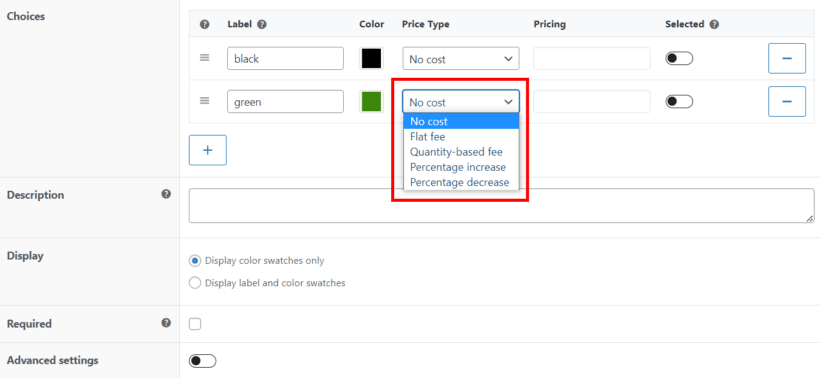
There are several other options, such as adding a description. Ignore the 'Required' field if you want the variation to be optional.
Step 4: Enable WooCommerce conditional variation logic
To enable conditional logic for WooCommerce variations, toggle on the Advanced settings toggle. Use the conditional logic section to show or hide the color options only if the necessary conditions are met. For example, in this screenshot, the color swatches will only appear when the Large Size variation is selected:
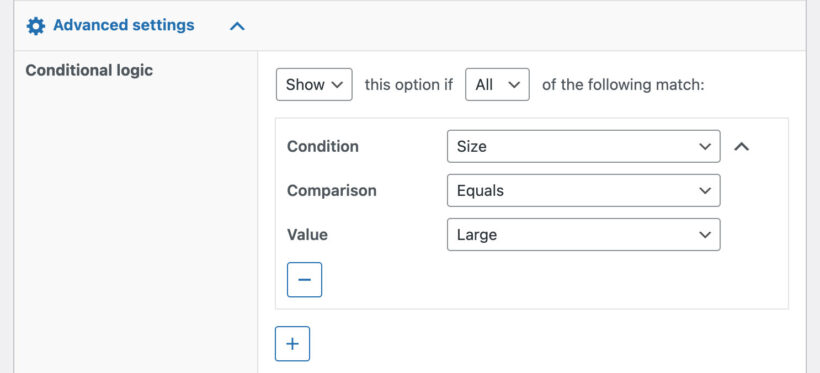
Use the 'Condition' field to select which other option or product variation will control the appearance of the option you're creating. Choose the requirements for the conditional logic, such as that the customer must select a variant with a particular attribute.
In our t-shirt color example, we’ll select the 'Size' attribute and make the color option appear only when the buyer selects a certain size.
Under the Comparison condition, we’ll choose Equals. Finally, we’ll set the Value to be Large. This means that the color option will only be displayed if the selected Size is Large. To add more conditions to the same variation, use the + sign.
Step 5: Test the conditional variation on your site’s front end
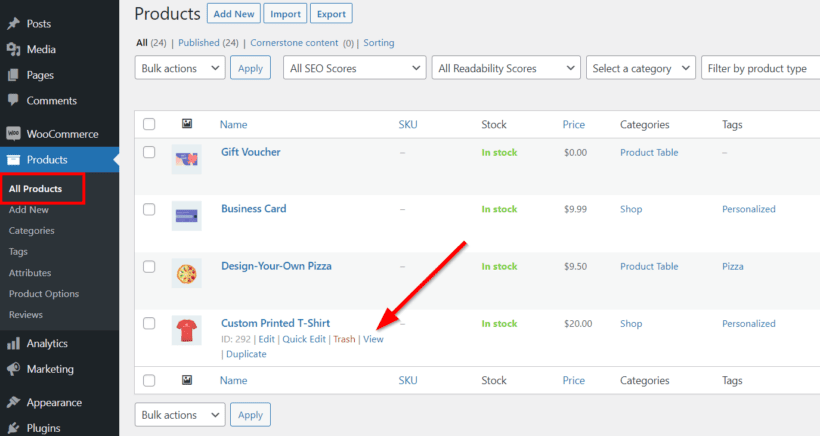
We've seen what the back end looks like. Let's now take a look at what we have on the front end with these two conditions set. On your WordPress dashboard, go to Products → All Products. Click View after hovering over the product you want to preview.
When the page first loads, we'll see the usual product variations but we won't see the color option that we added in the previous section. When we select the appropriate variation, the color swatches will appear.
Keep working to add more advanced conditional variations as needed. For example, you could create a different set of color swatches for each size variant, add a 'gift wrap' checkbox which controls whether gift wrapping options appear, and much more.
Start using conditional variations for your WooCommerce products
Using Woocommerce conditional variations is an excellent strategy for enhancing customer experience in your ecommerce store.
In this article, we’ve explained all you need to know about conditional variations. We’ve also shown you practical examples of how they work for various products, especially using our business card demo.
We then demonstrated how you can configure conditional options for products on your online store using Barn2’s WooCommerce Product Options. We recommend this plugin because it’s simple to use and gives your store a clean and organized appearance.
Are you ready to add WooCommerce conditional variations to your store? Then you should get your copy of WooCommerce Product Options now.
If you have any questions, we’d love to hear from you in the comments section.