How to add color swatches to a WooCommerce product

In a standard WooCommerce setup, product attributes such as color are displayed as plain text or variation dropdowns. Discover how to make your product attributes much more visually appealing and informative with the help of visual swatches.
While millions of store owners choose WooCommerce to sell their products, it doesn't provide a visually appealing way for customers to choose a color before adding an item to their cart. Out of the box, WooCommerce offers customers the opportunity to choose colors from a text-based dropdown menu. While this “does the job”, it's better for customers to see the color options instead of having to read a list of attributes.

By replacing the variation dropdown with eye-catching color swatches, you can improve customer experience and potentially net more sales as a result.
Keep reading to discover the easy way to add WooCommerce color swatches to your store. We'll do it using the WooCommerce Product Options plugin, which lets you add a range of flexible options to product pages - including color swatches, clickable images, and so on.
At the end, I'll also show you how to use the WooCommerce Product Filters plugin to let customers filter products by color swatch.
Why add color swatches to WooCommerce?
1. Help customers make an informed choice
While there’s nothing inherently wrong with listing colours in a dropdown, it’s not as user-friendly as it could be.
For instance, offering the color ‘Blue’ on one of your t-shirt products drop-down menus doesn’t give the customer much information to work with. They don’t know what shade of blue it is, for example. As a result, they could end up dissatisfied when the product arrives.
Even if you added an extra word to describe the shade of blue your t-shirt is, opinions differ. After all, not all navy blues are the same shade. Even worse, non-descriptive color names such as ‘electric cherry’ sound exciting but doesn’t indicate the actual appearance of the color.
By adding WooCommerce color or image variation swatches, customers can view the exact color they're selecting and make an informed decision. This will deliver a better user shopping experience, driving up consumer satisfaction and helping to reduce refunds.
2. Increase your sales with eye-catching swatches
Color swatches also increase sales because they’re eye-catching and draw attention to your color variations.
With a generic, text-based drop-down menu, customers may not even consider alternative color options for your product, preferring to purchase variants accompanied by images instead.
Alternatively, with a bright array of colors to choose from in a prominent location on the product page, the sales of your product variations are bound to increase.
3. Provide a more visual way for customers to find products by color
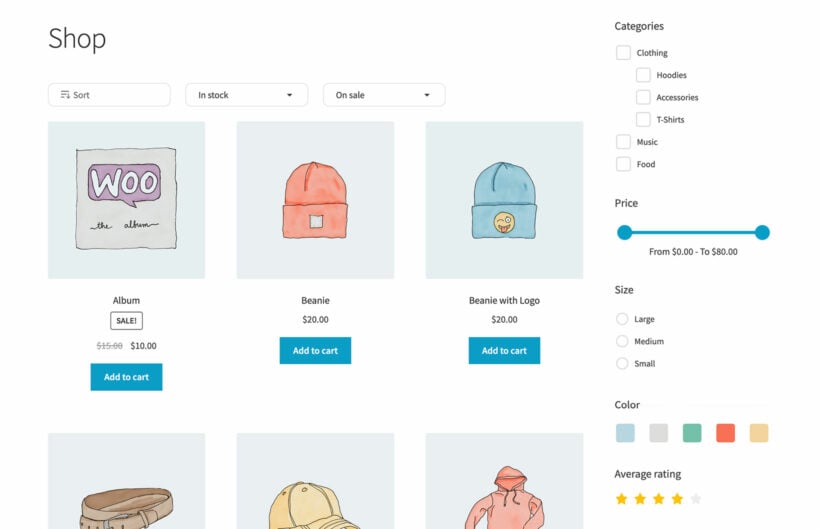
Remember the last time you were searching the web for an item of clothing in a particular color. I expect that you used the color filters on the shop page to view specific colors only.
This is a common feature in nearly all major ecommerce clothing stores. As a result, it's very strange that most WooCommerce stores don't have this feature. Instead, you have to click on the name of a color. While that's better than nothing, it takes a few extra seconds to find the color you're looking for. Whereas with color swatch filters, customers' eyes are instantly drawn to the color they want.
Next I'll tell you about the best WooCommerce color swatch plugins to fix both problems. One of them adds color swatches to the product page, and the other adds color filters to the shop pages. Use both plugins together for best results across the entire shopping experience.
Plugin 1: Add color or image swatches to the WooCommerce product page
The WooCommerce Product Options plugin lets you add a wide range of options to your product pages, replacing the usual variation dropdowns. You can use it to display ALL your variants in more visual ways, or you can use it for certain variations only (e.g. color) while keeping the dropdowns for other attributes (e.g. size).
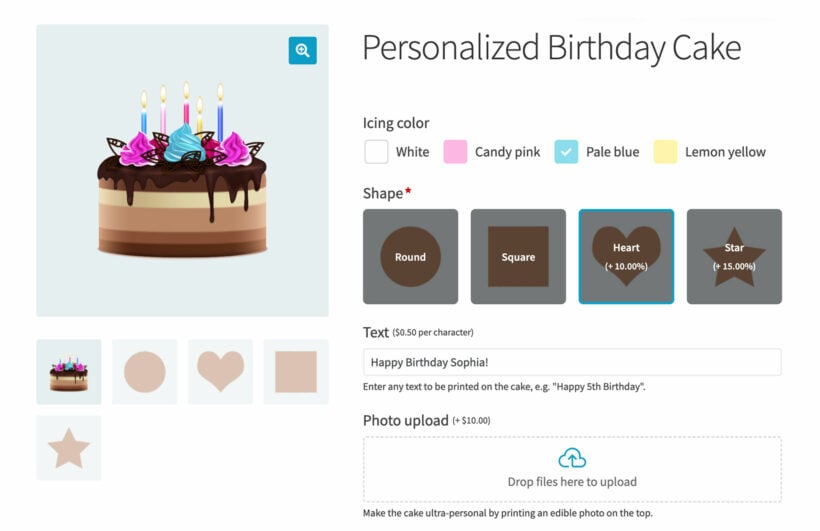
For example, this cake product uses WooCommerce color swatches to allow customers to select an icing color. It also lets customers choose a cake shape by clicking on an image, type a personal message into a text field, and upload a photo for printing. Think about how much more visually appealing this is than normal variation dropdowns!
WooCommerce color swatch setup tutorial
In this tutorial, I'll explain how to replace the 'Color' variation dropdown with WooCommerce color swatches or images. You can also use the same instructions to display other attribute dropdowns in more visual ways.
Before you start, make sure you have a WordPress website with WooCommerce installed, some products, and a color attribute added via Products → Attributes which is used in the variations for at least one product.
Step #1: Install and activate WooCommerce Product Options
- Get WooCommerce Product Options and download the plugin's zip file from the order confirmation page.
- Go to Plugins → Add New → Upload Plugin.
- Choose the zip file you downloaded, upload, and then click 'Activate'.
- Activate your license key in the plugin setup wizard.
Step #2: Add color swatches to WooCommerce
Once the plugin is installed, it’s time to start implementing the new and improved color swatches in your WooCommerce store.
Remember, you can also add image swatches, checkboxes, radio, and text buttons. However, for the purpose of this tutorial, we will focus on variation color swatches.
To add visual swatches to WooCommerce, take the following steps:
- Go to Products → Product Options.
- Create a new product options group. Give it a descriptive name so that you can find it easily later.
- Set the group to appear on one or more products that have the color variation attribute. You can either do this by enabling the option group for all products, or by selecting specific products or categories.
- Click 'Add option'.
- Choose an option style. This will probably be 'Color swatch', but you can use 'Image buttons' to allow customers to click on images to select a color variation if you prefer.
- Select the option to create a product option based on existing variation attributes.
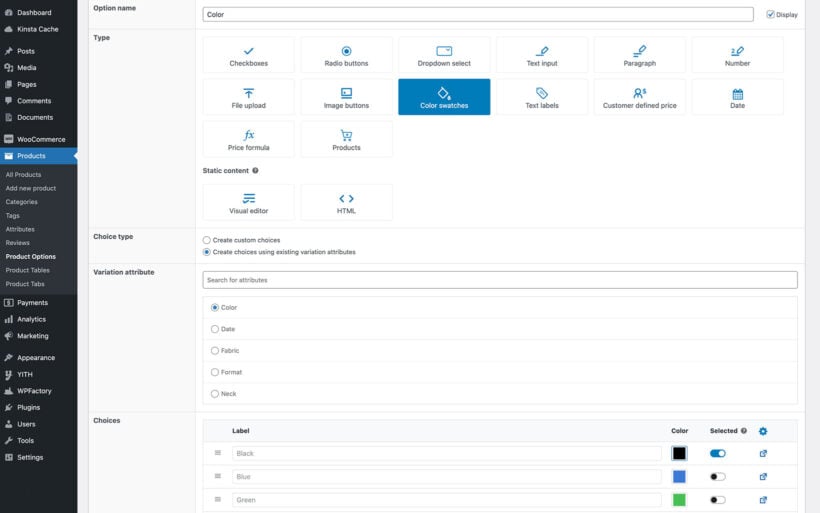
- This will display an attribute picker displaying all the global attributes which you added via Products → Attributes. Select the attribute that you're using for the product's color.
- All the colors that you previously added to your store will appear in a table below. Select the exact color that will appear in the swatch for each one.
Once you have done this, the color variation dropdown for the relevant products will be replaced by WooCommerce color swatches.
Note: Each product will only show the color swatches for its own variations. This means that it's fine to offer different color choices for different products. For example, if your t-shirt product has Red, White and Green attributes and a hoodie product has Black and Orange attributes, then each one will only show the appropriate color swatches.
Step #3 (optional): Display color swatches on the WooCommerce shop page
Whichever WooCommerce color swatches plugin you choose, it's worth considering which pages in your store customers would like to select colors on. Normally, the color swatches will only appear on individual product pages. That's not terribly convenient for customers because they have to visit multiple pages to choose colors and add to the cart.
You can improve on this by installing one the WooCommerce Product Table plugin, which will also display the color swatches on the WooCommerce shop page like this:
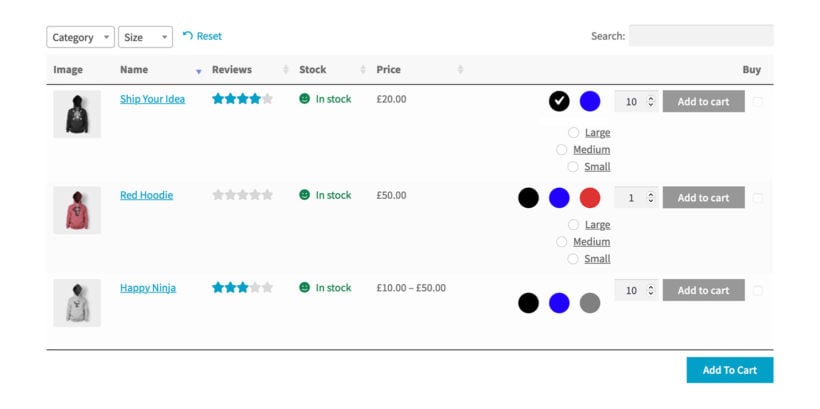
As you can see, this handy plugin replaces the standard shop/category page layout with a structured table view that contains much more information about each product. This includes a 'Buy' column containing all the purchase information that customers need in order to make selections and add to their cart.
To show color swatches on your main shop pages, follow these steps:
- Install WooCommerce Product Table on your WordPress site.
- Use the setup wizard to show the product table layout on your main shop and category pages.
Assuming that you've already used WooCommerce Product Options to display the color attribute as swatches, these will appear in the Buy column of the table. It's a true one-page shopping experience 🚀
Plugin 2: Add color swatch filters to your shop pages
So far, we've learned how to allow customers to select a color by clicking on a color swatch before adding a product to the cart. However, that doesn't help customers to find products in the first place. To do that, you need to add color swatch filters to your main shop pages.

You can easily add color swatch filters with the WooCommerce Product Filters plugin. This is how to do it:
- Install the plugin and download the zip file from the confirmation email.
- Upload and activate the plugin.
- Activate your license key in the confirmation email.
- Go to Products → Product Filters.
- Create a new filter group.
- Click 'Add Filter'.
- Select 'Attribute' as the filter type and choose the 'Color' attribute which you added via Products → Attributes.
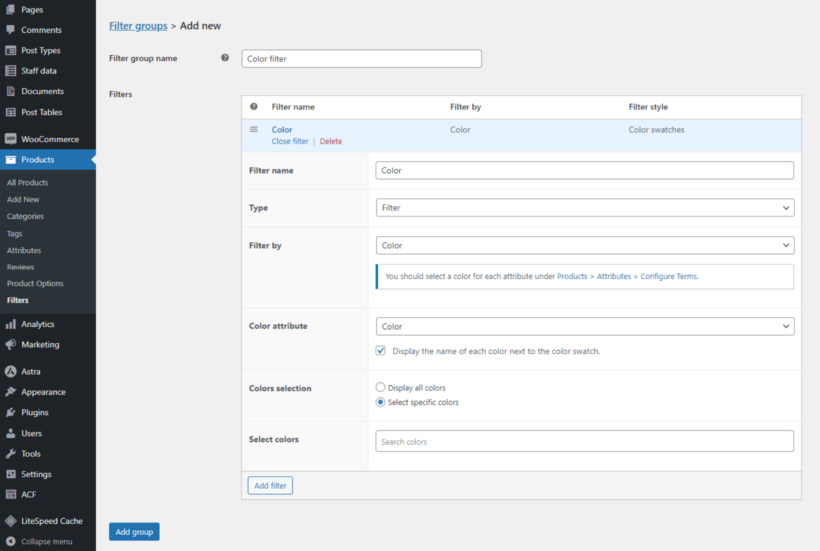
- Select the filter style as 'Color swatch'.
- This time, you need to select an exact shade for each color on the 'Edit term' page for the attribute. To do that, go to Products → Attributes and click the 'Edit terms' link for your color attribute. Edit each individual color and select a swatch shade from the color picker.
- Repeat steps 6-9 to add as many filters as you need. You can add filters for price, other attributes, categories, rating, in stock, and so on.
- Finally, go to the WordPress widget editor (e.g. Appearance → Widgets in a Classic theme, or 'Edit Site' in a block theme) and add a 'Product Filter' widget. Select the filter group you just created.
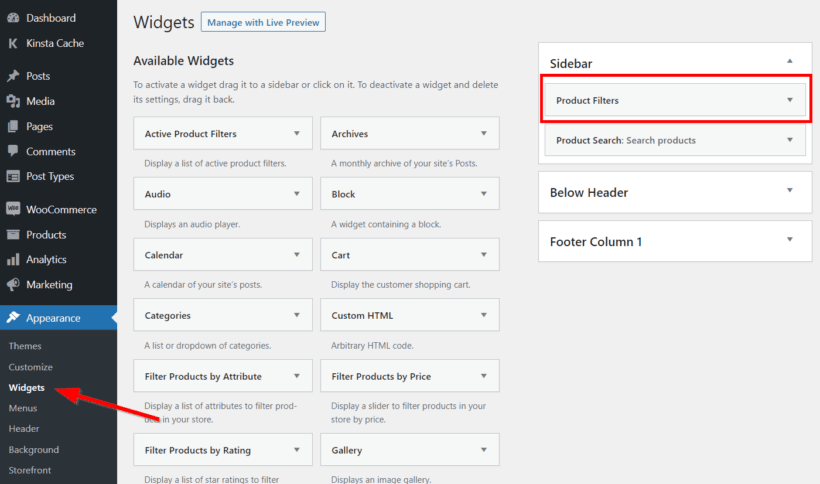
Now when you visit your WooCommerce store, the page sidebar will contain eye-catching color swatch filters. Customers can use these to refine the list of products by their desired colors.
Add swatches to improve your online store’s performance today
Variation swatches for WooCommerce provide a more visual way for shoppers to select their desired color or shade. You can either display them as color swatches, or clickable images of the product in each color.
Instead of having to read through a text-based list of colors, customers' eyes will instantly be drawn to the colors they like best. Colors are inherently visual, so providing a visual way to select them makes perfect sense.
These are the best WooCommerce color swatch plugins, depending on where in your store you want the swatches to appear:
- WooCommerce Product Options to replace the variation dropdowns with color swatches.
- WooCommerce Product Filters to allow customers to filter your shop pages by color swatch.
If you’re ready to provide your customers with a shopping experience that’s much more informative and easy on the eye, download your chosen plugins today!
2 Comments
Hello - I am trying to find out if I can bulk edit colour swatches on woocommerce. I am very new to all of this! Would I need to buy a plug-in? We have only wording and defo want to change to swatches. We have 4 x garments - t-shirts, long-sleeve t-shirts, sweats and hoodies. The chosen colour swatches are the individual to each style of garment. Can I change and bulk edit all of the t-shirts for instance with our chosen colour swatches? Thank you Deborah
Hi, Deborah. Thanks for your comment. You'll need to purchase the WooCommerce Attributes Swatches plugin by our friends at Iconic to all you to add/create and set up color swatches on your site. I suggest you please contact Iconic Support for the best advice on whether their plugin allows you to edit the color swatches in bulk. I hope this helps point you in the right direction. Please let me know if you have any more questions. You can also get in touch via our dedicated Support Center. Cheers.