WooCommerce guide: Crafting irresistible cart discounts

Looking for the best way to set up WooCommerce cart discount promotions? Here, we'll explore how to use cart discounts to reduce cart abandonment rates, increase average order values, and boost revenue in your online store.
The average cart abandonment rate in 2024 is 70.19%. This means that out of every 10 customers who add products to the cart in an online store, 7 leave without completing their purchases! 😟
Evidently, this is a massive problem that can impact revenue and profits - but luckily, cart discount promotions can help. Cart discounts are a powerful way to reduce abandoned carts, increase average order value, and boost sales in your WooCommerce store. And in this tutorial, I'll show you how to set them up.
WooCommerce doesn’t have native options to create cart discounts (you can only add basic product-level discounts to individual products or product categories). However, we can easily set them up using WooCommerce Discount Manager. This is the best plugin to create a variety of cart discounts (based on total spend, buy one get one free, etc.), add start and end dates to schedule discount promotions, limit discounts to specific user roles or users, and more.
A run-through of WooCommerce cart discounts
WooCommerce cart discounts are discounts applied when customers reach the cart page in an online store. Because cart discounts are implemented towards the end of the buyers' journey, they act as a last-minute nudge to motivate customers to complete their purchases.
As mentioned earlier, WooCommerce doesn't enable you to add cart discounts — discounts are added on a product level when you update the sale price of each product. So, the best way to set this up in your store is by using a plugin.
Benefits of offering cart discounts in WooCommerce
Here are the top benefits of providing cart-specific discounts in your WooCommerce store.
- They encourage customers to add more items to reach discount thresholds. This helps increase revenue.
- They offer an incentive for customers to complete their purchases. This helps reduce cart abandonment rates.
- Offering special discounts for returning customers encourages repeat business. This helps improve customer loyalty.
- Discounts can be set to promote specific products or combinations. This is useful in situations where you want to launch a new product range or clear excess stock.
Top strategies for offering WooCommerce cart discounts
Here are the top strategies to design your cart discount campaigns around.
Storewide discounts
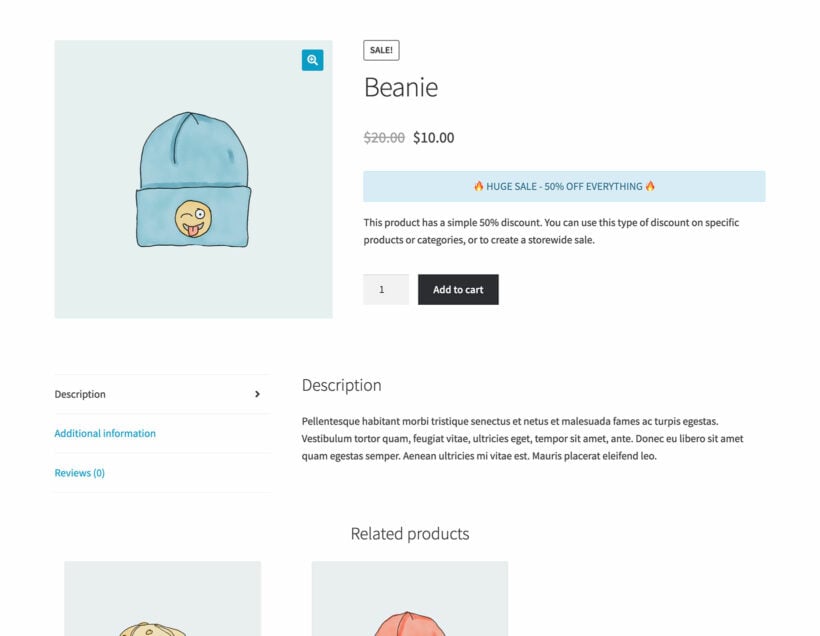
Storewide discounts are discounts that apply to all products in your WooCommerce store. They affect the entire inventory and reduce prices across all items by the same amount. For example, offering a storewide 20% discount for the holiday season.
Pros of storewide discounts
- It's pretty straightforward to design storewide sales campaigns and set them up on the backend.
- They are effective at clearing out old stock, especially during end-of-season sales.
- They can drive a significant increase in sales over a short period, especially since shoppers have a huge selection of on-sale items to pick from.
Cons of storewide discounts
- Slashing prices across all products can cut into your store's profit margins, especially if the discount is substantial.
- Frequent storewide discounts can lead customers to expect that they'll always get products at a reduced price. This makes it much harder to sell them at full prices later.
- Storewide discounts aren't targeted at specific customer segments. This may make them less impactful over time.
Category discounts
Category discounts target specific product categories in your store. With this strategy, you offer discounts on select groups of items rather than the entire store. There are various ways to offer category-based discounts. For instance, you can discount items based on seasonal trends, overstocked items, new category launches, etc.
Pros of category discounts
- They are more targeted than storewide sales, and if planned well, can be more effective at driving revenue.
- WooCommerce seasonal pricing is useful for moving stock in specific categories, particularly if they are seasonal items or overstocked products.
- Limiting discounts to select items makes it a lot easier to maintain your store's overall profit margins.
Cons of category discounts
- It takes a bit more time and effort to plan and market category-specific discounts than storewide discounts.
- Not all customers may be interested in buying products from categories on sale, so these kinds of offers may not attract them.
Storewide discounts vs category discounts
Storewide discounts attract a wider audience than category-specific ones and are great for boosting your store's overall sales. They are relatively simple to plan, set up, and promote, making them effective during huge sale events like Black Friday. The flip side is that they can reduce profit margins across all products and may devalue your brand if used too often.
Category discounts, on the other hand, target specific product lines. They allow you to strategically promote certain items without impacting your entire inventory. While this makes them great for driving sales to seasonal items or underperforming categories, it also means that you need to spend a bit more time planning, implementing, and marketing them compared to storewide sales.
Targeted promotions: User role-based discounts
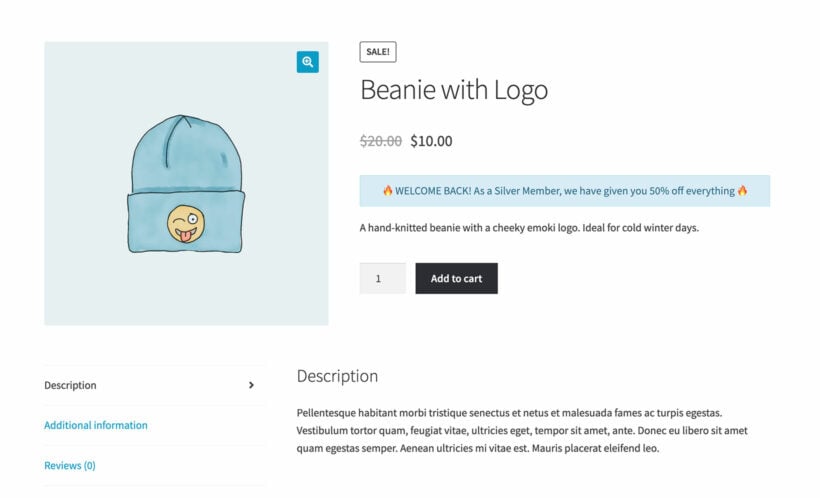
User-role discounts take the concept of "targeted" discounts to a whole new level.
User role-based discounts allow you to offer different discounts to different types of users based on their roles in your WooCommerce store, such as wholesale, retail, or VIP customers. For example, if you run a hybrid wholesale-retail store, you can offer wholesale customers a 30% discount, VIP members a 15% discount, employees a 20% discount, and new customers 10% off as a first-time order discount.
Pros of user role-based discounts
- User-role discounts are more targeted — and therefore more effective — compared to other discount strategies.
- Rewarding specific user roles, like VIP members, helps build customer loyalty and encourages repeat purchases over time.
- Offering discounts to wholesale customers ensures you don't lose out on profit from bulk purchases.
- Employee discounts are great for boosting morale and serve as a valuable perk.
Cons of user role-based discounts
- Setting up and managing multiple discount rules for various user roles takes a bit more time and effort than storewide and category-specific discounts.
Introducing the best WooCommerce cart discount plugin
A fully featured discount plugin gives you granular control over how, when, where, and what types of discounts to offer provides a competitive edge in a world filled with seasonal discounts, flash sales, and fierce competition to retain customers and reward their loyalty.
Picture a discount plugin that creates highly customised discounts and maximises profits. That’s not just a win; it's a massive win for your business and your customers.
Simon HarperFounder, SRH Design
WooCommerce Discount Manager is the best choice for setting up and managing cart discounts in your store. It's super easy to use and can implement storewide, category-specific, user-role-based discounts in minutes.
It lets you offer various types of cart-based discounts including discounts based on total spend, free products (think: buy one get one or BOGO) sales, fixed-price quantity-based discounts, conditional quantity-based discounts, etc.
An added benefit of WooCommerce Discount Manager is that it auto-applies the discounts on the cart page; no need for customers to enter coupon codes.
And because it's an all-in-one discount and dynamic pricing plugin, you can use it for product-level discount offers such as fixed amount and fixed percentage discounts.
Let's quickly explore its top features.
WooCommerce Discount Manager's key features
- You can easily create pretty much any type of cart-based discount in your store: fixed-price quantity-based discounts, conditional quantity-based discounts, buy one get one (BOGO) promotions, based on total spend, etc.
- There are options to add advanced discount rules and conditions to further control how the discounts work.
- It has a built-in scheduling option, so you can add start and end dates for promotions to ensure everything is properly set up ahead of time.
- You can add custom banners in noticeable locations on the product page and in the cart to promote the offers on the front end.
- It gives a smooth user experience — the discount is auto applied so there's no need for them to type in the coupon code when they land on the cart page.
How do I set up cart discounts in WooCommerce?
Let's look at how to create various types of cart discounts using WooCommerce Discount Manager, including discounts based on total spend, buy one get one free (BOGO), bundle offers, product combos, tiered pricing, etc.
Discount based on total spend
With this strategy, customers receive a discount when their order total reaches a certain amount. For instance, if you set a threshold of $100, customers who spend at least $100 in a single transaction will receive a discount. This type of discount is designed to encourage customers to add more items to their cart to reach the minimum spend threshold.
Benefits of discounts based on total spend
- Setting a minimum spend requirement nudges customers to buy more to reach that threshold. This boosts the average order value.
- More items in the cart mean higher sales volume. This strategy is particularly useful for moving products quickly, e.g. clearing out inventory or promoting specific product lines.
- Customers are more likely to purchase in bulk or choose higher-priced items to qualify for the discount. This can be especially beneficial for stores that sell products with high margins.
Steps to set up discounts based on total spend
- Get WooCommerce Discount Manager and add it to your site.
- Access your WordPress dashboard and go to Marketing → Discounts.
- Tap "Add New" to create a new discount based on total spend offer.
- Give the discount a name.
- Pick "Based on total spend" from the discount type modal menu.

- Mention the products eligible for this offer in the "Which products?" field, whether all products, specific products, or specific categories.
- If you picked "Selected categories" or "Selected products" previously, you can now pick the appropriate products to be part of the discount offer.
- Enter the amount required for this offer to be applied to customers' carts.
- Select whether you want a percentage or fixed amount discount applied. Then, specify the discount percentage or amount.
- Mention the user roles that are eligible for this offer in the "Applies to" field, whether selected roles, selected users, or all customers.
- Define how long the discount offer is available. Add start and end dates to schedule it or activate it immediately.
- Add custom content (text, images, shortcodes, and HTML code) to promote this discount in the "Product page content" field. Something like "Get 25% off on orders of $200 and above. No coupon code needed ✨".
- Designate the location for the custom message you typed previously to be displayed on the product page in the "Content location" field.
- Add a different custom message to the cart page in the "Cart notice" field. Here, you can add something like, "Congratulations! 🎉 We've automatically applied the discount to your order 🎉!"
- Tap "Save" to save the discount based on total spend offer.
That's all! Now head to the front end and test things out to be sure things work as expected.
Free products: BOGO
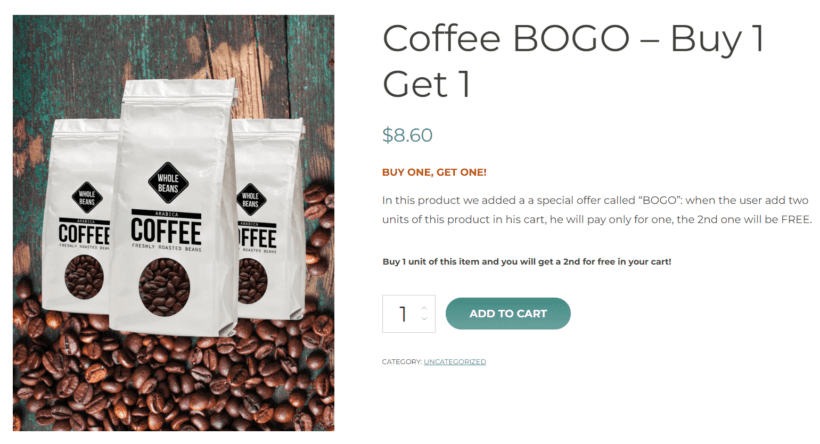
With the "Buy One, Get One" aka BOGO strategy, customers receive a second product for free when they purchase a specified item.
Benefits of BOGO promotions
- BOGO offers are highly appealing. People love getting something for free, so this is a great way to drive traffic and sales to your store.
- When done right, offering a free or discounted product increases the perceived value of the purchase. This can give customers the impression that they are getting more for their money.
- Like discounts based on total spend, BOGO promotions can help you clear out excess stock or promote new products by pairing them with popular items.
Pro tip: You can join forces with complementary brands to offer cross-brand bundle discounts. For example, if you sell fitness clothing, you can partner with a nutritional supplement brand to offer a free gift or sample product with every purchase. This not only boosts sales but also introduces customers to new products from both brands. Check out this detailed guide for more information.
Steps to set up BOGO promotions
- Get WooCommerce Discount Manager and add it to your site.
- Access your WordPress dashboard and go to Marketing → Discounts.
- Tap "Add New" to create a new buy one get one (BOGO) offer.
- Give the discount a name.
- Select "Free product" from the discount type modal menu.
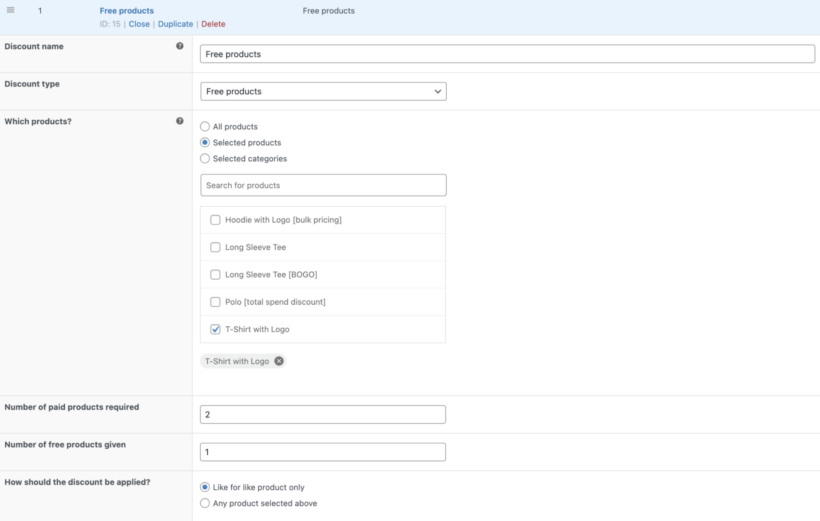
- Specify the products eligible for this offer in the "Which products?" field, whether all products, specific products, or specific categories.
- If you selected "Selected categories" or "Selected products" previously, you can now pick the appropriate products to be part of the discount offer.
- Enter "1" in the "Number of paid products required" field.
- Enter "1" in the "Number of free products given" field.
- Specify whether the offer applies to similar products or other products that are part of the offer in the "Which products?" field.
- Add the user roles eligible for the discount in the "Applies to" field, whether selected roles, selected users, or everyone.
- Define how long the discount offer is available. Add start and end dates to schedule it or activate it immediately.
- Add custom content (text, images, shortcodes, and HTML code) to promote this discount in the "Product page content" field. Here, you can add "Sale alert: 🤑 Buy one get one free offer on this item. No coupon code needed✨".
- Choose from six different locations on the product page to display the custom message you typed previously in the "Content location" field.
- Add a different custom message to the cart page in the "Cart notice" field. Here, you can add, "🎉 We've added your free product to your cart, enjoy 🎉!"
- Tap "Save" to save the BOGO offer.
That's all! Now head to the front end and test things out to be sure things work as expected.
Quantity discount: Fixed price
Fixed-price quantity discounts let customers buy a certain quantity of a product for a fixed price. This encourages bulk purchases and simplifies the pricing structure for customers. For instance, if your WooCommerce store sells clothing, you can offer customers a "Buy 3 t-shirts for $50" deal.
Benefits of fixed-price quantity discounts
- This strategy encourages customers to buy more items to take advantage of the discount. This promotes bulk purchases.
- Setting a quantity threshold increases the average order value as customers add more products to their cart to be eligible for the fixed-price deal.
- Fixed-price discounts are pretty straightforward, making it easier to communicate the value of the discount offer to customers.
Steps to set up bundle offers
- Get WooCommerce Discount Manager and add it to your site.
- Access your WordPress dashboard and go to Marketing → Discounts.
- Tap "Add New" to create a new fixed price discount.
- Give the offer a name.
- Select "Buy X products for a fixed price" from the "Discount type" dropdown.

- Specify the products eligible for this offer in the "Which products?" field, whether all products, specific products, or specific categories.
- If you selected "Selected categories" or "Selected products" previously, you can now pick the appropriate products to be part of the discount offer.
- Update the number of items customers must add to their carts to qualify for the discount in the "Quantity required for discount" field.
- Enter the price for the bundle of items in the "Fixed price" field.
- Add the user roles eligible for the discount in the "Applies to" field, whether selected roles, selected users, or everyone.
- Define how long the discount offer is available. Add start and end dates to schedule it or activate it immediately.
- Add custom content (text, images, shortcodes, and HTML code) to promote this discount in the "Product page content" field. Here, you can add "Flash Sale: 🤑Buy 3 t-shirts for $100. No coupon code needed✨".
- Choose from six different locations on the product page to display the custom message you typed previously in the "Content location" field.
- Add a different custom message to the cart page in the "Cart notice" field. Here, you can add, "🎉 Congrats! You've saved money in our sale - complete your purchase before midnight when the sale ends 🎉!"
- Tap "Save" to save the bundle offer.
Good job! You've added the tiered price discounts to your WooCommerce store. Now head to the front end and test things out to be sure everything works as expected.
Quantity discount: Conditional
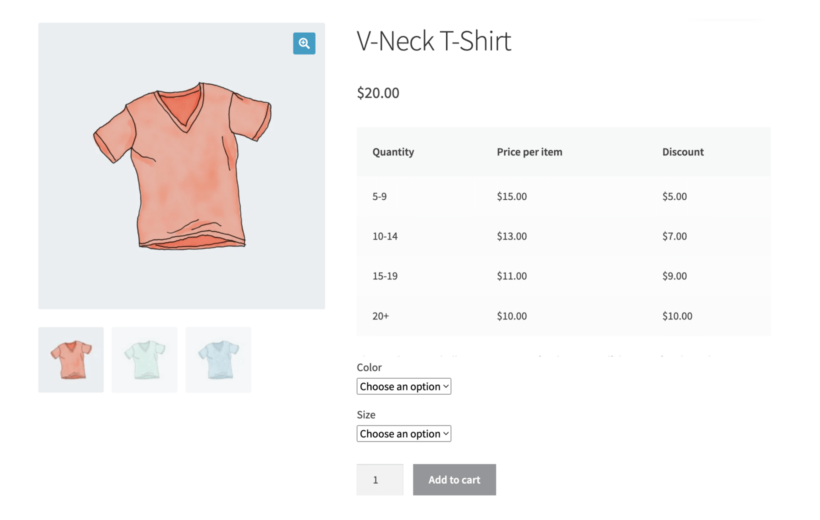
Conditional quantity discounts (also known as tiered price discounts) are a pricing strategy where customers receive progressively larger discounts as they purchase higher quantities of a product. This means that the more they buy, the greater the discount per unit. For instance, the screenshot above shows the tiered discounts for t-shirts in a clothing store as follows (note that the discount is per item): 1-4 t-shirts: No discount; 5-9 t-shirts: $5 off; 10-14 t-shirts: $7; 15-19 t-shirts: $11; 20+ t-shirts: $10.
Benefits of conditional quantity discounts
- Offering bigger discounts for larger order quantities gives customers an incentive to buy more items to reach the next discount tier. So it's a great way to increase the total purchase volume.
- As customers add more items to their cart to benefit from higher discounts, the average order value goes up. This leads to increased average order values (AOV).
- Tiered pricing provides a clear and straightforward bulk pricing structure. This makes it easier to show customers how much they're saving when they buy in bulk.
Steps to set up conditional quantity discounts
- Get WooCommerce Discount Manager and add it to your site.
- Access your WordPress dashboard and go to Marketing → Discounts.
- Tap "Add New" to create a new discount.
- Name the conditional quantity discount offer.
- Select "Bulk Pricing" from the "Discount type" dropdown.
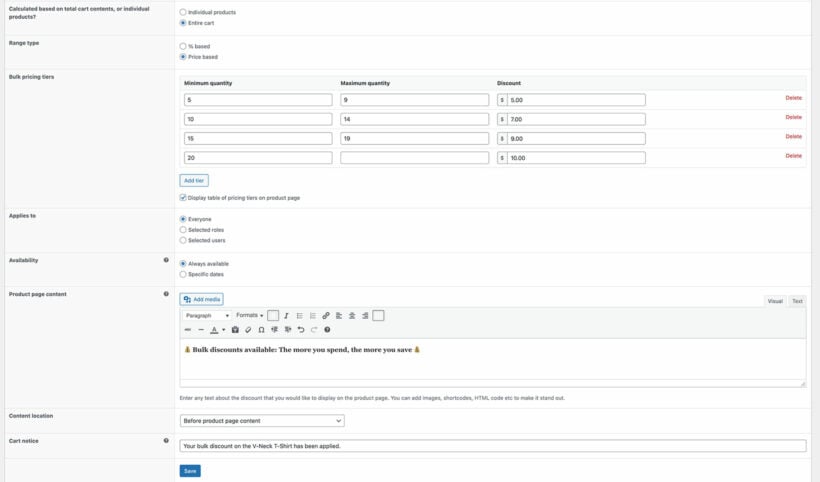
- Specify the products eligible for this offer in the "Which products?" field, whether all products, specific products, or specific categories.
- If you selected "Selected categories" or "Selected products" previously, you can now pick the appropriate products to be part of the discount offer.
- Specify whether the discount offer should apply to the entire cart of individual products. So, for instance, if you offer the bulk discount on purchases with a minimum quantity of 6 products and choose "Individual products" here, customers must add at least 6 units of each product to qualify for the discount. They can't add multiple products to reach the minimum qualifying quantity.
- Decide whether you want to offer a percentage or a fixed amount for the bulk discount offer.
- Next, update the bulk price tiers. Feel free to add as many as you like, and make sure there's no overlap in the minimum and maximum quantities.
- Add the user roles eligible for the discount in the "Applies to" field, whether selected roles, selected users, or everyone.
- Define how long the discount offer is available. Add start and end dates to schedule it or activate it immediately.
- Add custom content (text, images, shortcodes, and HTML code) to promote this discount in the "Product page content" field. Here, you can add "🤑Bulk discounts available. The more you buy, the more you save✨!".
- Choose from six different locations on the product page to display the custom message you typed previously in the "Content location" field.
- Add a different custom message to the cart page in the "Cart notice" field. Here, you can add "🎉 Your bulk discount has been applied. Complete your order to lock in the discounts 🎉!"
- Tap "Save" to save the tiered discount offer.
Good job! You've added the tiered price discounts to your WooCommerce store. Now head to the front end and test things out to be sure everything works as expected.
Best practices for maximum sales impact
These tips will help you plan and implement effective cart discount campaigns in your WooCommerce store.
Use discount schedules
Discount schedules are exactly what they sound like...specific times and dates for your discounts to start and end. This lets you plan and automate your sales in advance and makes sure that discounts are applied and removed exactly when you want. Most stores typically schedule promotions around:
- Major holidays like Christmas, New Year’s, and Easter.
- Special events like Black Friday and Cyber Monday.
- Weekends, starting from Friday night all through Sunday.
- End-of-season sales, for example, discounts on winter clothing as spring approaches.
Benefits of scheduling discount offers
- Scheduling discounts during peak shopping times, like holidays or special events, helps you capitalize on the increased traffic and consumer spending.
- Scheduling discounts allows you to plan your sales strategy well in advance. This helps avoid errors and reduces the stress of last-minute changes.
- Planning and schedules discount offers in advance gives you time to coordinate your marketing efforts — email campaigns, social media posts, and ads — more effectively.
Promote your sales using banners
Visibility is key. If customers aren't aware of your discounts, they won't take advantage of them. That's where banners on the product page come in. WooCommerce Discount Manager lets you add custom messages to be displayed on prominent locations on the product detail pages of items that are eligible for the offer.
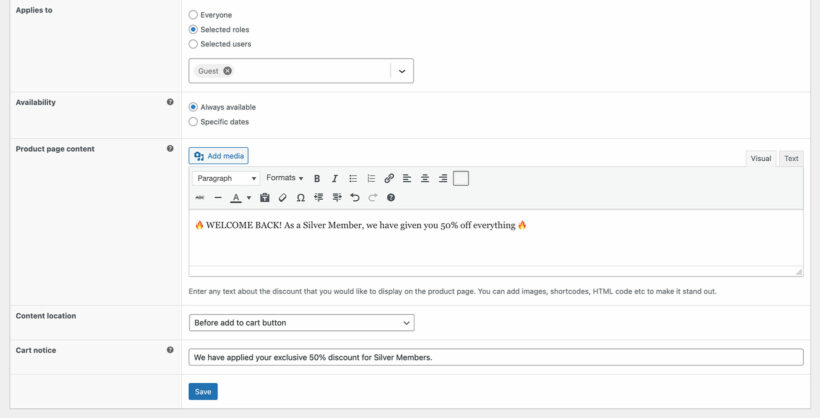
These custom banners, together with the default WooCommerce sale badge are super effective at directing shoppers' attention to the items on sale.
Monitor and analyze performance
You need to track and analyze key metrics to see what’s working and what’s not. This allows you to adjust your discounting strategy for future promotions. For example, if a certain type of cart discount offer performs better, e.g., buy one get one free offers, you can choose to focus more on those types in the future. Or you can use your findings on the best-performing times and dates to plan and schedule future discounts.
Key metrics you should track when running WooCommerce cart discount offers
- Sales: This is probably the most obvious metric to monitor. Keep an eye on how your sales numbers change during discount periods. Are you selling more products? Is revenue increasing?
- Cart abandonment rate: Track how often customers add items to their cart but don’t complete the purchase. Cart discounts should reduce your cart abandonment rate. If it's still high, it might mean that your discounts aren’t compelling enough or that there are issues in the checkout process.
- Average order value (AOV): The AOV measures the average amount spent per order. Ideally, you should expect to see higher AOV during promotional offers because they encourage customers to buy more items or higher-value products.
- Conversion rate: This measures the percentage of visitors to your site who make successful purchases. Higher conversion rates during discount periods indicate that your offers and promotional efforts are effective.
- Customer acquisition cost (CAC): Track the cost of acquiring new customers during discount promotions. Lower CACs during discount periods are a promising sign that your offers are more efficient at attracting customers.
- Return on investment (ROI): Compare the revenue generated from the discount to the costs associated with it, including marketing expenses, to make sure you're not losing money.
Tips to analyze metrics from cart discount promotions
Keep these tips in mind while reviewing and analyzing discount metrics:
- Compare the key metrics during discount periods to other periods. This shows you the direct impact of your discounts.
- Look for patterns over time to identify key trends. For example, do certain types of discounts consistently lead to higher sales or lower cart abandonment rates?
- Break down key metrics that matter most to your business by customer segments. See how different groups (e.g., new vs. returning customers) respond to discounts.
- Evaluate whether the timing of your discounts affects their success. For example, do weekend sales perform better than weekday sales?
- Take into account external factors like holidays, competitor activities, and market trends that might influence your metrics.
Add WooCommerce cart discounts to your store today!
Cart discounts are a proven tactic to nudge customers toward completing their purchases and boost revenue in your online store.
With WooCommerce Discount Manager, it only takes a few minutes to create various kinds of cart discounts — buy one get one (BOGO) offers, bundle offers, tiered discounts, discounts based on total spend, and more. (It's an all-in-one discount slash dynamic pricing plugin, so it offers product-level discounts like percentage and fixed discounts too.)
Everything takes only a few minutes to set up. Plus, it applies the discounts automatically when customers reach the cart page; they won't even have to enter coupon codes.
Add WooCommerce Discount Manager to your store and create your first cart discount in minutes!