How to create custom post types in WordPress (step-by-step)

Every WordPress site comes with the default post and page post types. While they are fine for small websites, they're not enough for large sites. This is where the WordPress custom post type comes in. In this tutorial, I’ll provide a simple step-by-step guide to creating, managing, and displaying custom post types.
A post type is essentially a way to categorize your website's content into distinct and meaningful groups. Whether it's portfolio projects, events, products, or anything else, you can create and use custom post types to keep different types of content separate. This makes it easier for you to manage and display your content in a more organized and meaningful way. Custom post types are incredible - they transform WordPress from a basic blogging platform to a powerful Content Management System (CMS) that can be customized to meet the needs of any website 🚀
Custom post types are helpful, but they can be a bit confusing. On top of that, custom fields and taxonomies can further complicate things for new users. But don't worry - by the end of this tutorial, you'll have a clear understanding of WordPress custom post types, taxonomies, and fields. You'll also know how to create a post type in WordPress with the free Easy Post Types and Fields plugin, and how to display them on your website with Posts Table Pro.
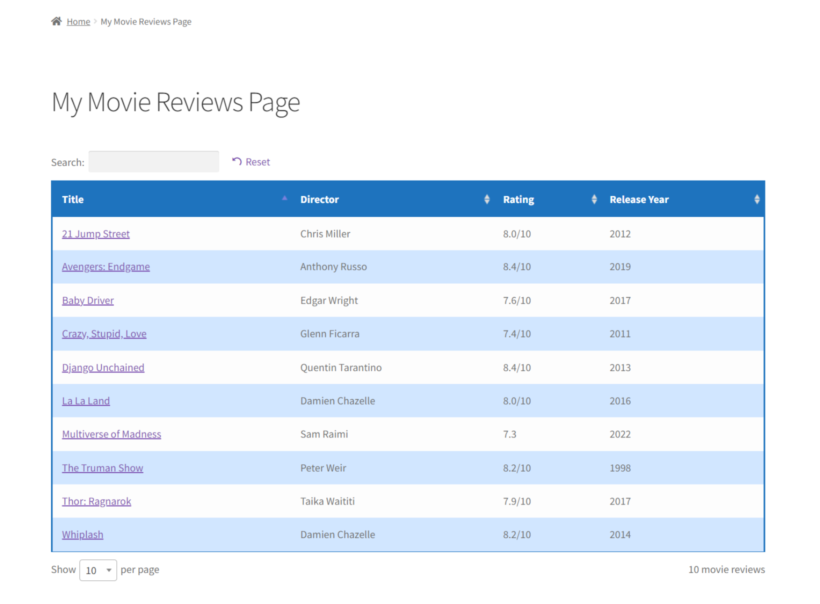
How to create a custom post type with a WordPress plugin
The free Easy Post Types and Fields plugin makes it easy for beginners or developers to create custom post types in WordPress. You can also use it to add extra data to your post types by creating custom taxonomies and custom fields. Its CPT UI will walk you through the entire process step-by-step.
1. Install the Easy Post Types and Fields plugin

To create custom post type in WordPress, we need to first install the Easy Post Types and Fields plugin:
- In your WordPress admin area dashboard, go to Plugins → Add New.
- Search for the Easy Post Types and Fields plugin by Barn2, and then install and activate it.
Once the plugin is activated on the website, the custom post type creation wizard will load automatically.
2. Create custom post type with the wizard
- Firstly, give your WordPress custom post type a singular and a plural name. For example, if you are creating a movie review custom post type then the names can be:
- Singular name: Movie Review
- Plural name: Movie Reviews
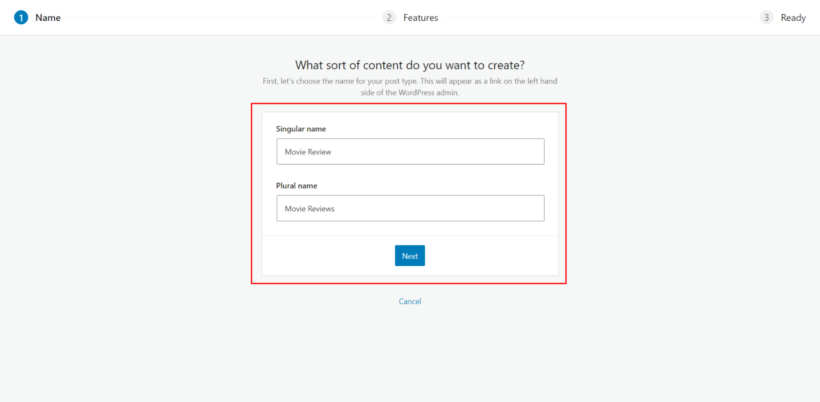
- Now select all the data/attributes that you plan to store for the custom post type:
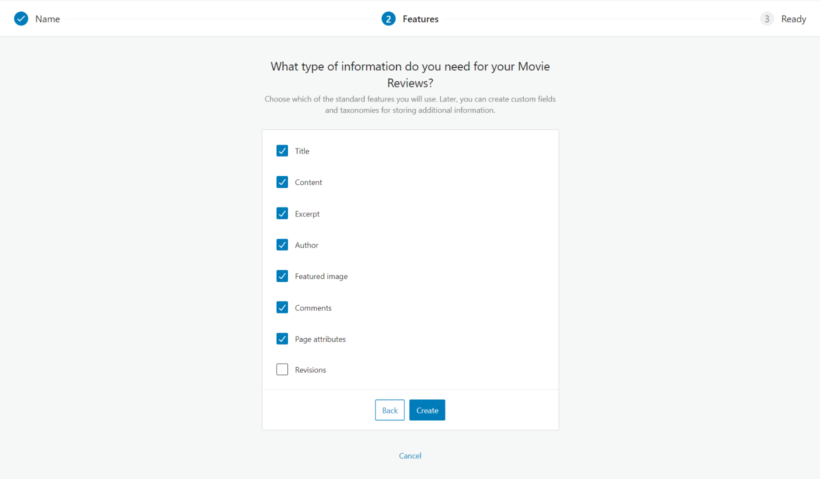
And that's it! You've successfully created your first custom post type 🎉
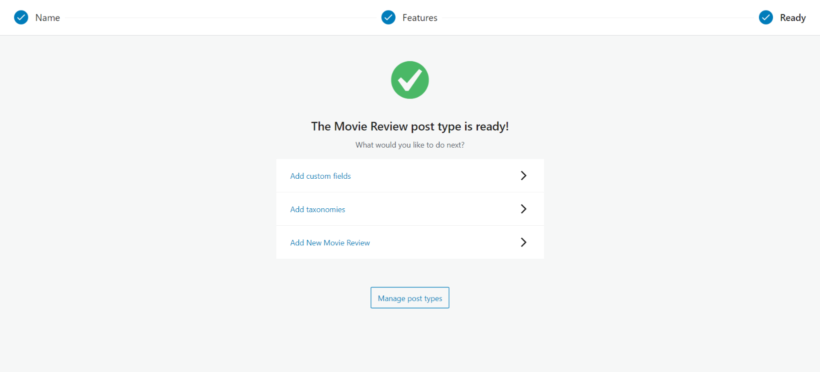
3. Add content/posts to custom post type
In step 2 of the custom post type creation wizard, you choose which standard WordPress fields to enable for the post type. If you like, then you can extend it further by adding custom fields and custom taxonomies.
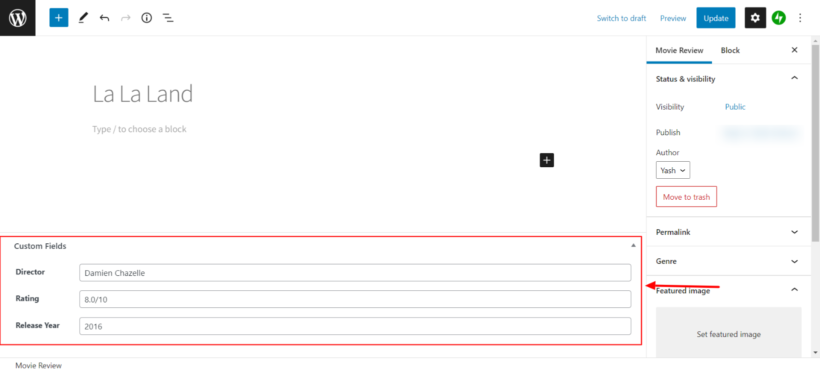
A custom field is useful for storing unique data about each custom post. In contrast, you should use custom taxonomies to group the post types by particular data. For example, our 'Movie Reviews' post type might have a custom field for 'Release date' and a custom taxonomy for 'Genre'.
How to add custom fields or taxonomies to a custom post type:
- Go to Post Types → Manage.
- In the Action column, click on the Custom Fields or Custom Taxonomies button for the custom post type.
- Now click on Add New and enter the details of the new custom field or taxonomy, such as Name, Slug, and Field Type.
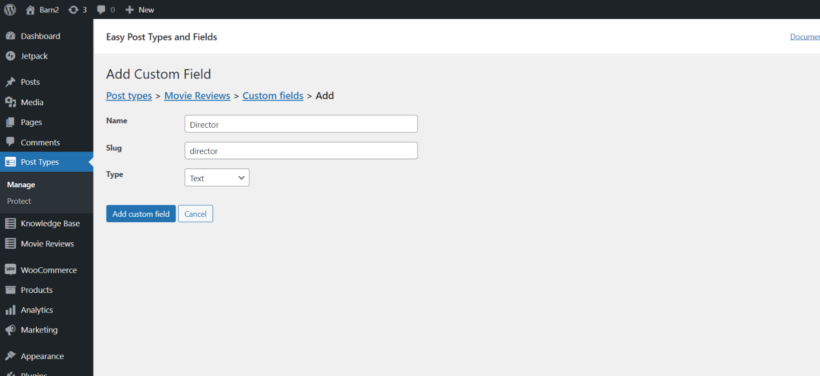
I added three custom fields to the Movie Reviews post type:
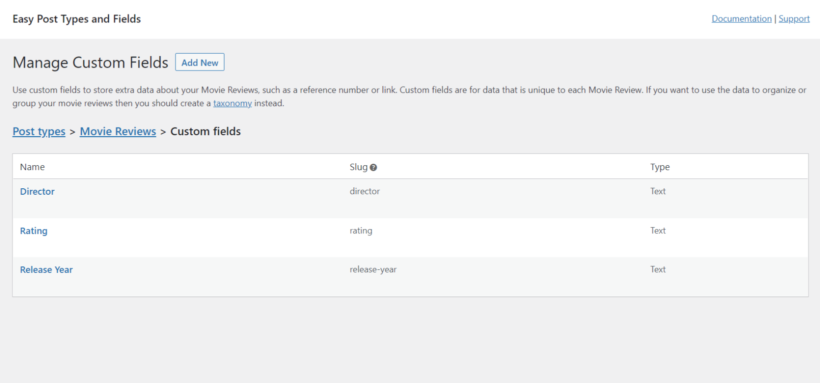
4. Adding content/posts to the custom post type
Now you're ready to start adding and organizing content to the custom post type.
In the WordPress dashboard, hover over the post type name and click on Add New. Enter the details for your post type and select taxonomies to organize the content.
Repeat this process for every new post. Once you are done, you can view the custom post type posts by clicking on the Post Type name in the WordPress dashboard. The content/pages for the post type I created for this tutorial (Movie Reviews) look like this:
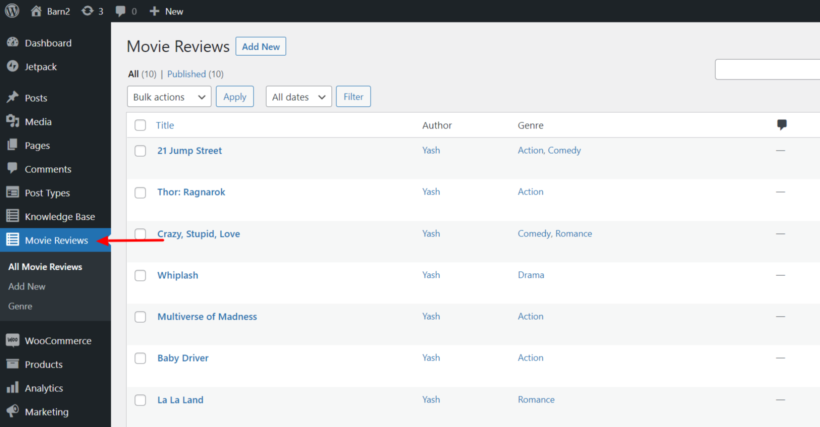
Now you have finished the add post type WordPress process, the next step is to display the posts in a searchable table on the front end of your website. But first, I'll show you the steps to create a custom post type in WordPress without using a plugin. (Just in case you want to do that!)
How to create a WordPress custom post with code
It's also possible to create custom post types in WordPress by writing custom code. This is commonly referred to as "manual creation" because it involves writing and injecting PHP and custom CSS codes to create a custom post in WordPress. To get started, you'll need to know how to write code, understand the functions.php file, and be familiar with the default WordPress API and args. If you don’t know how to do this then you should use the plugin method described above, instead.
How to create a custom post type in WordPress programmatically
To create a WordPress custom post type programmatically, you will need to use the register_post_type function, which is part of the WordPress core. This takes an array of arguments to determine the properties of the custom post type, such as additional labels, descriptions, navigation menu icons, and more. In the case of the "Movies" custom post type, you can add even more options such as support for revisions, featured images, and custom fields, and associate it with a custom taxonomy. This way, you can create a custom post-type UI that has all the features and functionalities you need.
Here’s an example code snippet which would create a custom post in WordPress called 'Movies':
function create_movie_post_type() {

register_post_type( 'movies',

array(

'labels' => array(

'name' => __( 'Movies' ),

'singular_name' => __( 'Movie' )

),

'public' => true,

'has_archive' => true,

'menu_icon' => 'dashicons-video-alt3',

'supports' => array( 'title', 'editor', 'thumbnail' )

)

);

}

add_action( 'init', 'create_movie_post_type' );
This example uses the create_movie_post_type function to register the custom post type. The add_action is used to attach the function to the init action hook, which is triggered when WordPress initializes.
The register_post_type function takes an array of arguments that specify the properties of the custom post type. Some of the key arguments are:
- labels: an array of labels for the custom post type, including the name and singular name.
- public: a boolean value indicating whether the custom post type should be publicly accessible or now.
- has_archive: a boolean value indicating whether the custom post type should have an archive page or not.
- menu_icon: the icon to be used for the custom post type in the WordPress admin menu.
- supports: an array of features that the custom post type should support, such as title, editor, and thumbnail.
How to display custom post types with Posts Table Pro
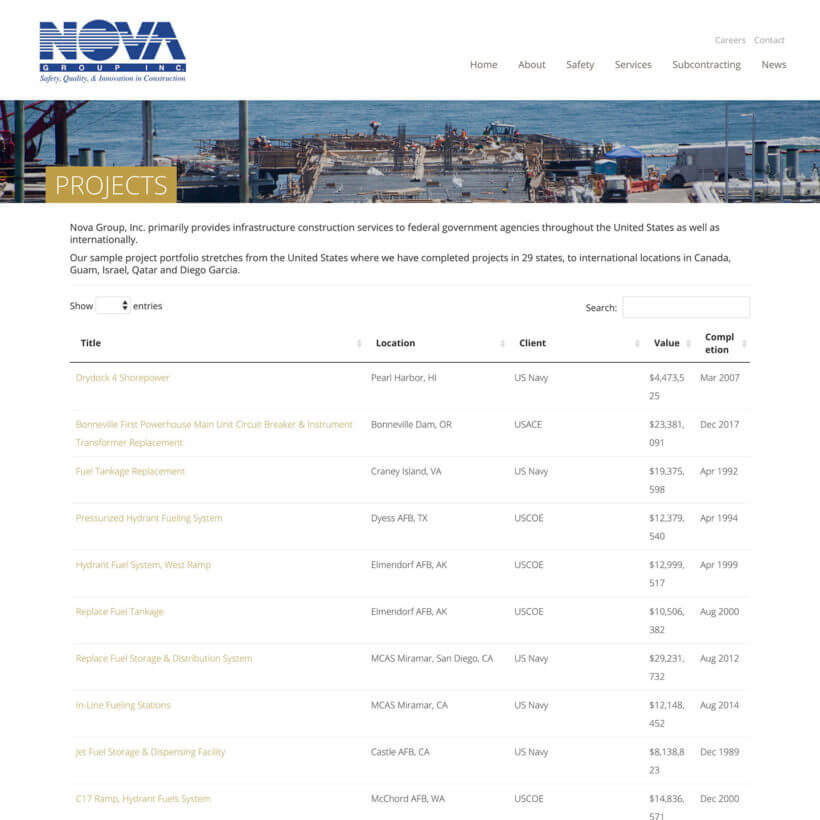
So far, you've learned 2 methods to create a WordPress custom post type. But that's no use because they don't appear on your website yet! Next, you need to actually list the custom posts on the front end.
Posts Table Pro is a powerful plugin that enables you to display any published website content in a structured, tabular format. It gives you complete control over how to list custom post types in WordPress. Visitors can quickly search, sort and filter the list of custom posts to find exactly what they're looking for.
For instance, if you have created a custom post type for movie reviews and you want to display the data for movie reviews, you can create a table that only displays the content of the movie reviews custom post type:

1. Display custom post type data in a searchable table
When you install Posts Table Pro, a setup wizard will launch automatically to guide you through the process of creating your first custom post type table:
- Begin by naming your table and selecting the post type you want to display. If you don't have a content type yet, you can create one using the free Easy Post Types and Fields plugin.
- Next, choose which movies or pages to include. The options available will depend on the post type that you selected in the previous step. For example, if you selected a post with custom taxonomy then the relevant taxonomies will be listed for you to choose from.
- Customize the table to your liking. You can choose which columns to display and in what order. To add a new column, select the column type from the dropdown menu and click "Add". You can also reorder the columns by dragging and dropping the sort icon or column heading.
- Add filters to make it easier for users to find what they're looking for - for example, custom taxonomy filters. For example, if you've sorted your movie reviews by genre, you can add a filter for that. The filters appear as dropdowns above the table, and you can add as many as you like. Note that the available filter options will change depending on the post type you selected on the first page.
- Enable lazy loading to speed up the table's performance. This lets you list hundreds or thousands of custom posts.
- Customize the sorting options for the list of custom post types.
- Finally, the wizard will confirm that you've finished creating the table and provide instructions for inserting it onto your site.
FAQ
What are WordPress custom post types?
If you haven't created one before, then it's natural to wonder "What is custom post type in WordPress?"
A WordPress custom post type is a type of content on your website. It allows you to store and organize information separately from other types of content.
Think of post types as buckets of information where website owners can store and organize their custom content. Each bucket/post type is different from others in nature and is built to serve a different purpose.
WordPress itself comes with a couple of default post types.
- Page
- Post
- Media
- Attachments
Post types such as pages and posts are set up automatically with every website, and you can use them to differentiate blog post content from web page content. Some plugins and themes also come packaged with their own post types, such as the 'Product' post type that is automatically installed with WooCommerce for building ecommerce websites.
You can also create your own custom post types (CPT) to organize a website's custom content more strategically. For example, if you have a book review website, then you can create a 'Reviews' post type to store the movie reviews.
To further structure the content, every custom post type can have custom taxonomies and custom fields.
By combining multiple custom post types, fields, and taxonomies, you can smartly organize the content on your website.
What's the difference between default and custom post types?
Default post types are part of WordPress itself: posts, pages, comments, and media library attachments.
A custom post type is very similar, but has been added separately and isn't part of WordPress itself. Custom post types include ecommerce products, events, testimonials, projects, and just about anything else you can think of 🚀
Why should I use custom post types?
If you're using WordPress to add more than just pages and posts, then creating custom post types will help:
- They make your life easierEach custom post type has its own dedicated section within the WordPress admin. This helps you to keep different types of content separate and to stay organized.
- They add flexibilityWhile all post types look similar in the back end, you can display them in very different ways in the front end. For example, you can apply different templates to specific post types - e.g. to have a custom design for your 'Portfolio' pages which is different from your blog posts. You can also use custom taxonomies to group items within a particular post type. You can then use the Posts Table Pro plugin to allow visitors to filter by this taxonomy, without mixing the results up with your other content types.
How do I create multiple custom post types in WordPress?
Creating multiple custom post types in WordPress is not much different from creating a single custom post type. You just need to repeat the steps multiple times to create different post types. Here is some step you can follow to create multiple custom post types in WordPress:
- Define the custom post type arguments: Just like creating a single custom post type, you need to define the arguments for each custom post type you want to create. These arguments include labels, descriptions, menu icons, and other related parameters.
- Register the custom post type: Once you have defined the arguments for each custom post type, you can register them using the 'register_post_type()' function. The function should be called multiple times, each time with different arguments for each custom post type.
- Save the code: The code should be saved in the theme's functions.php file or a custom plugin. You can also create a child theme and add the code there if you want to keep your custom post types intact even after theme updates.
- Check the custom post types: After saving the code, you can check if the custom post types are successfully created by visiting the WordPress dashboard and checking the Posts section. You should see your custom post types listed there.
That's it! By following these steps, you can create as many custom post types as you need in WordPress. It is important to note that you should have a basic understanding of PHP and WordPress API to implement this process successfully. If you're not comfortable with coding you can use a WordPress plugin to create multiple custom post types.
How to restrict access to WordPress custom post types

WordPress itself lets you mark each individual custom post as private or password protect it. However, there's no way to restrict access to entire custom post types or their categories.
You can do this with the Password Protected Categories plugin. Use it to restrict access to any or all of your custom post type categories and taxonomies.
Start creating custom post types today!
WordPress custom post types are the best way to keep different types of content separate. You can easily create them with the free Easy Post Types and Fields plugin.
Once you've done that, it's important to list custom posts in a way that makes them easy for visitors to find. The Posts Table Pro plugin is perfect for this. It takes your custom post types and displays them in a searchable, sortable table with filters like this:
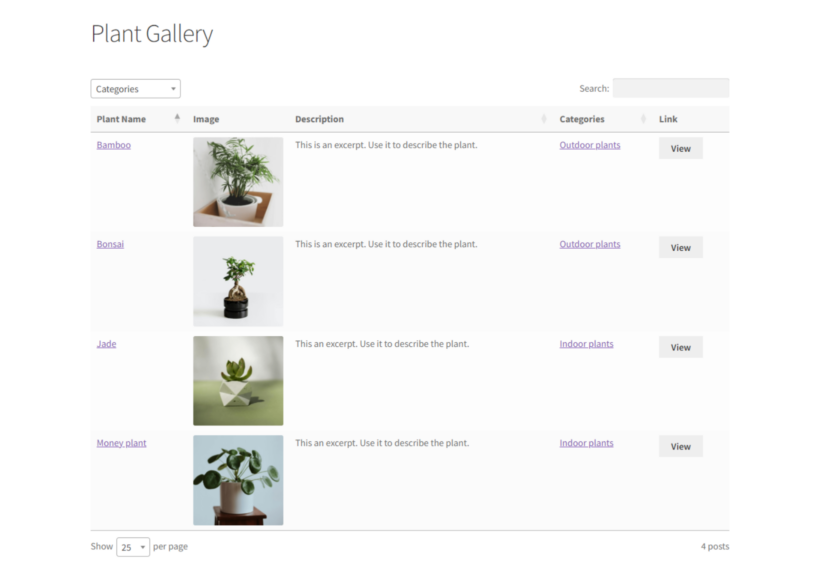
Posts Table Pro lets you:
- Display posts, pages, or any other custom post types in tabular format.
- Show content based on custom fields and taxonomies.
- Allow visitors to filter, sort, and perform quick searches.
- Use shortcode flexibly to display limited data.
- Display custom field content as table columns.
Create a custom post type today and display it with Posts Table Pro. And if you have any questions about our custom post type WordPress tutorial, let us know in the comments section below 😀
2 Comments
How i can add category for the custom type?
Hi, Pawel. Thanks for your comment. For a custom post type, you can add/create categories as custom taxonomies (which you can see mentioned in this article). I hope this helps. Please let me know if you have any more questions. You can also get in touch via our dedicated Support Center. For quick reference, you can browse our detailed and extensive plugin Knowledge Base articles and tutorials. Cheers.