Custom taxonomies in WordPress: A guide (2024)

Are you looking for an easy way to create custom taxonomies in WordPress? Every WordPress website comes with two taxonomies: categories and tags. If you want to further organize the content on your website, this easy step-by-step guide will help you create, display, and filter by a custom WordPress taxonomy.
What Is Taxonomy in WordPress? WordPress taxonomies have made structuring and grouping content effortless for most of us. But there can be instances where having custom taxonomies can help structure the content more effectively.
For example, if you have a niche website, such as a Book review site, you can have ‘Book Types’ as a taxonomy for filtering content. You can also add custom sub-taxonomies such as Classics, Fantasy, or thrillers’ to further structure the content on your book review site.
In this guide, you'll learn:
- What are custom taxonomies?
- How to create custom taxonomies with new custom post types.
- How to create WordPress custom taxonomy for existing post types.
- Creating hierarchical and non-hierarchical taxonomies.
- How to display custom taxonomies on the website.
- How to allow website visitors to filter and sort content by taxonomy filter.
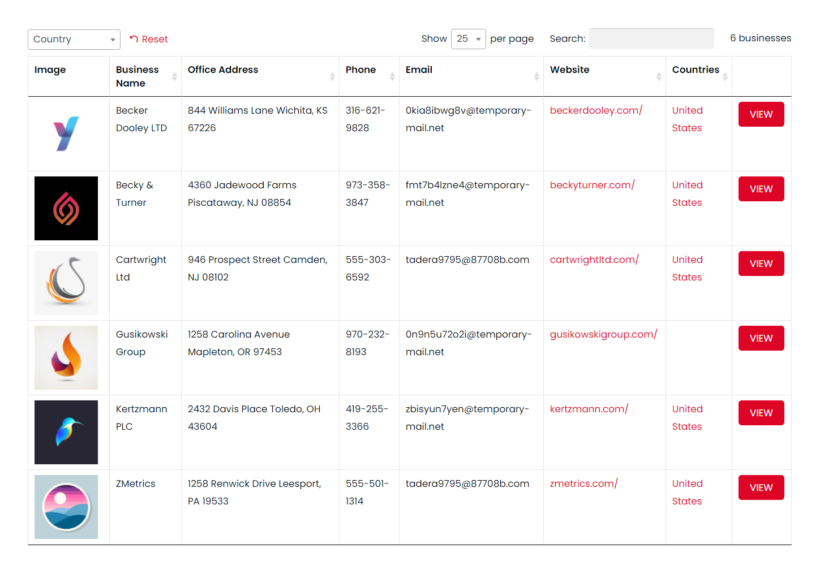
By the end of this tutorial, you’ll be able to create custom taxonomies and custom post types and display them to visitors like this:
If you are a beginner WordPress user, custom taxonomies can be a little confusing. Let’s start with that.
What are custom WordPress taxonomies?
A WordPress taxonomy is a way to organize and structure the content on your website. Just like how taxonomy (as a field of study) has helped biologists classify and group biological organisms, WordPress custom taxonomy function helps organize the content on a WordPress site.
By default, every WordPress site has two taxonomies:
- Categories
- Tags
You can use them to group or structure blog posts and pages on your website fairly quickly.

While these might be sufficient to manage and structure content type on a standard website, they can be pretty limiting if you wish to further categorize and diversify your WordPress content.
For example, if you have a movie review website, you can add ‘Genre’ as a custom taxonomy. Your visitors can directly check your reviews of the movies in that particular genre. Based on your website's content, these genres can be horror, action, drama, thriller, adventure, etc.
Custom taxonomies can be hierarchical too. This means your WordPress custom taxonomy terms can have sub-categories to further define the website’s content type structure.
The movie review website example can have a category like ‘Action’, which can further have sub-categories like ‘Disaster Movies’, ‘Superhero Movies’, or ‘Spy Movies’. This is what the structure can look like:
- Action (Parent taxonomy)
- Disaster action movies (sub taxonomy)
- Superhero action movies (sub taxonomy)
- Thriller (Parent taxonomy)
- Crime thriller movies (sub taxonomy)
- Psychological thriller movies (sub taxonomy)
- Comedy (Parent taxonomy)
- Slapstick comedy (sub taxonomy)
- Parody comedy (sub taxonomy)
Now that we know what WordPress custom taxonomy means. Let’s see how you can create them.
What are the benefits of custom taxonomies in WordPress?
Custom taxonomies in WordPress provide several benefits, including:
- Better content organization: Custom taxonomies allow you to categorize your content in a way that makes sense for your website, rather than relying on WordPress's default categories and tags.
- Improved user experience: By grouping related content under specific taxonomies, it makes it easier for your website visitors to find what they are looking for and navigate your website with ease.
- Increased relevance: Custom taxonomies can help you to create more relevant and targeted content by allowing you to categorize content by specific topics, genres, or themes.
- Improved SEO: Custom taxonomies can help your website's search engine optimization (SEO) by providing a more structured and organized way of categorizing your content. This makes it easier for search engines to understand the structure and content of your website.
- Enhanced customizability: Custom taxonomies give you the ability to create custom templates and styles for your taxonomy archives, providing you with a greater level of control over how your taxonomies are displayed on your website.
Custom taxonomies are a powerful tool that can help you to better organize and structure your content, improve user experience, and enhanced the overall look and feel of your website.
Step 1: How to create custom taxonomy in WordPress
WordPress is quite flexible, and for creating custom taxonomies, you get a few alternatives. Broadly, here are the two ways to create custom WordPress taxonomies.
- Creating custom WordPress taxonomies with a free plugin (for non-developers)
- Creating custom WordPress taxonomies with code (for developers)
Let’s discuss both of these in more detail.
How to create custom taxonomy with a plugin (no-code way)
You can easily create custom WordPress taxonomies with a WordPress plugin.
There are many popular WordPress taxonomy plugins for creating custom post types and taxonomies like Custom Post Type UI Plugin. For this WordPress tutorial, we’ll be using the free Easy Post Types and Fields plugin to create your own custom taxonomies.

We designed this plugin with the aim to make the process of creating custom post types and taxonomies more simplified. Additionally, with the Easy Post Types and Fields plugin, you can do the same in minutes. It doesn't require touching a single line of code snippet.
Setting up taxonomies with a plugin is better as it takes less time to set up. Additionally, it never leads to any coding-related issues. When you opt to go with the codeless route, it’s easier for someone else to understand the system and make future adjustments.
You can easily avoid such issues with the Easy Post Types and Fields plugin. So, let’s see how you can set it up.
Installing Easy Post Types and Fields plugin
To install the Easy Post Types and Fields plugin, follow these steps:
- Login to your WordPress admin dashboard and go to Plugins → Add New.
- Now search for ‘Easy Post Types and Fields’ in the search bar. Locate the plugin and make sure you see the author as ‘By Barn2’. If you can’t locate the plugin, you can download it from WordPress.org and upload it to your WordPress website.
- Once the plugin is installed, click on the Activate button.
After activating the plugin, you’ll be redirected to the setup wizard. If you wish to create custom post types, you can use this wizard. But if you wish to just create custom taxonomies, you can click on the Skip Setup Wizard link.

Creating custom caxonomies with Easy Post Types and Fields plugin
With the Easy Post Types and Fields Plugin, you can create custom taxonomies for existing post types (categories and tags). Or you can create custom post types alongside creating new custom taxonomies.
Let’s check out both of them one by one.
How to create custom taxonomies with a new custom post type
In this scenario, we'll create a new post type and custom taxonomies for the same.
For this, you can go with the setup wizard as it covers both parts: custom post types and custom taxonomies.
Alternatively, you can follow the steps below:
- Go to Post Types → Manage in your WordPress admin dashboard.
- Click on the Add New button to add a new Custom Post Type.
- Give your post a singular name as well as a plural name. For example, Movie (Singular) and Movies (plural). Click on the Next button.
- From the checkbox list, select the type of information you want the custom post type to have. Then, click on the Create button.

Your custom post type is now ready. Now you’ll find the links to add custom fields and taxonomies.
- To create a custom taxonomy, select the Add taxonomies button.
- You’ll be redirected to the custom taxonomies page. Click on the Add New button to add a new item.
- Give your taxonomy a singular name and a plural name.
- Click on the Add Taxonomy button.

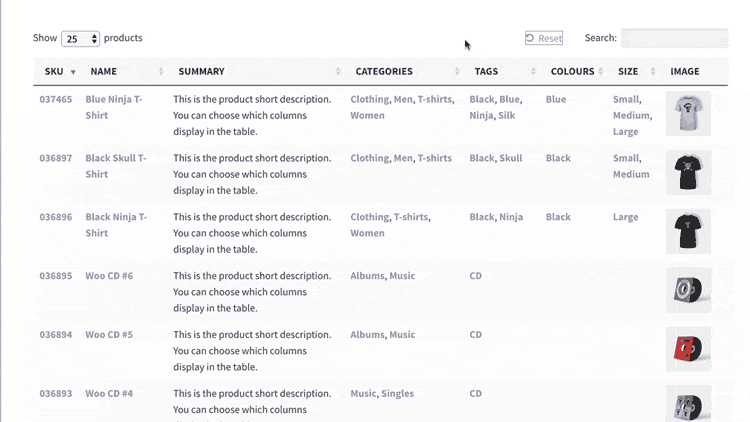
After adding custom taxonomies, it will show up on the Manage Taxonomies page of the respective custom post type. Also, it will be listed as a taxonomy for the newly created post type and will be displayed on the backend like this:

How to create custom taxonomy for existing post types
We know that WordPress has its own default post types: Categories and Tags. If you want to extend this and add custom taxonomies to existing post types, follow these steps:
- First, go to Post Types → Manage in your WordPress admin dashboard.
- Next, head over to Other Post Types by clicking on the tab. You will find this right next to the Easy Post Types tab.
- Now click on the Taxonomies button for the post type you want to update. Here I am adding a new taxonomy to Posts.

- Click on the Add New button and give it a singular and plural taxonomy name. The slug or the permalink will be autogenerated, but you can change it.
- Click on Add taxonomy button.
New custom taxonomy for existing post types is now successfully added. Now you can add individual terms for the taxonomies.
How to create hierarchical and non-hierarchical taxonomies
Hierarchical taxonomy ordering helps in further structuring content based on parent and child taxonomies.
For example, WordPress categories are hierarchical in nature. If you sell apparel on your website, you can also add sub-categories such as shirts, caps, shoes, etc. You can further bifurcate these categories into subcategories to better structure your content type. (for example, sneakers, boots, and running shoes).


Simultaneously, WordPress Tags are flat and do not follow any hierarchical order. They are usually used to label specific topics on a page. Creating hierarchical taxonomies is pretty straightforward. While adding new taxonomies, simply tick the checkbox for hierarchical taxonomy.
Additionally, you can edit taxonomies by clicking on the Taxonomies button for the respective post type. Click on the edit button for the said taxonomy, enable the checkbox, and click on the Update taxonomy button. You can check if the taxonomy terms are hierarchical or not from the manage taxonomies page. It will look like this:

Now that we have our taxonomies in place, let’s see how you can group/filter posts and display them to the website visitors with the Posts Table Pro plugin.
Step 2: How to add custom taxonomies to post tables
Even if you create a dozen taxonomies for your post types, it will have near to no effect on the website’s front end on its own. You need to display or filter posts by WordPress taxonomy to display the posts in that particular post type.

For this, we’ll be using the Posts Table Pro plugin. Posts Table Pro comes with the option to display any website content in a well-structured tabular format. Not just displaying. You can also allow your customers to sort, filter, and perform keyword searches easily.
But before we can start using the plugin, you need to install and activate it on your website. Here’s how you can do it.
Installing the Posts Table Pro plugin
If you don’t have a copy of the plugin, you can get it here.
- In your WordPress dashboard, go to Plugins → Add New.
- Upload the Posts Table Pro zip file to your website and install it.
- Once the installation is complete, click on the Activate button.
- Follow the setup wizard instructions to create your first table.
Posts Table Pro should now be active on your website.
Displaying custom taxonomy content with the Posts Table Pro plugin
The Post Table Pro plugin simplifies the process of creating tables from your WordPress posts or pages. You can use the table builder option to select the content you want to display, customize the table columns and filters, and choose sorting options.
To create a table using the Post Table Pro plugin, you have two options. First, a setup wizard will open automatically when you install the plugin, which guides you through the process of creating your first table. Alternatively, you can create new tables by going to Post Tables → Add New. The process of creating a table involves several stages, which are outlined in the following instructions.
- Start by giving your table a name and selecting the post type you wish to display. If you do not yet have a content type, you can create one using the free Easy Post Types and Fields plugin.
- Next, select the posts or pages you would like to include in the table. The available options will vary based on the post type you selected in the previous step. For instance, if you chose a post with custom taxonomy, the relevant taxonomies will be listed for you to select.
- Customize your table to suit your preferences. You can determine which columns to display and in what order. To add a new column, choose the column type from the dropdown menu and click "Add". You can also reorder columns by dragging and dropping the sort icon or column heading.
- Add WordPress custom taxonomy filters to your table to improve user experience. Filters appear as dropdowns above the table and can be customized according to your preferences.
- Enable lazy loading to improve the table's performance, even when containing hundreds or thousands of items.
- Choose how to sort the table. You can set the default sorting option and the sort direction.
- Finally, the wizard will confirm that you have finished creating your table and provide instructions for inserting it onto your site.
Displaying the table on your site
After creating your table, the next step is to decide where to display it on your website. There are two ways to add a table to your WordPress site.
- If you're using the Gutenberg block editor, you can simply select the 'Post Table' block and insert the table directly from the block settings.
- Alternatively, you can copy the shortcode from the last page of the table builder or from the main Tables page in the Post Tables section of the WordPress admin. You can then paste this shortcode on any page where you want the searchable database to appear. This way, you can place the table on any page regardless of its topic or content.
Check here to learn more about how you can use the shortcode feature of Posts Table Pro.
How to create custom taxonomy in WordPress via coding
This is for developers or someone who likes taking the technical approach to making WordPress theme customizations. With the following code, you can create custom taxonomies through coding.
To give you an idea, first, you need to register the custom function add_action in the functions.php file. Then create a new taxonomy WordPress with the register_taxonomy function with relevant parameters and args.
Since this guide is focused on non-developers, we won’t be digging deep into this approach. Here's a free tuts+ guide on creating custom WordPress taxonomies using PHP, HTML, and CSS that you can check out. If you’re unsure then I recommend using a plugin or hiring a developer on Codeable to do it for you.
Over to you!
Creating custom taxonomies is a great way to structure and organize your website content. If you have a requirement to structure your website’s content in a specific way, chances are you can do it by creating custom post types and custom taxonomies in no time. For this, the Easy Post Types and Fields plugin is just excellent. It does not require any advanced customizations and gets the job done in minutes.
Displaying structured content based on taxonomies is made simple with Posts Table Pro. This versatile plugin is not only ideal for displaying custom post types and taxonomies. At the same time, it also offers a range of customization options to help you create a content table that perfectly meets your needs.
Whether you want to showcase your portfolio, blog posts, products, or any other type of content, Post Table Pro has everything you need. Here are some of the most popular features that make this plugin so powerful:
- List and filter by custom taxonomy for posts, pages, and any other custom post types.
- Display content based on taxonomies and custom fields.
- Allow visitors to filter, sort, and perform keyword searches.
- Display any kind of content in a sleek table format.
- Control what appears in a table.
- Display filtered content with a simple shortcode.
It's great that you now have knowledge of what is taxonomy in WordPress. You also learn how to create custom taxonomies in WordPress. I hope that our new Easy Post Types and Fields plugin has been a helpful resource for you in this process.
I would love to hear your thoughts and experiences using our plugin
Have you found it user-friendly and efficient in creating custom taxonomies for your website? Please share your insights in the comments section below. Your feedback is invaluable to us and helps us improve our plugin for other users.