How to create a WordPress audio library
This tutorial will show you how to create a WordPress audio library or MP3 player using the Document Library Pro plugin. Your visitors will be able to find and play audio tracks directly in a searchable and sortable table. They can play individual audio tracks or even complete audio playlists.
Audio galleries are a popular feature of many websites. There are lots of reasons for wanting to know how to create a filterable music library or audio track directory. You may be a band, artist, composer or musician and want to display your music or sound effects on a single directory page with embedded audio. Maybe you're a CD and want to include a track listing with samples.
You might need to provide samples as part of an audio or music catalogue or directory. Perhaps you're a voiceover artist and want to create an audio track library with examples of your work. Alternatively, your site might feature audio learning materials such as recorded tutorials or lectures, foreign language classes, or podcasts.
Whatever your reason for creating a WordPress audio library, this tutorial will show you how to do it using the Document Library Pro plugin.
The perfect WordPress audio library plugin
The Document Library Pro plugin has everything you need to create a WordPress audio library. While it has 'Document' in the name, it's perfect for listing any type of resource - including audio.
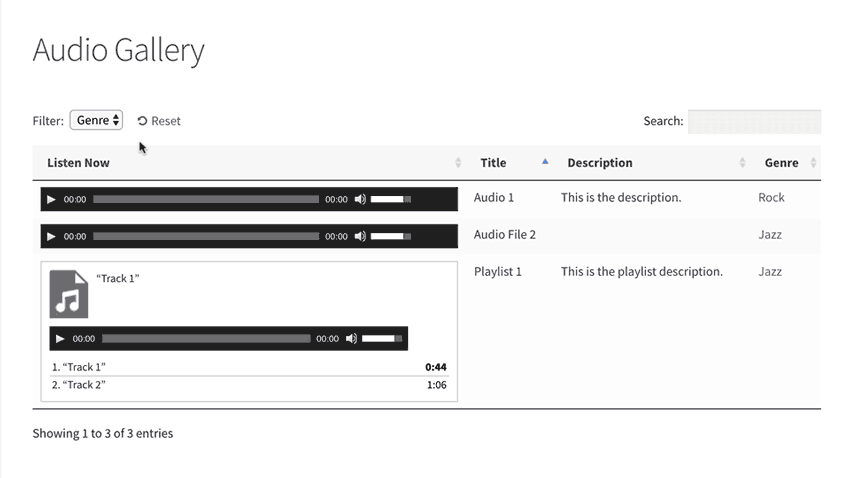
You add your audio files to the WordPress media library (or host it elsewhere, e.g. on Spotify), and the plugin displays them in a searchable table or grid. It contains embedded music tracks or MP3 players which you can listen to directly from the audio library page:
It's a really neat way of displaying audio tracks. People can listen to them, play, pause and fast forward directly within the table.
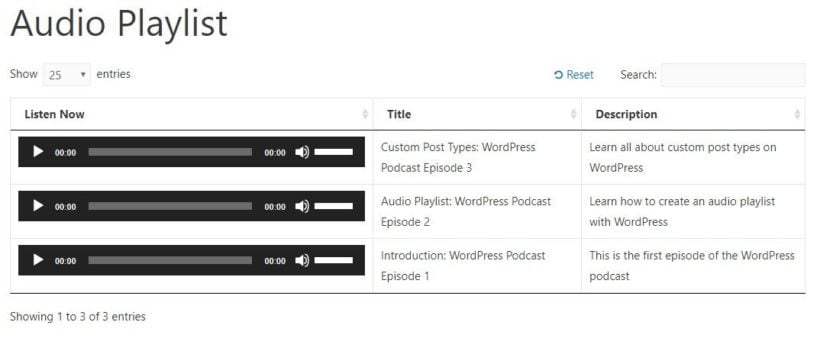
Document Library Pro also works as a WordPress audio playlist plugin. It creates a container for playlists by listing them in a table-like directory structure. You can listen to playlists and navigate between the tracks from the table. People don't have to click through to a separate page to listen to them - it's all on one page.
You can use Document Library Pro to display audio players and playlists created using the audio shortcodes that come with WordPress itself. I'll also share some third party WordPress audio plugins that can be used to display more fancy audio players.
Read on to learn how to create a searchable, filterable WordPress audio library.
What type of audio can you include in a WordPress audio library?

These days, people use audio files for a huge variety of purposes. The good news is that you can publish any of these in a WP audio library. This includes:
- Multiple audio file formatsMP3, WAV, MPEG and more.
- Types of audio recordingAudiobooks, bands, choir music, foreign language lessons, karaoke backing tracks, orchestra music, relaxing background music, samples, singles and albums, podcasts, stock music (e.g. corporate background music, royalty free music, sound effects, etc.).
- Audio from third party websitesIf you host your audio files externally, that's fine. The WordPress audio library also supports embeds from other platforms such as Mixcloud, ReverbNation, SoundCloud and Spotify.
Whether your site features audio learning materials such as recorded tutorials or lectures, foreign language classes, or podcasts, you can also integrate text to speech technology to offer additional accessibility features. This allows users to listen to written content in audio format, thereby catering to diverse learning preferences and enhancing the overall user experience.
How to set up your digital WordPress audio library
Now, we get to the tutorial part of this article. Keep reading to learn how to set up a WordPress audio library.
1. Add the audio files to WordPress
To get started, you need a WordPress website with the Document Library Pro plugin installed.
First, you need to add each audio item to WordPress as a 'Document' post. Each 'Document' will appear individually in your front end audio library. You need to do this even if your actual audio files are hosted outside of WordPress.
There are several ways to do this:
- Option 1: Add document manuallyGo to Documents → Add New in the WordPress admin and add all the information you want to display about each document. Don't worry about uploading the actual audio file yet - we'll do this in Step 2.
- Option 2: Use drag and drop file uploadGo to Documents → Import and drag and drop the audio files into WordPress. Then, go to Documents and manually edit each one as needed. For example, the name will be the same as the filename, and you can change this to make it more user-friendly.
- Option 3: Upload from CSVYou can also go to Documents → Import and upload a CSV file. This should contain all the information that you want to display for each audio track, as well as the URL where the audio file is hosted (e.g. in the WordPress Media Library or on another website).
2. Add embedded audio players
The next step is to add an embedded audio player to each of the audio items (i.e. 'Documents') that you added in Step 1. For each one, you can add either a standalone audio track or a full audio playlist.
Initially, we'll use the native WordPress audio and playlist shortcodes. Later, I'll show you how to create even more impressive-looking audio embeds using other plugins which work with the WordPress audio library.
- Go to the Documents section of the WordPress admin and click on one of the documents.
- Add an audio player to the main content area using one of these methods:
- If you plan to store the audio files in the WordPress Media Library, then you should click the 'Add Media' button and upload the file. When you insert it into the document content, WordPress will automatically convert it into a full functional audio player. It must be a valid audio file type such as MP3, AAC, WAV or FLAC.
- To embed audio files hosted on Mixcloud, ReverbNation, SoundCloud or Spotify, simply paste the URL into the content area. Again, WordPress will display this as an embedded audio player.
- If your audio files are hosted on another third party platform then you need to get an embed code. To add it, go to the 'Text' tab and paste the embed code there.
- Click 'Update' to save the document post.
Adding audio playlists
You can also add complete playlists to the WordPress audio library. If you're planning to treat the entire table as a playlist then you should add each embedded audio track as a separate 'Document' as described above. This would look like this:
Alternatively, it's also possible to add actual playlists which appear in a single row of the table like this:
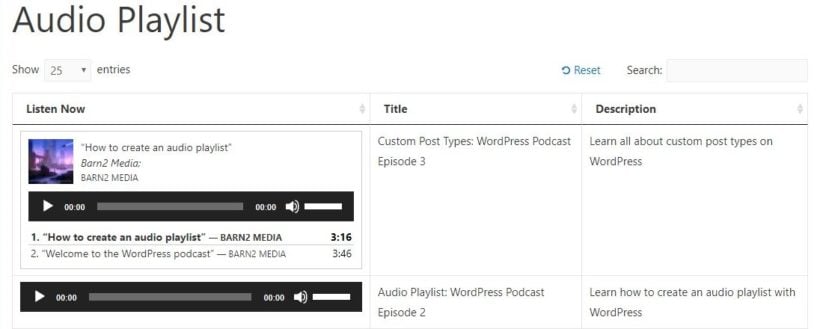
To add a playlist to one of your 'Documents' - like in the second screenshot above:
- Edit the document.
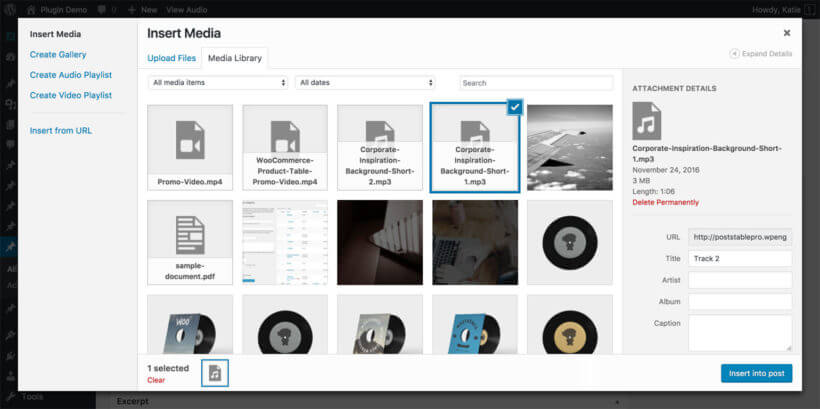
- Click 'Add Media'. Instead of adding an individual MP3 file or similar, click 'Create Audio Playlist'. If you can't see this link, it's because you haven't uploaded any audio tracks to your WordPress media library yet. Once you have uploaded some audio tracks, this link will appear.
- Select all the audio or music tracks that you want to include in the playlist and click 'Create a New Playlist'.
- On the next page, you can add the track name underneath. This will appear on your playlist so make it as descriptive as possible - e.g. the song name. There are also some settings on the right, for example whether to display the artist name.
- Finally, click 'Insert Audio Playlist'. WordPress will automatically create and embed your playlist.
- Click 'Update'.

3. Create a front end WordPress audio library
Now it's time to list the audio files on the front end of your website so that everyone can see (and hear!) them.
Document Library Pro has already created a main audio library page for you. To find it, go to the Pages section in the WordPress admin and find the page called 'Document Library'. Rename this to something more relevant such as 'Audio Library' (remember to change the permalink too).
View the page and you'll see your audio files listed in a table or grid view with one on each row. However, it may not have the information that you want to display yet.
To customize it to your requirements, go to Documents → Settings. Read through the page and change the settings as needed.
Recommended settings for an audio library
Document Library Pro has over 50 options and you can set it up however you like. In particular, I recommend that you use the following options:
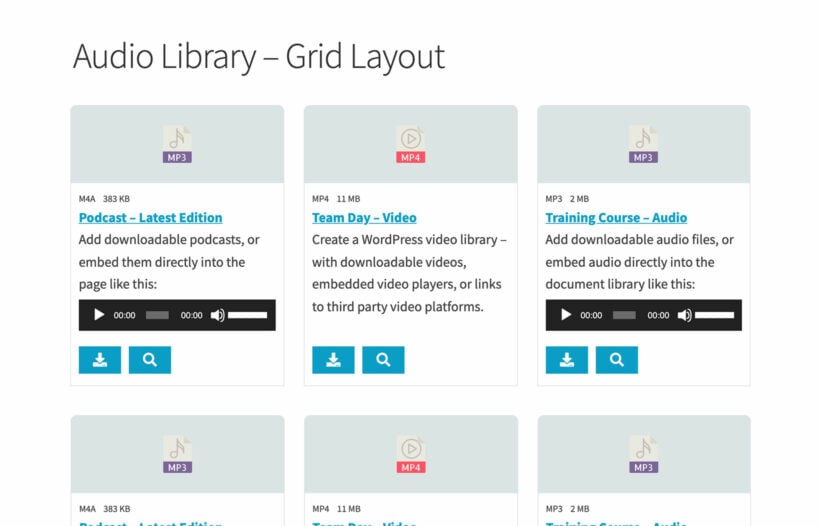
- Layout - Choose between a table layout with 1 audio track per row; or a grid layout with a tile for each document (like Netflix).
- Content - There are lots of available content types to choose from. For a WordPress audio library, add something like:
title, content, excerpt. This will display the title, the content field (which contains your embedded audio player or playlist), and an excerpt (which is useful for showing a brief overview of the audio file). You can rename the columns by adding a colon after each one like this:title: Song, content:Listen Now, excerpt:Description. - Shortcodes - Enable this option. This tells Document Library Pro to display the embedded music players in the main audio library, instead of the unrendered shortcode which WordPress has created behind the scenes.
- Links - By default, people can click on the title column to access a separate page for each audio item. The separate page will have the name at the top with the embedded audio player underneath, and any other data you've entered on the right (e.g. the file size). If you don't need these pages then add
noneto the Links option. - Filters - If you have added categories or tags to your audio items, then add some filter dropdowns so that people can find then more easily.
- Lazy load - Enable this if you will be listing lots of audio files. This tells the plugin to load one page of the audio library at a time, speeding up the load times.
4. View the audio library
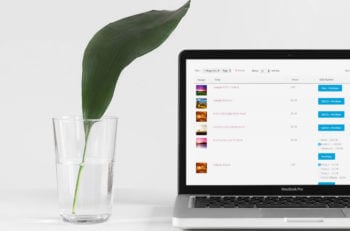
Your finished audio directory will look something like this:
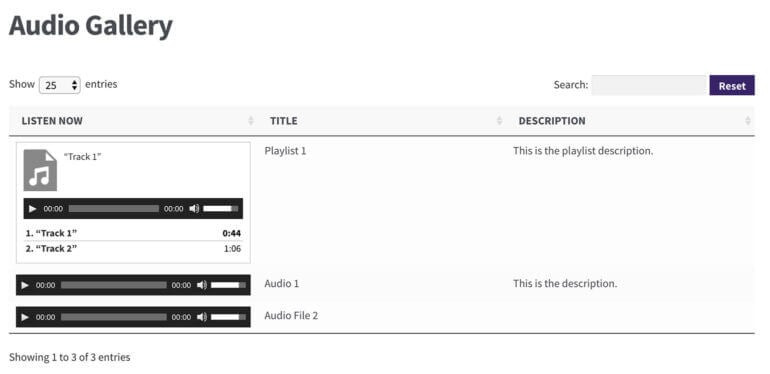
This has created a professional-looking WordPress audio library listing all your music tracks. You can add as many as you like.
If you have lots or music tracks or audio playlists then the plugin will add pagination buttons at the bottom.
Restyling the audio player
So far, I've shown you how to display the built-in audio and playlist shortcodes in a searchable WordPress audio library.
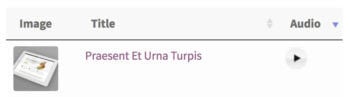
Use it to create a very simple audio player, which appears as a small play button in a circle. When you click on the circle, the audio track plays and a pause icon appears within the button instead. If space is at a premium in your WordPress audio library, then this is an ideal plugin to add small audio players.
To display a compact audio player in the audio library, just install the plugin. Next, add the shortcode [sc_embed_player fileurl="URL OF THE MP3 FILE"] to the content field for each document.
Need to add download links?
Some WordPress audio libraries simply embed the audio files on the page, like the examples above. This is very secure because visitors can listen online but can't download the files.
If you want people to be able to download the audio files, then that's fine too. You can add download links, buttons or file type icons. Visitors click on these to download the audio file to their computer.
- Go to Documents and click to edit a document.
- Find the 'Document Link' option in the top right hand corner. Use it to either select the audio file from the WordPress Media Library, or add the URL where it is hosted on another website.
- Go to Documents → Settings and add a 'link' column to your list of columns.
- Use the other link-related settings on the page to choose a style for the download links.
This will add a download column to the WordPress audio library.
Need to sell audio online?
If you want to sell audio files in your WordPress audio library then you need an e-commerce plugin. You can sell audio files using either WooCommerce or Easy Digital Downloads.
Either way, you can use our other plugins to list the audio products in a searchable table. Your audio store will look like the other screenshots in this article, but will also have 'Buy' buttons so that people can make purchases.
Selling audio with WooCommerce
 The free WooCommerce plugin lets you sell absolutely anything online. Use it with our other plugin, WooCommerce Product Table, to create a searchable audio library.
For example, Dosado used WooCommerce Product Table to sell audio files with embedded music players in the table.
Read our tutorial about how to create a WooCommerce audio store.
Selling audio with Easy Digital Downloads
If you only sell digital audio files then you can also sell them using the Easy Digital Downloads (EDD) plugin.
EDD is a bit simpler than WooCommerce because it doesn't have any options you don't need, such as Shipping.
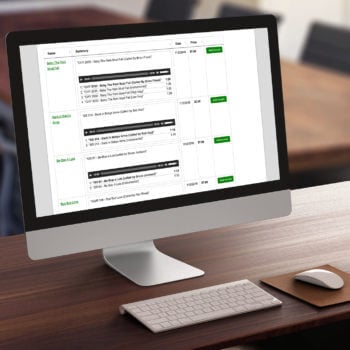
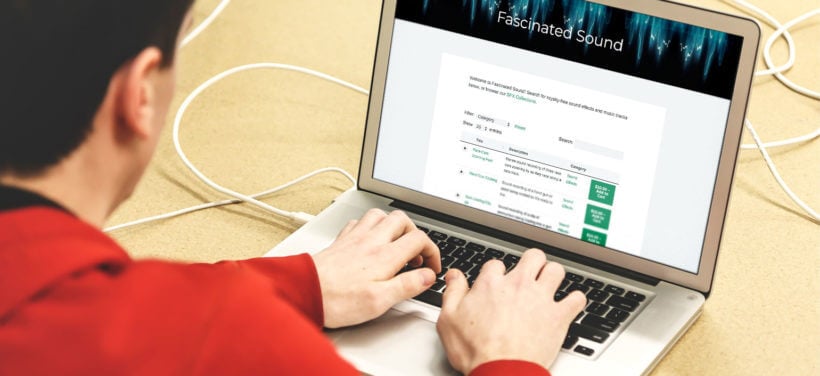
For example, Fascinated Sound use EDD with our Posts Table Pro plugin to sell royalty-free sound effects and music tracks. They list over 600 downloadable audio products in their WordPress audio library.
Each audio download is listed in a table with columns for audio player, title, description, category and add to cart button. You can click on a category in the table to filter by that category. There's also a category filter dropdown above the WordPress audio library.
Customers can listen to each track by clicking on the embedded play buttons. The play buttons were created using the free Compact WP Audio Player plugin, which works perfectly in the audio library.
We love Fascinated Sound's WordPress audio library because it's such a user-friendly way to list and sell music and other audio products.
Read our tutorial about how to list products (including audio products) with Easy Digital Downloads.
It's time to create a WordPress audio library!
So now you know how to create an audio library in WordPress. Now it's your turn. Follow the steps in this tutorial to create your own WordPress audio library or music directory. To get started, download Document Library Pro today - it's one of the best WordPress audio plugins around.
- Supports all types of audio file.
- Aimed at beginners or developers.
- Full support and documentation.
- Money back guarantee.
21 Comments
Good day team, i am a computer science student working on building a music archive please can you give any directive on how to create one or is a custom theme avilable for me to work on. thank you
Hi, Simi. Thanks for your comment. I'm not sure how a theme would have the functionality for what you'd like to achieve, but this article of ours has the information that you need for using our Document Library Pro plugin to create an audio library / music archive. You can also consider using its free version, Document Library Lite, albeit it of course has less features than the pro version. Best of luck with your project!