How customize your WooCommerce shop page
Out of the box, the default shop page in WooCommerce showcases products in a grid layout. Keep reading to discover some simple but effective ways to edit and customize WooCommerce shop pages.
The WooCommerce shop page is an integral part of your online store – after all, it’s the page your customers will interact with most. That's why you need more control over its design in order to create an intuitive, user-friendly layout that's suited to your specific business and delivers value to customers.
In this post, we'll walk you through a quick, step-by-step tutorial about how to customize the WooCommerce shop page by transforming it into a conversion-optimized order form. We'll do it using the WooCommerce Product Table plugin.

But before we jump into the tutorial, let’s quickly explore the WooCommerce shop page.
What is the WooCommerce shop page?
The WooCommerce shop page serves as a placeholder for a post type archive to display products. A post type archive displays a list of all posts under a particular post type, tag, or category. In this case, it would be the Products post type to display WooCommerce products.
Behind the scenes, the shop page may be rendered differently than other pages on your WordPress site. The exact layout and appearance of the default WooCommerce shop page depends on your theme. In most themes, it looks something like this:
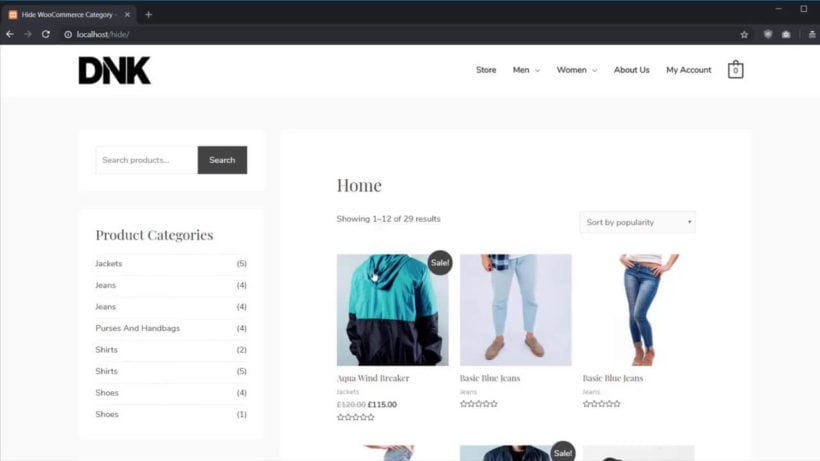
The products are listed in a grid layout with some basic information about each one. This typically includes a large image, the product name, price, and maybe star ratings from reviews. It doesn't include product options such as variations, or the ability to choose a quantity and add to the cart.
The default shop page may be full-width, or it may have a sidebar where you can add filter widgets etc.
As you can see, the basic WooCommerce shop page can look great without any customization. However, while it's well suited to some types of products, it's completely inappropriate for others. If it's not the best way to showcase the types of products that you sell, then you will need to edit or customize the WooCommerce shop page. I'll tell you how to do that next. But don't stop there as it's also possible to edit the default product page layout.
Methods to edit the WooCommerce shop page
When it comes to customizing the default WooCommerce shop page, there are several different ways to achieve a completely unique look and feel. There's no limit to what you can do! For example, you can edit the default layout, add custom fields, include product filters, show exclusive offers, and much more 🪄
Your priority should be to customize the WooCommerce shop page in a way that suits the types of products you're selling. Ideally, your custom shop page should:
 Encourage prospective customers to browse through more products.
- Make it easy for customers to find exactly what they're looking for.
- Display enough information about each product for customers to decide to make a purchase.
- Allow customers to select all the options they need to add the product to their cart.

I'm going to tell you several different ways to use WooCommerce to edit the shop page. First we'll look at the built-in WooCommerce edit shop page options, and then we'll look at how you can use plugins to get even more flexibility.
1. Using the WooCommerce Customizer
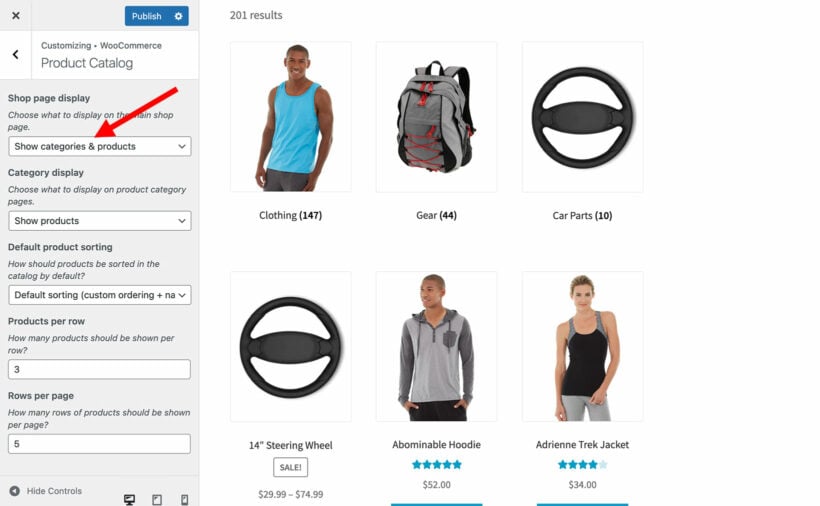
Your first stop to customize the WooCommerce shop page is the Customizer. You'll find this at Appearance → Customize → WooCommerce.
This contains a range of options to edit the shop page. These let you customize the details of the shop page in WooCommerce. They don't change the overall look and feel or the information which is displayed about each product.
- Store Notice - Optionally show a banner at the bottom of every page in the shop.
- Product Catalog:
- Shop page display - Choose whether to show products, categories or both.
- Category display - Similarly, choose whether to show products, subcategories or both on category archive pages.
- Default product sorting - Change how products are sorted when the WooCommerce shop page custom loads.
- Products per row - Customize the number of shop page product per row.
- Rows per page - Edit the number of rows of products on the shop page grid before pagination buttons appear underneath.
2. Customizing with the WordPress block editor
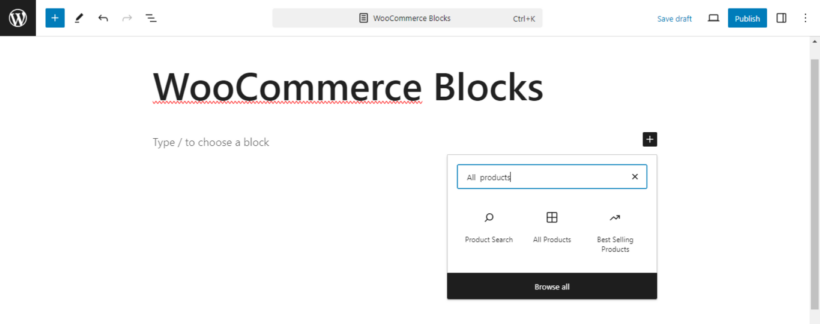
You can use the built-in WordPress block editor to create a custom WooCommerce shop page. Also known as 'Gutenberg', this comes with a range of WooCommerce blocks for displaying products in different ways.
For example, you could create a customized shop page which has some static content first, then a list of your top selling products, then another heading followed by your entire product catalog.
The best way to find the WooCommerce shop page blocks is to click the + icon to add a new blog. You can then search for 'products' and the relevant blocks will appear. You can list all products, products by category, best selling products, and so on.
For shop page WooCommerce blocks that let you select which products to include, you'll then see a range of options like this:
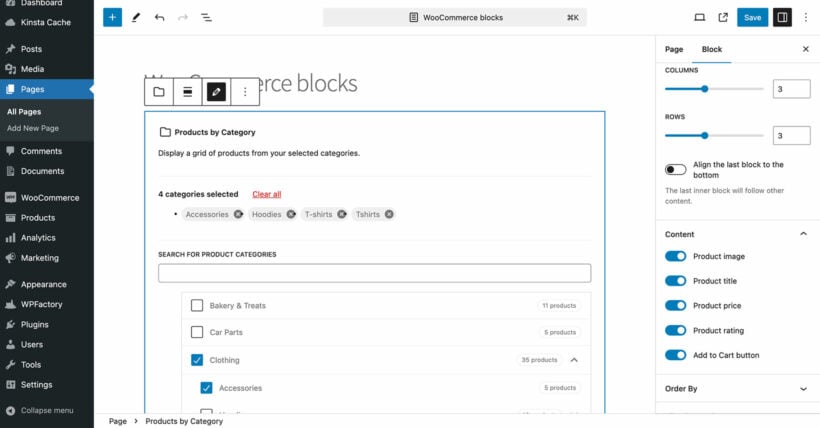
Use the options in the main block to select which products to display on the customized WooCommerce shop page. Also use the options in the 'Block' tab on the right to customize details like the number of columns and rows in the product grid, and whether to hide any of the product data.
The WooCommerce blocks provide a neat way to edit the shop page structure. However, as with the Customizer, they don't actually change the layout of how the products are listed. Moveover, they don't let you show additional data about each product, or allow customers to select quantities or variations from the shop page.
3. Manual customization (using code and hooks)
It's also possible to write custom code to customize the WooCommerce shop page.
This is a developer-level task so I won't go into this option in much detail. It's a good option if you just need to make some minor tweaks. However, if you want to make significant changes then it's better to use a plugin. If you're a developer and want to edit the shop page using code then Sellbrite have provided a useful guide on the available hooks and filters.
4. Using WooCommerce extensions and plugins
Finally, you can use plugins to create a completely custom shop page. This is by far the most flexible option because you can choose from a wide range of plugins to edit different parts of the shop page.
In the next section, I'll show you how to customize the WooCommerce shop page using 2 high quality plugins:
- WooCommerce Product Table, which replaces the default product grid with a conversion-optimized order form view.
- WooCommerce Product Filters, which adds professional-grade product filters to the shop page to aid product discovery.
Step-by-step guide: Customizing the shop page with product tables
One way to create a high-converting custom WooCommerce shop page is by showcasing your products in a searchable, sortable table. You can do this using the fully customizable WooCommerce Product Table plugin.
For many types of products, the table layout can significantly boost conversions because:
- The instant search box and filter dropdowns let customers find products quickly and easily.
- It lists products in a much more structured format, making it easy for customers to compare and choose products.
- You can display far more product data than the default WooCommerce shop page layout. For example, you can show product descriptions, dimensions, stock, and so on. If you want to display even more information, then you can use WooCommerce Product Table with the Quick View Pro plugin. This adds 'Quick view' buttons the product table so that customers can view more information without leaving the shop page.
- Customers can select product quantities and variations directly on the customized WooCommerce shop page. Again, this allows them to purchase without leaving the page.
- The order form layout also encourages customers to spend more. It does this by adding multi add to cart checkboxes to the shop page. Customers can select multiple products and then add all their selections to the cart at once.
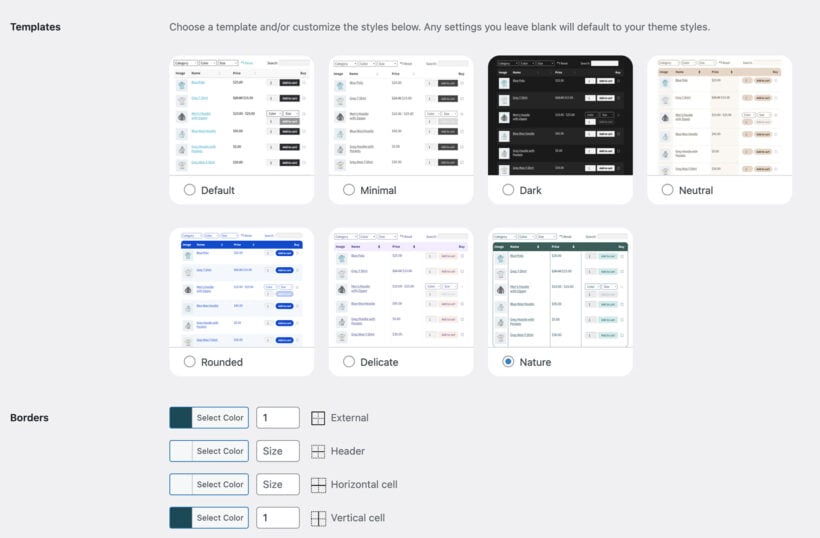
- Choose from pre-built templates for the design of your shop page. You can then further customize each template to match your exact brand design.
Using product tables to design the WooCommerce shop page is an ideal solution for online store owners who sell:
- Products in bulk (wholesale sellers), customizable products (like pizzas, chocolate boxes, or gift hampers).
- Items that have lots of specifications (such as hardware goods, kitchen counters, or laptops).
- Products with variations or add-on options (like clothes, shoes, and personalized gifts).
Next, I'll show you how to set it up on your WooCommerce shop page.
1. Install and set up Product Tables for WooCommerce
First, get the WooCommerce Product Table plugin and install it on your WordPress website.
2. Create your first product table
When you first activate the plugin, this will launch the product table builder. You can also launch it by going to Products → Product Tables. Set up your shop page product table by going through each page of the builder:
On the first page, choose the option to "Display on a shop page (e.g. main storefront, category page, etc.)".

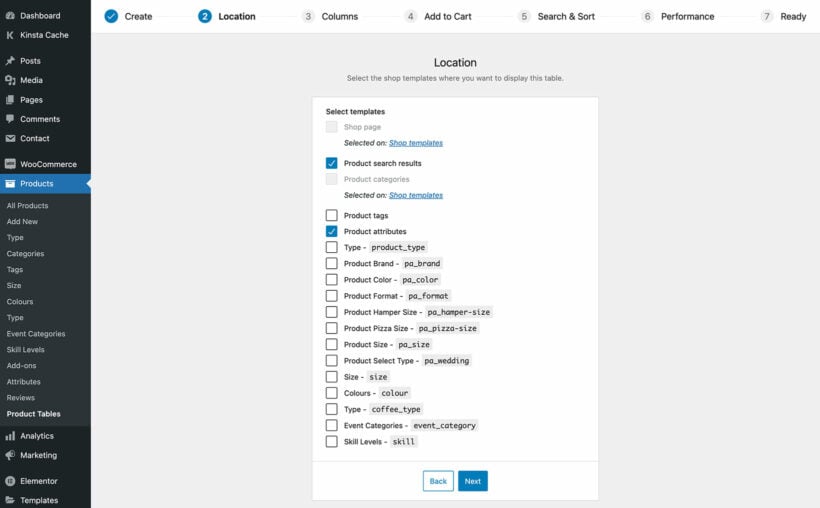
On the next page, select which WooCommerce shop page templates you will enable the table view on. As a minimum, you should choose the shop page. You can also display the table on categories, attribute archive pages, etc.
The remaining pages allows you to choose which product data to display on the WooCommerce shop page, add filters, replace the add to cart buttons with checkboxes, display variations on the shop page, and more.
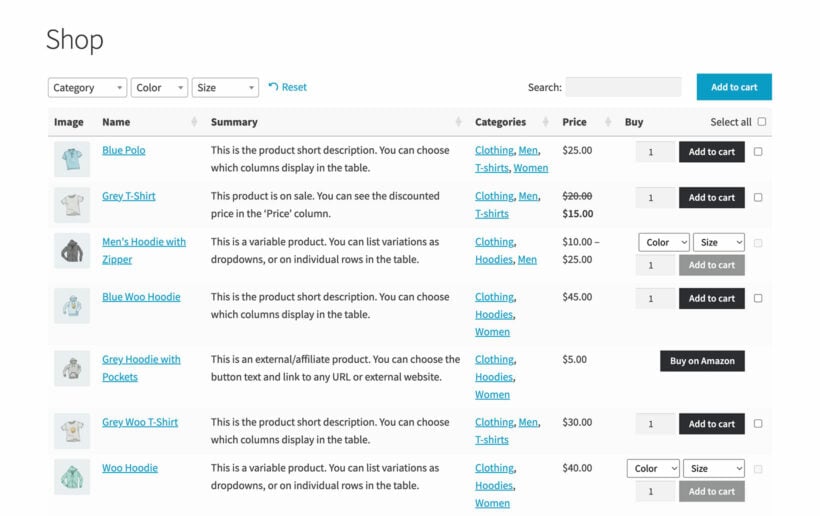
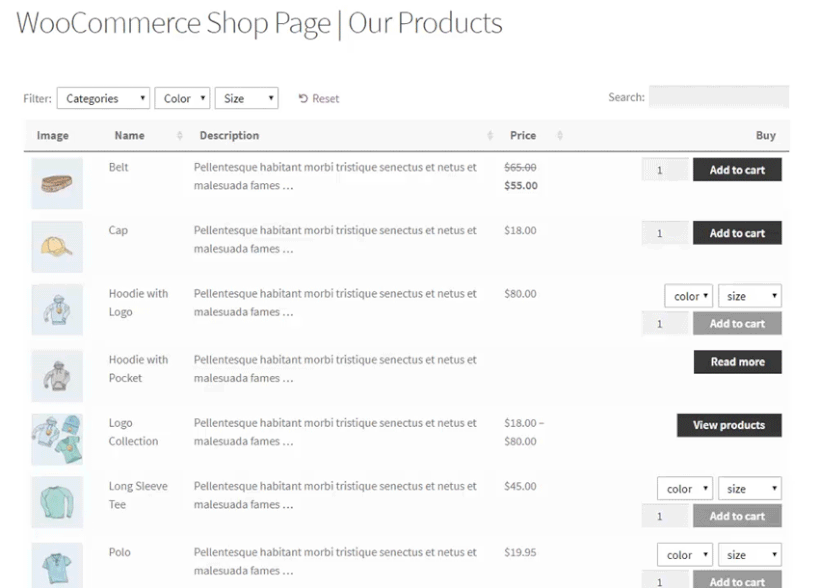
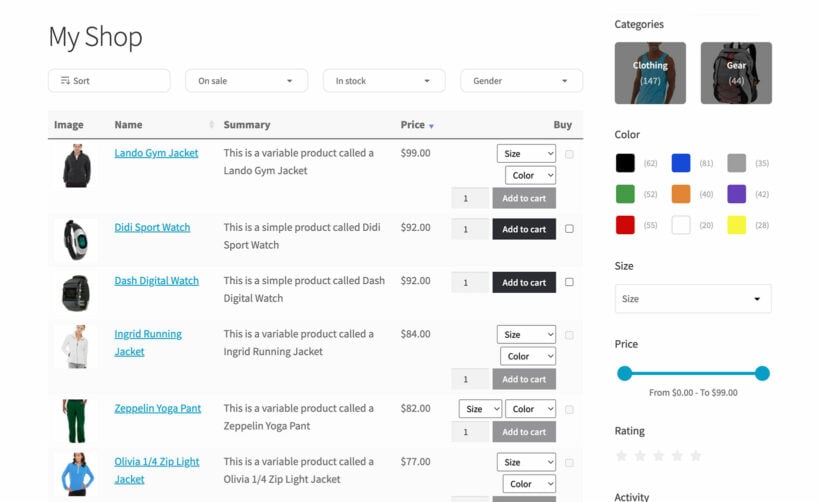
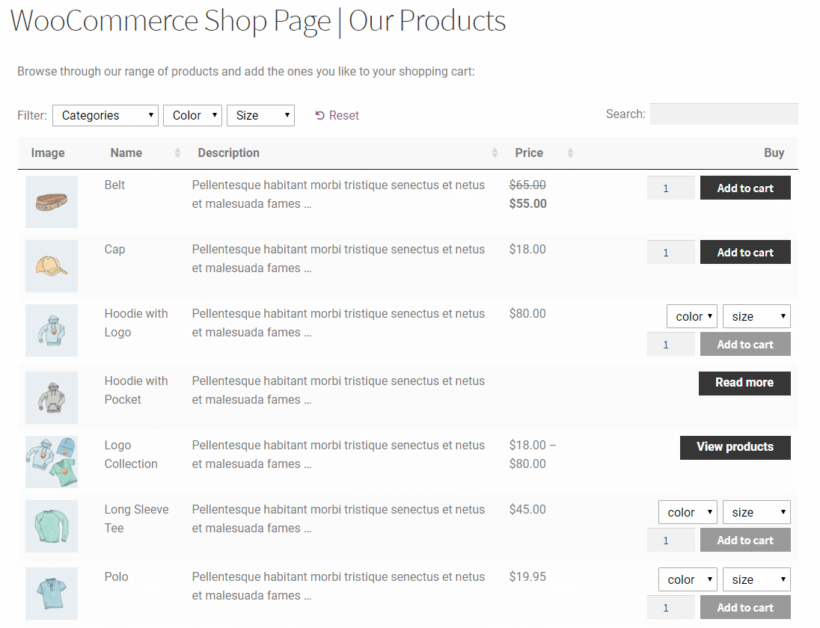
Once you've finished, your customized WooCommerce shop page, category pages, and any other pages will now display product tables on the front end:
Bonus plugin: Adding advanced product filters to the shop page
As you can see in the screenshots above, WooCommerce Product Table comes with some basic filter dropdowns. These appear at the top of the custom WooCommerce shop page. You can also add the default filter widgets to your shop page sidebar.
Alternatively, you can use the WooCommerce Product Filters plugin to add even more advanced filters to the shop page. This works on its own, or with WooCommerce Product Table.
WooCommerce Product Filters gives you even more filtering options which can appear above the products on the shop page, or as widgets in the shop sidebar. Here's an example of what your supercharged shop page filters might look like:
Bonus plugin: Allow customers to check out directly on the shop page
Above, we learned how the WooCommerce Product Table lets you create a custom shop page layout which is better for conversions. It achieves this by making it quicker and easier for customers to find products and add them to their cart.
However, that's only half of the story.
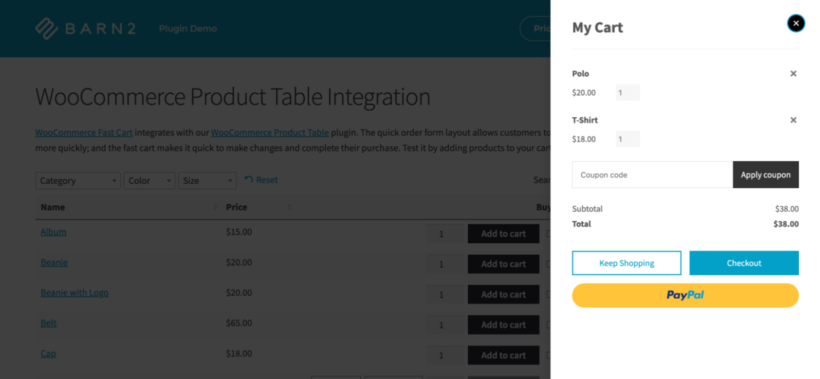
The other half is the final part of the purchase process. That is, reviewing and completing an order. And that's where the WooCommerce Fast Cart plugin comes in.
WooCommerce Fast Cart adds either a popup cart or a floating cart icon to your custom WooCommerce shop page. Customers use this to review their order, enter their details, pay and check out - without ever leaving the shop page. It's a much faster way to complete an order, and therefore can help to reduce abandoned carts.
Next steps: Customize the WooCommerce shop page today
The default WooCommerce shop page offers a number of useful features. However, it's not the best solution for all types of online stores. By editing your shop page’s layout, you can enhance your online store's visual appeal, improve usability, increase sales, and boost conversions.
We recommend using the WooCommerce Product Table plugin to upgrade the default shop page layout with an intuitive, user-friendly table layout. This will allow customers to:
- Search, sort, and filter products to find what they're looking for, quickly.
- Add multiple products to cart in one go.
- Select product variations without having to click through to the single product page.
- View more products per page in a neat and organized way (with complete product information).
Do you agree that customizing the WooCommerce shop page's layout and design will help you simplify the purchasing process? Share your thoughts in the comments below!
FAQ
How to use WooCommerce Product Table with Elementor (or other page builders)
Instead of customizing the default WooCommerce shop page, you can also create an entirely new shop page using a page builder like Elementor. We'll show you how to use WooCommerce Product Table with Elementor - with the Storefront theme - to create a unique shop page for your online store. The process is similar for other page builders, too.
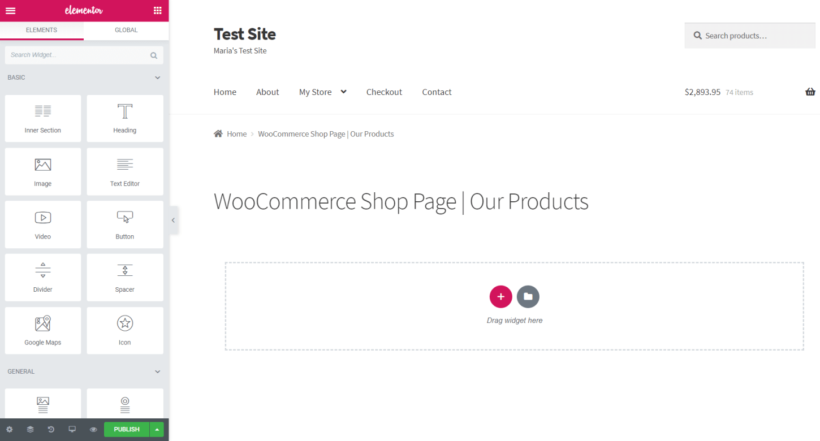
1. Create a new page and edit it using Elementor
Create a new page or post and edit it using the Elementor editor. You can do this by clicking on the Edit with Elementor button.
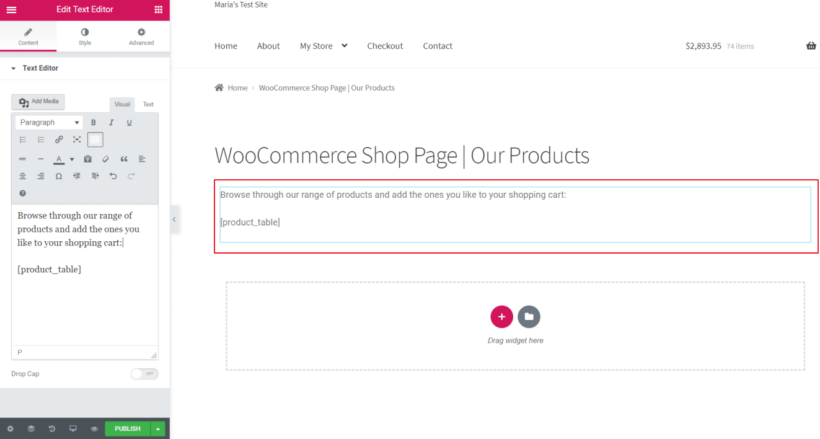
2. Add the WooCommerce Product Table shortcode to a text editor or shortcode widget
When you create a product table at Products → Product Tables, you're given a shortcode for adding it to a page. Add this to an Elementor widget, such as a text editor or shortcode widget.
Here’s what it might look like on the front end:
10 Comments
Hi-
How can I use the column priorities feature found in the shortcode on the WooCommerce shop page? I need to ensure that the "add to cart/quote" button always appears no matter the device used to access it.
Hi, Bill. Thanks for asking. I'm happy to help you with setting the priorities option in your product table shortcode. So that I can assist you best, please could you submit a request via our dedicated Support Center together with your plugin License key and I or another member of our team will get back to you as quickly as possible.
Hi, is there any coustom woocomerce page available where we can simply upload and modify for our needs for a simple store. Thanks.
Hi, Blanca. For what you describe, what you need to look for is called "managed WooCommerce hosting". I hope this helps you with your search! Cheers.
I ask for your advice. We updated our website into an online store (we enabled woocommerce) On the website we have (in the menu) a "sales program" and we have all the products (pages) that we sell.
If we create a product in a woocommerce store and add a description, we will make duplicate content, which is not right. What would you do to solve this problem. thank you very much
Hi Tadej, thanks for your comment. I would like to get more information about this issue that you are experiencing. Please, could you send us an email via our Support Center and attach a screenshot(s) of this issue.
Looking forward to your response. Thanks!
Hi
I have followed the steps above but I'm having trouble hiding the original/default Product listing on the Shop page - is there somewhere else I have to enable/disable it?
Thanks
Mehul
Hi, Mehul. Thanks for getting in touch and sorry to hear you're having this difficulty. So that we may assist you best, please could you go to our Support Center at https://barn2.com/support-center/ and fill up a technical issue form to send us a plugin support request using the email address you used to purchase the plugin or include your plugin License key so that we can pull up your Barn2 Plugins account. Thanks in advance!
Hello admin,
i want to add a photo below The “ADD TO CART” button . like this :
https://3dmaxfarsi.com/wp-content/uploads/2020/03/add-to-cart.jpg
can you help me how can i do that without plugin ?
Hi, Jafar.
Thanks for your comment and for the example image. You can do that by adding custom code or customizing the single product page template, which is a developer-level task. If you don't have a developer who can do this for you, then I recommend that you post a job on Codeable where their pre-approved WordPress experts will send you a quote. We have partnered with them to provide plugin customization for our customers.
Let me know if you have any other questions by filling up a form at our Support Center.
Best regards,