How to add custom fields to WooCommerce variations


You can add custom fields to WooCommerce variations in two ways. Use a plugin like WooCommerce Product Options to let customers select extra choices on the product page, or use a plugin, ACF or a code snippet to store extra data on each variation itself. I'll show you how to set up both.
Extra options and extra product information help customers choose the right variation without guesswork. This matters more in ecommerce than in a physical store, because online shoppers can't pick up the product or ask a member of staff before they buy.
While WooCommerce lets you create product variations, these are pretty basic. They only appear as dropdowns and it's not possible to add other field types. For example, you can't add checkboxes or text area custom input fields. Apart from a simple variation description, there's also no way to add extra data to product variations.
This guide covers both routes:
- Adding read-only custom fields to appear on your product variations.
- Adding editable fields for WooCommerce product variations for the customer to select and fill in.
I'll talk you through the best WooCommerce variation custom field plugins, whichever type you need.
What are the two types of WooCommerce custom fields for variations?
Before we start, let's clarify exactly what is a WooCommerce custom field for variations. It can be confusing because people often use this term to mean two different things:
- Adding additional data to specific variationsThis is the literal definition of WordPress custom fields. A custom field is a way to add extra data to a post. By default, you can add custom fields to WooCommerce products but not individual product variations. However, there are plugins to help with this.
- Adding extra fields or options to a product which customers can select fromTechnically, extra product options are not custom fields because this means something else in WordPress terms. However, for practical purposes, a product option or variation is a custom field type which appears on a product for customers to fill in. As a result, it makes sense to refer to it as a "custom field". For example, this might be extra checkboxes, a text box or text area that customers can type in, or another custom field type.
The phrase "WooCommerce custom fields for variations" can be used interchangeably to refer to both product options and custom fields. As a result, in this article I will tell you how to achieve both. That way, you will find the information you need - whatever you're looking for!
Which method should you use?
The right method depends on whether customers need to choose or type something, or whether you just need to display extra information once they've picked a variation. Here's how the four main approaches compare.
| Method | Best use case | Customer-editable? | Setup difficulty |
|---|---|---|---|
| WooCommerce Product Options | Letting customers choose or enter something before they buy, such as a size, a message or a file upload | Yes | Easy, guided builder |
| WC Fields Factory (free) | Showing extra static information on existing variations, such as a spec or care note | No, admin only | Easy |
| ACF | Showing custom fields on products generally; variations need extra code | No | Moderate, needs a code snippet for variations |
| Custom code (hooks) | Full control over variation data for developers | No | Advanced, needs a developer |
In my experience, the choice comes down to whether customers need to act on the field or just read it. I'd use ACF when I want to display static information alongside the variation description once a customer selects a normal variation, such as a spec sheet reference or a care instruction.
I'd use WooCommerce Product Options when customers need to fill in extra fields themselves on the product page, such as a personalization message or a file upload. Both WC Fields Factory and ACF display read-only text, so neither is the right choice if you want the field to affect pricing or collect a real choice from the customer.
How to add custom fields to WooCommerce variations
Let's start with the literal meaning of "WooCommerce custom fields for variations": Showing additional data about specific variations, rather than letting customers choose options themselves. I'll show you how to do this next, then cover the product options method afterwards.
Normally, WordPress custom fields can only be enabled for pages, posts, and custom post types such as WooCommerce products. For example, you can do this with plugins like Advanced Custom Fields (ACF). That's how WooCommerce custom fields are generally used. You can then display custom fields on the product page. However, these appear to the entire product and aren't specific to individual variations.
Until recently, the market leader for this was Iconic's WooCommerce Custom Fields for Variations plugin (sold as part of the Iconic suite at iconicwp.com). Iconic shut down in May 2026 and the plugin has been merged into Kadence Store Kit. This has prompted many customers to seek a more future-proof replacement.
If you've come here looking for a WooCommerce Custom Fields for Variations alternative, the free WC Fields Factory is the closest like-for-like replacement. It extends WordPress custom fields so you can add them to individual product variations.
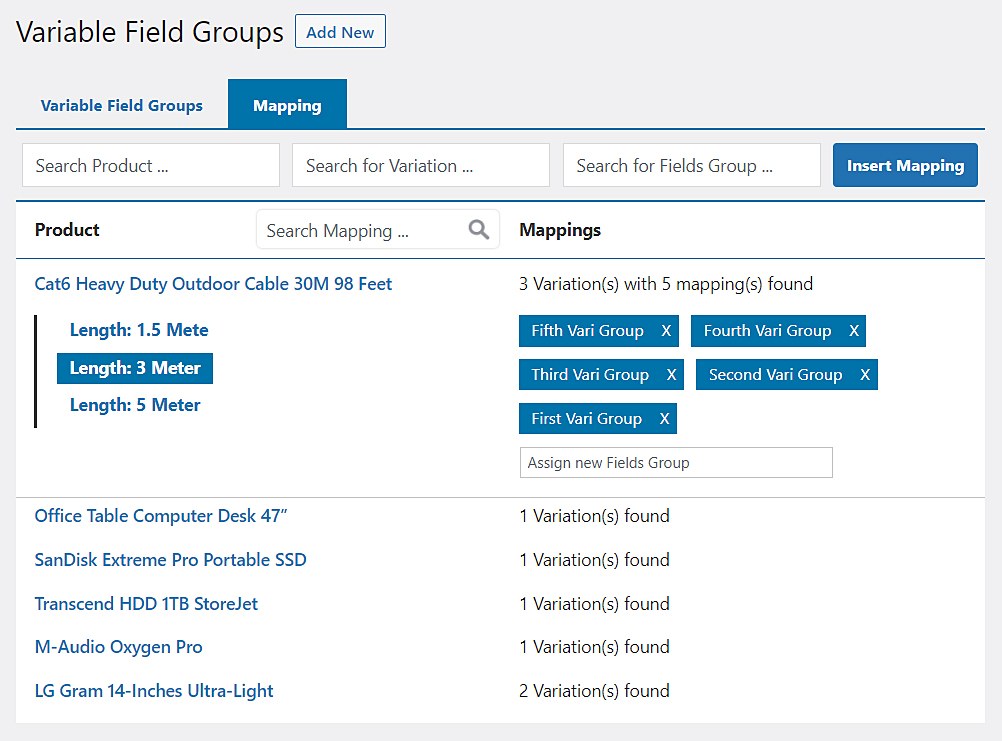
How do the variation custom fields work?
WC Fields Factory is a free plugin for displaying static information on a product variation. It works by letting you add custom field groups, which appear on the 'Edit' screen for all your products and variations.
You can add an unlimited number of variation custom fields. These are options to structure them into groups with headings between each section.
You then add the required product data to the custom fields for all of the variations that you want it to appear on. Leave the custom field value blank for any that aren't needed. The custom fields won't be used for any variations where you don't add the extra data.
Warning: This option only displays static product data
While you can add various custom field types for variations in the WordPress back end, such as checkboxes, custom text fields and number fields, these are only for admin purposes. WC Fields Factory is only for displaying product data in the front end. The variation custom fields will always appear as text on the front end.
If you need to create options for customers to choose from and add information to, then you need the WooCommerce Product Options plugin instead. We cover this in the product options section below, which lets customers select or enter their own choices.
How to add custom fields to product variations
- Install the free WC Fields Factory plugin from Plugins → Add New in your WordPress dashboard.
- Go to WC Fields Factory → Variation Fields.
- Next, click 'Add New' and give your group a title. Click 'Add Field'. Add as many new custom fields that you need for your variations. Add the required information such as the field name and label.

- In the 'Product Page Display Options' section, choose where the variation custom fields will appear on the individual product page.

- Finally, edit one of your variable products and go to the 'Product Data' section of the 'Edit Product' screen. On the 'Variations' tab, open up a variation that you want to add custom field data to. You will see your variation custom fields under the variation description snippet.

As you can see in the screenshots, it's easy to add custom fields to variations. Now when you view the product page and select a variation, the custom field data (if entered) will appear.
Ensuring theme compatibility
When adding custom fields to WooCommerce variations, it's important to consider how they'll display across different devices and themes. Custom fields should respect your theme's styling and responsive design so they don't look out of place. Test your custom fields on mobile devices to ensure they maintain proper formatting and usability.
If you're using Elementor templates for your product pages, you may need to adjust template settings to accommodate the additional fields. Most quality WooCommerce themes will handle custom variation fields appropriately, but always test thoroughly to ensure compatibility across devices.
Adding custom fields for advanced product options (beyond variations)
In this section, I'll show you how to add custom option fields to standard WooCommerce products. These allow users to customize the product in a way that is much more flexible than using variations.
The problem with product variations is that they only ever appear as dropdown lists. For example, imagine that you offer a choice of sizes and colors. Customers must select their size from one dropdown and their preferred color from another.
That creates a fairly boring user experience. Even worse, there's no way to add more flexible custom field types to variations such as text input or file upload fields.
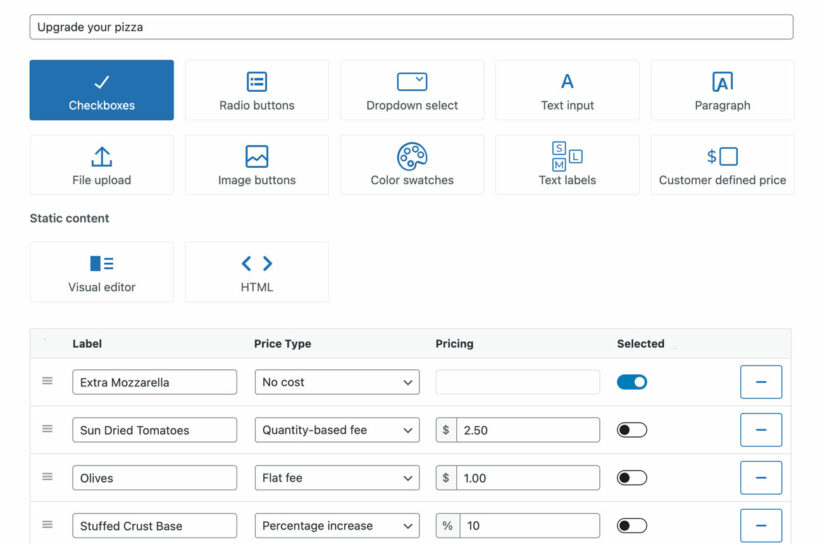
Instead of (or in addition to) using variable products, you can add more custom options using the WooCommerce Product Options plugin. This comes with a huge range of custom field types including clickable images, checkboxes, dropdowns, radio buttons, text and paragraph fields, and more.
You can also add a text field to a WooCommerce product page for something like a gift message or an engraving request.
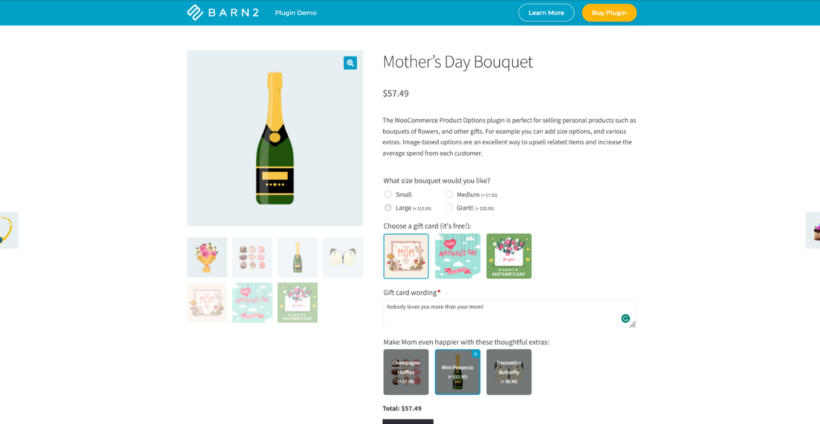
You can use WooCommerce Product Options to add a wide range of custom order fields to your products. Either create these directly in the plugin's simple interface, or display existing product variations using field types such as checkboxes and color swatches.
How to add selectable custom fields to WooCommerce products and variations
Now we know how WooCommerce Product Options can help with adding custom field options to your products and variations, let's learn how to set it up.
- Install WooCommerce Product Options on your WordPress site.
- In the WordPress admin, go to Products → Product Options.
- Either edit the default product option group, or add a new one. You can create as many groups as you like, each containing a different set of custom product option fields.
- Use the visibility options to show/hide the custom fields on specific products or categories, or leave this blank to show them on all products.
- Add as many options/custom fields as you like to the group. To do this, either create the fields directly on this page, or select existing attributes to display as WooCommerce variation custom fields.
- Decide whether to use the advanced settings, such as conditionally showing and hiding custom fields depending on which other options are selected. You can also add rules, such as a minimum and maximum number of each custom field which can be selected.
- Create as many custom field option groups as you need, each containing different new fields.
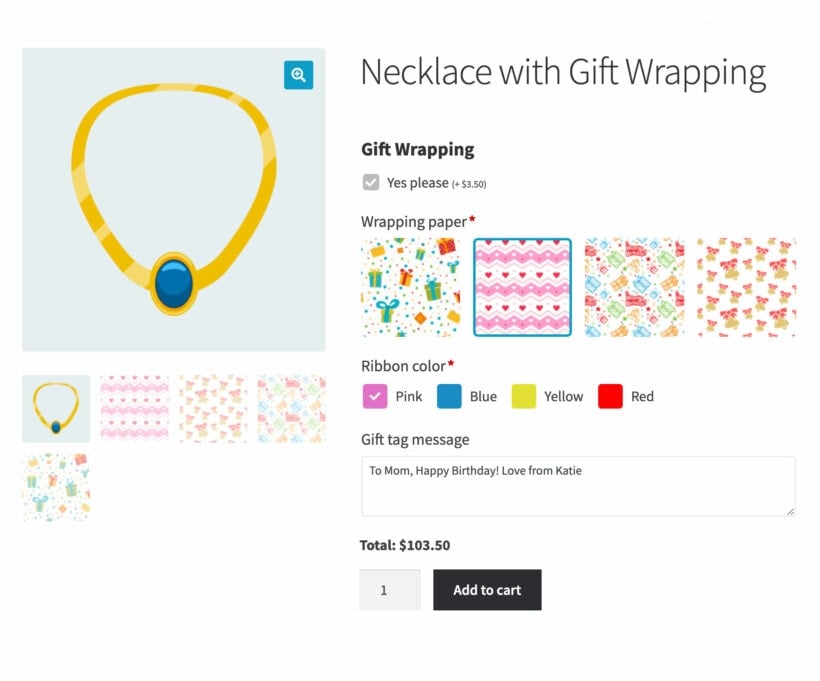
You can now visit a product page on your store to see the custom fields you have added. Pretend to be a customer and test what happens when you select different options. Add them to your card, and you will see the conditional fields in the checkout and cart page.
Using conditional logic for dynamic product pages
Your product page design doesn't have to be compromised by adding new options. With some clever conditional logic, you can keep things looking neat while still offering unique choices. When properly implemented, fields can appear or disappear based on customer selections, creating a guided configuration process.
For example, if a customer selects 'Gift Wrapping' with a checkbox, you can automatically display a text field for a gift message. This keeps your product pages clean while still offering extensive customization options. For full setup instructions, see how to add conditional logic to WooCommerce variations.
To set up field display based on product attributes, you'll need to define rules that specify when each field should appear. The configuration process typically involves selecting a trigger field, a condition such as equals, not equals or contains, and the value that activates the condition. This creates a dynamic product experience that responds intelligently to customer choices.
More about the WooCommerce Product Options plugin
Now let's talk a bit more about the WooCommerce Product Options add-on.
We built this plugin after struggling with the limitations of WooCommerce variations and the lack of built-in field types. We wanted to give shop owners more control over the products they sell in WooCommerce.
It supports field types including text boxes, checkboxes, radio buttons, image buttons, file uploads and date pickers, and you can target each field to specific products, categories or variations.
Key features
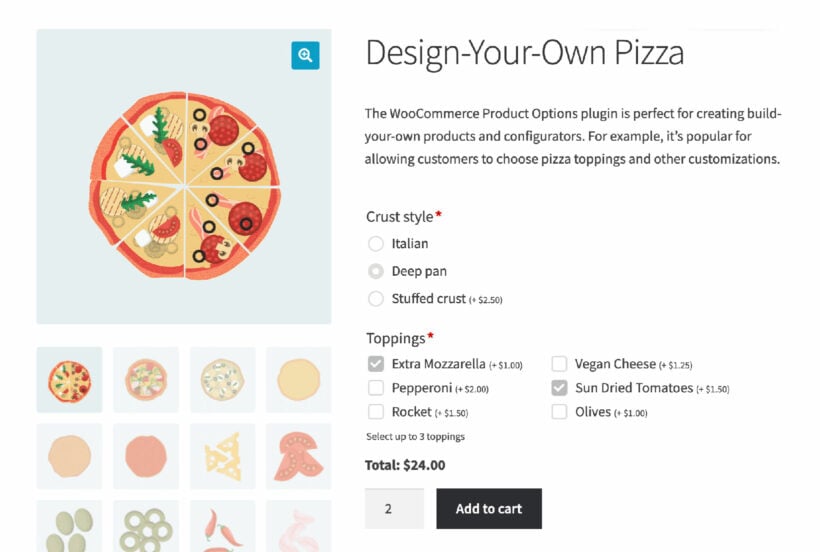
Some of the most noteworthy aspects of the WooCommerce Product Options plugin are as follows:
- Add custom product fields centrally and choose which products and categories to use them on.
- Works with any WooCommerce product type, including simple or variable products.
- Product input fields include text boxes, radio buttons, photo fields, file uploads, and checkboxes.
- Set both fixed and variable pricing based on the combinations of custom fields selected.
- Use minimum and maximum order amounts as well as other quantity criteria.
- Conditional logic lets you show or hide user-selected options.
- Comes with full support from Barn2's WordPress experts.
- Try it risk-free with a 30-day money back guarantee.
Set up custom fields for WooCommerce variations today
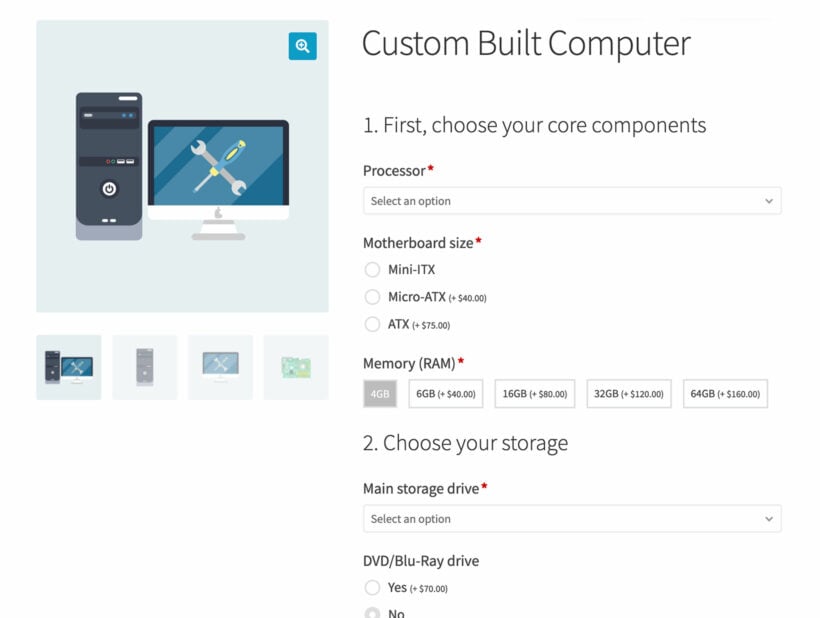
Plugins like WooCommerce Product Options are a faster, more reliable way to add custom fields compared to using WordPress hooks. You don't need to touch any code, and you get more flexibility and control over the product experience.
Katie KeithFounder & CEO
To recap, we've looked at two ways to add different types of custom field to a WooCommerce product:
- Use the WooCommerce Product Options plugin to add extra fields or options to a product which customers can select from.
- Use the free WC Fields Factory plugin to display additional static data on specific variations.
FAQ
Why show custom product variation fields for WooCommerce products?
Before we close, let's dive a bit deeper into why you might want to display custom fields on specific variations. After all, WooCommerce itself comes with variation descriptions where you can add extra data about each option.
Sometimes, a variation needs to display more information than you can neatly fit into the variation name and description. For example, imagine that you offer security software and need to show the security level and rating for each option. Variation custom fields offer a structured way to display this data.
Long variation descriptions with too much information may clutter the product page once a variation is selected. Use custom fields to provide unique product variant information to structure and organize the product page.
By displaying custom fields for complex product variants, you can improve the look and feel of your product page. This makes it easier for consumers to choose the right option for their needs. It also gives you greater freedom to display more details about your products.
Can custom fields for variations be used to alter product pricing?
Yes - when you use the WooCommerce Product Options plugin to add custom fields to variations, then each extra option can have its own price. Use this to increase the price by a fixed amount or percentage when that option is selected.
Can I add conditional logic to WooCommerce variation fields?
Conditional logic is useful when the product page needs to change as the customer selects options. For example, you might show an engraving field only after the customer ticks an 'Add engraving' checkbox, or display extra choices for one product configuration.
If you need that behavior, follow the separate tutorial on how to add conditional logic to WooCommerce variations. Read-only variation fields are better for displaying extra information after a variation is selected, rather than changing the buying form itself.
What other plugins can be used for adding custom fields to variations?
WooCommerce Product Options is the best plugin for adding extra options to products which customers can select. Alternatively, use the free WC Fields Factory plugin to add read-only custom fields to variations.
Can I add different field types like checkboxes or dropdowns to WooCommerce variations?
Yes, but the field type depends on the method. WooCommerce Product Options lets you add checkboxes, dropdowns, radio buttons, image buttons and more as selectable choices. WC Fields Factory and ACF display static text, so they're best for showing information rather than collecting a new choice from the customer.
Can I use ACF with WooCommerce product variations?
Yes. Advanced Custom Fields doesn't support variations out of the box, but developers can extend it with custom code to show extra fields on individual variations. This works well for read-only information such as a spec sheet reference or a care instruction, alongside the variation description.
What hooks save custom variation fields?
The woocommerce_save_product_variation hook saves the data you enter into a custom field when you update a variation. Pair it with one of the display hooks, such as woocommerce_variation_options_pricing, to add the field to the admin screen in the first place.
What is the difference between product options and variation custom fields?
Product options let customers choose or enter something on the product page, such as a size, a message or an uploaded file. Variation custom fields store extra information against a variation that's already been created, and usually just display that information to the customer rather than asking them to choose anything.
How to add custom fields for product variations using WordPress hooks and WooCommerce functions
If you want to add variation custom fields which customers can select on the product page, then it's best to use a plugin. This is complex to build, and it would take you many months of development to replicate a plugin like WooCommerce Product Options.
However, if you just want to add read-only custom field data to WooCommerce variations, then developers can do this themselves using a code snippet.
The following code snippets are courtesy of Business Bloomer. If you don't know how to use them then you should ask your developer, or you can use our customization services or the WC Fields Factory plugin recommended above.
Most custom variation fields hook into one of the tabs on the 'Variations' screen in the admin, or into the save action that fires when you update a variation. The WooCommerce developer documentation covers these in more detail, but here are the hooks you'll use most often:
| Hook | What it's for |
|---|---|
| woocommerce_variation_options_pricing | Adds a custom field next to the regular price fields on the Pricing tab of each variation. |
| woocommerce_variation_options_inventory | Adds a custom field next to the SKU and stock fields on the Inventory tab. |
| woocommerce_variation_options_dimensions | Adds a custom field next to length, width and height on the Shipping tab. |
| woocommerce_variation_options_download | Adds a custom field alongside the downloadable file settings, for variations of a downloadable product. |
| woocommerce_product_after_variable_attributes | Adds a custom field that doesn't fit neatly into Pricing, Inventory, Dimensions or Downloads, placed after the standard fields. |
| woocommerce_save_product_variation | Saves whatever the admin enters into any of the custom fields above, when the variation is updated. |
Use one of the display hooks to add the field's input box to the admin screen, then use woocommerce_save_product_variation to store the value against that variation as post meta.
How to display variation custom field values on the frontend
Once a custom field is saved against a variation, you still need to decide where the value appears for customers.
There are three common places to show it: Directly under the variation description once a customer selects that variation, or in WooCommerce's existing 'Additional information' tab alongside the product's regular attributes. A third option is a custom template, if you need more control over the layout.
Whichever plugin or code method you use, the value only becomes visible to customers once you've added it to one of these locations. WC Fields Factory handles this through its display options (see the setup steps above). The code snippets below show how to do it manually, by filtering the variation data and overriding the template file.
Step 1: Add the custom field to the variations
Use the following code snippet to add a custom field to each variation in the WordPress back end. Either add it to your child theme or using a free plugin such as Code Snippets:
// Snippet: Add Custom Field to Product Variations - WooCommerce

// Author: Rodolfo Melogli

// Community: Https://businessbloomer.com/club/
// 1. Add custom field input @ Product Data > Variations > Single Variation
add_action( 'woocommerce_variation_options_pricing', 'bbloomer_add_custom_field_to_variations', 10, 3 );
function bbloomer_add_custom_field_to_variations( $loop, $variation_data, $variation ) {
woocommerce_wp_text_input( array(
'id' => 'custom_field[' . $loop . ']',
'class' => 'short',
'label' => __( 'Custom Field', 'woocommerce' ),
'value' => get_post_meta( $variation->ID, 'custom_field', true )
) );
}
// 2. Save custom field on product variation save
add_action( 'woocommerce_save_product_variation', 'bbloomer_save_custom_field_variations', 10, 2 );
function bbloomer_save_custom_field_variations( $variation_id, $i ) {
$custom_field = $_POST['custom_field'][$i];
if ( isset( $custom_field ) ) update_post_meta( $variation_id, 'custom_field', esc_attr( $custom_field ) );
}
// 3. Store custom field value into variation data
add_filter( 'woocommerce_available_variation', 'bbloomer_add_custom_field_variation_data' );
function bbloomer_add_custom_field_variation_data( $variations ) {
$variations['custom_field'] = '<div class="woocommerce_custom_field">Custom Field: <span>' . get_post_meta( $variations[ 'variation_id' ], 'custom_field', true ) . '</span></div>';
return $variations;
}
Step 2: Display the custom field on the product page when a variation is selected
Next, you need to override the WooCommerce template file 'variation.php' in your child theme. You can find this in woocommerce/templates/single-product/add-to-cart. Put the amended version of this file in your child theme's woocommerce/single-product/add-to-cart folder (or create this if it doesn't exist).
Add the following to the template file in the child theme. Replace each instance of "custom_field" with the name of the custom field that you created in the previous code snippet:
<script type="text/template" id="tmpl-variation-template">

<div class="woocommerce-variation-description">

{{{ data.variation.variation_description }}}

</div>
<div class="woocommerce-variation-price">
{{{ data.variation.price_html }}}
</div>
<div class="woocommerce-variation-custom_field">
{{{ data.variation.custom_field}}}
</div>
<div class="woocommerce-variation-availability">
{{{ data.variation.availability_html }}}
</div>
</script>
Advanced implementation with ACF
For developers looking to create more complex custom field structures for variations, Advanced Custom Fields (ACF) integration offers powerful capabilities. While ACF doesn't natively support product variations, developers can extend it using custom code to create repeater fields and other advanced field types specifically for variations, as discussed in this ACF support forum thread.
This approach requires more technical expertise but provides greater flexibility for complex product configurations. Helper utilities can be created to simplify the management of ACF fields within the variation context, making the admin experience more intuitive while maintaining ACF's powerful field management capabilities.
4 Comments
Hi Barn2 Team,
you recommend Iconic WooCommerce Custom Fields for Variations to add custom fields to variations. I want to be able to create product filters based on these custom fields.
Is it possible to access / use the custom field data of the Iconic plugin with Barn2's WooCommerce Product Filters plugin?
In Iconic's documentation only FacetWP is mentioned https://iconicwp.com/docs/woocommerce-custom-fields-for-variations/how-to-filter-product-variations/ - although I feel that you both Barn2 & Iconic work pretty close in general.
Would be amazing to get an answer on this before BF-sale ends ;) Thanks a lot!
Hi Benjamin, thank you for the comment. I'm afraid WooCommere Product Filters is not compatible with custom fields for variations. We have a feature request for it and we're tracking the demand. We'll contact you if/when it's available. If you need anything else, you can contact us through our Support Center - https://barn2.com/support-center/. - Carl
Believe it or not, i was really sad when i discovered that i cant add more info for every variation, i will sell software products, some of variation work only on windows and other for multidevice, or software requirements ( windows 10/ android 4.3/ macos x... , 2/4/8/16gb ram ....) this plugins with JetEngine via using dynamics, will help me to show product info for the customer depending on the variation he chose, it will change automatically after he selecte the right software version without leaving the product page.
Thank you very much, this guide is like a gold for me.
Hi, Nayan. Thanks for your comments. I'm glad the info about how you can use WooCommerce Product Options to add extra fields or options to variations is helpful! Should you have any questions, you can get in touch with us via our dedicated Support Center. Cheers.