Setting the WooCommerce cart and checkout on the same page (step-by-step)

WooCommerce takes users through multiple pages before they can complete their orders. If a customer wants to buy one product, they have to go through four pages! That's definitely not ideal. It's better to put the WooCommerce cart and checkout on the same page.
Yes, the situation really is that bad for customers. First, they go to the shop page, then the product page, then the cart page, and then finally, the checkout page. The process involves even more pages for customers buying multiple products.
One way to improve the user experience and shorten the customer journey is by bringing product selection, the cart page, and the checkout page all into one page.
In this article, we’ll show you two easy ways to set up the WooCommerce cart and checkout on the same page. By the end of this article, you'll be able to create a fully functioning one-page checkout in either of these two ways:

Best ways to set the WooCommerce cart and checkout on the same page
There are two easy ways you can display the WooCommerce cart and checkout on the same page and create a better checkout flow. This can help you make your online store more user-friendly and boost sales.
The popup cart and checkout method
My favorite way to speed up the purchase flow is by using the WooCommerce Fast Cart plugin to display the cart and checkout form in a popup on the same page. Keep reading to learn more about this method or skip ahead to the instructions.
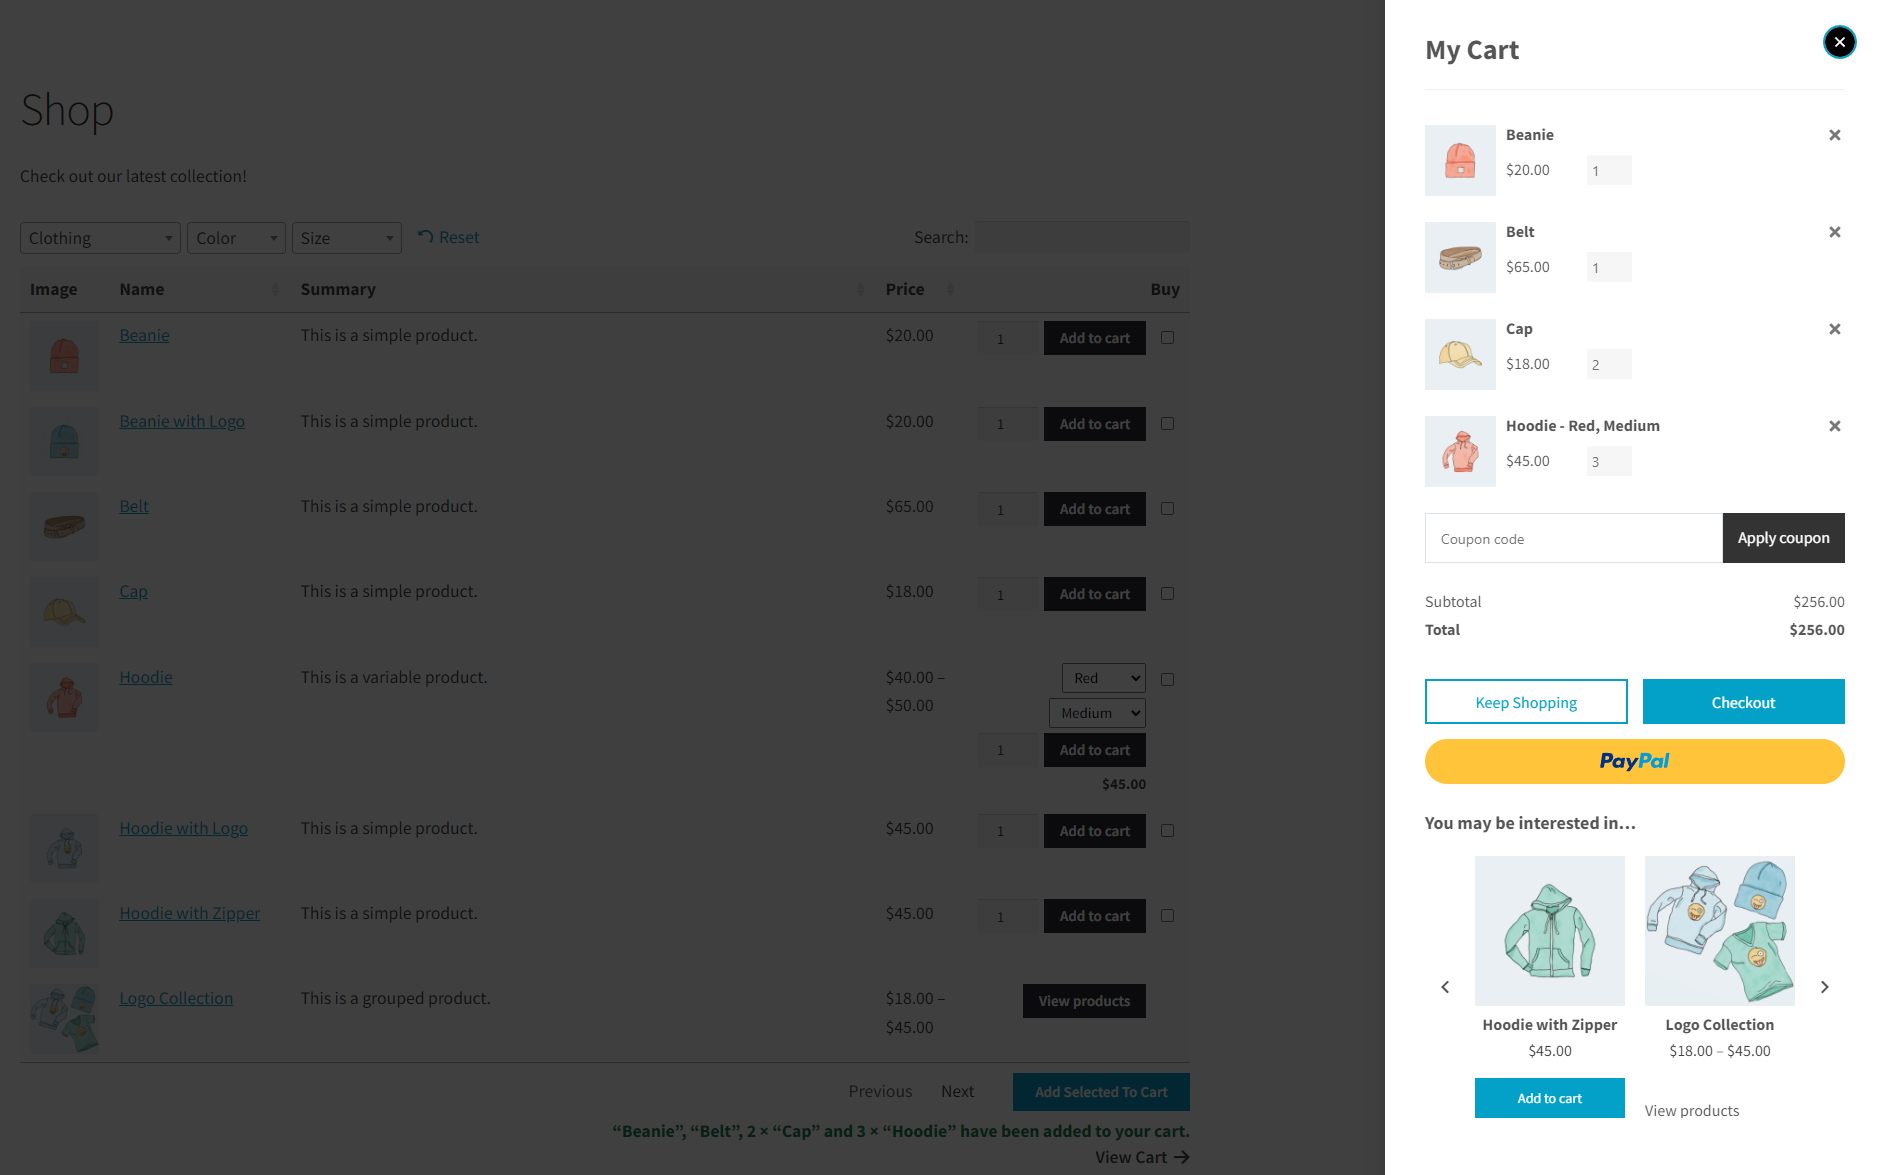
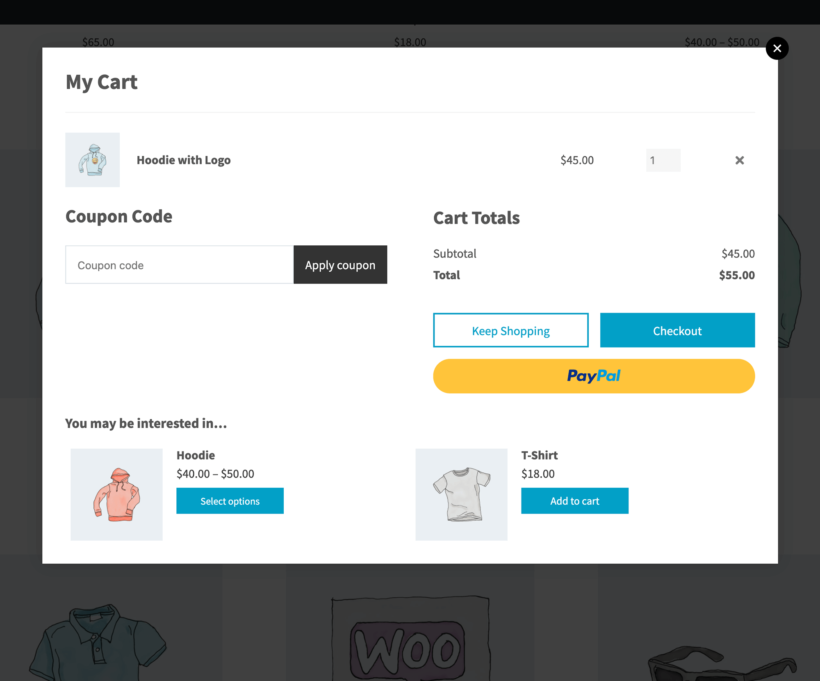
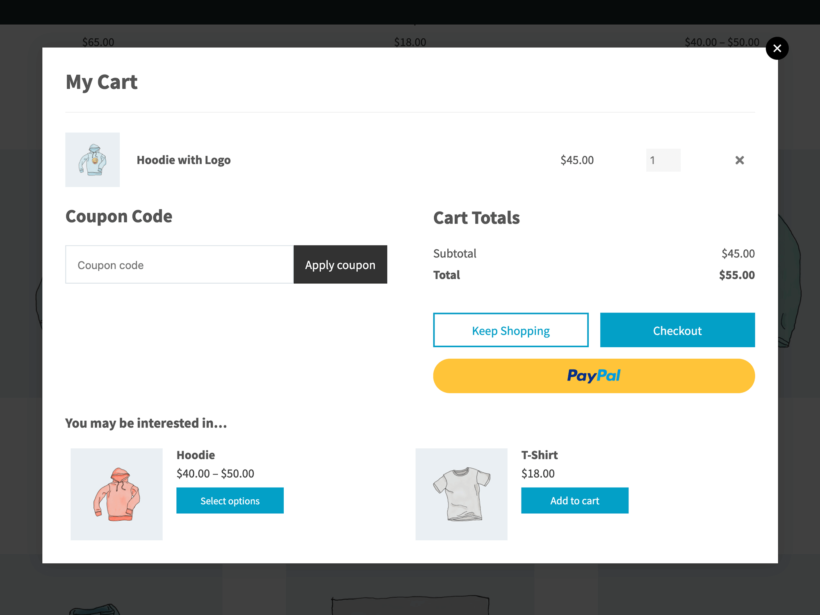
WooCommerce Fast Cart lets you show the cart and checkout on any page of your WooCommerce site. This means that if a customer wants to purchase a product when browsing your store’s catalog, they can simply click on the “Add to cart” button to open the cart and checkout page in a popup. That way, customers can quickly order products from any page they’re on - without leaving the page.
As a result, customers can review their orders, add more products, make changes to their orders, and checkout using the fast cart popup screen.
The WooCommerce Fast Cart plugin lets you display the cart and checkout in a side cart or a popup that appears in the center of the user’s screen. Either way, the entire shopping experience on your WooCommerce site is brought to a single page. It's a true one-click WooCommerce checkout.
As a result, you’ll get happier customers who are less likely to abandon their cart when shopping from your WooCommerce site.
Tip: For best results, use Fast Cart to prevent abandoned carts, and a dedicated cart abandonment plugin for the few who still leave your store.
The one-page checkout method
There's a second way to put the WooCommerce cart and checkout on the same page. It involves listing your products at the top of the page, and then a combined cart and checkout below. Customers can add products to the cart and see them in the cart at the bottom of the page. They can remove products, edit quantities, and complete the checkout fields - all on the same page.
You can achieve this by combining the WooCommerce Product Table plugin with the WooCommerce One Page Checkout plugin. Keep reading to learn more about this method, or skip ahead to the instructions.
Together, these two plugins shorten the order process and create a custom cart page on your online store. This way, you speed up the customer journey by giving users a quick and easy way to select products and checkout from your WooCommerce site:
Why have a product table on the same page as the WooCommerce cart and checkout?
Used alone, the one-page checkout plugin puts the cart and checkout on the same page. However, it's not ideal because shoppers will still have to browse multiple product pages to find what they’re looking for.
This is why we recommend using the WooCommerce Product Table plugin. It lets you showcase products in a tabular layout so customers can quickly select products using sortable and filterable product tables. You can then use the WooCommerce One Page Checkout plugin to show cart and checkout options on the same page.
This way, shoppers can quickly find the products they want to buy and add them to their cart at once using a single button. Once that’s done, they can fill out their billing details and checkout from the same page. In addition to this, customers can even edit their orders from the same page.
This simplifies the one-page checkout process on your WooCommerce store and is a great way to encourage more sales.
Setup instructions
Method 1: WooCommerce Fast Cart
You can use the WooCommerce Fast Cart plugin to display the cart and checkout in a popup on the same page.
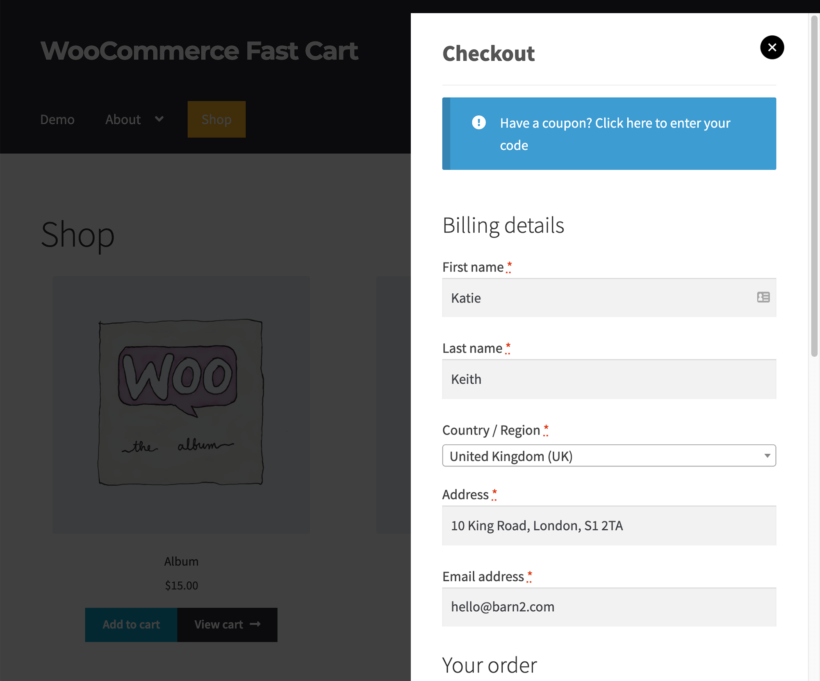
You can use the plugin to allow customers to use the popup cart and checkout. That way, the cart opens first so the customer can review their order before progressing to the on-page popup checkout. You can also speed things up further by skipping the cart completely and immediately initiating the same page checkout.
How to set up the WooCommerce Fast Cart plugin
- To get started, install and activate the WooCommerce Fast Cart plugin on your WordPress site.
- Use the plugin setup wizard to choose the main settings for your same page popup WooCommerce cart and checkout.
- You can select from two different layouts. These include showcasing the cart and checkout in the side cart or using a centered popup using the Layout section. The Auto open checkbox will automatically open the cart and checkout popup as soon as a user adds the product to their cart.
- Make sure to enable the Allow fast checkout checkbox. This will let customers quickly checkout with their order using the fast cart popup.
- You can also choose to skip the cart page entirely and showcase the checkout options instantly. Do this by enabling the Direct checkout checkbox.
- In addition to this, the plugin lets you select what to display in the popup, including product images, product prices, quantity pickers, item delete buttons, coupons, cross-sells, and shipping information.
Pro tip: Displaying related products in the popup cart can help you increase the average order value on your online store.
Now when customers are finished adding products to their shopping cart, they can quickly checkout using a popup cart and checkout popup.
Method 2: WooCommerce Product Table
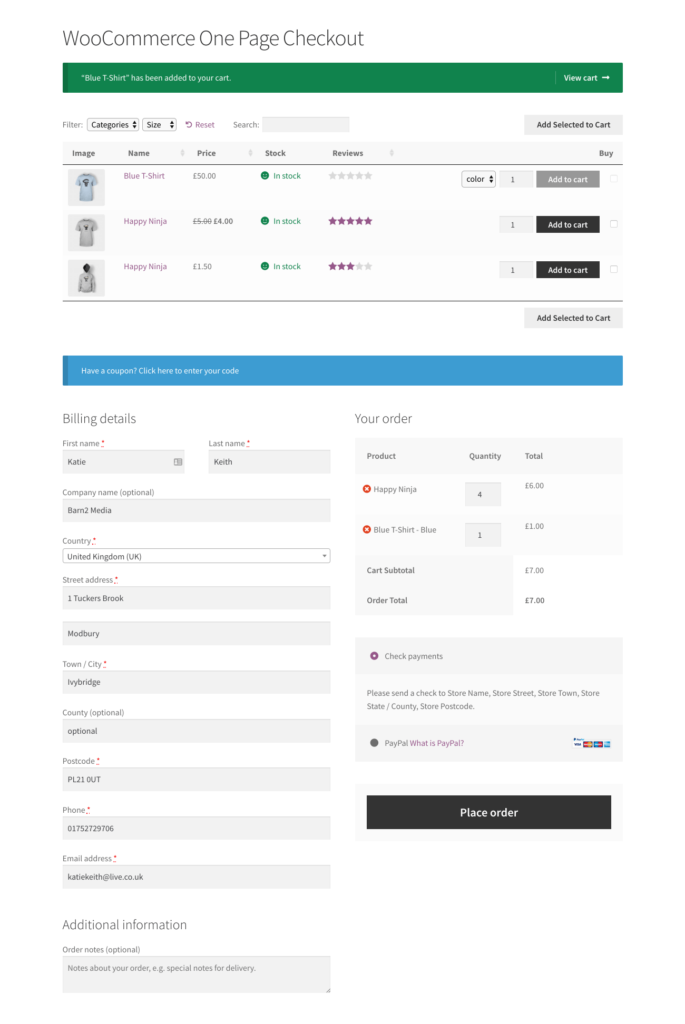
If you don't want to display the cart and checkout in a side cart or popup on the same page, then use method 2 instead. This displays a combined WooCommerce cart and checkout on the same page as a searchable product table.
Here's what you need to do to set the cart and checkout on the same page with WooCommerce Product Table. Either watch this video or follow the instructions underneath:
Step 1: Set up the WooCommerce Product Table plugin
- To get started, install and activate the WooCommerce Product Table plugin on your WordPress site.
- The setup wizard will open automatically - use it to set up your first product table. For example:
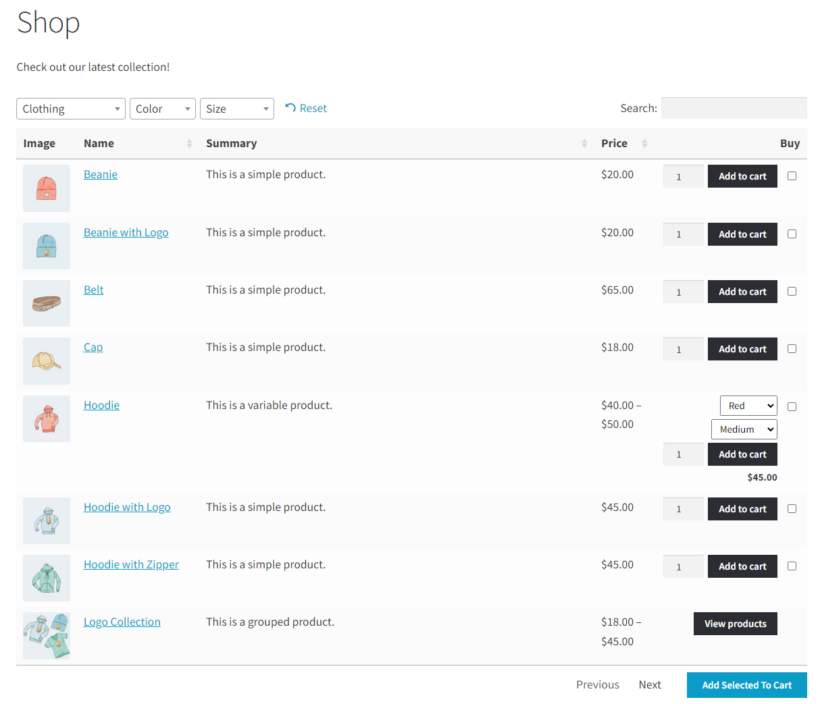
- Specify all the columns that you want to show in your product table using the Columns field.

- Select the Quantities checkbox to let users purchase multiple products without having to leave the page.
- In addition to setting other product table options, such as sorting options and filters, you can also let your customers select multiple products and add them all at once to their shopping cart using the Add to cart section. Simply select Add to cart checkboxes using the Adding products to cart dropdown menu. Choose where you want to display the “Add all to cart” button using the Multi-select cart button dropdown.

- Specify all the columns that you want to show in your product table using the Columns field.
- If you're not using the Gutenberg editor then copy the shortcode from the last page of the wizard.
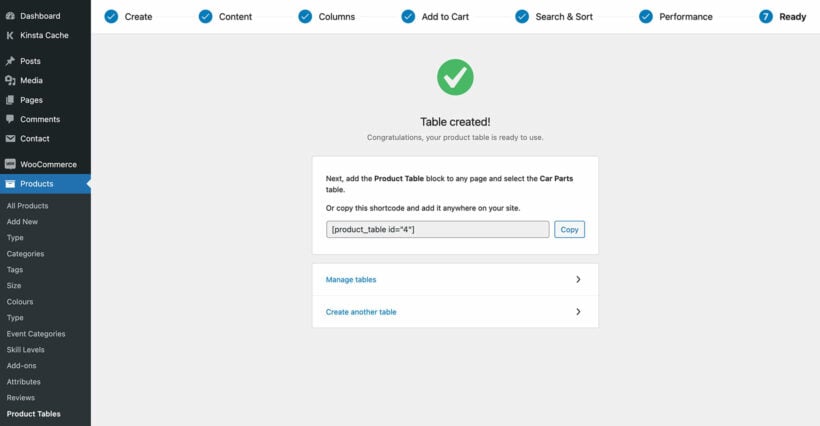
- Now go to the page where you want to list the WooCommerce cart and checkout on the same page. Either insert a 'Product Table' Gutenberg block and select your table, or paste the shortcode.
Used alone, your product tables might look like this. Keep reading to learn how to add a WooCommerce checkout underneath.
Step 2: Create a page for your products, cart and checkout
In Step 1, you added a product table to a page. Next, you need to add the WooCommerce cart and checkout on the same page. You can do this with the WooCommerce One Page Checkout plugin, which add a checkouts form below the table. The checkout is editable, so it acts just like the WooCommerce cart in which customers can edit and delete quantities without leaving the page.
- Install and activate the plugin on your WooCommerce site, then head to the page we created earlier with the product table.
- Add a Shortcode block and paste the
[woocommerce_one_page_checkout]shortcode before clicking on the Update button.
Now view the page. Customers can browse the product table to find what they’re looking for. They can add multiple products to their cart at once, edit their selections in the cart, and checkout – all from the same page.
Set up WooCommerce cart and checkout on the same page
The WooCommerce purchase flow is quite lengthy and overwhelming. It’s much better to use a same page WooCommerce cart and checkout plugin to improve the ordering process. Letting customers add products to their cart and checkout from the same page can help you reduce cart abandonment rates and increase conversion on your online store.
As we have seen, there are two excellent ways to do this:
- Use WooCommerce Fast Cart to display a popup cart and/or checkout on the same page as where the customer adds products to the cart.
- Alternatively, use WooCommerce Product Table and One-Page Checkout to list products in a searchable table with an editable cart and checkout underneath.
Get your chosen plugin today, and start showing the WooCommerce cart and checkout on the same page 😀