The ultimate one-page WooCommerce checkout guide
If you're creating an order form for your e-commerce store, then you're likely to want a WooCommerce one-page checkout too. Keep reading to learn how to enable WooCommerce one-page shopping.
WooCommerce one-page checkout lets customers select products and complete their purchase within a single page. One-page shopping is excellent for user experience because it's fast, so the customer is less likely to get frustrated and you're less likely to have a high cart abandonment rate.
The perfect WooCommerce one page checkout plugin needs two things:
- An easy way to view and find products, select options, and add them to their order without leaving the page. This involves listing WooCommerce products in a quick one-page order form.
- A WooCommerce checkout form - either underneath the product order form or in a popup on the same page.
Unfortunately, setting up WooCommerce one-page shopping isn't as easy as it sounds. Most order form plugins meet the first requirement but come short with the second one. And the official WooCommerce.com extension for one-page checkout isn't great at displaying products.
This tutorial will tell you how to meet both requirements - no coding required! You'll learn how to list products in a quick order form, with a choice of two types of WooCommerce single page checkout.
Further reading: The 14 best WooCommerce checkout plugins
But first, let’s cover the basics – what is a one-page checkout?
What is WooCommerce one-page checkout?
As I mentioned above, a WooCommerce single page checkout allows customers to select products and complete their purchases – all on one page.
Why do I need a WooCommerce one-page checkout plugin?
Typically in WooCommerce, a customer needs to add products to their shopping cart, then go to the cart page and then to the checkout page. This means that there are multiple steps to the point of making a purchase.
In the simplest of terms, this is bad. Research shows that 22% of abandoned carts happen because the checkout flow is too long. The more pages the customer has to click through to make a purchase, the less likely they are to complete it.
A WooCommerce single page checkout combines all the steps onto one page, allowing for a faster checkout experience.
You can speed up the purchase process by using a WooCommerce single-page checkout plugin to list products and allow customers to complete their journey on the same page. This is why even WooCommerce has created its own one-page checkout plugin. But there’s a catch 😲
The 3 best WooCommerce one page checkout plugins
Next, let's explore the 3 best plugins for adding one-page checkout to WooCommerce. We'll start with the official extension from WooCommerce.com. That's a good starting point but has limitations. As a result, Plugin #2 will provide an alternative way to implement one-page checkout, and Plugin #3 works alongside the official extension to add the missing functionality.
Read about all three plugins to choose the combination that will work best for your customers.
Plugin 1: WooCommerce One Page Checkout
Rating: 3.7 out of 5 stars
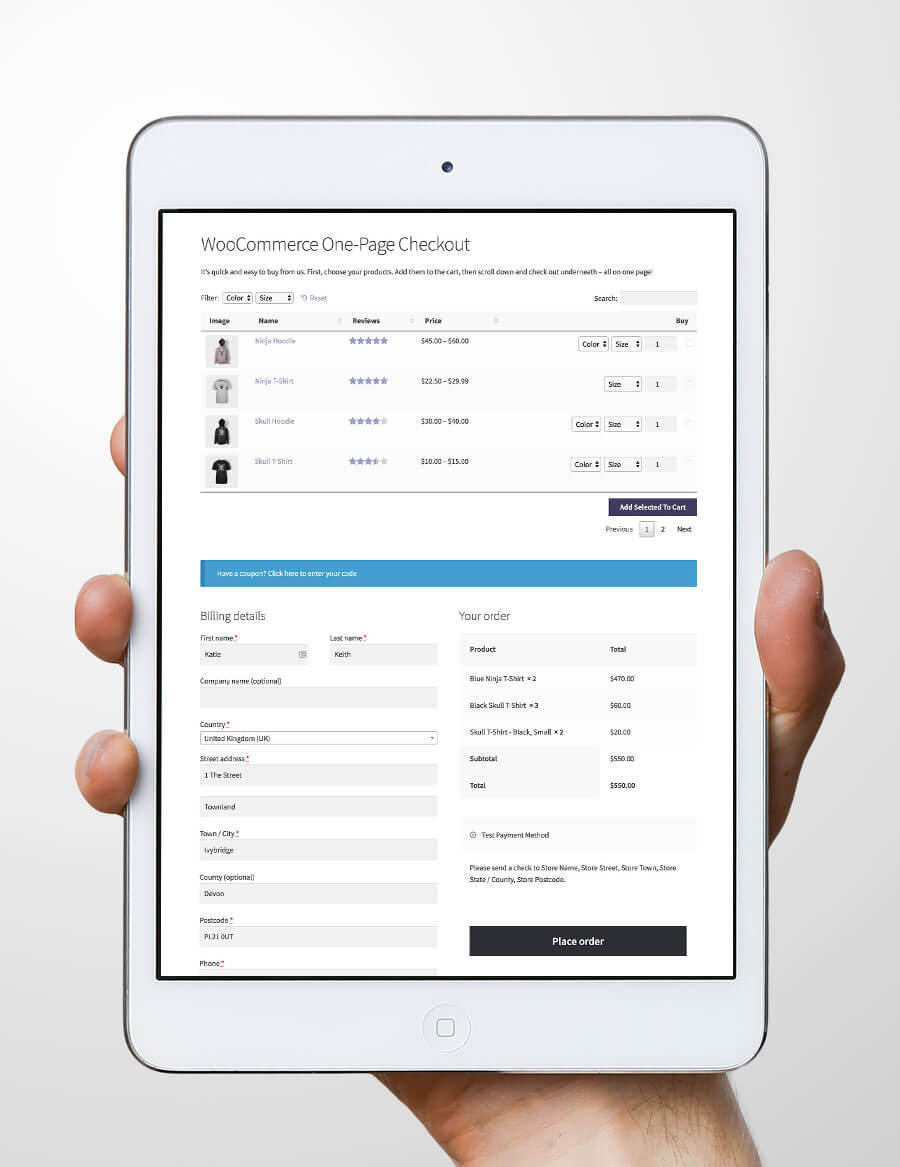
The official WooCommerce one page checkout plugin lists plugins in a basic layout at the top of the page, with a checkout form underneath.
It does this well, except that it lists products in a very basic way. That's fine for displaying one product or a small number of products with a checkout form underneath. However, this plugin is useless for product selection if you have a large number of products. It also fails to deliver if you want to enable customers to search, sort, and filter the list of products to find what they're looking for.
Any ecommerce store with numerous products needs to seriously consider user experience and make things easier for the customer. This involves listing products in a user-friendly way:
- The products have to be easy to find.
- All the important product data needs to be visible at once, without having to visit multiple pages.
- Customers need to be able to choose quantities and compare variations from one page.
Luckily, there are two easy ways to improve on this. We'll do this with Plugins 2 and 3 in this list.
Plugin 2: Display a popup checkout on your main shop pages
Rating: 5 out of 5 stars
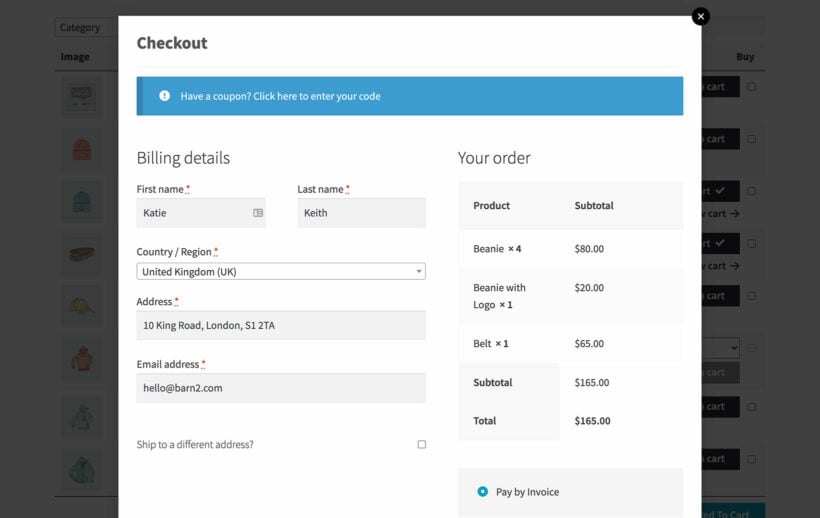
I think that the most user-friendly way to enable one-page checkout in WooCommerce is to display the checkout in a popup window on the same page as your products. That way, you don't add clutter to your shop pages - and yet customers can quickly check out on the same page where they add products to their cart.
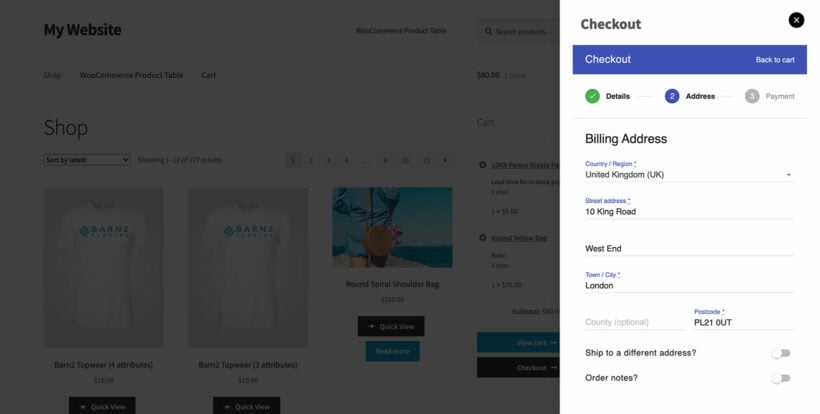
With this type of WooCommerce single-page checkout, the checkout form appears in a popup instead of below the list of products. In this case, the customer journey looks like this:
-
- The customer visits the product table page and uses the search, sort and filtering to find the products they want.
- They select the products and add them to their cart.
- A popup immediately appears over the product table. The customer makes any changes to the selected products, enters their details and completes the purchase without having to leave the page.
You can easily add this type of WooCommerce one-page checkout with the WooCommerce Fast Cart plugin. This lets you display a popup cart and/or complete checkout on the same page as your products. When a customer adds a product to the cart, you can either display the popup on-page checkout automatically, or let them click on a floating cart icon to launch it.
Popup one-page checkout setup instructions
- Install WooCommerce Fast Cart on your WordPress site.
- Go to the WooCommerce Fast Cart settings page at WooCommerce → Settings → Fast Cart.

- Choose how you want the fast cart to work. In particular, I recommend enabling the 'Direct Checkout' and 'Auto Open' options. Together, these make the checkout appear as soon as customers add products to the cart. It's the fastest way of using the plugin for a WooCommerce one-page shopping experience.
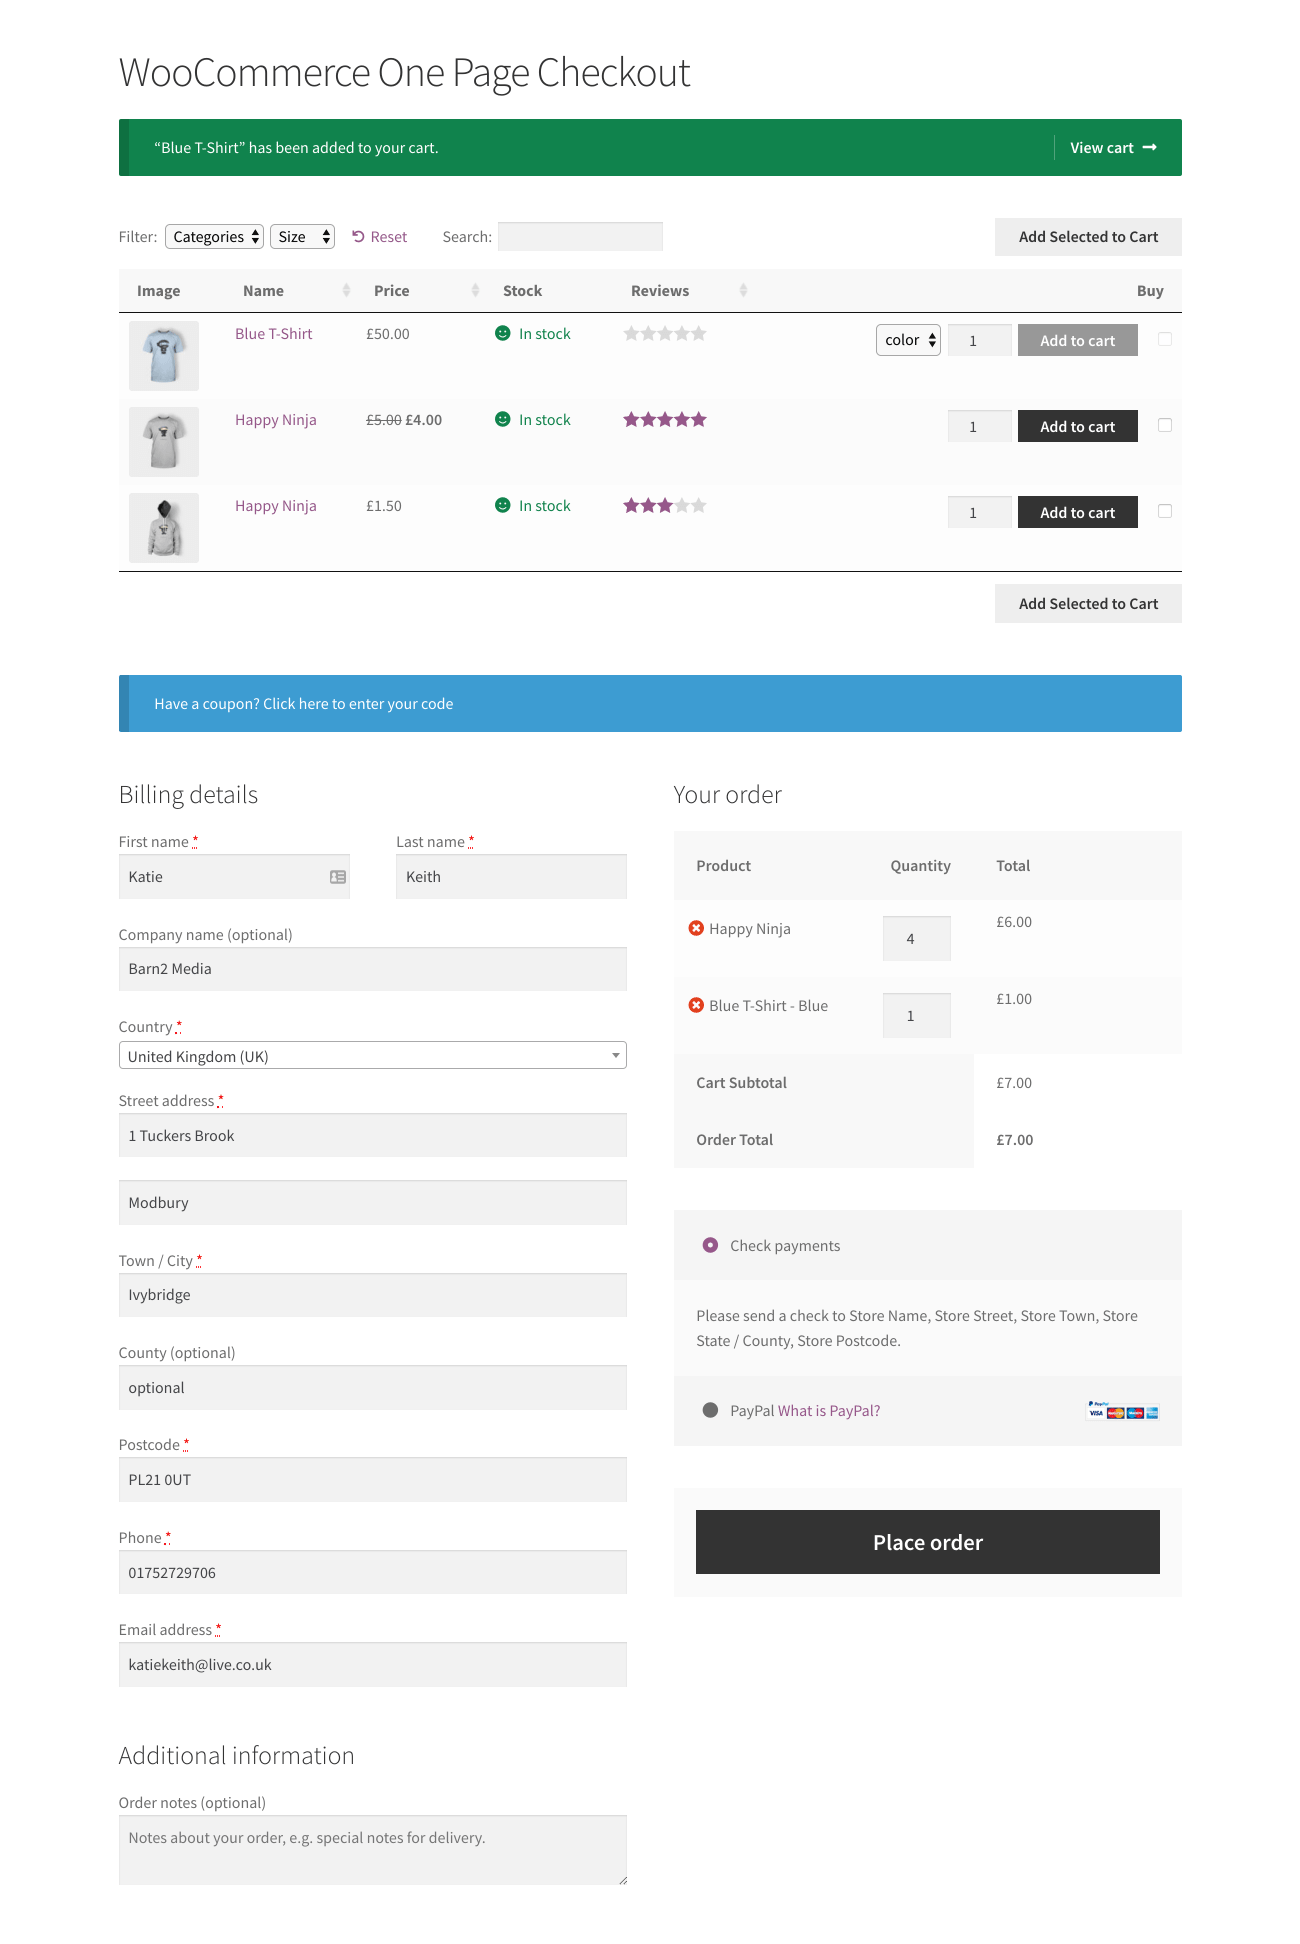
Plugin 3: List products in a searchable order form with one-page checkout underneath
When we discussed Plugin #1, I told you about the limitations of using the WooCommerce One-Page Checkout extension on its own. The main problem was that it lists products in such a basic way, with no way to search or filter them. That's where WooCommerce Product Table comes in.
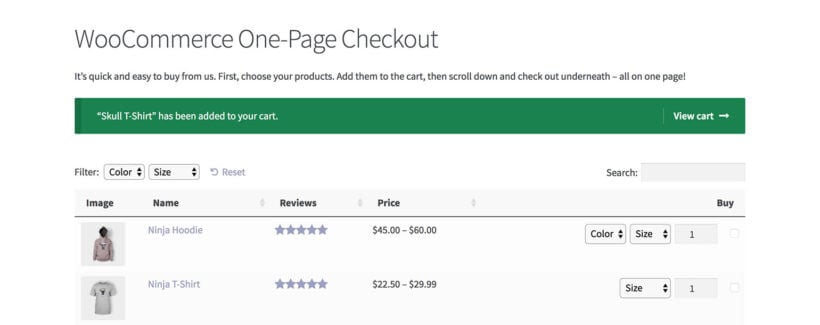
This bestselling WooCommerce one-page checkout plugin lists products in a searchable order form, allowing for a quick browsing experience. You can list hundreds or even thousands of products, with quick search and sort filters so that customers can easily find what they want. After adding products to their order, customers can add their details and checkout, directly on the order form page!
You'll need two plugins to implement this method:
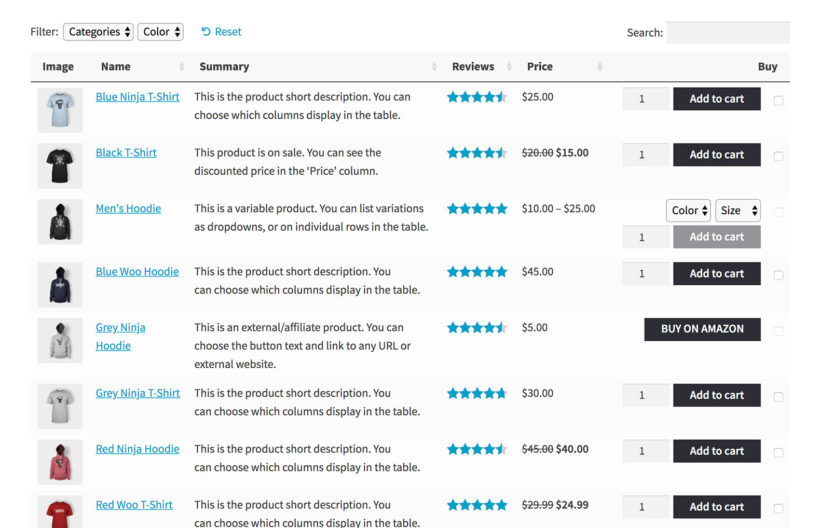
- WooCommerce Product Table to list products in a searchable one-page order form. This will allow you to list all your products in a single easy-to-navigate table which you can place on any page. You can choose which columns of information to include, add product variation dropdowns, and even add a search box and filters. The lazy load option lets you list hundreds or even thousands of products, neatly separated by pagination links.
- WooCommerce One-Page Checkout to display a checkout form underneath the list of products.
Together, this will create a seamless checkout experience for your customers. They won't have to switch between pages to find each product they are interested in. It's true one-page shopping, regardless of how many products you have.
Setup instructions for WooCommerce one-page checkout
Step 1: install WooCommerce Product Table
- Install the WooCommerce Product Table plugin on your WordPress site.
- Use the table builder at Products → Product Tables to choose the essential information about your product tables. This includes which columns of information to display about your products. Here are some tips for creating an effective WooCommerce one-page shopping experience:
- You may wish to prevent people from leaving the one-page order form and clicking through to the single product page. To do this, click the pencil icon for each column and open the Advanced column to disable the link on that column.
- If you want to list lots of products, you'll probably want to choose the 'Checkbox' add to cart option. This adds a multi-select option so that customers can add lots of products to the cart at once.
- If you're selling variable products, then choose either the 'dropdown' or 'separate' variation options. This lets customers choose variations directly in the order form instead of having to click through to the single product page. (After all, that would defeat the purpose of a WooCommerce one-page checkout!).
- Enable the 'Quantity' option so that customers can buy more than one of each product.
- Finally, go to the plugin settings page at Products → Product Tables → Settings and make these changes:
- Disable the 'Ajax Cart' option. By leaving this box unticked, the page will reload when customers add products to the cart, displaying the one-page checkout underneath with the correct products.
- Keep the number of Products per page fairly low so that customers don't have to scroll too far to view the checkout under the table. If you have more products than the number of rows, then pagination links will appear under the table so that they can view more products without leaving the page.
Step 2: Create a landing page listing your products
This is where we create the page that we'll be using as our WooCommerce single-page checkout:
- Create a new page (Pages → Add New).
- Add a shortcode to the page:
[product_table id="123"](replace "123" with the actual ID for your table, which you can get from Products → Product Tables. Alternatively, if you're building the page with the Gutenberg editor then you can insert the 'Product Table' block instead of using a shortcode.
This will list all your products with the options you chose on the plugin settings page.
You can add as many product tables as you like to the page - just create multiple tables and insert them, each listing different products.
Step 3: Add one-page checkout to WooCommerce
Next, you need to add one-page checkout to the page you just created.
- Install the WooCommerce One Page Checkout add-on.
- Edit the product table page that you created in Step 2, above.
- Add the following shortcode underneath the product table shortcode:
[woocommerce_one_page_checkout]
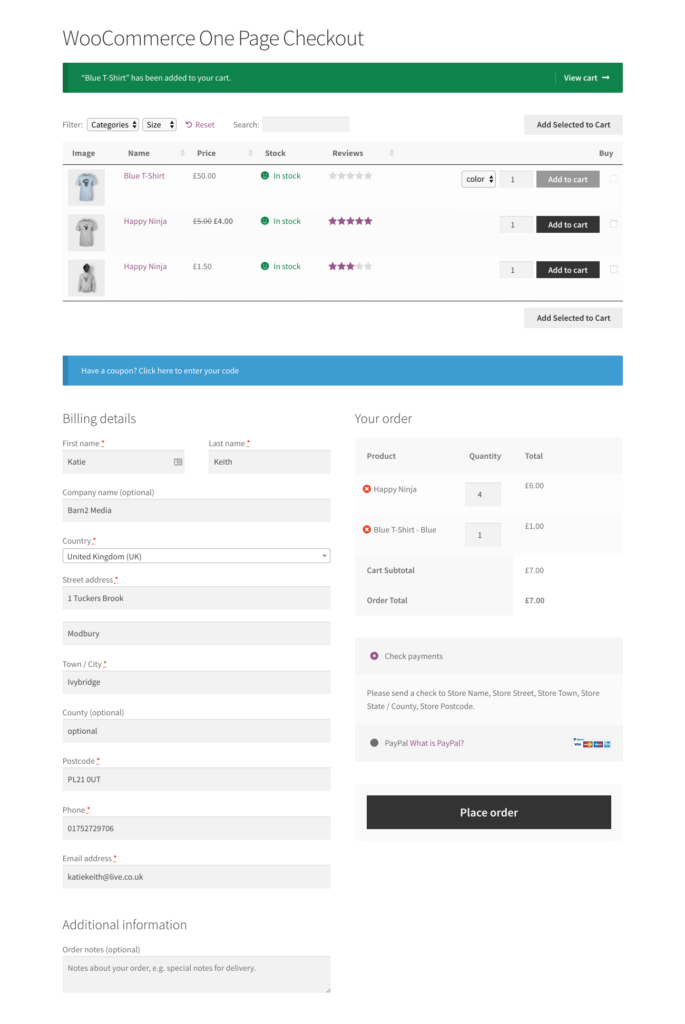
Your finished WooCommerce order form page should look something like this in the WordPress back end:
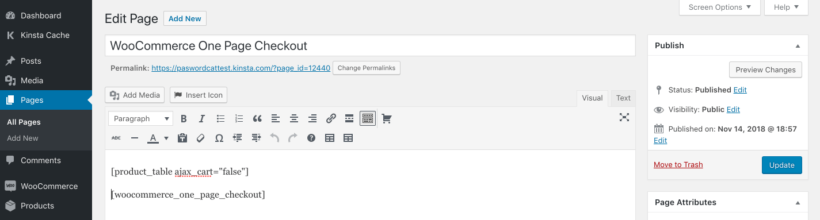
This will create a WooCommerce single-page checkout with a product table at the top, and the checkout form below.
FAQ
What is the best WooCommerce one page checkout?
The best WooCommerce one page checkout allows customers to complete their purchase as quickly as possible. You can achieve this with the WooCommerce Fast Cart plugin by allowing checkout in an on-page popup. Equally, you can achieve it by combining WooCommerce Product Table with the official One Page Checkout extension.
Both are good options from a functionality standpoint. However, you may want to consider your customer's behavior and preferences when choosing which WooCommerce single-page checkout to use. If your customers usually buy a single or just a couple of items per session, you may want to go with the pop-up checkout option. It's fast and seamless and allows for a very quick checkout:
On the other hand, if your customers tend to purchase several different items at a time or would prefer a more traditional checkout experience, you may want a checkout form below your products. This way, customers can take their time to add products to their cart one by one (or remove products if they change their mind). Finally, they can scroll down to the checkout form once they're ready to place the order.
How can I create a custom checkout page in WooCommerce?
In this article, we've looked at how to display the default WooCommerce checkout under a list of products; and how to display it in a popup checkout. None of these plugins will actually change the design of the checkout.
We have a separate article on how to create a custom checkout page. Once you've done this, the customized checkout will automatically appear in your one-page checkout - whichever of the above plugins you are using. That's because they inherit the styling of the default checkout, so if you edit this then it will be reflected in your one-page checkout.
Is a one step checkout better than a multistep checkout?
The beauty of WooCommerce one page checkout is the speed of making a purchase. WooCommerce multistep checkout does the opposite by adding extra steps to the process. However, the two concepts are more compatible than you might think. This is because you can add a multistep checkout to a single page - for example, as tabs within that one page.
We have a separate article on how to add multistep checkout to WooCommerce.
How do I customize the fields on my one page checkout?
If you want to edit the fields on the WooCommerce checkout, you can easily do this with WooCommerce Checkout Field Editor.
This handy plugin is perfect if you want to streamline your checkout process or even add custom checkout fields. For example, you can use it to collect extra information from each customer. This will appear on the WooCommerce one-page checkout, whether you've added it below the list of products or in a popup checkout.
You can also use the editor to write more persuasive calls to action and change the purchase button - instead of the standard 'buy now' CTA, you can easily do some A/B testing to find out what works best for your customers.
Can I disable the WooCommerce cart completely?
If you're using Plugin 2 (i.e. Fast Cart with a popup checkout), then you can easily disable the cart. Simply enable the 'Direct Checkout' and 'Skip Cart Page' options on the plugin settings page. That way, customers can only access the checkout and there are no back doors to the cart page.
However, this is a bit trickier if you're using Plugins 1 and/or 3. Even though the checkout appears below the list of products, there are still ways for customers to access the cart page. For example:
- The cart link will still appear in your navigation menu and/or header (depending on your theme and menus).
- When the customer adds products to the cart, they will see a success message linking to the cart.
- If your WooCommerce order form page includes a sidebar with the 'WooCommerce Cart' widget, then the contents of the cart will show after they add products. This widget includes links to the cart and a separate checkout page.
It's absolutely fine to use these checkout features alongside one-page checkout. It gives customers a choice. For example, if they want to edit the contents of their cart, they can click through to the cart page and check out afterwards. This is handy because WooCommerce one-page checkout lists the products in the cart without any means to edit them.
However, some online store owners prefer to completely disable the WooCommerce cart and just use the one-page checkout. That's fine too.
How to do it
The simplest solution is to add a 301 redirect to stop people from accessing the cart page. You can do this by installing the free Redirection plugin and redirecting the cart page to wherever you like.
For example, you might redirect the cart page to the WooCommerce checkout. This is the checkout page defined in the WooCommerce settings, and is separate from the one where you've added a product table.
Alternatively, you could add an anchor link to a point underneath the product table on your one-page checkout page, and create a redirect so that people are taken there when they click on a cart link. When a customer adds a product to the cart and sees the success message with 'View Cart' link, clicking it will scroll them down the page to the WooCommerce one-page checkout under the product table.

Get the best WooCommerce one-page checkout plugin now 🚀
In conclusion, a WooCommerce one-page checkout can greatly enhance the shopping experience for your customers. It can increase your conversion rate, and ultimately boost your online sales.
By streamlining the checkout process and reducing the number of steps, you can eliminate unnecessary barriers. This makes it easier for customers to complete their purchases.
With the right implementation and customization, a one-page checkout can be a powerful tool for any WooCommerce store looking to improve their checkout process and drive growth. So, take the time to consider which type of one-page checkout is best for your business.
To add one-page checkout to WooCommerce, you can either:
- Use WooCommerce Fast Cart to add a popup checkout to your main shop pages.
- Use WooCommerce Product Table to list products in a searchable order form; and the One-Page Checkout plugin to display the checkout form underneath.
Both options offer a great way to reduce cart abandonment by optimizing how customers complete their purchases. Choose the right plugins for your needs, and make your customers happy 😄
10 Comments
looks very promising, will add to my wishlist.
thanks
Hi, John.
Thanks for your interest in WooCommerce Product Table! Should you have any questions, please let me know. You can also get in touch with us via our dedicated Support Center.
Best regards and keep safe,
yeah just try this using method 2 and one page checkout under table not updating without refreshing.
Hi, Rendra. Sorry to hear this. It could be due to the Use AJAX when adding to the cart option being enabled. We recommend disabling this, as mentioned in one of the bullet points under 2 ways to create a WooCommerce one-page checkout > Step 1: Install WooCommerce Product Table. Thanks.