How to sell 'build your own' custom product boxes in WooCommerce
While WooCommerce is widely used for simple stores, it’s also possible to create custom product boxes in WooCommerce. Keep reading to learn how to set up a ‘Build Your Own Product’ system.
Whether you want to sell bespoke vegetable boxes, luxury food, or gift baskets, build your own pizza or burrito, build a box, or something else, you can sell custom product boxes with WooCommerce.
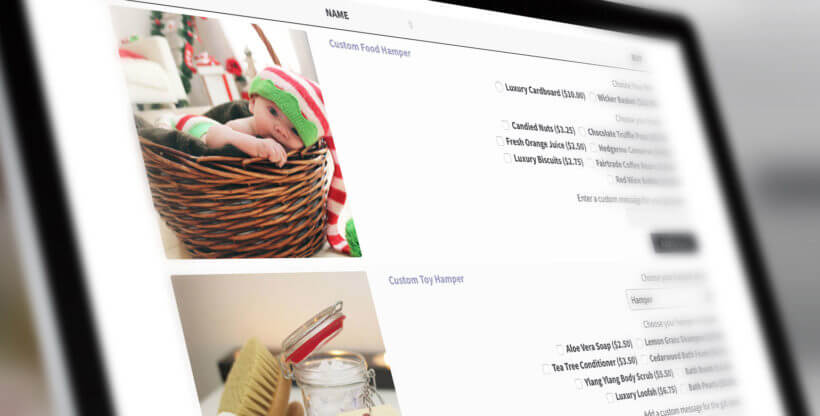
Used creatively, WooCommerce is perfect for selling custom product boxes and bespoke orders. Customers can choose from a selection of products in different categories to order a custom combination that is unique to them. They can view the available box contents in a user-friendly list, tick the ones they want, and add to the cart – all from a simple one-page order form.
Pretty neat, right? Below you’ll see an animation showing a WooCommerce custom product box plugin in action:
Best of all, it’s surprisingly easy to create a WooCommerce build your own product system using the flexible Product Table plugin to list the available box contents. You won’t even need to write any code :)
This tutorial will cover everything you need to know to get started on your own WooCommerce custom product box site. We’ll show you how to install and set up WordPress and the required plugins and different strategies for organizing and listing the available box contents. We'll also share some handy design tips to tailor your 'Build your own product' ordering system to suit any kind of business.
Examples of custom product boxes in WooCommerce
First, let’s look at the types of WooCommerce build your own product that you can sell with WooCommerce. This will help you to understand the options and think about what you need for your own custom product boxes.
1. Build your own pizza, sandwich, wrap, burrito, or salad
A WooCommerce takeaway restaurant website might want to let customers choose fillings and build their own meals. This could be used to create a customized pizza, sandwich, sub, wrap, burrito, salad, or other custom product box.

For example, the item choices might work as follows:
- Build your own pizza – choose your base, choose your sauce, choose your toppings, and choose your dips.
- Create your own sandwich – choose your bread, choose your fillings, choose your salads, and choose your sauces.
- Build a burrito website – choose your fillings, choose extras, and sides.
The WooCommerce build your own product website would have separate lists of the different types of items – one for each category. For example, the pizza example would start with a list of bases, followed by a list of sauce choices, and so on. Customers could add as many extras as they like to their custom product selection, all from one page.
2. Create your own custom gift basket product
There’s something depressing about buying a basket/hamper as a gift when you don’t get to choose what’s in it! Whether you’re buying a food, beauty, or gift basket, it’s far better to build your own gift basket with items that you know your loved one will enjoy.
You can use WooCommerce to develop a custom product box website selling gift baskets. This might involve creating 3 separate categories: one for the hamper or product box options; one listing all the foods/gifts/cosmetics/etc to fill the gift basket; and one with the padding and wrapping options. Customers can choose their options and add all the individual elements to the cart, creating their own custom gift baskets.
3. Custom meat or vegetable boxes with WooCommerce
The meat and vegetable box industry is growing rapidly as more and more people discover the benefits of local and organic food.
There are 2 main types of meat box or vegetable box websites:
- Some companies use WooCommerce to sell the same weekly meat or veg box to all their customers.This contains whatever produce is currently in season, and customers can’t choose the contents. You may sell a choice of meat or vegetable boxes (e.g. Small and Large boxes), but there are no customization options for individual customers. The best way to set this up is to add each box as a separate WooCommerce product (e.g. meat box, fruit box, and vegetable box), with or without variations (e.g. size options). Display the products and/or variations in a table using WooCommerce Product Table. Use YITH WooCommerce Subscriptions to get recurring revenue, as customers can sign up to receive the same box weekly, fortnightly, or monthly (or at whatever regular intervals you choose).
- The other type of vegetable box scheme allows customers can selecting the items to include in the box.Instead of ordering a box with pre-defined contents, customers can view a list of available items and create a custom product box in WooCommerce. The custom food box company will then fill each box individually, and deliver it to them. Continue reading this tutorial to learn how to set this up.
Before you start, make sure you’re clear on specifically what type of product box you’re building.
You may also want to check out another tutorial of ours: Use WooCommerce to create a restaurant online food ordering system.
How will customers build their own WooCommerce product?
If you follow this tutorial to set up your own WooCommerce custom product box system, it will work like this:
- The customer will be taken to a single page listing all the box items that are available to choose from, divided neatly into sections/categories.(Or if you prefer, you can divide the process among several pages.) Each section can have basic instructions above the list of products, for example: “Please choose 1 item from each section.”
- Customers can select all the items they require.Standalone items will appear on their own row in the list. Mutually exclusive items will appear as dropdown lists so that customers can choose between them. If you use an additional Product Add-Ons plugin (more info about this below), then you can also add further options such as checkboxes and custom gift messages.
- Once they have filled their custom product box, the customer can click the ‘Add Selected to Cart’ button.This will add all the products to the WooCommerce cart with the selected options.
- Next, the customer can click through to view their selected products in the cart, view the total price, and make any changes.They can then access the checkout, enter their details and order the 'Build your own product' online.
- As the store owner, you will receive email notification of each new order. You can then build the product box containing the items they have selected, and deliver it to them as appropriate.
See it in action on our ‘Build a gift basket’ plugin demo page.
What will my build-your-own WooCommerce site cost?
The great thing about selling WooCommerce custom product boxes is that you’ll be using the self-hosted version of WordPress. You will own your own data, and won’t have to pay high monthly charges for a hosted e-commerce platform. It also gives you more control over what your website will cost.
Here’s a list of the various elements of your WordPress WooCommerce website and what they might cost:
Your WooCommerce build your own product website
- WordPress CMS (content management system) – this powers your overall website and is 100% free of charge.
- WordPress theme – free (if you choose, you can purchase a premium WooCommerce theme for approx $65. However, the Storefront theme featured in this tutorial is free).
- WooCommerce plugin – this adds the core e-commerce functionality to WordPress and is also free.
- WooCommerce Product Table plugin – this paid-for plugin lists your products in a table layout so that customers can choose and customize the options to build their boxes.
- Bonus: WooCommerce Product Options plugin – you only need this if the product variation options that come built into the free WooCommerce plugin aren’t suitable. The core WooCommerce platform lets customers select customization options from 1 or more dropdown lists. If you want further options, such as multi-select checkboxes or custom gift messages, then you’ll need the Product Options plugin too.
- Any further plugins you choose to add extra functionality, such as ongoing subscription boxes.
Other costs
- Web hosting(Ongoing cost) – There are many web hosts for various price ranges. If you’re outside of Europe, we recommend signing up direct with Kinsta or or WP Engine. It’s important to choose a managed WordPress host because they will ensure your website loads quickly, is reliable and you won’t lose sales due to downtime etc. They also come with extra features such as backups with one-click restores, and free staging sites. Scrimping on hosting is a false economy.
- Payment gateway feesIf your customers will be paying for their WooCommerce build your own products online, then you will need a payment gateway. This will take a percentage of each sale in fees. PayPal is the easiest payment option to set up and charges are just a few percent. If you will be receiving a lot of online orders then I’d recommend a credit card processor with even lower fees such as Stripe.
Total up the options you’ll need to give you an idea of the cost involved. It’s amazing just how inexpensive it is to set up a website for your business creating your own products.
With those costs clear, we’re nearly ready to cover how to actually create a custom product box website with WooCommerce. But first, let's have a quick look at 2 websites that are already using WooCommerce and product tables to sell 'Build your own' products.
Case study #1 - using WooCommerce to sell custom cosmetics product boxes
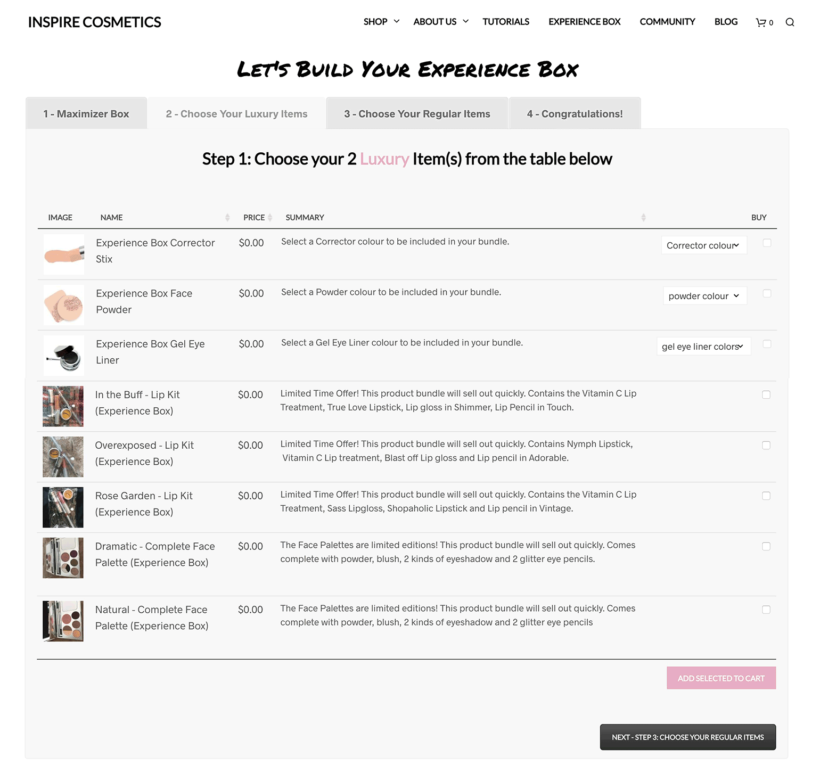
Inspire Cosmetics uses the WooCommerce Product Table plugin to sell custom product boxes of cosmetics. They've built a multi-step page where customers are taken through an intuitive journey to build their own product box. First, you choose an experience box. Second, you choose the experience box contents from 2 tables listing the cosmetics products. Third, you complete your order via the WooCommerce cart and checkout.
They used the Beaver Builder WordPress page builder plugin to create the tabbed layout. To boost performance, each tab links to a separate page but the customer has the illusion of remaining on one page for the entire process.
They also use the WooCommerce Quantity Manager plugin to ensure that people select the correct quantity of items for their experience box. This allows them to sell different-sized boxes with the correct validation rules.
Case study #2 - using WooCommerce to sell custom product baskets for pets
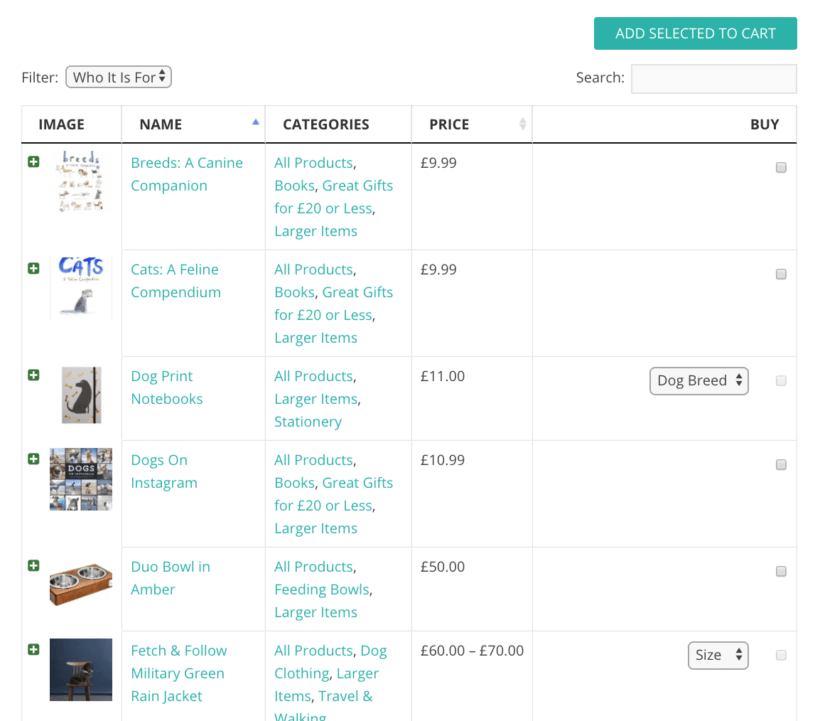
Barks and Squeaks uses WooCommerce Product Table to sell create your own product gift baskets for pets and their owners. Customers can quickly choose variations and create a custom product box containing multiple WooCommerce products. You can use the "Who Is It For?" filter above the table to narrow down the list. This speeds up the buying process.
Now you've seen the WooCommerce design your own product system in action on 2 real websites, I'll show you how to set it up yourself!
How to create a WooCommerce custom product box website
Building a 'Build your own product' system from scratch can be a daunting proposition, but WordPress and the right plugins make it really easy.
This section will show you everything you need to know: you’ll learn how to set up WordPress and an appropriate theme, along with the plugins you need. Then, I’ll show you how to use those WooCommerce plugins to set up your product categories and tables, and then create your own product page listing the box contents.
Step 1 – Set up WordPress
First, sign up with a good WordPress web host such as Kinsta or WP Engine and follow their instructions to install WordPress.
Once you’ve logged into the WordPress admin for the first time, go to Appearance → Themes and install a theme. Themes are the “templates” on which all WordPress sites are built, and there are hundreds of thousands to choose from, so you can make your site look just how you want.
You can either buy a premium theme and install it, or use a good quality free theme such as Storefront. All the product images in this tutorial and the accompanying video use the Storefront theme.
If you don’t like the design of Storefront, check out its many child themes which offer a good choice of themes for your WordPress website design. There’s even a child theme designed specifically for food websites!
Step 2 – Install WooCommerce
When you first activate WooCommerce, you’ll be taken to a Setup Wizard. This will walk you through the main steps to creating your online store. For example, it will auto-create your main pages such as the shop page, cart, and checkout. You can choose your tax and shipping settings and set up payment gateways. You can then use the official WooCommerce documentation to make any further changes to the overall setup of your online shop.
Step 3 – Create ‘build your own product’ categories
Once you’ve set up WooCommerce, it’s time to create the categories that the custom product box ordering system will be divided into. First, write them down on a piece of paper to make sure it’s logical and user-friendly.
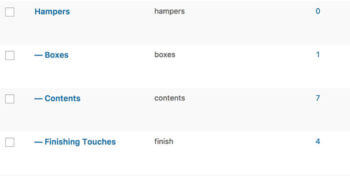
Think about the best way to group product elements. For example, if you’re creating a ‘build a gift basket’ website then you might want 3 categories: one for the box/basket, one for the contents, and one for finishing touches such as padding and bows.
Remember, you’re creating a tailored user experience: you need to take the customer on a journey to create the custom product box, making one decision at a time.
Once you’ve planned a category structure, go to Products → Categories in the WordPress admin. Create as many categories as you need.
Step 4 – Plan your products
Now, it’s time to create some products. Each of the items that customers can choose as part of the "build your own" process will be a ‘product’ in WooCommerce. Again, it’s best to plan your products before adding them to the website:
- First, write a list of all the separate items that customers will be able add to their box when building the custom product.Structure the list into the categories you created a minute ago. For example, if you’re building a ‘design a custom pizza’ website then your list should include things like bases (deep pan base, Italian base), sauces (tomato sauce, spicy garlic sauce), toppings (pepperoni, ham, meatballs, mozzarella, goat’s cheese), and so on.
- Next, decide whether to create each item on the list as an individual product, or to group them into variations.I’d recommend using individual products for standalone items, and variable products for items that the customer has to choose between. For example:
- In the pizza example, the customer only needs a single pizza base, so you would add a single variable product called ‘Pizza Base’. You might then add 2 variation options to this product: ‘deep pan’ and ‘Italian’. Later, I’ll show you how to display these on an order form with a dropdown so that customers can select a base from the 2 options. (NB: with variable products, it will still sometimes be possible for customers to choose more than 1 option if they want to. However, using this format will discourage them from doing so).
- For other types of items, such as pizza toppings, the customer can choose as many as they like. It’s not an ‘either/or’ choice and the toppings aren’t dependent on each other. You should add each of these items as individual products, not as variations.

Tip - Use Add-Ons for extra product options
If variations aren’t flexible enough then you can add extra product options using the WooCommerce Product Options plugin instead. This has extra options such as check boxes, radio buttons, the ability for customers to add some custom text, etc.
Step 5 – Add the products
Once you’ve worked out all the products that you’ll need to create, and decided on the format, it’s time to add them to WooCommerce. Follow this process for each product:
- Go to Products → Add New in the WordPress admin.
- Add all the product data such as title, description, category, and upload a featured image.
- In the ‘Product Data’ section, choose a product type:
- Select ‘Simple Product’ if you’re creating a standalone item that can be added to the eventual WooCommerce build your own product without variations. Add a price, plus choose the stock options if you want to use stock control.
- Select ‘Variable Product’ if you’re creating several mutually exclusive items for customers to choose from (like my pizza base example in the previous section). This is slightly trickier to set up – please follow the instructions on creating attributes in the WooCommerce documentation. Once you’ve created your attributes, tick the ‘Use for Variations’ box and go to the ‘Variations’ tab. You can then select your attributes and create the variations (one for each options) with their own pricing and stock control.
- If you’re using WooCommerce Product Options to provide extra options, then you can use these with the Simple or Variable product type. Add your options under Products → Options.
- Finally, click Publish to add the product to the custom product box website.
Now comes the fun part!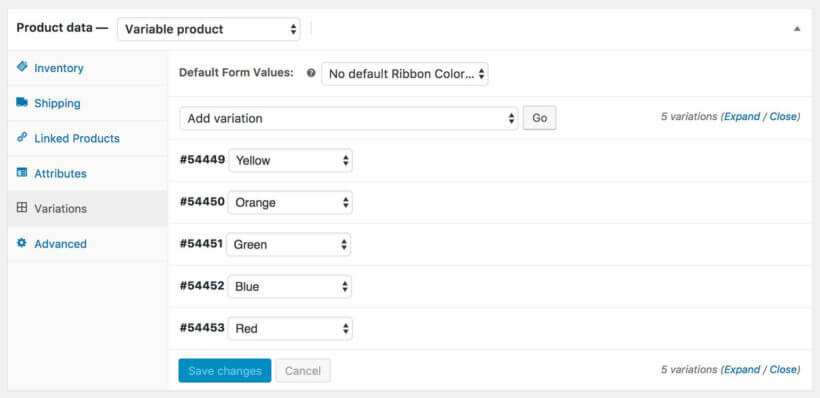
Step 6 – Create a ‘build your own product’ page
It’s time to list everything on a single page or order form, so that customers can select items and build their own custom product box. You’ll need the WooCommerce Table plugin for this:
- Buy WooCommerce Product Table and install it.
- Create your first tableThe product table builder will open automatically. Go through each page to choose details such as which products to display, and which columns to include. Copy the shortcode from the final page of the table builder - you'll need this for Step 6.
- Create more tablesGo to Products → Product Tables and create a different table for each section of the 'Build your own product' system. For example, you might create a different one to list the products from each category.
- Create a page (Pages → Add New) which you will use for the custom product box online order form. Add whatever information you like to this page, for example instructions and any rules/restrictions that customers should follow in selecting their products. (E.g. you might add instructions like “Choose 1 product from each category”.)
- Divide the page into sub-headings – 1 for each category. For example, a ‘build a custom pizza’ website might need H2 subheadings for Base, Sauce, Cheeses and Toppings.
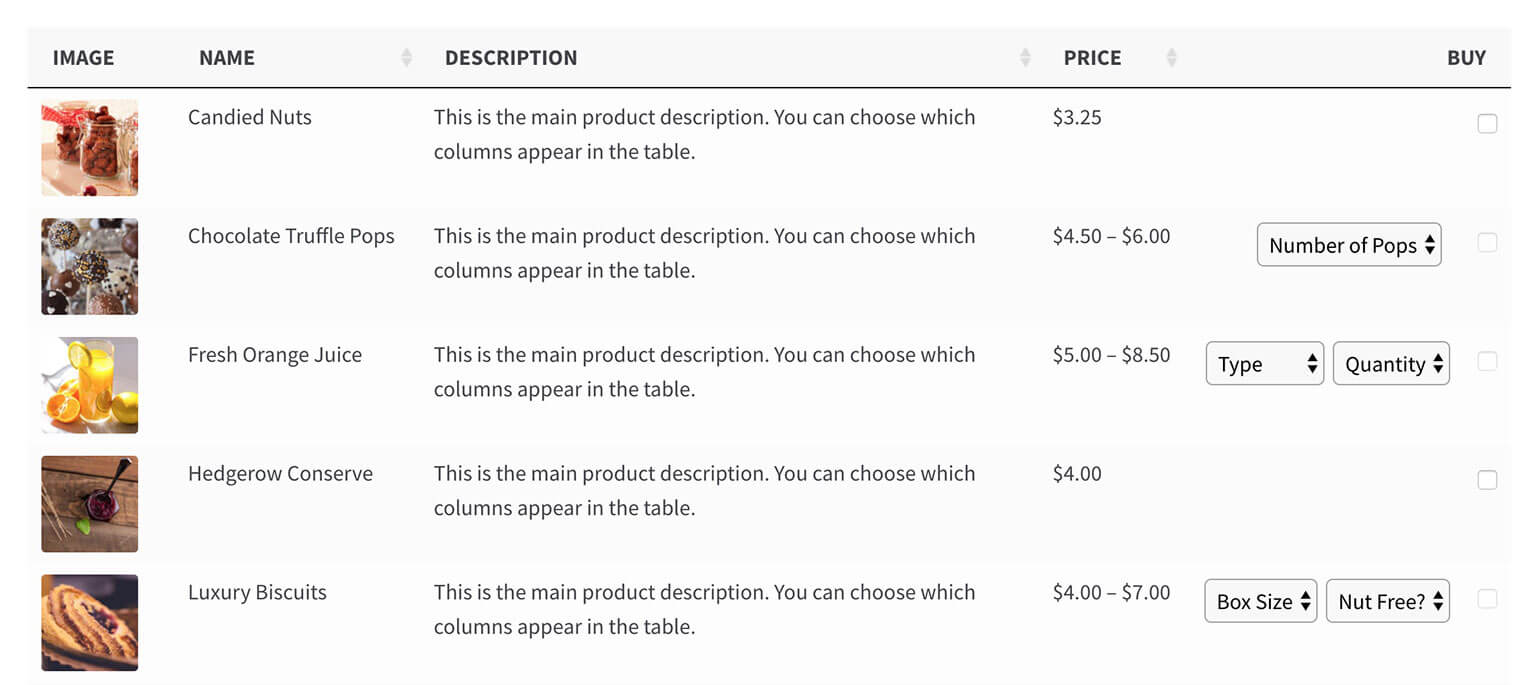
- Insert tables onto the pageNow insert the product tables that you created in Steps 2 and 3 into the relevant parts of the page. To do this, either use the 'Product Table' Gutenberg block or the shortcode that you copied earlier.
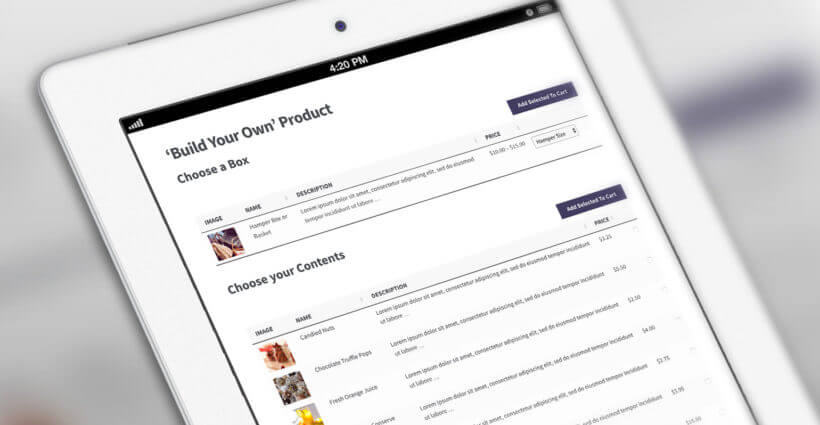
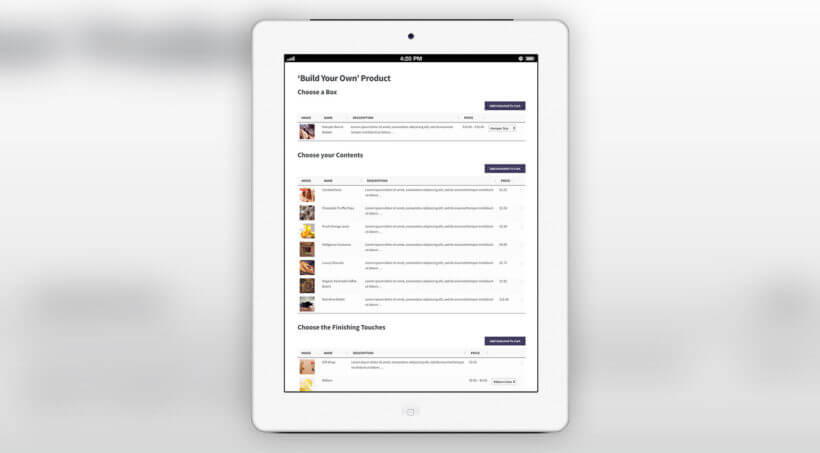
The end result will be a page listing each section of your 'Build your own product' order form, like this:
Split the 'build a box' process across multiple pages
In the previous section, you learned how to add multiple product tables to a single page. Alternatively, you can split the 'build your own custom product' ordering process across several pages.
Depending on what you're selling, this can have several benefits:
- If you have a small selection of products then it makes sense to keep everything on one page. In contrast, if you have a lot of products or options then it's good to use multiple pages.
- It can also be better for performance, as fewer products are being loaded all at once (although WooCommerce Product Table does come with a lazy load option, which helps with page load times).
How to set it up
To create a multi-step 'Build your own product' process, it's important to make things as easy as possible for the customer. The process must be simple and intuitive. For example:
- You might add a 'Next Step' button under each product table, intuitively directing users to the next page after they add products to the cart.
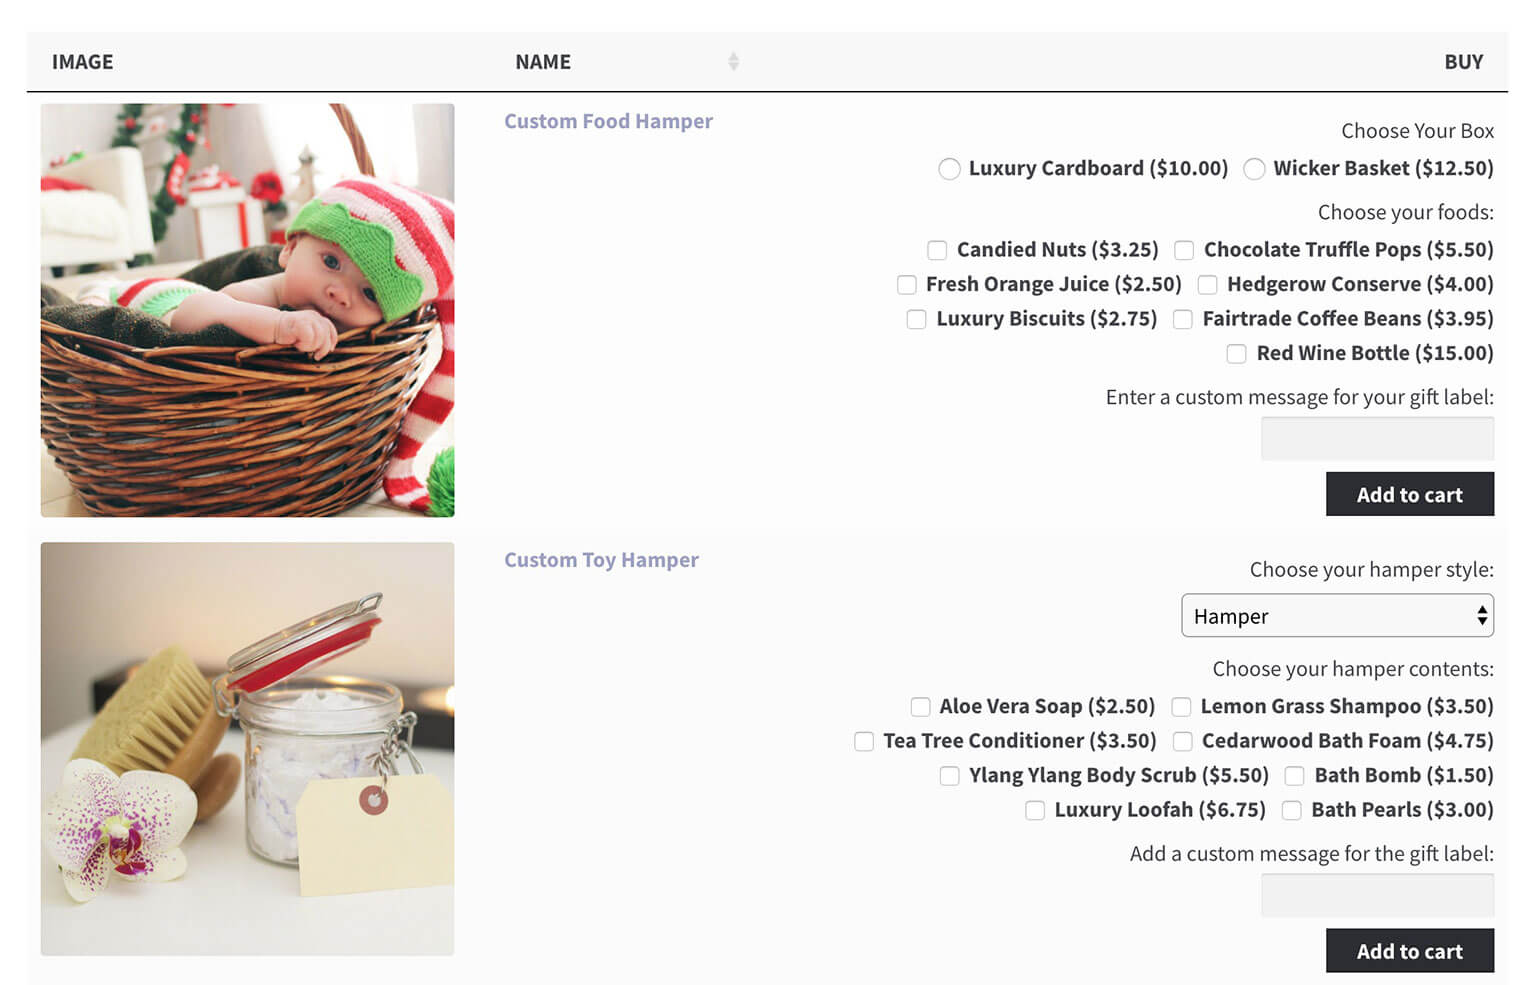
- For an even more seamless user experience, install the free WooCommerce Add to Cart Custom Redirect plugin. List your basket/box products on the first page of the order process, and use this plugin to redirect each one to the page where you've listed the box contents products. Users will automatically be redirected to the correct next page, depending on which box they choose. This is an excellent option if you offer different content products for each box. (Tip: To use this plugin with WooCommerce Product Table, you must ensure that the Ajax cart option is disabled. The redirection only works if the page refreshes after adding a box to the cart.)
Bonus options
By now, you know how to create a WooCommerce store where customers can select multiple items to create a build your own custom product box. Before we finish, I’ll tell you about some plugins that can further enhance it.
Add 'quick view' links
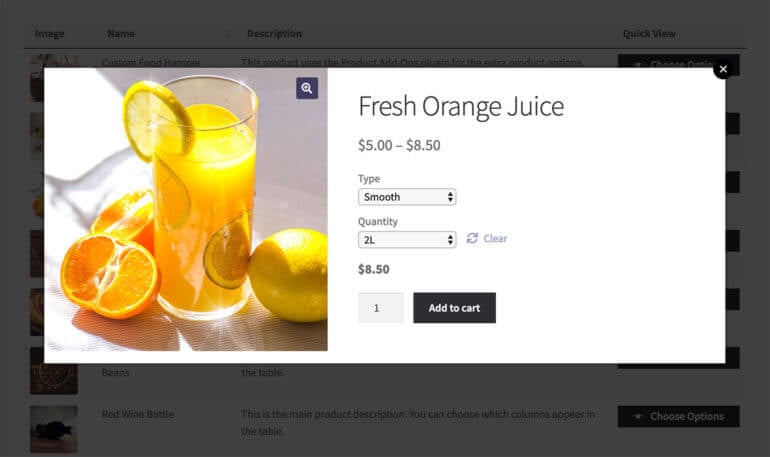
So far, you've learned how to list the components of your 'build your own' WooCommerce products on a single page, with an add to cart column listing all the options. That's fine if you have a small number of options for each product. But what if you're creating more complex custom product box systems systems, with many variations or product add-ons? You can see from the screenshots above that the product list will start to look cluttered if you have too many options.
If this applies to the build your own products in your ecommerce store, then WooCommerce quick view is the solution:

Quick view is a great way to tidy up your custom product box ordering pages without having to take customers to a separate page for each product. This keeps them within the flow of building their own product and avoids distractions. (Tip: If you install WooCommerce Quick View Pro then I recommend using WooCommerce Product Table to disable the links to individual product pages.)
Set quantity rules and defaults
Out of the box, all your WooCommerce products will have a default quantity of 1. Customers can add as many of each item to their custom boxes as they like.
Many 'build a box' schemes need more control over product quantities. Specifically, they need to ensure that customers add the right number of items from each category to their boxes. You can easily do this with the WooCommerce Quantity Manager plugin.
How it works
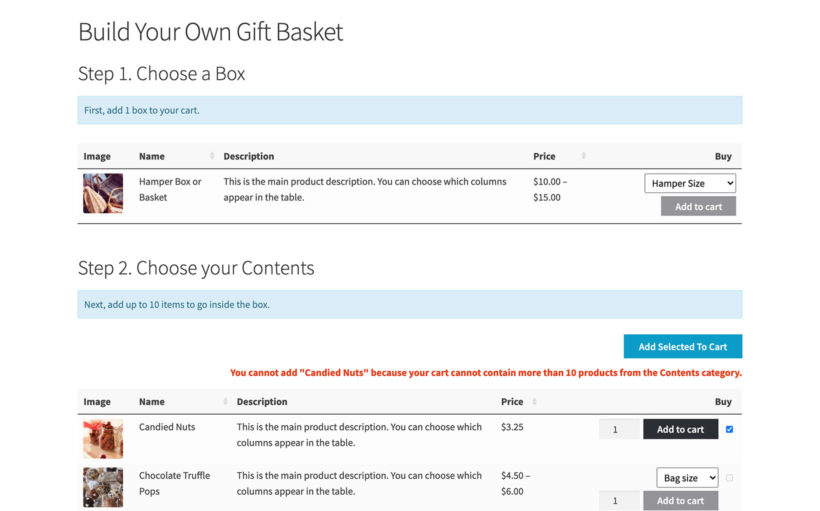
Let's say that you have created 3 sections for your WooCommerce built-your-own-product system: Box, Contents, and Finishing Touches. You can add minimum and maximum controls like this:
- Box - Set the minimum and maximum quantity for this product to 1.
- Box contents - If you want customers to choose up to $30 worth of items, then set the maximum category value to $30. Alternatively, set a minimum and maximum quantity so that customers have to choose a certain number of box items instead.
- Finishing Touches - To let customer choose up to 2 decorative options for their custom product box, set the maximum category quantity to 2.
Where possible, the WooCommerce Quantity Manager plugin will stop customers from adding the wrong quantity in the first place. For example, the quantity field for the 'Box' product won't let customers select more than 1.
If the customer tries to add too many products from the box contents category, then they will see an error. The error will be helpfully worded and will advise them what they need to change.
If the WooCommerce cart doesn't contain enough products from a certain category then again, a helpful error will ask them to add more.
To improve user experience, I recommend adding clear messages about the quantity requirements to the build-your-own-product page. You can see an example of this in the screenshot above.
Sell different products for each box or basket
So far, we've assumed that you will be offering the same box contents products to everyone, regardless of which box they select.
If you'd rather sell different products depending on the custom product box, then you can do this too.
Simply create a separate category for each gift basket and use WooCommerce Product Table to create a table listing all the products for each box. Put the box itself in the same category, and use the sort options in WooCommerce Product Table to list the box first. Use the free Product Dependencies plugin to prevent people from buying the contents products unless they have also added the correct box to their cart.
Can I add a fixed price for each box option, instead of charging separately for the contents?
Some people use WooCommerce Product Table to create a custom product box website with a fixed price for each box. For example, they might offer Box A for £10 and Box B for £20. Each box contains a different number of products.
Again, you can achieve this by using WooCommerce Product Table with the WooCommerce Discount Manager plugin.
How to sell fixed price product boxes in WooCommerce
- Install WooCommerce Discount ManagerFirst, install the WooCommerce Discount Manager plugin on your WordPress website.
- Create a fixed price dealNext, go to Marketing → Discounts and click 'Create New'. Select the 'Buy X products for a fixed price' discount type.
- Choose the discount detailsSelect which products customers can combine to get the fixed price offer, for example your 'box contents' category. Also select the number of items that they must add in order to be charged the fixed price.

After you have saved the fixed price discount, customers can
Repeat the above steps to create as many fixed price deals as you like. For example, you might create one fixed price to sell quantities of 5, another for quantities of 10, and so on.
If there are any quantities that you don't want customers to be able to buy (for example, quantities of less than 5) then you can use the WooCommerce Quantity Manager plugin to prevent this.
Can I sell box subscriptions, and let customers change their order each week/month?
This is possible, with a bit of extra work.
1. Create your subscription and box contents products
- First, install YITH WooCommerce Subscriptions and create a subscription product for each box.Create a separate category for these products. Use WooCommerce Product Table to list products from this category on a public page. Customers can view the subscriptions, sign up and pay online. (Note: The subscription product is just for the ongoing subscription/membership plan - do NOT include options for choosing the box contents as part of the subscription product. You'll create separate products for the box contents next.)
- Next, create categories for the box contents products.Add each option for the box contents as a separate product, or as variable products with a choice of options. Decide whether or not to charge for these products:
- If all products are included within the ongoing subscription plan, then leave the price of the box contents products as 0. This is because the customer has already paid via their subscription and the products are essentially free.
- If customers have to pay for each item in addition to the subscription cost, then add prices for each product.
- Alternatively, if you include some products within the basic subscription and charge extra for more expensive items, then you can do that too. If the customer selects chargeable items then they will make a one-off payment for these at the checkout, otherwise they can choose their box contents and check out for free.
- Create a new product page for choosing the box contents. Use WooCommerce Product Table to list the products from these categories.
- Finally, use the AutomateWoo plugin to automatically email your customers at regular intervals, reminding them to order the box contents for that subscription period.The emails should contain instructions on how to log into their account and order their box contents for that week/month.
2. Restrict access to the box contents products
- Restrict what subscribers can order, and how often If you want to control how many items customers can order for their box, then you can add the WooCommerce Quantity Manager plugin.
- Prevent non-subscribers from ordering box contents products To prevent non-subscribers from ordering the monthly/quarterly box, you need to restrict the page where you've listed these products. Do this using the WooCommerce Protected Categories plugin. Use it to restrict them to logged in customers.
Can customers change their box each week?
Some WooCommerce subscription box websites like to sell subscriptions for a fixed weekly/monthly cost, while giving customers the option to choose the box contents each week. Unfortunately there is no straightforward way for the customer to change their box each time. The way WooCommerce Subscriptions works is that they subscribe to receive the same products each time.
My suggestion
Lots of people have asked us how to do this, so here's a suggestion:
- Use YITH WooCommerce Subscriptions to sell the subscriptions without any actual products (i.e. box contents) associated. For example, you might have a product called 'Weekly Box - 10 Items'. This would bill the customer a fixed amount each week.
- In a private area on your site (which you could create using our WooCommerce Protected Categories plugin), you could add the products that are available each week. Create a separate category for each subscription option. You would then use the WooCommerce Quantity Manager plugin to restrict the number/value of items that the customer can order from that category. Set the price for each product to 0.00 so that customers can order the products each week without paying extra. Or if a product has a surcharge on top of their fixed subscription amount, then you can set this as the product price and they must pay this when they check out that week.
- Use the AutomateWoo extension to automatically email the customer each week with a separate email for each type of subscription. The email should include details of how to access the hidden area where they can choose their products for the week, and the deadline for ordering. Each week, the customer will log into their account, view the hidden category containing the products that are available on their subscription, select them from the product table, and check out in the usual way.
- As with all subscription box services, if the customer doesn't order specific products before the weekly deadline then you would choose the items for them.
That's a lot of plugins!
I realise that this method involves combining several plugins. They are all reputable plugins which we have tested to work well together. If you don't wish to code it from scratch yourself (which would be very complex - and therefore expensive) then we believe this is the best method for allowing customers to choose different contents for their subscription boxes each week.
Can people build their own custom product box without having to pay online?
Yes, you can do this. When you set up WooCommerce, you need to choose one of the offline payment options. For example, you can enable payment by check or invoice. You can reword these to anything you like, so your customers won't see the word 'check'.
They can then place the order in WooCommerce without having to pay. You will receive an email notifying you of the order. This will contain details of the selected products and the customer's contact details. You can then arrange payment offline in whichever way works for you.
Get building! How do you use WooCommerce custom product boxes?
And there you have it! You now know everything about creating a WooCommerce build your own product boxes page. Plus, you know doing this can be quick and easy using WooCommerce and the WooCommerce Product Table plugin.
- WooCommerce Product Table makes it easy to create custom ordering pages for your build-your-own-product systems.
- Use it with WooCommerce Quantity Manager to control how many items customers can add to their product box.
- Add WooCommerce Discount Manager to sell fixed price product boxes.
- All of these plugins come with a 30-day money back guarantee, so you can try them on your WordPress site risk-free!
Designing your own site doesn’t have to be hard, no matter what sector you work in. With this simple tutorial, and some help from the most powerful e-commerce platforms on the web, you’ll be able to set up a beautiful, easy-to-use site.
I’d love to hear how you’ve achieved a build your own box system using WooCommerce. Did you use the plugins I’ve mentioned in this tutorial, or are there any good ones I’ve missed? Please add your comments below, and include a link to your site where we can see it working 😀
50 Comments
I am working on a meal plan subscription where customers will be able to edit their meal selections for following deliveries. I understand your explanation for how to do it with protected categories and quantity manager but wanted some clarification on the first initial order. Is there a way I can allow customers to select their meal options before checking out? Or do they need to purchase the subscription first and then get a follow-up email sent to them with a link to the protected category for them to select their first meals?
Thank you
Hi, Rena. Thanks for your comment. The Examples of WooCommerce build your own websites given in this article explain that you can allow customers to select the product or meal options to include in their first order (and succeeding ones, if it's for a subscription) before checking out. You then also have the option to sell box subscriptions, and let customers change their order each week/month.
I hope this helps. Please let me know if you have any more questions. You can also get in touch with us and enquire via our dedicated Support Center. Thanks!
thank you for helping the people
Hello, Shivu. Thanks for your comment. I'm glad to hear you found our tutorial helpful! Should you have any questions, please let me know. You can also get in touch with us through our dedicated Support Center. Stay safe.
I don't know why in 2 years you don't have made some features for group product in cart to distinguish the products in which box they go. It is useless to talk about a feature if you cannot use it if not for a single product composed at a time...
Hello, Edoardo. Thanks for your comment. This is because of the limitation mentioned in the WooCommerce Cart page, which I hope you'll understand is no longer part of our plugin and so this is beyond our control. You can see our suggested workaround in our reply at this link. Let me know if you have any other questions.
Hi. My charity has used Product Table in the past and are now relaunching or catering social enterprise. To be Covid secure we are now offering packed lunches instead of buffets. I'd like the ordering process to be as follows:
Step one: choose the total number of packed lunches you want to order. Say it's 6.
Step two: choose your sandwich filling. So here you could choose eg 4 cheese and 2 chicken. Important: the number you of each variation (filling) you choose should add up to the number of lunches selected in step one. You should not be able to choose more or less than 6.
Steps 3, 4, etc: Select other options eg drinks, snacks, again with each variation equalling the number of lunches ordered.
What I want to avoid is people ordering eg 6 lunches then 3 or 10 variations as they haven't understood the process.
Is this possible?
Thanks so much
Hi, Sam. Thanks for your renewed interest in using WooCommerce Product Table for your organization.
For what you would like to achieve, I suggest that you combine Steps 1 and 2 and add the sandwich filling options as variations of the packed lunches product. This way, users will select the variation/filling and quantity of packed lunches and add them to the cart in the same step.
I hope this makes sense. Let me know if you have any other questions. You can also get in touch with us to discuss any further details via our Support Center.
Best regards and keep safe,
Hi, this plugin seems great for our online store, we'd just like to have some questions answered before going ahead to make sure it is indeed suitable for the needs:
1) Once customers are in 'Cart' or once our stores receive the orders, the group of items, appear as contents of one box (considering a person might want to buy two or several create your own box or pizza etc) or as individual items (which wouldn't be very helpful I guess in the case of people buying several build your own items at the same time)?
2) Why do people need to be 'adding to cart' every step (or is it just wrong and it actually means add to 'box', 'pizza', etc... ? Or does it add to cart as a separate item?
3) Can a price for a box/pizza be set and remove the pricing from the content items?
4) Can the same plugin be used for two or several sections?
Thanks in advance!
Looking forward to the feedback.
Hi Gina
1) In WooCommerce, there is no way to group products in the way you have described so each product is listed individually. The only way around this is to create each type of Build Your Own product as a single product, and add all the box contents options as variations of that product - that way, each build your own item will appear as a separate item in the cart, with all the variations that the customer chose grouped underneath it.
2) Interesting point! This is because Woocommerce works by adding items to the cart. WooCommerce Product Table has an option to reword the 'Add Selected to Cart' button which will be useful if you are using the checkbox add to cart style, instead of having an add to cart button for each product/variation. For example, you could change it to 'Add Selected to Box'.
If you have an add to cart button for each product/variation then you can reword the button text using our free WooCommerce Custom Add to Cart Button plugin.
3) Yes, please see the 'Can I add a fixed price for each box option, instead of charging separately for the box contents?' section of the above tutorial for instructions.
4) Yes, you can add as many product tables as you like to your website, each listing different products or variations. You can have multiple tables on the same page (as in our example), or separate pages with tables on them.
Thanks for your reply Katie! The team is looking into it.
Can this plugin display a list of product accessories based on a previous selection. For example, if I’m showing a list of computers, then based on the selection, a list of compatible accessories would be displayed below once the first selection is made.
Hi Ronny, thanks for your comment. It's not possible to link separate tables in the way you have described, e.g. by highlighting computers in one table in order to generate a list of compatible accessories in a separate table lower down the page. Instead, could you list your computers in a table and instead of having an add to cart column, have a 'button' column which links to the single product page? (This is one of the columns that comes with the plugin.) You could add a table of accessories to the product description on the single product page. Customers can buy the computer and also purchase accessories on the single product page.
This should be fine because buying a computer is a big purchase and for expensive products like this, customers will typically expect to click from the product table to the single page and view more information before they add to the cart.
To list your accessories, I recommend using product tags or attributes (or maybe even creating a custom taxonomy) to tag each accessory with the names of all the computers they are compatible with. You can then use the options listed on this page to create a table listing the compatible accessories for each computer.
Thanks for the help!
Hi, Katie
This looks like what we're looking for.
But in terms of laying out options for the customer to choose from different categories on the same page, is it possible to make it like what https://www.labseries.com/create-your-own-gift has?
It adds a free bag for the products too.
Which part of that site do you want to replicate?
You can put product tables in toggles/accordions, with 1 for each category. Your theme might have a shortcode for toggles/accordions, or you can install the free Shortcodes Ultimate plugin if not.
I recommend using one of the plugins documented in the comparison table on this page to automatically add a free bag (which would be a separate 'product') to the cart when someone orders a gift box.
Let me know if you have any more questions.
That page is what we would like to replicate, where when you've chosen at least 3 items from those categories it'll show the add to bag option.
I meant is it possible to show product tiles instead of sequential items in a table?
Thanks for your reply. So it sounds like you want to prevent people from buying until they have selected at least 3 products. The best way to do this is to use the official WooCommerce Min/Max Quantities plugin to set a minimum quantity. This works slightly differently to the example you gave, but essentially achieves the same thing. People won't be able to check out until they have added the required number of items to the cart.
Hello,
Is it possible to combinate your plugging with subscription and let the customer possibility to chose again each week the content of the box.
For more explainaition, I sell food product box by subscription, customer chose for week between 2 and 5 recipes and should be able to again chose for the following week in their customers account.
Your plugging seems realy appropriate but i'm not sur about this point
thanks
Hi Cyrielle, I have added a section to the above tutorial which answers your question. You can find this here.
Thanks so much for this tutorial.
What prevents the customer from ordering more than once per week, besides manually checking?
If the products are $0 but the subscription is for a weekly selection, could the user not just put in two orders and try to pass one by? The min max plugin only seems to be per order. Also, if you could set a max weekly, I don't think I want to prevent them from ordering more but at full price....
Thanks again, eager to read your response. Maybe I am missing something or maybe I a not and there isn't an out of the box solution besides custom coding.
Thanks again.
Hi, Anthony. Sorry for the slow response. Glad to know you found our tutorial useful.
That's an interesting point and you've got me there - I'm yet to see or hear/read about any plugin that would allow you to prevent or restrict a customer from placing x amount of orders in a given period. Without such a plugin, something like this would most likely require custom coding by a developer.
Thanks!
Thank you!
I don't think that's possible, you would need to do it by setting a maximum number of products that can be bought from that category rather than based on value. However, you could ask WooCommerce.com support if this is a feature of their plugin, as I'm not that familiar with it.
Hi Katie,
I am wondering if these plug in is for me. I am offering Meat Subscriptions where customers can build their own custom box for a fixed price ie 99 box 149 box and 199 box. I want to know if I can either give products points to fill the boxes or make everything equal and they get for example 4 choice to add in the 99 box. As well will it integrate with Woo commerce Subscriptions? I currently have Custom Product Boxes but it does not integrate with subscriptions and it is a key asset I need for my website.
Hi Christopher, you can list subscription products in a table using WooCommerce Product Table. The plugin doesn't integrate 100% with variable subscriptions, but is perfect with normal subscriptions. The best way to do this is to list each box option as a separate subscription product, and it will have its own row in the 'Choose Your Meat Box Subscription' table.
Your 2nd question is a bit more complex. To avoid any custom coding, here's a suggestion of how you could do it:
Install the WooCommerce Memberships plugin and create a membership level associated with each subscription. When someone buys a subscription, they will be given access to a hidden area of your website for that specific subscription level.
For each membership level, you need to create a hidden page containing a category of products that are only visible to that level. Add all the products that will be available to that level, and list them on the page using WooCommerce Product Table (here's a link to the instructions for showing a specific category in a table). Use the Quantities & Units plugin (tutorial here) to limit the number of products that can be purchased from that category. So the category of products for Box 99 will be limited to a maximum of 4 products.
You would need to list the product prices as zero, since they have already paid via their subscription. The customer will select all the products they need and checkout as usual via WooCommerce. This also opens up a nice extra revenue opportunity if you want it, as you could potentially offer extras that they can pay for on top of their subscription.
I know that sounds complex, but it should do what you need!
Thank you, So I am doing the first thing you said, but instead of having people pay for things before building, would it be possibly for them to choose a box size and frequency and then only be allowed to choose a set number of items for that box? I am trying to find that option I just bought the plugin. Like you are allowed 4 choices in this box as an example.
What I mean is there a way to set Min and Max basically so there is a 100.00 box and the items are all 25 each so they get a choice of 4 items
Hi Christopher, you could do this using the Min/Max Quantities for WooCommerce plugin with our Product Table plugin. Here's how it would work:
A few people have been asking similar questions, so I will also add this as an extra section in the tutorial above.
Hi Katie, My client sells build-your-own salads for a more or less fixed price and for that amount you can choose between two bases, select 3 types of protein, two types of toppings etc. There are a few items that cost extra. Would that work with your plugins? If so, how?
Thanks so much!!
Hi Ingrid, you need to do this by using WooCommerce Product Table with the official WooCommerce Product Add-Ons plugin. We have integrated the two plugins to work together so that you can choose add-on options (e.g. extra toppings) within the add to cart column of the product table. This should be perfect for your client. You can read about the integration at: barn2.com/kb/product-tables-woocommerce-add-ons".
My client works with 6 steps and most don't add anything to the price (select 3 proteins) but if you select a fourth one or a fifth one, it would add a few dollars to the price. The top of the https://producttable.barn2.com/build-your-own-product/ page gets very close to what I would be looking for, with each basket item being a step in the process, However, most steps would not add anything to the price. The bottom portion of that page shows that things get selected without a price attached, but with 6 steps (and possibilities to get extra protein items and extra veggies etc., it would start to look really messy pretty soon. Is it possible to create something like the top one with all the steps, but have it say "Included" or something in stead of an amount in the price column for certain selections? Or do you have another middle of the road solution?
Hi Ingrid, instead of having a price column, I recommend that you create a custom field column and manually either add the price or 'Included'. That will give you more flexibility. Here's a link to our article on how to create custom fields for your WooCommerce product.
Dear Katie!
Thanks for the article. Your plugin *maybe* what im looking for... Does it work with this scenario:(?)
We are planning to sell a single variable product in bundles of say 100+, 250+ and 500+ pieces with fixed bundle savings. in each bundle is one product with about 6 different variations. the customer chooses a bundle, then its size (100,250...) and adds their individual variable versions of this product to the bundle. as he needs to know, if minimum quantity is reached there should be a visual representation like "90 more Products needed in cart for Bundle 100" and it shouldn't be possible to order a bundle that isn't 100% filled up. Also a "XXX already saved" text would be great.
Furthermore, as we only sell bulk but want customers give the chance to test our products, we would like to offer them to create their own sample bundle, where they can mix and match all our products into one sample bundle, with a max of 10 per product, minimum order value of say 100€ and the same maximum discount per product we offer in our respective largest bundle.
So the not so basic question is: With what (types of) plugins do I realize that? Are yours suitable for that?
Thanks so much in advance!
Hi Malte, I'm afraid I don't know any plugins that can achieve that exact combination of features. You can use WooCommerce Product Table with a minimum order quantity plugin, but this would be for the entire order rather than requiring people to select a specific number of add-ons or variations for a single product.
The options are either to develop this as a bespoke plugin (possibly on top of WooCommerce Product Table and an off-the-shelf minimum order plugin to keep the cost down), or to simplify your requirements to work with what's already available. For example, for your 100 piece bundle, you could offer some pre-defined options with different combinations of 100 pieces, rather than making the customer choose all 100 individually. Realistically, I expect that customers won't have the patience to choose 100-500 pieces and might prefer to have pre-defined choices, given the size of the bundles.
I hope this is helpful for you.
I think I have a similar issue here then someone else had above.
Using pizza ordering as an example, the customer would need to be able to
1) order several "pizzas", each with different toppings.
2) customize the order with (maximized) number of toppings by category - for example up to 2 portion of meat, 3 portion of cheese, 1 sauce.
3) order the same topping more than one times, have pepperoni and pepperoni again from the meat category.
The question is that how "close" is your product to work like this - could we "patch" the plugin to work like this or this sounds like a serious change in the core functionality.
Thanks
Hi Zed, last week we released a new version of WooCommerce Product Table which integrates with the official Product Add-Ons plugin. Instead of using variations (which has the limitation you mentioned, where customers can only select 1 of each variation), you can add the pizza toppings as check boxes so that customers can tick as many as they like. You can read about this at: barn2.com/kb/product-tables-woocommerce-add-ons.
Also - you can use the 'Custom Price Multiplier' add-on to let people choose how many of each add-on they want.
Hi Katie
My client wants a customer to be able to choose from 3 different box sizes - 5 item, 10 item and 15 item - and must choose that number of items. Also, they must be able to choose from all the products they sell and can choose more than one fr om each category, if that is what they wish.
Is this possible with your plugin?
Thanks
Hi Diane, you can use the Product Add-Ons plugin to list the items in check boxes where people can tick as many as they like, but there's no way to force them to order 5, 10 or 15 items.
This was very informative and well written. As a developer myself I was able to find exactly what I was looking for. Lots of great details in this tutorial.
HI Katie. Thank you for the tutorial.
I am looking for something like this but for multivendor woocommerce site (which is yet to be built). What I would like to do is let the vendors create their own product table - is that going to be too complicated for them? If i need to I can also do it for them - so that's not a major issue. However, I would like to add products from different vendors to one product table - where the vendors agree to such things. This way they would promote each other's products, and hopefully increase sales. They would also deliver their hampers locally and would need a minimum number of hampers for the scheme to be worthwhile. That means there will be two minimums here: one for each order and one for the local delivery every Thursday, for example. Any hints as to how I could achieve this?
Many thanks.
Best regards,
Ivana
I forgot to add: it would mean that I would have multiple product tables on the site, and maybe even for one geographical area - for example one for meat and dairy orders and one for fresh fruit and vegetable orders and another for processed foods (flour, sugar, oil and such like). Is that doable?
Many thanks. Have a good weekend.
Ivana
Hi Ivan, thanks for your comments.
Yes, you can have multiple product tables on your website - you just add a product table shortcode wherever you want a table to appear. The shortcode has lots of options so that you can create tables showing products from specific categories, tags, custom fields, taxonomies, dates, etc. so each product table can contain different products. I would suggest that you create categories for things like meat and dairy, fresh fruit and veg, etc. and create a custom taxonomy for geographical area. This will give you 2 logical ways to create tables and sort products.
With regards to the multivendor side of things, at the moment it's probably best if you create the product tables so they don't have to go through the knowledge base and learn how to use the shortcode. In the future we intend to add a shortcode generator to our website, which will make it easier - but you might still want to do it for them.
WooCommerce Product Table doesn't have any features to add minimum order quantities, but there are other plugins you could add to do this. These would prevent customers from checking out if they haven't added the minimum number of products.
Hi again Ivan, we have recently announced a minimum order quantity plugin that you can use with WooCommerce Product Table. You can read about this here.
I got a "build your own" product site My product has three parts top, handle, and base. I have 9 tops 16 handles and 7 bases. which results in a 1000 variations. WooCommerece has some weird issue after 900 variations where you can't get in to edit the attributes or variations at least right now for me.
I like your tutorial though
Thanks for your comment. I think that WooCommerce could make a lot of improvements to the way they handle variations and how easy they are to manage, which is a shame. If you have lots of variations then it quickly gets quite fiddly to manage.
Hi again Brandon, we have now integrated our WooCommerce Product Table plugin with the WooCommerce Product Add-Ons plugin. This is more intuitive and lets you add extra product options in a much simpler way and with less duplication than variations, so you might want to use this instead. More info at: barn2.com/kb/product-tables-woocommerce-add-ons.
This is awesome but I have one question -
Can you do this build your own product on your website but at the same time sell individual products or will everything have to fall into this "build your own"?
I am creating a store that sells lots of products including "build your own gift basket." I'm just curious if I can still have a normal store and the "build your own gift basket" option at the same time using the strategy you provided above.
Thank you for the awesome demo.
Hi Liz, yes you can add this setup to any WooCommerce website. You can sell other products and display them in different product tables, or just using the standard WooCommerce shop and category page layouts. The 'build your own' section can be completely standalone.