Best WordPress plugins for restricting content access
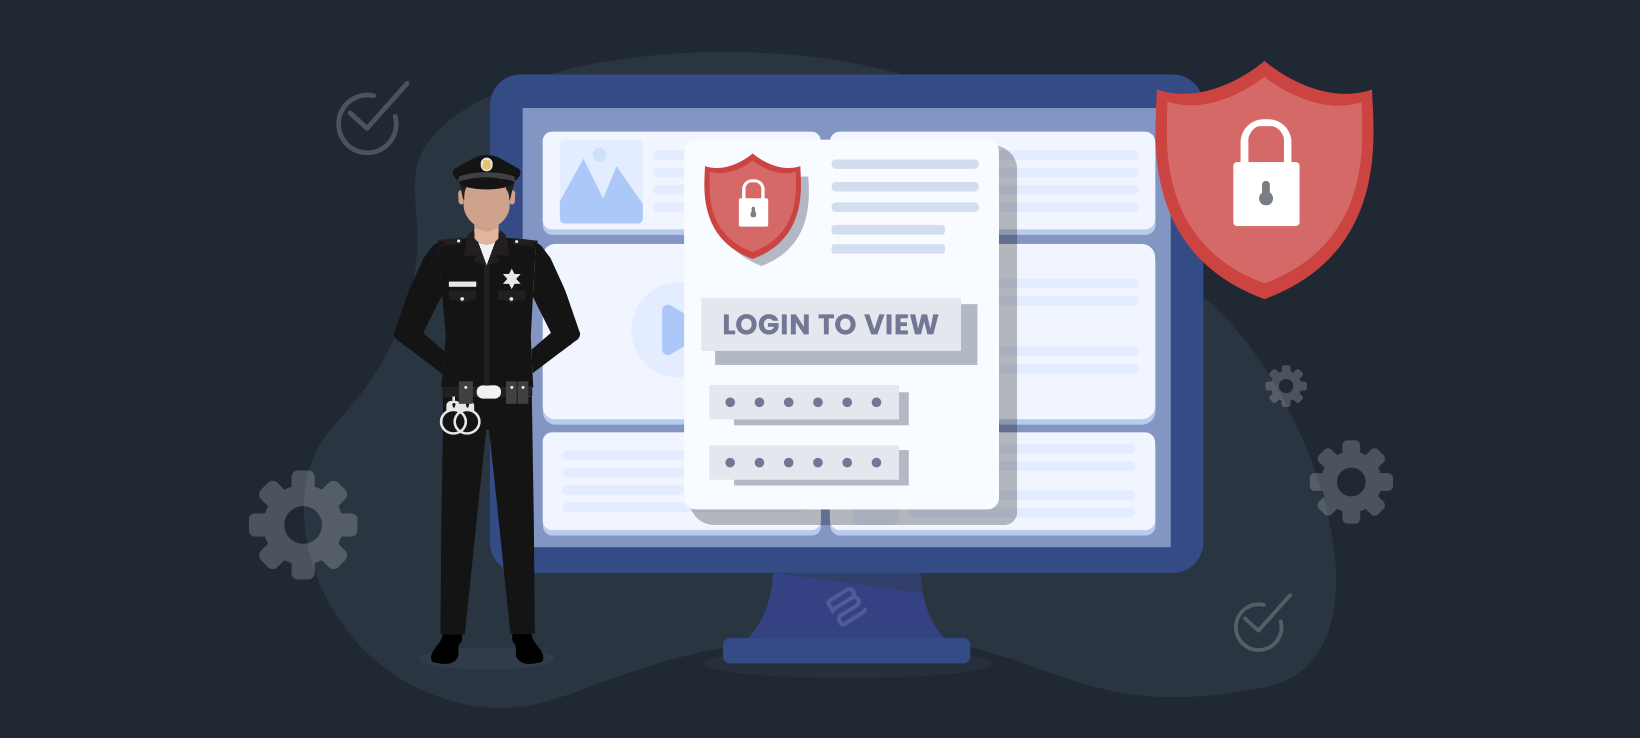
Do you want to restrict access to your website content to members only? Private WordPress content can help you manage your site better by creating hidden areas and even letting you earn revenue with membership or subscription plans.
There are many use cases for private content in a WordPress site. For example:
- You can create hidden areas of WordPress that only certain people can see.
- Bloggers or digital publishers can use restricted content to create a paid membership site that offers premium content to only subscribers.
- WooCommerce store owners can build and maintain a private store with exclusive products this way.
Out of the box, WordPress offers a few visibility settings that allow you to restrict access to a page or entire post. But if you want more flexibility with how you grant your site visitors access to your content, you'll need a WordPress to restrict content plugin.
In this post, we'll start by showing you how to create private WordPress content the default way. Then we'll talk about the best plugin to help you with this and also demonstrate how to use it.
Why restrict access to your WordPress content?
Just as the name implies, Content Management Systems (CMS) like WordPress offer multiple options for managing online content. One of these options involves restricting access to this content. Depending on the type of site and the nature of your industry, doing this flexibly and effectively can make a big difference.
As the most popular platform for building a website today, WordPress allows you to create private content in a couple of ways. You can protect private WordPress content using a simple password you give to people without an account. Alternatively, you can use this content type to ensure that certain logged-in users can only access certain content.
Still not sure whether your site needs restricted content? Here are some of the most popular use cases of private WordPress content:
- Private portfolios
- Company wiki resources
- Private events
- Subscription-based online publications with membership levels
- Premium galleries and stock photography sites
- Affiliate marketing sites
- Private wholesale stores
- University blogs, tutorials, and department-only resources
- Digital download stores
- Protect WooCommerce products in an online store
Another popular use for private content is in testing sites and site features still under development. You can grant site users in your organization access to preview these features.
Now that you have an idea why restricting WordPress content access makes sense, let's talk about how to go about it.
How to restrict access to your website content (2 ways)
There are two approaches you can take when creating post and page restrictions. You can either use the visibility options WordPress offers by default or use a WordPress plugin.
Using a WordPress plugin as an add-on offers more flexibility by allowing you to password protect whole sections of your site. We'll talk more about this later.
For now, let's show you how to restrict access to WordPress content using the default method.
Restricting content access via default WordPress options
When creating a new post or page, WordPress allows you to choose from 3 privacy options. You can either set the page to be public, private, or password protect it. Each of these options can be accessed in the visibility settings while editing your content.
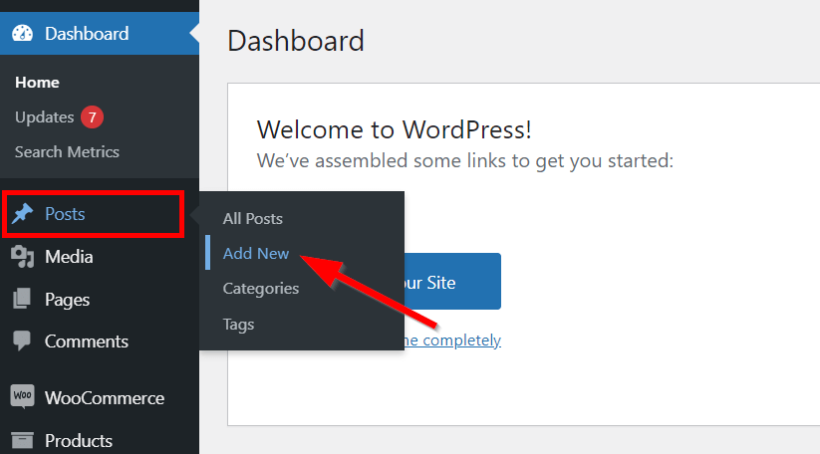
To do this, navigate to Posts → Add New or Pages → Add New within your WordPress admin dashboard.
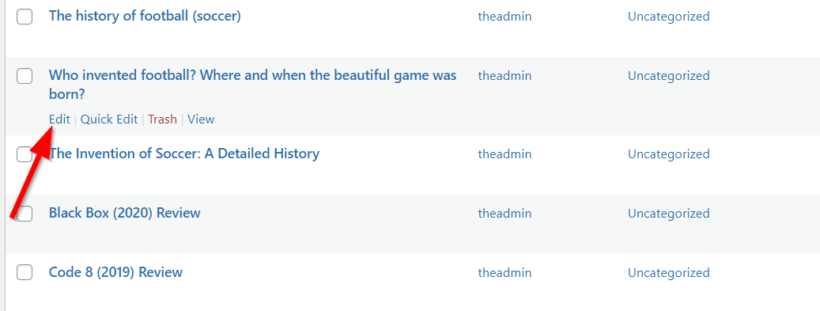
You can also edit existing posts or pages by simply clicking Edit after hovering over the content.
Creating private and password protected pages
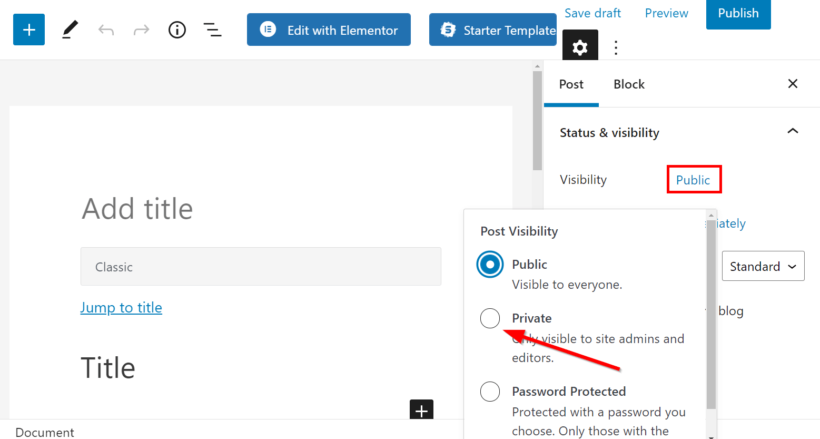
Next, go to the Status and visibility tab of the Settings block. Here, you want to click Public next to Visibility. You'll see a dropdown of the 3 visibility options. You can choose the Private option.
If you create a private page or post this way, only WordPress users with Administrator and Editor roles can view the content. They'll have to log in while using your site to access the content.
This is pretty limiting. If you want more flexibility, you can check out the other method of using a plugin.
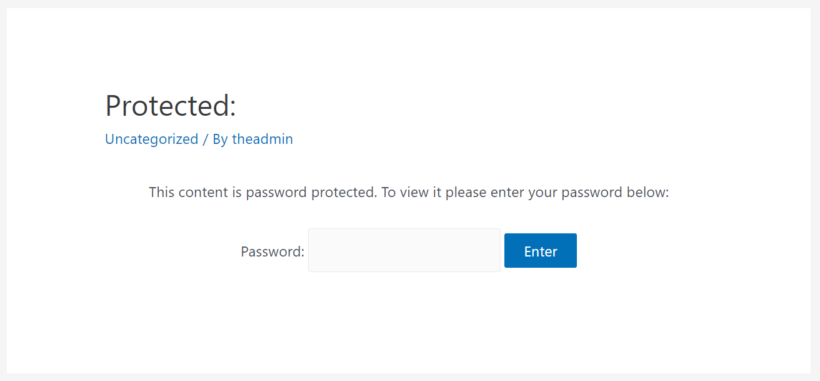
The other option available by default is to password-protect your content. To do this, select Password Protected from the visibility options dropdown. You'll then be required to set a password for accessing the page content.

Now, users will need to enter a password on a login page that grants them permission to view the post content. This method doesn't make the post or page private as it will still be visible on the public parts of your website's front-end.
The major issue with using this method is that you cannot password protect multiple pages at the same time. Even if you add the same password for multiple content pieces, the user will still need to enter a password every time they try to access any of them. This can impact user experience negatively.
To avoid this, you can use a WordPress plugin that helps you restrict access to content differently. Apart from being able to password-protect content in bulk, you also get more control over your private WordPress content. Let's talk more about this.
Restricting content access via WordPress plugin
We've discussed all the privacy options WordPress offers for your content above. But in most cases, you'll need more features to serve private content to your site visitors.
For example, you may want to protect specific post categories within your public site or grant access to different user roles other than administrators and editors. To do this effectively, you'll need a WordPress plugin. And there are lots of content restriction plugins out there.
The ideal plugin for implementing advanced privacy protection for your content not only extends the default WordPress features. It is also very easy to use, even for the most non-technical site owners and administrators. You get all the privacy features you need without the need to write any PHP code or add a shortcode to your WordPress site.
Our recommendation - Password Protected Categories
Of all the plugins offering these privacy features, Password Protected Categories stands out. Unlike the other options available (which are mostly WordPress membership plugins), Password Protected Categories adds only the essential privacy features you need to your site. This means you get to keep your site light and don't have to deal with any bloat.
Since the plugin doesn't pack unnecessary features, it's very intuitive and beginner-friendly. Also, it's affordable, and you get excellent support too in case you ever get stuck or need any help.
What can you do with Password Protected Categories?
Using this plugin, you can hide any type of WordPress content category (create private posts, events, and even custom post types). You can also configure your content to be automatically accessible by individual user profiles or users with specific roles.
Alternatively, you can also password protect an entire category. This method doesn't require site visitors to have an account on your site, provided they have the password.
Some of the most popular use cases for this plugin include private portfolios, exclusive online stores, and exclusive invite-only events.
How to use the private WordPress content plugin
To start using Password Protected Categories, you first need to download the plugin here.
Once you've downloaded the plugin, you'll receive a license key in your email. You'll use this key to activate the product after uploading it to WordPress.
You can upload the plugin by following these steps:
- Log into your site's WordPress dashboard. Next, navigate to Plugins → Add New → Upload Plugin.
- Then select the ZIP file you downloaded earlier. Click Install Now followed by Activate Plugin.
- Once the plugin is activated, you'll be able to enter the license key you received in your email. After this, click Activate.
That's it! Password Protected Categories is now active on your site. You can use it to create private content in a very flexible way.
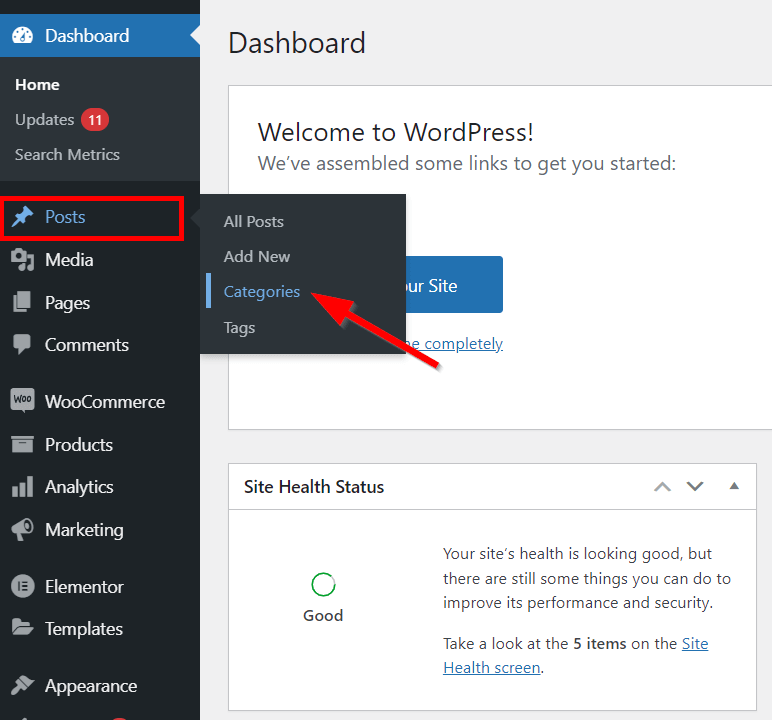
For example, you can use it to restrict access to content categories to specific user roles. To do this, go to Posts → Categories. This is not limited to posts only. You can also go to the categories of any content type you want.
Tip: If pages and posts aren't enough then you can add extra content types to your site - e.g. 'events' or 'member content' - using this tutorial. You can then add categories and make them private using the Password Protected Categories plugin.
Making categories private
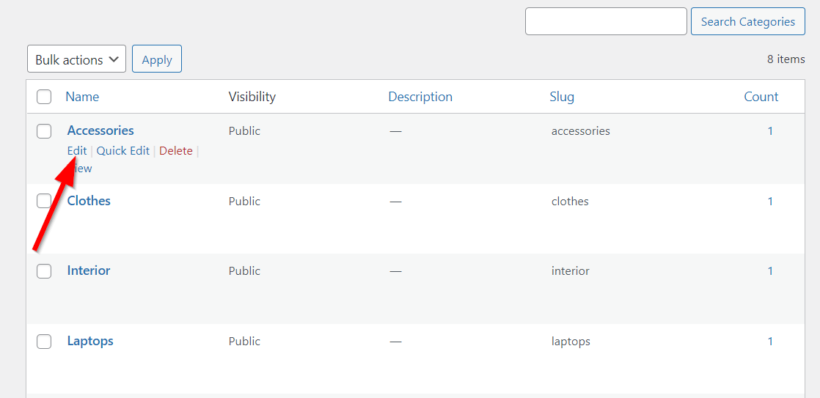
Next, hover over the category you want to make private and click Edit.
On the settings page, select Protected in the Visibility tab. Then select whether you want to make the category accessible to individual users, user groups, or users with a particular role. You can now select the user roles or specific users you want to grant access to.

When you're done, click Update, and the changes will be saved.
You can also set one or multiple passwords for access to this category. To do this, check the Password protected box and enter the password you want.

The good thing is you can use all these privacy options at the same time. This offers your site visitors more flexibility to choose how they want to access your content.
If you've added events, digital downloads, or portfolios to your WordPress site, Password Protected Categories works seamlessly with any of these post types.
Alternate method - WordPress Secure Copy Content Protection plugin
If you don't want your content to be copied or stolen and would like to hide your unique articles with a password and protect them with watermarks, then can use the WordPress Secure Copy Content Protection plugin. With the help of this WP plugin, you can ensure the security of your content as the plugin comes with many content locking features. You can disable content selection, right-click, copy-paste, image save/print, and use lots of other options. These features will not only help to make your exceptional content protected but also will save your website from web scraping, which is, unfortunately, very popular these days.
This content protection plugin for WordPress has lots of distinctive features, that will help search engines find your content easily. For instance, you are able to use geo-blocking, IP address blocking, password protection, content locking, and more. Besides, you can set the paywall on your website, and earn money with a security plugin. For that, you just have to connect a PayPal account to your website, and the users will be able to access the content of your website only after making a payment.
You can get the free or pro version of the Secure Copy Content Protection plugin. The Pro version comes with more advanced features and you can get access to dozens of additional helpful features for a one-time nominal price.
Start making WordPress private today
Gaining full control over the privacy of your content is a very integral part of running a WordPress site successfully. Depending on your industry and the nature of your content, you may want to make your site content private.
In this article, we've shown you the 2 ways you can make your WordPress content private. As an alternative to creating private content the default WordPress way, we recommended using a WordPress plugin.
Using Password Protected Categories, you can create private portfolios or limit access to certain posts by making entire categories private. This is faster and very easy to use. Besides its main features, the plugin also offers other interesting privacy options you can try out.
Ready to make your WordPress content private? You can use the Password Protected Categories plugin to gain fine-grained control over your content's privacy.