How to set up a WordPress media library: Step by step guide
Looking for a way to create a front-end WordPress media library that your visitors can browse? You've come to the right place!
What you need to know:
- The WordPress Media Library is the default place to upload and store files on the back end (dashboard) of your website.
- The Document Library Pro plugin can display the files from your Media Library on the front end of your website.
- You can choose what information to display in the front end Media Library, and which file types to display.
- Full setup tutorial below.
Managing and displaying media files on the front end of your website can be a challenging task, as the WordPress Media Library normally only appears in the WP admin.
In this guide, we'll explore an unusual use case for the Document Library Pro plugin - how to use it to display files from the WordPress Media Library. This powerful plugin that revolutionizes the way you handle documents and other file types in WordPress. From organizing and categorizing files to customizing the front-end display, we'll provide you with step-by-step instructions and practical tips to make the most out of your front end Media Library.
Whether you're a business, an educational institution, or a content-driven website, this guide will equip you with the knowledge and strategies to efficiently manage and showcase your Media Files to the public. This makes them easily accessible to your audience.
What is a media library?
The Media Library that comes with WordPress core is the default place to upload and store files and photos on your website. When you're just getting started it does a solid job of organizing files in your dashboard. However, it quickly becomes cluttered and impossible to navigate without the help of a plugin. Furthermore, you might want your files to be directly accessible to website visitors as well.
This is where a front end WordPress Media Library can come in handy for displaying:
- Large numbers of files (especially images)For example, you might need to display more images than the WordPress media gallery can handle. In this case, a front end media library with search, filter, and sort options will be more user-friendly.
- Non-image filesIf you need to display files like PDFs or audio files, a frontend media library provides an easy way to make those files accessible. You can even use it to create a document library.
Benefits of a front end media library
If you want to display files and multimedia content on your website, then a lot of people immediately look for a gallery plugin. However, this brings several disadvantages to compared to displaying the media library files directly on the front end:
- It adds an extra step to the process. With a gallery plugin, you have to manually create a gallery. The files displayed are stored in the media gallery of WordPress, but you have the extra step of creating the gallery and bulk selecting the files.
- It only supports certain file types. The WordPress Media Library stores any file type, whereas a gallery is all about image files. What about displaying other types of Media Library file, such as documents and PDF uploads?
- It's harder to update. With no built-in version control, it's easy to lose track of which version of each file you're displaying.
Some Examples
There are lots of websites that can benefit from displaying some or all of the WordPress Media Library on the front end. Here are some examples:
- Photography/videography websites: For photographers and videographers, their work is their product. Displaying high-quality images and videos directly on the front end allows potential customers to easily browse and appreciate their work.
- Document database: If you need to share resources with your users, then displaying PDF's and other documents from the WordPress Media Library can be really helpful.
- E-commerce sites: Product images, user reviews with photos, tutorial videos - all these can be organized in the media library and displayed on the front end for potential customers to see.
- Educational sites: These may need to display media files like lecture videos, images, diagrams, and infographics on the front end for easy access to students.
Why Document Library Pro is the best front end WordPress media library plugin
The Document Library Pro plugin is the ideal solution for creating a front end Media Library. While its name focusses on documents, you can use it to display any type of media file in a searchable database on the front end of your website. This might be images, presentations, videos, PDFs, audio files, etc.
Unlike media gallery WordPress plugins, Document Library Pro displays Media Library files directly on your website. You don't have to manually create a gallery first or use FTP.
It works like this:
- First, you bulk select all the WordPress Media Library files which you want to display on the front end.
- Next, you select the option to convert them to documents. At this point, Document Library Pro creates a 'Document' post for each file, which you can use to add any extra information that you want to display about each media file. The document posts link to files in the WordPress Media Library so that you can display them in the front end.
- Finally, you use a simple shortcode to insert any or all of your 'Documents' (i.e. Media Library files) onto the front end of your website.
When you've finished, you'll have set up a professional-looking library with optional features like instant AJAX search, lazy loading, and sort/filtering. You can display media library without having to learn coding languages such as CSS, JavaScript, and HTML. Users can click on a link, button, or file type icon to instantly view or download the media file.
Key features of Document Library Pro
With its intuitive interface and powerful functionalities, this WordPress Media Library plugin offers a seamless solution for organizing, managing, and showcasing your documents on your website. Here are some key features:
- Instant search, sorting, and filtering: Document Library Pro provides robust search capabilities, allowing users to quickly find specific files based on keywords, categories, or tags. Sorting and filtering options further enhance the browsing experience, enabling users to navigate through your front end Media Library effortlessly.
- Flexible layout options: Choose between table or grid layouts to display your documents. These flexible layout options ensure that your library looks visually appealing and well-organized, providing an optimal user experience.
- Support for various file types and 3rd party URLs: Document Library Pro supports a wide range of file types, including documents, images, videos, and more. Additionally, it enables you to include 3rd party URLs, such as embedded audio and video players, expanding the possibilities for media file display and interaction.
- Integration with password protected categories: Take advantage of the enhanced security features offered by Document Library Pro. By using it with its sister plugin Password Protected Categories, you can create private Media Libraries, granting exclusive access to authorized users. Protect sensitive information and ensure confidentiality with this powerful integration.
How set up a media library in WordPress
Next, I'll tell how you to use the Document Library Pro plugin to directly display files from your WordPress Media Library on the front end of your site.
You'll learn how to create a table which lists any (or all) of the following information in the front end:
- File name - with or without a link to view the file on a separate web page.
- Title - the filename.
- Image - a featured thumbnails image to represent the media file with different image formats like gif, jpeg, and webp images.
- Caption - this is a useful way to show a description or summary of each file.
- File size and file type - these are both generated automatically.
- Dates - e.g. the date the media file was added to the library, and the date it was last modified.
- Any additional categories, custom fields, metadata or taxonomies that you choose to add. You can use these to store information such as the file size, and file type, add any extra descriptive text, and even add extra links, images, icons, or download buttons.
- Download link - A link, button, or file type icon to download the media file or open it in the browser.
You'll also learn how to organize WordPress Media Library in a more simple grid layout, with each file displayed in its own tile.
Further reading: How to organize WordPress Media Library.
Step 1: Get Document Library Pro
Follow the below steps to add a searchable media library to WordPress
- Purchase and install Document Library Pro and follow the on-screen instructions to activate your license key.
- Complete the setup wizard and navigate to your Media Library.
We're now going to convert the media library WordPress folders and files into 'Documents' so that you can display them on the front end. Don't worry about the word 'documents' - you can do this with literally any type of file! This might be images (e.g. jpg or png), spreadsheets (e.g. csv or xls), or even audio or video (e.g. mp3 or mp4)!
Step 2: Add media files to your library
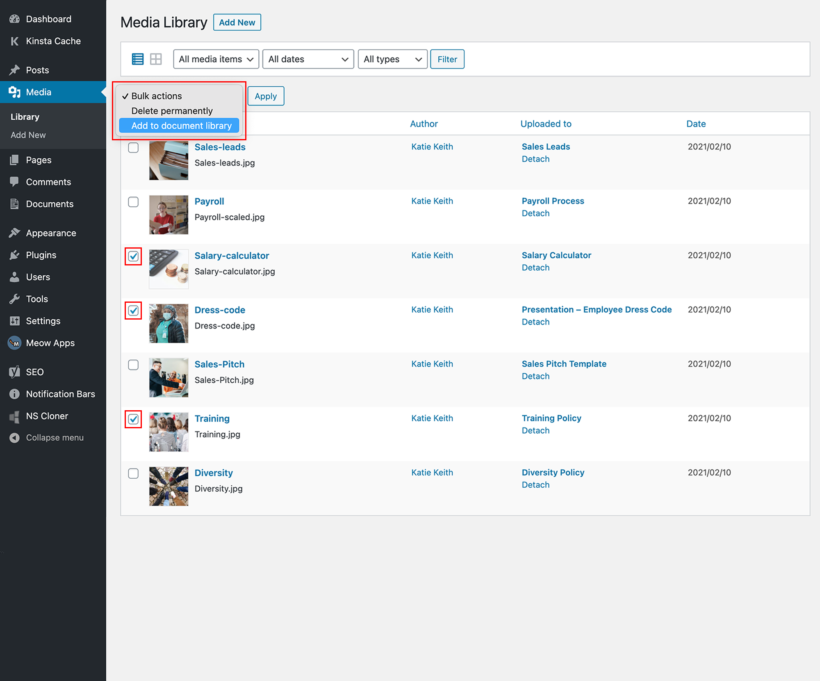
- Make sure you're on the list view and not the grid view. (You can toggle the two views using the blue icons on the top left of the WordPress media library.)
- Tick all the media library files that you want to display on the front end.
- Click the 'Bulk actions' dropdown and select 'Add to document library'.
- Next, go to the Documents section of the WordPress admin. You'll see that each media library WordPress folders file has been added as a 'document'. Make any changes as needed. For example, if you're planning to display the filename in the front-end media library then you might want to edit the title of each document to make it more readable.
Drag and drop new files
Alternatively, if the files aren't already in the WordPress Media Library then you can drag and drop them straight into Document Library Pro. This converts them to 'Document' posts straight away, also saving them to the main Media Library.
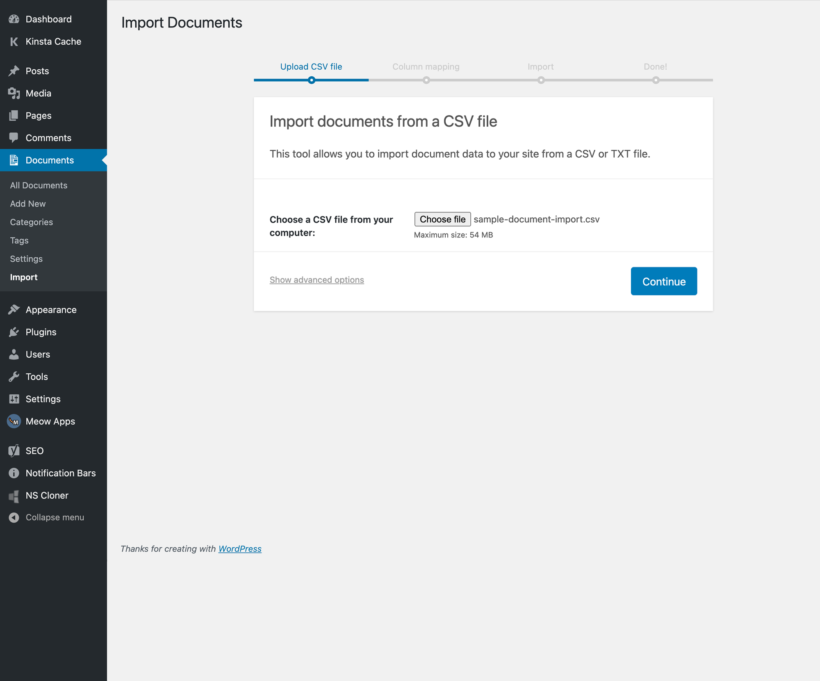
- Go to the Documents → Import section of the WordPress admin.
- Drag and drop the files directly onto the page, or click to browse and select them.
- This will add the file to the Media Library, and will also add each one as a document that you can display in the front end - complete with links to download the files. Again, make any changes to the data that you're planning to display about each one.
Step 3: Display media files on the front-end library view
First, I'll tell you how to create a front-end WordPress Media Library that uses the information that WordPress itself stores about each file. Afterward, I'll tell you how to store extra information about your files and display it in the media library.
- In the WordPress admin, go to the plugin settings page at Documents → Settings.
- Go through the settings and choose how you want the front-end media library to look and behave.
Key settings to optimize your front-end media library display
There are lots of settings, and here's a summary of the ones that are most important for listing media files on the front end:
-
- Columns - Choose which columns to display the media files. Make sure you include a 'link' column so that people can download the media file. If you have added a featured image for each media file then include the 'image' column too. You can also include columns like image size and file type.
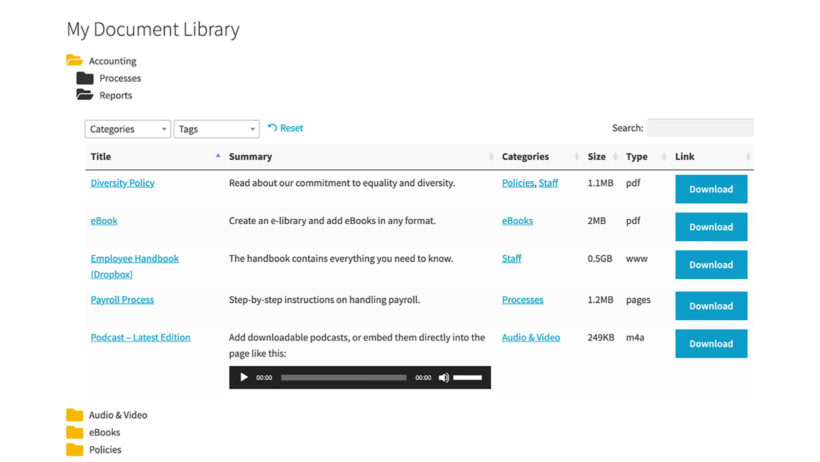
- Folders - Enable this option if you want to structure the WordPress media files into folders, based on their categories. This helps people to find files by category.
- Link options - There are several options for choosing how the download links work in the front-end WordPress media library. If you're displaying different file types then it's a good idea to enable the 'Icon' option. This displays file type icons so that people know what type of file they're about to download. You can also choose whether or not to open links to media library files in a new tab.
- Filters - If you've added media library categories and tabs (under Documents → Categories and Documents → Tags), then add
doc_categories,doc_tags. This will add category and tag filter dropdowns above the front-end media library. - Lazy load - Enable this if you have more than a couple dozen media files to display.
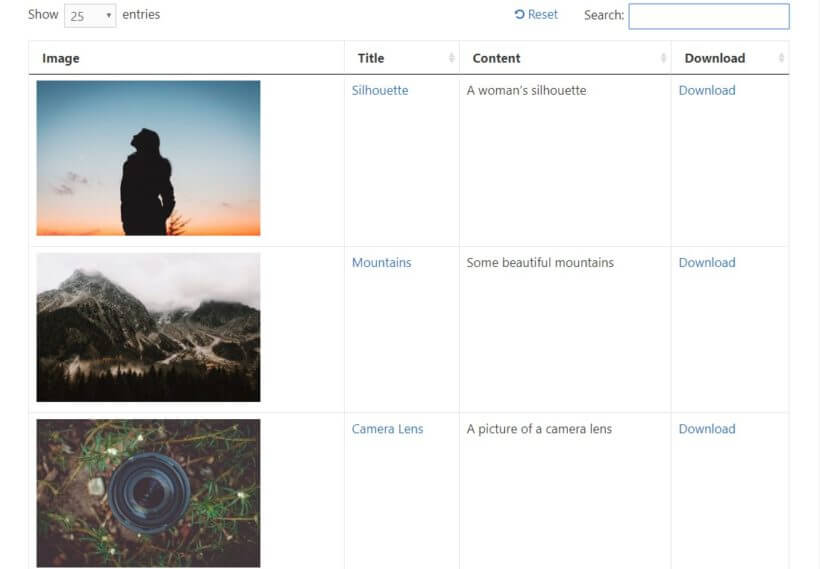
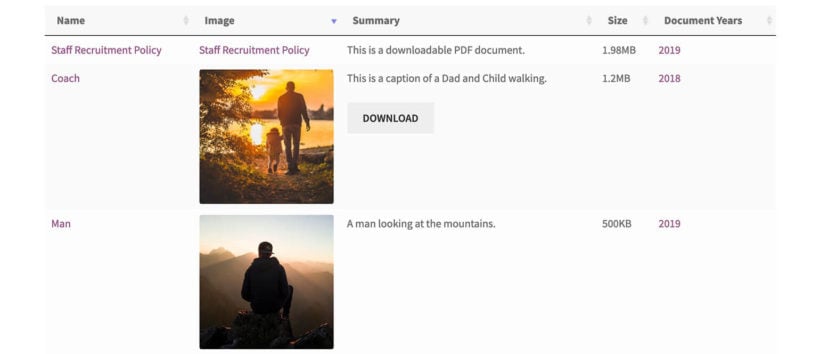
WordPress frontend media library that looks something like this:
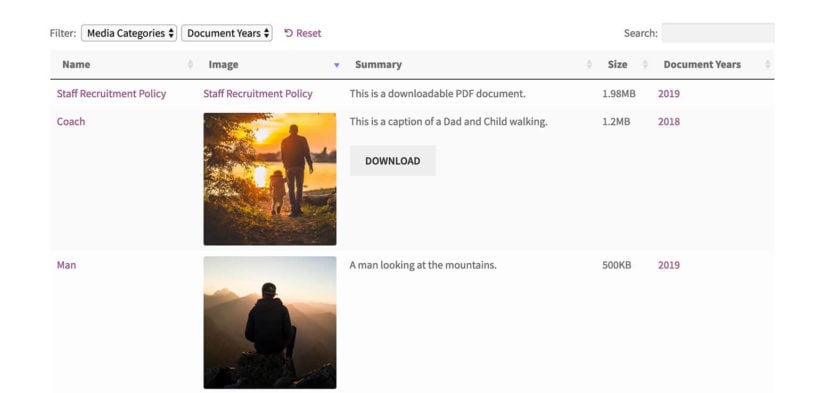
This screenshot includes an image column displaying the featured image, which we have renamed 'Content'. If you are only displaying the WordPress image library and don't want to have to add a featured image for each document, then you might prefer to use this method which uses the Posts Table Pro plugin.
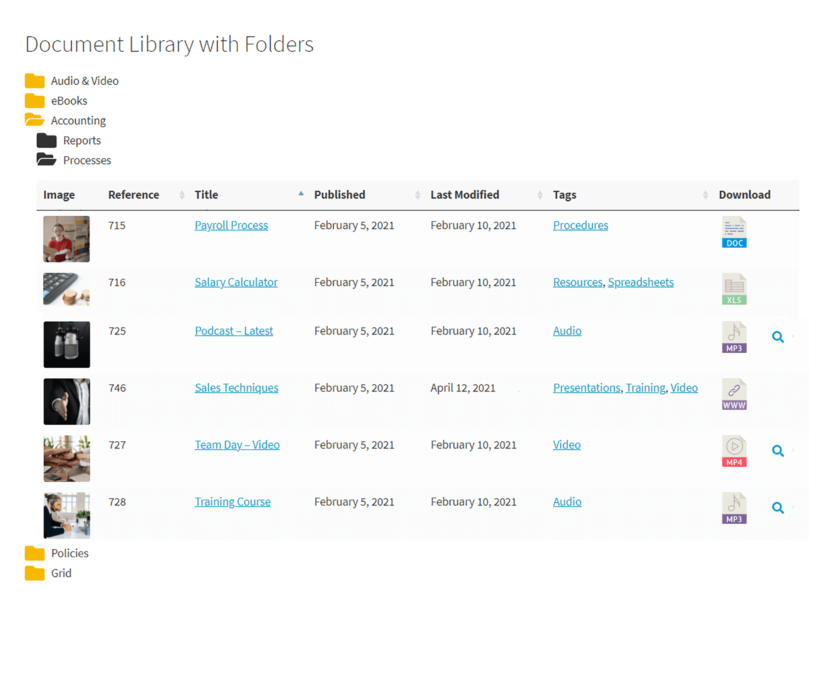
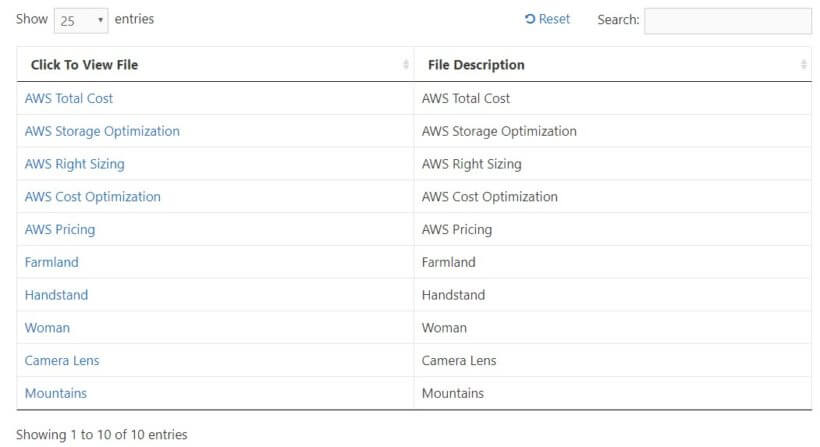
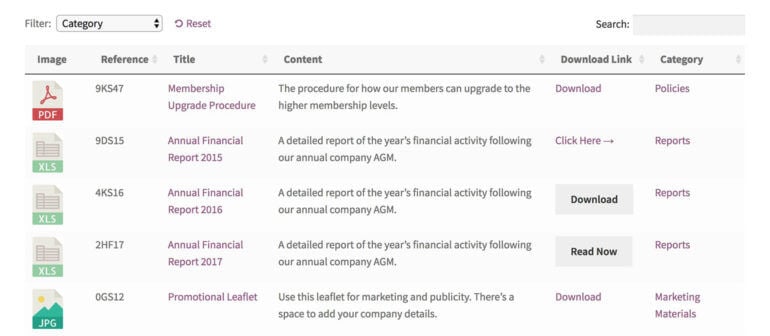
You can also display non-image files (e.g. PDF, XLS or DOCX), for example like this:
Step 4: Set up media category and tag filters
The plugin lets you categorize your media library files (i.e. documents) and add tags. These allow you to keep things organized in the back end, while allowing visitors to filter by media category and tag.
To set up your Media Library categories and tags, go to Documents → Categories and Documents → Tags. Add your categories and tags as needed, and then apply them to each document as needed. If you're using the bulk import feature then you can also include a categories and tags column to do this automatically.
Step 5: Add extra fields to your WordPress Media Library
I recommend adding more information to the document, starting with the fields that come built into Document Library Pro. To do this:
- Go to the 'Documents' section of the WordPress admin and click Edit on any document.
- Fill in the fields which are available, such as the name, description and excerpt.
- There are also options to categorize and tag the files.
If that's not enough, then you can also use the free version of the Easy Post Types and Fields plugin to add extra fields. You can add:
- Custom fieldsUse these to list unique information about each file. For example, if you wanted to add an extra summary or descriptive text about each file, or to store a reference number, then you'd need a custom field.
- Custom taxonomiesUse these for information that you want to be able to filter by and use to group your files. For example, if you wanted to store the year for each file and add a Year filter dropdown above the front-end media library, then you'd need a taxonomy for this.
How to add custom fields and taxonomies to WordPress media files
- Install Easy Post Types and Fields from wordpress.org via Plugins → Add New.
- Go to the 'Post Types' section which appears on the left of the WordPress Dashboard.
- Go to the 'Other Post Types' tab and find the 'Documents' post type. Click on either 'Custom Fields' or 'Custom Taxonomies'.
- Add the required information to add as many custom fields and taxonomies as you like.
- Now go to the 'Documents' section and you will see the new fields on the 'Add/Edit Document' screen. Add the data for each media file.
- Now go back to Documents → Settings and edit the 'Content' section to tell Document Library Pro to include your new custom fields and taxonomies as columns:
- To add a custom field column, add
cf:followed by the custom field name (e.g.cf:reference) - To add a custom taxonomy column, add
tax:followed by the custom taxonomy slug (e.g.tax:document_year)
- To add a custom field column, add
For example, your list of columns might be: title:Name,excerpt,cf:reference,tax:document_year
Set up your WordPress media library today!
The WordPress Media Library is fantastic, and it's a shame that it's normally only available in the back end.
By using the Document Library Pro plugin, you can take your existing files and display them on the WordPress frontend media library of your WooCommerce website for everyone to see. Use the advice and tips in this tutorial, and you'll find huge flexibility in controlling how your frontend WordPress media library functions.
Have any other questions about using Document Library Pro to create a front end media library in WordPress? Leave a comment and we'll try to help out!
FAQ
1. Why use a WordPress media library plugin?
A media library plugin helps you manage your files better by offering features like folders, bulk editing, and advanced search options. It makes handling lots of images, videos, or documents quicker and more organized.
2. Can I edit media files in my WordPress library?
Yes, you can! WordPress allows basic edits like cropping, resizing, or rotating images directly in the media library. For more advanced edits, you’d need an external tool or a plugin.
3. How can I manage my media library effectively?
To keep things tidy, name your files descriptively, use a plugin which can add folders, and regularly delete unused media. Keeping your library organized saves time and helps your site load faster.
4. Should I add metadata to my media files?
Absolutely. Adding metadata like alt text, titles, and descriptions improves SEO and makes your site more accessible. It also helps you keep track of your files and find them easily.
5. How do I organize my media library?
You can organize your media library by creating folders using a plugin, tagging files with keywords, or naming them consistently. Regularly reviewing and cleaning up unused media ensures everything stays easy to find. Watch this video we made to learn more!
10 Comments
This post is useless. It doesn't even answer the actual question of HOW TO SHOW YOUR MEDIA LIBRARY on the front end. It's also extremely out of date / doesn't match the current interface. It goes on and on and on and doesn't even answer the question.
Hi David, thanks for the comment. You can find how to show the media library on the frontend in this section of the post above. Also, somme of the images above have been stylized for online presentation but I believe the main content of the images are still accurate. If you see an inaccurate image, please let me know which one. I also recommend contacting us through our Support Center for best assistance. Cheers! - Carl