How to set up WooCommerce vacation mode quickly
Picture this: you’re a small business owner planning a vacation but have no way to fulfill online orders while away. What do you do? The simplest solution is to set your WooCommerce store to vacation mode 🏖️
Putting your store into vacation mode is the easiest way to hide your store and prevent new orders during your absence.
The benefit of putting your store into vacation mode is that you maintain site visibility when you can’t process orders in scenarios like:
- Personal time off
- Seasonal breaks
- Staff holidays or staff shortages
- Product development focus
- Order backlog catch-up
- Inventory management
- Maintenance
The only problem is that WooCommerce doesn’t include a built-in “pause” button. That said, you do have options.
In this guide, I’ll walk you through three reliable ways to set up vacation mode and keep your customers informed during your absence. I’ll show you how to:
- Hide all your store pages completely using WooCommerce Private Store.
- Keep the store open but display a clear notice about the delayed dispatch times using WooCommerce Lead Time (spoilers: this is the best way to avoid losing sales).
- Hide all your store pages using custom code.
Let’s explore the best vacation mode setup for your store and how to do it without losing customer trust or search visibility.
Method 1: WooCommerce Private Store: Your complete WooCommerce vacation mode solution
The quickest and most hassle-free way to put your WooCommerce store into vacation mode is by using a plugin, and WooCommerce Private Store is built exactly for that.
This powerful plugin hides your entire WooCommerce store — including shop pages, products, categories, cart, and checkout — while keeping the rest of your WordPress site visible to site visitors. That means your homepage, blog posts, contact page, and any vacation notice you’ve added can still be accessed by your visitors, even though they can’t place orders.
Here’s how it works:
- WooCommerce content is completely hidden until a valid password is entered.
- Your regular WordPress pages remain fully accessible, allowing customers to view your general pages and any vacation notices that you’ve added to them (e.g. the store banner) without placing orders.
- No coding is needed — setup is intuitive and fast.
- Store activation/deactivation is extremely simple and intuitive.
From the store owner’s perspective, temporarily hiding your WooCommerce store means you can control access permissions by user role, ensuring your team (and anyone you choose) can still manage inventory during your time off. All you have to do is share passwords with trusted customers if needed during vacation periods.
You can also create a professional login page with customized vacation messaging, including reopening dates. For example, you could put up something like: On a break! We'll return on July 17th.
By using WooCommerce Private Store, you maintain your online presence and brand visibility without the stress of receiving orders you can’t fulfill. You can keep your blog posts, contact information, and company details accessible for ongoing communication.
“I needed to close my online store, but not to close down the entire site. Private Store did just that, after a very swift installation. I recommend it!”
Michel Laforge
Note: If you only want to hide a specific category of WooCommerce products rather than the entire store, check out Barn2’s WooCommerce Protected Categories plugin.
How to set up WooCommerce vacation mode in 3 simple steps
Setting up WooCommerce vacation mode with the WooCommerce Private Store plugin is quick and easy. Here’s how to do it in just three steps:
Step #1: Choose the protection type
The first thing you need to do is choose the protection type. After installing the plugin, go to WooCommerce → Settings → Private Store.
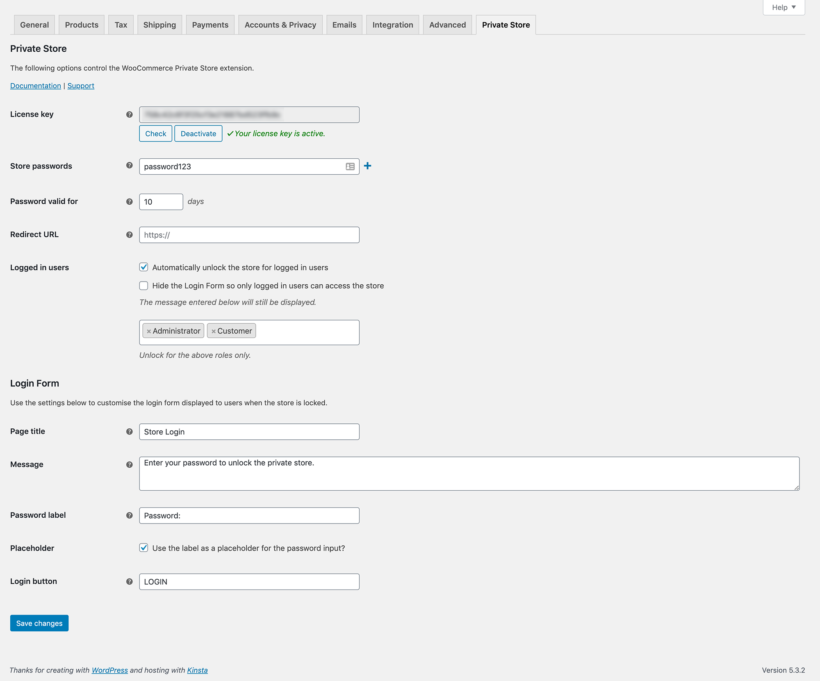
Choose how you want to protect your store:
Option #1: Password protection
Set one or more passwords for customers to access the store during your break. This is ideal if you want to allow a few trusted customers (like VIPs or wholesalers) to continue ordering.
- Enter a password in the Store passwords field. (Click the + icon to add multiple passwords.)
- Set the Password valid for field.
- Enter a Redirect URL to redirect visitors to your store page if they enter the correct password and unlock the store. You might want to redirect them to the main Shop page or a specific product category page.
Option #2: User role access
Grant access to specific WooCommerce user roles like the Shop Manager or Administrator, so your team can continue managing the store in the background.
Pro tip: You can set multiple passwords for different people who should have access, and allow both password access and user role access at the same time.
Customers will only need to enter the password once to access the entire store. This makes it simple if you want to grant access to certain customers, such as valued wholesalers.
Step #2: Customize your vacation message
In the same settings screen, you can:
- Customize the login page with your store closure message.
- Include your expected reopening date and any additional instructions (e.g. how customers can leave a message).
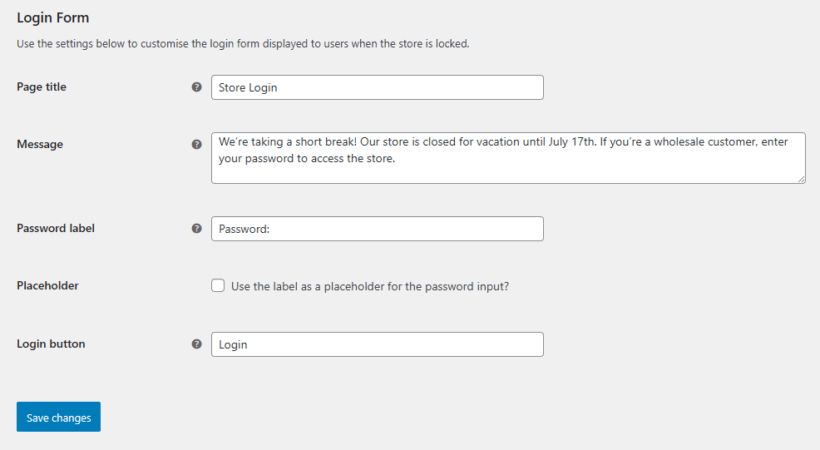
Here’s an example of a message you can use: We’re taking a short break! Our store is closed for vacation until July 17th. If you’re a wholesale customer, enter your password to access the store.
Step #3: Test store protection
Visit your site in a private or incognito browser to test it from a customer’s perspective.
It should look something like this:
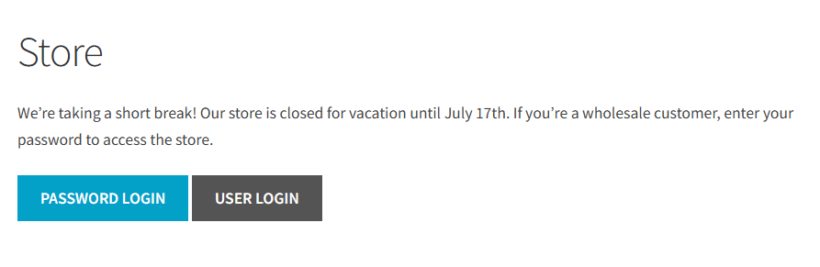
You should check to see that:
- All WooCommerce pages (shop, products, cart, checkout) should now be hidden.
- Your main site, blog, and contact pages remain fully visible.
- Customers trying to access a product will be redirected to the login page with your vacation message.
- Trusted customers only need to enter the password once to access the entire store.
You can also:
- Use the “Add to Private Store” option to protect additional pages.
- Add a banner using a plugin like Hello Bar to add a sitewide notice that the store is temporarily closed for vacation.
When you’re ready to reopen, simply disable the restriction and your store is back online instantly.
Real-world scenarios: When to use WooCommerce Private Store
Here are some real-world scenarios when it makes sense to use WooCommerce Private Store:
Retailer taking a break
By activating WooCommerce Private Store, retailers taking a break can hide their shop from public view, so no new orders are placed.
The rest of their website, such as blogs or informational pages, remains accessible. This is perfect for temporary breaks or maintenance periods.
Seasonal store
A business that sells seasonal items, like holiday decorations, can use the WooCommerce Private Store plugin to pause sales during the off-season by hiding its store.
This prevents unwanted orders and allows them to prepare for the next season. In addition to this, they can also schedule when the store will reopen.
Restaurant closed
A restaurant using WooCommerce Restaurant Ordering to take online food orders may need to close temporarily for staff holidays. They can hide the ordering system while keeping other website pages (like menus and contact information) visible using the WooCommerce Restaurant Ordering plugin.
This is essential when restaurants want to close more strongly than using the opening hours features in WooCommerce Restaurant Ordering.
You can put up a notice to let customers know about the temporary closure and reopening date to help manage expectations and reduce confusion.
Restaurants using WooCommerce Restaurant Ordering can temporarily close online ordering during staff holidays by hiding the order system with WooCommerce Private Store. Other pages (like menus and contact information) remain visible. A clear notice about closure and reopening helps manage customer expectations better than just relying on opening hours settings.
Method 2: Display information about the delay using WooCommerce Lead Time (best if you don't want to lose sales)
Closing your WooCommerce store completely might seem like the only choice when going on vacation, but it’s certainly not the best option. Not only can you lose potential sales during this period, but search engines may temporarily stop indexing your product pages, which can impact your SEO and future traffic.
Instead, you can keep your store open as usual and use the WooCommerce Lead Time plugin to add a clear notice to each product that the dispatch time will be delayed because you’re currently closed for vacation.
It only takes a second to set up, and it allows customers to continue placing orders while being fully informed of the increased waiting time.
There are two main ways to use WooCommerce Lead Time to display information about the delay:
- Global Manual Lead Time. Add a simple static message, such as We’re currently closed for vacation and will dispatch your order after January 4th. This message appears on all product pages, so customers are immediately aware of the delay.
- Global Dynamic Lead Time. Instead of a static message, you can set the exact date when you’ll resume dispatching products. The plugin automatically calculates and displays the remaining days or weeks until orders will be processed, keeping customers informed with up-to-date timing.
Step-by-step instructions
Here’s how you can display information about the delay:
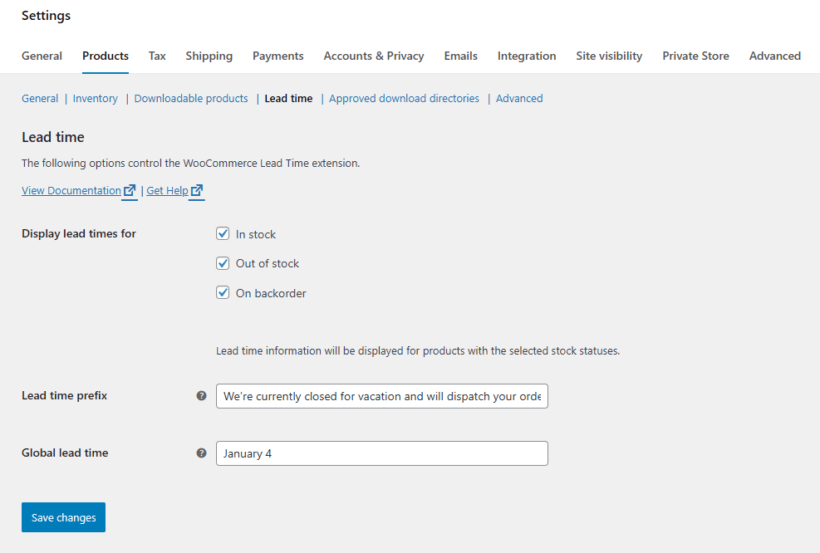
- Head over to WooCommerce → Products → Lead time.
- Select which product stock status’ to display lead times for (in stock, out of stock, on backorder).
- Enter your vacation message in the Lead time prefix field.
- Enter the expected date the products will be dispatched in the Global lead time field.
- Click the Save changes button.
If some of your products have different dispatch dates, you can set a lead time for an individual product by following these steps:
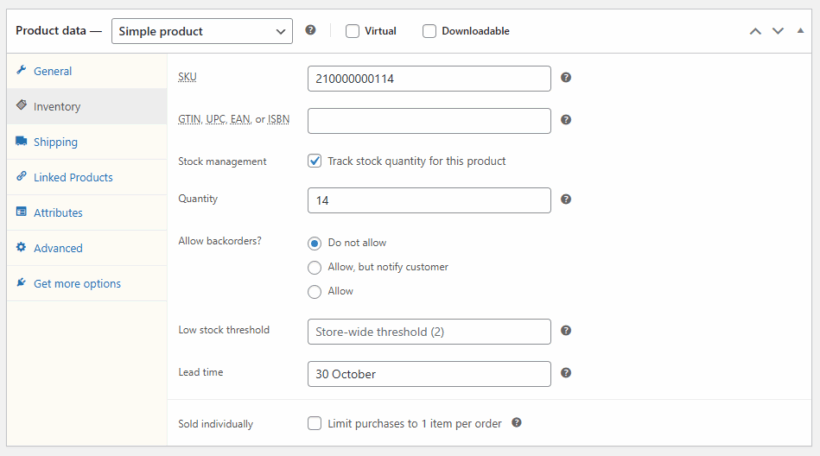
- Go to the product’s Edit product page.
- Scroll down to the Product data section and click on the Inventory tab.
- Enter the expected dispatch date in the Lead time field.
- Click the Update button.
This approach lets you maintain sales momentum while setting clear expectations, helping avoid customer frustration and order cancellations during your vacation period.
Method 3: Advanced code-based solutions for developers
Instead of using a plugin, developers who feel comfortable using PHP can add this line of code to their child theme’s functions.php file to disable cart and checkout features temporarily while they’re on vacation:
add_filter( 'woocommerce_is_purchasable', '__return_false' );
Adding a code snippet might not be the easiest solution for some users, especially small business owners with less technical experience. Without PHP knowledge, even minor errors can lead to significant delays or having to rely on costly external help.
If you do decide to use the code snippet, you should add a store notice to let your customers know how long your store will be unavailable. There are two ways to do this:

If you’re not using a block theme:
- From your WordPress dashboard, navigate to Appearance → Customize → WooCommerce → Store Notice.
- Type in your holiday message, such as We’re on holiday! Store will reopen on [insert date here].
- Tick the Enable Store Notice checkbox.
- Click the Publish button.
If you are using a block theme:
The block-based (Full Site Editing) themes hide WordPress’ old Customizer panel from the sidebar. At the time of this writing, WooCommerce hasn’t moved the Store Notice feature into the Site Editor yet, but the panel is still there. It’s just not linked anywhere.
You can open it directly through /wp-admin/customize.php and the Store Notice section will load as usual.
Once you reach the Store Notice section, all you have to do is:
- Type your holiday message. Something like: We’re on holiday! Store will reopen on [insert date here].
- Tick the Enable Store Notice checkbox.
- Click the Publish button.
Best practices for communicating your WooCommerce store vacation mode
Don't overcomplicate your store closure. Follow these straightforward guidelines to set up vacation mode efficiently while maintaining customer trust:
- Deploy a site-wide notification banner or message clearly stating your closure dates and expected return date.
- Announce vacations as far in advance as possible to give customers adequate preparation time.
- Use your social media platforms and your newsletter to let your regular customers know about the upcoming store shutdown and when it’s expected to reopen.
- Update your Google Business Profile with temporary hours during vacation periods.
- Clearly communicate expected order processing timeframes for when you return.
By following these simple best practices, you can efficiently set your store in vacation mode without losing customer trust or loyalty.
Start your worry-free store vacation today
This article has introduced two straightforward solutions for putting your WooCommerce store into temporary vacation mode.
To recap:
- WooCommerce Private Store offers a quick, no-code way to password-protect your entire store while keeping your website visible. This lets you maintain brand presence, control who can access your products, and display custom vacation messages.
- WooCommerce Lead Time helps you keep your store open while clearly communicating any shipping delays during your break. This way, you don’t lose sales, and customers remain informed about expected delivery times.
Whichever method you choose, enjoy peace of mind knowing your store looks professional, your customers are well-informed, and everything is ready to smoothly resume when you return. Clear communication during closures builds trust and loyalty.
Ready to start your vacation without stress? Get started today with Barn2’s WooCommerce Private Store plugin and take that well-deserved break worry-free.