WooCommerce tickets: How to sell event tickets on your store (2025)

Are you organizing an event and looking for a convenient and user-friendly way to sell tickets online? There's a surprisingly simple way to do this by using WooCommerce with the WooCommerce Product Options plugin.
While there are WooCommerce events plugins available, these can be overkill for many website owners who simply want to sell tickets to events or training courses. Instead of using a dedicated WordPress events plugin, you can use the WooCommerce and WooCommerce Product Options plugins to sell tickets on your WordPress website.
WooCommerce Product Options adds extra options to your products, so that you can collect additional information from your customers when they purchase tickets. This makes it easy to sell tickets with WooCommerce and collect the information you need, such as the required ticket type, attendee information and lunch options. Customers can select the options that are relevant to them and the total price will be calculated automatically based on their choices.
In this article, we will show you how to use WooCommerce and WooCommerce Product Options to sell tickets to events on your online store. We will provide step-by-step instructions for setting up the plugins and adding ticket options to your products. We'll also provide bonus tips for creating a smooth and efficient checkout process for your customers. Whether you're organizing a conference, workshop, or training course, this guide will help you sell tickets in WooCommerce and collect information from attendees.
This method is much simpler than using a WordPress events plugin because you're simply adding extra options to normal WooCommerce products. That keeps it super-simple for you, and is quick and easy to set up.
Introduction to WooCommerce and the Product Options plugin
WooCommerce lets people create an online store and manage their inventory, orders, and customers from a single dashboard. One of the key features of WooCommerce is its flexibility and customization options. You can use it to set up payment gateways, shipping methods, and more. And even better, WooCommerce is 100% free to use!
The WooCommerce Product Options plugin is a useful tool that allows users to add extra options to their products. This can include event booking options, such as a date and time calendar, ticket type, or lunch choices. It also lets you add options for customers to enter additional information, such as personalization details or attendee information.
Combine the two plugins to use WooCommerce to sell tickets. The WooCommerce product is the 'ticket', and you can add as many options to it as you like in order to sell tickets online.
Tutorial: Using WooCommerce to sell tickets for events and training courses
Step 1 - Install WooCommerce
Skip this step if you already have a WooCommerce store and simply need to sell tickets on it.
To get started with selling tickets in WooCommerce, you will need to have a WordPress website and a domain name. Once your website is set up and ready to go, you can install and activate the WooCommerce plugin by following these steps:
- Log in to your WordPress dashboard and go to the 'Plugins' section.
- Click on the 'Add New' button and search for "WooCommerce" in the plugin directory.
- Click on the 'Install Now' button for the WooCommerce plugin and wait for it to be installed on your WordPress site.
- Once the plugin is installed, click on the 'Activate' button to enable it.
- Configure the main WooCommerce settings to choose options such as your main store currency, taxes, etc. If you want to restrict the number of tickets that you can sell for each event, then enable inventory management too.
Step 2 - Install WooCommerce Product Options
After WooCommerce is installed and activated, buy the Product Options plugin. Install it by following the instructions in your email confirmation.
- Go to the 'Products' section of your WordPress dashboard and add a new product. This will take you to the product editor page. Use this to add details about the event or training course that you want to sell tickets for. For example, you can enter name, description, and an image.
- Add a basic price for the ticket. For example, if a ticket normally costs $25 then enter this as the cost. (I'll show you how to add more advanced calculations for your ticket pricing in a minute.)
- To restrict the number of tickets that you can sell, go to the 'Inventory' tab. Click 'Manage stock' and enter the number of available seats/places.
Step 3 - Add a date field plus extra options for selling tickets in WooCommerce
Next, we'll add a date calendar, plus various extra options to the ticket product:
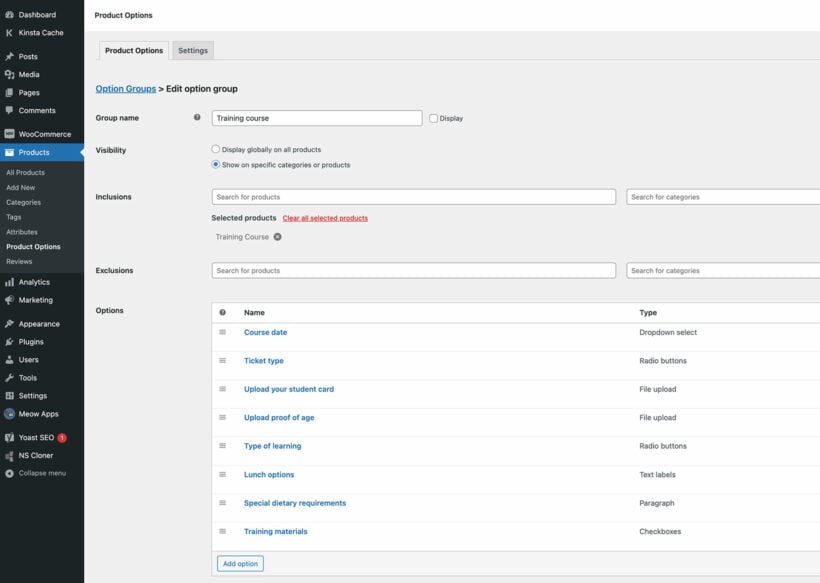
- Go to Products → Product Options and create a new option group.
- Select the product that you just created. This makes the extra options appear on the ticket product.
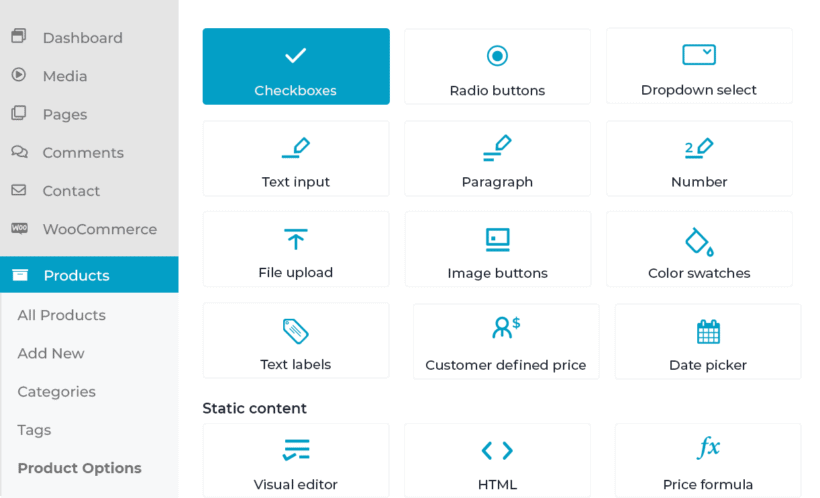
- Add all the ticket options that you want to display to customers when they buy the ticket. You can add whichever options you like, and I'll explain some of the most popular ones below.
Popular options for using WooCommerce to sell tickets
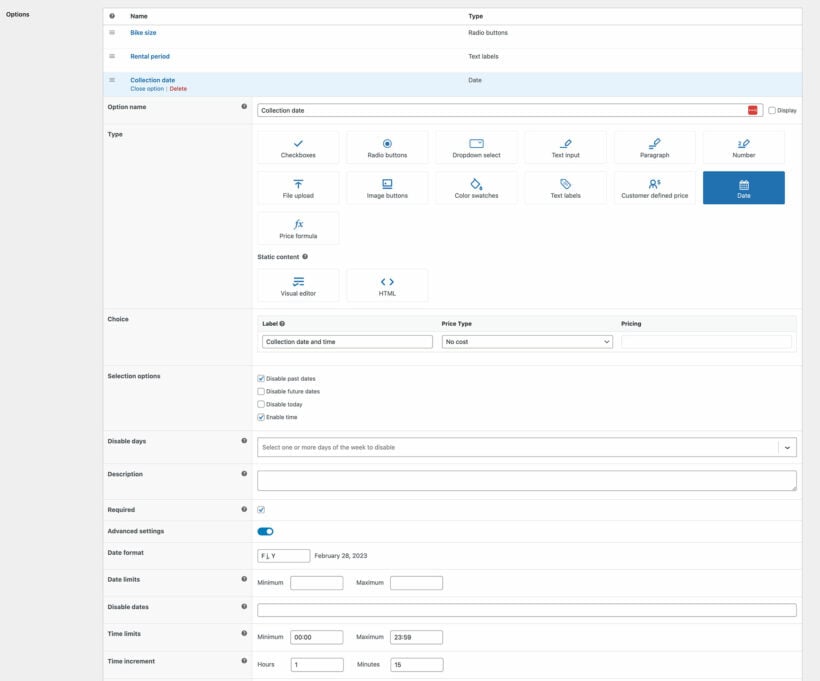
To sell tickets, you will likely want to add a date picker field where users can select the date and time of the event they want to attend. You can also add a 'Ticket type' dropdown where they can select the type of ticket they want to purchase. Maybe you'll add checkboxes for chargeable extras such as a printed training handbook. The possibilities are endless!
Event date
Are you using WooCommerce to sell tickets for events that have a choice of dates? If so, then it's important to let customers choose the date.
To add a calendar to the event page, just add a 'Date picker' option. Go through the options to set it up as needed, for example:
- Disable past dates (recommended for selling event tickets).
- Consider disabling the current date.
- Set date limits to control how long into the future people can book an event.
- Remove any dates or days of the week when the event is not running.
- Choose whether to display a time picker in the date calendar.
- Set the length of each time slot.
- And so on.
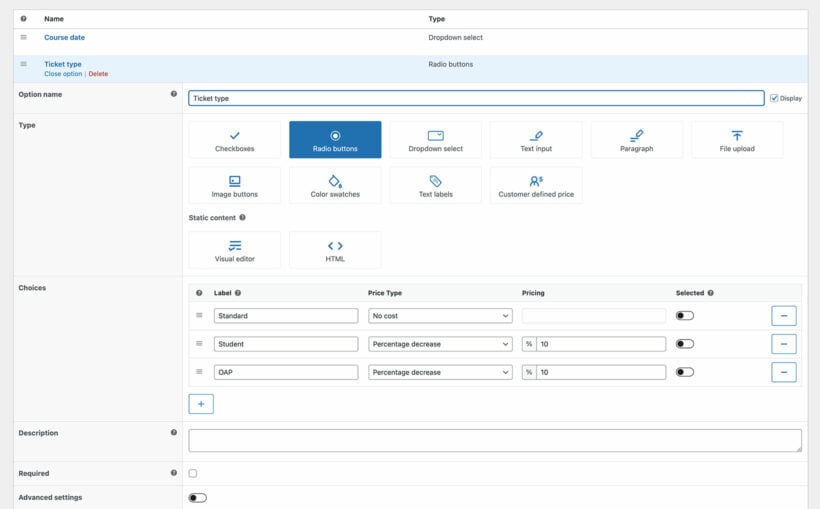
Adding a 'Ticket type' dropdown
To add a 'Ticket type' dropdown, select 'Dropdown' from the 'Type' section. Next, give your option a name, such as 'Ticket type'.
If you're already set up a 'Ticket type' product variation then you can select this and choose a style to display it in. Alternatively, add the different ticket types and their prices by clicking on the 'Add Choice' button and entering the details for each choice. For example, you might have a 'Standard' ticket for $50, a 'Student' ticket for $45 and a 'Group' ticket for $40.
Bear in mind that you have already entered a main price for the product. For this reason, you might want to use the ticket type option to increase or reduce the base price. For example, when someone selects 'Student' then it might decrease the overall product price by 10%.
Sell chargeable extras on top of the ticket price
You can also use the WooCommerce Product Options plugin to sell chargeable extras. Customers buy these and pay an extra cost, on top of the main price for the ticket. For example, you might sell a 'Training handbook' for $10. I recommend displaying these extra options as checkboxes.
To add checkboxes for chargeable extras, select 'Checkboxes' from the 'Type' section. Again, give your option a name, such as 'Extras'. Then, click on the 'Add Choice' button to add the different extras and their prices.
Add meal options
Lots of courses and events have lunch or other meals provided. When you're using WooCommerce to sell tickets, it's easy to let customers choose their meal options at the same time.
For example, you could add radio buttons for selecting the standard lunch, or a vegan or gluten free option. You can also add a text field to collect information about attendees' dietary requirements or allergies.
Collect attendee information
And finally, you need to know who's attending the event. The WooCommerce checkout already collects the name and address of the person you're selling the ticket to. However, this may not be the person attending the event.
As a result, it's a good idea to add extra text fields to the product page to collect this information. For example, you can add a text input field for entering the name of each attendee.
Online vs. in-person training
Do you offer online versus face-to-face versions of the event? Sell tickets to both by adding radio buttons to choose the training format.
What else can I do to sell tickets more effectively?
In addition to the basic product options such as radio buttons, dropdowns and checkboxes, the WooCommerce Product Options plugin includes advanced features that you can use when selling tickets. One of these features is conditional logic, which allows you to show or hide certain options based on the choices that the customer makes.
Here are some examples of how conditional logic can improve the way you sell tickets with WooCommerce:
- You might have a 'Ticket type' dropdown where customers can select the type of ticket they want to purchase. If they select the 'Student' ticket type, you can use conditional logic to show a text field where they can enter their student ID number. This allows you to collect additional information from your customers and provide them with the appropriate discount based on their ticket type.
- If a customer selects a 'Group' ticket type, you can use conditional logic to show a text field where they can enter the number of people in their group. This allows you to calculate the total price for their group, and also ensures that you have the correct number of tickets available.
- If they select the 'VIP' ticket, you could show a checkbox where they can add a backstage pass for an additional cost.
- If a customer selects a specific event date, you can use conditional logic to show additional options that are only available for that date. For example, if they select the 'Friday at 5pm' event, you could show a checkbox where they can add a networking dinner for an additional cost.
Overall, there are many ways that you can use conditional logic to show and hide fields when selling tickets online. This allows you to provide a more personalized and tailored experience for your customers, and make it easy for them to purchase the tickets that are relevant to them.
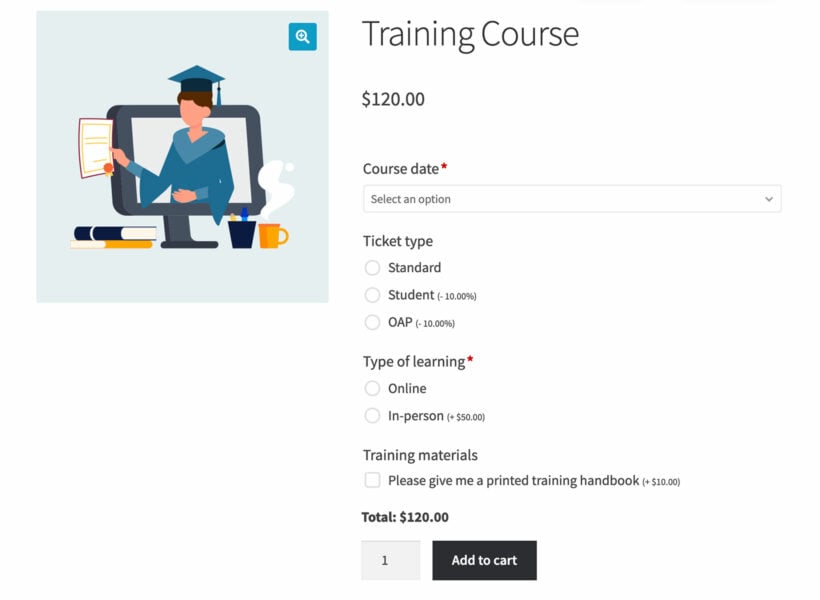
What does the ticket product look like on the frontend?
Once you have saved your product options, view the ticket product on the front end of your website. Users will be able to select the date, ticket type and any extras they want to purchase. The total price will be calculated automatically based on their selections.
You can also use WooCommerce sell tickets to multiple attendees at once. Customers simply use the quantity box to add the required number of attendees. The ticket price increases based on the number of people attendees.
Bonus: Use WooCommerce Fast Cart to let customers buy tickets more quickly
The WooCommerce Fast Cart plugin can speed up the purchasing process for your customers and improve user experience. Customers can add items to their cart and complete their order in a same-page popup checkout, without having to visit multiple pages. This can help to increase your conversions and make it easier for customers to buy tickets to your events or training courses.
Once WooCommerce Fast Cart is installed and activated, the setup wizard will open automatically. Use this to configure the popup cart and checkout. For selling tickets, you may want to skip the cart completely. That way, you can display a popup checkout as soon as a user adds a ticket to their cart. This can be particularly useful for selling tickets, as it allows customers to quickly and easily purchase the tickets they want without having to go through multiple pages.
One of the key benefits of using WooCommerce Fast Cart for selling tickets is that the ticket options that the customer selected on the product page will appear in the popup cart and checkout. They can clearly see their selections and the total price, including any extras.
Start using WooCommerce to sell tickets today!
In conclusion, the WooCommerce and WooCommerce Product Options plugins make it easy to sell tickets to events or training courses. You can add options to your products to allow customers to choose their ticket type, purchase extras, and enter attendee information.
This is a simple and effective way to sell tickets online, without the need for a complex events plugin. All you do is create a ticket product and add extra options to it.
The WooCommerce plugin is 100% free of charge. WooCommerce Product Options comes with a full 30-day money back guarantee, and full support and documentation. Give it a try and see how it can benefit your business.