How to customize the quantity input in WooCommerce


WooCommerce quantity inputs are too basic for many stores: Every product starts at 1, increases one at a time, and has no maximum beyond stock. That is a problem when you sell packs, cases, minimum orders, or fixed multiples.
By default, WooCommerce allows you, or rather your customers, to change the quantities of items they're considering to buy in a fairly basic way. They can either type in a number by hand or go up and down using those small arrows.
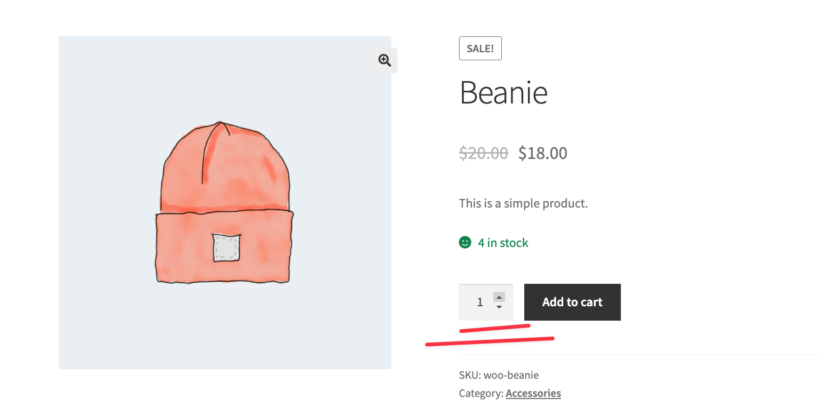
The only thing WooCommerce does to make sure those values are correct is that it compares them against the set inventory for a given product. This is fine.
However, "fine" is probably the most we can give it.
For slightly more advanced business models or types of products, you might need access to more granular settings for product quantities, their increments, or even ways to limit quantity in WooCommerce.
This article covers six ways to customize quantity inputs in WooCommerce.
- Change the rules on the product's own quantity box to set the default quantity, minimum, maximum and increment.
- Add extra quantity boxes to the product page when each choice needs its own quantity.
- Show quantity inputs away from the product page when customers need to order from a list or form.
Different ways to customize WooCommerce quantity input
This article covers two separate questions about WooCommerce quantity input. First, it covers what quantities customers may order, including the default quantity, minimum, maximum and increment. Second, it covers where the quantity input appears, because WooCommerce normally shows it only on the single product page.
The sections work outward from the product page. The first group changes the quantity box on the product page itself. The last group puts quantity inputs on the shop page instead.
Use this table to choose the right approach.
| Approach | What it does | Best for | Where the quantity input appears |
|---|---|---|---|
| WooCommerce Quantity Manager | It sets the default quantity, minimum, maximum and increment. | It suits most stores. It is the shortest route and needs no code. | It changes the existing quantity box, everywhere it appears. |
| WooCommerce Product Options | It adds a quantity picker beside each option choice, with price formulas that respond to quantity. | It suits build-your-own boxes, bundles and configurable products. | It appears beside each option choice on the product page. |
| WooCommerce Bulk Variations | It builds a grid with a quantity box for every variation. | It suits one product ordered in a spread of sizes or colors. | It appears in a grid on the product page. |
| PHP snippet | It filters the quantity arguments directly. | It suits one blanket rule across the whole store. | It changes the existing quantity box, everywhere it appears. |
| WooCommerce Product Table | It turns the catalog into an order form with a quantity box per row. | It suits wholesale and repeat-order stores where customers know what they want. | It appears on the shop page or any page holding the table. |
| WooCommerce Restaurant Ordering | It replaces typing with plus and minus buttons in an order form. | It suits small quantities ordered quickly. | It appears in an order form layout. |
You can read the steps below, or watch this video to see how the plugin route works.
Change the default product quantity
Stock WooCommerce always starts the quantity box at 1. For some stores, 1 is the wrong starting point.
Here's when setting a different default quantity makes sense:
- In wholesale scenarios. For example, making the default quantity 10 can be easier to grasp than the alternative of naming the product something like "10-pack of X" and then hoping that the customer hasn't missed this detail when ordering the product.
- In scenarios where you'd prefer to sell packs of items rather than single items. This works well for commodities or other products that people run out of regularly. For example, it's more convenient for someone to buy, say, five packs of coffee right away vs just one.
For stores that need a different starting quantity, use the aforementioned WooCommerce Quantity Manager plugin.
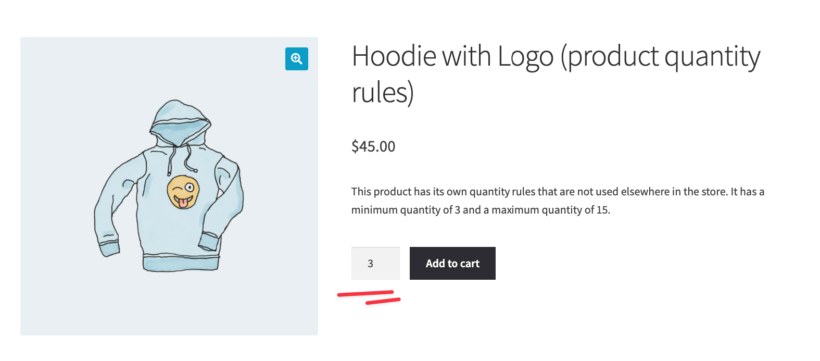
The plugin lets you set whatever number you wish to serve as the default quantity, following the global quantity rules documentation. Apart from that, you can set those default quantities globally (for the entire store), per product category, as well as per individual products and product variations.
Set global rules at WooCommerce → Settings → Products → Quantity Manager. Rules set on a category, a product or a variation override the global ones.
For the customer, the look of the product page doesn't change. All that's different is the number next to the Add to cart button.
Set quantity minimums/maximums
WooCommerce keeps an eye on the product quantities that your customers are adding to cart. It makes sure that those quantities are more than one and less than whatever you have in stock. This, again, is "fine" for most applications, but not always.
Not being able to set the min/max quantities can be problematic when dealing with products where you can't or don't want to sell just a single unit. This can be a matter of manufacturing costs, minimum order value required, etc.
Then, on the other end of the spectrum, it's not hard to imagine scenarios where you can't sell or ship products in quantities higher than a certain number in a single order.
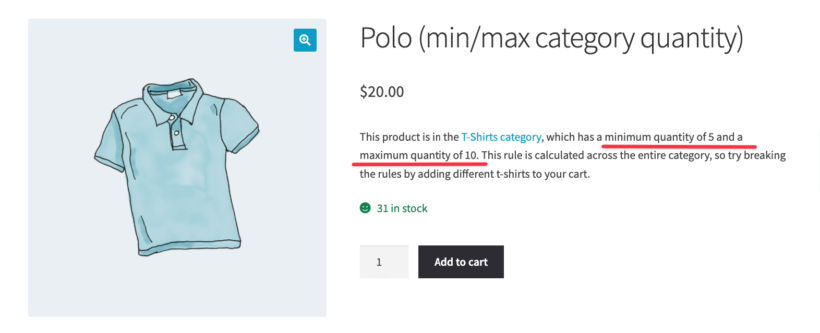
WooCommerce Quantity Manager sets a minimum and maximum globally, per category, per product or per variation. The more specific rule wins.
Here's an example: say you're selling t-shirts, but you don't want to allow customers to buy less than five in a single order. At the same time, you don't care if they buy the same t-shirt five times or five different t-shirts, one of each. You can set a rule that governs this in WooCommerce Quantity Manager quite easily.
The same rules can set a minimum and maximum order value for the whole cart rather than a per-product quantity. The rules stack, so a global rule, a category rule and a product rule can all be in play at once. The quantity rules logic documentation sets out which one wins.
Add quantity increments
By default, WooCommerce doesn't deliver any options for setting custom quantity increments. Customers simply buy in any increment of 1.
Or, more accurately, such a thing is only available if you're ready to write custom code and add it to your theme's functions.php file. The code route is covered further down.
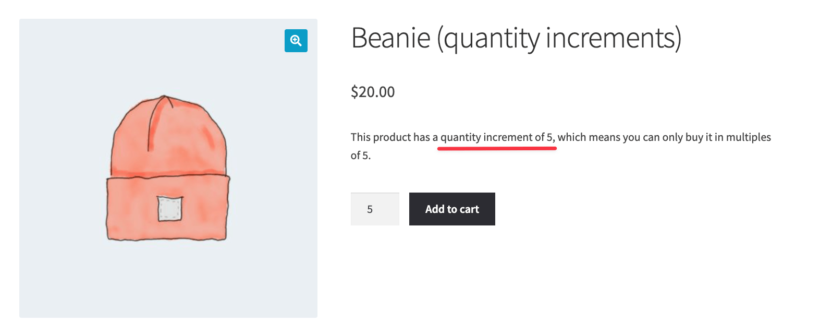
Instead, WooCommerce Quantity Manager lets you set custom increments per category, product, product variation, or globally.
This can work well for products that come in packs of X from the manufacturer, and repacking them to match each order's quantity would be too time-consuming. Think of pens, hats, etc.
Setting default increments solves this issue and forces the customer to buy a given product in multiples of X.
Allow different quantities per user role
Being able to set different WooCommerce quantity input options per user role is a great way of making your store usable for both your retail and wholesale customers.
For example, you can allow retail customers to buy just a single item of any given product. For wholesalers, however, you can make that number 5, 10, or whatever you wish.
You can set similar rules for min/max order value, and default product quantities.
Add a quantity picker to each product option

WooCommerce Product Options lets you add an individual quantity picker next to each choice within an option. This is separate from the single quantity field WooCommerce shows for the product as a whole.
People often search for a quantity box per variation, so I want to be clear early. This method adds quantity pickers per option choice, not per product variation. If you need a quantity box for each variation, I'll cover that in the next section.
This works well when the customer needs to choose different amounts of several things on one product page. For example, you might use it for a build-your-own snack box, a case of mixed wine, food boxes, bundles, or wholesale orders. You could also use it for personalized items where the buyer picks a quantity of each design.
Configure option quantity pickers
To set it up, go to Products → Product Options, then add or edit an option group. Add an option that uses custom choices, for example checkboxes or a list of products, then tick 'Display a quantity picker alongside each choice' and save.
Once you enable the setting, a Quantity column appears in the list of choices. You can use this to set the default quantity for each choice. If the column is not visible, click the blue cog icon above the choices.
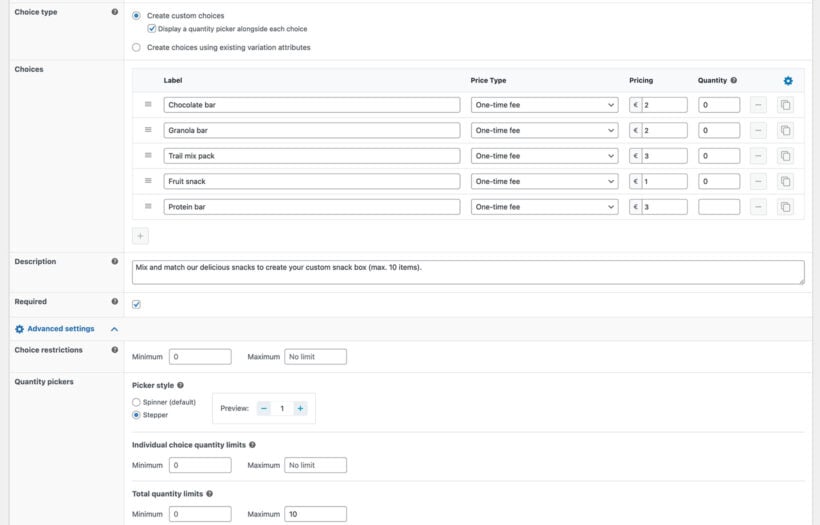
WooCommerce Product Options also adds a Quantity pickers section to the option settings. This controls the picker style, either a standard spinner or a stepper with plus and minus icons either side. It also lets you set a minimum and maximum for each individual choice, plus a minimum and maximum for the combined choices in the option.
On the front end, the customer sees a quantity selector next to each available choice. They can choose how many of each option they want before adding the main product to the cart.
Main quantity and shipping
Option quantities are completely separate from the main product quantity. Changing one does not change the other. WooCommerce calculates shipping from the main product quantity and the product's shipping settings, not from the option picker quantities, so adding more of an option does not by itself change the shipping cost.
If WooCommerce Quantity Manager is also active, its rules carry into the option pickers. The minimum and step take the higher of the two values. The maximum takes the lower value.
You can see the full setup details in the quantity pickers documentation.
Use price formulas with the quantity input
WooCommerce Product Options also has a Price formula option type. Formula variables go in square brackets. [product_quantity] is the main WooCommerce quantity input, and [product_price] is the product's price.
You can also use [product_weight], [product_width], [product_length], and [product_height]. Any option of your own can be referenced by its name. This is useful for a WooCommerce measurement price calculator, product configurators, and quantity-based pricing.
A price formula produces a per-unit amount. WooCommerce adds that amount to the product's own per-unit price, then multiplies the total by the quantity in the main quantity input. This means the formula should not multiply by [product_quantity], because that would count the quantity twice.
Price formula examples
The bulkPrice() function returns a per-unit price by tier. The documented t-shirt example is bulkPrice( [product_price], [product_quantity], 10, 18, 50, 15, 100, 12 ). The first argument is the base price, the second picks the tier, and the pairs that follow give each tier's starting quantity and per-unit price. The shirt's own price applies for one to nine, then 18 each from 10, 15 each from 50, and 12 each from 100.
The bulkRate() function works the same way, but the tier values are multipliers rather than prices. The documented example is bulkRate( [product_price], [product_quantity], 10, 0.95, 50, 0.9, 100, 0.85 ). It gives 5% off from 10 units, 10% off from 50, and 15% off from 100.
This screenshot shows the formula field in the WordPress admin, with the product quantity variable used inside a bulk pricing formula.
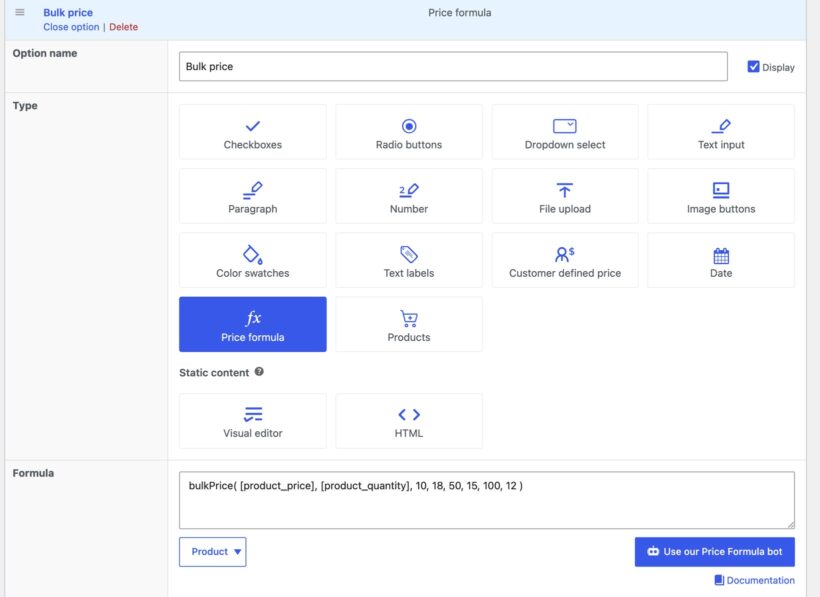
When the formula is meant to supply the whole price, as it is in both examples above, tick the option's "Ignore main product price" checkbox. This stops the product's own price from being added on top.
We saw this in a bakery cookie pack build. The store stored the pack size in a custom field, then derived a per-unit price from that pack size with [product_price] / productMeta( 'base_quantity' ). Be aware that productMeta() reads the parent product ID, so on a variable product it falls back to the default value unless the field is mapped to each variation.
Every option choice also has a price type, which decides whether its charge responds to the quantity input at all. 'Quantity-based' multiplies the charge by the main quantity. 'One-time fee' charges it once per order however many units are bought.
I recommend reading more price formula examples if your pricing depends on tiers, measurement price calculations, product metadata, or multiple selected options.
Create a bulk order form with a separate quantity box for each variation
This is for stores selling one product in many sizes and colors, where a single customer orders a spread across them. For example, it fits a wholesale clothing order of two smalls, six mediums and four larges.
Let me just show you an example screenshot of what something like this can look like, and then I'll explain the details:
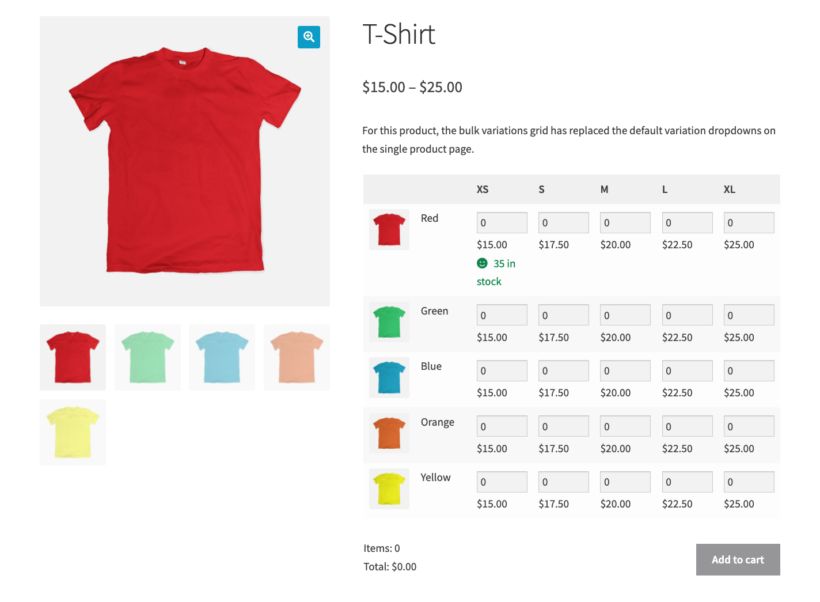
What you see here is a large order form that gathers all available variations of a given product, along with quantity inputs for each variation.
This can be invaluable in wholesale scenarios where your customers might want to buy different quantities of different variations in a clear and easy to comprehend way. Although this might look like a complex thing at first, it's much easier to grasp than the alternative of working your way through each variation individually and adding them to cart one by one.
WooCommerce Bulk Variations builds the grid from the product's existing attributes, so each combination gets its own quantity box on the product page. The grid covers one product's variations at a time, so it does not replace an order form spanning the whole catalog.
The grid is controlled from the plugin's own settings page, where you choose which attribute forms the rows and which forms the columns. You can put a bulk variations grid inside a product table, so a catalog-wide order form can still open into a full variation grid.
Customize the WooCommerce quantity input with code
If you would rather do this in a snippet than install a plugin, one filter covers most WooCommerce quantity input changes. The hook is woocommerce_quantity_input_args.
WooCommerce runs this hook inside wc_get_quantity_input_args(). That function is the single place WooCommerce assembles the minimum, maximum, step, and starting value for the quantity field.
This is why I recommend using the filter instead of overriding the global/quantity-input.php template. The classic quantity input template, the block Add to Cart with Options quantity selector, and the Store API behind the Cart and Checkout blocks all read from the same function. As a result, one snippet can cover classic themes and block themes without touching a template file.
Set the default, minimum, maximum, and step
The first snippet sets a default quantity, a minimum, a maximum, and a step for every product. This is the blanket version to start from if your whole store follows the same quantity rule.
add_filter( 'woocommerce_quantity_input_args', 'barn2_custom_quantity_input', 10, 2 );

function barn2_custom_quantity_input( $args, $product ) {

    // The cart uses this same filter, so leave it alone.
    // Without this check, every cart row resets to your default quantity.
    if ( is_cart() ) {
        return $args;
    }

    $args['min_value']   = 5;  // Smallest quantity a customer can order.
    $args['max_value']   = 50; // Largest quantity a customer can order.
    $args['step']        = 5;  // Only allow multiples of 5.
    $args['input_value'] = 10; // Quantity shown in the box on page load.

    return $args;
}
The classic cart passes each line item's quantity through the same filter as the starting value. A filter without the is_cart() check resets every row of the cart to your default. That is why the snippet returns early there.
You can also apply the same idea to one product category only. Variations do not hold their own categories, so the snippet checks the parent product ID. Without that parent check, the rule silently never fires on variable products.
add_filter( 'woocommerce_quantity_input_args', 'barn2_wholesale_quantity_rules', 10, 2 );

function barn2_wholesale_quantity_rules( $args, $product ) {

    if ( is_cart() || ! $product ) {
        return $args;
    }

    // Variations don't hold their own categories, so check the parent product.
    $product_id = $product->is_type( 'variation' ) ? $product->get_parent_id() : $product->get_id();

    if ( has_term( 'wholesale', 'product_cat', $product_id ) ) {
        $args['min_value']   = 12;
        $args['step']        = 12;
        $args['input_value'] = 12;
    }

    return $args;
}
Since WooCommerce 10.1, there is also a deeper route for some rules. The woocommerce_quantity_input_min, woocommerce_quantity_input_max, and woocommerce_quantity_input_step filters now run inside the product object itself, in get_min_purchase_quantity(), get_max_purchase_quantity(), and get_purchase_quantity_step().
Anything that asks the product gets the filtered value. This includes the Store API and the variation data on variable products. The next snippet shows the step version.
add_filter( 'woocommerce_quantity_input_step', 'barn2_quantity_step', 10, 2 );

function barn2_quantity_step( $step, $product ) {
    return 5;
}
Hide the quantity input
If you want to sell a product one at a time, use woocommerce_is_sold_individually. This is better than hiding the quantity input with CSS because WooCommerce enforces the rule.
add_filter( 'woocommerce_is_sold_individually', 'barn2_hide_quantity_input', 10, 2 );

function barn2_hide_quantity_input( $sold_individually, $product ) {

    $product_id = $product->is_type( 'variation' ) ? $product->get_parent_id() : $product->get_id();

    if ( has_term( 'made-to-order', 'product_cat', $product_id ) ) {
        return true;
    }

    return $sold_individually;
}
CSS only changes what the customer sees in the browser. The sold-individually filter changes the WooCommerce purchase rule.
Validate the step on classic add to cart
The step value is browser-side only on the classic path. WooCommerce's classic add to cart does not check it. A direct ?add-to-cart=123&quantity=7 URL still adds 7 even with a step of 5.
The block cart normalizes quantities through the Store API. The classic cart does not. Use woocommerce_add_to_cart_validation if you need server-side validation for classic add to cart requests.
add_filter( 'woocommerce_add_to_cart_validation', 'barn2_enforce_quantity_step', 10, 3 );

function barn2_enforce_quantity_step( $passed, $product_id, $quantity ) {

    $step = 5;

    // fmod() rather than % so this still works if you allow decimal quantities.
    if ( abs( fmod( $quantity, $step ) ) > 0.0001 ) {

        wc_add_notice(
            sprintf( 'This product is sold in multiples of %d.', $step ),
            'error'
        );

        return false;
    }

    return $passed;
}
Put the code in a site-specific plugin or a code snippets plugin rather than the active theme's functions.php. That is the practical way to make the rules survive a theme switch or theme update. If your theme adds its own plus and minus buttons with JavaScript, test that those buttons respect the step value.
These filters cannot turn the number field into a dropdown. The step also accepts decimals, but WooCommerce treats stock amounts as whole numbers unless you change that. If you need decimal quantities, that needs a more specific setup.
The code route can work well when a store needs one blanket quantity rule across every product. It becomes harder to justify when that rule differs by category, by product, or by customer type.
However, once you want different rules per category, per product, per variation, or per user role, you are maintaining a growing snippet. That is the point at which Quantity Manager usually pays for itself.
Show the quantity input somewhere other than the product page
A WooCommerce quantity input only exists on the single product page. The shop page is a grid view of your product catalog, with images and add to cart buttons for each product. That means a customer buying six different products has to open six product pages.
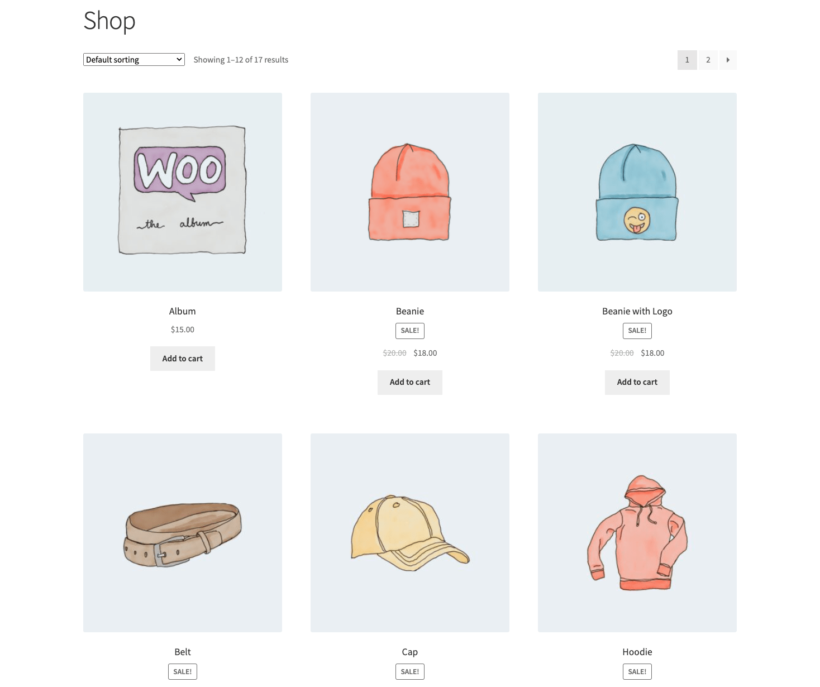
Everything so far has changed the quantity input on the product page. The last two sections move it off that page. An order form table gives every product its own quantity box on one page, and plus and minus buttons change how customers set the number once they are there.
Display your product catalog in table view - with fields for quantity input
The table view is a great way to transform your standard shop page into an order form. The customer can add products to cart in bulk, and also set custom quantities of those products at the same time.
The WooCommerce Product Table plugin allows you to do that. Here's an example of what that final order form can look like:
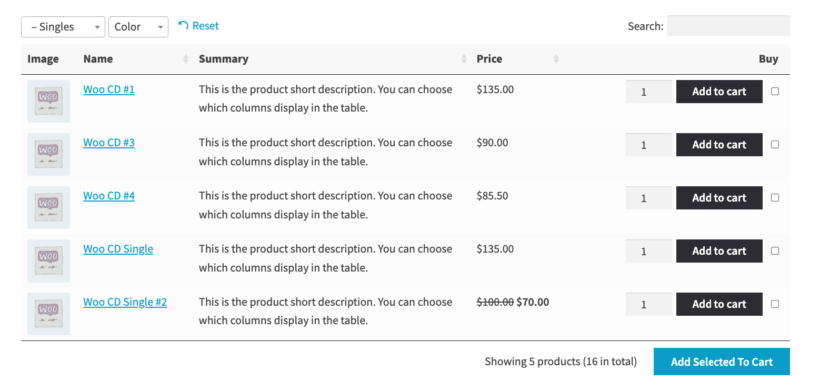
You build tables at Products → Product Tables using the table builder. Then you place the table with the shortcode it gives you.
The quantity rules from the first half of the article still apply inside the table. A minimum, maximum or increment set in Quantity Manager is enforced on the table's quantity boxes too. The WooCommerce Product Table plugin documentation covers the table settings in more detail.
Variations can be given their own row, so each size or color gets its own quantity box. This is useful if you want to display product variations as separate table rows. A table replaces browsing with scanning, so it suits stores where customers already know what they want. However, it is the wrong choice for a store that sells on photography and long descriptions.
Add plus and minus buttons for product quantities
Plus and minus buttons provide your customers with a quick way to change product quantities in a couple of clicks. This can be an overall safer approach that saves your customers from making typos when entering quantities by hand.
Here's a demo of what those plus and minus buttons can look like on a restaurant website:
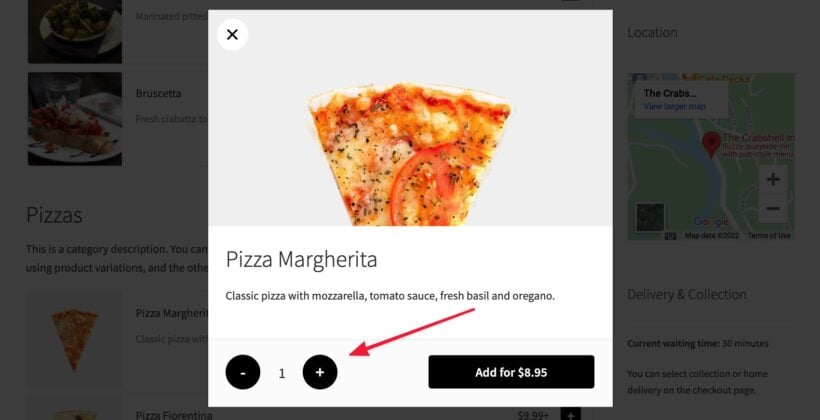
This is done with the help of our WooCommerce Restaurant Ordering plugin. Although the name seems to put it in a certain drawer, it can very well be used on any type of ecommerce store, not just for taking food orders. Replace pizza with t-shirts or business cards, and it works just as well.
The plugin displays your products as an order form with plus buttons next to them. Clicking those buttons either adds the product to cart right away or displays a lightbox for product customization/selecting variations if there are any (this is the pizza example you can see above).
Plus and minus buttons replace typing, so they suit small quantities. Nobody ordering 40 units wants to click plus 40 times, which is why a typed box is still the better default on a wholesale store.
Many WooCommerce themes add their own plus and minus buttons already, so check the theme before adding anything.
Create a custom WooCommerce quantity input with unlimited options
Most stores changing the WooCommerce quantity input want a minimum, a maximum, a default or an increment. For that, WooCommerce Quantity Manager is the shortest route, and you do not need to write code.
- WooCommerce Quantity Manager is best when you need no-code defaults, minimums, maximums and increments.
- A PHP snippet works when you only need one storewide rule.
- WooCommerce Product Options fits products where each option choice needs its own quantity.
- WooCommerce Bulk Variations works when customers need a quantity box for each variation.
- WooCommerce Product Table is best for a shop page order form.
- WooCommerce Restaurant Ordering adds plus and minus buttons to order forms for small quantities in any type of store.
Choose the approach that matches where customers choose quantities, then test the cart, shipping and checkout totals before publishing.