Complete guide to WooCommerce POS (WooCommerce point of sale)

If you’re looking for a simple solution for taking customer orders at the counter or table using a tablet or iPad, this article is just the thing you need.
Here, we’ll show you how you can create a WooCommerce POS ordering system for your business. Whether you run an online store, physical store, retail store, restaurant, spa, local coffee shop, or hotel – a WooCommerce POS plugin (or "WooCommerce point of sale plugin") can help you streamline business operations.
Having software that enables you to take customer orders is incredibly important – regardless of what sort of business you’re running. It enables your staff to quickly enter customers’ orders into a single ordering system – not multiple versions for in-store and online, or worse, something on paper. It’s more accurate and more efficient, especially for cashiers.
A WooCommerce POS system will simplify the order-taking process and make it easier for your waiting staff or behind-the-counter staff (cashiers) to add and remove items from the order list, select variations, place orders for customers, and instantly send it through for processing.
By the end of this post, you'll know how to set this all up.
You can also watch a video version of this post below.
What we'll cover
I’ll show you step-by-step how you can use WooCommerce with the WooCommerce Product Table plugin to create a one-page ordering system that enables your staff to take customer orders. They’ll be able to use this system on different types of devices including mobile devices like iPads or Android tablets/phones.
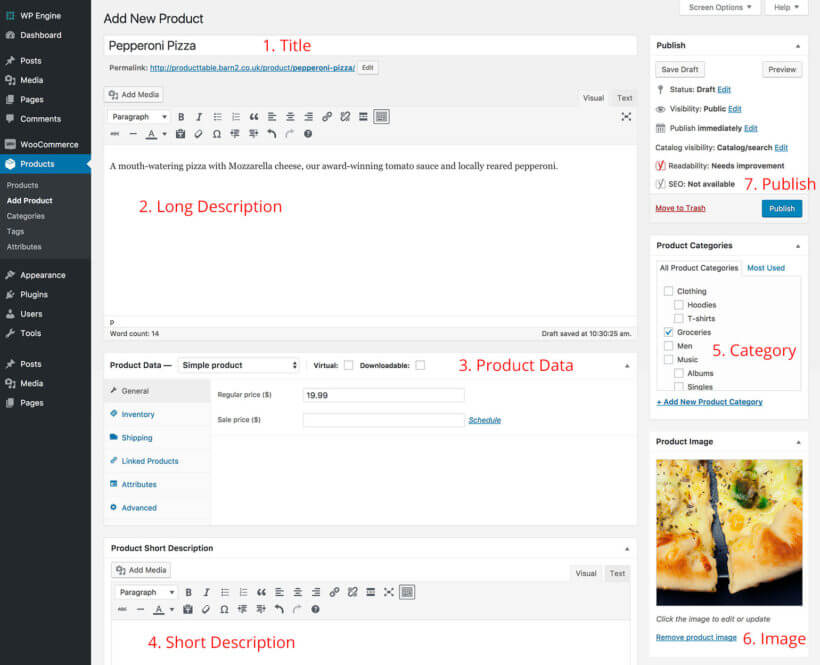
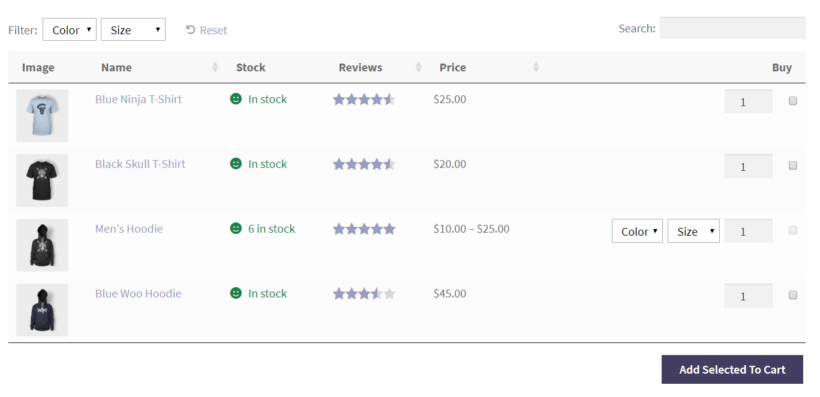
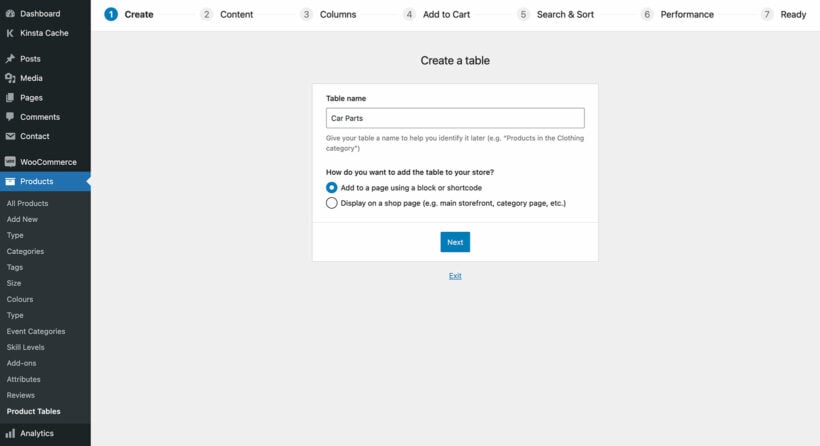
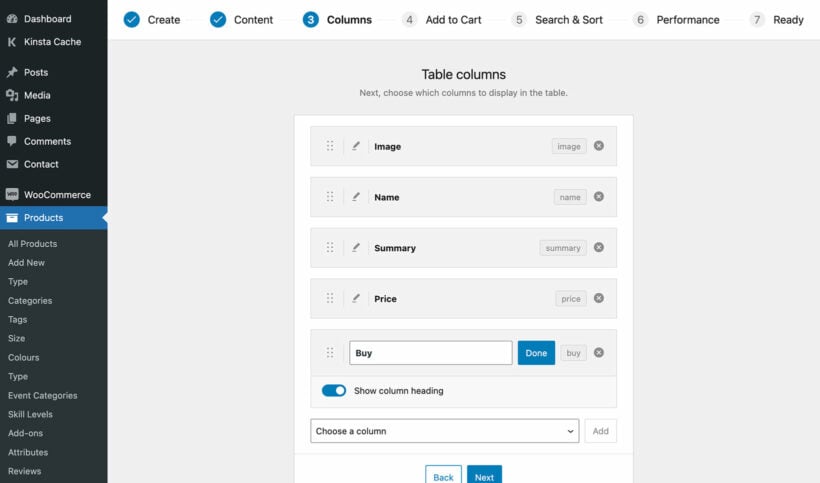
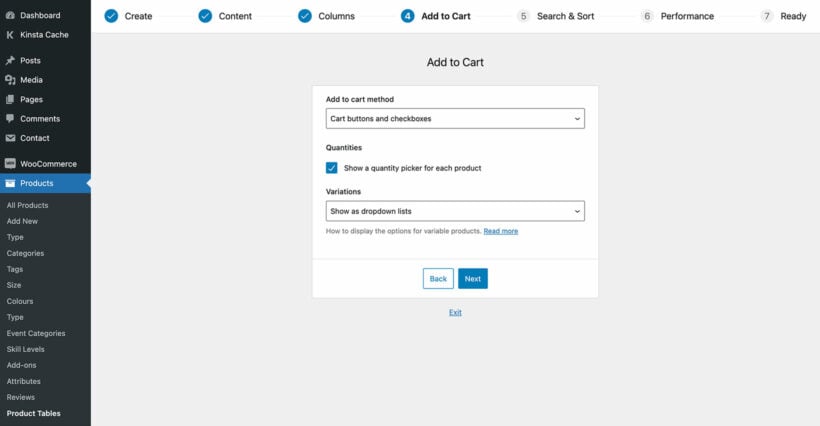
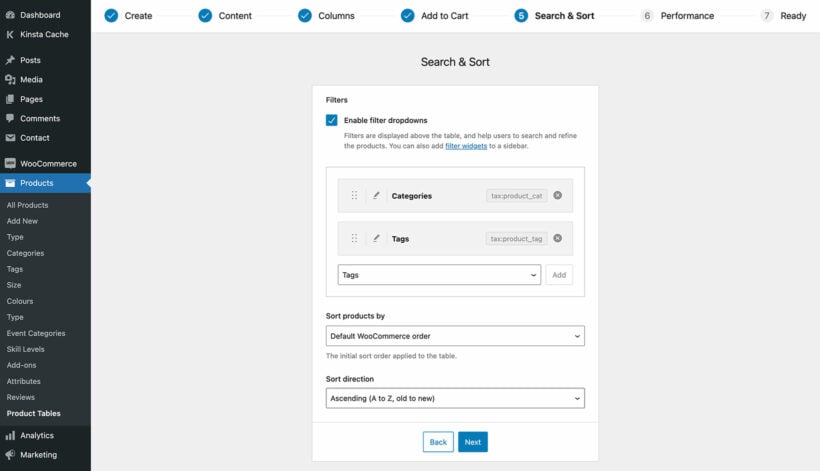
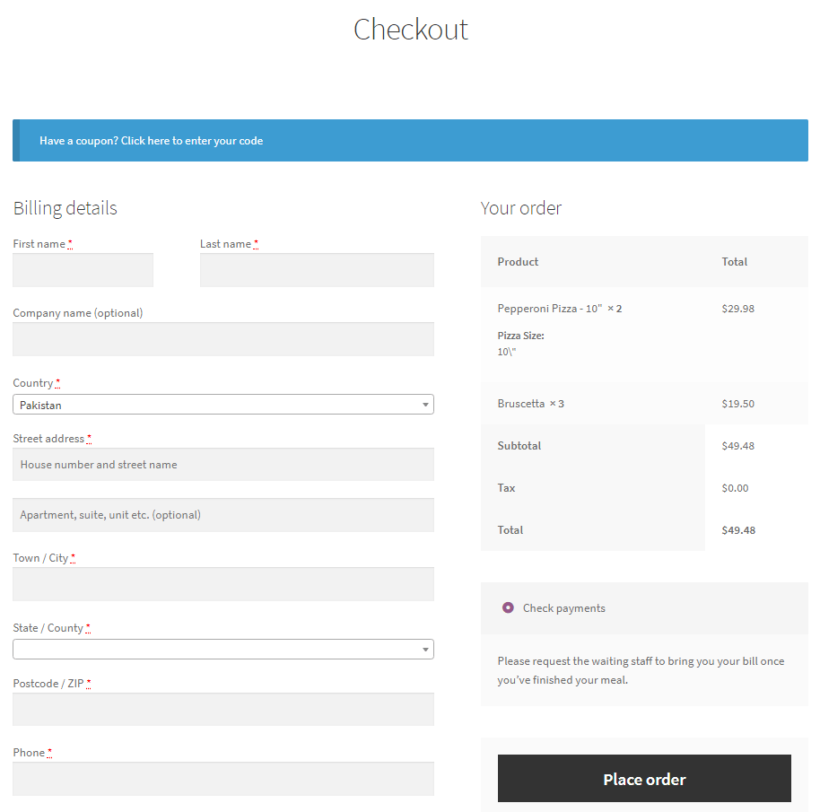
I’ll start by showing you how to install and set up the WooCommerce Product Table plugin on your existing WordPress website. Then, you’ll learn how to use the plugin to create an easy-to-use, one-page POS ordering form. This form will enable your waiting staff to easily view, select, and customize the customer’s orders. And, lastly, we’ll go over some tips about how you can optimize your order taking process using advanced features like routing orders to the right department. Let’s get started. Most stores take customer orders using a static computer screen. All of the items in the customer’s order are recorded and forwarded to the relevant departments. Unfortunately, there are a number of problems associated with this approach to taking orders: The solution is to set up a WooCommerce point-of-sale system to quickly input the customer’s order, calculate the total amount owed, and collect payment information using an iPad or Android tablet. Using WooCommerce for your point of sale system gives you a web-based, state-of-the-art solution. It's inexpensive, and it's easy to set up. If you're already using WooCommerce for selling online, then even better – integrating WooCommerce POS with your existing store will offer a huge saving of time, simplicity, and money for store owners. So, what are the benefits of WooCommerce POS? If you run a business that requires waiting staff to take customer orders or requires customers to place their own orders at the counter, you’ll be able to speed up the order placing process using a WooCommerce POS integration on your WordPress website. It’s easy to set up and uses the popular WooCommerce plugin with some minor modifications and additional plugins. The best part is that a POS WooCommerce system is highly customizable. You get the freedom and flexibility to set up POS products the way you want. This way, you can create an intuitive interface that's easy for staff to use. In addition to this, you can store all sales and inventory data for POS products in your custom WooCommerce point of sale system. This enables you to make informed business decisions in a timely manner such as preventing out-of-stock situations. Related: Check out our complete guide on how to build a WooCommerce B2B wholesale store! There are plenty of POS products that integrate with WooCommerce. Some examples include Square Point of Sale and wePOS. Although these are viable options, we recommend building your own WooCommerce POS system. The main benefit of custom POS products for WooCommerce is that you have full control over its functionality and ease of use. You get to choose which features to include and which ones to leave out. This will depend on the types of products you sell and the technical expertise of your sales staff. We're going to show you step-by-step how to create an easy-to-use, one-page POS system. This form will enable your waiting staff to easily view, select, and customize the customer’s orders in a way that aligns with your business requirements. WooCommerce is the most popular e-commerce platform that you can use to sell just about anything. Whether you’re organizing your online store’s items, creating an online shopping cart, placing orders, or checkout pages, it’s got you covered. It’s a free plugin that can be installed to any WordPress site. Along with a WordPress website and WooCommerce plugin, you’ll also need the WooCommerce Product Table plugin to turn your normal WooCommerce store into a WooCommerce point of sale product that's highly customizable and functional. You need the WooCommerce Product Table plugin to be able to display products in a user-friendly, one-page table layout that’ll also serve as an order form. Your front-of-house staff will be able to use this on any device to take orders. Your front-of-house staff, waiting staff, or even customers themselves will be able to run a product search, sort, and filter the products they’d like to purchase and place orders. Any point of sale system needs to be fast, and using WooCommerce Product Table ensures there's no waiting around. Your uses will be able to: Confirmed orders are automatically sent to your back-end staff via email and are displayed on a computer screen. Additionally, you can pair your WooCommerce POS system with a WooCommerce order printing plugin (we'll recommend one later) that enables you to print out this information as a receipt. When a customer places an order, they’ll be directed to the purchase page where they can choose the payment method of their choice, including PayPal and credit cards. Using a WooCommerce Product Table plugin enables you to handle variable products. You can quickly find and select the variants that your customers want to purchase using the product table’s search, sort, and filter tools. And the best part is that all of this works in real time and is responsive across different devices. Once you’ve set up your WordPress site and installed a WooCommerce-ready theme, you can get started creating your own point of sale ordering system. This ordering system will enable your customers to easily add items to their shopping cart, and pay for the cart items using the payment method of their choice at the counter or at the table using an iPad/tablet. Here, you’ll learn how to create a WooCommerce POS system that consumer-facing stores can use for taking orders. You can follow the steps outlined below from start to finish or jump straight to a specific step: If you don't already use WooCommerce, you'll need to start by adding your products. WooCommerce offers built-in tools to help you handle product inventory and store management. Once you’ve installed the WooCommerce plugin, add your store’s items as WooCommerce products. Here’s what you need to do to add new products (including variable products) to your WooCommerce store: Go to Products → Add New from the WordPress dashboard and enter the following product details: If any of your products don’t have options or choices, simply select the ‘Simple Product type’ in the ‘Product Data’ section. Use ‘Variable Products’ for adding choices. For example, if you’re selling t-shirts, you could add variations for the different available colors (blue, green, gray) or sizes (small, medium, large). Click on the Publish button. Repeat the same process until you’ve added all of your products to WooCommerce. An extra product options plugin gives you more flexibility compared to the product variations. That's because it lets you add checkboxes and various other options. Now you’re ready to display your products in one-page WooCommerce POS order form: Use the product table border to create a WooCommerce POS order form to meet your requirements. The first page lets you choose which method you'll use to create the table product. We want our WooCommerce POS system to be separate from the public-facing website, so leave this set to "Add to a page using a block or shortcode". On the next page, you can choose for the WooCommerce POS order form to include all your products or specific items only. As you’re creating an order form to be used by your staff, choose columns that’ll make it easier for them to find exactly what they’re looking for. For starters, display columns for the product’s name, price, and add to cart button. You can also add an image of the product to make it easier for users to identify the product they’re looking for in the order form. Similarly, you can add other columns like product’s SKU in your POS order form. This helps staff members easily reference exact items and help your back-end staff find the correct item. Additionally, you can create a stock column to keep your customers updated about product availability. This will also help you monitor stock levels and restock them before they run out (this alone is a huge benefit for your inventory management, and a great reason to use this system). Here's a complete list of available columns that you can choose to display in your WooCommerce POS order form. There are several options that can be configured from the WooCommerce Product Table’s settings page. Our main goal is to make it easier for users to find products and add them to the shopping cart. For this reason, I’d recommend using the Add to Cart page to enable the quantity field, variation dropdowns, and multi add to cart checkboxes. Make it easy to quickly find products Employees using a WooCommerce POS system need to find products very quickly. By default, the POS order form will include a search box at the top. This lets customer’s easily search for an item quickly using the product name or SKU. You can make products even more findable by enabling filter dropdowns too: Set the Search box option as Above table. You can also add relevant filters for information you’ve already added about your products, like categories or tags. This will allow users to quickly find specific types of items. You can do this by setting the Product filters option to Custom and adding categories, tags in the Custom filters option. Here’s a complete list of filter options you can set for your POS order form. Or even better, you can create even more advanced filtering options by using WooCommerce Product Table alongside the WooCommerce Product Filters plugin. By now you’ve set up the WooCommerce Product Table plugin on your WooCommerce website and configured its settings. Next, we’ll create a simple, one-page order form for your users to take orders at the counter or table using a tablet/iPad. To do this, we’ll add the WooCommerce Product Table plugin’s shortcode to the ordering system page: Head over to Pages → Add New from the WordPress dashboard to create a new page for your WooCommerce order form. Your customers and/or waiting staff will use this one-page order form to select items, add them to the shopping cart, and place the order: WooCommerce requires your waiting staff to complete the necessary checkout fields, and click the Place Order button to place a customer's order. This is because WooCommerce is designed to take online customer’s orders, which wouldn’t work for other businesses such as spas and restaurants. We need to make sure there’s an option for waiting staff to take orders on behalf of the customer. We’ll configure the checkout page to accept payments after placing the order. This will allow your waiting staff to place an order without making the payment. Here’s a quick tutorial explaining how it’s done: Here’s what your checkout page should look like: WooCommerce has the default option set to ask your waiting staff for the Billing details. You can remove the Billing details fields by using the YITH WooCommerce Checkout Manager plugin. This will also make your checkout process faster for your staff. Another way is to create a shared user account for staff members to use and enter the default billing details for your business. This will auto-populate information for each order, so your staff can ignore this page, and just click the ‘Place order’ button to complete the order. By now, you've learned how to create a one-page point of sale system in WooCommerce. Keep reading for a selection of bonus tips on how to fine-tune the POS order process to suit your organization. You can make it easier for your waiting staff to take POS orders at the table or the counter using an iPad/tablet by adding extra fields to your order form. To do this, you’ll have to add an extra field or two, to help them take note of any additional information. These could include: The YITH Checkout Manager plugin lets you add, edit, and remove the fields shown on the WooCommerce checkout page. This makes it the ideal tool for adding an extra field to the checkout form. You can let your customers make a credit card payment directly into the WooCommerce POS system by adding an online payment gateway such as Stripe. This allows your customers to add their credit card information directly into the checkout page. I f you want to be able to scan their card, you’ll need to use a separate card reader and process payment outside of the WooCommerce POS order system. Similarly, you can also leverage barcode scanning options with a barcode scanner (use a plugin such as this to generate barcodes). You may want to add your WooCommerce POS order system to an existing WooCommerce site. This is an extremely efficient setup, as you'll have all your orders and inventory management in one place. But – you don't want the public being able to use your custom system. In this case, you’ll have to hide your POS ordering system from public view. It should only be accessible to staff members who take customer orders at the table or from behind the counter. You can do this by password protecting your page containing the POS ordering system. As a result, only staff members with the correct password will have access to it. However, your products will still appear on the rest of your website, for instance, in the search results. You can use the WooCommerce Private Store plugin to add extra security which will hide everything related to your WooCommerce order system from public view. Go to the WooCommerce Private Store plugin settings, and choose the same password you used to protect the ordering system. This enables all your staff members to unlock the ordering page and all other parts of WooCommerce using a single password. Once you've set up the WooCommerce telephone ordering system, you need to plan how to manage the orders. Next, I'll share some tips on how to adapt the WooCommerce order process to make it easier for staff. Out of the box, WooCommerce requires users to select payment options and enter payment information before they mark orders as complete. However, this might not suit your specific buying process (for example because you’ll be handling your payments outside of the website - e.g. at the end of the massage services). The YITH Order Status Control plugin offers functionality that will let you automatically mark all your orders as complete. This way customer orders will be sent straight to the back-end staff without any further manual steps. You can now automatically send new orders to staff involved in the order process. There are two default ways for back-end staff to view new orders: Alternatively, there are two easy plugins that improve the order notifications: Print out new orders automatically by pairing the WooCommerce-based ordering system with a GPRS printer. This will ensure that all customer orders are instantly printed for your back-end staff as soon as they’re placed. Depending on the store setup, you can either print the receipt to give to the customer, or print the receipt for immediate processing by another team. You do this with the Bizprint plugin. Use the WooCommerce Multiple Email Recipients plugin to send order notifications to different email addresses, depending on which product or category has been ordered. This is a huge time-saver if different departments are responsible for processing different types of product. Setting up an efficient (and accurate) POS ordering system for customers and staff is simple and easy. The WooCommerce and WooCommerce Product Table plugins together enable you to create a searchable, sortable, and customizable point of sale order form for your business. A point of sale for WooCommerce system makes it easy for your staff members to take orders at the counter or table using different devices (including mobile devices) like iPads or Android tablets/phones. You can upgrade your existing ordering system by pairing it with some of the useful WordPress plugins we mentioned in this post. What are some of the features you look for in a WooCommerce POS ordering system to make it easier for customers and staff members to place orders using an iPad/tablet? Let us know by commenting below!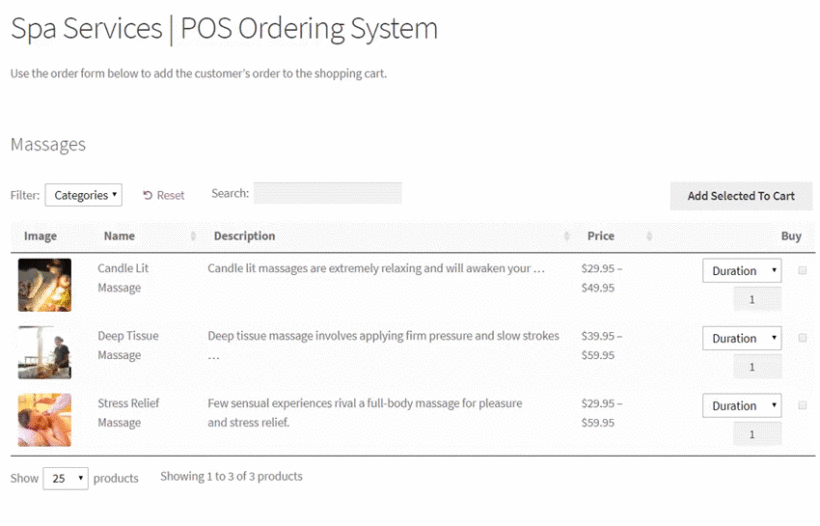
Why you need a WooCommerce POS tool to take orders

How your business can benefit from an automated WooCommerce POS ordering system
Which point of sale integrates with WooCommerce?
What you’ll need to get started
Introducing the WooCommerce Product Table plugin
How it works
Advantages of using WooCommerce Product Table
How to create a WooCommerce POS point of sale system using WooCommerce Product Table
Step 1: Add items as WooCommerce products
Use Product Add-Ons for accepting customer requests
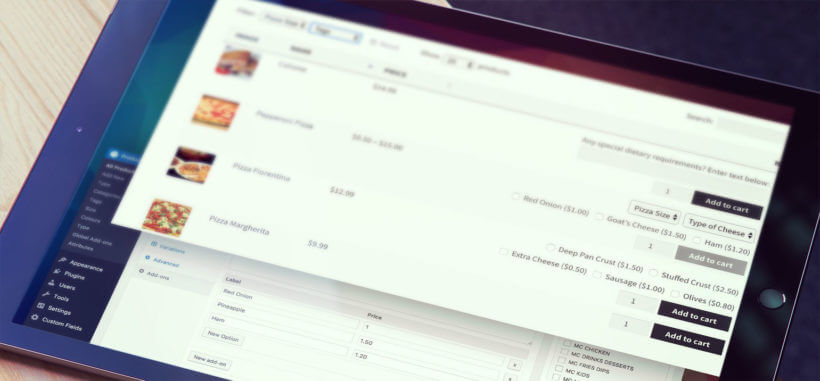 You can also add text boxes and other fields to your order forms using the Product Options plugin. This is a great addition to robust POS products that aim to deliver a personalized user experience. They enable you to collect additional information from your customers like special requests or preferences. This information will be automatically directed to your back-end staff along with the order.
Step 2: Install and activate the WooCommerce Product Table plugin
Step 3: Create a WooCommerce POS order form
3a. Select your products
3b. Decide which columns you want to include in the POS order form
3c. Enable add to cart checkboxes
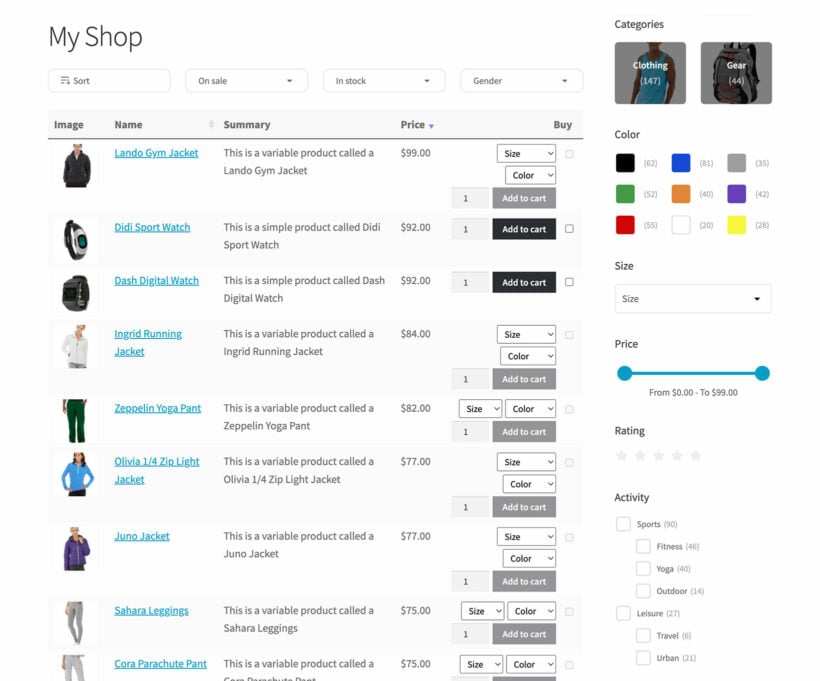
Step #4: Create a one-page WooCommerce POS order form
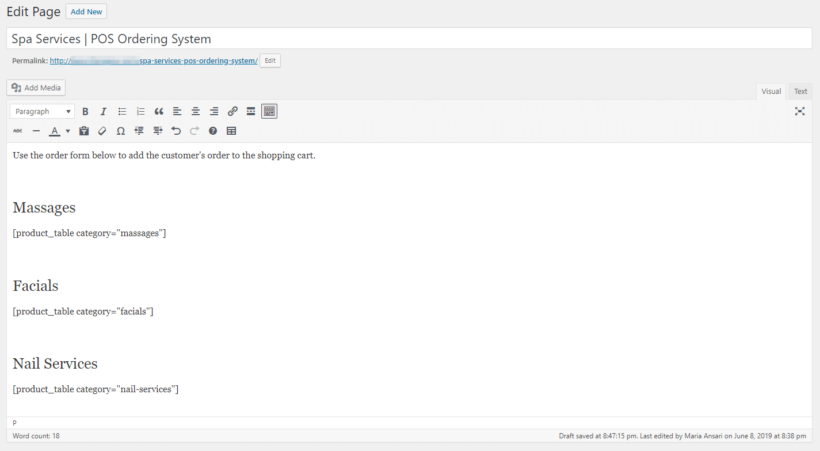
[product_table category="category-slug"] under each sub-heading. This will display all your products from the relevant category. And if you want to display products categorized under Massages, add the shortcode [product_table category="massages"].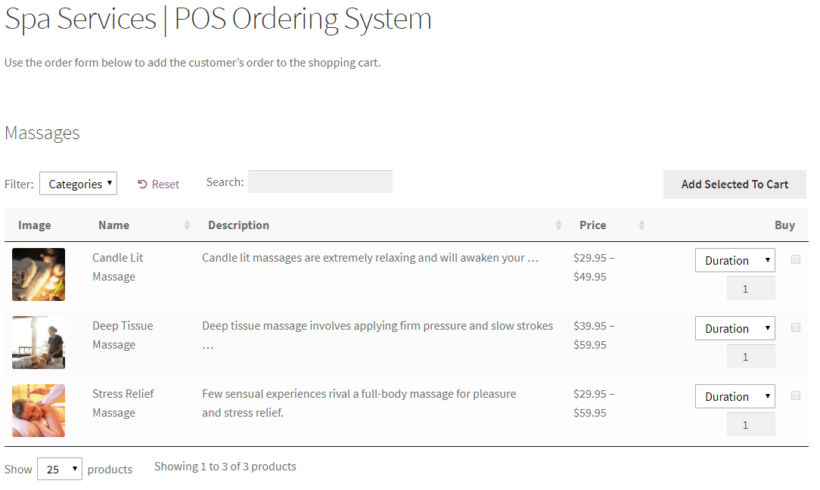
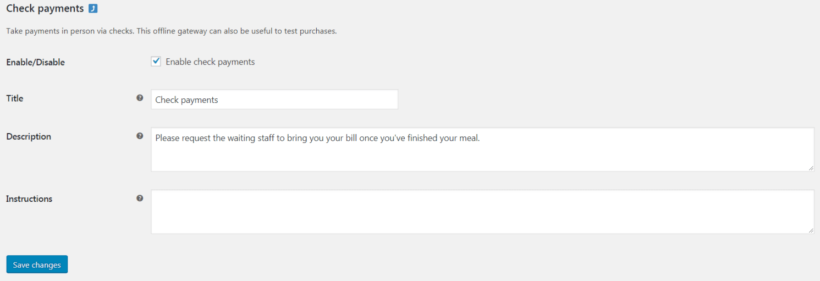
Step #5: Simplify the checkout process

Bonus tips
Collect extra information from the customer
Accept payment by credit card
Protect your WooCommerce POS system and hide it from public view
Managing orders
Automatically mark orders as complete
Forward orders to the right department and print receipt
Automatically print new orders
Send new orders to different email addresses
Set up your own WooCommerce POS ordering system
6 Comments
I own a large market for selling household products and I have stores and I created a system to link the stores with the points of sale that I own, but recently I created an online store to place the products, but I want to link the site to the store's program where if a product is purchased either from the stores or the online store, that goes to the store management
Hi, Mohammed. Thanks for your interest. When someone places an order, WooCommerce processes the order and sends out order notifications/order updates via email to your designated email address in WooCommerce > Settings > Emails. For your use case, you will need to specifically link/integrate your POS with WooCommerce.
I hope this makes sense and helps point you in the right direction. Let me know if you have any other questions. Thanks
Hi, I have tested over last year few POS extensions, paid and free ones. Each of them lacks some feature or does it job not as good as placing a order in WC admin. I like your idea or using table plugin for this. But what I miss is the ability to print a receipt on a 80 mm wide receipt printer. Any idea?
Hi, Adrian. Thanks for your interest in using WooCommerce Product Table for your POS use case in WooCommerce. For adapting the WooCommerce order info to print on an 80mm wide receipt printer, I suggest you contact the WooCommerce Automatic Order Printing plugin's author/developer/support.
I hope this makes sense and helps point you in the right direction. Let me know if you have any other questions.
Do you offer service to develop Pos software/App that can integrate with woocemmerce website?
Hi, Azhar. Thanks for asking. I'm sorry, this isn't a service that we provide. The easiest way to find someone suitable who develops custom plugins/software is to post a job on Codeable where their pre-approved experts will send you a quote. I hope this helps point you in the right direction. Thanks.