How to set up a floating cart on your WooCommerce website: Complete Guide

Do you want to reduce the cart abandonment rate in your WordPress store? You can easily achieve this by adding a WooCommerce floating cart.
According to a study by Baymard Institute, 18% of online shoppers who abandon a cart do so because the checkout process is too complicated. The same study reveals that by optimizing your site's checkout process, you can increase conversions by as much as 35.62%.
In this post, we'll show you how to improve your store's checkout experience by adding a WooCommerce floating cart. We'll be using the WooCommerce Fast Cart plugin to do this. This method doesn't require any code and you can build your first floating cart in a few minutes.
Let's dive in!
You also have the option to watch the accompanying video tutorial here:
What is a floating cart and why should you use one?
A floating cart is a quick panel that appears whenever a buyer adds a product to their cart. It works like a mini-checkout cart that allows the customer to add or remove cart items and also change the quantity of each item without leaving the product or shop page. You can display your WooCommerce floating cart either as a popup or a sidebar.
Here are some of the ways you and your customers can benefit from a floating cart:
- Your customers don't need to go to a separate checkout page.
- You can push the shopper to buy more by recommending related products in the sidebar.
- It improves your store's shopping experience and makes the checkout process faster by reducing the number of steps involved.
- Your customers can check cart details anytime and adjust item quantities anywhere in your store.
In the end, a WooCommerce floating cart helps to improve your ecommerce site in different ways. For starters, your customers will enjoy a better shopping experience. As a result, you also get to record higher conversion rates and lower cart abandonment rates.
Now that we know what a WooCommerce floating cart is and its benefits, let's show you how to set it up.
How to set up a WooCommerce floating cart
The easiest way to add a floating cart to your store is to use a dedicated WooCommerce plugin.
If you want to offer your store visitors the best user experience possible, we recommend using a WordPress plugin like WooCommerce Fast Cart. This method not only adds a simple floating cart to your store, but the plugin also offers additional checkout optimization features.
Let's give you a quick overview of the WooCommerce Fast Cart plugin and what it has to offer.
What is WooCommerce Fast Cart?
WooCommerce Fast Cart is the best fully-featured plugin for speeding up your store's checkout process. The plugin allows your customer to launch the cart automatically from anywhere within your store.
With WooCommerce Fast Cart, your checkout options are fully customizable. Unlike other WooCommerce checkout plugins, this tool doesn't just add a simple floating cart widget. Here are some of the other features the plugin offers:
- Add the floating cart either as a sidebar or centered popup.
- Preview orders, apply coupon codes and make changes to cart items.
- Integrate WooCommerce's product recommendation feature to boost your average order value.
Using WooCommerce Fast Cart, you can either add a floating cart that redirects you to a separate checkout page or enable checkout directly from the sidebar. We'll show you how to do both below.
Adding a floating cart with a separate checkout page
Ready to create your first WooCommerce floating cart? You can do this by following these 3 easy steps. Or alternatively, watch us setting it up in this video:
Step 1: Install and activate WooCommerce Fast Cart
To start building your WooCommerce floating cart, first grab your copy of the WooCommerce Fast Cart plugin here.
Once you've gotten your WooCommerce Fast Cart license, you can now download the plugin as a ZIP file. You'll also receive an email with your license key. You'll use this key to activate the plugin later within your WordPress dashboard.
Next, it's time to upload the plugin to WordPress.
- Log into your WordPress dashboard. Then navigate to Plugins → Add New → Upload Plugin.
- Select the ZIP file you downloaded after getting your copy of the plugin and click Install Now. Once the plugin is installed, click Activate Plugin.
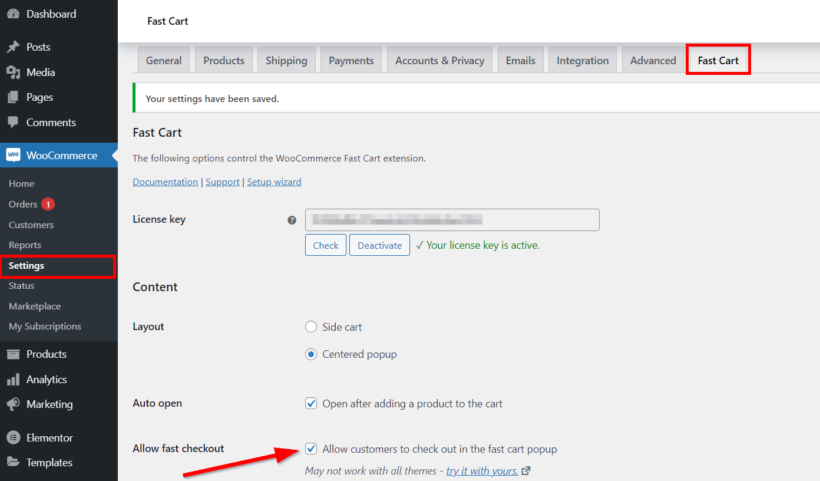
- The next step is to activate the plugin's license. To do this, go to WooCommerce → Settings → Fast Cart, and enter your license key from the email. Then click Activate.
Congratulations! Your copy of the WooCommerce Fast Cart plugin is now ready for use.
Now it's time to customize your WooCommerce floating cart.
Step 2: Customize your WooCommerce floating cart
To customize your floating cart, go to WooCommerce → Settings → Fast Cart and scroll down to the Content tab.
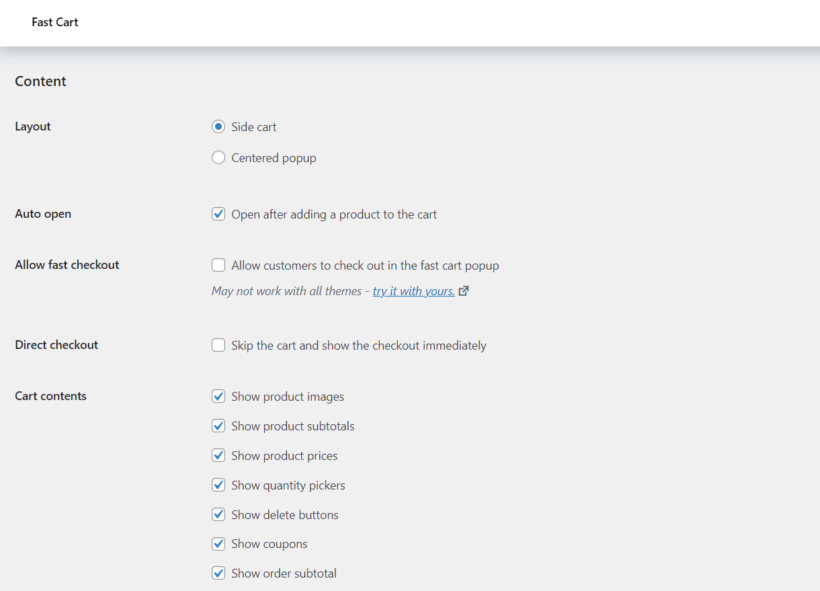
Each section allows you to customize your cart in different ways:
- Content Here, you can choose the floating cart's layout (sidebar or centered popup), the elements to add to it (product images, prices, etc.), or enable auto-open. This displays the floating cart every time a buyer adds a product to the cart. You can also allow customers to check out within the fast cart by enabling fast checkout. Since we want the buyer to go to a separate checkout page, we'll disable fast checkout.
- Cart icon In this section, you can choose to display a small floating cart icon either at the top, center, or bottom right corner of the page. Shoppers can then click this icon to see the full sidebar.
- Replace pages This option replaces the default cart page with the floating cart.
- Design You can also use hex codes to set the colors of different elements of the floating cart like the icon, text, and background.
When you're done, click Save changes.
Step 3: Test your new floating cart
The last step is to ensure that all your new floating cart settings are working properly. Here's how to do that:
- Go to the store's frontend by clicking Visit Store in the top left corner of your WordPress dashboard.
- On your shop page, select any product and click Add to cart. The floating cart should appear immediately. Test different features like adding an item or applying a coupon code and click Checkout.
You should be redirected to a separate checkout page.
Adding a floating cart with fast checkout
You can also use WooCommerce Fast Cart to add a floating cart that allows the customer to check out without going to a separate checkout page. To do this, go to WooCommerce → Settings → Fast Cart and check the 'Allow fast checkout' box.
Now the buyer can easily complete the check process right within the WooCommerce floating cart.
Other tips and tools for optimizing your store's shopping experience
For an even faster checkout experience, you can use WooCommerce Fast Cart to add a direct "Buy It Now" option to your store. To do this, check the 'Direct checkout' box on the plugin's settings page.

Now once a buyer adds a product to the cart, they'll be redirected to checkout immediately. They'll also be able to see all the items in the cart.
Finally, let's take a look at 3 other WooCommerce plugins you should also try.
WooCommerce Quick View Pro
The WooCommerce Quick View Pro plugin adds a Quick view button to your WooCommerce products. This allows your customers to select from multiple buying options in a popup without going to the individual product page.

WooCommerce Product Table
If you own a WooCommerce wholesale store, then you should be using the WooCommerce Product Table plugin. It allows you to list your products in an organized and flexible way. This way, your customers can apply different filters, select product variations, and add multiple products to the cart quickly.

WooCommerce Restaurant Ordering
Another WooCommerce plugin we recommend is WooCommerce Restaurant Ordering. This plugin is ideal for restaurants and other made-to-order websites where customers can select products from different categories like 'Starters' and 'Deserts', all on the same page. Combined with the WooCommerce Fast Cart, your customers can order food in the fastest way possible.

In general, delivering the best shopping experience in a professional-looking WooCommerce store requires some A/B testing. The only way to know what's best for conversion and customer satisfaction is to try out different colors, sizes, and positions for your floating cart.
Where to get the plugins
Optimizing your WooCommerce store for sales requires a lot of effort. In this post, we demonstrated how to use WooCommerce Fast Cart to create a floating cart that allows customers to add and edit products in their cart without leaving the product page.
We also considered WooCommerce Quick View Pro, WooCommerce Product Table, and WooCommerce Restaurant Ordering. These plugins make it easy for buyers to choose from multiple buying options and add multiple products to their cart, all from one page.
Are you ready to add a WooCommerce floating cart to your store? Get started with the WooCommerce Fast Cart plugin today.